


WMB 81242 LMBB |
WMB 81242 LMS |
Washing Machine |
User’s Manual |
Lave-linge |
Manuel d‘utilisation |
Waschmaschine |
Bedienungsanleitung |
Lavatrice |
Manuale utente |
Document Number |
2820523272_EN / 14-01-13.(14:55) |

1 Important instructions for safety and environment
This section contains safety instructions that will help protect from risk of personal injury or property damage. Failure to follow these instructions shall void any warranty.
1.1 General safety
•This product can be used by children at and above 8 years old and by persons whose physical, sensory or mental capabilities were not fully developed or who lack experience and knowledge provided that they are supervised or trained on the safe usage of the product and the risks it brings out. Children must not play with the product. Cleaning and maintenance works should not be performed by children unless they are supervised by someone.
•Never place the product on a carpet-covered floor. Otherwise, lack of airflow beneath the machine will cause electrical parts to overheat.This will cause problems with your product.
•If the product has a failure, it should not be operated unless it is repaired by the Authorized Service Agent.
There is the risk of electric shock!
•This product is designed to resume operating in the event of powering on after a power interruption. If you wish to cancel the programme, see "Cancelling the programme" section.
•Connect the product to a grounded outlet protected by a 16 A fuse. Do not neglect to have the grounding
installation made by a qualified electrician. Our company shall not be liable for any damages that will arise when the product is used without grounding in accordance with the local regulations.
•The water supply and draining hoses must be securely fastened and remain undamaged. Otherwise, there is the risk of water leakage.
•Never open the loading door or remove the filter while there is still water in the drum. Otherwise, risk of flooding and injury from hot water will occur.
•Do not force open the locked loading door.The loading door will be ready to open just a few minutes after the washing cycle comes to an end. In case of forcing the loading door to open, the door and the lock mechanism may get damaged.
•Unplug the product when not in use.
•Never wash the product by spreading or pouring water onto it! There is the risk of electric shock!
•Never touch the plug with wet hands! Never unplug by pulling on the cable, always pull out by grabbing the plug.
•Use detergents, softeners and supplements suitable for automatic washing machines only.
•Follow the instructions on the textile tags and on the detergent package.
•The product must be unplugged during installation, maintenance, cleaning and repairing procedures.
•Always have the installation and repairing procedures carried out by the Authorized Service Agent.
Manufacturer shall not be held liable for damages that may arise from procedures carried out by unauthorized persons.
•If the power cable is damaged, it must be replaced by the manufacturer, after sales service or a similarly qualified
person (preferably an electrician) or someone designated by the importer in order to avoid possible risks.
1.2 Intended use
•This product has been designed for domestic use. It is not suitable for commercial use and it must not be used out of its intended use.
•The product must only be used for washing and rinsing of laundry that are marked accordingly.
•The manufacturer waives any responsibility arisen from incorrect usage or transportation.
1.3 Children's safety
•Packaging materials are dangerous to children. Keep packaging materials in a safe place away from reach of the children.
•Electrical products are dangerous for the children. Keep children away from the product when it is in use. Do not let them to tamper with the product. Use child lock to prevent children from intervening with the product.
•Do not forget to close the loading door when leaving the room where the product is located.
•Store all detergents and additives in a safe place away from the reach of the children by closing the cover of the detergent container or sealing the detergent package.
1.4 Package information
•Packaging materials of the product are manufactured from recyclable materials in accordance with our National Environment Regulations. Do not dispose of the packaging materials together with the domestic or other wastes. Take them to the packaging material collection points designated by the local authorities.
1.5 Disposing of the waste product
•This product has been manufactured with high quality parts and materials which can be reused and are suitable for recycling.Therefore, do not dispose the product with normal domestic waste at the end of its service life. Take it to a collection point for the recycling of electrical and electronic equipment. Please consult your local authorities to learn the nearest collection point. Help protect the environment and natural resources by recycling used products. For children's safety, cut the power cable and break the locking mechanism of the loading door so that it will be non-functional before disposing of the product.
1.6 Compliance with WEEE Directive
This appliance’s packaging material is
recyclable. Help recycle it and protect the environment by dropping it off in the municipal
receptacles provided for this purpose. Your appliance also contains a great amount of

 recyclable material. It is marked with this label to indicate the used appliances that should not be mixed with other waste.This way, the appliance recycling
organised by your manufacturer will be done under the best possible conditions, in compliance with European Directive 2002/96/EC on Waste Electrical and Electronic Equipment. Contact your town hall or your retailer for the used appliance collection points closest to your home. We thank you doing your part to protect the environment.
2 / 76 EN |
Washing Machine / User’s Manual |
|
|

2 Installation
Refer to the nearest Authorised Service Agent for installation of the product.To make the product ready for use, review the information in the user manual and make sure that the electricity, tap water supply and water drainage systems are appropriate before calling the Authorized Service Agent. If they are not, call a qualified technician and plumber to have
any necessary arrangements carried out.
C
B
A
C
2.1 Appropriate installation location
•Place the machine on a rigid floor. Do not place it on a long pile rug or similar surfaces.
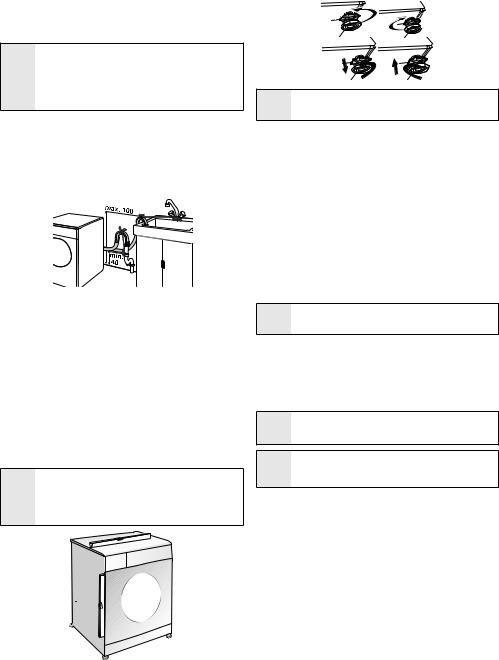
•Total weight of the washing machine and the dryer -with full loadwhen they are placed on top of each other reaches to approx. 180 kilograms. Place the product on a solid and flat floor that has sufficient load carrying capacity!
•Do not place the product on the power cable.
•Do not install the product at places where temperature may fall below 0ºC.
•Place the product at least 1 cm away from the edges of other furniture.
2.2 Removing packaging reinforcement
Tilt the machine backwards to remove the packaging reinforcement. Remove the packaging reinforcement by pulling the ribbon.
2.Remove transportation safety bolts by turning them gently.
3.Attach the plastic covers supplied in the User Manual bag into the holes on the rear panel. (P)
C Keep the transportation safety bolts in a safe place to reuse when the washing machine needs to be moved again in the future.
C Never move the product without the transportation safety bolts properly fixed in place!
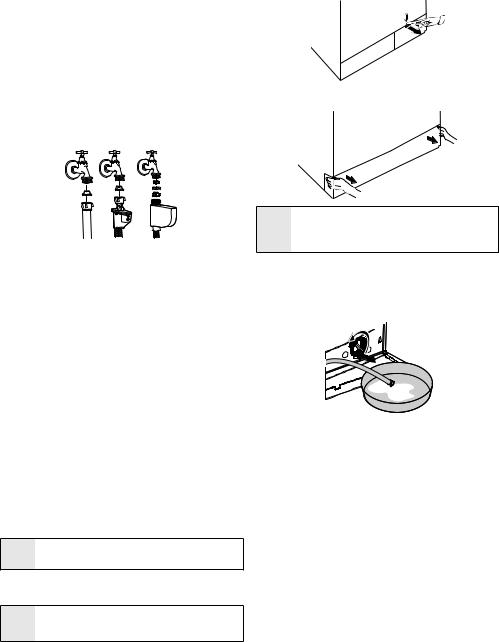
2.4 Connecting water supply
C The water supply pressure required to run the product is between 1 to 10 bars (0.1 – 1 MPa). It is necessary to have 10 – 80 liters of water flowing from the fully open tap in one minute to have your machine run smoothly.
Attach a pressure reducing valve if water pressure is higher.
C If you are going to use the double water-inlet product as a single (cold) water-inlet unit, you must install the supplied stopper to the hot water valve before operating the product. (Applies for the products supplied with a blind stopper group.)
A warning: Models with a single water inlet should not be connected to the hot water tap. In such a case the laundry will get damaged or the product will switch to protection mode and will not operate.
A warning: Do not use old or used water inlet hoses on the new product. It may cause stains on your laundry.
1.Connect the special hoses supplied with the product to the water inlets on the product. Red hose (left) (max. 90
ºC) is for hot water inlet, blue hose (right) (max. 25 ºC) is for cold water inlet.
A warning: Ensure that the cold and hot water connections are made correctly when installing the product.
Otherwise, your laundry will come out hot at the end of the washing process and wear out.
2.3 Removing the transportation locks |
2. Tighten all hose nuts by hand. Never use a tool when |
tightening the nuts. |
A warning: Do not remove the transportation locks before taking out the packaging reinforcement.
A warning: Remove the transportation safety bolts before operating the washing machine! Otherwise, the product will be damaged.
1.Loosen all the bolts with a suitable spanner until they rotate freely (C).
3.Open the taps completely after making the hose connection to check for water leaks at the connection
3 / 76 EN |
Washing Machine / User’s Manual |
points. If any leaks occur, turn off the tap and remove the nut. Retighten the nut carefully after checking the seal. To prevent water leakages and damages caused by them, keep the taps closed when the machine is not in use.
2.5 Connecting to the drain
•The end of the drain hose must be directly connected to the wastewater drain or to the washbasin.
A warning: Your house will be flooded if the hose comes out of its housing during water discharge. Moreover, there is risk of scalding due to high washing temperatures!
To prevent such situations and to ensure smooth water intake and discharge of the machine, fix the end of the discharge hose tightly so that it cannot come out.
•The hose should be attached to a height of at least 40 cm, and 100 cm at most.
•In case the hose is elevated after laying it on the floor level or close to the ground (less than 40 cm above the ground), water discharge becomes more difficult and the laundry may come out excessively wet.Therefore, follow the heights described in the figure.
•To prevent flowing of dirty water back into the machine and to allow for easy discharge, do not immerse the hose end into the dirty water or do not drive it in the drain more than 15 cm. If it is too long, cut it short.
•The end of the hose should not be bent, it should not be stepped on and the hose must not be pinched between the drain and the machine.
•If the length of the hose is too short, use it by adding an original extension hose. Length of the hose may not be longer than 3.2 m.To avoid water leak failures, the connection between the extension hose and the drain hose of the product must be fitted well with an appropriate clamp as not to come off and leak.
2.6 Adjusting the feet
A warning: In order to ensure that the product operates more silently and vibration-free, it must stand level and balanced on its feet. Balance the machine by adjusting the feet. Otherwise, the product may move from its place and cause crushing and vibration problems.
1.Loosen the lock nuts on the feet by hand.
2.Adjust the feet until the product stands level and balanced.
3.Tighten all lock nuts again by hand.
A warning: Do not use any tools to loosen the lock nuts. Otherwise, they will get damaged.
2.7 Electrical connection
Connect the product to a grounded outlet protected by a 16 A fuse. Our company shall not be liable for any damages that will arise when the product is used without grounding in accordance with the local regulations.
•Connection must comply with national regulations.
•Power cable plug must be within easy reach after installation.
•If the current value of the fuse or breaker in the house is less than 16 Amps, have a qualified electrician install a 16 Amp fuse.
•The voltage specified in the "Technical specifications" section must be equal to your mains voltage.
•Do not make connections via extension cables or multiplugs.
B warning: Damaged power cables must be replaced by the Authorized Service Agents.
Transportation of the product
1.Unplug the product before transporting it.
2.Remove water drain and water supply connections.
3.Drain all water that has remained in the product.
4.Install transportation safety bolts in the reverse order of removal procedure;
C Never move the product without the transportation safety bolts properly fixed in place!
A warning: Packaging materials are dangerous to children. Keep packaging materials in a safe place away from reach of the children.
4 / 76 EN |
Washing Machine / User’s Manual |
|
|
3 Preparation
3.1 Sorting the laundry
•Sort laundry according to type of fabric, colour, and degree of soiling and allowable water temperature.
•Always obey the instructions given on the garment tags.
3.2 Preparing laundry for washing
•Laundry items with metal attachments such as, underwired bras, belt buckles or metal buttons will damage the machine. Remove the metal pieces or wash the clothes by putting them in a laundry bag or pillow case.
•Take out all substances in the pockets such as coins, pens and paper clips, and turn pockets inside out and brush. Such objects may damage the product or cause noise problem.
•Put small size clothes such as infant's socks and nylon stockings in a laundry bag or pillow case.
•Place curtains in without compressing them. Remove curtain attachment items.
•Fasten zippers, sew loose buttons and mend rips and tears.
•Wash “machine washable” or “hand washable” labeled products only with an appropriate programme.
•Do not wash colours and whites together. New, dark coloured cottons release a lot of dye.Wash them separately.
•Tough stains must be treated properly before washing. If unsure, check with a dry cleaner.
•Use only dyes/colour changers and limescale removers suitable for machine wash.Always follow the instructions on the package.
•Wash trousers and delicate laundry turned inside out.
•Keep laundry items made of Angora wool in the freezer for a few hours before washing.This will reduce pilling.
•Laundry that are subjected to materials such as flour, lime dust, milk powder, etc. intensely must be shaken off before placing into the machine. Such dusts and powders on the laundry may build up on the inner parts of the machine in time and can cause damage.
3.3 Things to be done for energy saving
Following information will help you use the product in an ecological and energy-efficient manner.
•Operate the product in the highest capacity allowed by the programme you have selected, but do not overload; see, "Programme and consumption table".
•Always follow the instructions on the detergent packaging.
•Wash slightly soiled laundry at low temperatures.
•Use faster programmes for small quantities of lightly soiled laundry.
•Do not use prewash and high temperatures for laundry that is not heavily soiled or stained.
•If you plan to dry your laundry in a dryer, select the highest spin speed recommended during washing process.
•Do not use detergent in excess of the amount recommended on the detergent package.
3.4 Initial use
Before starting to use the product, make sure that all preparations are made in accordance with the instructions in sections “Important safety instructions” and “Installation”. To prepare the product for washing laundry, perform first operation in Drum Cleaning programme. If your product
is not equipped with Drum Cleaning programme, perform the Initial Use procedure in accordance with the methods described under “5.2 Cleaning the loading door and the drum” section of the user manual.
C Use an anti-limescale suitable for the washing machines.
C Some water might have remained in the product due to the quality control processes in the production. It is not harmful for the product.
3.5 Correct load capacity
The maximum load capacity depends on the type of laundry, the degree of soiling and the washing programme desired. The machine automatically adjusts the amount of water according to the weight of the loaded laundry.
A warning: Follow the information in the “Programme and consumption table”.When overloaded, machine's washing performance will drop. Moreover, noise and vibration problems may occur.
Laundry type |
Weight (g) |
Bathrobe |
1200 |
Napkin |
100 |
Duvet cover |
700 |
Bed Sheet |
500 |
Pillowcase |
200 |
Tablecloth |
250 |
Towel |
200 |
Hand towel |
100 |
Evening gown |
200 |
Underclothing |
100 |
Men’s overalls |
600 |
Men’s shirt |
200 |
Men’s pajamas |
500 |
Blouses |
100 |
3.6 Loading the laundry
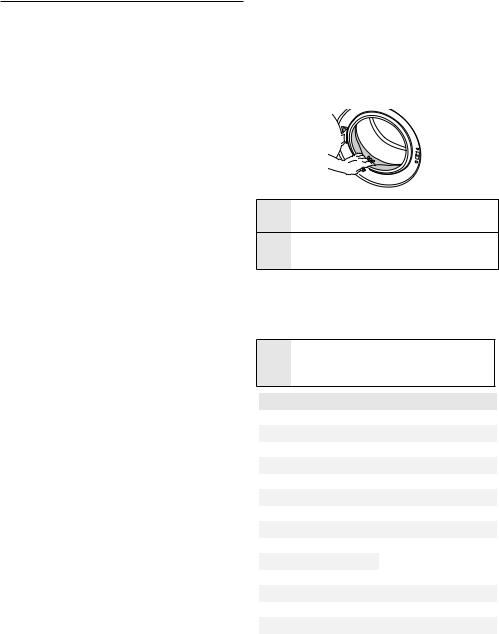
1.Open the loading door.
2.Place laundry items loosely into the machine.
3.Push the loading door to close until you hear a locking sound. Ensure that no items are caught in the door.
5 / 76 EN |
Washing Machine / User’s Manual |
|
|

C The loading door is locked while a programme is running.
The door can only be opened a while after the programme comes to an end.
A warning: In case of misplacing the laundry, noise and vibration problems may occur in the machine.
3.7 Using detergent and softener
C When using detergent, softener, starch, fabric dye, bleach or limescale remover read the manufacturer's instructions on the package carefully and follow the suggested dosage values. Use measuring cup if available.
Detergent Drawer
The detergent drawer is composed of three compartments:
–(1) for prewash
–(2) for main wash
–(3) for softener
–(*) in addition, there is siphon piece in the softener compartment.
2 3  1
1
Detergent, softener and other cleaning agents
•Add detergent and softener before starting the washing programme.
•Never leave the detergent drawer open while the washing programme is running!
•When using a programme without prewash, do not put any detergent into the prewash compartment
(compartment nr. "1").
•In a programme with prewash, do not put liquid detergent into the prewash compartment (compartment nr. "1").
•Do not select a programme with prewash if you are using a detergent bag or dispensing ball. Place the detergent bag or the dispensing ball directly among the laundry in the machine.
•If you are using liquid detergent, do not forget to place the liquid detergent cup into the main wash compartment (compartment nr. "2").
Choosing the detergent type
The type of detergent to be used depends on the type and colour of the fabric.
•Use different detergents for coloured and white laundry.
•Wash your delicate clothes only with special detergents (liquid detergent, wool shampoo, etc.) used solely for delicate clothes.
•When washing dark coloured clothes and quilts, it is recommended to use liquid detergent.
•Wash woolens with special detergent made specifically for woolens.
A
A warning: Do not use soap powder.
Adjusting detergent amount
The amount of washing detergent to be used depends on the amount of laundry, the degree of soiling and water hardness.
•Do not use amounts exceeding the dosage quantities recommended on the detergent package to avoid problems of excessive foam, poor rinsing, financial savings and finally, environmental protection.
•Use lesser detergent for small amounts or lightly soiled clothes.
Using softeners
Pour the softener into the softener compartment of the detergent drawer.
•Do not exceed the (>max<) level marking in the softener compartment.
•If the softener has lost its fluidity, dilute it with water before putting it in the detergent drawer.
Using liquid detergents
If the product contains a liquid detergent cup:
•Make sure that you have placed the liquid detergent cup in compartment nr. "2".
•If the liquid detergent has lost its fluidity, dilute it with water before putting in the detergent cup.
If the product does not contain a liquid detergent cup:
•Do not use liquid detergent for the prewash in a programme with prewash.
•Liquid detergent stains your clothes when used with Delayed Start function. If you are going to use the Delayed Start function, do not use liquid detergent.
Using gel and tablet detergent
Apply the following instructions when using tablet, gel and similar detergents.
•If the gel detergent thickness is fluidal and your machine does not contain a special liquid detergent cup, put the gel detergent into the main wash detergent compartment during first water intake. If your machine contains a liquid detergent cup, fill the detergent into this cup before starting the programme.
•If the gel detergent thickness is not fluidal or in the shape of capsule liquid tablet, put it directly into the drum before washing.
•Put tablet detergents into the main wash compartment (compartment nr. "2") or directly into the drum before washing.
C Tablet detergents may leave residues in the detergent compartment. If you encounter such a case, place the tablet detergent between the laundry, close to the lower part of the drum in future washings.
C Use the tablet or gel detergent without selecting the prewash function.
6 / 76 EN |
Washing Machine / User’s Manual |
|
|

Using starch
•Add liquid starch, powder starch or the fabric dye into the softener compartment.
•Do not use softener and starch together in a washing cycle.
•Wipe the inside of the machine with a damp and clean cloth after using starch.
Using bleaches
•Select a programme with prewash and add the bleaching agent at the beginning of the prewash. Do not put detergent in the prewash compartment.As an alternative application, select a programme with extra rinse and add the bleaching agent while the machine is taking water from the detergent compartment during first rinsing step.
•Do not use bleaching agent and detergent by mixing them.
•Use just a little amount (approx. 50 ml) of bleaching agent and rinse the clothes very well as it causes skin irritation.
Do not pour the bleaching agent onto the clothes and do not use it for coloured clothes.
•When using oxygen based bleaches, select a programme that washes at a lower temperature.
•Oxygen based bleaches can be used together with detergents; however, if its thickness is not the same with the detergent, put the detergent first into the compartment nr. "2" in the detergent drawer and wait until the detergent flows while the machine is taking in water.Add the bleaching agent from the same compartment while the machine is still taking in water.
Using limescale remover
•When required, use limescale removers manufactured specifically for washing machines only.
3.8 Tips for efficient washing
<![endif]>Soiling Level
|
|
Clothes |
|
|
|
|
Light colours and whites |
Colours |
Dark colours |
Delicates/ |
|
|
Woolens/Silks |
||||
|
|
|
|
||
|
(Recommended temperature |
(Recommended temperature |
(Recommended |
(Recommended |
|
|
temperature range |
temperature range |
|||
|
range based on soiling level: |
range based on soiling level: |
|||
|
based on soiling level: |
based on soiling level: |
|||
|
40-90ºC) |
cold-40ºC) |
cold-40ºC) |
cold-30ºC) |
|
|
|
|
|||
|
It may be necessary to pre- |
Powder and liquid |
|
|
|
|
|
|
|||
|
treat the stains or perform |
|
|
||
|
detergents recommended |
|
|
||
|
prewash. Powder and liquid |
|
Prefer liquid |
||
|
for colours can be used at |
Liquid detergents |
|||
Heavily Soiled |
detergents recommended |
detergents produced |
|||
dosages recommended for |
suitable for colours |
||||
|
for whites can be used at |
for delicate clothes. |
|||
|
heavily soiled clothes. It is |
and dark colours can |
|||
(difficult stains such |
dosages recommended for |
Woolen and silk |
|||
recommended to use powder |
be used at dosages |
||||
heavily soiled clothes. It is |
clothes must be |
||||
as grass, coffee, |
detergents to clean clay and |
recommended for |
|||
recommended to use powder |
washed with special |
||||
fruits and blood.) |
soil stains and the stains that |
heavily soiled clothes. |
|||
detergents to clean clay and |
woolen detergents. |
||||
|
are sensitive to bleaches. Use |
|
|||
|
soil stains and the stains that |
|
|
||
|
detergents without bleach. |
|
|
||
|
are sensitive to bleaches. |
|
|
||
|
|
|
|
||
|
|
|
|
|
|
|
|
Powder and liquid detergents |
Liquid detergents |
Prefer liquid |
|
Normally Soiled |
Powder and liquid detergents |
detergents produced |
|||
|
recommended for whites |
recommended for colours |
suitable for colours |
for delicate clothes. |
|
|
can be used at dosages |
and dark colours can |
|||
(For example, stains |
can be used at dosages |
Woolen and silk |
|||
recommended for normally |
be used at dosages |
||||
caused by body on |
recommended for normally |
soiled clothes. Use detergents |
recommended for |
clothes must be |
|
collars and cuffs) |
soiled clothes. |
without bleach. |
normally soiled clothes. |
washed with special |
|
|
woolen detergents. |
||||
|
|
|
|
||
|
|
|
|
|
|
|
|
Powder and liquid detergents |
Liquid detergents |
Prefer liquid |
|
Lightly Soiled |
Powder and liquid detergents |
detergents produced |
|||
recommended for colours |
suitable for colours |
||||
|
recommended for whites |
can be used at dosages |
and dark colours can |
for delicate clothes. |
|
|
can be used at dosages |
Woolen and silk |
|||
(No visible stains |
recommended for lightly |
be used at dosages |
|||
recommended for lightly soiled |
clothes must be |
||||
soiled clothes. Use detergents |
recommended for lightly |
||||
exist.) |
clothes. |
washed with special |
|||
|
|
without bleach. |
soiled clothes. |
woolen detergents. |
|
|
|
|
|
||
|
|
|
|
|
7 / 76 EN |
Washing Machine / User’s Manual |
|
|

4 Operating the product
4.1 Control panel
1 |
|
2 |
3 |
4 |
5 |
||||||
|
|
|
|
|
|
|
|
|
|
|
|
|
|
|
|
|
|
|
|
|
|
|
|
|
|
|
|
|
|
|
|
|
|
|
|
|
|
|
|
|
|
|
|
|
|
|
|
|
|
|
|
|
|
|
|
|
|
|
|
|
|
|
|
|
|
|
|
|
|
|
|
|
|
|
|
|
|
|
|
|
|
|
|
|
|
|
|
|
|
|
|
|
|
|
|
6 |
7 |
8 |
|
|
1 |
- Spin Speed Adjustment button |
5 |
- On / Off button |
|
2 |
- Display |
|
6 |
- Delayed Start buttons (+ / -) |
3 |
- Temperature Adjustment button |
7 |
- Auxiliary Function buttons |
|
4 |
- Programme Selection knob |
8 |
- Start / Pause / Cancel button |
|
|
|
|
|
|
Dark wash |
Dark wash |
Synthetics |
Cottons |
Pre-wash |
Main |
Rinse |
Wash |
Spin |
Delicate |
Pet hair |
Door Ready |
(Darkcare) |
(Darkcare) |
|
|
|
wash |
|
|
|
|
removal |
|
Drain |
Anti- |
Duvet |
Child- |
Hand |
BabyProtect |
Cotton |
Woollens expres 14 |
Daily |
mini 30 |
On/Off |
|
(Pump) |
creasing |
(Bedding) proof lock |
Wash |
|
Eco |
Super short |
|
|
|
||
|
|
|
|
|
|
|
express |
|
|
|
|
Daily |
Rinse hold |
Start/ |
No spin |
Quick |
Finished |
Cold |
Temperature |
Self |
Lingerie |
Eco Clean |
|
express |
|
Pause |
|
wash |
|
|
|
Clean |
|
|
|
Mixed 40 |
Super 40 |
Extra rinse |
Freshen |
Shirts |
Jeans |
Sport |
Time delay Intensive |
Fasihon |
Anti- |
|
|
(Mix40) |
|
(Rinse Plus) up |
|
|
|
|
|
care |
allergic |
|
|
8 / 76 EN |
Washing Machine / User’s Manual |
|
|
4.2 Display symbols
F1 |
F2 |
F3 |
F4 |
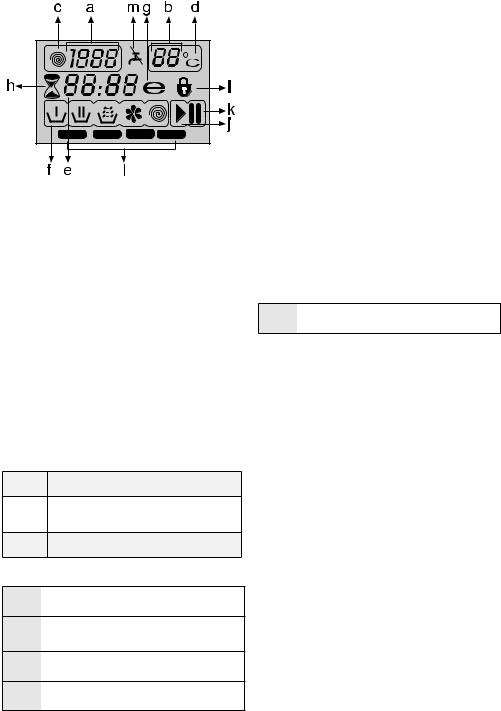
a - Spin Speed indicator b - Temperature indicator c - Spin symbol
d - Temperature symbol
e - Remaining Time and Delayed Start indicator
f - Programme Indicator symbols (Prewash / Main Wash / Rinse / Softener / Spin)
g - Economy symbol
h - Delayed Start symbol i - Door Locked symbol j - Start symbol
k - Pause symbol
l - Auxiliary Function symbols m - No Water symbol
4.3 Preparing the machine
Make sure that the hoses are connected tightly. Plug in your machine. Turn the tap on completely. Place the laundry in the machine. Add detergent and fabric softener.
4.4 Programme selection
Select the programme suitable for the type, quantity and soiling degree of the laundry in accordance with the
"Programme and consumption table" and the temperature table below.
90˚C |
Heavily soiled white cottons and linens. (coffee table |
|
covers, tableclothes, towels, bed sheets, etc.) |
||
|
Normally soiled, coloured, fade proof linens, cottons or 60˚C synthetic clothes (shirt, nightgown, pajamas, etc.) and
lightly soiled white linens (underwear, etc.)
40˚C- |
Blended laundry including delicate textile (veil curtains, |
30˚C- Cold |
etc.), synthetics and woolens. |
Select the desired programme with the Programme
Selection button.
C
C
C
C
4.5 Main programmes
Depending on the type of fabric, use the following main
programmes.
• Cottons
Use this programme for your cotton laundry (such as bed sheets, duvet and pillowcase sets, towels, bathrobes, underwear, etc.).Your laundry will be washed with vigorous
washing action for a longer washing cycle.
• Synthetics
Use this programme to wash your synthetic clothes (shirts, blouses, synthetic/cotton blends, etc.). It washes with a gentle action and has a shorter washing cycle compared to the Cottons programme.
For curtains and tulle, use the Synthetic 40˚C programme with prewash and anti-creasing functions selected.As their meshed texture causes excessive foaming, wash the veils/ tulle by putting little amount of detergent into the main wash compartment. Do not put detergent in the prewash
compartment.
• Woollens
Use this programme to wash your woolen clothes. Select the appropriate temperature complying with the tags of your clothes. Use appropriate detergents for woolens.
4.6 Additional programmes
For special cases, additional programmes are available in
the machine.
C
• Cotton Economic
You may wash your normally soiled durable cotton and linen laundry in this programme with the highest energy and water saving compared to all other wash programmes suitable for cottons.Actual water temperature may differ from the declared cycle temperature. Programme duration may automatically be shortened during later stages of the programme if you wash less amount (e.g. ½ capacity or less) of laundry. In this case energy and water consumption will be further decreased giving you the opportunity for a more economical wash.This feature is available for certain
models having remaining time display.
• BabyProtect
Use this programme to wash baby laundry, and the laundry that belongs to allergic persons. Longer heating time and an
additional rinsing step provide a higher level of hygiene.
• Hand wash
Use this programme to wash your woolen/delicate clothes that bear “not machinewashable” tags and for which hand wash is recommended. It washes laundry with a very gentle
washing action to not to damage clothes.
• Daily express
Use this programme to wash your lightly soiled cotton
clothes in a short time.
• Super short express
Use this programme to wash your little amount of lightly soiled cotton clothes in a short time.
9 / 76 EN |
Washing Machine / User’s Manual |
|
|

• Darkcare
Use this programme to wash your dark coloured laundry or the laundry that you do not want it get faded.Washing is performed with little mechanic action and at low temperatures. It is recommended to use liquid detergent or
woolen shampoo for dark coloured laundry.
• Mixed 40 (Mix 40)
Use this programme to wash your cotton and synthetic
clothes together without sorting them.
• Intensive
You can wash your durable and heavily soiled clothes on this program. This program washes for a longer time and an extra rinse cycle will be made compared to the “Cottons” program. You can use it for your heavily soiled clothes that you wish to be rinsed gently.
• Freshen Up
Use this programme to remove the odour on the laundry that
are worn only for once and do not contain any stains or dirt.
• Eco Clean
Use this programme, which is much more sensitive to environment and natural resources, to wash your lightly soiled and unstained cotton laundry (max. 3.5 kg) in a short timeCand economically.
• Self Clean
Use this programme regularly (once in every 1-2 months) to clean the drum and provide the required hygiene. Run the programme without any laundry in the machine.To obtain better results, put powder limescale remover for washing machines into the detergent compartment II.When the programme is over, leave the loading door ajar so that the
inside of the machine gets dry.
C
C
4.7 Special programmes
For specific applications, select any of the following
programmes.
• Rinse
Use this programme when you want to rinse or starch
separately.
• Spin + Drain
Use this programme to apply an additional spin cycle for your laundry or to drain the water in the machine.
Before selecting this programme, select the desired spin speed and press Start / Pause / Cancel button.The machine will spin the laundry with the set spin speed and drain the water coming out of them.
If you wish to drain only the water without spinning your laundry, select the Pump+Spin programme and then select the No Spin function with the help of Spin Speed Adjustment button. Press Start / Pause / Cancel button.
C Use a lower spin speed for delicate laundries.
4.8 Temperature selection
Whenever a new programme is selected, the maximum temperature for the selected programme appears on the temperature indicator.
To decrease the temperature, press the Temperature Adjustment button.Temperature decreases with increments of 10° and finally,“-” symbol indicating the cold wash option
appears on the display.
C
Economy symbol
Indicates the programmes and temperatures that provide
energy savings.
C
4.9 Spin speed selection
Whenever a new programme is selected, the recommended spin speed of the selected programme is displayed on the spin speed indicator.
To decrease the spin speed, press the Spin Speed Adjustment button. Spin speed decreases gradually.Then, depending on the model of the product, "Rinse Hold" and "No Spin" options appear on the display. See "Auxiliary function selection" section for explanations of these options.
C Rinse Hold option is indicated with “ ” symbol and No Spin option is indicated with “ ” symbol.
10 / 76 EN |
Washing Machine / User’s Manual |
|
|
4.10 Programme and consumption table
EN |
|
2 |
|
|
|
|
|
|
Auxiliary functions |
|
|
||||
|
|
|
|
|
|
|
|
|
|
|
|
|
|
|
|
|
|
|
|
<![if ! IE]> <![endif]>(kg)LoadMax. |
<![if ! IE]> <![endif]>ConsumptionWater (l) |
<![if ! IE]> <![endif]>ConsumptionEnergy (kWh) |
<![if ! IE]> <![endif]>Speed***Max. |
<![if ! IE]> <![endif]>Prewash |
<![if ! IE]> <![endif]>WashQuick |
|
<![if ! IE]> <![endif]>PlusRinse |
<![if ! IE]> <![endif]>Creasing-Anti |
<![if ! IE]> <![endif]>HoldRinse |
<![if ! IE]> <![endif]>removalhairPet |
Selectable |
|
|
|
|
|
|
|
|
|
|
|
|
|
|
|
|
Programme (°C) |
|
|
|
|
|
|
|
|
|
|
|
|
|
temperature |
|
|
|
|
|
|
|
|
|
|
|
|
|
|
|
|
range °C |
|
|
|
|
|
|
|
|
|
|
|
|
|
|
|
|
Cottons |
|
90 |
|
8 |
74 |
2.40 |
1600 |
• |
• |
|
• |
• |
• |
• |
90-Cold |
|
|
|
|
|
|
|
|
|
|
|
|
|
|
|
|
Cottons |
|
60 |
|
8 |
72 |
1.70 |
1600 |
• |
• |
|
• |
• |
• |
• |
90-Cold |
|
|
|
|
|
|
|
|
|
|
|
|
|
|
|
|
Cottons |
|
40 |
|
8 |
72 |
0.95 |
1600 |
• |
• |
|
• |
• |
• |
• |
90-Cold |
|
|
|
|
|
|
|
|
|
|
|
|
|
|
|
|
BabyProtect |
|
90 |
|
8 |
72 |
2.10 |
1600 |
|
|
|
* |
|
• |
|
90-30 |
|
|
|
|
|
|
|
|
|
|
|
|
|
|
|
|
Cotton Economic |
|
60** |
|
8 |
54 |
1.17 |
1600 |
|
|
|
|
|
• |
|
60-Cold |
|
|
|
|
|
|
|
|
|
|
|
|
|
|
|
|
Cotton Economic |
|
60** |
|
4 |
47 |
0.84 |
1600 |
|
|
|
|
|
• |
|
60-Cold |
|
|
|
|
|
|
|
|
|
|
|
|
|
|
|
|
Cotton Economic |
|
40** |
|
4 |
47 |
0.76 |
1600 |
|
|
|
|
|
• |
|
60-Cold |
|
|
|
|
|
|
|
|
|
|
|
|
|
|
|
|
Cotton Economic |
|
40 |
|
8 |
72 |
0.77 |
1600 |
|
|
|
|
|
• |
|
60-Cold |
|
|
|
|
|
|
|
|
|
|
|
|
|
|
|
|
Intensive |
|
60 |
|
8 |
72 |
1.60 |
1600 |
|
|
|
* |
• |
• |
|
60-40 |
|
|
|
|
|
|
|
|
|
|
|
|
|
|
|
|
Synthetics |
|
60 |
|
3 |
45 |
1.00 |
1200 |
• |
• |
|
• |
• |
• |
• |
60-Cold |
|
|
|
|
|
|
|
|
|
|
|
|
|
|
|
|
Synthetics |
|
40 |
|
3 |
45 |
0.45 |
1200 |
• |
• |
|
• |
• |
• |
• |
60-Cold |
|
|
|
|
|
|
|
|
|
|
|
|
|
|
|
|
Eco Clean |
|
20 |
|
3.5 |
39 |
0.16 |
1600 |
|
|
|
|
|
• |
|
20 |
|
|
|
|
|
|
|
|
|
|
|
|
|
|
|
|
Mixed 40 (Mix 40) |
|
40 |
|
3.5 |
45 |
0.55 |
1200 |
• |
• |
|
• |
• |
• |
• |
40-Cold |
|
|
|
|
|
|
|
|
|
|
|
|
|
|
|
|
Super short express |
|
30 |
|
2 |
35 |
0.10 |
1400 |
|
|
|
• |
|
• |
|
30-Cold |
|
|
|
|
|
|
|
|
|
|
|
|
|
|
|
|
Daily express |
|
90 |
|
8 |
55 |
1.95 |
1400 |
|
|
|
• |
|
• |
|
90-Cold |
|
|
|
|
|
|
|
|
|
|
|
|
|
|
|
|
Daily express |
|
60 |
|
8 |
55 |
1.10 |
1400 |
|
|
|
• |
|
• |
|
90-Cold |
|
|
|
|
|
|
|
|
|
|
|
|
|
|
|
|
Daily express |
|
30 |
|
8 |
65 |
0.22 |
1400 |
|
|
|
• |
|
• |
|
90-Cold |
|
|
|
|
|
|
|
|
|
|
|
|
|
|
|
|
Woollens |
|
40 |
|
1.5 |
45 |
0.30 |
1200 |
|
|
|
• |
|
• |
|
40-Cold |
|
|
|
|
|
|
|
|
|
|
|
|
|
|
|
|
Hand wash |
|
30 |
|
1 |
35 |
0.20 |
1200 |
|
|
|
|
|
|
|
30-Cold |
|
|
|
|
|
|
|
|
|
|
|
|
|
|
|
|
Darkcare |
|
40 |
|
3 |
82 |
0.55 |
1200 |
|
|
|
* |
|
• |
|
40-Cold |
|
|
|
|
|
|
|
|
|
|
|
|
|
|
|
|
Self Clean |
|
70 |
|
- |
95 |
2.15 |
800 |
|
|
|
* |
|
|
|
70 |
|
|
|
|
|
|
|
|
|
|
|
|
|
|
|
|
Freshen Up |
|
- |
|
2 |
30 |
0.03 |
1200 |
|
|
|
|
|
• |
|
- |
|
|
|
|
|
|
|
|
|
|
|
|
|
|
|
|
• : Selectable
* :Automatically selected, no cancelling.
**: Energy Label programme (EN 60456 Ed.3)
***If maximum spin speed of the machine is lower then this value, you can only select up to the maximum spin speed. - : See the programme description for maximum load.
** “Cotton eco 40°C and Cotton eco 60°C are standard cycles.”These cycles are known as ‘40°C cotton standard cycle’ and ‘60°C cotton standard cycle’ and indicated with the 
 symbols on the panel.
C The auxiliary functions in the table may vary according to the model of your machine.
C Water and power consumption may vary subject to the changes in water pressure, water hardness and temperature, ambient temperature, type and amount of laundry, selection of auxiliary functions and spin speed, and changes in electric voltage.
C You can see the washing time of the programme you have selected on the display of the machine. It is normal that small differences may occur between the time shown on the display and the real washing time.
11 / 76 EN |
Washing Machine / User’s Manual |
|
|

4.11 Auxiliary function selection
Select the desired auxiliary functions before starting the programme. Furthermore, you may also select or cancel auxiliary functions that are suitable to the running
programme by pressing the Start / Pause / Cancel button when the machine is operating. For this, the machine must be in a step before the auxiliary function you are going to select or cancel.
Depending on the programme, press a, b, c or d buttons to select the desired auxiliary function. Symbol of the selected
auxiliary function appears on the display.
C
C
C
• Prewash
A Prewash is only worthwhile for heavily soiled laundry. Not using the Prewash will save energy, water, detergent and time.
F1 appears on the display when you select this function (a).
• Quick Wash
This function can be used in Cottons and Synthetics programmes. It decreases the washing times and also the number of rinsing steps for lightly soiled laundry.
F2 appears on the display when you select this function (b).
C
• Rinse Plus
This function enables the machine to make another rinsing in addition to the one already made after the main wash.
Thus, the risk for sensitive skins (babies, allergic skins, etc.) to be effected by the minimal detergent remnants on the laundry can be reduced.
F3 appears on the display when you select this function (c).
• Anti-Creasing
This function creases the clothes lesser when they are being washed. Drum movement is reduced and spinning speed is limited to prevent creasing. In addition, washing is done with a higher water level.
F4 appears on the display when you select this function (d).
• Rinse Hold
If you are not going to unload your clothes immediately after the programme completes, you may use rinse hold function to keep your laundry in the final rinsing water in order to prevent them from getting wrinkled when there is no water in the machine. Press Start / Pause /Cancel button after this process if you want to drain the water without spinning your laundry. Programme will resume and complete after draining the water.
If you want to spin the laundry held in water, adjust the Spin Speed and press Start / Pause / Cancel button.
The programme resumes.Water is drained, laundry is spun
and the programme is completed.
• Pet hair removal
This function helps to remove pet hair that remain on your garments more effectively.
When you select this function, Prewash and Extra Rinse steps are added to the normal programme.Thus, washing is performed with more water (30%) and the pet hair is
removed more effectively.
A
4.12 Time display
Remaining time to complete the programme appears on the display while the programme is running. Tim is displayed as
“01:30” in hours and minutes format.
C
Delayed start
With the Delayed Start function the startup of the programme may be delayed up to 24 hours. Delayed start timeCcan be increased by increments of 30 minutes.
Open the loading door, place the laundry and put detergent, etc. Select the washing programme, temperature, spin speed and, if required, the auxiliary functions. Set the desired delayed start time by pressing the Delayed Start + or - buttons. Delayed Start symbol flashes. Press Start / Pause / Cancel button. Delayed start countdown starts. Delayed Start symbol illuminates steadily. Start symbol appears.“:” sign in the middle of the delayed start time on the display
starts flashing.
C
Changing the delayed start period
If you want to change the time during countdown:
Press Start / Pause / Cancel button.“:” sign in the middle of the delayed start time on the display stops flashing. Pause symbol appears. Delayed Start symbol flashes. Start symbol disappears. Set the desired delayed start time by pressing the Delayed Start + or - buttons. Press Start / Pause / Cancel button. Delayed Start symbol illuminates steadily. Pause symbol disappears. Start symbol appears.“:” sign in the middle of the delayed start time on the display starts flashing.
Cancelling the Delayed Start function
If you want to cancel the delayed start countdown and start the programme immediately:
Press Start / Pause / Cancel button.“:” sign in the middle of the delayed start time on the display stops flashing. Start symbol disappears. Pause symbol and Delayed Start symbol
12 / 76 EN |
Washing Machine / User’s Manual |
|
|

flashes. Decrease the delayed start time by pressing the Delayed Start - button. Programme duration appears after 30 minutes. Press Start / Pause / Cancel button to start the programme.
4.13 Starting the programme
Press Start / Pause / Cancel button to start the programme. Start symbol showing the startup of the programme will turn on. Loading door is locked and Door Locked symbol appears on the display.The symbol of the step from which the programme has started appears on the display (Prewash, Main Wash, Rinse, Softener and Spin).
4.14 Progress of programme
Progress of a running programme is indicated on the display with a set of symbols.
Relevant symbol appears on the display at the beginning of each programme step and all symbols remain lit at the end of the programme.The farthermost right symbol indicates
the current programme step.
Prewash
If the Prewash auxiliary function is selected, Prewash symbol appears on the display indicating that the prewash step has
started.
Main Wash
Main Wash symbol indicating that the main wash step has
started appears on the display.
Rinse
Rinse symbol indicating that the rinsing step has started
appears on the display.
Softener
Softener symbol indicating that the softener step has started
appears on the display.
Spin
Appears at the beginning of the final spin step and remains
lit during Spin and Pump special programmes.
C
4.15 Loading door lock
There is a locking system on the loading door of the machine that prevents opening of the door in cases when the water level is unsuitable.
Door Locked symbol appears when the loading door is locked.This symbol will flash until the loading door becomes ready to open when programme completes or the machine is paused. Do not force to open the loading door in this step. Symbol disappears when the door is ready to open.You can
open the door when the symbol disappears.
4.16 Changing the selections after programme has started
Switching the machine to pause mode
Press the Start / Pause / Cancel button to switch the machine to pause mode. Pause symbol appears on the display indicating that the machine is paused. Start symbol disappears.
Changing the speed and temperature settings for auxiliary functions
Depending on the step the programme has reached, you may cancel or activate the auxiliary functions; see, "Auxiliary function selection".
You may also change the speed and temperature settings; see, "Spin speed selection" and "Temperature selection".
Adding or taking out laundry
Press the Start / Pause / Cancel button to switch the machine to pause mode. The programme follow-up light of the relevant step during which the machine was switched into the pause mode will flash.Wait until the Loading Door can be opened. Open the Loading Door and add or take out the laundry. Close the Loading Door. Make changes in auxiliary functions, temperature and speed settings if necessary. Press Start / Pause / Cancel button to start the
machine.
C
4.17 Child Lock
Use Child Lock function to prevent children from tampering with the machine. Thus you can avoid any changes in a
running programme.
C
To activate the Child Lock:
Press and hold 2nd and 4th Auxiliary Function buttons for 3 seconds.“Con” appears on the display.
C |
Same phrase will appear on the display if you press |
any button when Child Lock is enabled. |
To deactivate the Child Lock:
Press and hold 2nd and 4th Auxiliary Function buttons for 3
seconds.“COFF” appears on the display.
C
4.18 Cancelling the programme
Press and hold Start / Pause / Cancel button for 3 seconds. Start symbol flashes. Symbol of the step at which the programme was cancelled remains lit. "End" appears on the
display and the programme is cancelled.
C
4.19 Machine is in Rinse Hold mode
Spin symbol flashes and Pause symbol illuminates when the machine is in Rinse Hold mode.
If you want to spin your laundry when the machine is in this mode:
Adjust the spin speed and press Start / Pause / Cancel button. Pause symbol disappears and Start symbol appears. Programme resumes, discharges the water and spins the laundry.
13 / 76 EN |
Washing Machine / User’s Manual |
|
|
If you only want to drain the water without spinning: Just press Start / Pause / Cancel button. Pause symbol
disappears. Start symbol appears. Programme resumes and discharges the water only.
4.20 End of programme
“End” appears on the display at the end of the programme. Symbols of the programme steps remain lit.Auxiliary function, spin speed and temperature that were selected at the beginning of the programme remain selected.
4.21 Your machine is equipped with a “Standby Mode”
In case of not starting any programme or waiting without making any other operation when the machine is turned on by On/Off button and while it is in selection step or if no other operation is performed approximately 2 minutes after the programme you selected has come to an end, your machine will automatically switch to energy saving mode. Brightness of indicator lights will decrease. Also, if your product is equipped with a display showing the
programme duration, this display will completely turn off. In case of rotating the Programme Selection knob or pressing any button, lights and display will restore to their previous condition. Your selections made while exiting the energy saving mode may change. Check the appropriateness of your selections before starting the programme. Readjust if necessary. This is not a fault.
5 Maintenance and cleaning
Service life of the product extends and frequently faced problems decrease if cleaned at regular intervals.
5.1 Cleaning the detergent drawer
Clean the detergent drawer at regular intervals (every 4-5 washing cycles) as shown below in order to prevent accumulation of powder detergent in time.
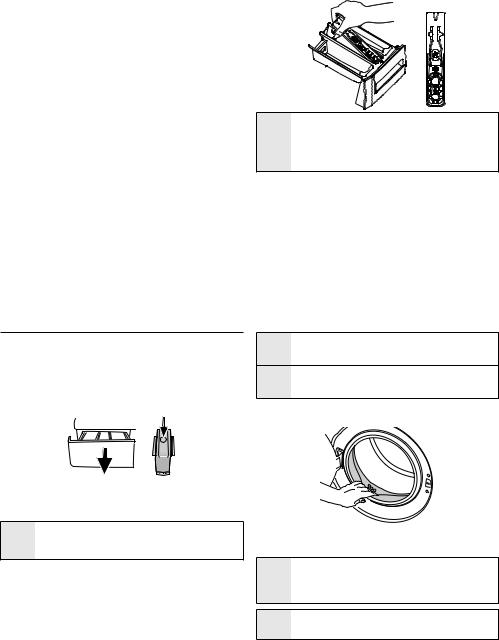
1.Press the dotted point on the siphon in the softener compartment and pull towards you until the compartment is removed from the machine.
C If more than normal amount of water and softener mixture starts to gather in the softener compartment, the siphon must be cleaned.
2.Wash the detergent drawer and the siphon with plenty of lukewarm water in a washbasin.Wear protective gloves or use an appropriate brush to avoid touching of the residues in the drawer with your skin when cleaning.
3.Insert the drawer back into its place after cleaning and make sure that it is seated well.
If your detergent drawer is the one indicated in the following figure:
C Lift the rear part of the siphon to remove it as illustrated.
After performing the above mentioned cleaning procedures, replace the siphon back to its seating and push its front section downwards to make sure that the locking tab engages.
5.2 Cleaning the loading door and the drum
Residues of softener, detergent and dirt may accumulate in your machine in time and may cause unpleasant odours and washing complaints.To avoid this, use the Drum Cleaning programme. If your machine is not featured with Drum Cleaning programme, use Cottons-90 programme and select Additional Water or Extra Rinse auxiliary functions as well. Run theBefore starting the programme, put max. 100 g of powder anti-limescale into the main wash detergent compartment (compartment nr. 2). If the anti-limescale is in tablet form, put only one tablet into compartment nr. 2. Dry the inside of the bellow with a clean piece of cloth after the programme has come to an end.
C Repeat Drum Cleaning process in every 2 months.
C Use an anti-limescale suitable for the washing machines.
After every washing make sure that no foreign substance is left in the drum.
If the holes on the bellow shown in the figure is blocked, open the holes using a toothpick.
C Foreign metal substances will cause rust stains in the drum. Clean the stains on the drum surface by using cleaning agents for stainless steel. Never use steel wool or wire wool.
A warning: Never use sponge or scrub materials.These will damage the painted and plastic surfaces.
14 / 76 EN |
Washing Machine / User’s Manual |
|
|
5.3 Cleaning the body and control panel
Wipe the body of the machine with soapy water or noncorrosive mild gel detergents as necessary, and dry with a soft cloth.
Use only a soft and damp cloth to clean the control panel.
5.4 Cleaning the water intake filters
There is a filter at the end of each water intake valve at the rear of the machine and also at the end of each water intake hose where they are connected to the tap. These filters prevent foreign substances and dirt in the water to enter the washing machine. Filters should be cleaned as they do get dirty.
1.Close the taps.
2.Remove the nuts of the water intake hoses to access the filters on the water intake valves. Clean them with an
appropriate brush. If the filters are too dirty, take them out by means of pliers and clean them.
3.Take out the filters on the flat ends of the water intake hoses together with the gaskets and clean thoroughly under running water.
4.Replace the gaskets and filters carefully in their places and tighten the hose nuts by hand.
5.5 Draining remaining water and cleaning the pump filter
The filter system in your machine prevents solid items such as buttons, coins and fabric fibers clogging the pump impeller during discharge of washing water.Thus, the water will be discharged without any problem and the service life of the pump will extend.
If the machine fails to drain water, the pump filter is clogged. Filter must be cleaned whenever it is clogged or in every 3 months.Water must be drained off first to clean the pump filter.
In addition, prior to transporting the machine (e.g., when moving to another house) and in case of freezing of the water, water may have to be drained completely.
A warning: Foreign substances left in the pump filter may damage your machine or may cause noise problem.
In order to clean the dirty filter and discharge the water: 1. Unplug the machine to cut off the supply power.
A warning: Temperature of the water inside the machine may rise up to 90 ºC.To avoid burning risk, filter must be cleaned after the water in the machine cools down.
2.Open the filter cap.
If the filter cap is composed of two pieces, press the tab on the filter cap downwards and pull the piece out towards yourself.
If the filter cap is one piece, pull the cap from both sides at the top to open.
C You can remove the filter cover by slightly pushing downwards with a thin plastic tipped tool, through the gap above the filter cover. Do not use metal tipped tools to remove the cover.
3.Some of our products have emergency draining hose and some does not have. Follow the steps below to discharge the water.
Discharging the water when the product has an emergency draining hose:
a.Pull the emergency draining hose out from its seat
b.Place a large container at the end of the hose. Drain the water into the container by pulling out the plug at the end of the hose.When the container is full, block the inlet
of the hose by replacing the plug.After the container is emptied, repeat the above procedure to drain the water in the machine completely.
c.When draining of water is finished, close the end by the plug again and fix the hose in its place.
d.Turn the pump filter to take it out.
15 / 76 EN |
Washing Machine / User’s Manual |
|
|

Discharging the water when the product does not have an emergency draining hose:
a.Place a large container in front of the filter to catch water from the filter.
b.Loosen pump filter (anticlockwise) until water starts to flow. Fill the flowing water into the container you have placed in front of the filter.Always keep a piece of cloth handy to absorb any spilled water.
c.When the water inside the machine is finished, take out the filter completely by turning it.
4.Clean any residues inside the filter as well as fibers, if any, around the pump impeller region.
5.Install the filter.
6.If the filter cap is composed of two pieces, close the filter cap by pressing on the tab. If it is one piece, seat the tabs in the lower part into their places first, and then press the upper part to close.
16 / 76 EN |
Washing Machine / User’s Manual |
|
|

6 Technical specifications
Models (EN) |
WMB 81242 LMBB |
WMB 81242 LMS |
|
|
|
Maximum dry laundry capacity (kg) |
8 |
8 |
|
|
|
Height (cm) |
84 |
84 |
|
|
|
Width (cm) |
60 |
60 |
|
|
|
Depth (cm) |
54 |
54 |
Net weight (±4 kg.) |
71 |
71 |
Electrical input (V/Hz) |
230 V / 50Hz |
230 V / 50Hz |
Total current (A) |
10 |
10 |
|
|
|
Total power (W) |
2200 |
2200 |
Spin speed (rpm/ min., max.) |
1200 |
1200 |
Stand-by mode power (W) |
1.00 |
1.00 |
Off-mode power (W) |
0.20 |
0.20 |
Main model code |
8811 |
8811 |
Single Water inlet / Double Water inlet |
• / - |
• / - |
|
|
|
• Available
C Technical specifications may be changed without prior notice to improve the quality of the product.
C Figures in this manual are schematic and may not match the product exactly.
C Values stated on the product labels or in the documentation accompanying it are obtained in laboratory conditions in accordance with the relevant standards. Depending on operational and environmental conditions of the product, these values may vary.
17 / 76 EN |
Washing Machine / User’s Manual |
|
|

7 Troubleshooting
Programme cannot be started or selected.
• Washing machine has switched to self protection mode due to a supply problem (line voltage, water pressure, etc.). >>> Press and hold Start / Pause button for 3 seconds to reset the machine to factory settings. (See "Cancelling the programme")
Water in the machine.
• Some water might have remained in the product due to the quality control processes in the production. >>> This is not a failure; water is not harmful to the machine.
Machine vibrates or makes noise.
•Machine might be standing unbalanced. >>> Adjust the feet to level the machine.
•A hard substance might have entered into the pump filter. >>> Clean the pump filter.
•Transportation safety bolts are not removed. >>> Remove the transportation safety bolts.
•Laundry quantity in the machine might be too little. >>> Add more laundry to the machine.
•Machine might be overloaded with laundry. >>> Take out some of the laundry from the machine or distribute the load by hand to balance it homogenously in the machine.
•Machine might be leaning on a rigid item. >>> Make sure that the machine is not leaning on anything.
Machine stopped shortly after the programme started.
• Machine might have stopped temporarily due to low voltage. >>> It will resume running when the voltage restores to the normal level.
Programme time does not countdown. (On models with display)
•Timer may stop during water intake. >>> Timer indicator will not countdown until the machine takes in adequate amount of water. The machine will wait until there is sufficient amount of water to avoid poor washing results due to lack of water. Timer indicator will resume countdown after this.
•Timer may stop during heating step. >>> Timer indicator will not countdown until the machine reaches the selected temperature.
•Timer may stop during spinning step. >>> Automatic unbalanced load detection system might be activated due to the unbalanced distribution of the laundry in the drum.
•Machine does not switch to spinning step when the laundry is not evenly distributed in the drum to prevent any damage to the machine and to its surrounding environment. Laundry should be rearranged and re-spun.
Foam is overflowing from the detergent drawer.
•Too much detergent is used. >>> Mix 1 tablespoonful softener and ½ l water and pour into the main wash compartment of the detergent drawer.
•Put detergent into the machine suitable for the programmes and maximum loads indicated in the “Programme and consumption table”. When you use additional chemicals (stain removers, bleachs and etc), reduce the amount of detergent.
Laundry remains wet at the end of the programme
•Excessive foam might have occurred and automatic foam absorption system might have been activated due to too much detergent usage.
>>> Use recommended amount of detergent.
•Machine does not switch to spinning step when the laundry is not evenly distributed in the drum to prevent any damage to the machine and to its surrounding environment. Laundry should be rearranged and re-spun.
Awarning: If you cannot eliminate the problem although you follow the instructions in this section, consult your dealer or the Authorized Service Agent. Never try to repair a nonfunctional product yourself.
18 / 76 EN |
Washing Machine / User’s Manual |
|
|
Dokument Nummer
2820523272_DE/140113.1451

1 Wichtige Hinweise zur Sicherheit und zum Umweltschutz
In diesem Abschnitt finden Sie Hinweise, die für Ihre und die Sicherheit anderer Personen unerlässlich sind. Halten Sie sich unbedingt an diese Hinweise, damit es nicht zu Verletzungen oder Sachschäden kommt. Bei Nichteinhaltung dieser Anweisungen erlöschen sämtliche Garantieansprüche.
1.1 Sicherheit allgemein
•Dieses Gerät darf nur dann von Kindern ab acht Jahren und von Personen genutzt werden, die unter körperlichen, geistigen Einschränkungen sowie beeinträchtigter Wahrnehmung leiden oder denen es an Erfahrung und Wissen mangelt, wenn diese beaufsichtigt und gründlich mit der sicheren Bedienung des Gerätes sowie jeglichen damit verbundenen Risiken vertraut gemacht werden. Kinder dürfen nicht mit dem Gerät spielen. Reinigungsund Wartungstätigkeiten sollten nicht Kindern überlassen werden, wenn diese nicht aufmerksam beaufsichtigt werden.
•Stellen Sie das Gerät niemals auf Teppichen, Teppichböden und ähnlichen Unterlagen auf.Andernfalls kann die Maschine nicht richtig von unten belüftet werden, elektrische Komponenten können überhitzten. Dies kann zu Problemen mit Ihrem Gerät führen.
•Bei Fehlfunktionen darf das Gerät erst dann wieder in Betrieb genommen werden, nachdem es durch den autorisierten Kundendienst repariert wurde. Es besteht Stromschlaggefahr!
•Nach einem Stromausfall setzt das Gerät den Betrieb wieder automatisch fort.Wenn Sie ein Programm abbrechen möchten, schauen Sie sich bitte den Abschnitt „Programm abbrechen“ an.
•Schließen Sie das Gerät an eine geerdete, mit einer 16 A-Sicherung abgesicherte Steckdose (Schukosteckdose) an. Die Installation der Schutzerde muss grundsätzlich von einem qualifizierten Elektriker ausgeführt werden.Wir haften nicht für jegliche Schäden, die durch mangelhafte, nicht den örtlichen Vorschriften entsprechende, Erdung entstehen.
•Wasserzulaufund Wasserablaufschläuche müssen fixiert und dürfen nicht beschädigt werden.Andernfalls kann Wasser auslaufen.
•Öffnen Sie niemals die Tür des Gerätes, nehmen Sie niemals den Filter heraus, wenn sich noch Wasser in der Trommel befindet.Andernfalls besteht
Überschwemmungsgefahr und Verletzungsgefahr durch heißes Wasser.
•Versuchen Sie niemals, die Waschmaschinentür mit Gewalt zu öffnen. Die Waschmaschinentür lässt sich erst ein paar Minuten nach dem Ende des Waschprogramms öffnen. Falls Sie versuchen, die Tür gewaltsam zu öffnen, können Tür und Verriegelungsmechanismus beschädigt werden.
•Ziehen Sie den Netzstecker, wenn Sie das Gerät nicht benutzen.
•Gießen Sie niemals Wasser oder andere Flüssigkeiten direkt auf das Gerät! Es besteht Stromschlaggefahr!
•Berühren Sie den Stecker niemals mit feuchten oder gar nassen Händen! Ziehen Sie den Netzstecker niemals am Kabel aus der Steckdose: Fassen Sie grundsätzlich den Stecker selbst.
•Verwenden Sie ausschließlich für Waschmaschinen geeignete Waschmittel,Weichspüler und Zusatzstoffe.
•Halten Sie sich an die Hinweise auf Pflegeetiketten und auf der Waschmittelpackung.
•Vor Aufstellung,Wartung, Reinigung und vor Reparaturen muss unbedingt der Netzstecker gezogen werden.
•Lassen Sie Installationsund Reparaturarbeiten grundsätzlich vom autorisierten Kundendienst ausführen. Der Hersteller haftet nicht bei Schäden, die durch den Eingriff nicht autorisierter Personen entstehen.
•Falls das Netzkabel beschädigt wird, muss es vom Hersteller, seinem Kundendienst, einer vom Importeur bestimmten Stelle oder einer gleichermaßen qualifizierten Person (am besten einem Elektriker) ausgetauscht werden.
1.2 Bestimmungsgemäßer Einsatz
•Dieses Gerät wurde für den Hausgebrauch entwickelt. Es darf nicht für kommerzielle Zwecke und nicht außerhalb seines bestimmungsgemäßen Einsatzgebietes eingesetzt werden.
•Das Gerät darf nur zum Waschen und Spülen von Textilien verwendet werden, die entsprechend gekennzeichnet sind.
•Der Hersteller haftet nicht bei Schäden, die durch falschen Gebrauch oder unsachgemäßen Transport entstehen.
1.3 Sicherheit von Kindern
•Verpackungsmaterialien können eine Gefahr für Kinder darstellen. Lagern Sie sämtliche Verpackungsmaterialien an einem sicheren Ort und außerhalb der Reichweite von Kindern.
•Elektrogeräte können für Kinder gefährlich sein. Halten Sie Kinder im Betrieb daher unbedingt vom Gerät fern. Lassen Sie Kinder nicht mit dem Gerät spielen. Nutzen Sie die Kindersicherung, damit Kinder das Gerät nicht manipulieren können.
•Vergessen Sie nicht, die Tür des Gerätes zu schließen, wenn Sie den Raum verlassen.
•Lagern Sie sämtliche Waschund Zusatzmittel an einem sicheren Ort und außerhalb der Reichweite von Kindern. Schließen Sie den Deckel des Waschmittelbehälters, verschließen Sie Waschmittelpackungen.
1.4 Hinweise zur Verpackung
•Die Verpackungsmaterialien des Produktes wurden in Übereinstimmung mit unseren nationalen
Umweltschutzrichtlinien aus recyclingfähigen Materialien hergestellt. Entsorgen Sie die Verpackungsmaterialien nicht mit dem regulären Hausmüll. Bringen Sie Verpackungsmaterialien zu speziellen Sammelstellen; entsprechende Informationen erhalten Sie von Ihrer Stadtverwaltung.
1.5 Altgeräteentsorgung
•Dieses Produkt wurde aus hochwertigen Teilen und Materialien hergestellt, die wiederverwendet und dem Recycling zugeführt werden können. Entsorgen Sie das Produkt daher nicht mit dem normalen Hausmüll. Nutzen Sie eine Sammelstelle zum Recycling von elektrischen und elektronischen Altgeräten. Ihre Stadtverwaltung informiert Sie gerne über eine Sammelstelle in Ihrer Nähe. Durch das aufmerksame Recycling gebrauchter Produkte leisten Sie einen wichtigen Beitrag zum Schutz
20 / 76 DE |
Waschmaschine / Bedienungsanleitung |
|
|
unserer Umwelt und unserer natürlichen Ressourcen. Damit Kinder nicht in Gefahr gebracht werden, schneiden Sie das Netzkabel ab und machen die Türverriegelung unbrauchbar, bevor Sie das Gerät entsorgen.
1.6 Die Einhaltung der WEEE-Richtlinie
Dieses Gerät ist mit dem Symbol zur selektiven
Behandlung von Elektround Elektronikausstattungen gekennzeichnet. Dies
bedeutet, dass das ausgediente Gerät gemäß der EG-Richtlinie 2002/96 zwecks Zerlegen
oder Recycling von einem selektiven
Sammelsystem erfasst werden muss, um jegliche Auswirkungen auf die Umwelt zu reduzieren Weitere Auskünfte können von den zuständigen örtlichen oder landesweiten Behörden erhalten werden.
Nicht selektiv behandelte Elektronikprodukte können auf Grund der in ihnen enthaltenen Schadstoffe für die Umwelt und die menschliche Gesundheit schädlich sein.
2 Installation/Aufstellung
Lassen Sie Ihr Gerät vom autorisierten Kundendienst in Ihrer Nähe installieren.Wenn Sie Ihre Maschine betriebsbereit machen, achten Sie darauf, dass Wasserzulauf und Wasserablauf in einwandfreiem Zustand sind (schauen Sie dazu auch in die Bedienungsanleitung), ehe Sie sich an den Kundendienst wenden. Falls dies nicht der Fall sein sollte, lassen Sie die nötigen Arbeiten durch einen qualifizierten Klempner oder Techniker ausführen.
|
Die Vorbereitung des Aufstellungsortes, der Wasserzu- |
C und -ableitung sowie des elektrischen Anschlusses sind |
|
|
Sache des Kunden. |
|
Warnung: Installation und elektrischer Anschluss |
B des Gerätes müssen vom autorisierten Kundendienst |
|
|
ausgeführt werden. Der Hersteller haftet nicht bei |
|
Schäden, die durch den Eingriff nicht autorisierter |
|
Personen entstehen. |
|
Warnung: Untersuchen Sie das Gerät vor der Installation |
A auf eventuelle, sichtbare Defekte. Falls Defekte vorliegen, |
|
|
darf das Gerät nicht installiert werden. Beschädigte |
|
Geräte können gefährlich sein. |
C |
Achten Sie darauf, dass Wasserzulaufund |
-ablaufschläuche sowie das Netzkabel nicht geknickt |
|
und nicht anderweitig beschädigt werden, wenn Sie das Gerät nach dem Anschluss an Ort und Stelle rücken oder es reinigen.
2.1 Der richtige Aufstellungsort
•Stellen Sie die Maschine auf einem stabilen Untergrund auf. Stellen Sie das Gerät nicht auf langflorigen Teppichen oder ähnlichen Unterlagen auf.
•Eine Kombination aus Waschmaschine und Trockner kann – voll beladen – bis etwa 180 kg Gewicht erreichen. Stellen Sie das Gerät auf einem stabilen, ebenen Untergrund auf, der das Gewicht der Maschine(n) mühelos tragen kann!
•Stellen Sie das Gerät nicht auf das Netzkabel.
•Stellen Sie das Gerät nicht an Stellen auf, an denen die Temperatur unter 0 °C abfallen kann.
•Sorgen Sie für einen Abstand von mindestens 1 cm zwischen den Seiten des Gerätes und anderen Möbelstücken.
2.2 Transportstabilisatoren entfernen
Zum Entfernen der Transportstabilisatoren neigen Sie die Maschine etwas nach hinten. Entfernen Sie die Stabilisatoren durch Ziehen am Band.
2.3 Transportsicherungen entfernen
A Warnung: Entfernen Sie die Transportsicherungen erst nachdem die Transportstabilisatoren entfernt wurden.
A Warnung: Entfernen Sie die Transportsicherungsbolzen unbedingt, bevor Sie die Waschmaschine nutzen! Andernfalls wird das Gerät beschädigt.
1.Lösen Sie sämtliche Bolzen mit einem passenden Schlüssel, bis sie sich frei drehen lassen (C).
2.Entfernen Sie die Transportsicherungen, indem Sie diese vorsichtig herausdrehen.
3.Setzen Sie die Kunststoffabdeckungen (diese finden Sie im Beutel mit der Bedienungsanleitung) in die Löcher an der Rückwand ein. (P)
C Bewahren Sie die Transportsicherungen gut auf. Sie brauchen sie, wenn Sie die Waschmaschine später einmal transportieren möchten.
C Transportieren Sie das Gerät niemals ohne korrekt angebrachte Transportsicherungen!
2.4 Wasseranschluss
C Die Maschine benötigt zum Arbeiten einen Wasserdruck zwischen 1 und 10 bar (0,1 bis 1 MPa). (In der Praxis bedeutet dies, dass innerhalb einer Minute 10 bis 80 Liter Wasser aus dem voll geöffneten Wasserhahn laufen müssen, damit Ihre Maschine richtig arbeiten kann.) Falls der Wasserdruck höher sein sollte, verwenden Sie ein Druckreduzierventil.
C Wenn Sie ein Gerät mit doppeltem Wasserzulauf mit nur einem Wasserzulauf (Kaltwasser) nutzen möchten, muss der mitgelieferte Stopfen am
Warmwasserzulaufventil installiert werden. (Dies gilt für Geräte, die mit Blindstopfen geliefert werden.)
A Warnung: Modelle mit einzelnem Wasserzulauf sollten nicht an den Warmwasserhahn angeschlossen werden. Falls Sie dies dennoch versuchen, wird Ihre Wäsche beschädigt – oder das Gerät wechselt in den Sicherheitsmodus und arbeitet nicht.
21 / 76 DE |
Waschmaschine / Bedienungsanleitung |
|
|

A Warnung: Verwenden Sie keine alten oder gebrauchten Wassereinlaufschläuche mit Ihrem neuen Gerät. Diese können zu Verschmutzungen Ihrer Wäsche führen.
1.Schließen Sie die mit der Maschine gelieferten Spezialschläuche an die Wasserzuläufe des Gerätes an. Der rote Schlauch (links) dient als Warmwassereinlass (maximal 90 °C), der blaue Schlauch (rechts) als Kaltwassereinlass (maximal 25 °C).
A Warnung: Achten Sie bei der Installation Ihres Gerätes darauf, dass Kaltund Warmwasseranschlüsse korrekt durchgeführt werden.Andernfalls kommt Ihre Wäsche am Ende des Waschvorgangs eventuell heiß aus der Maschine und verschleißt schneller.
2.Ziehen Sie sämtliche Schlauchmuttern mit der Hand an. Ziehen Sie die Muttern niemals mit Zangen oder ähnlichen Werkzeugen an.
Herausnehmen noch sehr nass ist. Halten Sie sich deshalb an die in der Abbildung angegebenen Höhen.
•Damit kein verschmutztes Wasser in die Maschine zurücklaufen kann und um der Maschine das Abpumpen zu erleichtern, darf das Ende des Schlauches nur maximal 15 cm tief in den Ablauf eingeführt werden und darf nicht im Abwasser enden. Falls das Schlauchende zu lang sein sollte, schneiden Sie ein Stück ab.
•Das Schlauchende sollte nicht gebogen werden, es sollte nicht darauf getreten werden und es darf nicht zwischen Ablauf und Maschine eingeklemmt werden.
•Falls der Schlauch zu kurz sein sollte, können Sie einen Original-Verlängerungsschlauch verwenden. Die Gesamtlänge des Schlauches ab Austrittspunkt aus der Maschine darf 3,2 m nicht überschreiten.
Um ein Auslaufen von Wasser zu vermeiden, müssen Ablaufschlauch und Verlängerungsschlauch mit einer passenden Schelle gesichert werden, damit sich die Verbindung nicht lösen und kein Wasser austreten kann.
3.Nach dem Anschluss der Schläuche öffnen Sie die Wasserzuläufe (Hähne) komplett und überzeugen sich davon, dass kein Wasser an den Anschlussstellen austritt. Falls Wasser austreten sollte, drehen Sie den Hahn zu und lösen anschließend die Mutter. Überprüfen Sie die Dichtung, ziehen Sie die Mutter anschließend wieder gut an. Um ein Auslaufen von Wasser und daraus entstehende Wasserschäden zu vermeiden, halten Sie die Wasserhähne geschlossen, wenn Sie die Maschine nicht benutzen.
2.5 Wasserablauf anschließen
•Das Ende des Wasserablaufschlauches muss direkt an den Wasserablauf (Abfluss) in der Wand oder am Waschbecken angeschlossen werden.
A Warnung: Ansonsten kann es zu Überschwemmungen kommen, falls sich der Schlauch beim Abpumpen des Wassers lösen sollte. Bei hohen Waschtemperaturen besteht Verbrühungsgefahr! Damit es nicht zu unangenehmen Situationen kommt und damit Wasserzu- /-ablauf reibungslos funktionieren, fixieren Sie das Ende des Ablaufschlauches so, dass es sich keinesfalls lösen kann.
•Der Schlauch sollte in einer Höhe von mindestens 40 und maximal 100 cm angeschlossen werden.
•Wenn der Ablaufschlauch zuerst am Boden (bis etwa 40 cm über dem Boden) und danach wieder nach oben verläuft, kann es zu Schwierigkeiten beim Wasserablauf kommen; es kann vorkommen, dass die Wäsche beim
2.6 Füße einstellen
A Warnung: Damit Ihre Maschine leise und vibrationsfrei arbeiten kann, muss sie absolut gerade und ausbalanciert stehen. Sie balancieren die Maschine aus, indem Sie die Füße entsprechend einstellen. Sollte das Gerät nicht fest und gerade stehen, kann es sich im Betrieb bewegen, stark vibrieren und gegen andere Gegenstände oder Möbelstücke stoßen.
1.Lösen Sie die Kontermuttern an den Füßen von Hand.
2.Stellen Sie die Füße so ein, dass das Gerät stabil und absolut gerade steht.
3.Ziehen Sie die Kontermuttern anschließend mit der Hand an.
22 / 76 DE |
Waschmaschine / Bedienungsanleitung |
|
|
|
|
|
|
|
|
• Geben Sie sehr kleine Textilien wie Kinderund |
|
|
A |
Warnung: Lösen Sie die Kontermuttern grundsätzlich nur |
|||||
|
|
Nylonstrümpfe in einen Wäschebeutel oder Kissenbezug. |
|||||
|
mit den Händen, benutzen Sie keinerlei Werkzeuge dafür. |
|
|||||
|
|
|
Andernfalls kann es zu Beschädigungen kommen. |
• Drücken Sie Vorhänge nicht zusammen, wenn Sie diese |
|||
|
2.7 Elektrischer Anschluss |
|
in die Maschine geben. Bei Vorhängen entfernen Sie |
||||
|
|
zuvor sämtliche Applikationen und sonstige nicht textile |
|||||
|
Schließen Sie das Gerät an eine geerdete, mit einer 16 |
|
|||||
|
|
Teile. |
|||||
|
A-Sicherung abgesicherte Steckdose (Schukosteckdose) |
|
|||||
|
• Schließen Sie Reißverschlüsse, nähen Sie lose Knöpfe an, |
||||||
|
an.Wir haften nicht für jegliche Schäden, die durch |
||||||
|
|
reparieren Sie Risse und sonstige Defekte. |
|||||
|
mangelhafte, nicht den örtlichen Vorschriften entsprechende, |
|
|||||
|
• Waschen Sie Textilien, die mit „maschinenwaschbar“ oder |
||||||
|
Erdung entstehen. |
|
„Handwäsche“ gekennzeichnet sind, ausschließlich mit |
||||
|
• |
Der Anschluss muss gemäß örtlichen Vorschriften |
|
||||
|
|
dem passenden Waschprogramm. |
|||||
|
|
erfolgen. |
|
||||
|
|
• Waschen Sie bunte und weiße Textilien nicht zusammen. |
|||||
|
• |
Der Netzstecker muss nach der Installation frei zugänglich |
|||||
|
|
bleiben. |
|
Neue, intensiv gefärbte Baumwollsachen (z. B. schwarze |
|||
|
|
|
Jeans) können beim Waschen stark abfärben.Waschen |
||||
|
• |
Falls Ihre Stromversorgung mit einer geringeren als |
|
||||
|
|
Sie solche Wäschestücke grundsätzlich separat. |
|||||
|
|
einer 16 A-Sicherung ausgestattet ist, lassen Sie eine |
|
||||
|
|
• |
Hartnäckige Verschmutzungen müssen vor dem Waschen |
||||
|
|
16 A-Sicherung durch einen qualifizierten Elektriker |
|||||
|
|
|
richtig behandelt werden. Fragen Sie im Zweifelsfall bei |
||||
|
|
installieren. |
|
||||
|
|
|
einer chemischen Reinigung nach. |
||||
|
• |
Die im Abschnitt „Technische Daten“ angegebene |
|
||||
|
• Verwenden Sie ausschließlich Färbemittel oder Mittel zur |
||||||
|
|
Spannung muss mit Ihrer Netzspannung übereinstimmen. |
|||||
|
• |
Schließen Sie das Gerät nicht über Verlängerungskabel |
|
Kalkentfernung, die sich ausdrücklich zur Verwendung in |
|||
|
|
der Waschmaschine eignen. Beachten Sie dabei immer |
|||||
|
|
oder Mehrfachsteckdosen an. |
|
||||
|
|
|
die Hinweise auf der Verpackung. |
||||
|
|
|
|
|
|
|
|
|
B |
Warnung: Beschädigte Netzkabel müssen durch den |
|
• |
Waschen Sie Hosen und empfindliche Kleidungsstücke |
||
|
autorisierten Kundendienst ersetzt werden. |
|
|
„auf links“, also mit der Innenseite nach außen. |
|||
|
|
|
|
|
|
• |
Legen Sie Wäschestücke aus Angorawolle vor dem |
|
|
|
|
|
|
||
|
Gerät transportieren |
|
Waschen ein paar Stunden in das Gefrierfach Ihres |
||||
1. |
Ziehen Sie grundsätzlich den Netzstecker, bevor Sie das |
|
Kühlschranks. Dadurch bilden sich weniger Knötchen im |
||||
|
|
Gerät transportieren oder verrücken. |
|
Material. |
|||
2. |
Trennen Sie Wasserablauf und Wasserzulauf (Hahn zuvor |
• Wäsche, die mit Substanzen wie Mehl, Kalk, Milchpulver |
|||||
|
|
schließen). |
|
oder ähnlichen Dingen verunreinigt wurde, muss zuvor |
|||
3. |
Lassen Sie sämtliches noch im Gerät verbliebenes |
|
gründlich ausgeschüttelt werden, bevor sie in die |
||||
|
|
Wasser ab. |
|
Maschine gegeben wird.Andernfalls können sich staub- |
|||
4. |
Bringen Sie die Transportsicherungsbolzen wieder an; |
|
oder pulverförmige Substanzen innerhalb der Maschine |
||||
|
|
lesen Entfernen der Bolzen, gehen Sie entsprechend in |
|
ablagern und im Laufe der Zeit Schäden verursachen. |
|||
|
|
umgekehrter Reihenfolge vor. |
3.3 Tipps zum Energiesparen |
||||
|
C |
Transportieren Sie das Gerät niemals ohne korrekt |
|
Die folgenden Hinweise helfen Ihnen, Ihr neues Gerät |
|||
|
|
ökologisch sinnvoll und energiesparend einzusetzen. |
|||||
|
angebrachte Transportsicherungen! |
|
|||||
|
|
|
|
|
|
• |
Nutzen Sie möglichst die maximale Beladung des |
|
|
|
|
|
|
|
jeweiligen Programms – dabei jedoch nicht überladen. |
|
A |
Warnung: Verpackungsmaterialien können eine |
|
|
|||
|
|
|
Schauen Sie sich die „Programmund Verbrauchstabelle“ |
||||
|
Gefahr für Kinder darstellen. Lagern Sie sämtliche |
|
|
||||
|
|
|
an. |
||||
|
|
|
Verpackungsmaterialien an einem sicheren Ort und |
|
|
||
|
|
|
|
• |
Halten Sie sich immer an die Hinweise auf den |
||
|
|
|
außerhalb der Reichweite von Kindern. |
|
|||
|
|
|
|
|
|
|
Waschmittelpackungen. |
3 |
Vorbereitung |
• Waschen Sie leicht verschmutzte Wäsche bei niedrigen |
|||||
|
Temperaturen. |
||||||
|
3.1 Wäsche sortieren |
• Nutzen Sie schnelle Programme, wenn Sie nur geringe |
|||||
|
|
Mengen leicht verschmutzter Wäsche waschen. |
|||||
|
• |
Sortieren Sie die Wäsche nach Textilientyp, Farbe, |
|
||||
|
• Verzichten Sie bei nur leicht verschmutzter Wäsche auf |
||||||
|
|
Verschmutzungsgrad und zulässiger Waschtemperatur. |
|||||
|
|
|
Vorwäsche und hohe Temperaturen. |
||||
|
• |
Halten Sie sich grundsätzlich an die Angaben auf den |
|
||||
|
• Wenn Sie Ihre Wäsche in einem Wäschetrockner trocknen |
||||||
|
|
Pflegeetiketten. |
|||||
|
|
|
möchten, wählen Sie beim Waschen die höchstmögliche |
||||
|
3.2 Wäsche zum Waschen vorbereiten |
|
|||||
|
|
Schleudergeschwindigkeit. |
|||||
|
• |
Wäsche mit Metallteilen wie Büstenhalter, Gürtelschnallen |
• Verwenden Sie nicht mehr Waschmittel als auf der |
||||
|
|
und Metallknöpfe beschädigen die Maschine. Entfernen |
|
Waschmittelverpackung angegeben. |
|||
|
|
Sie die Metallteile oder waschen Sie die Textilien in einem |
3.4 Erst Inbetriebnahme |
||||
|
|
Wäschebeutel oder Kissenbezug. |
Bevor Sie Ihr neues Gerät zum ersten Mal benutzen, machen |
||||
|
• |
Leeren Sie sämtliche Taschen komplett aus, entfernen |
|||||
|
Sie sich unbedingt mit den Abschnitten „Wichtige Hinweise |
||||||
|
|
Sie Münzen, Kugelschreiber, Büroklammern, |
|||||
|
|
zu Ihrer Sicherheit“ / „ Wichtige Hinweise zur Sicherheit und |
|||||
|
|
Papiertaschentücher und ähnliche Dinge, bevor Sie die |
|||||
|
|
zum Umweltschutz“ und „Installation/Aufstellung“ vertraut. |
|||||
|
|
Wäsche in die Maschine geben. Drehen Sie Taschen auf |
|||||
|
|
Bereiten Sie die Maschine entsprechend vor, indem Sie |
|||||
|
|
links, entfernen Sie Fusseln. Fremdkörper können das |
|||||
|
|
zuerst das Trommelreinigung-Programm ausführen. |
|||||
|
|
Gerät beschädigen und zu starken Betriebsgeräuschen |
|||||
|
|
Falls Ihr Gerät nicht mit einem Trommelreinigung- |
|||||
|
|
führen. |
|||||
|
|
|
|
||||
23 / 76 DE |
|
|
|
Waschmaschine / Bedienungsanleitung |
|||
|
|
|
|
|
|
|
|
 Loading...