


User Guide
English ( 3 – 12 )
Guía del usuario
Español ( 13 – 22 )
Guide d'utilisation
Français ( 23 – 32 )
Guida per l'uso
Italiano ( 33 – 42 )
Benutzerhandbuch
Deutsch ( 43 – 52 )
Appendix
English ( 53 )
User Guide (English)
Introduction
Box Contents
MPX16 |
Visit akaipro.com/mpx16 to download |
MPX File Conversion Utility (download) |
the MPX File Conversion Utility. |
|
Power Adapter
User Guide
Safety & Warranty Manual
Support
For the latest information about this product (system requirements, compatibility information, etc.) and product registration, visit akaipro.com/mpx16.
For additional product support, visit akaipro.com/support.
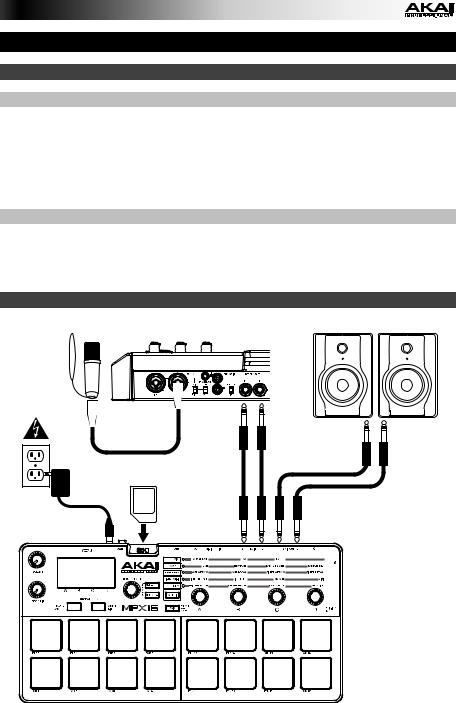
Quick Start / Connection Diagram
Microphone |
Audio interface, |
Monitors, loudspeakers, etc. |
mixer, etc. |
|
|
|
|
SD |
SD card |
Power |
|
Items not listed under the Box Contents are sold separately.
3
Features
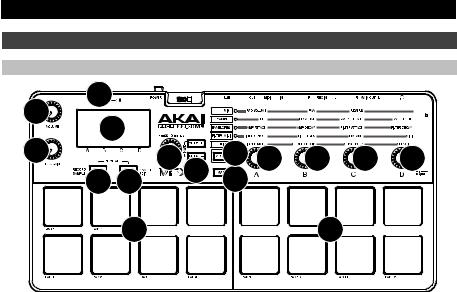
Top Panel
5 |
7 |
|
|
|
|
|
|
|
|
1 |
|
|
|
|
|
|
|
|
|
6 |
|
|
|
11 |
|
|
|
|
|
|
|
2 |
3 |
12 |
12 |
12 |
12 |
||
|
8 |
9 |
|
4 |
|
|
|
|
10


 10
10


1.Display: This screen shows the current parameters, values, etc., depending on your current operation.
2.Value Dial: Turn this knob to change the currently selected value shown in the display. Press and hold this knob while turning it or the Parameter Knobs to move by increments of 10.
3.Select +/–: Press these buttons to move to the next or previous parameter or setting shown in the display.
Press both buttons simultaneously to save a kit. See Operation > Saving Kits to learn more.
4.Main: Press this button to return to the main screen in the display.
Press and hold this button while connecting MPX16's USB Port to your computer's USB port to access an SD card inserted into MPX16's SD Card Slot. See Operation > Using MPX16 as an SD Card Reader to learn more.
5.Volume: Turn this knob to adjust the volume of the Main Out and Headphone Out.
6.Rec Gain: Turn this knob to adjust the level of the incoming signal being recorded. This affects the Rec In.
7.Microphone: Record audio into this built-in microphone. The microphone will be automatically disabled if a cable is connected to either Rec In jack.
8.Record Sample: Press this button to enter Record Sample Mode. See Operation > Recording Samples to learn more.
Press this button and Sample Edit simultaneously to silence all sounds playing from MPX16 immediately.
9.Sample Edit: Press this button to Sample Edit Mode. See Operation > Editing Samples to learn more.
Press this button and Record Sample simultaneously to silence all sounds playing from MPX16 immediately.
4
10.Pads: Press these pads to trigger the samples on an inserted SD card (sold separately). The pads are velocity-sensitive, which makes them very responsive and intuitive to play. See Operation > Editing Pads to learn more.
The pads light up different colors to indicate their current states:
•Off (no color): The pad has no sample assigned to it.
•Amber: The pad has a sample assigned to it.
•Green: The pad's assigned sample is currently playing.
•Red: The pad is currently being edited (whether or not a sample is assigned to it).
11.Pad Edit: Press this button to cycle through the available parameters that the knobs control. See Operation > Editing Pads section to learn more.
12.Parameter Knobs: Turn these knobs to adjust the currently selected parameter shown above each one. See Operation > Editing Pads chapter to learn more.
Rear Panel


 4
4


 9
9 
 8
8
 5
5 6 7
6 7


 3
3


 1 2
1 2


1.DC In: If you do not want to use a computer in your setup (i.e., if you are using MPX16 to control an external MIDI module), connect this jack to a power outlet using the included power adapter (5.8V DC, 860mA, center-positive). Alternatively, you can connect MPX16's USB Port to a power outlet using a standard USB charger (sold separately).
2.Power Button: Press this button to power MPX16 on or off.
3.USB Port: Use a standard USB cable to connect this USB port to your computer. The computer's USB port provides ample power to MPX16, though you may use the included power adapter instead. You can also power MPX16 by connecting this USB port to a power outlet using a standard USB charger (sold separately). This connection is also used to send and receive MIDI data to and from your computer.
4.SD Card Slot: Insert a standard SD card containing samples into this slot. Use the MPX File Conversion Utility (downloadable for free at akaipro.com/mpx16) to load samples onto an SD card. If you choose to load samples to an SD card without using the MPX File Conversion Utility, please see Operation > Editing Samples to make sure they are formatted properly.
5.Rec In: Use standard 1/4" (6.35mm) TRS cables to connect these inputs to an external audio source to record into MPX16. Control the input recording level with the Rec Gain knob. If you want to record a mono source instead of a stereo one, connect to the left (L) input only. Connecting a cable to either of these jacks automatically disables the
Microphone.
6.MIDI In: Use a standard five-pin MIDI cable to connect this MIDI In to the MIDI Out of an external MIDI device (e.g., another MIDI controller).
7.MIDI Out: Use a standard five-pin MIDI cable to connect this MIDI Out to the MIDI In of an external MIDI device (e.g., a synthesizer, sequencer, drum machine, etc.).
8.Main Out: Use standard 1/4" (6.35 mm) TS cables to connect these outputs to a speaker or amplifier system. For mono sound, connect a cable to the left (L) output only. Adjust the volume of these outputs with the Volume knob.
9.Headphone Out: Connect standard 1/4" (6.35 mm) stereo headphones to connect this output. Adjust the volume of this output with the Volume knob.
5
Operation
Introduction
MPX16 manages your samples, pads, and their settings by storing them in kits. This chapter covers the following topics:
Display Overview
Selecting Kits
Recording Samples
Editing Samples
Editing Pads
Saving Kits
Using MPX16 as a USB-MIDI Controller
Using MPX16 as an SD Card Reader
Display Overview
This is an overview of MPX16's display on its Main screen. Use the Select +/– buttons to move the cursor between the different fields, and use the Value Dial to change the currently selected field's setting or value.
KIT:i06 LOC: INT
003: 808 HH O
P01 EDIT: MIX VOL PAN REV CMP 100 C 100 100
Kit: The number of the preset, either a Internal Kit (with an "i" prefix) or a User Kit (with an "e" prefix).
Sample Location (Loc): Displays the sample location, either MPX16's internal sample library or an inserted SD card (sold separately).
Sample Name: Displays the name of the selected sample from MPX16's internal sample library or an inserted SD card (sold separately).
Pad Edit: Displays the currently selected pad and the parameter type: Mix, Sample (Smple),
Envelopes (Envs), Filter/MIDI (Filt), or Utility (Util). Select a pad by pressing it. Select the parameter type by pressing the Pad Edit button.
Parameters: Displays the four parameters currently controlled by the four Parameter Knobs. These will vary depending on the parameter type.
Selecting Kits
A "kit" includes each pad’s sample location, name and/or number, and its parameters.
To select a Kit:
1.Use the Select +/– buttons to move the cursor to the Kit field.
2.Use the Value Dial to scroll through the kit numbers. (Internal kits have an "i" prefix, and user kits have an "e" prefix.)
3.When the desired kit number is shown, wait a few seconds. The kit will load automatically.
6
Recording Samples
Record Sample Mode lets you record a sample to a connected SD card using the built-in Microphone or Rec In jacks. Samples are saved as WAV files.
Important: You must have an SD card inserted into the SD Card Slot to enter Record Sample Mode.
To enter or exit Record Sample Mode, press the Record Sample button.
This is an overview of MPX16's display on its Record Sample screen. Use the Select +/– buttons to move the cursor between the different fields, and use the Value Dial to change the currently selected field's setting or value.
•Monitor (Mon): Determines whether the recorded audio will be sent to the Main Out/Headphone Out (On), or neither (Off).
Record Sample
Mon:Off
Source: MONO L Thresh: -10 dB Press Enter> ARM
|
•Source: Determines from where the sample is recorded. When set to Mono L, the signal will be recorded in mono from the left Main Out jack only. When set to Mono R, the signal will be recorded in mono from the right Main Out jack only. When set to Stereo, the signal will be recorded in stereo from both Main Out jacks.
•Threshold (Thresh): Determines how loud the signal must be before MPX16 begins recording. The available range is -60 dB to 0 dB. Alternatively, you can disable the threshold (Off), which lets you begin recording immediately after pressing the Value Dial.
To record a sample:
1.Press the Value Dial.
If a Threshold is set, MPX16 will begin recording when the incoming audio signal exceeds the Threshold. Alternatively, you can simply press the Value Dial once more to start recording immediately.
If the Threshold is Off, press the Value Dial to star recording immediately.
2.Stop recording by pressing the Value Dial once more.
To keep the recorded sample, press the Value Dial again. Use the Select +/– buttons to move the cursor and use the Value Dial to change the character.
To discard the recorded sample and try again, press Record Sample.
3.After naming the sample, you will be asked to assign the sample to a pad.
To assign the sample to a pad, press the desired pad, and then press the Value Dial. This will replace the sample on that pad with the one you just saved.
Armed...
Mon:Off
Source: MONO L
Thresh: -10 dB
Enter> Start!
|
Recording...
Mon:Off
Source: MONO L
Thresh: -10 dB
Enter> Stop
|
Name Sample...
SAMPLE001
Press ENTER>Keep
Press REC >Redo
To keep the sample but not assign it to a pad yet, press the Main button.
7

Editing Samples
Sample Edit Mode lets you apply various editing processes to sample on a connected SD card.
Important: You must have an SD card inserted into the SD Card Slot to enter Sample Edit Mode.
To enter or exit Sample Edit Mode, press the Sample Edit button, and then use the Value Dial to select the sample in the Sample field.
To select a different pad, press the Sample Edit button to exit Sample Edit Mode, and then repeat the process above.
This is an overview of MPX16's display on its Sample Edit screen. Use the Select +/– buttons to move the cursor between the different fields, and use the Value Dial to change the currently selected field's setting or value.
•Sample Name: Displays the name of the selected sample from an inserted SD card.
•Edit Process: Displays the current edit process:
Sample:808 HH O
Normalize
ST: 000,000,000
END: 000,000,000
Execute?>No
oCopy to New: This process copies the sample audio to a new sample file. The new sample will have a subsequent number in its name to distinguish it from the original.
oRename: This process lets you edit the sample's name. If you enter a name of a sample that is already stored on your SD card, you will be asked if you want to overwrite that sample or return to the previous screen.
oDelete: This process lets you delete the sample from the SD card. You will be asked to confirm the deletion or to cancel and return to the previous screen.
oFade In: This process gradually fades in the sample's audio using a logarithmic curve, starting from –∞ dB at the start point and up to full volume at the end point.
oFade Out: This process gradually fades out the sample's audio using a logarithmic curve, starting from full volume at the start point and down to –∞ dB at the end point.
oExtract to New: This process uses the sample audio between the start point and end point to create a new sample file. The new sample will have a subsequent number in its name to distinguish it from the original.
oDiscard: This process crops the sample, deleting any audio between its start point and end point.
oStereo>Mono: This process converts a stereo sample into a mono sample. When Left is the source, only the left channel will be used. When Right is the source, only the right channel will be used. When Sum is the source, the left and right channels will be summed.
oNormalize: This process measures amplitude across the sample and adjusts its overall volume so the sample's peak is at 0 dB.
oReverse: This process causes the sample to play backwards.
•Sample Start Point (St): You can adjust this setting for edit processes that can be applied to a specific segment of the sample.
•Sample Start Point (End): You can adjust this setting for edit processes that can be applied to a specific segment of the sample.
•Execute: For edit processes that require confirmation, press the Value Dial to confirm you want to apply the process (Yes) or cancel it (No).
8

About Formats
You can use MPX16 to trigger your own samples instead of the ones in MPX16's internal sample library, but make sure your files and SD card are formatted correctly for MPX16 to use.
Load the sample files onto an SD card (sold separately) by doing one of the following:
•inserting an SD card into MPX16's SD Card Slot, and then use MPX16 an SD card reader (see Using MPX16 as an SD Card Reader to learn how to do this). After that, use the MPX File Conversion Utility (downloadable for free at akaipro.com/mpx16).
•using a third-party SD card reader.
Please note the following (especially if you do not use the MPX File Conversion Utility):
•The samples files must be 16-bit, mono or stereo WAVs. They can have a sample rate of 48, 44.1, 32, 22.05, or 11.205 KHz.
•The sample files must be located in the root (main) directory of the card and not in any subdirectories.
•You can use an SD card or SDHC card with a capacity up to 32 GB.
•We recommend formatting your SD card to a FAT32 file system (if it is not already) and naming your sample files according to this format. This means:
•Do not use any of these characters: " * / \ : < > ? |
•Do not use spaces.
•Limit your file name to 8 characters, if possible.
•Up to 512 files can be stored in the root directory of the card.
•You can assign up to 48 MB worth of samples onto MPX16's pads at a time (the sample library on your SD card can be larger, of course). Also, please note that a sample's size will be rounded up when loaded (e.g., a 2.1 MB sample on the SD card will be treated as a 3 MB sample when it is assigned to a pad).
9

Editing Pads
To edit a pad's parameters, press the Pad Edit button to cycle through the available parameter families, and then use Parameter Knobs A–D to adjust their corresponding parameters.
Parameter |
Parameter |
Description |
Range/Options |
|
Family |
|
|
|
|
|
|
|
|
|
Mix |
A: Volume (Vol) |
The maximum output level of the pad. |
000 – 100 |
|
|
B: Pan |
The position of the pad's sample in |
Center (Ctr), |
|
|
|
the stereo field. |
L50 |
– R50 |
|
C: Reverb (Rvb) |
The amount of reverb applied to the |
000 |
– 100 |
|
|
pad. (At 100, the signal is an equal |
|
|
|
|
blend of the wet and dry signals.) |
|
|
|
|
|
|
|
|
|
|
|
|
Sample |
A: Tuning (Tun) |
The pitch of the pad. |
-12 to +12 |
|
|
|
|
semitones |
|
|
B: Envelope>Tuning (E>T) |
How much the filter envelope affects |
000 |
– 100 |
|
|
the pad's pitch. (When set to 100, the |
|
|
|
|
envelope will add 12 semitones to the |
|
|
|
|
sample's pitch.) |
|
|
|
C: Sample Start (St.) |
An offset for the start point of the |
000 |
– 999 |
|
|
sample on the pad. Higher values |
|
|
|
|
move the start point forward in the |
|
|
|
|
sample. This does not affect the |
|
|
|
|
actual sample file or the same sample |
|
|
|
|
assigned to other pads. |
|
|
|
D: Sample End (End) |
An offset for the end point of the |
000 |
– 999 |
|
|
sample on the pad. Higher values |
|
|
|
|
move the end point backward in the |
|
|
|
|
sample. This does not affect the |
|
|
|
|
actual sample file or the same sample |
|
|
|
|
assigned to other pads. |
|
|
|
|
|
|
|
|
|
|
|
|
Envelopes |
A: Filter Attack (F.A) |
The attack setting of the filter |
000 |
– 100 |
|
|
envelope for the pad. This also |
|
|
|
|
depends on the Trigger Mode setting |
|
|
|
|
(see the Utility parameters below). |
|
|
|
B: Filter Decay (F.D) |
The decay setting of the filter |
Off, |
|
|
|
envelope for the pad. This also |
000 |
– 999 |
|
|
depends on the Trigger Mode setting |
|
|
|
|
(see the Utility parameters below). |
|
|
|
C: Amplitude Attack (A.A) |
The attack setting of the amplitude |
000 |
– 100 |
|
|
envelope for the pad. This also |
|
|
|
|
depends on the Trigger Mode setting |
|
|
|
|
(see the Utility parameters below). |
|
|
|
D: Amplitude Decay (A.D) |
The decay setting of the amplitude |
Off, |
|
|
|
envelope for the pad. This also |
000 |
– 999 |
|
|
depends on the Trigger Mode setting |
|
|
|
|
(see the Utility parameters below). |
|
|
|
|
|
|
|
10
Parameter |
Parameter |
Description |
Range/Options |
|
|
||||
Family |
|
|
|
|
|
|
|
|
|
Filter/MIDI |
A: Cutoff (Cut) |
The cutoff setting of the 4-pole low- |
000 – 100 |
|
|
|
pass filter. |
|
|
|
B: Resonance (Res) |
The resonance setting of the 4-pole |
000 – 100 |
|
|
|
low-pass filter. |
|
|
|
C: Envelope>Filter (E>F) |
How much the filter envelope affects |
000 – 100 |
|
|
|
the current pad's filter cutoff. (When |
|
|
|
|
set to 100, the envelope level will be |
|
|
|
|
added to the cutoff value.) |
|
|
|
D: MIDI Note (MID) |
The MIDI note sent and received by |
000 – 127 |
|
|
|
the pad. |
|
|
|
|
|
|
|
|
|
|
|
|
Utility |
A: Trigger Mode (Trg) |
How the pad will play its sample when |
One Shot (1Sh), |
|
|
|
pressed, which also affects the filter |
Loop (Lp), |
|
|
|
and amplitude envelopes: |
Hold (Hld) |
|
|
|
One-Shot: When you press the pad, |
|
|
|
|
|
|
|
|
|
the entire sample will play. |
|
|
|
|
Loop: When you press and hold the |
|
|
|
|
pad, the sample will loop until you |
|
|
|
|
release it. |
|
|
|
|
Hold: When you press the pad, the |
|
|
|
|
sample will loop until you press the |
|
|
|
|
pad again. |
|
|
|
B: Choke Group (C.G) |
The pad's choke group. When you |
01 – 16 |
|
|
|
press a pad in a choke group, all |
|
|
|
|
samples assigned to other pads in that |
|
|
|
|
choke group will stop playing. |
|
|
|
C: Mono/Poly (M/P) |
How the pad plays a second instance |
Mono (Mon), |
|
|
|
of its sample if you press it again |
Poly (Pol) |
|
|
|
before its sample finishes playing. |
|
|
|
|
Mono: Pressing the pad before its |
|
|
|
|
sample is finished will cause the |
|
|
|
|
sample to restart. |
|
|
|
|
Poly: Pressing the pad before the |
|
|
|
|
sample is finished will trigger a second |
|
|
|
|
instance of the sample. |
|
|
|
D: Velocity (Vel) |
How the pad will respond to velocity |
On, |
|
|
|
(how hard you press it). |
Off |
|
|
|
On: The force with which you hit the |
|
|
|
|
pad affects its playback volume. |
|
|
|
|
Off: Pressing the pad will play the |
|
|
|
|
sample at full volume. |
|
|
|
|
|
|
|
11

Saving Kits
If you change the currently selected kit, you will lose any changes you have made when you load different kit unless you save it.
To save the current kit:
1.Press both Select +/– buttons simultaneously. The display will ask if you want to save the current kit.
2.Use the Value Dial to select Overwrite or Copy.
If you select Overwrite, press the Value Dial to save all changes to the current kit, or press any other button to cancel.
If you select Copy, press the Value Dial to save all changes to a new kit, or press any other button to cancel.
MPX16 will save the kit to the next available user kit number (e.g., if you have 12 user kits already saved on the SD card, the next user kit will be e13).
Using MPX16 as a USB-MIDI Controller
To use MPX16 as a MIDI controller, use a standard USB cable to connect its USB Port to your computer's USB port, and then power it on. MPX16's pads will send and receive MIDI note messages to and from your computer. (The same MIDI note messages will also be sent out of MPX16's MIDI Out jack.)
Using MPX16 as an SD Card Reader
To use MPX16 as a SD card reader, use a standard USB cable to connect its USB Port to your computer's USB port, and then power it on while pressing and holding its Main button. The computer will recognize a connected SD card as a mass-storage device. (MPX16 cannot be used in its normal operation while being used as an SD card reader.)
Important: If you are loading sample files onto the SD card for MPX16 to use later, please make sure they are formatted correctly. See Operation > Editing Samples > About Formats to learn more.
12

Guía del usuario (Español)
Introducción
Contenido de la caja
MPX16 |
Visite akaipro.com/mpx16 para descargar |
MPX File Conversion Utility (descargar) |
el software MPX File Conversion Utility. |
|
Adaptador de corriente
Guía del usuario
Manual sobre la seguridad y garantía
Soporte
Para obtener la información más completa acerca de este product (los requisitos del sistema, compatibilidad, etc.) y registro del producto, visite akaipro.com/mpx16.
Para soporte adicional del producto, visite akaipro.com/support.
Diagrama de instalación y conexión rápida
Microfóno |
Interfaz de audio, |
Monitores, altavoces, etc. |
|
mezclador, etc. |
|
SD Tarjeta SD |
Alimentación |
Los elementos que no se enumeran en Contenido de la caja se venden por separado.
13

Características
Panel superior
5 |
7 |
|
|
|
|
|
|
|
|
1 |
|
|
|
|
|
|
|
|
|
6 |
|
|
|
11 |
|
|
|
|
|
|
|
2 |
3 |
12 |
12 |
12 |
12 |
||
|
8 |
9 |
|
4 |
|
|
|
|
10


 10
10


1.Pantalla: Esta pantalla muestra los parámetros, valores, etc. actuales, dependiendo de su operación actual.
2.Cuadrante de valores: Gire esta perilla para cambiar el valor actualmente seleccionado que se muestra en la pantalla. Mantenga pulsada esta perilla mientras la gira o gira las perillas de parámetro para moverse de a incrementos de 10.
3.Selección +/–: Pulse estos botones para moverse al parámetro o ajuste siguiente o anterior que se muestra en la pantalla.
Pulse ambos botones simultáneamente para guardar un kit Consulte Funciones > Cómo guardar los kits para aprender más.
4.Pantalla principal: Pulse este botón para regresar a la pantalla principal.
Mantenga pulsado este botón mientras conecta el puerto USB del MPX16 al puerto USB de su ordenador para acceder a la tarjeta SD insertada en la ranura para tarjeta SD del MPX16. Consulte Funciones > El MPX16 como lector de tarjeta SD para aprender más.
5.Volumen: Gire esta perilla para ajustar el volumen de la salida Main Out (Principal) y de la salida para auriculares.
6.Ganancia de grabación: Gire esta perilla para ajustar el nivel de la señal entrante que se está grabando. Esto afecta las entradas de Rec In (Entrada de grabación).
7.Micrófono: Grabe audio con este micrófono incorporado. El micrófono se desactivará automáticamente si se conecta un cable en alguno de los conectores Rec In.
8.Grabación de muestra: Pulse este botón para entrar al modo Grabación de muestra. Consulte Funciones > Grabación de muestras para aprender más.
Pulse este botón y Sample Edit (Edición de muestra) simultáneamente para silenciar inmediatamente todos los sonidos que reproduce el MPX16.
9.Edición de muestra: Pulse este botón para entrar al modo Edición de muestra. Consulte
Funciones > Edición de muestras para aprender más.
Pulse este botón y Record Sample (Grabación de muestra) simultáneamente para silenciar inmediatamente todos los sonidos que reproduce el MPX16.
14

10.Pads: Pulse estos pads para disparar las muestras de la tarjeta SD insertada (la tarjeta se vende por separado). Los pads son sensibles a la velocidad, lo que los hace de rápida respuesta y muy intuitivos para tocar. Consulte Funciones > Edición de pads para aprender más.
Los pads se iluminan de diferentes colores para indicar su estado actual:
•Apagado (sin color): El pad no tiene ninguna muestra asignada.
•Ámbar: El pad tiene ninguna muestra asignada.
•Verde: La muestra asignada al pad se está reproduciendo actualmente.
•Rojo: El pad está siendo editado actualmente (independientemente de si se le asignó una muestra o no).
11.Edición de pad: Pulse este botón para alternar entre los parámetros disponibles que controlan las perillas. Consulte la sección Funciones > Edición de pads para aprender más.
12.Perillas de parámetros: Gire estas perillas para ajustar el parámetro actualmente seleccionado que se muestra por encima de cada una de ellas. Consulte Funciones > Edición de pads para aprender más.
Panel trasero


 4
4


 9
9 
 8
8
 5
5 6 7
6 7

 3
3


 1 2
1 2


1.Entrada de CC: Si no desea utilizar un ordenador en su configuración (por ejemplo, si está utilizando el MPX16 para controlar un módulo MIDI externo), conecte este conector a una toma de corriente utilizando el adaptador de corriente incluido (5.8 V CC, 860 mA, centro positivo). Como alternativa, puede conectar el puerto USB del MPX16 a un tomacorriente utilizando un cargador USB estándar (que se vende por separado).
2.Botón de encendido: Pulse este botón para encender o apagar el MPX16.
3.Puerto USB: Utilice un cable USB estándar para conectar este puerto USB a su ordenador. El puerto USB del ordenador suministra suficiente corriente al MPX16, aunque puede utilizar en su lugar el adaptador de corriente incluido. También puede alimentar el MPX16 conectando este puerto USB a un tomacorriente utilizando un cargador USB estándar (que se vende por separado). Esta conexión también se utiliza para enviar y recibir datos MIDI desde y hacia su ordenador.
4.Ranura para tarjeta SD: Inserte una tarjeta SD estándar con muestras en esta ranura. Utilice el software MPX File Conversion Utility (que se descarga gratis desde akaipro.com/mpx16) para cargar muestras en la tarjeta SD. Si prefiere cargar muestras a la tarjeta SD sin utilizar el MPX File Conversion Utility, consulte Funcionamiento > Edición de muestras para asegurarse de que esté formateada correctamente.
5.Entrada de grabación: Utilice cables TRS estándar de 1/4 pulg. (6,35 mm) para conectar estas entradas a una fuente de audio externa para grabar con el MPX16. Controle en nivel de entrada de grabación con la perilla Rec Gain (Ganancia de grabación). Si desea grabar una fuente mono en lugar de una estéreo, conecte solamente la entrada izquierda (L). Al conectar un cable a cualquiera de estos conectores, el micrófono se desactivará automáticamente.
6.Entrada MIDI: Utilice un cable MIDI estándar de cinco patillas para conectar esta entrada MIDI a la salida MIDI de un dispositivo MIDI externo (por ejemplo, otro controlador MIDI).
7.Salida MIDI: Utilice un cable MIDI estándar de cinco patillas para conectar esta salida MIDI a la entrada MIDI de un dispositivo MIDI externo (por ejemplo, un sintetizador, secuenciador, caja de ritmos, etc.).
8.Salida principal: Use cables TRS estándar de 1/4 pulg. (6,35 mm) para conectar estas salidas a un altavoz o sistema de amplificador. Para obtener sonido monofónico, conecte un cable solamente a la salida izquierda (L). Ajuste el nivel de estas salidas con la perilla Volume (Volumen).
9.Salida para auriculares: Conecte auriculares estéreo estándar de 1/4 pulg (6,35 mm) a esta salida. Ajuste el nivel de esta salida con la perilla Volume.
15

Funciones
Introducción
El MPX16 administra sus muestras, pads y sus ajustes almacenándolos en kits. Este capítulo cubre los siguientes temas:
Reseña general de la pantalla
Selección de kits
Grabación de muestras
Edición de muestras
Edición de pads
Cómo guardar los kits
El MPX16 como controlador USB-MIDI
El MPX16 como lector de tarjeta SD
Reseña general de la pantalla
Esta es una reseña general de lo que muestra el MPX16 en su pantalla Principal. Utilice los botones Select +/– (Selección +/-) para mover el cursor entre los diferentes campos y utilice el cuadrante de valor para cambiar el ajuste o valor del campo seleccionado actualmente.
KIT:i06 LOC: INT
003: 808 HH O
P01 EDIT: MIX VOL PAN REV CMP 100 C 100 100
Kit: El número del preset, ya sea un kit interno (con prefijo "i") o un kit del usuario (con un prefijo "e").
Ubicación de la muestra (Loc): Indica la ubicación de la muestra, ya sea en la biblioteca de muestras interna del MPX16 o en la tarjeta SD insertada (que se vende por separado).
Nombre de la muestra: Indica el nombre de la muestra seleccionada en la biblioteca de muestras interna del MPX16 o en la tarjeta SD insertada (que se vende por separado).
Edición de pad: Indica el pad actualmente seleccionado y el tipo de parámetro: Mezcla,
Muestra (Smple), Envolventes (Envs), Filtro/MIDI (Filt) o Utilidades (Util). Seleccione un pad pulsándolo. Seleccione el tipo de parámetro pulsando el botón Pad Edit (Edición de pad).
Parámetros: Indica los cuatro parámetros controlados actualmente por las cuatro perillas de parámetros. Estas varían según el tipo de parámetro.
Selección de kits
Un "kit" incluye la ubicación, nombre y/o número de la muestra de cada pad y sus parámetros.
Para seleccionar un kit:
1.Utilice los botones Select +/– para mover el cursor hasta el campo Kit.
2.Utilice el cuadrante de valor para desplazarse a través de los números de kit. (Los kits internos tienen prefijo "i" y los kits del usuario prefijo "e").
3.Cuando se muestra el número del kit deseado, espere unos segundos. El kit se cargará automáticamente.
16
Grabación de muestras
El modo Grabación de muestra le permite grabar una muestra en una tarjeta SD conectada utilizando el micrófono incorporado o los conectores Rec In. Las muestras se graban como archivos WAV.
Importante: Debe tener una tarjeta SD insertada en la ranura para tarjetas SD para entrar al modo de Grabación de muestra.
Para entrar o salir del modo Grabación de muestra, pulse el botón Record Sample.
Esta es una reseña general de lo que muestra el MPX16 en su pantalla Record Sample. Utilice los botones Select +/– (Selección +/-) para mover el cursor entre los diferentes campos y utilice el cuadrante de valor para cambiar el ajuste o valor del campo seleccionado actualmente.
•Monitor (Mon): Determina si el audio grabado se enviará a las salidas Main Out / auriculares (On) o a ninguna (Off).
Record Sample
Mon:Off
Source: MONO L Thresh: -10 dB Press Enter> ARM
|
•Source (Fuente): Determina desde donde se graba la muestra. Al ajustarse a Mono L, la señal se grabará en mono desde el conector Main Out izquierdo solamente. Al ajustarse a Mono R, la señal se grabará en mono desde el conector Main Out derecho solamente. Al ajustarse a Stereo, la señal se grabará en estéreo desde ambos conectores Main Out.
•Umbral (Thresh): Determina qué tan fuerte debe ser la señal antes de que el MPX16 comience a grabar. El rango disponible es de -60 dB a 0 dB. Como alternativa, puede deshabilitar el umbral (Off), lo que le permite comenzar a grabar inmediatamente después de pulsar el cuadrante de valor.
Cómo grabar una muestra:
1.Pulse el cuadrante de valor.
Si está establecido el umbral, el MPX16 comenzará a grabar cuando la señal de audio entrante supere el umbral. Como alternativa, simplemente pulse el cuadrante de valor una vez más para comenzar a grabar inmediatamente.
Si el umbral está en Off, pulse el cuadrante de valor para comenzará a grabar inmediatamente.
2.Detenga la grabación pulsando el cuadrante de valor una vez más.
Para conservar la muestra grabada, pulse el cuadrante de valor nuevamente. Utilice los botones Select +/– para mover el cursor y utilice el cuadrante de valor para cambiar el carácter.
Para descartar la muestra grabada y volver a intentarlo, pulse
Record Sample.
3.Después de nombrar la muestra, se le pedirá que se la asigne a un pad.
Armed...
Mon:Off
Source: MONO L
Thresh: -10 dB
Enter> Start!
|
Recording...
Mon:Off
Source: MONO L
Thresh: -10 dB
Enter> Stop
|
Name Sample...
SAMPLE001
Press ENTER>Keep
Press REC >Redo
Para asignar la muestra a un pad, pulse el pad deseado y después pulse el cuadrante de valor. Esto reemplazará la muestra en ese pad con la que acaba de guardar.
Para conservar la muestra pero no asignarla a ningún pad aún, pulse el botón Main (Principal).
17
 Loading...