AKAI MPD218 User Guide

User Guide
English ( 3 – 5 )
Guía del usuario
Español ( 6 – 8 )
Guide d’utilisation
Français ( 9 – 11 )
Guida per l’uso
Italiano ( 12 – 14 )
Benutzerhandbuch
Deutsch ( 15 – 17 )
Appendix
English ( 18 )

User Guide (English)
Introduction
Box Contents
MPD218
USB Cable
Software Download Cards
User Guide
Safety & Warranty Manual
Important: Visit akaipro.com and find the webpage for MPD218 to download the MPD218 Editor Software and Preset Documentation.
Support
For the latest information about this product (system requirements, compatibility information, etc.) and product registration, visit: akaipro.com.
For additional product support, visit: akaipro.com/support.
Quick Start
1.Use the included USB cable to connect MPD218’s USB port to an available USB port on your computer (powered on).
2.On your computer, open your digital audio workstation (DAW).
3.Select MPD218 as the controller in the Preferences, Device Setup, or Options of your DAW.
Tip: You can use MPD218 with a MIDI-controllable iOS app. To do this:
1.Press and hold the Note Repeat button.
2.Connect your iOS device (powered on) to MPD218’s USB port using an Apple iPad Camera Connection Kit (sold separately).
3.After MPD218 powers on, release the Note Repeat button.
3

Features
1 2

3


 3
3


3


 3
3


 5
5


 3
3


 3
3


4 10
10


 6
6


 7
7
 9
9

 8
8


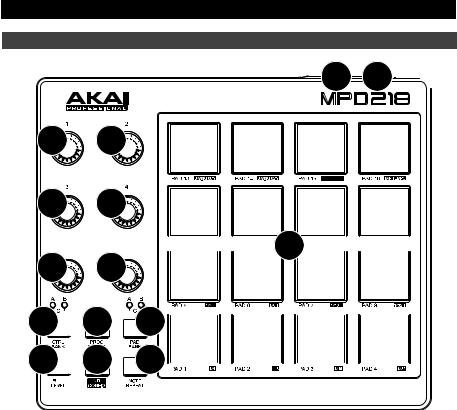
1.USB Port: Use a standard USB cable to connect this USB port to your computer. The computer’s USB port provides ample power to MPD218. This connection is also used to send and receive MIDI data to and from your computer.
2.Kensington® Lock: You may use this Kensington lock slot to secure the MPD218 to a table or other surface.
3.Potentiometers: Use these 360º knobs to send continuous controller messages to your software or external MIDI device.
4.Control Bank (Ctrl Bank): Use this button to select one of three independent banks of potentiometers. This lets you control up to 18 independent parameters.
5.Pads: Use these pads to trigger drum hits or other samples in your software or external MIDI sound module. The pads are pressureand velocity-sensitive, which makes them very responsive and intuitive to play.
6.Pad Bank: Use this button to select one of three independent banks of pads. This lets you access up to 48 different pads (16 pads across 3 pad banks).
7.Full Level: Press this button to activate Full Level Mode in which the pads always play at a maximum velocity (127), no matter how hard or soft you hit them.
4

8.Note Repeat: Press and hold this button while striking a pad to cause the pad to retrigger at a rate based on the current tempo and Time Division settings.
Tip: You can sync Note Repeat to an internal or external MIDI clock source. See the description for Note Repeat Configuration (NR Config) to learn how to do this.
9.Note Repeat Configuration (NR Config): Press this button and then press a pad to select its secondary function (printed next to the pad number).
Important: While holding this button, the pads will not send any of their normal MIDI messages.
•Pads 1–8: Press one of these pads to determine Time Division, which determines the rate of the Note Repeat feature: quarter notes (1/4), eighth notes (1/8), 16th notes (1/16), or 32nd notes (1/32). On Pads 5–8, the T indicates a triplet-based time division.
•Pads 9–14: Press one of these pads to select the amount of Swing: Off, 54%, 56%,
58%, 60%, or 62%.
•Pad 15 (Ext Clock): Press this pad to set MPD218’s clock source (external or internal), which will determine the rate of its time-related features. When lit (external), MPD218 will use your DAW’s tempo. When off (internal), MPD218 will use its own tempo, which you can set with Pad 16, which will flash at the current tempo.
•Pad 16 (Tap Tempo): Press this pad at the desired rate to enter a new tempo. MPD218 will detect the new tempo after 3 taps. The pad will flash at the current tempo if you hold NR Config and if MPD218 is using its internal clock.
10.Program Select (Prog Select): Press and hold this button and then press a pad to select the Program with the same number as the pad. A Program is a pre-mapped layout of pads, which can be useful for specific situations (using a General MIDI drum set or using a specific melodic scale).
Important:
While holding this button, the pads will not send any of their normal MIDI messages.
Visit akaipro.com and find the webpage for MPD218 to download the MPD218 Preset Documentation.
5

Guía del usuario (Español)
Introducción
Contenido de la caja
MPD218
Cable USB
Tarjetas de descarga de software
Guía del usuario
Manual sobre la seguridad y garantía
Importante: Visite en akaipro.com la página correspondiente al MPD218 para descargar el software de edición y la documentación de los presets del MPD218.
Soporte
Para obtener la información más reciente acerca de este producto (requisitos de sistema, información de compatibilidad, etc.) y registrarlo, visite: akaipro.com.
Para soporte adicional del producto, visite: akaipro.com/support.
Inicio rápido
1.Utilice el cable USB incluido para conectar el puerto USB del MPD218 a un puerto USB disponible en su ordenador (encendido).
2.Abra su estación de trabajo de audio digital (DAW) en su ordenador.
3.Seleccione MPD218 como controlador en Preferences (Preferencias), Device Setup (Configuración de dispositivo) u Options (Opciones) de su DAW.
Consejo: Puede utilizar el MPD218 con una aplicación controlable por MIDI para iOS. Para hacerlo:
1.Mantenga pulsado el botón Note Repeat (Repetición de nota).
2.Conecte su dispositivo iOS (encendido) al puerto USB del MPD218 mediante un Apple iPad Camera Connection Kit (Kit de conexión de cámara para iPad de Apple) (que se vende por separado).
3.Una vez encendido el MPD218, suelte el botón Note Repeat.
6
 Loading...