


SEMI-WEIGHTED USB/MIDI KEYBOARD CONTROLLER
HAMMER-ACTION USB/MIDI KEYBOARD CONTROLLER
OPERATOR'S MANUAL
WWW.AKAIPRO.COM
TABLE OF CONTENTS |
|
FRONT PANEL OVERVIEW ................................................................................................................ |
1 |
REAR PANEL OVERVIEW................................................................................................................... |
3 |
HOOKUP DIAGRAM ............................................................................................................................ |
3 |
DISPLAYING INFORMATION .............................................................................................................. |
5 |
OCTAVE AND TRANSPOSITION ................................................................................................. |
5 |
NOTE ............................................................................................................................................. |
5 |
NOTE AFTERTOUCH (Channel Pressure).................................................................................... |
5 |
CONTROL CHANGE ..................................................................................................................... |
5 |
CONTROL AFTERTOUCH ............................................................................................................ |
6 |
MIDI MACHINE CONTROL COMMAND (MMC)............................................................................ |
6 |
PREVIEWING ................................................................................................................................ |
6 |
ABOUT MODES ................................................................................................................................... |
7 |
PRESET MODE .................................................................................................................................... |
8 |
PAGE 1 – LOAD PRESET ............................................................................................................. |
8 |
PAGE 2 – SAVE/COPY PRESET .................................................................................................. |
8 |
PAGE 3 – NAME PRESET ............................................................................................................ |
8 |
EDIT MODE .......................................................................................................................................... |
9 |
EDIT MODE PARAMETERS ................................................................................................ |
10 |
EDITING THE KEYBOARD ......................................................................................................... |
11 |
KEYBOARD OCTAVE .......................................................................................................... |
11 |
KEYBOARD AFTERTOUCH................................................................................................. |
11 |
KEYBOARD VELOCITY ....................................................................................................... |
11 |
EDITING THE PADS.................................................................................................................... |
12 |
NOTE PARAMETERS .......................................................................................................... |
13 |
PROGRAM CHANGE PARAMETERS ................................................................................. |
14 |
EDITING KNOBS AND FADERS................................................................................................. |
15 |
CONTROL CHANGE PARAMETERS .................................................................................. |
16 |
AFTERTOUCH PARAMETERS............................................................................................ |
17 |
INCREMENT/DECREMENT PARAMETERS (knobs only)................................................... |
18 |
EDITING BUTTONS .................................................................................................................... |
19 |
CONTROL CHANGE PARAMETERS .................................................................................. |
19 |
PROGRAM CHANGE PARAMETERS ................................................................................. |
20 |
EDITING THE ARPEGGIATOR ................................................................................................... |
21 |
ARPEGGIO PARAMETERS – TYPE, RANGE, BUTTON MODE......................................... |
22 |
ARPEGGIO PARAMETERS – GATE, SWING ..................................................................... |
23 |
EDITING NOTE REPEAT ............................................................................................................ |
24 |
NOTE REPEAT BUTTON MODE ......................................................................................... |
25 |
NOTE REPEAT PARAMETERS – GATE, SWING ............................................................... |
25 |
EDITING TIME DIVISION ............................................................................................................ |
26 |
DEFAULT TIME DIVISION ................................................................................................... |
26 |
BUTTON MODE ................................................................................................................... |
26 |
EDITING THE PITCH BEND WHEEL.......................................................................................... |
27 |
EDITING THE MODULATION WHEEL........................................................................................ |
28 |
MIDI CHANNEL .................................................................................................................... |
28 |
MIDI CC ................................................................................................................................ |
28 |
MINIMUM VALUE ................................................................................................................. |
28 |
MAXIMUM VALUE................................................................................................................ |
28 |
EDITING TRANSPORT CONTROL............................................................................................. |
29 |
EDITING TAP TEMPO................................................................................................................. |
29 |
EDITING FOOTSWITCH PEDAL INPUTS................................................................................... |
30 |
EDITING EXPRESSION PEDAL INPUT...................................................................................... |
31 |
EDITING SPLIT ........................................................................................................................... |
32 |
SPLIT POINT........................................................................................................................ |
32 |
SPLIT PARAMETERS .......................................................................................................... |
32 |
GLOBAL MODE ................................................................................................................................. |
33 |
KILL MIDI – Page1....................................................................................................................... |
33 |
MIDI COMMON CHANNEL – Page 2 .......................................................................................... |
33 |
LCD CONTRAST – Page 3.......................................................................................................... |
33 |
KEYBOARD VELOCITY CURVE -- Page 4 ................................................................................. |
34 |
PAD SENSITIVITY – Page 5 ....................................................................................................... |
34 |
PAD VELOCITY CURVE – Page 6 .............................................................................................. |
34 |
PAD THRESHOLD – Page 7 ....................................................................................................... |
35 |
KEYBOARD TRANSPOSITION – Page 8.................................................................................... |
35 |
MIDI CLOCK – Page 9................................................................................................................. |
35 |
TAP TEMPO AVERAGE – Page 10............................................................................................. |
35 |
SAVE GLOBAL – Page 11........................................................................................................... |
36 |
SYSEX TX – Page 12 .................................................................................................................. |
36 |
VERSION – Page 13.................................................................................................................... |
36 |
PROGRAM CHANGE MODE ............................................................................................................. |
37 |
PROG CHANGE (Program Change)............................................................................................ |
37 |
PROG+BANK (Program Change with Bank Change) .................................................................. |
37 |
FREQUENTLY ASKED QUESTIONS ................................................................................................ |
38 |
TROUBLESHOOTING........................................................................................................................ |
39 |
TECHNICAL SPECIFICATIONS ........................................................................................................ |
40 |
CONTACT INFORMATION ................................................................................................................ |
40 |
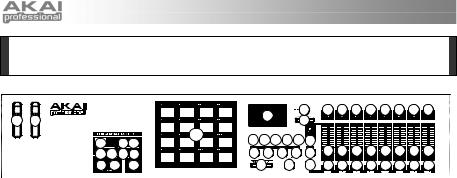
FRONT PANEL OVERVIEW
|
|
|
|
|
|
1 |
|
|
2 |
10 10 10 10 10 10 10 10 |
25 |
26 |
|
|
|
|
|
|
3 |
|
|
|
|
|
|
|
|
|
|
|||
|
|
|
|
14 |
4 |
5 |
6 7 8 13 |
|
||
|
19 |
16 17 |
|
|
||||||
|
|
|
|
|
|
|
|
|||
|
15 15 15 15 |
|
9 |
9 |
9 |
9 |
9 |
11 11 11 11 11 11 11 11 |
||
|
21 22 |
18 |
|
23 |
24 |
20 |
12 12 12 12 12 12 12 12 |
|||
1.LCD – The display is used for navigating 8. [PROGRAM CHANGE] – Pressing this
menus, displaying data, and affecting change on MPK61/MPK88’s options and parameters.
2.[VALUE] (Push to Enter) – This dial is used to increment and decrement Presets, parameter values and settings. This dial also functions as an [ENTER] button when it is pressed down.
3.[<] AND [>] BUTTONS – These buttons are used to navigate through the fields of menus and options. The [<] button also functions as a [CANCEL] button.
4.[PRESET] – This button calls up Preset Mode. You can select and recall different Preset programs in this mode.
5.[EDIT] – This button calls up Edit Mode, which allows you to edit the behavior of the keyboard, pads, knobs, buttons, faders and default settings for each preset.
6.[GLOBAL] – This button calls up Global Mode, where MIDI reset commands and global system preferences are set.
7.[PREVIEW] – This button allows you to see what value will be sent by a controller, without actually sending the value. This gives you precise control over your parameters and helps avoid erroneous controller data being sent to your devices due to the physical position of the controller. This is especially useful when switching between control banks where, for example, the physical position of a fader may not correspond to the last value sent by the controller. Holding down [PREVIEW] allows you to view the original value and adjust the physical position of the fader as necessary before transmitting any values.
button will enter Program Change mode. In this mode, you can send a Program Change or Program with Bank Change message to a hardware or software module.
9.TRANSPORT CONTROL BUTTONS –
These five buttons are dedicated buttons for sending transport control commands. The transport control buttons can be set to transmit either MMC (MIDI Machine Control), MMC/MIDI SysEx, MIDI START/STOP or pre-assigned MIDI CC values.
10.8 ASSIGNABLE KNOBS –Each 360-degree knob can be used to send continuous control data to a desktop audio workstation or external MIDI device.
11.8 ASSIGNABLE FADERS – Each fader can be used to send continuous control data to a desktop audio workstation or external MIDI device.
12.8 ASSIGNABLE BUTTONS – These buttons can be used as MIDI CC switches or Program Change switches. They can function in momentary or toggle modes. When [TIME DIVISION] has been activated, these 8 buttons are used to set the time division of the Arpeggiator and Note Repeat features.
13.[CONTROL BANK] – The MPK61/MPK88 features 3 independent banks of continuous controllers. Effectively, this allows you to control up to 72 independent parameters with the knobs, faders and buttons on the MPK61/MPK88. The [CONTROL BANK] button is used to switch among the 3 banks. The LEDs above the button will reflect the currently selected control bank.
1

14.16 MPC PRESSURE AND VELOCITY SENSITIVE PADS – The pads can be used to trigger drum hits or samples on your software or hardware module or can be configured to send Program Change messages. The pads are pressure and velocity sensitive, which makes them very responsive and intuitive to play.
15.PAD BANK buttons – These 4 buttons switch among pad banks A, B, C, D. Each bank can address a unique set of 16 sounds, giving you access of up to 64 different sounds you can trigger with the pads.
The currently selected pad bank will be indicated on the LCD display.
16.[FULL LEVEL] – When [FULL LEVEL] is activated, the pads always play back at a maximum velocity (127), no matter how hard or soft you hit them.
17. [16 LEVEL] –
When [16 LEVEL]
is activated, you can use the 16
pads to change a selected sound’s
velocity in 16
steps. When you press the [16
LEVEL] button, the
last pad that was hit gets mapped to all 16 pads. The pads will now output the same note number and pressure controller as the initial pad, but the velocity is fixed at the values shown in the diagram on the right, regardless of how hard you hit them. This allows you to have more control over the velocity of a sound.
18.[NOTE REPEAT] – Holding this button while striking a pad causes the pad to retrigger at a rate based on the current Tempo and Time Division settings. The Note Repeat feature can be synced to an internal or external MIDI Clock source. [NOTE REPEAT] can function as a latching or momentary button.
19.[SPLIT] – This button divides the keyboard into left and right sections – A and B, respectively – allowing you to control two different sets of sounds simultaneously. When [SPLIT] is activated, its LED will light up.
Tip: You can set the dividing point of the keyboard – or "Split Point" – by simply holding down the [SPLIT] button and pressing the desired key on the keyboard.
20.[TIME DIVISION] – This button is used to specify the rate of the Note Repeat and Arpeggiator features. When [TIME DIVISION] is activated, you can press one of the 8 switches to specify a time division. [TIME DIVISION] can function as a momentary or toggle button.
Please note that while [TIME DIVISION] is active, the 8 assignable buttons will not function as MIDI CC or Program Change switches until [TIME DIVISION] has been deactivated.
21.[ARP ON/OFF] – This button enables and disables the internal Arpeggiator. The Arpeggiator will only function on notes being played on the keyboard. The Arpeggiator feature on the MPK61/MPK88 works in conjunction with the Tempo and Time Division settings, which specify the rate of arpeggiation. Please note that the Arpeggiator can be synced either to an internal or external MIDI Clock source (such as a software DAW or a MIDI device).
22.[LATCH] – This button works in conjunction with the Arpeggiator. When the Arpeggiator is turned on and [LATCH] has been enabled, you can hold down a combination of keys -- the Arpeggiator will memorize and continue to arpeggiate these notes, even if you depress the keys. There are a couple of ways to use the [LATCH] function:
a.While holding down the keys, you can add more notes to the sequence by pressing down additional keys.
b.If you depress the keys, release them, and then press down a new combination of notes, the Arpeggiator will memorize and arpeggiate the new notes.
23.[OCTAVE + / -] – These buttons can be used to shift the keyboard’s range up and down. The display will indicate which octave you have shifted to. If both buttons are pressed at the same time, the octave shift will reset to 0.
24.[TAP TEMPO] – This button allows you to tap in a new tempo. If the preset is reloaded, the tempo will revert to the saved tempo value. (Please note that a preset’s default tempo can be set in Edit Mode). Tap Tempo does not work when the MPK61/MPK88 is set to External sync.
25.PITCH BEND WHEEL – Transmits MIDI Pitch Bend information on a selected MIDI channel and port.
26.MODULATION WHEEL – This wheel can be used to transmit continuous controller data. By default, the modulation wheel will transmit MIDI CC #01.
2

REAR PANEL OVERVIEW
1.DC POWER ADAPTER INPUT – Plug in a 6V–1A DC power adapter if you do not wish to power the MPK61/MPK88 through the USB connection.
2.POWER ADAPTER RESTRAINT – You can secure the power adapter cord to this restraint to prevent accidental unplugging.
3.USB CONNECTION – Plug a standard USB cable into this outlet and into the USB port of your computer. The computer’s USB port will provide power to the MPK61/MPK88. This connection is used to send and receive MIDI data to and from your computer and may also be used to send MIDI data from your computer to a device attached to the MIDI OUT port of the MPK61/MPK88.
4.MIDI OUT – Use a five-pin MIDI cable to connect the MIDI OUT of the MPK61/MPK88 to the MIDI IN of an external device.
2 |
1 |
3 |
4 |
5 6 6 7 |
8 |
5.MIDI IN – Use a five-pin MIDI cable to connect the MIDI OUT of an external MIDI device to the MIDI IN of the MPK61/MPK88.
6.FOOTSWITCH INPUT – Connect a ¼” TS footswitch to this input.
7.EXPRESSION PEDAL INPUT – Connect a ¼” TRS expression pedal to this input.
8.KENSINGTON LOCK SLOT – You may use this Kensington lock slot to secure the MPK61/MPK88 to a table or other surface.
HOOKUP DIAGRAM
Please refer to the following scenario for connecting the MPK61/MPK88.
COMPUTER
EXTERNAL SOUND MODULE
POWER
(optional, not included)
|
|
|
|
|
|
|
|
|
|
|
|
|
|
|
|
|
|
|
|
|
|
|
|
|
|
|
|
|
|
|
|
|
|
|
|
|
|
|
|
|
|
|
|
|
|
|
|
|
|
|
|
|
|
|
|
|
|
|
|
|
|
|
|
|
|
|
|
|
|
|
|
|
|
|
|
|
|
|
|
|
|
|
|
|
|
|
|
|
|
|
|
|
|
|
|
|
|
|
|
|
|
|
|
|
|
|
|
|
|
|
|
|
|
|
|
|
|
|
|
|
|
|
|
|
|
|
|
|
|
|
|
|
|
|
|
|
|
|
|
|
|
|
|
|
|
|
|
|
|
|
|
|
|
|
|
|
|
|
|
|
|
|
|
|
|
|
|
|
|
|
|
|
|
|
|
|
|
|
|
|
|
|
|
|
|
|
|
|
|
|
|
|
|
|
|
|
|
|
|
|
|
|
|
|
|
|
|
|
|
|
|
|
|
|
|
|
|
|
|
|
|
|
|
|
|
|
|
|
|
|
|
|
|
|
|
|
|
|
|
|
|
|
|
|
|
|
|
|
|
|
|
|
|
|
|
|
|
|
|
|
|
|
|
|
|
|
|
|
|
|
|
|
|
|
|
|
|
|
|
|
|
|
|
|
|
|
|
|
|
|
|
|
|
|
|
|
|
|
|
|
|
|
|
|
|
|
|
|
|
|
|
|
|
|
|
|
|
|
|
|
|
|
|
|
|
|
|
|
|
|
|
|
|
|
|
|
|
|
|
|
|
|
|
|
|
|
|
|
|
|
|
|
|
|
|
|
|
|
|
|
|
|
|
|
|
|
|
|
|
|
|
|
|
|
|
|
|
|
|
|
|
|
|
|
|
|
|
|
|
|
|
|
|
|
|
|
|
|
|
|
|
|
|
|
|
|
|
|
|
|
|
|
|
|
|
|
|
|
|
|
|
|
|
|
|
|
|
|
|
|
|
|
|
|
|
|
|
|
|
|
|
|
|
|
|
|
|
|
|
|
|
|
|
|
|
|
|
|
|
|
|
|
|
|
|
|
|
|
|
|
|
|
|
|
|
|
|
|
|
|
|
|
|
|
|
|
|
|
|
|
|
|
|
|
|
|
|
|
|
|
|
|
|
|
|
|
|
|
|
|
|
|
|
|
|
|
|
|
|
|
|
|
|
|
|
|
|
|
|
|
|
|
|
|
|
|
|
|
|
|
|
|
|
|
|
|
|
|
|
|
|
|
|
|
|
|
|
|
|
|
|
|
|
|
|
|
|
|
|
|
|
|
|
|
|
|
|
|
|
|
|
|
|
|
|
|
|
|
|
|
|
|
|
|
|
|
|
|
|
|
|
|
|
|
|
|
|
|
|
|
|
|
|
|
|
|
|
|
|
|
|
|
|
|
|
|
|
|
|
|
|
|
|
|
|
|
|
|
|
|
|
|
|
|
|
|
|
|
|
|
|
|
|
|
|
|
|
|
|
|
|
|
|
|
|
|
|
|
|
|
|
|
|
|
|
|
|
|
|
|
|
|
|
|
|
|
|
|
|
|
|
|
|
|
|
|
|
|
|
|
|
|
|
|
|
|
|
|
|
|
|
|
|
|
|
|
|
|
|
|
|
|
|
|
|
|
|
|
|
|
|
|
|
|
|
|
|
|
|
|
|
|
|
|
|
|
|
|
|
|
|
|
|
|
|
|
|
|
|
|
|
|
|
|
|
|
|
|
|
|
|
|
|
|
|
|
|
|
|
|
|
|
|
|
|
|
|
|
|
|
|
|
|
|
|
|
|
|
|
|
|
|
|
|
|
|
|
|
|
|
|
|
|
|
|
|
|
|
|
|
|
|
|
|
|
|
|
|
|
|
|
|
|
|
|
|
|
|
|
|
|
|
|
|
|
|
|
|
|
|
|
|
|
|
|
|
|
|
|
|
|
|
|
|
|
|
|
|
|
|
|
|
|
|
|
|
|
|
|
|
|
|
|
|
|
|
|
|
|
|
|
|
|
|
|
|
|
|
|
|
|
|
|
|
EXTERNAL MIDI DEVICE |
|
|
|
|
FOOTSWITCHES |
|
|
|
EXPRESSION PEDAL |
|||||||||||||||||||||||||||||||||||||||||||||||||||||||||||||||||||||
1.Connect a USB cable from your computer to the MPK61/MPK88. The unit will be powered through the USB connection. Alternatively, if you do not wish to use a computer in your setup or if you wish to power the MPK61/MPK88 externally, please plug in a 6V-1A DC power adapter (optional).
2.If you would like to use an external sound module, connect a 5-pin MIDI cable from the MIDI OUT of the MPK61/MPK88 to the MIDI IN of the external device.
3.If you would like to use another MIDI controller in your setup, connect a 5-pin MIDI cable from the MIDI OUT of the controller to the MIDI IN of the MPK61/MPK88.
3

A NOTE ABOUT USING THE MPK61/MPK88 WITH SOFTWARE
1.Make sure that the MPK61/MPK88 and all external devices are connected and that the USB cable is connected to your computer before opening any software applications on your computer with which you might want to use the MPK61/MPK88. If the unit is not plugged in before, your software application might not recognize the MPK61/MPK88 as an available device.
2.In your software application, you will need to set the MPK61/MPK88 as a default MIDI input device. This is usually done in the MIDI section of the Preferences menu.
3.If you would like to use tempo-synced features, such as Note Repeat and Arpeggiator, you will also need to slave the MPK61/MPK88 to a MIDI Clock generated by your software DAW. Make sure that your software is set up to send MIDI clock to the MPK61/MPK88 and that the unit’s MIDI Clock setting is set to “External” (see Global Mode). This will ensure that the Arpeggiator and Beat Repeat are synchronized to the tempo selected in your software DAW.
IMPORTANT
The operation of the MIDI OUT port changes depending on whether or not a USB cable is connected to the MPK61/MPK88.
•USB cable connected:
MIDI data from your computer is passed to the MIDI OUT port. When a USB cable is connected, you should activate "MIDI echo" in your sequencer if you want the MPK61/MPK88 to control another external device.
•USB cable not connected:
Whatever you play on the MPK61/MPK88 is sent to the MIDI OUT port.
Note: If you have another device connected to the MPK61/MPK88's MIDI IN port, that device's MIDI information will be ignored.
4

DISPLAYING INFORMATION
As you are working with the MPK61/MPK88, the LCD will help you keep track of what values and parameters are entered and sent to external devices. There are several kinds of information that the MPK61/MPK88 will display while in use: OCTAVE, TRANSPOSITION, NOTE, AFTERTOUCH (Channel Pressure), CONTROL CHANGE, MIDI MACHINE CONTROL (MMC), and PREVIEW MODE information.
OCTAVE AND TRANSPOSITION
When using the keyboard, the LCD will display the current octave and any transposition setting which you may have applied.
Note: The octave settings will apply to individual presets while transposition will affect all presets globally.
OCTAVE SHIFT
TRANSPOSITION
NOTE
When a PAD is hit, the MPK61/MPK88 will output MIDI Note On messages to trigger sounds on your DAW or external device. Each pad can have a MIDI Note Number associated with it. When you hit a pad, the screen will display the MIDI Note Number, the MIDI Port and Channel which the pad is using, as well as the pad bank and velocity (how hard you hit the pad).
Please see ‘Editing Pads’( page 13) for more information on MIDI Notes and Pads.
MIDI PORT |
NOTE |
AND CHANNEL |
INDICATOR |
PAD BANK MIDI NOTE NUMBER
NOTE AFTERTOUCH (Channel Pressure)
When enabled, AFTERTOUCH is MIDI data sent when pressure is applied to one of the pads after it has been struck and while it is being held down. It will be displayed on the far right of the display as you apply pressure to the pad.
NOTE
VELOCITY
VELOCITY IS ALSO DISPLAYED WITH BAR METER.
AFTERTOUCH
VALUE
AFTERTOUCH
VALUE IS ALSO DISPLAYED WITH BAR
METER
CONTROL CHANGE
When a KNOB or FADER is used, the MPK61/MPK88 will output MIDI Control Change data. This data is used to change certain parameters on your DAW or external sound module. When you move a knob or fader, the screen will indicate the Control Change (CC) Number, value, and MIDI Channel.
Please see ‘Editing Knobs and Faders’ for more information on Control Change.
MIDI PORT |
CONTROL CHANGE |
AND CHANNEL |
INDICATOR |
PAD BANK CONTROL CHANGE NUMBER
5
CONTROL CHANGE VALUE
VALUE IS ALSO DISPLAYED WITH BAR METER.

CONTROL AFTERTOUCH
The knobs and faders on the MPK61/MPK88 can also be set to transmit AFTERTOUCH information.
Please see ‘Editing Knobs and Faders’ (page 16) for more information on setting knobs and faders to transmit Aftertouch.
MIDI PORT |
AFTERTOUCH |
|
AND CHANNEL |
INDICATOR |
AFTERTOUCH |
|
|
|
|
|
|
|
|
VALUE |
|
|
VALUE IS ALSO |
|
|
DISPLAYED WITH |
|
|
BAR METER. |
PAD BANK |
|
|
MIDI MACHINE CONTROL COMMAND (MMC)
MMC
MIDI MACHINE CONTROL (MMC) is commonly COMMAND used to send transport control messages to
hardware record or playback machines. For example: Pressing [PLAY] on the MPK61/MPK88 sends an MMCPLAY message to a connected multi-track recorder, which begins playing. When [STOP] is pressed on the MPK61/MPK88, the deck also stops.
PREVIEWING
When the [PREVIEW] button is held down, and a fader or knob is moved, the LCD displays the screen on the right. The display shows the assigned event and the last sent value of moved knob or fader. While the [PREVIEW] button is held, the fader of knob will not be transmitting any information until [PREVIEW] is released and the fader or knob is used again. At that point, the fader or knob will begin transmitting from the value selected in the New Value field while in Preview mode.
CONTROL
CHANGE NUMBER
NEW VALUE
NEW VALUE
LAST VALUE |
LAST VALUE |
SENT |
SENT |
THE ADVANTAGES OF PREVIEWING
The [PREVIEW] button allows you to see what value will be sent by a controller, without actually sending the value. This gives you precise control over your parameters and helps avoid erroneous controller data being sent to your devices due to the physical position of the controller. For example, imagine that slider S1 is being used to send three different MIDI CC numbers, depending on the control bank which you are currently in. Let’s assume that S1 is assigned to MIDI CC#10 in control bank A and MIDI CC#11 in control bank B. While in control bank A, you adjust S1 (MIDI CC#10) to a value of 40. Now you switch over to control bank B and adjust S1 (MIDI CC#11) to a value of 80. If you now switch back to control bank A and try to adjust S1 (MIDI CC#10), you will notice that the transmitted values will begin at 80 (instead of 40), due to the physical location of the slider. To prevent this, you can hold down [PREVIEW] and move S1 back to a value of 40 (which will be shown in the “Last” value readout on the display). The slider will not be transmitting information while the [PREVIEW] button is held down. Once you reset the slider back to its “Last” value, you can release the [PREVIEW] button. Adjusting S1 (MIDI CC#10) will now give you a nice starting point at a value of 40.
6

ABOUT MODES
The MPK61/MPK88 has four different modes of operation. Each mode can be accessed by pressing the corresponding button on the MPK61/MPK88. Following is a short description of each mode:
Preset Mode
This mode allows you to load, save and copy Presets. A Preset is a collection of information about how different faders, knobs, and pads will behave. Using Presets allows you to save different configurations so you can quickly load them when you need them, without having to reprogram the MPK61/MPK88 every time.
Edit Mode
This mode allows you to edit the configuration of the MPK61/MPK88. Edit Mode is a powerful tool for customizing your set-up. In this mode, you can make changes to how the keyboard, pads, knobs and faders are behaving. For example, you may wish to have a fader or a knob transmit only a limited range of MIDI data, or you may wish to have a pad that transmits on a different MIDI Channel. You can change these and other various parameters in Edit Mode.
Global Mode
This mode allows you to set global parameters and make general changes to how your MPK61/MPK88 is functioning. For example, in Global Mode you can change how the pads respond to the touch, or change the brightness of the LCD screen. The parameters that you can modify in Global Mode also include controller resets, pad response curves, display brightness, and more.
Program Change Mode
This mode allows you to transmit various Program Change messages. In this mode, you can tell your DAW or an external device to switch to a different program bank of sounds. This way, you can avoid having to manually switch between different programs on your DAW or external device.
7
PRESET MODE
What is a Preset?
PRESET NAME |
PRESET NUMBER |
A Preset is a collection of information about how the MPK61/MPK88’s keyboard, sliders, knobs, and pads will behave. Using Presets allows you to save different configurations so you can quickly load them when you need them, without having to reprogram the MPK61/MPK88 every time.
The MPK61/MPK88 features different Preset banks that you can load and write to. When you turn on the MPK61/MPK88, it will automatically go into Preset Mode and Preset 1 will be displayed on the screen. You can also press the [PRESET] button at any time to call up this mode. In Preset Mode you can load, save/copy and rename Presets – each of these functions can be accessed through the 3 different pages. You can navigate between these pages with the [<] and [>] buttons.
PAGE 1 – LOAD PRESET
1.While you are in Preset Mode, you can change Presets with the [VALUE] dial below the screen. Turning the dial increments or decrements the current Preset number and displays the screen on the right:
When you do this, you will notice that ‘PRESS ENTER’ will begin to blink.
2. Pressing [ENTER] loads the selected Preset. Pressing [<] button or [PRESET] button cancels and returns you to the Preset that was last selected.
PAGE 2 – SAVE/COPY PRESET
In Preset Mode, you can also save and copy a Preset to a new location. This allows you to save any changes that you have made to the Preset.
Note that if you are saving the Preset to the same location (same preset number) the screen will say ‘SAVE TO’ and if you are saving to a different location (different preset number), the screen will display ‘COPY TO’.
DESTINATION
1.While you are in Preset Mode, press [>] button until you see the ‘SAVE TO’ screen similar to the one shown above.
2.You can select the location where you want to save the Preset by turning the [VALUE] knob. When you do this, you will notice that the ‘PRESS ENTER’ segment will begin to blink.
3.Press [ENTER] to save current Preset to the destination. Pressing [<] button or [PRESET] button cancels the operation and returns you to the Preset play mode.
PAGE 3 – NAME PRESET
While you are in Preset Mode, you can also change the Preset name. This way you can assign specific names to different Presets so you can quickly identify and access different controller configurations.
1.To name or rename the Preset, press the [>] button until you see ‘Preset Name’ displayed on the screen.
You will notice that the first letter of the name will begin blinking.
2.Turn the [VALUE] dial to change the blinking character.
3.To move between the characters, use [<] and [>] buttons.
4.When done, press [PRESET] again. The name will be saved.
ENTER PRESET NAME IN THIS FIELD
8

EDIT MODE
Pressing the [EDIT] button calls up Edit Mode. In this mode, you can edit the settings of the currently selected Preset. The settings vary depending on the controller you are editing and are described below.
Please note that the changes you make will only apply to the currently selected Preset.
NAVIGATING EDIT MODE
1.Press the [EDIT] button.
2.To select the controller you wish to edit, simply engage it – this will prompt the screen to display the properties of the particular controller (Page 1).
3.If there are multiple properties for the selected controller, turn the [VALUE] dial to select the property you wish to edit. Press [ENTER] to view the parameters of the selected property, if available (Page 2).
4.To move between the parameter fields on Page 2, use the [<] and [>] buttons. To change the values of the fields, turn the [VALUE] dial.
5.When finished editing the controller, press [ENTER] to accept the change or press [<] to cancel.
You can use the example screenshot on the right to help you determine where the Page 2 parameters described on the following page will appear on the screen.
FIELD 1
FIELD 2
FIELD 3
FIELD 4
9

EDIT MODE PARAMETERS
|
CONTROLLER SELECTED |
|
|
PAGE 1 |
|
|
PAGE 2 |
|
|
|
|
|
|
|
|||
|
|
|
|
OCTAVE |
|
|
KEYBOARD MIDI CHANNEL (field 1) |
|
|
|
|
|
|
|
UP/DOWN (field 4) |
|
|
|
|
|
|
|
|
|
|
|
|
KEYBOARD |
|
|
AFTERTOUCH |
|
|
KEYBOARD MIDI CHANNEL (field 1) |
|
|
|
|
|
|
ON/OFF BEHAVIOR (field 4) |
|
||
|
|
|
|
|
|
|
|
|
|
|
|
|
VELOCITY |
|
|
KEYBOARD MIDI CHANNEL (field 1) |
|
|
|
|
|
|
|
ON/OFF BEHAVIOR (field 4) |
|
|
|
|
|
|
|
|
|
|
|
|
|
|
|
|
|
|
MIDI CHANNEL (field 1) |
|
|
|
|
|
NOTE |
|
|
NOTE NUMBER (field 2) |
|
|
|
|
|
|
|
ON/OFF BEHAVIOR (field 3) |
|
|
|
|
|
|
|
|
|
|
|
|
PADS |
|
|
|
|
|
PRESSURE BEHAVIOR (field 4) |
|
|
|
|
|
|
|
MIDI CHANNEL (field 1) |
|
|
|
|
|
|
|
|
|
|
|
|
|
|
|
PROGRAM CHANGE |
|
|
PROGRAM CHANGE NUMBER (field 2) |
|
|
|
|
|
|
|
BANK M (MSB) (field 3) |
|
|
|
|
|
|
|
|
|
|
|
|
|
|
|
|
|
|
BANK L (LSB) (field 4) |
|
|
|
|
|
|
|
|
MIDI CHANNEL (field 1) |
|
|
|
|
|
CONTROL CHANGE |
|
|
CC NUMBER (field 2) |
|
|
|
|
|
|
|
RANGE – MINIMUM VALUE (field 3) |
|
|
|
|
|
|
|
|
|
|
|
|
KNOBS AND FADERS |
|
|
|
|
|
RANGE – MAXIMUM VALUE (field 4) |
|
|
|
|
|
|
|
MIDI CHANNEL (field 1) |
|
|
|
|
|
|
|
|
|
|
|
|
|
|
|
AFTERTOUCH |
|
|
CC NUMBER (field 2) |
|
|
|
|
|
|
|
RANGE – MINIMUM VALUE (field 3) |
|
|
|
|
|
|
|
|
|
|
|
|
|
|
|
|
|
|
RANGE – MAXIMUM VALUE (field 4) |
|
|
|
|
|
|
|
|
MIDI CHANNEL (field 1) |
|
|
|
|
|
CONTROL CHANGE |
|
|
CC NUMBER (field 2) |
|
|
|
|
|
|
|
|
BUTTON MODE (field 4) |
|
|
BUTTONS |
|
|
|
|
|
MIDI CHANNEL (field 1) |
|
|
|
|
|
PROGRAM CHANGE |
|
|
PROGRAM CHANGE NUMBER (field 2) |
|
|
|
|
|
|
|
BANK M (MSB) (field 3) |
||
|
|
|
|
|
|
|
||
|
|
|
|
|
|
|
BANK L (LSB) (field 4) |
|
|
|
|
|
|
|
|
ARPEGGIO TYPE (field 2) |
|
|
|
|
|
TYPE/RANGE/TOGGLE |
|
|
ARPEGGIO RANGE (field 3) |
|
|
ARP ON/OFF |
|
|
|
|
|
ARPEGGIO TOGGLE BEHAVIOR (field 4) |
|
|
|
|
|
GATE/SWING |
|
|
ARPEGGIO GATE VALUE (field 2) |
|
|
|
|
|
|
|
ARPEGGIO SWING VALUE (field 4) |
||
|
|
|
|
|
|
|
||
|
|
|
|
TOGGLE/MOMENTARY |
|
|
BUTTON MODE (field 2) |
|
|
NOTE REPEAT |
|
|
GATE/SWING |
|
|
NOTE REPEAT GATE VALUE (field 2) |
|
|
|
|
|
|
|
NOTE REPEAT SWING VALUE (field 4) |
||
|
|
|
|
|
|
|
||
|
TIME DIVISION |
|
|
DIVISION |
|
|
DEFAULT TIME DIVISION (field 2) |
|
|
|
|
|
|
BUTTON MODE (field 4) |
|
||
|
|
|
|
|
|
|
|
|
|
PITCH BEND WHEEL |
|
PITCH BEND |
|
|
MIDI CHANNEL (field 1) |
||
|
|
|
|
|
|
|
MIDI CHANNEL (field 1) |
|
|
MODULATION WHEEL |
|
|
MODULATION WHEEL |
|
|
CC NUMBER (field 2) |
|
|
|
|
|
|
RANGE – MINIMUM VALUE (field 3) |
|||
|
|
|
|
|
|
|
||
|
|
|
|
|
|
|
RANGE – MAXIMUM VALUE (field 4) |
|
|
TRANSPORT |
|
|
TRANSPORT FUNCTION |
|
|
MMC, MIDI, MMC/MIDI, or CTRL (field 2) |
|
|
TAP TEMPO |
|
TEMPO |
|
|
BPM (field 2) |
||
|
|
|
|
|
|
|
MIDI CHANNEL (field 1) |
|
|
|
|
|
CNTL CHANGE |
|
|
CC NUMBER (field 2) |
|
|
|
|
|
|
|
RANGE – MINIMUM VALUE (field 3) |
|
|
|
|
|
|
|
|
|
|
|
|
EXPRESSION PEDAL |
|
|
|
|
|
RANGE – MAXIMUM VALUE (field 4) |
|
|
|
|
|
|
|
|
MIDI CHANNEL (field 1) |
|
|
|
|
|
AFTERTOUCH |
|
|
RANGE – MINIMUM VALUE (field 3) |
|
|
|
|
|
|
|
|
RANGE – MAXIMUM VALUE (field 4) |
|
|
|
|
|
NOTE |
|
|
NOTE NUMBER, A (field 1) & B (field 2) |
|
|
|
|
|
PITCH |
|
|
PITCH WHEEL ON/OFF, A (field 1) & B (field 2) |
|
|
|
|
|
MODWHEEL |
|
|
MOD WHEEL ON/OFF, A (field 1) & B (field 2) |
|
|
|
|
|
SUSTAIN 1 |
|
|
SUSTAIN 1 PEDAL ON/OFF, A (field 1) & B (field 2) |
|
|
SPLIT |
|
|
SUSTAIN 2 |
|
|
SUSTAIN 2 PEDAL ON/OFF, A (field 1) & B (field 2) |
|
|
|
|
|
EXPRESSION |
|
|
EXPRESSION PEDAL ON/OFF, A (field 1) & B (field 2) |
|
|
|
|
|
ARP |
|
|
ARPEGGIATOR ON/OFF, A (field 1) & B (field 2) |
|
|
|
|
|
MIDI CH |
|
|
MIDI CHANNEL, B (field 2) |
|
|
|
|
|
AFTERTOUCH |
|
|
AFTERTOUCH ON/OFF, A (field 1) & B (field 2) |
|
|
|
|
|
|
|
|
MIDI CHANNEL (field 1) |
|
|
|
|
|
MIDI CC |
|
|
CC NUMBER (field 2) |
|
|
|
|
|
|
|
|
BUTTON MODE (field 4) |
|
|
|
|
|
DRUM PAD |
|
|
PAD NUMBER (field 4) |
|
|
|
|
|
NOTE REPEAT |
|
|
|
|
|
SUSTAIN PEDAL |
|
|
TIME DIV |
|
|
|
|
|
|
|
TAP TEMPO |
|
|
|
|
|
|
|
|
|
BANK CHANGE |
|
|
|
|
|
|
|
|
PLAY/STOP |
|
|
|
|
|
|
|
|
PLAY/RECORD |
|
|
|
|
|
|
|
|
ARP ON/OFF |
|
|
|
|
|
|
|
|
ARP LATCH |
|
|
|
|
|
|
|
|
SUSTAIN |
|
|
|
|
10

EDITING THE KEYBOARD
When editing the keyboard, please note that the changes will affect all the keys on the MPK61/MPK88. The keyboard properties you can edit include MIDI Channel, Octave, Aftertouch, and Velocity.
MIDI CHANNEL – This is the MIDI Channel on which the keyboard will be transmitting information.
OCTAVE – This is the default octave shift that will be applied to the keyboard when the current Preset is loaded.
AFTERTOUCH – Aftertouch describes pressure applied to the keys after they have been pressed. Aftertouch can often be used to control the vibrato, sustain or decay of a sound. The Aftertouch setting on the MPK61/MPK88 can be set to either “On” or “Off”. When set to “Off”, the MPK61/MPK88 will ignore Aftertouch.
VELOCITY – Velocity describes how hard the keys are struck. Most often, velocity is directly mapped to the perceived loudness of a sound; so the harder you play the keys, the louder the sound will be. The Velocity setting on the MPK61/MPK88 can be set to either “On” or “Off”. When set to “On”, the keyboard will detect how hard the keys are pressed and translate these values into corresponding MIDI velocities. When set to “Off”, MPK61/MPK88 will output a constant MIDI velocity, no matter how hard the keys are pressed.
SELECT PROPERTY
1.To edit the keyboard, press the [EDIT] button to enter Edit Mode.
2.Now select the keyboard for editing by pressing one of the keys.
3.You will see Page 1 displayed on the screen (shown on the left).
4.Turn the [VALUE] dial to select the property you wish to edit (Octave, Aftertouch, Velocity).
5.Press [ENTER] to edit the selected property.
PRESS ENTER TO EDIT
KEYBOARD OCTAVE
MIDI CHANNEL FIELD
1.In the first field of this page, you can set the keyboard’s MIDI channel field by turning the [VALUE] dial.
2.Press [>] to edit the Octave shift.
3.The Octave shift field will begin to blink. Set the shift by turning the [VALUE] dial (default shift is set to “0”).
4.When finished, press [ENTER] to return to Page 1.
OCTAVE SHIFT FIELD
KEYBOARD AFTERTOUCH
MIDI CHANNEL FIELD
1.You can set the keyboard’s MIDI channel field by turning the [VALUE] dial.
2.When done, press [>] to edit Aftertouch.
3.The Aftertouch field will begin to blink. Turn the [VALUE] dial to turn Aftertouch “On” or “Off” (default is set to “On”).
4.When finished, press [ENTER] to return to Page 1.
AFTERTOUCH FIELD
KEYBOARD VELOCITY
MIDI CHANNEL FIELD
1.You can set the keyboard’s MIDI channel field by turning the [VALUE] dial.
2.When done, press [>] to edit Velocity.
3.The Velocity field will begin to blink. Turn the [VALUE] dial to turn Velocity “On” or “Off” (default is set to “On”).
4.When finished, press [ENTER] to return to Page 1.
VELOCITY FIELD
11
 Loading...