


User Guide
English ( 2 – 10 )
Guía del usuario
Español ( 11 – 19 )
Guide d'utilisation
Français ( 20 – 28 )
Guida per l'uso
Italiano ( 29 – 37 )
Benutzerhandbuch
Deutsch ( 38 – 46 )
Appendix
English ( 47 )

User Guide (English)
Introduction
Box Contents
Rhythm Wolf
Power Adapter
User Guide
Safety & Warranty Manual
Support
Visit akaipro.com/rhythmwolf to download the latest User Guide, MIDI implementation chart, etc.
For the latest information about this product (system requirements, compatibility information, etc.) and product registration, visit akaipro.com/rhythmwolf.
For additional product support, visit akaipro.com/support.
Quick Start / Connection Diagram
Important: After powering Rhythm Wolf on, let it warm up before using it. Its tuning can be affected by the temperature.
External MIDI Device
|
|
|
Computer |
|
MIDI Keyboard |
|
(e.g., rack synth, sequencer, etc.) |
||||||||||||||||||||||||||
|
|
|
|
|
|
|
|
|
|
|
|
|
|
|
|
|
|
|
|
|
|
|
|
|
|
|
|
|
|
|
|
|
|
|
|
|
|
|
|
|
|
|
|
|
|
|
|
|
|
|
|
|
|
|
|
|
|
|
|
|
|
|
|
|
|
|
|
|
|
|
|
|
|
|
|
|
|
|
|
|
|
|
|
|
|
|
|
|
|
|
|
|
|
|
|
|
|
|
|
|
|
|
|
|
|
|
|
|
|
|
|
|
|
|
|
|
|
|
|
|
|
|
|
|
|
|
|
|
|
|
|
|
|
|
|
|
|
|
|
|
|
|
|
|
|
|
|
|
|
|
|
|
|
|
|
|
|
|
|
|
|
|
|
|
|
|
|
|
|
|
|
|
|
|
|
|
|
|
|
|
|
|
|
|
|
|
|
|
|
|
|
|
|
|
|
|
|
|
|
|
|
|
|
|
|
|
|
|
|
|
|
|
|
|
|
|
|
|
|
|
|
|
|
|
|
|
|
|
|
|
|
|
|
|
|
|
|
|
|
|
|
|
|
|
|
|
|
|
|
|
|
|
|
|
|
|
|
|
|
|
|
|
|
|
|
|
|
|
|
|
|
|
|
|
|
|
|
|
|
|
|
|
|
|
|
|
|
|
|
|
|
|
|
|
|
|
|
|
|
|
|
|
|
|
|
|
|
|
|
|
|
|
|
|
|
|
|
|
|
|
|
|
|
|
|
|
|
|
|
|
|
|
|
|
|
|
|
|
|
|
|
|
|
|
|
|
|
|
|
|
|
|
|
|
|
|
|
|
|
|
|
|
|
|
|
|
|
|
|
|
|
|
|
|
|
|
|
|
|
|
|
|
|
|
|
|
|
|
|
|
|
|
|
|
|
|
|
|
|
|
|
|
|
|
|
|
|
|
|
|
|
|
|
|
|
|
|
|
|
|
|
|
|
|
|
|
|
|
|
|
|
|
|
|
|
|
|
|
|
|
|
|
|
|
|
|
|
|
|
|
|
|
|
|
|
|
|
|
|
|
|
|
|
|
|
|
|
|
|
|
|
|
|
|
|
|
|
|
|
|
|
|
|
|
|
|
|
|
|
|
|
|
|
|
|
|
|
|
|
|
|
|
|
|
|
|
|
|
|
|
|
|
|
|
|
|
|
|
|
|
|
|
|
|
|
|
|
|
|
|
|
|
|
|
|
|
|
|
|
|
|
|
|
Power |
Mixer, |
audio interface, |
|
|
etc. |
|
Items not listed in Box Contents are sold separately. |
2
Features
Top Panel
|
1 |
8 |
8 |
8 |
8 |
8 |
|
|
|
|
8 |
8 |
8 |
8 |
8 |
|
8 |
16 |
|
|
|
|
|||||||
2 |
3 |
8 |
8 |
8 |
8 |
8 |
8 |
|
17 |
14 15 |
8 |
8 |
8 |
|
8 |
8 |
12 |
13 |
|
4 |
9 7 |
7 |
7 |
7 |
7 |
7 10 |
11 |
||
65 |
|
|
|
|
|
|
|
|
|
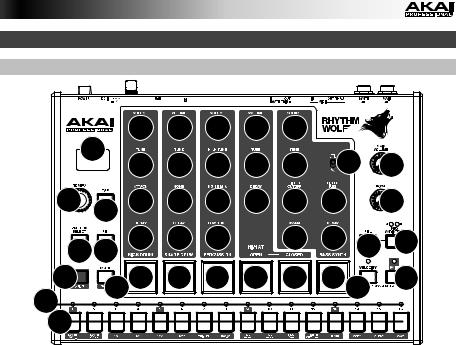
1.Display: This display shows Rhythm Wolf's tempo or other relevant values described in this guide.
2.Tempo: Turn this knob to adjust Rhythm Wolf's global tempo (20–300 BPM or beats per minute). The number will be shown in the display. You also use this knob to perform other operations such as setting bass synth note values, swing amount, or pattern length.
3.Tap: Press this button at the desired rate to enter a new tempo. Rhythm Wolf will detect the new tempo after three taps.
4.Shift: Press and hold this button to access the secondary functions of certain buttons.
5.Step Switches: Press these buttons to enter or erase a step/note from the pattern. Press and hold Shift to access their secondary functions:
•Synth Oct -/+: Use these buttons to shift the bass synth's "keyboard" (the Step Switches in Record Performance Mode) one octave up or down.
•1/4, 1/8, 1/16, 1/32: Use these buttons to select the pattern's time division (i.e., the note value of each Step Switch). When holding Shift, the Step Indicator above the current time division will be lit.
•Triplet: Press this button activate or deactivate Triplet, which turns the time division into triplet-based one (except for 1/32). When holding Shift, the Step Indicator above this button is lit when activated.
•Swing: Press this button and then turn the Tempo knob to adjust how much swing is applied to the pattern. At 50, no swing is applied. At 75, the pattern is entirely swung. (This is identical to Akai Professional MPCs.)
•Rec Step: Press this button to enter Record Step Mode. See the Record Step Mode section of this guide to learn more. When holding Shift, the Step Indicator above this button is lit when in this mode.
•Rec Perf: Press this button to enter Record Performance Mode. See the Record Performance Mode section of this guide to learn more. When holding Shift, the Step Indicator above this button is lit when in this mode.
3

•Rec Off: Press this button to deactivate recording. See the Record Step Mode and Record Performance Mode sections of this guide to learn more. When holding Shift, the Step Indicator above this button is lit when in this mode.
•MIDI Out/Thru, MIDI Sync: Press this button to switch between the Out and Thru functions of Rhythm Wolf's MIDI Out/Thru jack. The display will indicate which is currently selected:
When set to Out, Rhythm Wolf will send its own MIDI messages to its MIDI Out/Thru jack and to its USB Port.
When set to Thru, MIDI messages received through the MIDI In will be sent to the MIDI Out/Thru. Rhythm Wolf's messages will be sent to its USB Port.
•Sync: Press this button to select Rhythm Wolf's MIDI clock source: Internal, External, USB, or Gate. See the Transport Control section to learn more.
•Copy, Clear, Save: Use these buttons to copy, clear, or save the current pattern. See the Saving, Copying, and Clearing section to learn more.
6.Step Indicators: These LEDs will light up to indicate which steps contain a note (i.e., which Step Switches are active). See the Record Step Mode section of this guide to learn more.
7.Pads: Press these pads to play their corresponding voice or to deactivate or activate the voice while in Mute Mode or Solo Mode.
8.Voice Controls: Use these controls to fine-tune the sounds of their respective voices.
•Kick Drum: The kick drum voice.
o Volume: Turn this to set the kick drum's volume. o Tune: Turn this to tune the pitch of the kick drum.
o Attack: Turn this to set the volume of the kick drum's initial attack.
oDecay: Turn this to set the Decay time of the kick drum's amplitude envelope.
•Snare Drum: The snare drum voice.
oVolume: Turn this to set the snare drum's volume.
o Tune: Turn this to tune the pitch of the snare drum.
o Noise: Turn this to set how much noise is added to the snare drum voice.
oDecay: Turn this to set the Decay time of the snare drum's amplitude envelope.
•Percussion: A variable percussion voice consisting of a higher-pitched sound and lower-pitched sound added together and blended with noise.
oVolume: Turn this to set the percussion's volume.
oHigh Tune: Turn this to tune the pitch of the percussion's high-frequency sound.
oNoise Mix: Turn this to set the balance between the higherand lower-pitched sounds and the amount of noise. At its minimum position, no noise will be heard. At its maximum position, the sound consists entirely of noise.
oLow Tune: Turn this to tune the pitch of the percussion's low-frequency sound.
•Hi-Hat: The hi-hat voice. Only one sound—open or closed—can sound at a time.
oVolume: Turn this to set the hi-hat's volume.
o Tune: Turn this to tune the pitch of the hi-hat.
oDecay: Turn this to set the Decay time of the hi-hat's amplitude envelope.
•Bass Synth: A bass synthesizer with a two-pole, 12dB/octave low-pass filter.
oWave Type: Set this switch to determine what type of wave the bass synth uses: square (
 ) or sawtooth (
 ).
).
o Volume: Turn this to set the bass synth's volume.
o Tune: Turn this to tune the pitch of the bass synth.
4

oFilter Cutoff: Turn this to set the bass synth's filter cutoff frequency. This value also determines the frequency of the Sustain stage of the filter envelope.
o Filter Res: Turn this to set the bass synth's filter resonance (also known as Q).
oEnv Amt: Turn this to set the peak of the bass synth's filter envelope. This controls the difference in frequency between the Filter Cutoff setting and the highest part of the filter envelope.
oDecay: Turn this to set the Decay time of the bass synth's amplitude envelope.
9.Mute/Solo: Press and hold this button to mute specific voices in the sequencer's playback. Press a pad to mute or unmute its voice. Unmuted pads are lit red, while muted pads are not lit. This affects sequencer playback only; you can still play the pads to trigger their respective voices.
Press and hold Shift and then press and hold this button to enter Solo Mode. When in Solo Mode, you can press a pad to solo its voice (muting all others). Release the button to return to normal operation. This is a temporary mode, independent of any pad mutes.
10.Velocity: Press this button to edit the velocity of a step. See the Record Step Mode section of this guide to learn more.
Press this button and Play/Stop at the same time to start playback from the very beginning of the pattern rather than from the current position.
11.Play/Stop: Press this button to start or stop playback.
Press this button and Velocity at the same time to start playback from the very beginning of the pattern rather than from the current position.
Press and hold Shift and then press this button to send an All Notes Off message.
12.Fill: Press this button to play the fill for the current sequence (A, B, or A and B). See the About Patterns section to learn more.
13.Seq Variation: Press this button to select whether you are playing/editing Sequence A, Sequence B, or Sequence A and B. See the About Patterns section to learn more.
14.Pattern Select / Last Step: Press this button and then press one of the 16 Step Switches to select the pattern of the same number. Press the Pattern Select button again to return to normal operation. If you do this during playback, the current pattern will finish before moving to the next one.
Press and hold Shift and then press this button. The pattern's length (in steps) will appear in the display, and the Step Indicators will light red to show the pattern's length. Press one of the 16 Step Switches or turn the Tempo knob to set the pattern's length (in steps). If the Seq Variation button has either A or B lit, the maximum pattern length is 16 steps. If both A and B are lit, the maximum pattern length is 32 steps, and the minimum pattern length is 17 steps. Press the Last Step button again to return to normal operation.
15.Tie: When the bass synth is selected, press and hold this button, and then press a Step Switch to "tie" its note to the previous step or to return it to its previous ("un-tied") state. A tied note is "held over" from the previous note, meaning that its envelope is not retriggered. When you press and hold this button, the Step Indicators of tied steps will be lit amber, those with "un-tied" notes will be lit red, and those with no notes will be unlit.
You can do this to multiple Step Switches at once, and you can tie several consecutive notes together. Tied notes can also "wrap around" from the end to the beginning of a sequence.
16.Main Volume: Turn this knob to set the output volume of Rhythm Wolf's Main Out and
Synth Out.
17.Howl: Turn this knob to set the amount of overdrive (distortion) applied to Rhythm Wolf's
Main Out.
5
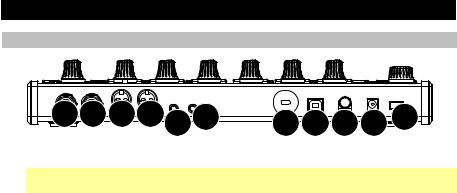
Rear Panel
6 7 8 9 10 11 |
5 4 3 2 1 |
1.Power Button: Press this button to power Rhythm Wolf on or off.
Important: After powering Rhythm Wolf on, let it warm up before using it. Its tuning can be affected by the temperature.
2.DC In: Use the included power adapter (12V, 2A, center-positive) to connect this jack to a power outlet.
3.Cable Restraint: You can secure a cable to this restraint to prevent it from accidentally unplugging.
4.USB Port: Use a standard USB cable to connect this port to an available USB port on your computer. This connection lets Rhythm Wolf send and receive MIDI over USB to and from your computer.
5.Kensington Lock Slot: You may use this Kensington lock slot to secure the Rhythm Wolf to a table or other surface.
6.Main Out: Use a standard 1/4" (6.35mm) TRS cable to connect this line-level output to the input of an audio interface, mixer, amplifier system, etc. You can also connect stereo headphones to this output. If the Synth Out is not connected to anything, the Main Out will include the drum and bass synth voices. If a cable is connected to the Synth Out, the Main Out will include the drum voices only.
7.Synth Out: Use a standard 1/4" (6.35mm) TS cable to connect this line-level output to the input of an audio interface, mixer, amplifier system, etc. (we recommend connecting this to a balanced input using a TRS cable instead of to an unbalanced one using a TS cable). The bass synth voice is sent through this output only if a cable is connected to it. Otherwise, the bass synth voice is sent to the Main Out.
8.MIDI Out/Thru: Use a standard five-pin MIDI cable to connect this MIDI Out to the MIDI In of an external MIDI device (e.g., a synthesizer, sequencer, drum machine, etc.). Press the MIDI Out/Thru button to set the function of this jack. The display will indicate which is currently selected. See Step Switches: MIDI Out/Thru above to learn more.
9.MIDI In: Use a standard five-pin MIDI cable to connect this MIDI In to the MIDI Out of an external MIDI device (e.g., another MIDI controller). For more information, visit akaipro.com/rhythmwolf to download the latest MIDI implementation chart.
10.Gate Trig Out: Use a standard 1/8" (3.5mm) TS cable to connect this output to the input of an optional external device that can receive Rhythm Wolf's Gate (trigger) messages.
11.Gate Trig In: Use a standard 1/8" (3.5mm) TS cable to connect this input to the output of an optional external device to send Gate (trigger) messages to Rhythm Wolf.
6

Transport Control
Rhythm Wolf's Play/Stop button operates differently depending on its Sync setting (Step Switch 13).
When set to Internal:
•Press the Play/Stop button to start or stop playback.
•Press the Velocity and Play/Stop buttons at the same time to start playback from the very beginning of the pattern rather than from the current position.
•When Rhythm Wolf's MIDI Out/Thru is set to Out, it will send MIDI Start, Stop, Continue, Clock, and SongPosPtr=0 depending on its transport state.
•Rhythm Wolf's Gate Trig Out will pulse each time it advances one step.
When set to External or USB:
•Rhythm Wolf's playback will respond to incoming MIDI Start, Stop, Continue, Clock, and SongPosPtr=0 messages.
•Rhythm Wolf's transport controls will not function.
When set to Gate:
•Press the Play/Stop button to start/resume or stop playback.
•Rhythm Wolf's time division can be set only to 1/8 or 1/16:
o When set to 1/8, two pulses will advance playback by one step.
oWhen set to 1/16, one pulse will advance playback by one step.
•Rhythm Wolf's Gate Trig Out will mimic its Gate Trig In.
7

About Patterns
Rhythm Wolf can store up to 16 patterns. Each pattern consists of four sequences: Sequence A, Sequence B, Fill A, and Fill B.
To select a pattern, press Pattern Select and then press one of the 16 Step Switches to select the pattern of the same number. Press Pattern Select again to return to normal operation.
To select which sequence you are playing/editing during playback, press Seq Variation to switch between Sequence A or Sequence B. The LED for the currently playing sequence will be lit solid. If the other sequence will play next, its LED will flash.
To automatically switch between playing Sequence A and then Sequence B (or vice versa), press and hold Shift and then press Seq Variation.
To return to playing only Sequence A or Sequence B, either press Seq Variation while the desired sequence is playing, or press and hold Shift and then press Seq Variation.
To select which sequence(s) you are playing/editing while stopped, press Seq Variation to switch between: Sequence A only (A will be lit) and Sequence B only (B will be lit).
Note: To select a fill to loop and/or edit, see below.
To play a fill, press the Fill button during playback. The fill that plays will be determined by (1) the state of the Seq Variation button and (2) which sequence is currently playing.
When Seq Variation is set to Sequence A only or Sequence B only:
•Press Fill to play the corresponding fill. When the fill is finished, the other sequence will start playing.
•Press and hold Fill to play the corresponding fill. When the fill is finished, the original sequence will continue playing.
When Seq Variation is set to both Sequences A and B:
•Press Fill during Sequence A to play Fill A and Fill B. When Fill B is finished, Sequence A will start playing again.
•Press Fill during Sequence B to play Fill B. When Fill B is finished, Sequence A will start playing again.
To select a fill to loop and/or edit during playback, press and hold the Fill button, press the
Seq Variation button to select either A or B, and then release both buttons. The fill you selected will now loop. This also lets you edit the fill (as you would edit Sequence A or Sequence B). To return to normal operation, press the Seq Variation button.
To select a fill to edit while stopped, press the Fill button, and then press the Seq Variation button to select either A or B buttons. This lets you edit the fill (as you would edit Sequence A or Sequence B). To return to normal operation, press the Fill button.
8

Editing Sequences
You can edit the sequences (and fills) of each pattern in two different modes, described below: Record Step Mode and Record Performance Mode.
Record Step Mode
Record Step Mode lets you use the 16 Step Switches to enter or remove notes from the sequence simply by pressing the corresponding Step Switches.
To enter Record Step Mode, press and hold Shift and then press Step Switch 9 (Rec Step).
To enter or remove steps:
•For the drum voices, press the pad whose steps you want to enter or remove, and then press one or more Step Switches to enter or remove notes at those positions. The notes are entered with the default Step Switch velocity (described below).
•For the bass synth voice, press the Bass Synth pad, and then press one or more Step Switches to enter or remove notes at those positions. The notes are entered with the default Step Switch velocity (described below). Also:
oTo set the note value, press and hold the desired Step Switches and turn the Tempo knob. If you are adjusting only one note, the note value will be shown in the display. If you are adjusting multiple notes, the display will show how many semitones up or down you are shifting them. The bass synth voice has a threeoctave range.
Each step (for both drum and bass synth voices) has a velocity, which determines how loud the note is played.
To edit a step's velocity, press and hold the Velocity button and then press the desired Step Switch to cycle between the available velocities: low (green), medium (amber), high (red), and off (unlit).
To select the default Step Switch velocity, press the Velocity button to cycle through the available default velocities: low (green), medium (amber), and high (red).
Record Performance Mode
Record Performance Mode lets you play the pads and/or 16 Step Switches to record a sequence in real time. The notes you play will be quantized (aligned) automatically with the steps. Your recording will be "overdubbed" onto the sequence(s).
Note: Any incoming MIDI performance will also be recorded.
To enter Record Performance Mode, press and hold Shift, and then press Step Switch 10 (Rec Perf).
To record steps:
•For the drum voices, play the desired sequence(s), and then play the pads. The pads are velocity-sensitive; the notes will be entered at the corresponding low, medium, or high velocities.
•For the bass synth voice, play the desired sequence(s), and then play the 16 Step Switches as you would a piano keyboard. The black switches are the same as the black keys on a piano, and the same is true for the white switches. The Step Switches are not velocity-sensitive, so you may want to edit the bass synth velocities in Record Step Mode (see Record Step Mode above to learn more).
9

Saving, Copying, and Clearing
Saving
To save patterns or global settings:
1.Press and hold Shift, and then press Step Switch 16 (Save). Its Step Indicator will flash green.
2.Release Step Switch 16 (Save), but keep holding Shift.
3.Turn the Tempo knob to select what you want to save: all patterns and global settings (All), the current pattern only (One), or the global settings only (Glo).
Important: Global settings include the tempo, the MIDI Out/Thru setting, and the Sync setting.
4.Press Step Switch 16 (Save), and then release Shift.
Copying
Important: Copying does not save a pattern. To retain the copied pattern, you must save it, as well.
To copy the current pattern:
1.Press and hold Shift, and then press Step Switch 14 (Copy). The Step Indicator for the current pattern will flash green. The Step Indicators for non-empty patterns will flash amber. The Step Indicators for empty patterns will be unlit.
2.Release Step Switch 14 (Copy), but keep holding Shift.
3.Press the Step Switch with the same number as the "destination" pattern (the pattern you want to copy to). The pattern will copy and load the destination pattern. After that, release Shift.
To cancel, press the Step Switch with the same number as the current pattern (its Step Indicator is flashing green), and then release Shift.
Clearing
Important: Clearing does not save a pattern. To retain the empty pattern, you must save it, as well.
To clear the current pattern:
1.Press and hold Shift, and then press Step Switch 15 (Clear). Its Step Indicator will flash green.
2.Press Step Switch 15 (Clear) again.
3.Release both buttons.
10
Guía del usuario (Español)
Introducción
Contenido de la caja
Rhythm Wolf
Adaptador de corriente
Guía del usuario
Manual sobre la seguridad y garantía
Soporte
Visite akaipro.com/rhythmwolf para descargar la última Guía del usuario, tabla de implementación MIDI, etc.
Para obtener la información más reciente acerca de este producto (requisitos de sistema, información de compatibilidad, etc.) y registrarlo, visite akaipro.com/rhythmwolf.
Para obtener soporte adicional del producto, visite akaipro.com/support.
Diagrama de inicio y conexión rápida
Importante: Tras encender el Rhythm Wolf, déjelo calentar antes de usarlo. La temperatura puede afectar su afinación.
|
|
|
Ordenador |
|
|
Teclado MIDI |
|
|
Dispositivo MIDI externo |
||||||||||||||||||||||||
|
|
|
|
|
|
(por ejemplo, sintetizador de rack, |
|||||||||||||||||||||||||||
|
|
|
|
|
|
|
|
|
|
|
|
|
|
|
|
|
|
|
|
|
|
|
|
|
|
|
|
|
|
|
|
|
|
|
|
|
|
|
|
|
|
|
|
|
|
|
|
|
|
|
|
|
|
|
|
|
|
|
|
|
|
|
|
|
|
|
|
|
|
|
|
|
|
|
|
|
|
|
|
|
|
|
|
|
|
|
|
|
|
|
|
|
|
|
|
|
|
|
|
|
|
|
|
|
|
|
|
|
|
|
|
|
|
|
|
|
|
|
|
|
|
|
|
|
|
|
|
|
|
|
|
|
|
|
|
|
|
|
|
|
|
|
|
|
|
|
|
|
|
|
|
|
|
|
|
|
|
|
|
|
|
|
|
|
|
|
|
|
|
|
|
|
|
|
|
|
|
|
|
|
|
|
|
|
|
|
|
|
|
|
|
|
|
|
|
|
|
|
|
|
|
|
|
|
|
|
|
|
|
|
|
|
|
|
|
|
|
|
|
|
|
|
|
|
|
|
|
|
|
|
|
|
|
|
|
|
|
|
|
|
|
|
|
|
|
|
|
|
|
|
|
|
|
|
|
|
|
|
|
|
|
|
|
|
|
|
|
|
|
|
|
|
|
|
|
|
|
|
|
|
|
|
|
|
|
|
|
|
|
|
|
|
|
|
|
|
|
|
|
|
|
|
|
|
|
|
|
|
|
|
|
|
|
|
|
|
|
|
|
|
|
|
|
|
|
|
|
|
|
|
|
|
|
|
|
|
|
|
|
|
|
|
|
|
|
|
|
|
|
|
|
|
|
|
|
|
|
|
|
|
|
|
|
|
|
|
|
|
|
|
|
|
|
|
|
|
|
|
|
|
|
|
|
|
|
|
|
|
|
|
|
|
|
|
|
|
|
|
|
|
|
|
|
|
|
|
|
|
|
|
|
|
|
|
|
|
|
|
|
|
|
|
|
|
|
|
|
|
|
|
|
|
|
|
|
|
|
|
|
|
|
|
|
|
|
|
|
|
|
|
|
|
|
|
|
|
|
|
|
|
|
|
|
|
|
|
|
|
|
|
|
|
|
|
|
|
|
|
|
|
|
|
|
|
|
|
|
|
|
|
|
|
|
|
|
|
|
|
|
|
|
|
|
|
|
|
|
|
|
|
|
|
|
|
|
|
|
|
|
|
|
|
|
|
|
|
|
|
|
|
|
|
|
|
|
|
|
|
|
|
|
|
|
Suministro |
Mezclador, |
interfaz de audio, |
|
eléctrico |
etc.). |
Los elementos que no se enumeran en Contenido de la caja se venden por separado.
11

Características
Panel superior
|
1 |
8 |
8 |
8 |
8 |
8 |
|
|
|
|
8 |
8 |
8 |
8 |
8 |
|
8 |
16 |
|
|
|
|
|||||||
2 |
3 |
8 |
8 |
8 |
8 |
8 |
8 |
|
17 |
14 15 |
8 |
8 |
8 |
|
8 |
8 |
12 |
13 |
|
4 |
9 7 |
7 |
7 |
7 |
7 |
7 10 |
11 |
||
65 |
|
|
|
|
|
|
|
|
|
1.Pantalla: Esta pantalla muestra el tempo del Rhythm Wolf u otros valores relevantes descritos en esa guía.
2.Tempo: Gire esta perilla para ajustar el tempo global del Rhythm Wolf (20 a 300 BPM o beats por minuto). El número se muestra en la pantalla. También puede utilizar esta perilla para realizar otras operaciones tales como establecer los valores de la nota del sintetizador de bajos, cantidad de swing o longitud del patrón.
3.Toque ligero: Pulse este botón al ritmo deseado para introducir un nuevo tempo. El Rhythm Wolf detecta el nuevo tempo tras tres toques.
4.Función secundaria: Mantenga pulsado este botón para acceder a las funciones secundarias de ciertos botones.
5.Interruptores de pasos: Pulse estos botones para añadir o eliminar un paso/nota del patrón. Mantenga pulsado Shift (Función secundaria) para acceder a sus funciones secundarias:
•Octava del sintetizador -/+: Utilice estos botones para desplazar el "teclado" del sintetizador de bajos (los interruptores de pasos en modo Grabación de interpretación) una octava hacia arriba o hacia abajo.
•1/4, 1/8, 1/16, 1/32: Utilice estos botones para seleccionar la división de tiempo del patrón (o sea, el valor de la nota de cada interruptor de pasos). Al mantener pulsado Shift, el indicador de pasos que está encima de la división de tiempo actual se iluminará.
•Triplete: Pulse este botón para activar o desactivar Triplet (Triplete), lo que transforma la división de tiempos en una división basada en tripletes (excepto para 1/32). Al mantener pulsado Shift, el indicador de pasos que está encima de este botón se ilumina cuando está activado.
•Swing: Pulse este botón y después gire la perilla Tempo para ajustar la cantidad de swing que se aplica al patrón. A 50, no se aplica swing. A 75, el patrón tiene swing en su totalidad. (Al igual que en los MPC de Akai Professional).
•Grabación de pasos: Pulse este botón para entrar al modo Grabación de pasos. Consulte la sección Modo Grabación de pasos de esta guía para aprender más. Al mantener pulsado Shift, el indicador de pasos que está encima de este botón se ilumina cuando está en este modo.
•Grabación de interpretación: Pulse este botón para entrar al modo Grabación de interpretación. Consulte la sección Modo Grabación de interpretación de esta guía para aprender más. Al mantener pulsado Shift, el indicador de pasos que está encima de este botón se ilumina cuando está en este modo.
•Grabación desactivada: Pulse este botón para desactivar la grabación. Consulte las secciones
Modo Grabación de pasos y Modo Grabación de interpretación de esta guía para aprender más. Al mantener pulsado Shift, el indicador de pasos que está encima de este botón se ilumina cuando está en este modo.
12

•Salida/pasante MIDI, sincronismo MIDI: Pulse este botón para alternar entre las funciones Salida y Pasante del conector MIDI Out/Thru (Salida/pasante MIDI) del Rhythm Wolf. La pantalla indicará cual está seleccionado actualmente:
Cuando se selecciona Out (Salida), el Rhythm Wolf envía sus propios mensajes MIDI a su conector MIDI Out/Thru y a su puerto USB.
Cuando se selecciona Thru (Pasante), los mensajes MIDI recibidos por la entrada MIDI In se envían al MIDI Out/Thru. Los mensajes del Rhythm Wolf se envían a su puerto USB.
•Sincronismo: Pulse este botón para seleccionar la fuente de reloj MIDI del Rhythm Wolf: Interna, externa, USB o compuerta. Consulte la sección Control de transporte para aprender más.
•Copiar, Borrar, Guardar: Utilice estos botones para copiar, borrar o guardar el patrón actual. Consulte la sección Guardar, copiar y borrar para aprender más.
6.Indicadores de pasos: Estos LED se iluminan para indicar qué pasos contienen una nota (o sea, qué indicadores de pasos están activos). Consulte la sección Modo Grabación de pasos de esta guía para aprender más.
7.Pads: Pulse estos pads para reproducir su voz correspondiente o para activar o desactivar la voz mientras mantiene pulsado el botón Mute/Solo (Silenciamiento/Solo).
8.Controles de voz: Utilice estos controles para efectuar un ajuste fino de sus respectivas voces.
•Bombo: La voz del bombo.
o Volumen: Gire esta perilla para ajustar el volumen del bombo. o Afinación: Gire esta perilla para ajustar el tono del bombo.
o Ataque: Gire esta perilla para ajustar el volumen del ataque inicial del bombo.
oDecaimiento: Gire esta perilla para ajustar el tiempo de decaimiento de la envolvente de amplitud del bombo.
•Redoblante: La voz del redoblante.
oVolumen: Gire esta perilla para ajustar el volumen del redoblante.
o Afinación: Gire esta perilla para ajustar el tono del redoblante.
oRuido: Gire esta perilla para establecer la cantidad de ruido añadida a la voz del redoblante.
oDecaimiento: Gire esta perilla para ajustar el tiempo de decaimiento de la envolvente de amplitud del redoblante.
•Percusión: Una voz de percusión variable que consiste en un sonido de tono alto y un sonido de tono bajo sumados y mezclados con ruido.
oVolumen: Gire esta perilla para ajustar el volumen de la percusión.
oTono alto: Gire esta perilla para ajustar el tono del sonido de alta frecuencia de la percusión.
oMezcla de sonido: Gire esta perilla para ajustar el equilibrio entre los sonidos de tono alto y bajo y la cantidad de ruido. En su posición mínima, no se oirá nada de ruido. En su posición máxima, el sonido consiste enteramente en ruido.
oTono bajo: Gire esta perilla para ajustar el tono del sonido de baja frecuencia de la percusión.
•Hi-Hat: La voz del hi-hat. Solo puede sonar un sonido –abierto o cerrado– por vez.
oVolumen: Gire esta perilla para ajustar el volumen del hi-hat.
o Afinación: Gire esta perilla para ajustar el tono del hi-hat.
oDecaimiento: Gire esta perilla para ajustar el tiempo de decaimiento de la envolvente de amplitud del hi-hat.
•Sintetizador de bajos: Un sintetizador de bajos con un filtro pasabajos de dos polos de 12 dB por octava.
oTipo de onda: Ajuste este interruptor para determinar el tipo de onda que utiliza el sintetizador de bajos: cuadrada o diente de sierra.
o Volumen: Gire esta perilla para ajustar el volumen del sintetizador de bajos.
o Afinación: Gire esta perilla para ajustar el tono del sintetizador de bajos.
13

oCorte del filtro: Gire esta perilla para ajustar la frecuencia de corte del filtro del sintetizador de bajos. Este valor también determina la frecuencia de la etapa de sostenido de la envolvente del filtro.
oResonancia del filtro: Gire esta perilla para ajustar la resonancia del filtro del sintetizador de bajos (también conocido como Q).
oEnvolvente de amplitud: Gire esta perilla para ajustar el pico del filtro de la envolvente del filtro de bajos. Esto controla la diferencia de frecuencias entre el ajuste del Filter Cutoff (Corte del filtro) y la parte más alta de la envolvente del filtro.
oDecaimiento: Gire esta perilla para ajustar el tiempo de decaimiento de la envolvente de amplitud del sintetizador de bajos.
9.Silenciamiento/Solo: Mantenga pulsado este botón para silenciar voces específicas en la reproducción del secuenciador. Pulse un pad para silenciar o anular el silenciamiento de su voz. Los pads que no están silenciados se iluminan, mientras que los que están silenciados no. Esto solo afecta a la reproducción del secuenciador; aún puede tocar los pads para disparar sus respectivas voces.
Mantenga pulsado Shift y después mantenga pulsado este botón para ingresar al modo Solo. En este modo, puede pulsar un pad para efectuar un solo con su voz (silenciando todas las demás). Suelte el botón para volver al funcionamiento normal. Este es un modo temporal, independiente de cualquier silenciamiento de pads.
10.Velocidad: Pulse este botón para editar la velocidad de un paso. Consulte la sección Modo Grabación de pasos de esta guía para aprender más.
Pulse este botón y reproducir/parar al mismo tiempo para iniciar la reproducción desde el comienzo del patrón en vez de la posición actual.
11.Reproducir/Parar: Pulse este botón para iniciar o detener la reproducción.
Pulse este botón y Velocity (Velocidad) al mismo tiempo para iniciar la reproducción desde el comienzo del patrón en vez de la posición actual.
Mantenga pulsado Shift y pulse este botón para enviar un mensaje "All Notes Off" (Todas las notas desactivadas).
12.Relleno: Pulse este botón para reproducir el relleno de la secuencia actual (A, B, o A y B). Consulte la sección Acerca de los patrones para aprender más.
13.Variación de secuencia: Pulse este botón para seleccionar si reproduce/edita la secuencia A, la secuencia B o la secuencia A y la B. Consulte la sección Acerca de los patrones para aprender más.
14.Selección de patrón / último paso: Pulse este botón y después pulse uno de los 16 interruptores de pasos para seleccionar el patrón con el mismo número. Pulse el botón Pattern Select nuevamente para volver al funcionamiento normal. Si hace esto durante la reproducción, el patrón actual terminará antes de continuar con el siguiente.
Mantenga pulsado Shift y luego pulse este botón. Aparecerá la longitud del patrón (en pasos) en la pantalla, y los indicadores de pasos se iluminarán de rojo para mostrar la longitud del patrón. Pulse uno de los 16 interruptores de pasos o gire la perilla Tempo para establecer la longitud del patrón (en pasos). Si el botón Seq Variation (Variación de secuencia) tiene ya sea A o B iluminados, la longitud máxima del patrón es de 16 pasos. Si ambos A y B están encendidos, la longitud máxima del patrón es de 23 pasos y la mínima es de 17. Pulse el botón Last Step nuevamente para volver al funcionamiento normal.
15.Atadura: Cuando se selecciona el sintetizador de bajos, mantenga pulsado este botón y luego pulse un interruptor de pasos para "atar" su nota al paso previo o para regresarla a su estado previo ("desatada"). Una nota atada "se mantiene" desde la anterior, lo que significa que su envolvente no se vuelve a disparar. Cuando mantiene pulsado este botón, los indicadores de pasos de los pasos que estén atados se iluminarán en ámbar, los que estén "desatados" se iluminarán en rojo y los que no tengan notas, estarán apagados.
Puede hacer esto para múltiples interruptores de pasos a la vez y puede atar varias notas consecutivas. Las notas también pueden "envolverse" desde el final al principio de una secuencia.
16.Volumen principal: Gire esta perilla para ajustar el volumen de las salidas Main Out (Salida principal) y Synth Out (Salida del sintetizador) del Rhythm Wolf.
17.Aullido: Gire esta perilla para ajustar la cantidad de overdrive (distorsión) aplicada a la salida Main Out del Rhythm Wolf.
14
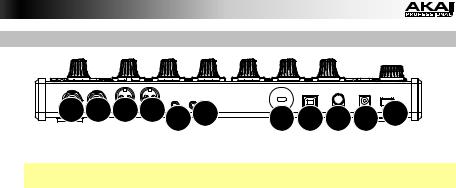
Panel trasero
6 7 8 9 10 11 |
5 4 3 2 1 |
1.Botón de encendido: Pulse este botón para encender o apagar el Rhythm Wolf.
Importante: Tras encender el Rhythm Wolf, déjelo calentar antes de usarlo. La temperatura puede afectar su afinación.
2.Entrada de CC: Utilice el adaptador de corriente incluido (12 V, 2 A, centro positivo) para conectar esta entrada a una toma de corriente.
3.Presilla del cable: Puede asegurar el cable a esta presilla para evitar que se desconecte accidentalmente.
4.Puerto USB: Utilice un cable USB estándar para conectar este puerto a un puerto USB disponible en su ordenador. Esta conexión le permite al Rhythm Wolf enviar y recibir datos MIDI a través de USB hacia y desde su ordenador.
5.Ranura de bloqueo Kensington: Puede utilizar esta ranura de bloqueo Kensington a fin de sujetar el Rhythm Wolf a una mesa u otra superficie.
6.Salida principal: Utilice un cable TRS de 6,35 mm (1/4 pulg.) estándar para conectar esta salida de nivel de línea a la entrada de una interfaz de audio, mezclador, sistema de amplificación, etc. También puede conectar auriculares estéreo a esta salida. Si la salida Synth Out no está conectada a nada, la salida Main Out incluirá las voces de la batería y del sintetizador de bajos. Si hay un cable conectado a la salida Synth Out, la salida Main Out solo incluirá las voces de la batería.
7.Salida del sintetizador: Utilice un cable TS de 6,35 mm (1/4 pulg.) estándar para conectar esta salida de nivel de línea a la entrada de una interfaz de audio, mezclador, sistema de amplificación, etc. (recomendamos conectar esta salida a una entrada balanceada utilizando un cable TRS en lugar de conectarla a una entrada no balanceada utilizando un cable TS). La voz del sintetizador de bajos se envía por esta salida solo si hay un cable conectado a ella. De lo contrario, la voz del sintetizador de bajos se envía a la salida Main Out.
8.Salida/pasante MIDI: Utilice un cable MIDI estándar de cinco patillas para conectar esta salida MIDI a la entrada MIDI de un dispositivo MIDI externo (por ejemplo, un sintetizador, secuenciador, caja de ritmos, etc.). Pulse el botón MIDI Out/Thru para establecer la función de este conector. La pantalla indicará cual está seleccionada actualmente. Consulte Interruptores de pasos: Salida/pasante MIDI más arriba para aprender más.
9.Entrada MIDI: Use un cable MIDI estándar de cinco patillas para conectar esta entrada MIDI a la salida MIDI de un dispositivo MIDI externo (por ejemplo, otro controlador MIDI). Para más información, visite akaipro.com/rhythmwolf a fin de descargar la última tabla de implementación MIDI.
10.Salida de disparo de compuerta: Utilice un cable TS de 3,5 mm (1/8 pulg.) estándar para conectar esta salida a la entrada de un dispositivo externo opcional que pueda recibir mensajes de compuerta (de disparo) desde el Rhythm Wolf.
11.Entrada de disparo de compuerta: Utilice un cable TS de 3,5 mm (1/8 pulg.) estándar para conectar esta entrada a la salida de un dispositivo externo opcional que pueda enviar mensajes de compuerta (de disparo) al Rhythm Wolf.
15
 Loading...