


WARNING
WARNING
The S20 is designed to be used in a standard household environment.
Power requirements for electrical equipment vary from area to area. Please ensure that your S20 meets the power requirements in your area. If in doubt, consult a qualified electrician or Akai Professional dealer.
120 VAC |
@ 60 Hz for USA and Canada |
220230/240 VAC |
@ 50 Hz for Europe |
240 VAC |
@ 50 Hz for Australia |
PROTECTING YOURSELF AND THE S20
Never touch the AC plug with wet hands.
Always disconnect the S20 from the power supply by pulling on the plug, not the cord.
Allow only an Akai Professional dealer or qualified professional engineer to repair or reassemble the S20. Apart from voiding the warranty, unauthorized engineers might touch live internal parts and receive a serious electrical shock.
Do not put, or allow anyone to put any object, especially metal objects, into the S20.
Use only a household AC power supply. Never use a DC power supply.
If water or any other liquid is spilled into or onto the S20, disconnect the power, and call your dealer.
Make sure that the unit is well-ventilated, and away from direct sunlight.
To avoid damage to internal circuitry, as well as the external finish, keep the S20 away from sources of direct heat (stoves, radiators, etc.).
Avoid using aerosol insecticides, etc. near the S20. They may damage the surface, and may ignite.
Do not use denaturated alcohol, thinner or similar chemicals to clean the S20. They will damage the finish.
Modification of this equipment is dangerous, and can result in the functions of the S20 being impaired. Never attempt to modify the equipment in any way.
Make sure that the S20 is always well-supported when in use (either in a specially-designed equipment rack, or a firm level surface).
When installing the S20 in a 19" rack system, always allow lU of ventilated free space above it to allow for cooling. Make sure that the back of the rack is unobstructed to allow a clear airflow.
In order to assure optimum performance of your S20, select the setup location carefully, and make sure the equipment is used properly. Avoid setting up the S20 in the following locations:
1.In a humid or dusty environment
2.In a room with poor ventilation
3.On a surface which is not horizontal
4.Inside a vehicle such as a car, where it will be subject to vibration
5.In an extremely hot or cold environment
S20 - Version L00 |
i |
WARNING
WARNING!!
To prevent fire or shock hazard, do not expose this appliance to rain or moisture.
1-En
IMPORTANT
This equipment is fitted with an approved converter plug.
To change the fuse in this type of plug proceed as follows:
1) Remove the fuse cover and old fuse. 2) Fit anew fuse which should be a BS1362 5 Amp A.S.T.A. or BSI approved type. 3) Refit the fuse cover.
If the AC mains plug fitted to the lead supplied with this equipment is not suitable for your type of AC outlet sockets, it should be changed to an AC mains lead, complete with moulded plug of the appropriate type.
If this is not possible, the plug should be cut off and a correct one fitted to suit the AC outlet. This should be fused at 5 Amps.
If a plug without a fuse is used, the fuse at the distribution board should not be greater than 5 Amp.
PLEASE NOTE: THE SEVERED PLUG MUST BE DESTROYED TO AVOID A POSSIBLE SHOCK HAZARD SHOULD IT BE INSERTED INTO A 13 AMP SOCKET ELSEWHERE.
The wires in this mains lead are coloured in accordance with the following code: BLUE -NEUTRAL
BROWN-LIVE
As the colours of the wires in the mains lead of this apparatus may not correspond with the coloured markings identifying the terminals in your plug, please proceed as follows:
The wire which is coloured BLUE must be connected to the terminal which is marked with the letter N or coloured BLACK.
The wire which is coloured BROWN must be connected to the terminal which is marked with the letter L or coloured RED.
DO NOT CONNECT ANY WIRE TO THE PIN MARKED E OR 1 OR COLOURED GREEN OR YELLOW 8 GREEN WHEN WIRING THE PLUG.
Ensure that all the terminals are securely tightened and no loose strands of wire exist.
Before replacing the plug cover, make certain the cord grip is clamped over the outer sheath of the lead and not simply over the wires.
6F-En
CAUTION (Only for the product sold in Canada and U.S.A.)
To prevent electric shock, do not use this polarized AC power plug with an extension cord, receptacle, or other outlet unless the blades can be fully inserted to prevent blade exposure.
14-En
ii |
S20 - Version 1.00 |
WARNING
FCC WARNING
This equipment has been tested and found to comply with the limits for a Class B digital device pursuant to Part 15 of the FCC rules. These limits are designed to provide reasonable protection against harmful interference in a residential installation. This equipment generates, uses, and can radiate radio frequency energy and, if not installed and used in accordance with the instructions, may cause harmful interference to radio communications. However, there is no guarantee that interference will not occur in a particular installation. If this equipment does cause harmful interference to radio or television reception, which can be determined by turning the equipment off and on, the user is encouraged to try to correct the interference by one or more of the following measures:
•Reorient or relocate the receiving antenna.
•Increase the separation between the equipment and receiver.
•Connect the equipment into an outlet on a circuit different from that to which the receiver is connected.
•Consult the dealer or an experienced radio/TV technician for help.
21 B-En
AVIS POUR LES ACHETEURS CANADIENS DU S20
Le present appareil numerique n'ement pas de bruits radioelectriques depassant les limites applicables aux appareils numeriques de la Class B prescrites clans le Reglement sur le brouillage radioelectrique edicte par le ministere des
Communications du Canada.
27-F
This digital apparatus does not exceed the Class B limits for radio noise emissions from digital apparatus set out in the Radio Interference Regulations of the Canadian Department of Communications.
27-En
CHANGES OR MODIFICATIONS NOT EXPRESSLY APPROVED BY THE MANUFACTURER FOR COMPLIANCE COULD VOID THE USER'S AUTHORITY TO OPERATE THE EQUIPMENT.
32-En
Copyright Notice
The AKAI S20 is a computer-based instrument and uses software contained in ROMs and floppy disks. Software that is provided with the instrument, including information contained in this manual, is copyrighted by applicable laws. You can use that software or information concerning the instrument only for personal use. You are strictly prohibited to copy or modify any part of the software or manual without written permission from AKAI ELECTRIC CO., LTD. in Japan.
S20 - Version l.00 |
iii |
WARRANTY
WARRANTY
AKAI Electric Co. Ltd. warrants its products, when purchased from an authorized "AKAI professional" dealer, to be free from defects in materials and workmanship for a period of 12 (twelve) months from the date of purchase. Warranty service is effective and available to the original purchase only, and only on completion and return of the AKAI Warranty Registration Card within 14 days of purchase.
Warranty coverage is valid for factory-authorized updates to AKAI instruments and their software, when their installation is performed by an authorized AKAI Service Center, and a properly completed Warranty Registration has been returned to your "AKAI professional" dealer.
To obtain service under this warranty, the product must, on discovery of the detect, be properly packed and shipped to the nearest AKAI Service Center. The party requesting warranty service must provide proof of original ownership and date of purchase of the product.
If the warranty is valid, AKAI will, without charge for parts or labor, either repair or replace the defective part(s). Without a valid warranty, the entire cost of the repair (parts and labor) is the responsibility of the product's owner.
AKAI warrants that it will make all necessary adjustments, repairs and replacements at no cost to the original owner within 12 (twelve) months of the purchase date if:
1) The product fails to perform its specified functions due to failure of one or more of its components. 2) The product fails to perform its specified functions due to defects in workmanship.
3)The product has been maintained and operated by the owner in strict accordance with the written instructions for proper maintenance and use as specified in this Operator's Manual.
Before purchase and use, owners should determine the suitability of the product for their intended use, and owner assumes all risk and liability whatsoever in connection therewith. AKAI shall not be liable for any injury, loss or damage, direct or consequential, arising out of use, or inability to use the product.
The warranty provides only those benefits specified, and does not cover defects or repairs needed as a result of acts beyond the control of AKAI, including but not limited to:
1)Damage caused by abuse, accident, negligence. AKAI will not cover under warranty any original factory disk damaged or destroyed as a result of the owner's mishandling.
2)Damage caused by any tampering, alteration or modification of the product: operating software, mechanical or electronic components.
3)Damage caused by failure to maintain and operate the product in strict accordance with the written instructions for proper maintenance and use as specified in this Operator's Manual.
4)Damage caused by repairs or attempted repairs by unauthorized persons.
5)Damage caused by fire, smoke, falling objects, water or other liquids, or natural events such as rain, floods, earthquakes, lightning, tornadoes, storms, etc.
6)Damage caused by operation on improper voltages.
IMPORTANT NOTE: This warranty becomes void if the product or its software is electronically modified, altered or tampered with in any way.
AKAI shall not be liable for costs involved in packing or preparing the product for shipping, with regard to time, labor, or materials, shipping or freight costs, or time or expense involved in transporting the product to and from AKAI Authorized Service Center or Authorized Dealer.
AKAI will not cover under warranty an apparent malfunction that is determined to be user error, or owner's inability to use the product.
THE DURATION OF ANY OTHER WARRANTIES, WHETHER IMPLIED OR EXPRESS, INCLUDING BUT NOT LIMITED TO THE IMPLIED CONDITION OF MERCHANTABILITY, IS LIMITED TO THE DURATION OF THE EXPRESS WARRANTY HEREIN.
AKAI hereby excludes incidental or consequential damages, including but not limited to:
1)Loss of time.
2)Inconvenience
3)Delay in performance of the Warranty. 4) The loss of use of the product.
5)Commercial loss.
6)Breach of any express or implied warranty, including the Implied Warranty of Merchantability, applicable to this product.
iv |
S20 - Version 1.00 |
|
|
Table of Contents |
Table of Contents |
|
|
Introduction ................................................................................... |
|
1 |
Features ....................................................................................................... |
|
......... 1 |
Panel Descriptions ...................................................................... |
|
2 |
Main Panel ...................................................................................................................... |
|
2 |
Rear Panel ...................................................................................................................... |
|
4 |
Handling Floppy Disks |
................................................................ |
5 |
THE DISK DRIVE ............................................................................................................ |
|
5 |
TAKING CARE OF YOUR DISKS ................................................................................... |
5 |
|
• Supplied Disks ..................................................................................................................................... |
|
6 |
Connections ................................................................................. |
|
7 |
Test Driving the S20 .................................................................... |
|
9 |
Playing Samples from Sound Disks ................................................................................ |
9 |
|
Sampling ........................................................................................................................ |
|
10 |
S20 Basics ................................................................................... |
|
11 |
Banks ............................................................................................................................. |
|
11 |
Memory: ..................................... |
……………………………………………………………...11 |
|
Stereo and/or Mono Sampling ....................................................................................... |
|
13 |
Files ............................................................................................................................... |
|
13 |
Programs ....................................................................................................................... |
|
14 |
• Multi-sampling and Examples of Layer Setting ................................................................................... |
14 |
|
• Example of Multi-timbre Sound Source Setting .................................................................................. |
15 |
|
The Number of Simultaneously Generated Voices ....................................................... |
16 |
|
The Mode Structure and Operation Flow ...................................................................... |
16 |
|
• S20 Mode Structure ........................................................................................................................... |
|
16 |
• Operational Flow ............................................................................................................................... |
|
16 |
Play Mode ................................................................................... |
|
17 |
Playback with Bank Keys .............................................................................................. |
|
17 |
Playback with Hold Feature ........................................................................................... |
|
17 |
• Making a Sound layer ........................................................................................................................ |
|
17 |
• Switching to Another Loop ................................................................................................................. |
|
18 |
Canceling Loop Playback .............................................................................................. |
|
18 |
• ALL STOP ......................................................................................................................................... |
|
18 |
• STOP ................................................................................................................................................ |
|
18 |
Reversing a Sample........................................................................................................ |
|
19 |
S20 - Version 1.00 |
V |
Table of Contents |
|
Sampling ..................................................................................... |
20 |
Sampling Procedure ..................................................................................................... |
20 |
• Auto-triggered Sampling ................................................................................................................... |
22 |
• Manual Sampling .............................................................................................................................. |
22 |
Tips for Sampling .......................................................................................................... |
23 |
Edit Mode .................................................................................... |
24 |
Operational Procedure in Edit Mode ............................................................................. |
24 |
TRIM ............................................................................................................................. |
25 |
• START POINT .................................................................................................................................. |
25 |
• START FINE ..................................................................................................................................... |
25 |
• SAMPLE LENGTH ............................................................................................................................ |
26 |
• LENGTH FINE .................................................................................................................................. |
26 |
LOOP ............................................................................................................................ |
26 |
• LOOP/ONE SHOT . ........................................................................................................................... |
26 |
• DISCARD ......................................................................................................................................... |
27 |
• LOOP LENGTH ................................................................................................................................ |
27 |
• LOOP FINE ...................................................................................................................................... |
27 |
PITCH.................................................................................................................................................. |
28 |
• TRANSPOSE ................................................................................................................................... |
28 |
• SAMPLE TUNE ................................................................................................................................ |
28 |
• CONSTANT PITCH .......................................................................................................................... |
28 |
• BEND ................................................................................................................................................ |
28 |
BEAT LOOP FUNCTION .............................................................................................. |
29 |
• BEAT ................................................................................................................................................ |
29 |
• SAMPLE TEMPO ............................................................................................................................. |
29 |
• NEW TEMPO ................................................................................................................................... |
29 |
• MASTER TEMPO . ............................................................................................................................ |
29 |
LEVEL ........................................................................................................................... |
30 |
• LEVEL .............................................................................................................................................. |
30 |
• MIDI VELOCITY ............................................................................................................................... |
30 |
• RELEASE ......................................................................................................................................... |
30 |
• MONO TRIGGER ............................................................................................................................. |
30 |
• RESAMPLE ...................................................................................................................................... |
31 |
PROG. .......................................................................................................................... |
31 |
• KEYRANGE HIGH ............................................................................................................................ |
31 |
• KEYRANGE LOW ............................................................................................................................ |
31 |
• PROG.NO.......................................................................................................................................... |
32 |
• MIDI CHANNEL . ....................................................................................................................................................... |
32 |
• PRIORITY.......................................................................................................................................... |
32 |
MIDI .................................................................................................................................................... |
32 |
• MIDI TRANSPOSE . ................................................................................................................................................. |
32 |
• MASTER TUNE ................................................................................................................................ |
32 |
• P.CHANGE CHANNEL . .......................................................................................................................................... |
32 |
• NOTE ASSIGN ................................................................................................................................. |
33 |
• OUT/THRU ....................................................................................................................................... |
33 |
DISK ................................................................................................................................................... |
33 |
vi |
S20 - Version 1.00 |
|
Table of Contents |
Sequence Mode .......................................................................... |
34 |
Recording Key Operations ............................................................................................. |
34 |
Playback of the Sequence ............................................................................................. |
35 |
Erasing a Track .............................................................................................................. |
35 |
• To erase the entire contents of a track ................................................................................................ |
35 |
• To erase certain bank data contained in a track .................................................................................. |
35 |
• To erase a bank data area contained in a track ................................................................................... |
35 |
Disk Operations ......................................................................... |
36 |
Loading Data ................................................................................................................. |
36 |
• Notes on Loading Files into S20 . ........................................................................................................ |
37 |
• Notes on Loading Samples for S1000/1100 Samplers ........................................................................ |
38 |
Saving Data ................................................................................................................... |
38 |
• Handling Data That Exceeds a Floppy Disk Capacity .......................................................................... |
40 |
Deleting a File in a Floppy Disk ..................................................................................... |
41 |
Formatting a Floppy Disk ............................................................................................... |
42 |
Applications ............................................................................... |
44 |
Effective Use of BEAT LOOP FUNCTION ..................................................................... |
44 |
• Tips for Looping .................................................................................................................................. |
44 |
Controlling the S20 from a MIDI Keyboard .................................................................... |
45 |
• Recording Panel Key Operations to the Sequencer ............................................................................ |
45 |
Appendix ..................................................................................... |
46 |
General Information about Optional Components ......................................................... |
46 |
• Memory Expansion ............................................................................................................................. |
46 |
Specifications ............................................................................. |
47 |
S20 MIDI Implementation Chart ................................................ |
49 |
S20 – Version 1.00 |
vii |
Introduction
Introduction
Thank you for buying an AKAI S20 16-bit Stereo Phrase Sampler.
The S20 is a professional-quality 16-bit stereo sampler that has been specifically designed for phrase sampling. It combines powerful capabilities with a clear, easy-to-use interface. The S20 gives you the features you need for sampling and editing in the studio, along with dedicated controls to allow you to do on-the-fly sampling, looping and playback in a live performance situation (ideal for DJs or live broadcast use).
Of course, the S20 also provides the features of a conventional MIDI sampler, including multi-sampling and multi-timbral capabilities. So if you're already using a GM module or synthesizer, the S20 will make it easy to add new sounds, phrase samples, and sound effects to your music.
The S20 is another member of Akai's highly acclaimed S-Series family of samplers. We hope that it will provide you many years of creative satisfaction.
To get the most from your S20, please read this manual thoroughly and keep it handy for future reference.
Features
•MIDI compatible digital sampler with 8 voice polyphony
•16-bit stereo sampling at 32/16/8 kHz sampling frequencies
•Maximum 14 second recording at 32 kHz mono sampling with the standard memory configuration; expandable to maximum 262 seconds with an additional 16 Megabyte SIMM installed
•16 large bank keys for sample assignment and function keys for real time performance on the front panel
•Sequence feature that records and reproduces the main panel operations
•Tap feature that provides BPM (beats per minute) display according to the manual tapping
•Beat loop function that provides a tempo from a sample loop length or adjusts samples' pitch by a tempo value entry
•Resampling feature that saves memory
•Easy sample editing using the edit matrix while auditioning samples
•Simple management of samples using 16 banks with edit parameters for individual bank control
•Multi-timbral/multi-sampled sound module that is fully MIDI controllable
•Built-in floppy disk drive that accepts 3.5-inch 2HD/2DD disks
•Able to load sample data from sound library disks for almost all AKAI S-series samplers (5900/S 1000/ S 1100/S2800/S3000/S3200/52000/S01), and REMIXI6
Note: In this manual, the names of main panel controllers (keys) are represented in bold.
S20 - Version 1.00 |
1 |
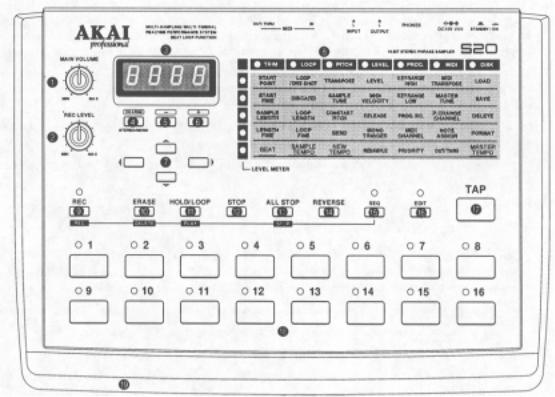
Panel Descriptions
Panel Descriptions
Main Panel
1. MAIN VOLUME
Adjusts the output level and headphone level at OUTPUT.
2. REC LEVEL
Adjusts the input level at INPUT. The current input level is shown on the LEVEL METER. In REC standby mode, the LEDs on the left column of the Edit Matrixes function as a level meter, allowing you to check the level.
3. PROG.No./DATA
The display shows information such as a parameter, symbol, current status, etc., depending on the current mode selection.
4. COARSE
This is used while you are editing the starting point or length of a sample to move quickly through the sample data. Press [+][-] while holding down this key to increase or decrease the first two digits of the number on the display.
This also switches between stereo and monaural while you are sampling.
5. -
Press this key to decrease the number on the display. Keep pressing this key to decrease the number continuously. Also, if you press [+] while holding down this key, the number will decrease rapidly.
6. +
Press this key to increase the number on the display. Keep pressing this key to increase the number continuously. Also, if you press [-] while holding down this key, the number will increase rapidly.
7. Cursor keys
Used to select a parameter in Edit Matrix when you are working in Edit mode; The cursor keys are also used to show a total sampling time with ~ cursor key (in seconds, at 32 kHz sampling frequency, mono) or remaining sampling time with the other cursor keys in Play mode and Sequence mode.
2 |
S20 - Version 1.00 |
8. Edit Matrix
This edit parameter map gives you fast access to a desired parameter; Move the light of an LED (left/ right/up/down) using cursor keys. The lit LEDs indicate the current parameter at their cross point in the matrix. The current parameter value is shown in PROG.No./DATA©.
9. REC
Pressing this key starts the sampling process; Pressing this key puts the S20 in record standby status; 'Consecutively pressing one of the bank keys starts sampling. REC is also used to execute commands in Edit mode and to start and stop sequence recording in Sequence mode.
10. ERASE (DELETE)
Pressing this key clears a sample assigned in a bank; Pressing a bank key along with ERASE will clear the sample in that bank. ERASE in Sequence mode is used to clear a track or bank data assigned in a track.
11. HOLD/LOOP (PLAY)
Pressing this key along with a bank key causes a looped sample to playback continually. You cannot have playback on hold with a sample without a loop setting (one-shot sample).
Pressing this key during sampling stops sampling and starts looped playback of that sample.
HOLD/LOOP is also used in Sequence mode to start recording a sequence.
12. STOP
For looped playback of a sample, pressing this key along with the corresponding bank key stops that playback. Multiple samples in loop playback can individually be stopped by this method.
13. ALL STOP (STOP)
Stops all sample playback immediately.
Playback of a sequence in Sequence mode can also be stopped by pressing this key.
Panel Descriptions
14. REVERSE
Pressing this along with a bank key causes a reversed playback of the corresponding sample; Releasing this with the bank key held down changes to normal playback of that sample.
15. SEQ
Pressing this key lights its LED and the S20 enters Sequence mode. Pressing the key a second time returns the unit to Play mode.
16. EDIT
Pressing this key lights up its LED indicating that the S20 is in Edit mode. Pressing the key a second time turns off the LED and returns the S20 to Play mode.
17. TAP
Tapping a tempo on this key sets the current tempo to the tapped tempo. NEW TEMPO for BEAT LOOP FUNCTION can be adjusted with this method.
Also, pressing this key along with a bank key will cause repeated playback of the beginning of the corresponding sample; Press the [+][-] to adjust the playback tempo for that beginning loop.
18. Bank keys 116
Pressing any bank keys) plays the samples) assigned to individual banks.
In play mode, an available bank (that contains a sample and is playable) is indicated by its LED being lit.
In Edit mode, you can select any one bank for editing by pressing the corresponding bank key; Its LED lights, indicating that the bank is editable.
19. Floppy disk drive
Used for loading or saving sample data from or to a floppy disk. This drive accepts a 2DD or 2HD floppy disk. ,
S20 - Version L00 |
3 |
Panel Descriptions
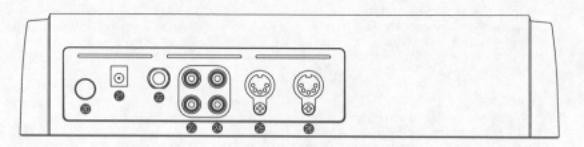
Rear Panel
20. POWER |
24. INPUT |
Turns on or off the S20. |
Connection for sound sources (such as the CD |
21. DC10V |
player or tape recorder) used for sampling. |
|
Connects to the enclosed S20 AC adapter.
22. PHONES
Connects to a pair of headphones.
The sound you monitor here also goes to OUTPUT 23.
(To protect your ears and headphones, turn down MAIN VOLUME 1. to minimum setting before turning on the unit.)
23. OUTPUT
Audio output of sampled sounds.
25. MIDI IN
Connects to MIDI OUT on an external MIDI controller.
26. MIDI OUT/THRU
Connects to MIDI IN on an external MIDI device. OUT or THRU operation is selected in Edit mode.
4 |
S20 - Version |
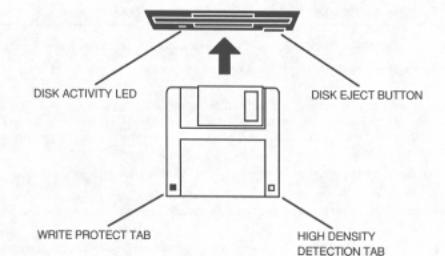
Handling Floppy Disks
Handling Floppy Disks
THE DISK DRIVE
The 3.5 inch floppy disk drive will accept high density (2HD) and double density (2DD) disks .
Disks are inserted into the drive:
The label should be facing upwards when it is inserted (actually, it is physically impossible to insert disks the wrong way round without using an extreme amount of force!).
To eject the disk, simply press the DISK EJECT button. While loading, saving or formatting the disk, the DISK ACTIVITY LED will be lit. NEVER press DISK EJECT button while the LED is lit.
It is important to remember that, unlike a synthesizer, the S20 has no means of storing sounds in its internal memory. As a result, it is vital that you save your work to disk before turning the power off otherwise you will lose your work and, unless previously saved or backed up, it will be gone for ever. In fact, it is a good idea to regularly save your work as you are working. All good computer users do this as it prevents the accidental loss of data should power be accidentally removed from the instrument. This also serves as a form of `undo' - if you make some kind of mistake in your programming and editing and can't fix it, you can load the last level of editing back into the sampler.
It may be a bit tedious to have to stop every now and then to save your work but it is better than losing some valuable sounds.
TAKING CARE OF YOUR DISKS
These floppy disks contain valuable sound data and, as such, should be treated with extreme care. Therefore, please observe the following points:
•Never slide the metal cover back and touch the disk. Finger marks may render the disk unreadable.
•Don't leave the disk in the drive whenever possible. When the disk is in the drive, the metal protective cover slides back exposing the actual disk inside and this makes it susceptible to picking up dust which may cause read errors.
•Do not leave your disks in a hot car.
S20 - Version 1.00 |
5 |

Handling Floppy Disks
Do not place your disks next to any magnetic sources such as speakers, amplifiers, televisions, etc. Also, try to avoid X-ray machines but with the added security at airports these days, this may not be possible. At airports, it is sometimes possible to ask for your disks to be inspected by hand at security desks. Always check with the security officer, just in case. Security X-ray machines are generally safe with disks, though. If in doubt, make backup copies which should be left at home.
Note: Some checked-in luggage are X-rayed by quite powerful machines that are not as safe as those that check hand luggage. It is probably best to take your disks as hand luggage.
Do not leave your disks around liquids - one accidental spill could ruin a lot of work!
Always use high quality disks. While cheap ones may be appealing, they are prone to errors more than good ones.
Try to ensure that the write protect tab is switched on (i.e. the tab not blocking the hole). This will prevent accidental erasure, formatting and loss of data. It may be a nuisance to try to write to the disk and find it write protected but it is less of a nuisance than accidentally over-writing a set of your favourite samples and programs!
Try to get into the habit of labelling your disks - it will pay dividends when you are searching for something.
Invest in a sturdy carrying case for your floppies, especially if you are a gigging musician. Heavy duty metal camera cases are ideal and some flight case manufacturers now make special heavy duty disk flightcases.
Even if you are using a hard disk of any sort, please make sure you have backed up your work to floppy disks. It can be time consuming but it will be worth it if you ever have a problem with your hard disk!
• Supplied Disks
Your S20 comes with four sound disks. A portion of this manual is described using such disks. The following is the contents of the sound disk.
|
Disk 1 |
ALL1 file |
Funky phrases (with demo sequence). |
|
|
Disk 2 |
ALL1 file |
House music phrases (with demo sequence). |
|
|
Disk 3 |
ALL1 file |
HipHop music phrases. |
|
|
Disk 4 |
ALL1 file |
Sound effects 1 |
|
|
|
ALL2 file |
Sound effects 2 |
|
|
|
ALL3 file |
Electric bass |
|
|
|
|
|
|
6 |
S20 - Version 1.00 |
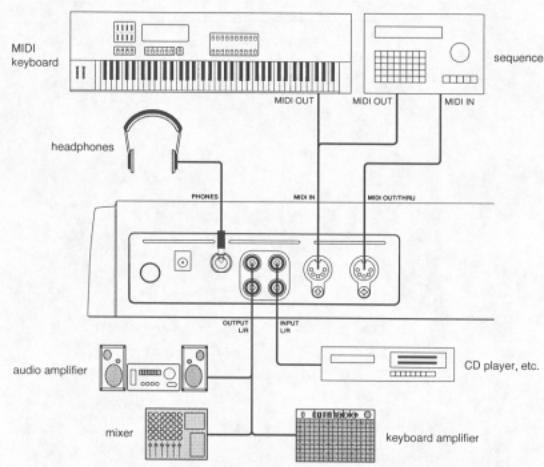
Connections
Connections
•Make sure that the S20 and other connected equipment are all turned off.
•Connect the sound source you are sampling (such as a CD player) to the INPUT.
•If you want the S20 to be MIDI controlled, connect a MIDI controller's (master keyboard, sequencer, etc.) MIDI OUT to the MIDI IN of the S20.
•If you want to record your performance on the S20 as MIDI data, connect a sequencer's MIDI IN to the MIDI OUT/THRU of the S20.
•Connect the S20 OUTPUT to the line inputs of an external amplifier or mixer. Connect headphones if necessary.
S20 - Version 1.00 |
7 |
Connections
•Before turning on the S20, make sure that the amplifier is turned off and the mixer volume is turned down.
•Turn on the S20; Its display first blinks, then indicates r 01. It shows r 4 with a 4-Megabyte SIMM installed or r 16 with a 16-Megabyte SIMM installed. After a while, the display changes to < 1 > indicating that the S20 is ready to use.
•Turn on the amplifier or mixer; Adjust the volume accordingly.
•When you press the bank key 1 on the S20, you can audition the sampler test tone.
Note: If the sample test tone is not heard, check the following:
•All equipment is turned on.
•All cables are properly connected.
•Volume of the mixer or amplifier is turned up enough; MAIN VOLUME setting on the S20 is turned up enough.
8 |
S20 - Version 7.00 |
Test Driving of the S20
Test Driving the S20
This section will get you up to running with the S20. It explains how to use the sound disks supplied and basic sampling techniques. For detailed explanations of various playing methods, sample editing, sequencing and so on, refer to the individual descriptions in the subsequent sections.
Playing Samples from Sound Disks
The following describes how to playback samples from a floppy disk.
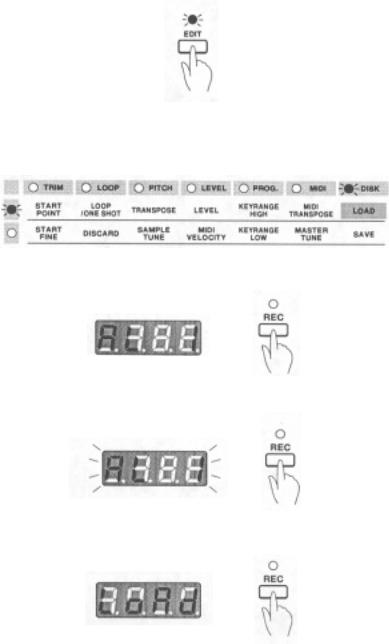
1. Press EDIT to light up the EDIT LED.
2.Insert one of the supplied sound disks into the drive located on the front panel of the S20.
3.Select LOAD in the Edit Matrix by moving the LED light with cursor keys; LOAD is at the top of the rightmost DISK row.
4. Press REC to show R L 1 in the display. If R L 1 is not shown, press [-] to find it.
5. Press REC a second time. The display will blink.
6. Press REC a third time; The display will change to L o A d to indicate that sample data is now loading.
S20 - Version 1.00 |
9 |
Test Driving of the S20
7. Press EDIT to turn off the EDIT LED; You are now in Play mode.
8. You can play a sample assigned to any bank with a lit LED by simply pressing that bank key.
•You can play multiple samples at a time by pressing several bank keys simultaneously.
•For a phrase sample that loops, like ones from the sound disk, you can set the loop to hold by pressing HOLD/LOOP and the corresponding bank key simultaneously; That sample will go on playing in a loop after the key is released. To stop playing a sample, press the corresponding bank key along with STOP, simultaneously. Pressing ALL STOP will stop all samples currently being played.
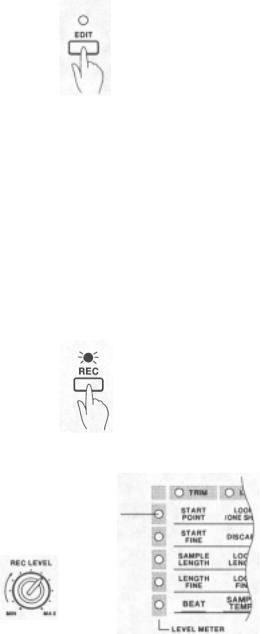
Sampling
1.Make sure that the S20 is in Play mode (with EDIT and SEQ LEDs both turned off) and start the sound source (i.e. the CD player, cassette or turntable).
2.Press REC.
3.Adjust the source input level that is shown in LEVEL METER (the LEDs lined vertically under Edit Matrix), using REC LEVEL; Set the level as high as possible, but do not light up the top LED.
Set the level so this top LED does not light up.
4.Press the bank key of an empty bank (one with its LED turned off) at the point you want to start sampling. Press STOP at the point you want to stop sampling/recording.
You can have up to 16 samples within the memory of the S20.
5.The recorded sample (from the CD player or turntable) will play each time the corresponding bank key is pressed.
Note; If F u L L blinks when you have started sampling by pressing a bank key, there is no more free memory. If you have a dispensable bank, press that bank key while holding down ERASE to erase the sound. By erasing the sound, the memory used for that bank will be accessable and you will be able to sample new sounds.
10 |
S20 - Version 1.00 |
 Loading...