


 Loading...
Quickstart Guide
English ( 3 – 8 )
Guía de inicio rápido
Español ( 9 – 15 )
Guide d’utilisation rapide
Français ( 16 – 22 )
Guida rapida
Italiano ( 23 – 29 )
Schnellstart-Anleitung
Deutsch ( 30 – 36 )
Appendix
English ( 38 )

2
Quickstart Guide (English)
Introduction
Features:
•Standalone MPC—no computer required
•7” (177 mm) full-color multi-touch display
•Also acts as a control surface for MPC software
•Full-size MIDI input and output
Box Contents
MPC One |
Software Download Card |
Power Adapter |
Quickstart Guide |
USB Cable |
Safety & Warranty Manual |
Important: Visit akaipro.com and find the webpage for MPC One to download the complete User Guide.
•2 GB of user storage, 2 GB pre-installed content included
•2 GB of RAM
•Full-size SD card slot
•USB-A 2.0 slot for thumb drive or MIDI controller
Support
For the latest information about this product (documentation, technical specifications, system requirements, compatibility information, etc.) and product registration, visit akaipro.com.
For additional product support, visit akaipro.com/support.
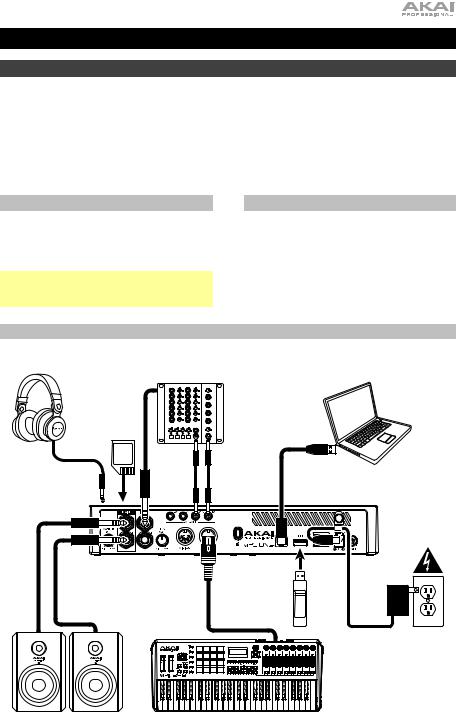
Connection Diagram
Items not listed under Introduction > Box Contents are sold separately.
Synthesizer |
Computer |
|
(optional) |
SD Card
(front panel)
Headphones
(front panel)
USB
Flash
Drive
Power
Powered Monitors |
MIDI Controller |
3

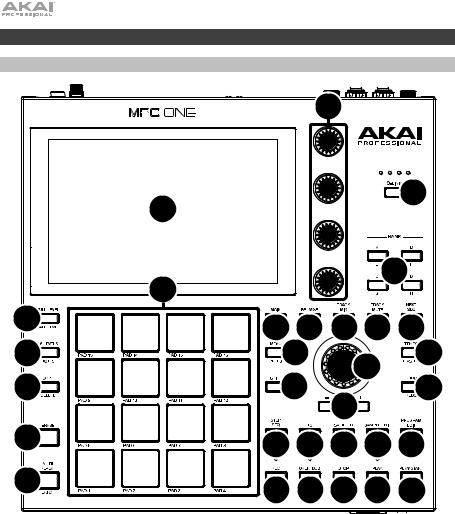
Features
Top Panel
|
|
12 |
|
|
||
|
1 |
|
|
|
13 |
|
|
|
|
|
|
||
|
6 |
|
|
7 |
||
8 |
|
|
|
|
||
15 16 17 |
18 19 |
|||||
9 |
||||||
14 |
|
2 |
30 |
|||
10 |
|
5 |
|
4 |
||
|
3 |
|
||||
|
|
|
|
|
||
31 |
20 |
21 22 |
23 24 |
|||
|
||||||
11 |
25 |
26 |
27 |
28 |
29 |
|
|
||||||
Navigation & Data Entry Controls
1.Display: This full-color multi-touch display shows information relevant to MPC One’s current operation. Touch the display (and use the hardware controls) to control the MPC interface. See Operation to learn how to use some basic functions.
Important: Remember to remove the protective film from the MPC One touchscreen!
2.Data Dial: Use this dial to scroll through the available menu options or adjust the parameter values of the selected field in the display. Pressing the dial also functions as an Enter button.
3.–/+: Press these buttons to increase or decrease the value of the selected field in the display.
4.Undo / Redo: Press this button to undo your last action.
Press and hold Shift and press this button to redo the last action you undid.
5.Shift: Press and hold this button to access some buttons’ secondary functions (indicated by red writing).
4

Pad & Q-Link Controls
6.Pads: Use these pads to trigger drum hits or other samples. The pads are velocity-sensitive and pressure-sensitive, which makes them very responsive and intuitive to play. The pads will light up different colors, depending on how hard you play them (ranging from yellow at a low velocity to red at the highest velocity). You can also customize their colors.
7.Pad Bank Buttons: Press any of these buttons to access Pad Banks A–D. Press and hold Shift while pressing any of these buttons to access Pad Banks E–H. Alternatively, double-press one of these buttons.
8.Full Level / Half Level: Press this button to activate/deactivate Full Level. When activated, the pads will always trigger their samples at the maximum velocity (127), regardless of the amount of MPC One you use.
Press and hold Shift and then press this button to activate/deactivate Half Level. When activated, the pads will always trigger their samples at half-velocity (64).
9.16 Level / Notes: Press this button to activate/deactivate 16 Level. When activated, the last pad that was hit will be temporarily copied to all 16 pads. The pads will play the same sample as the original pad, but a selectable parameter will increase in value with each pad number, regardless of the amount of MPC One you use.
Press and hold Shift and press this button to activate/deactivate Notes mode for the pads. When activated, you can play musical scales/modes, chords or progressions using the pads while in any mode. Use Pad Perform Mode to configure the settings for the pads.
10.Copy / Delete: Press this button to copy one pad to another. When the From Pad field is selected, press the “source” pad (the pad you want to copy). When the To Pad graphic (of all pads) is selected, press the “destination” pad. You can select multiple destination pads, and you can select pads in different pad banks. Tap Do It to continue or Cancel to return to the previous screen.
Press and hold Shift and press this button to delete.
11.Note Repeat / Latch: Press and hold this button, and then press a pad to trigger that pad’s sample repeatedly. The rate is based on the current tempo and Time Correct settings.
Press and hold Shift and then press this button to “latch” the Note Repeat feature. When latched, you do not have to hold the Note Repeat button for it to be activated. Press Note Repeat once more to unlatch it.
12.Q-Link Knobs: Use these touch-sensitive knobs to adjust various parameters and settings. The knobs can control one column of parameters at a time. The lights above the Q-Link Knobs indicate the currently selected column. Press the Q-Link button to change which column of parameters they currently control.
13.Q-Link Button: Press this button to change which column of parameters the Q-Link Knobs currently control (indicated by the lights above the Q-Link Knobs). Each press will select the next column.
Press and hold Shift and then press this button to select the previous column instead.
Mode & View Controls
14.Menu / Prefs: Press this button to open the Mode Menu. You can tap an option on the Menu screen to enter that mode, view, etc.
Press and hold Shift and then press this button to open the Preferences page in the Menu.
15.Main / Grid: Press this button to enter Main Mode.
Press and hold Shift and then press this button to enter Grid View Mode.
16.Browse / Save: Press this button to view the Browser. You can use the Browser to locate and select programs, samples, sequences, etc.
Press and hold Shift and then press this button to to save the current project (including its samples, programs, sequences, and songs).
17.Track Mix / Pad Mix: Press this button to view the Track Mixer where you can set levels, stereo panning, and other settings for your tracks, programs, returns, submixes, and masters.
Press and hold Shift and then press this button to view the Pad Mixer where you can set a program’s levels, stereo panning, routing, and effects.
5

18.Track Mute / Pad Mute: Press this button to view Track Mute Mode where you can easily mute tracks within a sequence or set mute groups for each track.
Press and hold Shift and press this button to view Pad Mute Mode where you can easily mute pads within a program or set mute groups for each pad within a program.
19.Next Seq / XYFX: Press this button to view Next Sequence Mode where you can trigger different sequences simply by playing the pads. This is useful for live performances, letting you change a song’s structure in real time.
Press and hold Shift and press this button to view XYFX Mode, which turns the touchscreen into an XY pad where each axis represents the range of an effect parameter. As you move touch or move your finger on the touchscreen, the current position will determine the current value of the two parameters. You can use this mode to create interesting effect automation on your tracks.
20.Step Seq / Automation: Press this button to view Step Sequencer Mode where you can create or edit sequences by using the pads as "step buttons," simulating the experience of a traditional step-sequencer-style drum machine.
Press and hold Shift and press this button to open Grid View Mode with the last used automation parameter for the track selected.
21.TC / On/Off: Press this button to open the Timing Correct window, which contains various settings to help quantize the events in your sequence.
Press and hold Shift and press this button to turn Timing Correct on and off.
22.Sampler / Looper: Press this button to view the Sampler where you can record audio samples to use in your projects.
Press and hold Shift and press this button to view the Looper where you can record and overdub audio in real time—a great tool for live performance as well as spontaneous moments in the studio. You can export the loop as a sample to use in your project.
23.Sample Edit / Q-Link Edit: Press this button to view Sample Edit Mode where you can edit your samples using various functions and processes.
Press and hold Shift and press this button to view Q-Link Edit Mode where you can assign other parameters to the Q-Link knobs.
24.Program Edit / MIDI Control: Press this button to view Program Edit Mode, which contains all parameters for editing your programs.
Press and hold Shift and press this button to view MIDI Control Mode where you can customize what MIDI messages are sent from certain controls on your hardware.
Transport & Recording Controls
25.Rec: Press this button to record-arm the sequence. Press Play or Play Start to start recording. Recording in this way (as opposed to using Overdub) erases the events of the current sequence. After the sequence plays through once while recording, Overdub will be enabled.
26.Overdub: Press this button to enable Overdub. When enabled, you can record events in a Sequence without overwriting any previously recorded events. You can enable Overdub before or during recording.
27.Stop: Press this button to stop playback. You can double-press this button to silence audio that is still sounding once a note stops playing. Press and hold Shift and press this button to return the playhead to 1:1:0.
28.Play: Press this button to play the sequence from the playhead’s current position.
29.Play Start: Press this button to play the sequence from its start point.
30.Tap Tempo / Master: Press this button in time with the desired tempo to enter a new tempo (in BPM).
Press and hold Shift and press this button to set whether the currently selected sequence follows its own tempo (the button will be lit amber) or a master tempo (the button will be lit red).
31.Erase: As a Sequence is playing, press and hold this button and then press a pad to delete the note event for that pad at the current playback position. This is a quick way to delete note events from your sequence without having to stop playback. When playback is stopped, press this button to open the Erase window where notes, automation and other sequence data can be erased from the sequence. Download the full User Guide for more information.
6
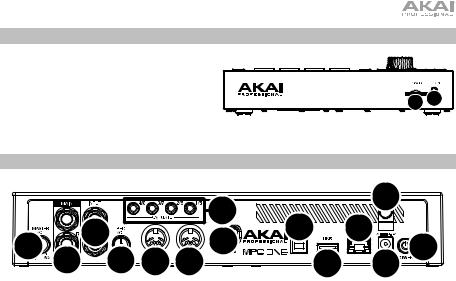
Front Panel
1. SD Card Slot: Insert a standard SD, SDHC or SDXC card into this slot to access its files directly using MPC One.
2. Phones (1/8” / 3.5 mm): Connect standard |
1 2 |
1/8” (3.5 mm) stereo headphones to this output.
Rear Panel
|
|
|
13 |
|
2 |
|
|
|
8 |
5 |
4 |
|
|
9 |
|
14 |
3 |
|||
10 |
7 12 11 |
|
6 |
1 |
1.Power Input: Use the included power adapter to connect MPC One to a power outlet.
2.Power Adapter Restraint: Secure the power adapter cable to this restraint to prevent it from accidentally unplugging.
3.Power Switch: Turns MPC One’s power on/off.
4.Link: Connect a standard Ethernet cable to this port to use Ableton Link and other compatible devices with MPC One. Download the full User Guide for more information.
5.USB-B Port: Use the included USB cable to connect this high-retention-MPC One USB port to an available USB port on your computer. This connection allows MPC One to send/receive MIDI and audio data to/from the MPC software on your computer.
6.USB-A Port: Connect a USB flash drive to this USB port to access files directly using MPC One. You can also connect a standard MIDI controller to this port.
7.Rec Vol: Turn this knob to adjust the volume of the inputs.
8.Inputs (1/4” / 6.35 mm): Use standard 1/4” (6.35 mm) TRS cables to connect these inputs to an audio source (mixer, synthesizer, drum machine, etc.). In Sample Record Mode, you can select whether you want to record either channel or both channels in stereo or in mono.
9.Master Vol: Turn this knob to adjust the volume of the outputs and phones output.
10.Outputs (1/4” / 6.35 mm): Use standard 1/4” (6.35 mm) TRS cables to connect these outputs to your monitors, mixer, etc.
11.MIDI In: Use a standard 5-pin MIDI cable to connect this input to the MIDI output of an external MIDI device (synthesizer, drum machine, etc.).
12.MIDI Out: Use a standard 5-pin MIDI cable to connect this output to the MIDI input of an external MIDI device (synthesizer, drum machine, etc.).
13.CV/Gate Outs: MPC One will send control voltage (CV) and/or Gate signals over these outputs to optional external sequencers. Use standard 1/8” (3.5 mm) TS cables to send a single CV/Gate signal per output, or use a stereo TRS-to-dual mono TSF breakout cable (such as a Hosa YMM261) to send two CV/Gate signals per output.
14.Kensington® Lock Slot: You can use this slot to secure your MPC One to a table or other surface.
7
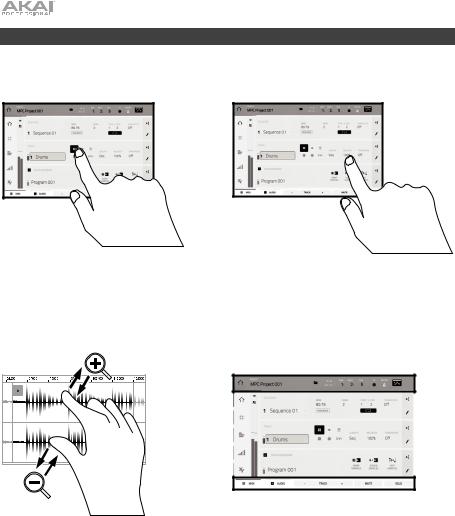
Operation
Here is some general information about how to use the MPC One display:
x2
Tap a button or option to select it. Use the data dial or –/+ buttons to change its setting or value
Spread two fingers to zoom in (into a section of a waveform, for example). Pinch two fingers to zoom out.
Double-tap a button to access advanced editing options. In some cases, this will show a numeric keypad that you can use to enter a value (an alternative to the data dial or –/+ buttons). Tap the upper-left part of the display to return to the previous view.
The upper edge of the display shows the toolbar, which contains information about the current view (often the name of the current track, sequence, audio pointer position, etc.). Tap an item to select it.
The lower edge of the display shows various buttons that you can use in the current view. Tap a button to press it.
To return to a previous view, either tap outside of the window currently in the display or tap the left arrow () in the upper-left part of the display.
8
Guía de inicio rápido (Español)
Introducción
Características:
•MPC autónomo—no requiere ordenador
•Pantalla multitácil de 177 mm (7 pulg.) a todo color
•También funciona como superficie de control para el software MPC
•Entrada y salida MIDI de tamaño completo
•2 GB de almacenamiento para el usuario y 2 GB de contenido preinstalado incluido
•2 GB de RAM
•Ranura para tarjeta SD de tamaño completo
•Ranura USB-A 3.0 para unidade de memoria o controladore MIDI
Contenido de la caja |
|
Soporte |
MPC One
Adaptador de alimentación
Cable USB
Tarjeta de descarga de software
Guía de inicio rápido
Manual sobre la seguridad y garantía
Para obtener la información más reciente acerca de este producto (documentación, especificaciones técnicas, requisitos de sistema, información de compatibilidad, etc.) y registrarlo, visite akaipro.com.
Para obtener soporte adicional del producto, visite akaipro.com/support.
Importante: Visite en akaipro.com la página correspondiente al MPC One para descargar la guía de usuario complete.
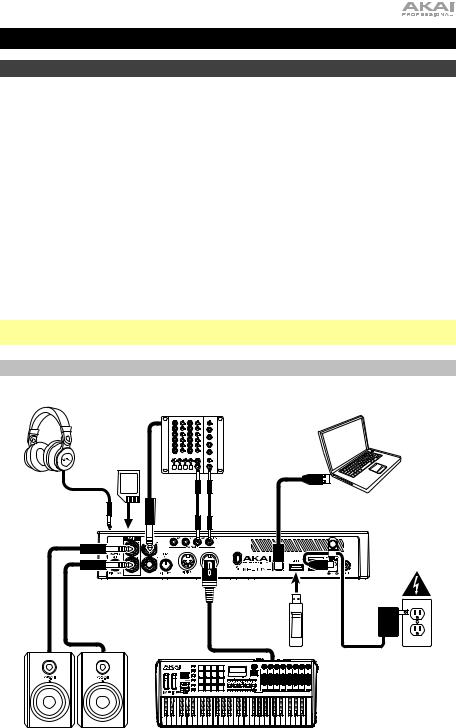
Diagrama de conexión
Los elementos que no se enumeran en Introducción > Contenido de la caja se venden por separado.
Sintetizador |
Ordenador |
Tarjeta SD |
(opcional) |
|
|
(Panel |
|
frontal) |
|
Auriculares
(Panel
frontal)
Unidad de memoria USB
Toma de corriente
Monitores activos |
Controladore MIDI |
9
Características
Panel superior
|
|
12 |
|
|
||
|
1 |
|
|
|
13 |
|
|
|
|
|
|
||
|
6 |
|
|
7 |
||
8 |
|
|
|
|
||
15 16 17 |
18 19 |
|||||
9 |
||||||
14 |
|
2 |
30 |
|||
10 |
|
5 |
|
4 |
||
|
3 |
|
||||
|
|
|
|
|
||
31 |
20 |
21 22 |
23 24 |
|||
|
||||||
11 |
25 |
26 |
27 |
28 |
29 |
|
|
||||||
Controles de navegación e ingreso de datos
1.Pantalla: Esta pantalla multitáctil a todo color muestra información relevante para la operación actual del MPC One. Toque la pantalla (y utilice los controles de hardware) para controlar la interfaz del MPC. Consulte Funcionamiento para aprender a utilizar algunas de las funciones básicas.
2.Cuadrante de datos: Utilice este cuadrante para desplazarse por las opciones de menú disponibles o ajustar los valores de los parámetros del campo seleccionado en la pantalla. Si se pulsa el cuadrante, también funciona como botón Enter.
3.–/+: Pulse estos botones para aumentar/disminuir el valor del campo seleccionado en la pantalla.
4.Deshacer / Rehacer: Pulse este botón para deshacer su última acción. Mantenga pulsado Shift y pulse este botón para volver a hacer la última acción que deshizo.
5.Shift (Función secundaria): Mantenga pulsado este botón para acceder a las funciones secundarias de algunos botones (indicadas por el texto color gris).
Pulse este botón dos veces para ver los botones que tienen funciones secundarias—los botones parpadearán durante unos segundos.
10
Controles de pad y Q-Link
6.Pads: Utilice estos pads para disparar golpes de batería u otras muestras existentes. Son sensibles a la velocidad y a la presión, lo que los hace muy responsivos e intuitivos para tocar. Los pads se encienden con diferentes colores en función de la fuerza con que los toca (varían de amarillo a baja velocidad hasta rojo a la velocidad máxima). También puede personalizar sus colores.
7.Botones del banco de pads: Pulse cualquiera de estos botones para acceder a los bancos de pads A–D. Mantenga pulsado Shift y pulse cualquiera de estos botones para acceder a los bancos de pads E–H. Como alternativa, pulse dos veces uno de estos botones.
8.Full Level / Half Level (Nivel máximo / Nivel medio): Pulse este botón para activar/desactivar el nivel máximo. Una vez activado, los pads siempre dispararán sus muestras a la velocidad máxima (127), sin importar la cantidad de fuerza que utilice.
Mantenga pulsado Shift y pulse este botón para activar/desactivar el nivel medio. Una vez activado, los pads siempre dispararán sus muestras a medio velocidad (64).
9.16 Level / Notes (16 niveles / Notas): Pulse este botón para activar/desactivar la función 16 Level. Cuando se activa, se copia temporalmente en los 16 pads el último pad que se golpeó. Los pads reproducirán la misma muestra que el pad original, pero un parámetro seleccionable aumentará su valor con cada número de pad, sin importar la cantidad de fuerza que utilice.
Mantenga pulsado Shift y pulse este botón para activar o desactivar el modo de notas para los pads. Una vez activado, puede tocar escalas/modos, acordes y progresiones musicales utilizando los pads estando en cualquiera de los modos. Utilice el modo de pads para actuación en vivo a fin de configurar los ajustes de los mismos.
10.Copy / Delete (Copiar / Borrar): Pulse este botón para copiar un pad a otro. Cuando se selecciona el campo From Pad (Desde pad), pulse el pad “fuente” (el pad que desea copiar). Cuando se selecciona el gráfico To Pad (Hacia pad) (de todos los pads), pulse el pad “destino”. Puede seleccionar múltiples pads destino y puede seleccionar pads en diferentes bancos de pads. Toque Do It (Ejecutar) para continuar o Cancel (Cancelar) para volver a la pantalla anterior.
Mantenga pulsado Shift y pulse este botón para eliminar.
11.Note Repeat / Latch (Repetir / trabar nota): Mantenga pulsado este botón y pulse un pad para disparar la muestra de ese pad repetidamente. La frecuencia se basa en el tempo actual y los ajustes de la corrección de tiempo.
Mantenga pulsado Shift y pulse este botón para “trabar” la característica de repetición de nota. Una vez trabada, no necesita mantener pulsado el botón Note Repeat (Repetición de nota) para activarlo. Pulse Note Repeat una vez más para destrabarlo.
12.Perillas Q-Link: Utilice estas perillas sensibles al tacto para ajustar diversos parámetros y valores. Las perillas pueden controlar una columna de parámetros por vez. Las luces encima de las perillas Q-Link indican la columna seleccionada actualmente. Pulse el botón Q-Link que está arriba de ellas para cambiar la columna de parámetros que controlan en ese momento.
13.Botón Q-Link: Pulse este botón para cambiar la columna de parámetros controlada actualmente por las perillas Q-Link (indicada por las luces encima de las perillas Q-Link). Cada pulsación seleccionará la próxima columna:
Mantenga pulsado Shift y pulse este botón para seleccionar en cambio la columna anterior.
Controles de modo y visualización
14.Menu / Prefs: Pulse este botón para abrir el menú de modo. Puede tocar una opción en la pantalla del menú para entrar a ese modo, pista, etc.
Mantenga pulsado Shift y pulse este botón para abrir la página de preferencias en el menú.
15.Main / Grid (Principal / Cuadrícula): Pulse este botón para entrar al modo principal. Mantenga pulsado Shift y pulse este botón para abrir el modo de vista de cuadrícula.
11

16.Browse / Save (Explorar / Guardar): Pulse este botón para ver el explorador. El explorador le permite navegar los discos rígidos internos y externos de su ordenador para cargar muestras, secuencias, canciones, etc.
Mantenga pulsado Shift y pulse este botón para guardar el proyecto actual (incluidos sus muestras, programas, secuencias y temas).
17.Track Mix / Pad Mix (Mezclador de canal / pad): Pulse este botón para acceder al mezclador de canal, en el cual podrá ajustar los niveles, el balance (panning) estéreo y otros ajustes para sus pistas, programas, regresos, submezclas y mezclas maestras.
Pulse este botón para acceder al mezclador de pad, en el cual podrá ajustar los niveles, el balance (panning) estéreo, el enrutamiento y los efectos del programa.
18.Track Mute / Pad Mute (Silenciamiento de pista/pad): Pulse este botón para acceder al modo de silenciamiento de pista, en el cual podrá silenciar pistas con facilidad dentro de una secuencia o definir grupos de silenciamiento para cada pista.
Mantenga pulsado Shift y pulse este botón para acceder al modo de silenciamiento de pad, en el cual podrá silenciar pads con facilidad dentro de un programa o definir grupos de silenciamiento para cada pad dentro de un programa.
19.Next Seq (Secuencia siguiente) / XYFX: Pulse este botón para acceder al modo de secuencia siguiente, en el cual podrá disparar diferentes secuencias con sólo tocar los pads. Esta función es útil para actuaciones en vivo, ya que podrá cambiar la estructura de los temas en tiempo real.
Mantenga pulsado Shift y pulse este botón para acceder al modo XYFX, el cual transforma la pantalla táctil en un pad XY en donde cada eje representa el rango del parámetro de un efecto. A medida que toca o mueve su dedo sobre la pantalla táctil, la posición actual determinará el valor actual de los dos parámetros. Puede usar este modo para crear un interesante efecto de automatización en sus pistas.
20.Step Seq / Automation (Secuenciador de pasos / Automatización): Pulse este botón para acceder al secuenciador de pasos, en el cual podrá crear o editar secuencias utilizando los pads como “botones de paso”, simulando la experiencia de una caja de ritmos al estilo de un secuenciador de pasos tradicional.
Mantenga pulsado Shift y pulse este botón para abrir el modo de vista de cuadrícula con el último parámetro de automatización utilizado para la pista seleccionada.
21.TC / On/Off (Corrección de temporización) / Activar/Desactivar): Pulse este botón para abrir la ventana de corrección de temporización, la cual contiene diversos ajustes que permiten cuantificar los eventos en su secuencia.
Mantenga pulsado Shift y pulse este botón para activar o desactivar la corrección de temporización.
22.Sampler / Looper (Muestreador / Generador de bucles): Pulse este botón para acceder al muestreador en el cual podrá grabar muestras de audio para utilizarlas en sus proyectos.
Mantenga pulsado Shift y pulse este botón para acceder al generador de bucles en el cual podrá grabar y sobregrabar audio en tiempo real—una excelente herramienta para actuaciones en vivo así como también momentos espontáneos en el estudio. Puede exportar el bucle como una muestra para usar en su proyecto.
23.Sample Edit / Q-Link Edit (Edición de muestra / Q-Link): Pulse este botón para acceder al modo de edición de muestra, en el cual podrá editar sus muestras utilizando diversas funciones y procesos.
Mantenga pulsado Shift y luego pulse este botón para entrar al modo de edición de Q-Link en el cual podrá asignar otros parámetros a las perillas Q-Link.
24.Program Edit / MIDI Control (Edición de programa / modo de control MIDI): Pulse este botón para acceder al modo de edición de programa, el cual contiene todos los parámetros para editar sus programas.
Mantenga pulsado Shift y pulse este botón para visualizar el modo de control MIDI, en el cual podrá personalizar los mensajes MIDI que se envían desde determinados controles de su hardware.
12
Loading...