


Quickstart Guide
English ( 3 – 10 )
Guía de inicio rápido
Español ( 11 – 18 )
Guide d’utilisation rapide
Français ( 19 – 26 )
Guida rapida
Italiano ( 27 – 34 )
Schnellstart-Anleitung
Deutsch ( 35 – 42 )
Appendix
English ( 43 )

Quickstart Guide (English)
Introduction
Box Contents
MPC Studio
USB Cable
(2) 1/8”-to-5-Pin MIDI Adapters
Neoprene Case
Software Download Card
Quickstart Guide
Safety & Warranty Manual
Support
For the latest information about this product (system requirements, compatibility information, etc.) and product registration, visit akaipro.com.
For additional product support, visit akaipro.com/support.
Setup
1. Installation
To download and install the required drivers and MPC software:
1.Go to akaipro.com and register your product. If you don’t have an Akai Professional account yet, you will be prompted to create one.
2.Download the MPC Software Package.
3.Open the file and double-click the installer application.
4.Follow the on-screen instructions to complete the installation.
Note: By default, the MPC software will be installed in [your hard drive] \ Program Files \ Akai Pro \ MPC (Windows) or Applications (Mac OS X). A shortcut will be created on your Desktop, as well.
3
2. Connection
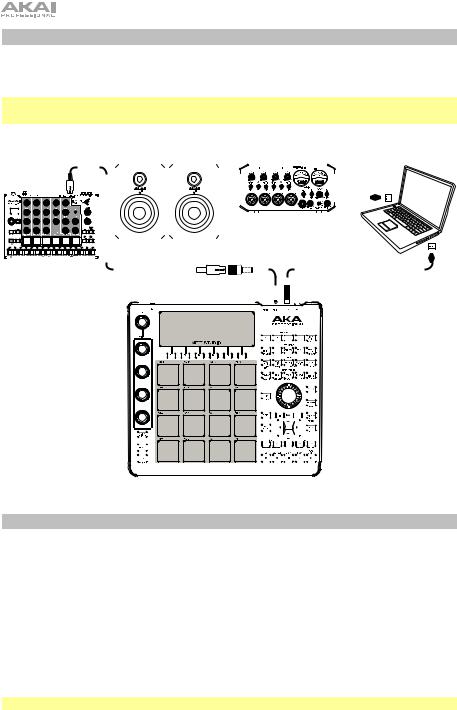
Here is just an example of how to use MPC Studio in your setup. Items not listed under
Introduction > Box Contents are sold separately.
Important: Do not connect audio devices (e.g., headphones, monitors, etc.) to the 1/8” MIDI In or MIDI Out jacks. Use the included 1/8”-to-5-Pin MIDI adapters to connect MIDI devices only.
|
|
|
Drum Machine |
Powered Monitors |
Audio Interface |
|
|
Computer |
|||||||||||||||||||||||||||||||||||||||||||||||||||||||||||||||||
|
|
|
|
|
|
|
|
|
|
|
|
|
|
|
|
|
|
|
|
|
|
|
|
|
|
|
|
|
|
|
|
|
|
|
|
|
|
|
|
|
|
|
|
|
|
|
|
|
|
|
|
|
|
|
|
|
|
|
|
|
|
|
|
|
|
|
|
|
|
|
|
|
|
|
|
|
|
|
|
|
|
|
|
|
|
|
|
|
|
|
|
|
|
|
|
|
|
|
|
|
|
|
|
|
|
|
|
|
|
|
|
|
|
|
|
|
|
|
|
|
|
|
|
|
|
|
|
|
|
|
|
|
|
|
|
|
|
|
|
|
|
|
|
|
|
|
|
|
|
|
|
|
|
|
|
|
|
|
|
|
|
|
|
|
|
|
|
|
|
|
|
|
|
|
|
|
|
|
|
|
|
|
|
|
|
|
|
|
|
|
|
|
|
|
|
|
|
|
|
|
|
|
|
|
|
|
|
|
|
|
|
|
|
|
|
|
|
|
|
|
|
|
|
|
|
|
|
|
|
|
|
|
|
|
|
|
|
|
|
|
|
|
|
|
|
|
|
|
|
|
|
|
|
|
|
|
|
|
|
|
|
|
|
|
|
|
|
|
|
|
|
|
|
|
|
|
|
|
|
|
|
|
|
|
|
|
|
|
|
|
|
|
|
|
|
|
|
|
|
|
|
|
|
|
|
|
|
|
|
|
|
|
|
|
|
|
|
|
|
|
|
|
|
|
|
|
|
|
|
|
|
|
|
|
|
|
|
|
|
|
|
|
|
|
|
|
|
|
|
|
|
|
|
|
|
|
|
|
|
|
|
|
|
|
|
|
|
|
|
|
|
|
|
|
|
|
|
|
|
|
|
|
|
|
|
|
|
|
|
|
|
|
|
|
|
|
|
|
|
|
|
|
|
|
|
|
|
|
|
|
|
|
|
|
|
|
|
|
|
|
|
|
|
|
|
|
|
|
|
|
|
|
|
|
|
|
|
|
|
|
|
|
|
|
|
|
|
|
|
|
|
|
|
|
|
|
|
|
|
|
|
|
|
|
|
|
|
|
|
|
|
|
|
|
|
|
|
|
|
|
|
|
|
|
|
|
|
|
|
|
|
|
|
|
|
|
|
|
|
|
|
|
|
|
|
|
|
|
|
|
|
|
|
|
|
|
|
|
|
|
|
|
|
|
|
|
|
|
|
|
|
|
|
|
|
|
|
|
|
|
|
|
|
|
|
|
|
|
|
|
|
|
|
|
|
|
|
|
|
|
|
|
|
|
|
|
|
|
|
|
|
|
|
|
|
|
|
|
|
|
|
|
|
|
|
|
|
|
|
|
|
|
|
|
|
|
|
|
|
|
|
|
|
|
|
|
|
|
|
|
|
|
|
|
|
|
|
|
|
|
|
|
|
|
|
|
|
|
|
|
|
|
|
|
|
|
|
|
|
|
|
|
|
|
|
|
|
|
|
|
|
|
|
|
|
|
|
|
|
|
|
|
|
|
|
|
|
|
|
|
|
|
|
|
|
|
|
|
|
|
|
|
|
|
|
|
|
|
|
|
|
|
|
|
|
|
|
|
|
|
|
|
|
|
|
|
|
|
|
|
|
|
|
|
|
|
|
|
|
|
|
|
|
|
|
|
|
|
|
|
|
|
|
|
|
|
|
|
|
|
|
|
|
|
|
|
|
|
|
|
|
|
|
|
|
|
|
|
|
|
|
|
|
|
|
|
|
|
|
|
|
|
|
|
|
|
|
|
|
|
|
|
|
|
|
|
|
|
|
|
|
|
|
|
|
|
|
|
|
|
|
|
|
|
|
|
|
|
|
|
|
|
|
|
|
|
|
|
|
|
|
|
|
|
|
|
|
|
|
|
|
|
|
|
|
|
|
|
|
|
|
|
|
|
|
|
|
|
|
|
|
|
|
|
|
|
|
|
|
|
|
|
|
|
|
|
|
|
|
|
|
|
|
|
|
|
|
|
|
|
|
|
|
|
|
|
|
|
|
|
|
|
|
|
|
|
|
|
|
|
|
|
|
|
|
|
|
|
|
|
|
|
|
|
|
|
|
|
|
|
|
|
|
|
|
|
|
|
|
|
|
|
|
|
|
|
|
|
|
|
|
|
|
|
|
|
|
|
|
|
|
|
|
|
|
|
|
|
|
|
|
|
|
|
|
|
|
|
|
|
|
|
|
|
|
|
|
|
|
|
|
|
|
|
|
|
|
|
|
|
|
|
|
|
|
|
|
|
|
|
|
|
|
|
|
|
|
|
|
|
|
|
|
|
|
|
|
|
|
|
|
|
|
|
|
|
|
|
|
|
|
|
|
|
|
|
|
|
|
|
|
|
|
|
|
|
|
|
|
|
|
|
|
|
|
|
|
|
|
|
|
|
|
|
|
|
|
|
|
|
|
|
|
|
|
|
|
|
|
|
|
|
|
|
|
|
|
|
|
|
|
|
|
|
|
|
|
|
|
|
|
|
|
|
|
|
|
|
|
|
|
|
|
|
|
|
|
|
|
|
|
|
|
|
|
|
|
|
|
|
|
|
|
|
|
|
|
|
|
|
|
|
|
|
|
|
|
|
|
|
|
|
|
|
|
|
|
|
|
|
|
|
|
|
|
|
|
|
|
|
|
|
|
|
|
|
|
|
|
|
|
|
|
|
|
|
|
|
|
|
|
|
|
|
|
|
|
|
|
|
|
|
|
|
|
|
|
|
|
|
|
|
|
|
|
|
|
|
|
|
|
|
|
|
|
|
|
|
|
|
|
|
|
|
|
|
|
|
|
|
|
|
|
|
|
|
|
|
|
|
|
|
|
|
|
|
|
|
|
|
|
|
|
|
|
|
|
|
|
|
|
|
|
|
|
|
|
|
|
|
|
|
|
|
|
|
|
|
|
|
|
|
|
|
|
|
|
|
|
|
|
|
|
|
|
|
|
|
|
|
|
|
|
|
|
|
|
|
|
|
|
|
|
|
|
|
|
|
|
|
|
|
|
|
|
|
|
|
|
|
|
|
|
|
|
|
|
|
|
|
|
|
|
|
|
|
|
|
|
|
|
|
|
|
|
|
|
|
|
|
|
|
|
|
|
|
|
|
|
|
|
|
|
|
|
|
|
|
|
|
|
|
|
|
|
|
|
|
|
|
|
|
|
|
|
|
|
|
|
|
|
|
|
|
|
|
|
|
|
|
|
|
|
|
|
|
|
|
|
|
|
|
|
|
|
|
|
|
|
|
|
|
|
|
|
|
|
|
|
|
|
|
|
|
|
|
|
|
|
|
|
|
|
|
|
|
|
|
|
|
|
|
|
|
|
|
|
|
|
|
|
|
|
|
|
|
|
|
|
|
|
|
|
|
|
|
|
|
|
|
|
|
|
|
|
|
|
|
|
|
|
|
|
|
|
|
|
|
|
|
|
|
|
|
|
|
|
|
|
|
|
|
|
|
|
|
|
|
|
|
|
|
|
|
|
|
|
|
|
|
|
|
|
|
|
|
|
|
|
|
|
|
|
|
|
|
|
|
|
|
|
|
|
|
|
|
|
|
|
|
|
|
|
|
|
|
|
|
|
|
|
|
|
|
|
|
|
|
|
|
|
|
|
|
|
|
|
|
|
|
|
|
|
|
|
|
|
|
|
|
|
|
|
|
|
|
|
|
|
|
|
|
|
|
|
|
|
|
|
|
|
|
|
|
|
|
|
|
|
|
|
|
|
|
|
|
|
|
|
|
|
|
|
|
|
|
|
|
|
|
|
|
|
|
|
|
|
|
|
|
|
|
|
|
|
|
|
|
|
|
|
|
|
|
|
|
|
|
|
|
|
|
|
|
|
|
|
|
|
|
|
|
|
|
|
|
|
|
|
|
|
|
|
|
|
|
|
|
|
|
|
|
|
|
|
|
|
|
|
|
|
|
|
|
|
|
|
|
|
|
|
|
|
|
|
|
|
|
|
|
|
|
|
|
|
|
|
|
|
|
|
|
|
|
|
|
|
|
|
|
|
|
|
|
|
|
|
|
|
|
|
|
|
|
|
|
|
|
|
|
|
|
|
|
|
|
|
|
|
|
|
|
|
|
|
|
|
|
|
|
|
|
|
|
|
|
|
|
|
|
|
|
|
|
|
|
|
|
|
|
|
|
|
|
|
|
|
|
|
|
|
|
|
|
|
|
|
|
|
|
|
|
|
|
|
|
|
|
|
|
|
|
|
|
|
|
|
|
|
|
|
|
|
|
|
|
|
|
|
|
|
|
|
|
|
|
|
|
|
|
|
|
|
|
|
|
|
|
|
|
|
|
|
|
|
|
|
|
|
|
|
|
|
|
|
|
|
|
|
|
|
|
|
|
|
|
|
|
|
|
|
|
|
|
|
|
|
|
|
|
|
|
|
|
|
|
|
|
|
|
|
|
|
|
|
|
|
|
|
|
|
|
|
|
|
|
|
|
|
|
|
|
|
|
|
|
|
|
|
|
|
|
|
|
|
|
|
|
|
|
|
|
|
|
|
|
|
|
|
|
|
|
|
|
|
|
|
|
|
|
|
|
|
|
|
|
|
|
|
|
|
|
|
|
|
|
|
|
|
|
|
|
|
|
|
|
|
|
|
|
|
|
|
|
|
|
|
|
|
|
|
|
|
|
|
|
|
|
|
|
|
|
|
|
|
|
|
|
|
|
|
|
|
|
|
|
|
|
|
|
|
|
|
|
|
|
|
|
|
|
|
|
|
|
|
|
|
|
|
|
|
|
|
|
|
|
|
|
|
|
|
|
|
|
|
|
|
|
|
|
|
|
|
|
|
|
|
|
|
|
|
|
|
|
|
|
|
|
|
|
|
|
|
|
|
|
|
|
|
|
|
|
|
|
|
|
|
|
|
|
|
|
|
|
|
|
|
|
|
|
|
|
|
|
|
|
|
|
|
|
|
|
|
|
|
|
|
|
|
|
|
|
|
|
|
|
|
|
|
|
|
|
|
|
|
|
|
|
|
|
|
|
|
|
|
|
|
|
|
|
|
|
|
|
|
|
|
|
|
|
|
|
|
|
|
|
|
|
|
|
|
|
|
|
|
|
|
|
|
|
|
|
|
|
|
|
|
|
|
|
|
|
|
|
|
|
|
|
|
|
|
|
|
|
|
|
|
|
|
|
|
|
|
|
|
|
|
|
|
|
|
|
|
|
|
|
|
|
|
|
|
|
|
|
|
|
|
|
|
|
|
|
|
|
|
|
|
|
|
|
|
|
|
|
|
|
|
|
|
|
|
|
|
|
|
|
|
|
|
|
|
|
|
|
|
|
|
|
|
|
|
|
|
|
|
|
|
|
|
|
|
|
|
|
|
|
|
|
|
|
|
|
|
|
|
|
|
|
|
|
|
|
|
|
|
|
|
|
|
|
|
|
|
|
|
|
|
|
|
|
|
|
|
|
|
|
|
|
|
|
|
|
|
|
|
|
|
|
|
|
|
|
|
|
|
|
|
|
|
|
|
|
|
|
|
|
|
|
|
|
|
|
|
|
|
|
|
|
|
|
|
|
|
|
|
|
|
|
|
|
|
|
|
|
|
|
|
|
|
|
|
|
|
|
|
|
|
|
|
|
|
|
|
|
|
|
|
|
|
|
|
|
|
|
|
|
|
|
|
|
|
|
|
|
|
|
|
|
|
|
|
|
|
|
|
|
|
|
|
|
|
|
|
|
|
|
|
|
|
|
|
|
|
|
|
|
|
|
|
|
|
|
|
|
|
|
|
|
|
|
|
|
|
|
|
|
|
|
|
|
|
|
|
|
|
|
|
|
|
|
|
|
|
|
|
|
|
|
|
|
|
|
|
|
|
|
|
|
|
|
|
|
|
|
|
|
|
|
|
|
|
|
|
|
|
|
|
|
|
|
|
|
|
|
|
|
|
|
|
|
|
|
|
|
|
|
|
|
|
|
|
|
|
|
|
|
|
|
|
|
|
|
|
|
|
|
|
|
|
|
|
|
|
|
|
|
|
|
|
|
|
|
|
|
|
|
|
|
|
|
|
|
|
|
|
|
|
|
|
|
|
|
|
|
|
|
|
|
|
|
|
|
|
|
|
|
|
|
|
|
|
|
|
|
|
|
|
|
|
|
|
|
|
|
|
|
|
|
|
|
|
|
|
|
|
|
|
3. Getting Started
1.Connect MPC Studio’s USB port to a free USB port on your computer, using a standard USB cable.
2.Power on MPC Studio.
3.On your computer, open the MPC software.
4.Follow the on-screen instructions to authorize your version of MPC.
5.In the MPC software, click the Edit menu, and select Preferences. Click the Audio tab and select the sound card you want to use. Click OK when you are done.
6.Start making music! See Operation to learn more.
Important: To view the MPC software User Guide, click the Help menu.
4
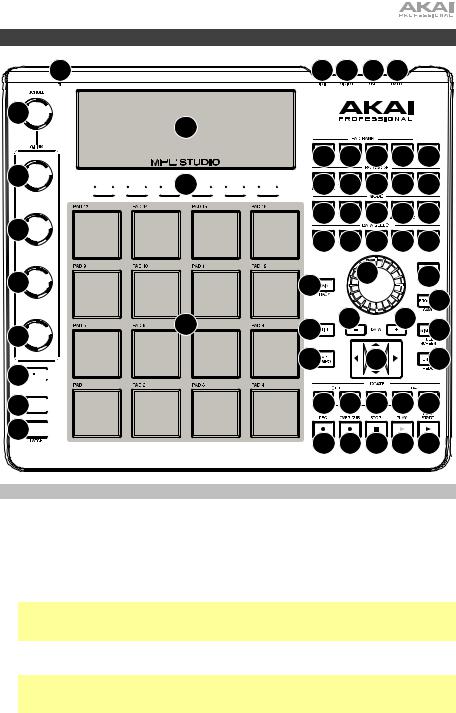
Features
5
14


13


13


13


13


15


47


 21
21


6


 7
7


16

3 4 |
1 2 |
17 17 17 17 18 |
||
19 20 30 31 32 |
||
25 26 |
27 |
28 29 |
34 35 36 37 38 |
||
23 |
|
9 |
11 |
|
|
||
|
|
24 |
|
|
10 |
|
|
22 |
|
10 |
|
|
|
33 |
|
48 |
|
8 |
12 |
|
|
|
|
44 44 46 45 45 |
|||
42 43 41 39 40 |
|||
Power & I/O
1.USB Port: Use the included USB cable to connect this high-retention-force USB port to an available USB port on your computer. This connection allows MPC Studio to send/receive MIDI and audio data to/from the MPC software.
2.Power Switch: Turns MPC Studio’s power on/off.
3.MIDI In: Use the included 1/8”-to-5-pin adapter and a five-pin MIDI cable to connect this input to the MIDI output of an external MIDI device (synthesizer, drum machine, etc.).
Important: Do not connect audio devices (e.g., headphones, monitors, etc.) to the 1/8” MIDI In or MIDI Out jacks. Use the included 1/8”-to-5-Pin MIDI adapters to connect MIDI devices only.
4.MIDI Out: Use the included 1/8”-to-5-pin adapter and a five-pin MIDI cable to connect this output to the MIDI input of an external MIDI device (synthesizer, drum machine, etc.).
Important: Do not connect audio devices (e.g., headphones, monitors, etc.) to the 1/8” MIDI In or MIDI Out jacks. Use the included 1/8”-to-5-Pin MIDI adapters to connect MIDI devices only.
5.Kensington® Lock Slot: You can use this slot to secure your MPC Touch to a table or other surface.
5

Navigation / Data Entry Controls
6.Display: This LCD shows all the information relevant to MPC Studio’s current operation. Much of this information is also shown in the software. Use the Cursor Buttons to navigate through the display, and use the Data Dial, and –/+ buttons to adjust the currently selected setting/parameter. Use the Mode buttons to change what page is shown, and use the F-Buttons to change what tab is shown.
Note: Press and hold Shift and turn the Data Dial to adjust the contrast of the display.
7.F-Buttons: Press one of these buttons to select its corresponding tab, shown above the button in the display.
8.Cursor Buttons: Use these buttons to navigate through the fields of menus and options shown in the display.
9.Data Dial: Use this dial to scroll through the available menu options or adjust the parameter values of the selected field in the display.
10.–/+: Press these buttons to increase/decrease the value of the selected field in the display.
11.Numeric: If the selected field in the display is a number, you can press Numeric and use the pads as a standard numeric keypad to enter a value. The numbers are printed in green above the pads.
12.Undo/Redo: Press this button to undo your last action. Hold down Shift and press this button to redo the last action you undid.
Pad / Q-Link Knob Controls
13.Q-Link Knobs: Use these touch-sensitive knobs to adjust various parameters and settings. The knobs can control one column of parameters at a time. Use the Scroll Knob above them to change which column of parameters they currently control.
14.Scroll Knob: Use this knob to change which column of parameters the Q-Link Knobs currently control.
15.Q-Link Trigger: Hold this button down, then touch one of the Q-Link Knobs to make that knob’s parameter’s value jump to its minimum or maximum (depending on the Trig parameter in the software).
16.Pads: Use these pads to trigger drum hits or other samples in your software. The pads are velocity-sensitive and pressure-sensitive, which makes them very responsive and intuitive to play. The pads will light up different colors, depending on how hard you play them (ranging from yellow at a low velocity to red at the highest velocity). To disable (or reenable) these lights, press Pad Assign then F6 (Velo Col).
If the selected field in the display is a number, you can press Numeric and use the pads as a standard numeric keypad to enter a value. The numbers are printed in green above the pads.
17.Pad Bank Buttons: These 4 buttons switch among Pad Banks A–H (press and hold Shift to access Banks E–H). Alternatively, double-press one of these buttons. Between these 8 banks with 16 pads per bank, you can access up to 128 MIDI events using the pads.
18.Pad Assign / Pad Copy: Press this button to assign a sample to a pad. In the display, the 4x4 grid that appears represents the 16 pads. Use the Cursor Buttons to navigate through the grid, and use the Data Dial or –/+ buttons to select a Program (when the Program field is highlighted) or a sample (when a pad is highlighted).
Hold down Shift and press this button to copy the samples and parameters from one pad to another. Use the Cursor Buttons to select the From Pad (“source”) or To Pads (“destination”) field and hit a pad to select it (you can copy to multiple pads). Use the F- Buttons to confirm or cancel the operation.
6

19.Full Level / Half Level: Press this button to activate/deactivate Full Level. When activated, the pads always play back at a maximum velocity (127), no matter how hard or soft you hit them.
Hold down Shift and press this button to activate/deactivate Half Level. When activated, the pads always play back at half-velocity (63).
20.16 Level: Press this button to activate/deactivate 16 Level. When activated, the last pad that was hit will be temporarily copied to all 16 pads. The pads will play the same sample as the original pad, but a selectable parameter will increase in value with each pad number, regardless of the amount of force you use. The available parameters are velocity, tuning, filter, layer, attack or decay.
21.Note Repeat / Latch: Hold this button down and press a pad to retrigger that pad’s sample at a rate based on the current tempo and Time Correct settings (the available Time Correct settings will appear in the display, which you can select with the F-Buttons). Hold down Shift and press this button to latch the Note Repeat feature. When latched, the button does not need to be held down for Note Repeat to be activated. Press Note Repeat once more to unlatch it.
Mode / View Controls
22.Shift: Hold this button down to access some buttons’ secondary functions (indicated by orange writing).
23.Main/Track: Press this button to view Main Mode in the display and software. Hold down Shift and press this button to view Track View Mode in the display and software.
24.Browser/Save: Press this button to view the file browser in the display. Hold down Shift and press this button to save the current project (including its samples, programs, sequences, and songs).
25.Prog Edit / Q-Link: Press this button to view Program Edit Mode in the display and software. Hold down Shift and press this button to assign a parameter to a Q-Link Knob: use the Cursor Buttons to select the desired Q-Link Knob, then use the Data Dial or –/+ buttons to select the desired parameter.
26.Prog Mix / Track Mix: Press this button to view Program Mixer Mode in the display and software. Hold down Shift and press this button to view Track Mixer Mode in the display and software.
27.Seq Edit / Effects: Press this button to enter Sequence Edit Mode. Hold down Shift and press this button to enter the Effects page, where you can select and route effects as well as edit effects’ parameters.
28.Sample Edit / Sample Rec: Press this button to view Sample Edit Mode in the display and software. Hold down Shift and press this button to view Sample Record Mode in the display and software.
29.Song/Other: Press this button to view Song Mode in the display and software. Hold down Shift and press this button to enter the Other page, which allows you to set: the minimum number of taps for the Tap Tempo button; pad threshold, sensitivity, and curve; the footswitches’ messages; and the program change target.
30.Step Seq: Press this button to view Step Sequence Mode in the display and software.
31.Next Seq: Press this button to view Next Sequence Mode in the display and software.
32.Track Mute / Pad Mute: Press this button to view Track Mute Mode in the display and software. Hold Shift and press this button to view Pad Mute Mode in the display and software.
7

33.Window / Full Screen: When this button is lit, it means the selected field in the display contains additional functions; press this button to access them. Use the F-Buttons, Cursor Buttons, and Data Dial or –/+ buttons to execute (or cancel) these additional functions.
Hold Shift and press this button to switch between Full Screen and Half Screen modes. In Full Screen mode, the workspace occupies the whole screen. In Half Screen mode, the parameter controls (Q-Link knobs, pads, sequence and track information, project information, etc.) are shown underneath the workspace.
34.Project / Folder 1: Press this button to view only project files in the file browser. Hold down Shift and press this button to select the browser’s Folder 1 shortcut.
35.Sequence / Folder 2: Press this button to view only sequence files in the file browser. Hold down Shift and press this button to select the browser’s Folder 2 shortcut.
36.Program / Folder 3: Press this button to view only program files in the file browser. Hold down Shift and press this button to select the browser’s Folder 3 shortcut.
37.Sample / Folder 4: Press this button to view only sample files in the file browser. Hold down Shift and press this button to select the browser’s Folder 4 shortcut.
38.No Filter / Folder 5: Press this button to view all files in the file browser. Hold down Shift and press this button to select the browser’s Folder 5 shortcut.
Transport / Recording Controls
39.Play: Press this button to play the sequence from the audio pointer’s current position.
40.Play Start: Press this button to play the sequence from its start point.
41.Stop: Press this button to stop playback.
42.Rec: Press this button to record-arm the sequence. Press Play or Play Start to start recording. Recording in this way (rather than using Overdub) erases the events of the current sequence. After the sequence plays through once while recording, Overdub will be enabled.
43.Overdub: Press this button to enable Overdub, which allows you to record note events in a sequence without overwriting any previously recorded note events. You can enable Overdub either before or during recording.
44.</> ( |</>| ): Use these buttons to move the audio pointer left/right, one step at a time. Hold Locate and press one of these buttons to move the audio pointer to the previous/next event in the grid.
45.<</>> (Start/End): Use these buttons to move the audio pointer left/right, one bar at a time. Hold Locate and press one of these buttons to move the audio pointer to the start or end of the grid.
46.Go To: Hold this button down to activate the secondary functions of the </> and <</>> buttons (i.e., |</>| and Start/End, respectively).
47.Erase: As a sequence is playing, hold this button down and press a pad to delete the note event for that pad at the current playback position. This is a quick way to delete note events from your sequence without having to stop playback.
48.Tap Tempo: Press this button in time with the desired tempo to enter a new tempo (in BPM) in the software.
8
Operation
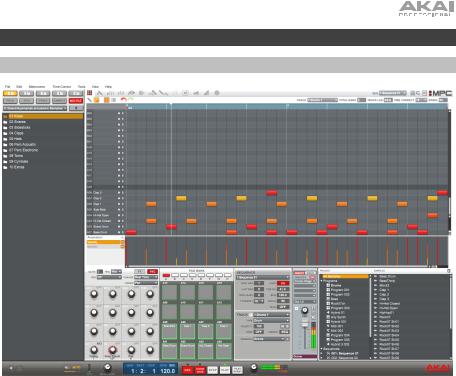
MPC Software Overview
This is just a broad overview of the MPC software’s features. Virtually all of the software elements can be accessed and controlled by MPC Studio. Please also refer to the in-depth User Guide (in the Help menu). The User Guide contains a quick tutorial on how to get started making a song so you can use MPC’s features right away—and more detailed information for experienced users.
Menu: The software’s menus.
Tabs: Click these tabs to view the different parts of the software (e.g., Program Edit, Program Mixer, Track Mixer, etc.).
Browser: The software’s file browser. From here, you can load files by clicking and dragging with your mouse or by using the MPC Studio’s controls.
Workspace: The main area where you build and edit the different parts of your project. Depending on what tab is selected, the workspace will show the sequence grid, the track grid, a song, or a sample waveform.
Parameter Controls: This area below the workspace contains the parameter controls for the current tab. Depending on what tab is selected, this space can show the Q-Link knob parameters, the pads their banks and samples, pad layers and their tuning, mixer controls for the program or Tracks, etc.
Time/Tempo: The current time and tempo information.
Transport: Controls related to playback and recording, identical to the MPC Studio’s transport controls.
Master Level: The software’s master output level and volume meter.
9

Get Started
Connect, Open & Configure
1.Connect MPC Studio to a USB port on your computer, as shown in Setup > 2. Connection.
2.Power on MPC Studio and open MPC software. (The first time you open the software, you will be asked for information required for authorization. Follow the on-screen instructions to authorize your software.)
3.In the software, go to Edit > Preferences, and click the Audio tab. Under Output and Input, select your sound card.
4.Click the MIDI tab. Under Active MIDI Inputs, check the MPC Studio Black box, and select
MPC Studio Black as MIDI Out Port A. Click OK.
5.Test your sound setting: Increase the volume of your computer, speakers, etc. and click Test, next to the Device pop-up menu. You will hear a tone, indicating your sound is properly configured.
Assign Samples to the Pads
1.On MPC Studio, press Browser.
2.User the Cursor Buttons and Data Dial to navigate the file structure on your computer, and find the samples you want to use with the MPC software.
3.You can press F3 (Play) to preview the sample before loading it, or you can press F2 (Auto) to enable Auto Preview (selecting a sample will preview it immediately).
4.Whenever you find a sample you want to use, hit the pad you want to assign it to (it will light up green), and press F6 (Open). The sound will be assigned to the pad as well as added to that program for future use.
5.Repeat this process for additional pads. Hit those pads to hear your samples in action!
Record & Perform
1.Press Main to return to Main Mode.
2.Press Overdub to record-arm the sequence.
3.Press Play to start recording. You will hear the metronome count 4 beats before the recording starts.
4.The sequence will start playing in a loop:
5.Perform using the pads! Each note will be recorded in the sequence. Even if you aren’t playing exactly in time with the beat, the software’s Time Correct feature (T.C.) will automatically “quantize” the notes so they are lined up in the grid.
6.You can erase notes by holding the Erase button and pressing (or holding down) a pad whose notes you want to erase. As the audio pointer moves through the sequence, any note from that pad will be erased.
Tip: If you are a beginning performer, we recommend playing one pad at a time. The Sequence will keep looping, so there’s no rush to record all the pads at once!
7.To stop recording, press Stop. To play back the sequence without recording, simply press Play.
Important!
To save your project, press Shift+Save. Select where you want to save your file and enter a file name. We recommend leaving the Also save samples box checked, so you won’t have to reload your samples when you want to open that project. Save often so you don’t lose any of your great work!
We highly recommend going through the tutorial in the MPC User Guide: In the software, go to the Help menu.
10
Guía de inicio rápido (Español)
Introducción
Contenido de la caja
MPC Studio
Cable USB
(2) Adaptadores MIDI de 3,5 mm (1/8 pulg.) Funda de neopreno
Tarjeta de descarga de software
Guía de inicio rápido
Manual sobre la seguridad y garantía
Soporte
Para obtener la información más completa acerca de este product (los requisitos del sistema, compatibilidad, etc) y registro del producto, visite akaipro.com.
Para soporte adicional del producto, visite akaipro.com/support.
Instalación
1. Instalación
Cómo descargar e instalar los controladores requeridos y el software del MPC:
1.Visite akaipro.com y registre su producto. Si aún no tiene una cuenta de Akai Professional, se le pedirá que cree una.
2.Descargue el paquete de software del MPC.
3.Abra el archivo y haga doble clic en la aplicación instaladora.
4.Siga las instrucciones de la pantalla para terminar la instalación.
Nota: Por defecto, el software del MPC se instalará en [su disco rígido] \ Archivos de programa \ Akai Pro \ MPC (Windows) o Aplicaciones (Mac OS X). También se creará un acceso directo en su escritorio.
11
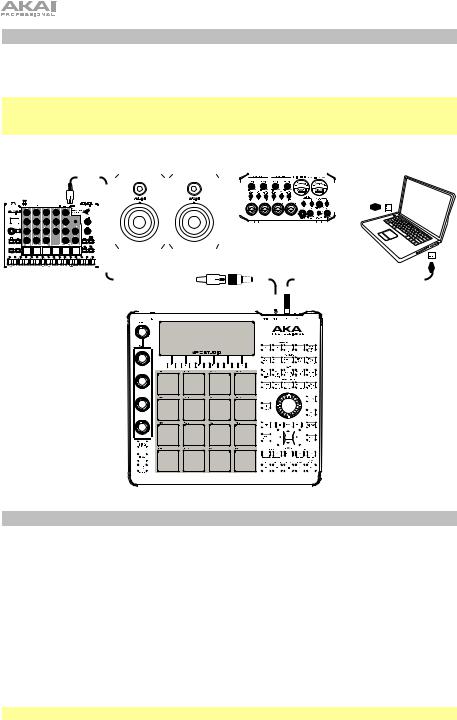
2. Conexión
Este es sólo un ejemplo de cómo utilizar el MPC Studio en su instalación. Los elementos que no se enumeran en Introducción > Contenido de la caja se venden por separado.
Importante: No conecte dispositivos de audio (como auriculares, monitores, etc.) a los conectores hembra de 3,5 mm (1/8 pulg.) entrada MIDI o salida MIDI. Use los adaptadores de 3,5 mm (1/8 pulg.) a MIDI de 5 patillas incluidos para conectar sólo dispositivos MIDI.
|
|
|
Caja de ritmos |
|
|
|
|
Monitores alimentados |
Interfaz audio |
|
|
Ordenador |
|||||||||||||||||||||||||||||||||||||||||||||||||||||||||||||
|
|
|
|
|
|
|
|
|
|
|
|
|
|
|
|
|
|
|
|
|
|
|
|
|
|
|
|
|
|
|
|
|
|
|
|
|
|
|
|
|
|
|
|
|
|
|
|
|
|
|
|
|
|
|
|
|
|
|
|
|
|
|
|
|
|
|
|
|
|
|
|
|
|
|
|
|
|
|
|
|
|
|
|
|
|
|
|
|
|
|
|
|
|
|
|
|
|
|
|
|
|
|
|
|
|
|
|
|
|
|
|
|
|
|
|
|
|
|
|
|
|
|
|
|
|
|
|
|
|
|
|
|
|
|
|
|
|
|
|
|
|
|
|
|
|
|
|
|
|
|
|
|
|
|
|
|
|
|
|
|
|
|
|
|
|
|
|
|
|
|
|
|
|
|
|
|
|
|
|
|
|
|
|
|
|
|
|
|
|
|
|
|
|
|
|
|
|
|
|
|
|
|
|
|
|
|
|
|
|
|
|
|
|
|
|
|
|
|
|
|
|
|
|
|
|
|
|
|
|
|
|
|
|
|
|
|
|
|
|
|
|
|
|
|
|
|
|
|
|
|
|
|
|
|
|
|
|
|
|
|
|
|
|
|
|
|
|
|
|
|
|
|
|
|
|
|
|
|
|
|
|
|
|
|
|
|
|
|
|
|
|
|
|
|
|
|
|
|
|
|
|
|
|
|
|
|
|
|
|
|
|
|
|
|
|
|
|
|
|
|
|
|
|
|
|
|
|
|
|
|
|
|
|
|
|
|
|
|
|
|
|
|
|
|
|
|
|
|
|
|
|
|
|
|
|
|
|
|
|
|
|
|
|
|
|
|
|
|
|
|
|
|
|
|
|
|
|
|
|
|
|
|
|
|
|
|
|
|
|
|
|
|
|
|
|
|
|
|
|
|
|
|
|
|
|
|
|
|
|
|
|
|
|
|
|
|
|
|
|
|
|
|
|
|
|
|
|
|
|
|
|
|
|
|
|
|
|
|
|
|
|
|
|
|
|
|
|
|
|
|
|
|
|
|
|
|
|
|
|
|
|
|
|
|
|
|
|
|
|
|
|
|
|
|
|
|
|
|
|
|
|
|
|
|
|
|
|
|
|
|
|
|
|
|
|
|
|
|
|
|
|
|
|
|
|
|
|
|
|
|
|
|
|
|
|
|
|
|
|
|
|
|
|
|
|
|
|
|
|
|
|
|
|
|
|
|
|
|
|
|
|
|
|
|
|
|
|
|
|
|
|
|
|
|
|
|
|
|
|
|
|
|
|
|
|
|
|
|
|
|
|
|
|
|
|
|
|
|
|
|
|
|
|
|
|
|
|
|
|
|
|
|
|
|
|
|
|
|
|
|
|
|
|
|
|
|
|
|
|
|
|
|
|
|
|
|
|
|
|
|
|
|
|
|
|
|
|
|
|
|
|
|
|
|
|
|
|
|
|
|
|
|
|
|
|
|
|
|
|
|
|
|
|
|
|
|
|
|
|
|
|
|
|
|
|
|
|
|
|
|
|
|
|
|
|
|
|
|
|
|
|
|
|
|
|
|
|
|
|
|
|
|
|
|
|
|
|
|
|
|
|
|
|
|
|
|
|
|
|
|
|
|
|
|
|
|
|
|
|
|
|
|
|
|
|
|
|
|
|
|
|
|
|
|
|
|
|
|
|
|
|
|
|
|
|
|
|
|
|
|
|
|
|
|
|
|
|
|
|
|
|
|
|
|
|
|
|
|
|
|
|
|
|
|
|
|
|
|
|
|
|
|
|
|
|
|
|
|
|
|
|
|
|
|
|
|
|
|
|
|
|
|
|
|
|
|
|
|
|
|
|
|
|
|
|
|
|
|
|
|
|
|
|
|
|
|
|
|
|
|
|
|
|
|
|
|
|
|
|
|
|
|
|
|
|
|
|
|
|
|
|
|
|
|
|
|
|
|
|
|
|
|
|
|
|
|
|
|
|
|
|
|
|
|
|
|
|
|
|
|
|
|
|
|
|
|
|
|
|
|
|
|
|
|
|
|
|
|
|
|
|
|
|
|
|
|
|
|
|
|
|
|
|
|
|
|
|
|
|
|
|
|
|
|
|
|
|
|
|
|
|
|
|
|
|
|
|
|
|
|
|
|
|
|
|
|
|
|
|
|
|
|
|
|
|
|
|
|
|
|
|
|
|
|
|
|
|
|
|
|
|
|
|
|
|
|
|
|
|
|
|
|
|
|
|
|
|
|
|
|
|
|
|
|
|
|
|
|
|
|
|
|
|
|
|
|
|
|
|
|
|
|
|
|
|
|
|
|
|
|
|
|
|
|
|
|
|
|
|
|
|
|
|
|
|
|
|
|
|
|
|
|
|
|
|
|
|
|
|
|
|
|
|
|
|
|
|
|
|
|
|
|
|
|
|
|
|
|
|
|
|
|
|
|
|
|
|
|
|
|
|
|
|
|
|
|
|
|
|
|
|
|
|
|
|
|
|
|
|
|
|
|
|
|
|
|
|
|
|
|
|
|
|
|
|
|
|
|
|
|
|
|
|
|
|
|
|
|
|
|
|
|
|
|
|
|
|
|
|
|
|
|
|
|
|
|
|
|
|
|
|
|
|
|
|
|
|
|
|
|
|
|
|
|
|
|
|
|
|
|
|
|
|
|
|
|
|
|
|
|
|
|
|
|
|
|
|
|
|
|
|
|
|
|
|
|
|
|
|
|
|
|
|
|
|
|
|
|
|
|
|
|
|
|
|
|
|
|
|
|
|
|
|
|
|
|
|
|
|
|
|
|
|
|
|
|
|
|
|
|
|
|
|
|
|
|
|
|
|
|
|
|
|
|
|
|
|
|
|
|
|
|
|
|
|
|
|
|
|
|
|
|
|
|
|
|
|
|
|
|
|
|
|
|
|
|
|
|
|
|
|
|
|
|
|
|
|
|
|
|
|
|
|
|
|
|
|
|
|
|
|
|
|
|
|
|
|
|
|
|
|
|
|
|
|
|
|
|
|
|
|
|
|
|
|
|
|
|
|
|
|
|
|
|
|
|
|
|
|
|
|
|
|
|
|
|
|
|
|
|
|
|
|
|
|
|
|
|
|
|
|
|
|
|
|
|
|
|
|
|
|
|
|
|
|
|
|
|
|
|
|
|
|
|
|
|
|
|
|
|
|
|
|
|
|
|
|
|
|
|
|
|
|
|
|
|
|
|
|
|
|
|
|
|
|
|
|
|
|
|
|
|
|
|
|
|
|
|
|
|
|
|
|
|
|
|
|
|
|
|
|
|
|
|
|
|
|
|
|
|
|
|
|
|
|
|
|
|
|
|
|
|
|
|
|
|
|
|
|
|
|
|
|
|
|
|
|
|
|
|
|
|
|
|
|
|
|
|
|
|
|
|
|
|
|
|
|
|
|
|
|
|
|
|
|
|
|
|
|
|
|
|
|
|
|
|
|
|
|
|
|
|
|
|
|
|
|
|
|
|
|
|
|
|
|
|
|
|
|
|
|
|
|
|
|
|
|
|
|
|
|
|
|
|
|
|
|
|
|
|
|
|
|
|
|
|
|
|
|
|
|
|
|
|
|
|
|
|
|
|
|
|
|
|
|
|
|
|
|
|
|
|
|
|
|
|
|
|
|
|
|
|
|
|
|
|
|
|
|
|
|
|
|
|
|
|
|
|
|
|
|
|
|
|
|
|
|
|
|
|
|
|
|
|
|
|
|
|
|
|
|
|
|
|
|
|
|
|
|
|
|
|
|
|
|
|
|
|
|
|
|
|
|
|
|
|
|
|
|
|
|
|
|
|
|
|
|
|
|
|
|
|
|
|
|
|
|
|
|
|
|
|
|
|
|
|
|
|
|
|
|
|
|
|
|
|
|
|
|
|
|
|
|
|
|
|
|
|
|
|
|
|
|
|
|
|
|
|
|
|
|
|
|
|
|
|
|
|
|
|
|
|
|
|
|
|
|
|
|
|
|
|
|
|
|
|
|
|
|
|
|
|
|
|
|
|
|
|
|
|
|
|
|
|
|
|
|
|
|
|
|
|
|
|
|
|
|
|
|
|
|
|
|
|
|
|
|
|
|
|
|
|
|
|
|
|
|
|
|
|
|
|
|
|
|
|
|
|
|
|
|
|
|
|
|
|
|
|
|
|
|
|
|
|
|
|
|
|
|
|
|
|
|
|
|
|
|
|
|
|
|
|
|
|
|
|
|
|
|
|
|
|
|
|
|
|
|
|
|
|
|
|
|
|
|
|
|
|
|
|
|
|
|
|
|
|
|
|
|
|
|
|
|
|
|
|
|
|
|
|
|
|
|
|
|
|
|
|
|
|
|
|
|
|
|
|
|
|
|
|
|
|
|
|
|
|
|
|
|
|
|
|
|
|
|
|
|
|
|
|
|
|
|
|
|
|
|
|
|
|
|
|
|
|
|
|
|
|
|
|
|
|
|
|
|
|
|
|
|
|
|
|
|
|
|
|
|
|
|
|
|
|
|
|
|
|
|
|
|
|
|
|
|
|
|
|
|
|
|
|
|
|
|
|
|
|
|
|
|
|
|
|
|
|
|
|
|
|
|
|
|
|
|
|
|
|
|
|
|
|
|
|
|
|
|
|
|
|
|
|
|
|
|
|
|
|
|
|
|
|
|
|
|
|
|
|
|
|
|
|
|
|
|
|
|
|
|
|
|
|
|
|
|
|
|
|
|
|
|
|
|
|
|
|
|
|
|
|
|
|
|
|
|
|
|
|
|
|
|
|
|
|
|
|
|
|
|
|
|
|
|
|
|
|
|
|
|
|
|
|
|
|
|
|
|
|
|
|
|
|
|
|
|
|
|
|
|
|
|
|
|
|
|
|
|
|
|
|
|
|
|
|
|
|
|
|
|
|
|
|
|
|
|
|
|
|
|
|
|
|
|
|
|
|
|
|
|
|
|
|
|
|
|
|
|
|
|
|
|
|
|
|
|
|
|
|
|
|
|
|
|
|
|
|
|
|
|
|
|
|
|
|
|
|
|
|
|
|
|
|
|
|
|
|
|
|
|
|
|
|
|
|
|
|
|
|
|
|
|
|
|
|
|
|
|
|
|
|
|
|
|
|
|
|
|
|
|
|
|
|
|
|
|
|
|
|
|
|
|
|
|
|
|
|
|
|
|
|
|
|
|
|
|
|
|
|
|
|
|
|
|
|
|
|
|
|
|
|
|
|
|
|
|
|
|
|
|
|
|
|
|
|
|
|
|
|
|
|
|
|
|
|
|
|
|
|
|
|
|
|
|
|
|
|
|
|
|
|
|
|
|
|
|
|
|
|
|
|
|
|
|
|
|
|
|
|
|
|
|
|
|
|
|
|
|
|
|
|
|
|
|
|
|
|
|
|
|
|
|
|
|
|
|
|
|
|
|
|
|
|
|
|
|
|
|
|
|
|
|
|
|
|
|
|
|
|
|
|
|
|
|
|
|
|
|
|
|
|
|
|
|
|
|
|
|
|
|
|
|
|
|
|
|
|
|
|
|
|
|
|
|
|
|
|
|
|
|
|
|
|
|
|
|
|
|
|
|
|
|
|
|
|
|
|
|
|
|
|
|
|
|
|
|
|
|
|
|
|
|
|
|
|
|
|
|
|
|
|
|
|
|
|
|
|
|
|
|
|
|
|
|
|
|
|
|
|
|
|
|
|
|
|
|
|
|
|
|
|
|
|
|
|
|
|
|
|
|
|
|
|
|
|
|
|
|
|
|
|
|
|
|
|
|
|
|
|
|
|
|
|
|
|
|
|
|
|
|
|
|
|
|
|
|
|
|
|
|
|
|
|
|
|
|
|
|
|
|
|
|
|
|
|
|
|
|
|
|
|
|
|
|
|
|
|
|
|
|
|
|
|
|
|
|
|
|
|
|
|
|
|
|
|
|
|
|
|
|
|
|
|
|
|
|
|
|
|
|
|
|
|
|
|
|
|
|
|
|
|
|
|
|
|
|
|
|
|
|
|
|
|
|
|
|
|
|
|
|
|
|
|
|
|
|
|
|
|
|
|
|
|
|
|
|
|
|
|
|
|
|
|
|
|
|
|
|
|
|
|
|
|
|
|
|
|
|
|
|
|
|
|
|
|
|
|
|
|
|
|
|
|
|
|
|
|
|
|
|
|
|
|
|
|
|
|
|
|
|
3. Para comenzar
1.Conecte el puerto USB del MPC Studio a un puerto USB de la computadora, con un cable USB estándar.
2.Encienda el MPC Studio.
3.En su ordenador, abra el software MPC.
4.Siga las instrucciones de la pantalla para autorizar su versión del MPC.
5.En la barra del menú del MPC, haga clic en el menú Edit (Editar) y seleccione Preferences (Preferencias). Haga clic en la pestaña Audio y seleccione la tarjeta de audio que desea utilizar. Haga clic en OK (Aceptar) cuando termine.
6.¡Comience a componer música! Consulte Funcionamiento para más información.
Importante: Para ver la Guía del usuario del software del MPC, haga clic en el menú Help (Ayuda).
12

Características |
|
5 |
|
14 |
6 |
|
|
13 |
7 |
|
|
13 |
|
13 |
|
13 |
16 |
|
|
15 |
|
47 |
|
21 |
|
3 4 |
1 2 |
17 17 17 17 18 |
||
19 20 30 31 32 |
||
25 26 |
27 |
28 29 |
34 35 36 37 38 |
||
23 |
|
9 |
11 |
|
|
||
|
|
24 |
|
|
10 |
|
|
22 |
|
10 |
|
|
|
33 |
|
48 |
|
8 |
12 |
|
|
|
|
44 44 46 45 45 |
|||
42 43 41 39 40 |
|||
Alimentación y entradas/salidas
1.Puerto USB: Use el cable USB incluido para conectar este puerto USB de alta fuerza de retención a un puerto USB disponible en la computadora. Esta conexión permite que el MPC Studio envíe y reciba datos MIDI y de audio hacia y desde el software MPC.
2.Interruptor de encendido: Permite encender y apagar el MPC Studio.
3.Entrada MIDI: Conecte esta entrada a la salida MIDI de un dispositivo MIDI externo (sintetizador, caja de ritmos, etc.) mediante el adaptador de 3,5 mm (1/8 pulg.) a 5 patillas incluido y un cable MIDI de cinco patillas.
Importante: No conecte dispositivos de audio (como auriculares, monitores, etc.) a los conectores hembra de 3,5 mm (1/8 pulg.) entrada MIDI o salida MIDI. Use los adaptadores de 3,5 mm (1/8 pulg.) a MIDI de 5 patillas incluidos para conectar sólo dispositivos MIDI.
4.Salida MIDI: Conecte esta salida a la entrada MIDI de un dispositivo MIDI externo (sintetizador, caja de ritmos, etc.) mediante el adaptador de 3,5 mm (1/8 pulg.) a 5 patillas incluido y un cable MIDI de cinco patillas.
Importante: No conecte dispositivos de audio (como auriculares, monitores, etc.) a los conectores hembra de 3,5 mm (1/8 pulg.) entrada MIDI o salida MIDI. Use los adaptadores de 3,5 mm (1/8 pulg.) a MIDI de 5 patillas incluidos para conectar sólo dispositivos MIDI.
5.Ranura de bloqueo Kensington®: Puede utilizar esta ranura a fin de sujetar el MPC Touch a una mesa u otra superficie.
13

Controles de navegación / Ingreso de datos
6.Pantalla: Esta pantalla LCD muestra toda la información relevante para la operación actual del MPC Studio. Gran parte de esta información se muestra también en el software. Use los botones de cursor para navegar por la pantalla y los botones –/+ del cuadrante de datos para ajustar el valor/parámetro seleccionado en ese momento. Use los botones mode (Modo) para cambiar la página que se muestra y los botones F para cambiar la pestaña que se muestra.
Nota: Mantenga pulsado Shift y use el cuadrante de datos para ajustar el contraste de la pantalla.
7.Botones F: Pulse uno de estos botones para seleccionar su pestaña correspondiente, mostrada arriba del botón en la pantalla.
8.Botones de cursor: Estos botones se usan para navegar por los campos de menús y opciones que se muestran en la pantalla.
9.Cuadrante de datos : Use este cuadrante para desplazarse por las opciones de menú disponibles o ajustar los valores de los parámetros del campo seleccionado en la pantalla.
10.–/+: Pulse estos botones para aumentar o disminuir el valor del campo seleccionado en la pantalla.
11.Numérico: Si el campo seleccionado en la pantalla es un número, puede pulsar Numeric y usar los pads como teclado numérico estándar para ingresar valores. Los números están impresos en verde sobre los pads.
12.Deshacer / volver a hacer: Pulse este botón para deshacer su última acción. Mantenga pulsado Shift y pulse este botón para volver a hacer la última acción que deshizo.
Controles de pad / Perillas Q-Link
13.Perillas Q-Link: Use estas perillas sensibles al tacto para ajustar diversos parámetros y valores. Las perillas pueden controlar una columna de parámetros por vez. Use la perilla de desplazamiento que está arriba de ellas para cambiar la columna de parámetros que controlan en ese momento.
14.Perilla de desplazamiento: Use esta perilla para cambiar la columna de parámetros que controlan las perillas Q-Link en ese momento.
15.Disparador Q-Link: Mantenga pulsado este botón y toque una de las perillas Q-Link para hacer que el valor del parámetro de esa perilla salte a su mínimo o máximo (dependiendo del parámetro Trig del software).
16.Pads: Use estos pads para disparar golpes de batería u otras muestras existentes en su software. Son sensibles a la velocidad y a la presión, lo que los hace muy responsivos e intuitivos para tocar. Los pads se encienden con diferentes colores en función de la fuerza con que los toca (varían de amarillo a baja velocidad hasta rojo a la velocidad máxima). Para deshabilitar (o volver a habilitar) estas luces, pulse Pad Assign (Asignación de pad) y luego F6 (Velo Col).
Si el campo seleccionado en la pantalla es un número, puede pulsar numeric y usar los pads como teclado numérico estándar para ingresar valores. Los números están impresos en verde sobre los pads.
17.Botones del banco de pads: Estos 4 botones conmutan entre los bancos de pads A–H (mantenga pulsado Shift para acceder a los bancos E–H). Como alternativa, pulse dos veces uno de estos botones. Entre estos 8 bancos con 16 pads por banco, es posible acceder a hasta 128 eventos MIDI usando los pads.
18.Asignar/copiar a pad: Pulse este botón para asignar una muestra a un pad. La grilla 4x4 que aparece en la pantalla representa los 16 pads. Use los botones de cursor para navegar por la grilla y el cuadrante de datos o los botones –/+ para seleccionar un programa (cuando se resalta el campo Program) o una muestra (cuando se resalta un pad).
Mantenga pulsado Shift y pulse este botón para copiar las muestras y parámetros de un pad a otro. Use los botones de cursor para seleccionar el campo From Pad (“origen”) o To Pads (“destino”) y toque un pad para seleccionarlo (puede copiar a varios pads). Use los botones F para confirmar o cancelar la operación.
14
 Loading...