


AKAI S1000 Series Software Version 2.0 Manual
for S1000, S1000HD, S1000PB

Version 2.0 89/11 |
Table of Contents - iii |
|
Introduction
1 Introduction
We at AKAI, and in particular the S1000 series development team, would like to thank you for buying a model of the Akai S1000 series, and hope that you will remain an AKAI player and user for a long time. As each unit is thoroughly tested and inspected before it leaves our factory, we are confident that you will enjoy years of service from this instrument.
Though we have taken great care in the manufacture of your AKAI sampler, any product which uses this level of technology may require servicing occasionally. The warranty below outlines your rights and responsibilities, and also mentions certain limitations and exclusions. Please read this warranty section carefully.
About this Manual
This manual covers operations under software Version 2.0 for the whole of the S1000 range (S1000, S1000HD and S1000PB). In this manual usually all models in the S1000 series will be referred to as "S1000". However, there are some functions and descriptions which apply only to particular models in the series. These parts of the manual are marked as being for these models, and you should take note accordingly.
This manual has been arranged in an order which we hope will be useful in your initial experiments with the S1000, and then for future use afterwards, as you learn more functions. Since the bottom row of buttons under the display (SELECT PROG, EDIT SAMPLE, etc) correspond to logical operations within the S1000's software, the manual has been arranged for the most part in sections matching these buttons.
There are two major exceptions to this rule: this first section, "Introduction", which is both an introduction to the features and terminology of the S1000, and a guide to the operation of SELECT PROG -- in other words, how to get your S1000 playing pre-recorded sample programs. Please take the trouble to read this section, as it explains basic terminology, operational concepts and shortcuts which you may not discover for yourself.
The second section, "Sampler Functions", covers the sampling and sample editing processes (EDIT SAMPLE), as well as the program editing functions (EDIT PROG). This chapter has been written from the "bottom up", ie from the process of recording a sample, through editing a sample, to putting together a program.
At the end of this manual there is an index. If you can't find what you want in the Table of Contents, try the index. Most major entries are cross-referenced in a number of ways, for instance, "Velocity crossfading" may also be looked up under "Crossfading, Velocity".
Finally, this manual assumes that you have a basic knowledge of MIDI and synthesizer terminology (eg you know what is meant by an "ADSR envelope" or a "Program Change message"). If you don't, there are many excellent books on the market which will guide you into the world of MIDI instruments and synthesizers. Get hold of one of these and read it before going much further with your S1000 - things will make a lot more sense after you've done this.
Version 20 89/11 |
Page 1 |
Introduction
WARRANTY
AKAI Electric Co. Ltd warrants its products, when purchased from an authorized AKAI dealer, to be free from defects in materials and workmanship for a period of 12 (twelve) months from the date of purchase. Warranty service is effective and available to the original purchaser only, and only on completion and return of the AKAI Warranty Registration Card within 14 days of purchase.
War: nary coverage is valid for factory-authorized updates to AKAI instruments and their software, when their installation is performed by an authorized AKAI Service Center, and a properly completed Warranty Registration has been returned to the factory.
To obtain service under this warranty, the product must, on discovery of the defect, be properly packed and skipped to the nearest AKAI Service Center. The party requesting warranty service moat provide proof of original ownership sad date of purchase of the product.
If the warranty is valid, AKAI will, without charge for parts or, labor, either repair or replace the defective part(a). Without a valid warranty, the entire coat of the repair (parts and labor) is the responsibility of
the product's owner.
AKAI warrants that it will make all necessary adjustments, repairs and replacements at no coat to the original owner within 12 (twelve) months of the purchase date if:
1The product fails to perform its specified functions due to failure of one or more of its components.
2The product fails to perform its specified functions due to defects in workmanship.
3The product has been maintained and operated by the owner in strict accordance with the written instructions for proper maintenance and use as specified in this Operator's Manual.
Before purchase and use, owners should determine the suitability of the product for their intended use, and the owner assumes all risk and liability whatsoever in connection therewith. AKAI shall not be liable for any injury, loss or damage, direct or consequential, arising out of the use, or inability to use the product.
The warranty provides only those benefits specified, and does not cover defects or repairs needed as a result of acts beyond the control of AICAI, including, but not limited to:
1Damage caused by abuse, accident or negligence. AKAI will not cover under warranty any original factory disk damaged or destroyed as a result of the owner's mishandling.
2Damage caused by any tampering, alteration or modification of the product: operating software, mechanical or electronic components.
3Damage caused by failure to maintain sad operate the product is strict accordance with the written instructions for proper maintenance sad use as specified in this Operator's Manual.
4Damage caused by repairs or attempted repairs by unauthorized persona.
5Damage caused by fire, smoke, falling objects, water or other liquids, or natural events such as rain, floods, earthquakes, lightning, tornadoes, storms, etc.
6 Damage caused by operation on improper voltages.
IMPORTANT NOTE: This warranty becomes void if the product or its software is electronically modified, altered or tampered with is any way.
AKAI shall not be liable for coats involved is packing or preparing the product for shipping, with regard to time, labor or materials, shipping or freight coats, or time sad expenses involved in transporting the product to and from an AKAI Authorized Service Center or Authorized Dealer.
AKAI will not cover under warranty an apparent malfunction that is determined to be user error, or the owner's inability to use the product.
THE DURATION OF ANY OTHER WARRANTIES, WHETHER IMPLIED OR EXPRESS, INCLUDING BUT NOT LIMITED TO THE IMPLIED CONDITION OF MERCHANTABILITY, IS LIMITED TO THE DURATION OF THE EXPRESS WARRANTY HEREIN.
ARAI hereby excludes incidental or consequential damages, including but not limited to:
1Loss of time
2Inconvenience
3Delay in performance of the Warranty
4The lose of use of the product
5Commercial lose
6Breach of any express or implied warranty, including the Implied Warranty of Merchantability, applicable to this product
Page 2 |
Version 20 89/11 |
Introduction
Copyright notice
The AKAI S1000 is a computer-based instrument, and as such contains and uses software in ROMs and disks. This software, and all related documentation, including this Operator's Manual, contain proprietary information which is protected by copyright laws. All rights are reserved. No part of the software or its documentation may be copied, transferred or modified. You may copy the operating software and any samples, programs, etc contained on disks for your own personal use. All other copies of the software are in violation of copyright laws. You may not distribute copies of the software to others, or transfer the software to another computer by electronic means. You may not modify, adapt, translate, lease, distribute, resell for profit or create derivative works based on the software and its related documentation or any part thereof without prior written consent from AKAI Electric Co. Ltd, Tokyo, Japan.
Version 2.0 89/11 |
Page 3 |
Introduction
WARNING
Power requirements for electrical equipment vary from area to area. Please ensure that your S1000 meets the power requirements in your area. If in doubt, consult a qualified electrician.
120V @ 60Hz for USA and Canada
220V @ 50Hz for Europe (excluding UK)
240V @ 50Hz for UK and Australia
Protecting yourself and the S1000
•Never touch the plug with wet hands.
•Always disconnect the S1000 from the power supply by pulling on the plug, not the cord.
•Allow only a qualified professional engineer to repair or reassemble the S1000. Apart from voiding the warranty, unauthorized engineers might touch live internal parts and receive a serious electric shock.
•Do not put, or allow anyone to put any object, especially metal objects, into the S1000.
•Use only a household AC power supply. Never use a DC power supply.
•If water or any other liquid is spilled into or onto the S1000, disconnect the power, and call your dealer.
•Make sure that the unit is well-ventilated, and away from direct sunlight.
•To avoid damage to internal circuitry, as well as the external finish, keep the S1000 away from sources of direct heat (stoves, radiators, etc).
•Avoid using aerosol insecticides, etc near the S1000. They may damage the surface, and may ignite.
•Do not use denaturated alcohol, thinner or similar chemicals to clean the S1000. They will damage the finish.
•Make sure that the S1000 is always well-supported when in use (either in a specially-designed equipment rack, or a firm level surface).
•When installing the S1000 in a 19" rack system, always allow lU of ventilated free space above it to allow for cooling. Make sure that the back of the rack is unobstructed to allow a clear airflow.
UK customers
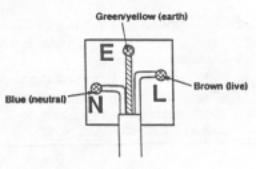
Important safety notice - The flex supplied with this machine has three wires, as shown in the illustration.
WARNING: THIS APPLIANCE MUST BE EARTHED
IMPORTANT
The wires in this mains lead are coloured in accordance with the following code: Green-and-yellow - earth
Blue - neutral Brown - live
Page 4 |
Version 2.0 89/11 |
|
Introduction
As the colours of the wires in the flex may not correspond to the colour markings in your plug, make sure that wires are connect in the following way. The green-and yellow wire should be connected to the terminal marked "E" or marked with the safety earth symbol ( ); the blue wire is connected to the terminal marked "N", or coloured black. The brown wire should be connected to the terminal marked "L", or coloured red. Make sure all terminal screws are tightened and there are no loose strands of wire.
FCC warning
This equipment generates and uses radio frequency energy, and if not installed and used properly, that is, in strict accordance with the manufacturer's instructions, may cause interference to radio and television reception. It has been type tested and found to comply with the limits for a Class B computing device in accordance with the specifications in Subpart J of Part 15 FCC Rules, which are designed to provide reasonable protection against such interference in a residential installation. However, there is no guarantee that interference will not occur in a particular installation. If this equipment does cause interference to radio or television reception, which can be determined by turning the equipment off and on, the user is encouraged to try to correct the interference by one or more of the following measures:
-reorientate the receiving antenna
-relocate the equipment with respect to the receiver
-- move the equipment away from the receiver
-plug the equipment into a different outlet, so that the equipment and receiver are on different branch circuits
If necessary, the user should consult the dealer or an experienced radio/television technician for additional suggestions.
The user may find the following booklet prepared by the Federal Communications Commission helpful:
"How to Identify and Resolve Radio-TV Interference Problems"
This booklet is available from the U.S. Government Printing Office, Washington, DC 20402, Stock No. 004-000-0034504.
Avis pour les acheteurs canadiens du S1000/ HD / PB
Le pr6sent appareil num6rique n'emet pas des bruits radioelectriques depassant les limites applicables aux appareils numeriques de la Class B prescrites dans le Reglement sur le brouillage radioelectrique edicte par le ministere des Communications du Canada
Version 2.089/11 |
Page 5 |
Introduction
FUR KUNDEN IN DER BUNDESREPUBLIK DEUTSCHLAND
Bescheinigung von AKAI
Hiermit wird bescheinigt, daB das Gerdt AKAI
S1000 / HD / PB in tYbereinstimmung mit den Bestimmungen der
Amtsblattverftigung 1046/1984
funkentstbrt ist.
Der Deutschen Bundespost wurde das Inverkehrbringen theses GerAtes ange zeigt and die Berichtignng zur Oberprdfung der Serie auf Einhaltung der Bestimmungen eingerliumt.
AKAI ELECTRIC CO., LTD
Page 6 |
Version 20 89/11 |
Introduction
Features
The AKAI S1000 is a high-quality digital sampler. With a sampling rate of 44.1kHz, and 16-bit resolution, the S1000 is capable of recording and replaying samples literally of CD quality, and the basic unexpended unit has a total sample time of over 23 seconds (mono). Memory may be added in 2Mbyte boards to a total of 8Mbytes to give over 90 seconds of total sample time.
There are three models in the AKAI S1000 series: the basic S1000, with a diskette drive, the 51000HD, with an integral 40Mb hard disk, and the S1000PB, which has a diskette drive, but none of the sample recording or editing facilities of the other models. The S1000PB is especially useful for setups where more than 16-note polyphony is required (using a S1000 and S1000PB), or as a playback-only sampler for live work. A 51000 may be used for recording and editing of samples, and they may then be transferred to a S1000PB using diskette or MIDI Sample Dump, and replayed. Diskette and MIDI data is, naturally, completely compatible between all models in the range, as well as with the S1000KB sampling keyboard.
16-note polyphony allows complex passages to be played with the full sample time. The samples may be edited with full trimming facilities (down to 1 sampling period), looped at up to 8 loop points per sample (with tuning of the loop), spliced to other samples, filtered and sent through two independent ADSR envelope generators. Full velocity, positional and looping crossfading is possible. Basic synthesizer waveforms (sine, triangle, etc) are available on disk for synthesizer/sampler sounds.
The S1000 is also capable of editing samples digitally - "stretching" or "squeezing" samples without changing the pitch in order to fit them into a specific time slot. Resampling can be done at any frequency (higher or lower than the original).
The stereo facility is ideal for sampling portions of prerecorded program material (making it an ideal tool for "house", "hip-hop" etc productions), as well as for sampling ambient acoustic sounds.
Naturally, a full MIDI implementation is built in - multi-timbral capabilities making the S1000 perfect for use with a sequencer such as the AKAI MPC-60 or ASQ-10.
Special functions for remote operation of the AKAI ME-35T Audio/MIDI trigger unit (1 or 2 can be controlled), together with a single-trigger monophonic mode make the S1000 into a real-time percussion tone generator.
In the studio, eight separate outputs allow maximum flexibility in mixing and adding effects. However, stereo operation is possible from just two outputs, and a built-in stereo effects send/return loop can save channels and space in live work.
The S1000 is capable of processing up to 200 samples, 100 programs, or a combination of up to 400 samples + programs + keygroups. The internal 3.5" floppy disk drive provides a quick easy method of storing and retrieving data (samples, programs and other settings).
Hard disks may be used by the S1000 when using the optional IB-103 interface board (AKAI provide a 40Mbyte capacity drive which may be mounted internally), but any SCSI-compatible drive may be used up to a capacity of 512Mbytes. The hard disk may be divided into partitions and volumes, and individual volumes may be auto-
Page 7
Version 2.0 89/11
Introduction
matically loaded in response to MIDI Program Change commands. The SCSI interface may also be used for fast transmission of sample data to SCSI-equipped computers for editing, etc. The optional IB-104 digital interface board provides coaxial and optical digital links, for direct digital sampling at rates of up to 48kHz, and hard disk archive/restore to DAT for quick and easy storage of data.
The industry-standard sampler prior to the introduction of the S1000 was the ALAI S900, and hundreds of sample disks were produced for this machine. You'll be pleased to know that the S1000 is capable of reading these samples and the associated programs from disk, converting them, and replaying them.
Page 8 |
Version 2.0 89/11 |
Introduction
Glossary
Every new technology invents its own terms to describe new techniques. Digital music is no exception, unfortunately. However, a glossary such as this can help introduce you to the vocabulary and concepts involved. We assume you have a basic knowledge of MIDI, but if the S1000 is your first excursion into MIDI and sampling, we suggest you get hold of an introductory MIDI book, and read it before proceeding much further with your S1000.
NOTE: This manual covers all models of the S1000 series - including the S1000PB (playback model). On the PB model, the CURSOR and DATA rotary knobs are replaced by two pairs of buttons (<= and => ), which correspond to turning the knobs by counterclockwise and clockwise respectively. One press of these buttons corresponds to turning the knobs by one click.
For the sake of simplicity, this manual will always refer to turning the CURSOR or DATA knobs. If you are using a S1000PB, you should interpret this as pressing the appropriate button (CURSOR or DATA). Where other S1000PB-specific information is given, this will be clearly indicated.
Button
In this manual, the word "button" will generally be used to refer to a push-button switch on the front panel. This is to distinguish them from the keys on a musical piano-type keyboard. There are two major exceptions to this convention: the use of the terms "number keypad", and "soft key", which come from computing, and are so well-engrained in technical language that using the terms "number button pad" and "soft button" would be pointless.
Crossfading
On the S1000, crossfading is the term used to describe the setting of the relative volume of two samples which are played at the same time. For instance velocity crossfading is used to describe the relative balance between two samples played by the same key, when the key is played at different velocities. Positional crossfading refers to relative balance between samples in different keyspans (see Multisampling. Additionally, the S1000 allows loop crossfading - the ability to fade samples inside themselves to allow for smooth looping.
Cursor
On the S1000, the cursor is the highlighted (reverse) part of the display which is moved by the CURSOR knob (S1000PB - CURSOR buttons), and indicates the parameter which may be changed by the DATA knob (S1000PB - DATA buttons) and/or the number keypad.
Field
On the S1000, a field is the portion of a page containing a parameter. Only fields (ie those portions of a page which may be altered) will be highlighted by the cursor as the CURSOR knob is turned to go through a page.
Key
In this manual, the word "key" will be generally used to refer to a key on a piano-type keyboard to distinguish these from buttons on the front panel.
Version 2.0 89/11 |
Page 9 |
Introduction
Keygroup
The term for a collection of a number of parameters of up to four samples - their name, keyspan, filtering, envelopes, etc.
Keyspan
On the S1000, a keyspan is the range of the keyboard on which a sample can be played.
LFO
Low Frequency Oscillator - an oscillator which operates at too low a frequency to produce an audible tone, but is used to modulate such parameters as pitch, pan position, etc. The S1000 has a number of LFOs implemented in software.
Looping
In sampling, looping refers to the process of taking a portion of a sample and repeating it. The 51000 allows eight such loops to be present in a sample, allowing incredibly subtle variations on the basic sampled sound.
Multisampling
When sampling a sound, replaying it at a radically higher or lower pitch will produce strange and unnatural effects. To overcome this problem, samples should be taken from across the pitch range of an instrument and assigned to different keyspans across the keyboard. This is known as multisampling.
Operating system or Operating software
Without a computer program to send signals through the maze of chips and circuitry which make up the hardware of the S1000, the machine would be useless. The program which contains the instructions to respond to MIDI messages, buttons and controllers, and display messages, etc on screen (as well as to record and play back sounds) is known as the operating system. This is automatically loaded when the S1000 is powered up, either from chips inside the S 1000, or, if a disk containing a later version of the operating system has been placed in the drive, from disk.
Page
On the S1000, a page is the set of information and parameters shown at any one time on the display screen. Pages can be entered by pressing the named buttons (SELECT PROG , MIDI, etc), or the soft keys whose legends are displayed at the bottom of a page.
Parameter
A value which can be changed (for instance length, tuning, upper limit of a keyspan) as displayed on the screen of the S1000.
Positional crossfading
See Crossfading.
Program
The term for a collection of keygroups which will all be selected together when the program is selected. Different programs can be assigned to different MIDI channels, so that when a sequencer is connected to the S1000, multi-timbral output is possible.
Page 10 |
Version 2.0 89/11 |
Introduction
Sample
Usually in the manual, the word sample will refer to a sound which has been recorded, digitized and edited, and can then be added to a keygroup (you might like to think of it as a "waveform" in analog synthesizer terms). However, when editing one of these sounds, the length and position inside this sample is also measured in samples. This latter meaning refers to the digitized "snapshot" image of the sound for one cycle of the sampling process. A sample recorded at 44.1kHz and lasting for exactly one second therefore contains 44,100 samples! It will usually be clear in this manual, however, what meaning of the word sample is meant at any one time. To sample, by the way, means "to record a sound on a sampler and make a sample of it".
Soft key
On the S1000, a button with no predefined function. The current state of the S1000 determines the function, which is displayed on the bottom line of the page.
Splicing
The process of joining samples to each other (analogous to tape splicing). However, this is much easier electronically than when using razor blades and splicing tape, and many more effects are possible. To take an extreme example, the sound of a string section could be spliced to the sound of a bottle breaking, and the resulting sample then spliced to the reversed sound of the string attack.
Velocity crossfading
See Crossfading and Velocity zones.
Velocity zones
On the S1000, a sample can be programmed to play only when a key is pressed between certain velocities. The range of these is known as a velocity zone. Up to four samples may be assigned in each keygroup, and if desired, each can be assigned to a different velocity zone. In this way, a finger-style electric bass sample could be assigned to lower velocity zones, and a slap or pull bass to higher ones, with a velocity crossfade added so that there is an intermediate range. The result, when played, will provide a highly expressive bass instrument.
Version 2.0 89/11 |
Page 11 |
Introduction
Volume
As well as being the output level from the S1000, volume has another meaning a collection of programs, samples and drum settings which can be stored together on a diskette, on a hard disk or in memory. One volume can be stored in memory or on each diskette, and up to 128 volumes can be stored on a hard disk.
Page 12 |
Version 2.0 89/11 |
Introduction
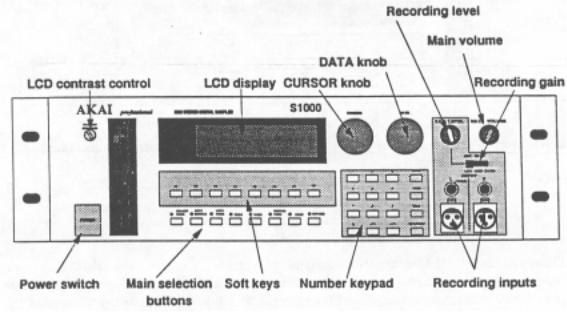
Front panel controls
This section describes the function of the controls on the front panel, and the general principles of operating the S1000. Reading this section now, and understanding the principles of the software user interface of the S1000 will probably save you a lot of time later on when you come to use the machine in earnest.
S1000/S1000HD front panel
Version 2.0 89/11 |
Page 13 |
Introduction
S1000PB front panel
Though the S1000 is a highly sophisticated sampler, you may feel that there are surprisingly few controls. However, each button on the front panel serves more than one function, and together with the 40 character x 8-line LCD display (also used for graphic displays), allow
you to perform a wide variety of editing and other commands easily.
Disk drive
Since the S1000 is a sampler with 2Mbyte of RAM, sample data and programs will be lost when the power is turned off. The cost of backing up so much memory with batteries would make the S1000 a prohibitively expensive instrument. Using diskettes to store sample, program and other data is a cost-effective way of overcoming this problem, as well as providing an easily-transportable storage medium for commercial and "home-grown" samples. An additional advantage is provided in the easy way you can upgrade the operating system.
A complex hardware/software combination such as the S1000 is always capable of being improved with new features. We have designed the hardware to be ready for such software features, and these can be added simply by turning on the S1000 with a disk containing the latest version of the operating system in the drive. Normally, the S1000 will "boot" the operating system from its own internal ROM, but if a disk containing a later version is inserted at power-on, this version will be loaded. This eliminates the need for troublesome and time-consuming ROM changes.
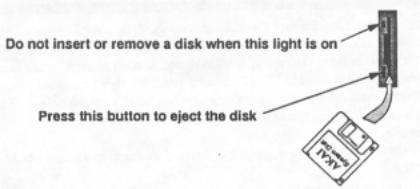
At the left of the unit (near the POWER switch) is a slot for 3.5" diskettes. When inserting a diskette, make sure the label is facing to the right, and the metal shutter is pointing towards the back of the S1000.
Version 2.0 89/11
Page 14
Introduction
Insert the disk with the metal shutter first, and the label to the right
Insert the disk until it clicks into place. To eject a disk, press the black rectangular button at the bottom of the disk drive. When the S1000 is reading or writing a disk ("accessing"), an LED on the disk drive will show this. NEVER, try to insert or remove a disk while this light is on! You may damage the drive and/or the data on the disk if you do this.
When buying blank 3.5" disks foruse with the S1000, you can use either MF2DD (these are low-density disks, cheaper, but don't hold as much data), or MF2HD high-density disks (more expensive and capable of holding more data). Format disks for use with the S1000 using the HIGH or LOW options in the disk formatting page of the DISK menu. No harm is done by formatting high-density disks as low-density (though it's a waste of a high-density disk), but you probably won't be able to format MF2DD disks as high-density. It's better not to try this.
You can prevent accidental erasure or overwriting of a disk by opening the small tab in the corner of the disk. It is a good idea to keep this small tab open all the time, unless you are sure that you want to write to, erase, or overwrite a disk.
Version 2.0 89/11 |
Page 15 |
Introduction
MAKING A COPY OF YOUR OPERATING SYSTEM DISK
If you destroy the data on any Operating System disk supplied as a future upgrade, this is a) annoying, and b) expensive. Unfortunately we must make a charge for replacement operating system disks, and, of course, it takes time for us to deliver them to you. You can save yourself this potential inconvenience by making a copy of the operating system, as described below. These instructions are not a full guide to disk operations - see the relevant section for full details.
1)Insert the Operating System disk in the drive and turn on the power to the S1000.
2)The S1000 will automatically load the operating system from disk.
3)Wait until the disk drive light goes off, remove the Operating System disk, and store it in a safe place. Insert a new disk (MF2DD or MF?.HD).
4)Press the DISK button (the DISK LED will light), and the S1000 will inform you that the disk is unformatted. Press the FORM soft key (F6) once to remove the "unformatted disk" message, and once again to display the formatting menu.
5)Press the START HIGH – F7 (for MF2HD) or LOW – F8 (for MF2DD) soft
key. The disk will be formatted, a process taking just over a minute. All existing data on the disk will be erased.
6)Now press the SAVE soft key ( F2 ). Move the cursor (using the CURSOR knob) so that
it covers the field below the" type of save: -" message (usually
'this will read "ENTIRE VOLUME"). Now change the message to read "OP-
ERATING SYSTEM", using the DATA knob.
'n Press GO ( F8 ). A message will be displayed saying that this will wipe the memory of the S1000. Since you've just turned it on, there are no samples or programs in memory
-press GO (this time it's F7).
8)The S1000 will save the operating system to disk. When the disk drive light has gone out, eject the disk, slide the write-protect tab so that the small square hole is open (this will prevent you overwriting or erasing the disk accidentally), and label the disk clearly.
9)Just to check everything's gone smoothly, turn off the S1000, insert your new copy of the operating system, and turn on the power. The S1000 should automatically load the disk version of the operating system. If it doesn't, something's gone wrong. Repeat the process again using another new disk, and if all else fails, call your AKAI dealer.
Headphones (S1000PB)
A stereo headphone socket (1/4 inch) is provided on the front panel. The level of the signal output here is adjusted by the MAIN VOLUME control (for models other than the S1000PB, the headphone connection is on the back panel).
MAIN VOLUME
This rotary control adjusts the overall output level of the LEFT/MONO, RIGHT and headphone outputs.
Page 16 |
Version 2.0 89/11 |
Introduction
REC GAIN (not S1000PB)
This is a 3-position slider switch (LOW, MID, HIGH) used for matching the level of the input source to the recording amplifier of the S1000. Fine adjustment should be carried out with the REC LEVEL control on the front panel. Ideally, you should set the REC GAIN so that the REC LEVEL is set about 2 o'clock. Remember that unlike analog devices, digital devices produce distortion which is particularly unpleasant, and "soft dipping" and the effect of saturation cannot be obtained by digital recording. You should always allow sufficient headroom for transient peaks when making a sample.
REC LEVEL (not S1000PB)
This rotary control is used when recording samples, to control the level of the signal fed into the S1000's recording section.
REC IN (not S1000PB)
Two parallel pairs of stereo balanced connectors are provided for connection of sound sources to be sampled. One pair is a pair of ITT-Cannon XLR-31F connectors (wired in accordance with American standards - 1=shield, 2=cold, 3=hot), and the other pair is a pair of unbalanced 1/4" phone connectors.
Unbalanced sources can, of course, be connected to the XLR inputs. If a mono source is used for sampling, use only either the LEFT (MONO) XLR or phone connector.
POWER SWITCH
Turn on the S1000 with the power switch on the left of the front panel (press for on, and press again for oft). On power-on, the display will indicate the initial SELECT PROG page, and the LED by the SELECT PROG button will light.
Editing controls
While most of the features described so far are those you might expect to find on any top-quality keyboard, all other controls on the panel are connected in one way or another with the display and operations specific to the S1000.
The display
The display is a backlit LCD display which usually displays white against a blue background. When displaying characters, 8 lines of 40 characters each can be displayed. The display is also capable of displaying graphic information, such as a volume vs time display of a sample, envelope shapes and a "MIDI PPM" for checking MIDI input to the S1000. The contrast of the display can be adjusted using the LCD CONTRAST control at the bottom right of the screen.
The bottom line of the display will always contain a row of up to eight or fewer "soft key" legends. These indicate the current function of the buttons immediately below the display (F1 - F8). These buttons have no predefined function -their use at any one time is defined by software - hence "soft keys". (When writing a button name as shown on the front panel, it will be written in this way: MIDI). Soft key legends may be of three types:
"Selected" (white on blue). When a soft key legend is displayed in this way, it means that this function has been selected. In this manual, this type of legend will be displayed like this: TUNE.
Version 2.0 89/11 |
Page 17 |

Introduction
"Function" (blue on white). A soft key legend like this means that pressing the appropriate button will bring up another page of the display. In this manual, this type of legend and the soft key pressed to access this function will be represented like this: LOAD.
"Action" (white on blue, in a box) - These soft key legends allow specific actions within a page on a display. These legends, and the button to press when performing these actions, will be represented like this: GO
The CURSOR knob
NOTE: As previously mentioned, the CURSOR knob is replaced on the S1000PB by a pair of buttons. All operations described here regarding the use of the CURSOR knob apply equally to the S1000PB. Simply press the appropriate button once for each click of the CURSOR wheel described here.
Since the LCD display is capable of showing so much information, many parameters can be displayed and altered in one page. To choose which parameter will be altered, turn this CURSOR knob (in either direction). The cursor (the indicator showing which parameter may be altered - a reversed box) will move around the page as you turn the knob. Only those values and parameters highlighted by the cursor can be altered.
The DATA knob
NOTE: As previously mentioned, the DATA knob is replaced on the S1000PB by a pair of buttons. All operations described here regarding the use of the DATA knob apply equally to the S1000PB. Simply press the appropriate button once for each click of the DATA wheel described here.
Page 18 |
Version 2.0 89/11 |

Introduction
non-numeric values, turning the knob will display all the options in order. Normally, there is no other entry procedure - simply displaying the correct value of a parameter using the DATA knob selects and stores it into the S1000's memory.
When editing numeric parameters, some of the values can be quite large, and it would be necessary to turn the DATA knob thousands of times (literally) in order to go through the whole range if the value was only changed by 1 for every click of the DATA control. There is an alternative to turning the knob thousands of times, though. As you move the cursor with the CURSOR knob onto a numeric field, you will notice that not all the digits are covered by the cursor immediately. Instead, they are highlighted one at a time from the left.
If a number such as 12345.67 is displayed, and the CURSOR knob is turned so that only the first three digits are highlighted (we'll use underlining here to represent highlighting here), thus: 12345.67 . Turning the DATA knob clockwise by one step now will increase the value of the last highlighted digit, so:12445.67 .
Now if the CURSOR knob is turned clockwise one click, the first four digits will be highlighted: 12445.67, and turning the DATA knob one click clockwise will produce: 12455.67.
If you turn the DATA knob more than ten clicks, of course, the value of the whole parameter will be incremented or decremented by the number of clicks. In this way, with very little effort, fast accurate editing of numbers can be achieved using only the two control knobs. The best way to learn how this works is to practise; after a short time, it should become second nature.
The number buttons
As an alternative to turning the knobs, you can also press the number buttons for direct entry of data. Use the +/< button to position the cursor at the left of a
numeric field, and the -/> button to highlight digits to the right, one at a time.
Version 2.0 89/11 |
Page 19 |
Introduction
Pressing a number on the number keypad will enter that number at the rightmost highlighted position and move the cursor one position further to the right. When you know the exact number you want to enter (eg a program number), this can be faster than using the CURSOR and DATA knobs, but when experimenting (eg setting loop points), the knobs may be faster than the number keypad. You'll probably discover quickly what method works best for you in each situation.
Remember, when selecting programs, you must press the ENT/PLAY button to confirm your selection.
The eight soft keys
As explained in the section describing the display, these buttons have no predefined function, but perform different jobs depending on the current state of the S1000. Common assignments for these soft keys are SLCT (usually F1 )which takes you back to the previous page, GO (usually F7 ), YES and NO.
SELECT PROG
This button is used to enter the main Program Selection page of the S1000. Turning the CURSOR knob brings the programs currently loaded in memory into view, and the DATA knob is used to select them. When in this mode, the LED on the button lights (as with all the buttons on this row when the appropriate button is pressed), to remind you of the currently-selected mode.
EDIT SAMPLE (not S1000PB)
This button is used to enter the main page for editing (including recording) samples.
SELECT SAMPLE (S1000PB only)
Since the S1000PB cannot record or edit samples, this button replaces the EDIT SAMPLE button on other models, and is used for sample selection.
EDIT PROG
This button is used to enter the main page for editing keygroups and programs.
MIDI
This button enters the main MIDI parameter page. A number of different MIDI-related settings can be made here.
DISK
Though some disk operations can be carried out from other pages, this button enters the page where most disk operations are carried out.
MASTER TUNE
Allows transposition and master tuning of the whole keyboard, as well as allowing a user-defined temperament to be set up.
DRUM
When used with one or two AKAI ME-35T audio/MIDI trigger units, the S1000 is capable of controlling them, making the S1000 the basis for a very sophisticated electronic percussion setup.
Page 20 |
Version 2.0 89/11 |

Introduction
OPTION
This button is currently unimplemented. In line with the "open" design of the S1000, future updates to the operating system software may bring enhancements to the capabilities of this unit which will use this button.
MARK/JUMP
These two grey buttons to the right of the number keypad are used in conjunction with each other. If you are carrying out editing operations which require changing display pages a lot, these can save a lot of time and effort. Pressing the MARK
button when the cursor is on a field will cause the S1000 to remember the position of the cursor, and pressing JUMP will take the cursor back to the MARKed position from any other page. Pressing JUMP again will take you back to the page you were at before you JUMPed.
You can reset the MARKed position at any time. This position is lost when the power is turned off. At power-on, this position defaults to the program select field in the initial SELECT PROG page.
NAME
When samples, programs or drum input settings are changed, they should be given a name for easy reference. Pressing the NAME button in certain pages will enable you to name the data. Letters (uppercase only) are entered by pressing the front panel buttons. Each button has a letter following its primary function (eg DISK / M , 2 / X ), and when entering names, pressing the NAME button will switch the function of the number buttons between letters and numbers. The CURSOR knob moves the cursor around inside the name field when naming a sample or program.
As an example, after positioning the cursor on a name field, the following buttons should be pressed to enter the name "BASS2":NAME F2 / B F1 / A 9 / S 9 / S NAME 2 / X ENT / PLAY. When entering names in letter mode, the + / < and - / > buttons work as backspace and spacebar buttons respectively (when in number mode, they enter the "+" and "-" characters, and the MARK and JUMP keys enter "#" and "." respectively). The last button enters and confirms the name, as described below.
ENT/PLAY
This is a dual-purpose button. When naming samples, programs, etc, pressing this button will end the naming process. When editing samples, however, pressing this button will play back the sample at its current stage of editing, without your having to set up a keyspan for the sample and find the correct key on a keyboard. The default note played when this button is pressed will be C3 (middle C) at a velocity of 127, but this can be altered in the MIDI TRAN page.
This concludes the tour of the front panel. It may seem rather brief, but bear in mind that many buttons have many functions, and interact with each other in different display pages. We have judged it better to give this brief description here, and concentrate later on the function of each button in context.
Version 2.0 89/11 |
Page 21 |
 Loading...