


 Loading...
Quickstart Guide
English ( 3 – 9 )
Guía de inicio rápido
Español ( 10 – 16 )
Guide d'utilisation simplifié
Français ( 17 – 23 )
Guida rapida
Italiano ( 24 – 30 )
Schnellstart-Anleitung
Deutsch ( 31 – 37 )
Appendix
English ( 38 – 42 )
Quickstart Guide (English)
Introduction
Box Contents
MPK225 |
Quickstart Guide |
Important: Download the full MPK225 |
USB Cable |
Safety & Warranty Manual |
User Guide at akaipro.com/mpk225. |
|
|
|
Support
For the latest information about this product (system requirements, compatibility information, etc.) and product registration, visit akaipro.com/mpk225.
For additional product support, visit akaipro.com/support.
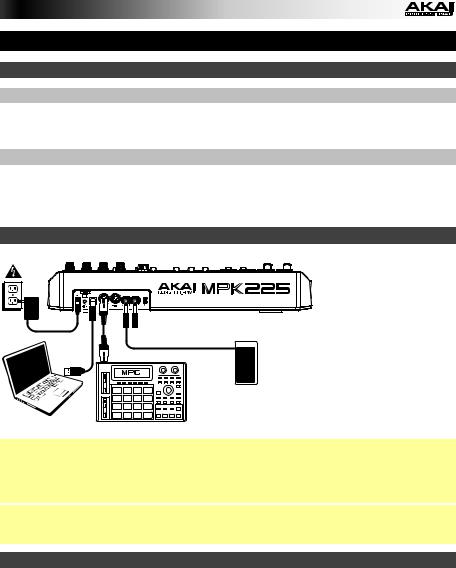
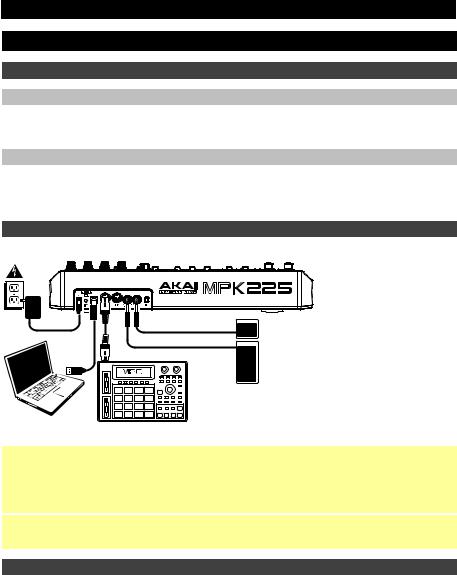
Quick Setup / Connection Diagram
Wall Power (optional)

 Sustain Pedal or Footswitch (optional)
Expression Pedal (optional)
External MIDI Sound Module (optional)
Computer |
Items not listed under the Box Contents are sold separately. |
Important note for Mac OS X users: The first time you connect MPK225 to your computer, you will see a Keyboard Setup Assistant message saying that your keyboard cannot be identified. Do not click Continue. Instead, close the window by clicking the circle in the upper-left corner. If you see another window asking you to select your type of keyboard, select
ANSI (United States and others) and click Done.
Note: If you do not want to use a computer in your setup (i.e., if you are using MPK225 to control an external MIDI module), connect MPK225's power input to a power outlet using an optional power adapter (6V DC, 1A, center-positive, sold separately).
About Modes
The MPK225 has four different modes of operation. Enter each mode by pressing its corresponding button. Each mode is described in detail later in this chapter. See the Appendix: Mode Parameters section for a complete list of editable parameters and settings.
•Preset Mode lets you to load, save, copy, and rename Presets—collections of information about how the knobs, buttons, and pads will behave.
•Edit Mode lets you to edit MPK225's configuration—how the keyboard, pads, knobs, buttons, and other features behave.
•Global Mode lets you set parameters and make changes to MPK225's general ("global") functioning—behavior and settings that are not specific to a Preset.
•Program Change Mode lets you send various Program Change messages, letting you remotely switch to a different program bank of sounds in your software or external MIDI
device.
3

Preset Mode
In Preset Mode, you can load, save, copy, and rename Presets. A Preset is a collection of information about how the knobs, buttons, and pads will behave. Using Presets allows you to save different configurations so you can load them quickly without reprogramming the MPK225 every time. This is also the default "performance mode."
To load a Preset:
1.Press Preset to enter Preset Mode.
2.Turn the Value Dial to select the desired Preset, which will appear in the display.
3.To load the selected Preset, press the Value Dial.
To cancel the operation and return to the current Preset, press Preset or just wait a few seconds.
To edit a Preset, please see the Edit Mode section of this chapter.
To save or copy a Preset:
Note: Saving and copying a Preset are mostly the same operation. The difference is that saving a Preset will save it to the same/original Preset number while copying a Preset will save it to a different Preset number.
1.Press Preset to enter Preset Mode.
2.Press the Right Cursor button. Store Program will appear in the display.
3.If you want to save it to the current Preset, press the Value Dial.
If you want to save/copy it to a different Preset, turn the Value Dial to select the desired Preset number (Copy Program will appear in the display), and then press the Value Dial.
To cancel the operation, press Preset.
To name or rename a Preset:
1.Press Preset to enter Preset Mode.
2.Press the Right Cursor button so Store Program appears in the display.
3.Press the Down Cursor button to select the Name field. The first letter of the name will blink.
4.Turn the Value Dial to change the blinking character, and use the Left Cursor and Right Cursor buttons to move between the characters.
5.To save the Preset name when you are finished, press the Value Dial. To cancel the operation, press Preset.
To restore the factory default Presets:
1.Press Preset to enter Preset Mode.
2.Press the Left Cursor button so Factory Settings appears in the display.
3.Turn the Value Dial and select Presets.
4.To restore MPK225's factory default Presets (which overwrites those you have saved), press the Value Dial.
To cancel the operation, press Preset.
4
Edit Mode
In Edit Mode, you can edit the settings of the currently selected Preset. The settings vary depending on the controller you are editing and are listed in the Appendix: Mode Parameters section. Please note that the changes you make will only apply to the currently selected Preset.
To navigate Edit Mode:
1.Press Edit to enter Edit Mode.
2.Select a control to edit (pad, button, etc.) by moving or pressing it. The selected control and its editable parameters will appear in the display.
3.In each page of Edit Mode:
•Use the Up Cursor and Down Cursor buttons to move through the parameters on the current page.
•If there are multiple pages (indicated by Pg1, Pg2, etc.), use the Left Cursor and Right Cursor buttons to move between different pages.
•Turn the Value Dial to change the currently selected value/setting.
4.To edit more controls, repeat Steps 2-3.
To return to a normal performance mode, press Preset.
Important: Save the Preset to you load a new Preset. See the
retain your edits. Without saving, these changes will be lost if Preset Mode section to learn how save your Preset.
For an overview of the available controls and parameters, see the Appendix: Mode Parameters section.
About HID
The HID (Human Interface Device) protocol lets devices send typical computer keyboard keystrokes. USB game controllers are an example of this, acting as an alternative to your computer's keyboard. MPK225 can also use the HID protocol, letting you configure certain buttons to send your most-often used keystrokes to your software, so you no longer need to switch focus constantly between the computer's keyboard and your MPK225.
To configure a control to use the HID protocol:
1.Press Edit to enter Edit Mode.
2.Select one of the Assignable Switches by pressing it. The selected button and its editable parameters will appear in the display.
3.Turn the Value Dial to change the Type field to HID.
4.Use the Up Cursor and Down Cursor buttons to select the Key#1 field, and turn the Value Dial to change it to the desired keystroke.
5.If your desired keystroke requires one or more modifier keys (e.g., Shift, Command, etc.), repeat Step 4 for Key#2, which lets you select different combinations of 1-3 modifier keys.
Important: Save the Preset to you load a new Preset. See the
retain your edits. Without saving, these changes will be lost if Preset Mode section to learn how save your Preset.
5
Global Mode
Global Mode lets you set parameters and make changes to MPK225's general ("global") functioning. These settings are not specific to a Preset; they affect all Presets.
To navigate Global Mode:
1.Press Global to enter Global Mode.
2.In each page of Global Mode:
•Use the Up Cursor and Down Cursor buttons to move through the parameters on the current page.
•Use the Left Cursor and Right Cursor buttons to move between different pages.
•Turn the Value Dial to change the currently selected value/setting.
3.To save the new Global Mode settings, use the Left Cursor and Right Cursor buttons to select the Save Globals page, and press the Value Dial to confirm the operation.
To cancel the operation instead, use the Left Cursor or Right Cursor buttons to select another page, or press Global.
To restore the factory default Global Mode settings:
1.Press Preset to enter Preset Mode.
2.Press the Left Cursor button so Factory Settings appears in the display.
3.Turn the Value Dial and select Globals.
4.To restore MPK225's factory default Global Mode settings (which overwrites those you have saved), press the Value Dial.
To cancel the operation, press Preset.
For an overview of the available settings and parameters, see the Appendix: Mode Parameters section.
Program Change Mode
A Program Change, often referred to as a Patch Change, is a MIDI message from one device to another that causes the latter to switch to a new program. Using Program Change messages, MPK225 can tell another hardware or software device which sound
to play.
For example, if your MPK225 is controlling a piano patch in your software or an external MIDI device, sending a Program Change message from MPK225 causes it to switch to a synth patch.
The MPK225 lets you send two types of Program Change messages:
•Program Change: This is a standard Program Change message (0-127) sent to your software or external device, letting you switch between 128 different program banks.
•Program Change with Bank Change: This is a standard Program Change message (0-127) plus a Bank Select LSB (Least Significant Bit) (0-127) and a Bank Select MSB (Most Significant Bit) message (0-127). This gives you access to up to 16384 different program banks. Your software or external device must support LSB and MSB messages to use this feature.
To navigate Program Change Mode:
1.Press Program Change to enter Program Change Mode.
2.In each page of Program Change Mode:
•Use the Up Cursor and Down Cursor buttons to move through the parameters on the current page.
•Use the Left Cursor and Right Cursor buttons to move between different pages.
•Turn the Value Dial to change the currently selected value/setting.
Important: These changes cannot be saved to your Presets or global settings. Once you power off the MPK225 they will return to the default settings.
For an overview of the available settings and parameters, see the Appendix: Mode Parameters section.
6

Features
Top Panel
8 |
9 |
11 11 11 11 |
15 |
10 |
11 11 11 11 |
|
|
|
19 |
20 |
21 |
22 |
23 |
13 12 |
12 |
12 |
|
12 |
17 16 16 16 16 |
2 |
2 |
7 |
5 |
14 |
|
||||
|
18 |
6 |
24 |
25 |
25 |
25 |
25 |
25 |
3 |
4 |
1 |
1.Keyboard: This 25-note keyboard is velocity-sensitive and, in conjunction with the Octave Up/Down buttons, can control a ten-octave range.
2.Octave Up/Down: Use these buttons to shift the keyboard's range up or down. The display will indicate the current octave. Press both buttons simultaneously to reset the octave shift to "zero."
3.Pitch-Bend Wheel: Moving this wheel sends MIDI Pitch Bend information on a selected MIDI channel and port.
4.Modulation Wheel: Moving this wheel sends continuous controller data—MIDI CC #01 (modulation), by default.
5.Tap Tempo: Tap this button at the desired rate to enter a new tempo.
Note: If you reload the current Preset, the tempo will revert to that Preset's tempo, which you set in Edit Mode.
Important: This feature does not work when the MPK225 is set to External sync.
6.Arp On/Off: Press this button to enable or disable the internal Arpeggiator whose rate is based on the current Tempo and Time Division settings. The Arpeggiator will function on notes being played on the keyboard only.
Note: You can also sync the Arpeggiator to an internal or external MIDI Clock source.
7.Latch: Press this button to activate or deactivate the Arpeggiator's Latch feature. When the Arpeggiator is on and Latch is enabled, you can press a combination of keys on the keyboard and the Arpeggiator continue to arpeggiate these notes even after you release the keys. Pressing a new combination of keys will start a new arpeggiation.
Tip: While holding down a combination of keys on the keyboard, add more notes to that arpeggiated chord by pressing additional keys.
8.Display: Use this LCD screen to view MPK225's menus, options, parameters, and settings.
7

9.Value Dial (Push to Enter): Use this dial to change the Preset, parameter values, settings, etc. Pressing the dial also functions as an Enter button.
10.Cursor Buttons: Use these buttons to navigate through the menus and options in the display. Use the Up Cursor and Down Cursor to move through the parameters currently shown in the display. (On some pages, the display's last row contains multiple parameters. Use the Up Cursor and Down Cursor to move between these, as well.) Use the Left Cursor and Right Cursor to move to the previous or next page.
11.Assignable Knobs: Use these 360º knobs to send continuous controller messages to your software or external MIDI device.
12.Assignable Switches: Use these switches to send MIDI CC messages or Program Change messages to your software or external MIDI device. They can function as momentary or toggle (latching) switches. If Time Division is activated, these switches select the time division of the Arpeggiator and Note Repeat features.
13.Time Division: Press this button and then press one of the Assignable Switches to select the current Time Division, which determines the rate of the Note Repeat and Arpeggiator features. This button can function as a momentary or toggle (latching) button.
Important: While Time Division is active, the Assignable Switches will not send any of their normal MIDI CC or Program Change messages until Time Division has been deactivated.
14.Control Bank Buttons: Use this button to select one of three independent banks of continuous controllers. This lets you control up to 36 independent parameters with the knobs and switches.
15.Pads: Use these pads to trigger drum hits or other samples in your software or external MIDI sound module. The pads are pressureand velocity-sensitive, which makes them very responsive and intuitive to play.
16.Pad Bank: Use these buttons to select one of four independent banks of pads. Each pad bank can contain a unique set of samples, giving you access of up to 32 different sounds.
17.Full Level: Press this button to activate Full Level Mode in which the pads always play at a maximum velocity (127), no matter how hard or soft you hit them.
18.Note Repeat: Press and hold this button while striking a pad to cause the pad to retrigger at a rate based on the current Tempo and Time Division settings. This button can function as a momentary or toggle (latching) button.
Note: You can also sync Note Repeat to an internal or external MIDI Clock source.
19.Preset: Press this button to enter Preset Mode where you can select and load different Presets (or Programs).
20.Edit: Press this button to enter Edit Mode where you can edit the functions of the keyboard, pads, knobs, and buttons as well as each Preset's default settings.
21.Global: Press this button to enter Global Mode where you can set your global (systemwide) preferences and execute MIDI reset commands.
22.Program Change: Press this button to enter Program Change Mode where you can send a Program Change or Program With Bank Change message to a hardware or software module.
23.Preview: Press and hold this button, and then press or move another control on the keyboard to see the value that control will send without actually sending the value. This helps you avoid sending erroneous controller messages due to the physical position of the controller. (This is useful when switching between control banks where, for example, the physical position of a knob may not correspond to the last value sent by the controller.)
8
24.Loop: Press and hold this button to activate the Loop or Repeat feature in your software. This button is considered a transport control, so it can be set to send the same messages as the other transport control buttons: MMC (MIDI Machine Control), MMC/MIDI SysEx, MIDI Start/Stop, or pre-assigned MIDI CC values.
Important: Your software must be able to loop or repeat in order to use this feature. Also, make sure that you are using the MPK225 Preset named after your particular software. If your software does not have a corresponding MPK225 Preset, configure the Loop button in Edit Mode so it communicates properly with your software.
25.Transport Control Buttons: These five buttons are dedicated buttons for sending conventional transport control commands: Rewind, Fast-Forward, Stop, Play, and Record. These can be set to send MMC (MIDI Machine Control), MMC/MIDI SysEx, MIDI Start/Stop, or pre-assigned MIDI CC values.
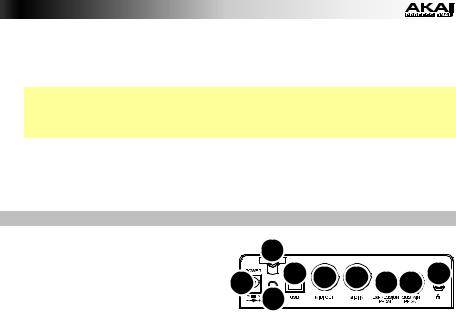
Rear Panel
1. Power Input: If you do not want to use |
|
2 |
|
||
a computer in your setup (i.e., if you are |
|
7 8 9 4 |
|||
using MPK225 to control an external |
1 |
5 6 |
|||
MIDI module), |
connect |
MPK225's |
|||
power input to a power outlet using an |
|
3 |
|
||
optional power adapter (6V DC, 1A, |
|
|
|||
center-positive, |
sold |
separately). |
|
|
|
Alternatively, you can connect MPK225's USB Port to a power outlet using a standard USB charger (sold separately).
2.Power Adapter Restraint: You can secure a power adapter cord to this restraint to help avoid disconnecting it accidentally.
3.Power Switch: Press this button to power the MPK225 on or off.
4.Kensington Lock: You may use this Kensington lock slot to secure the MPK225 to a table or other surface.
5.USB Port: Use a standard USB cable to connect this USB port to your computer. The computer's USB port provides ample power to MPK225. You can also power MPK225 by connecting this USB port to a power outlet using a standard USB charger (sold separately). This connection is also used to send and receive MIDI data to and from your computer.
This connection is also relevant to MPK225's MIDI Out and MIDI In:
•If an external device is connected to the MIDI Out, your computer can send MIDI messages out along this path: Computer MPK225 External Device.
•If an external device is connected to the MIDI In, the external device sends MIDI messages in along this path: External Device MPK225 Computer. MIDI messages can then be sent to an external device via the MIDI Out, but it must pass through the computer first.
6.MIDI Out: Use a standard five-pin MIDI cable to connect this MIDI Out to the MIDI In of an external MIDI device (e.g., a synthesizer, sequencer, drum machine, etc.).
7.MIDI In: Use a standard five-pin MIDI cable to connect this MIDI In to the MIDI Out of an external MIDI device (e.g., another MIDI controller). The MIDI messages sent to this MIDI In will be sent to your computer via the USB port.
8.Expression Pedal Input: Connect an optional 1/4" TRS expression pedal to this input.
9.Sustain Pedal Input: Connect an optional 1/4" TS sustain pedal or footswitch to this input. (You can configure the connected pedal to control the keyboard's sustain, to send a MIDI CC message, or other messages.)
9
Guía de inicio rápido (Español)
Introducción
Contenido de la caja
MPK225 |
Guía de inicio rápido |
Importante: Descargue la guía del |
|
usuario completa del MPK225 en |
|||
Cable USB |
Manual sobre la seguridad y garantía |
||
akaipro.com/mpk225. |
|||
|
|
||
|
|
|
Soporte
Para obtener la información más reciente acerca de este producto (requisitos de sistema, información de compatibilidad, etc.) y registrar el producto, visite akaipro.com/mpk225.
Para obtener soporte adicional del producto, visite akaipro.com/support.
Diagrama de instalación y conexión rápida
Tomacorriente de pared (opcional)
Pedal o interruptor de pedal de sostenido (opcional)
Pedal de expression (opcional)
Módulo de sonido MIDI externo (opcional)
Computadora
Los elementos que no se enumeran en Contenido de la caja se venden por separado.
Nota importante para los usuarios de Mac OS X: La primera vez que conecte el MPK225 a su computadora, aparecerá un mensaje del Asistente de configuración de teclados que dice que su teclado no pudo ser identificado. No haga clic en Continue (Continuar). En cambio, cierre la ventana haciendo clic en el círculo de la esquina superior izquierda. Si aparece otra ventana que le pide seleccionar el tipo de teclado, seleccione ANSI (United States and others) (Estados Unidos y otros) y haga clic en Done (Hecho).
Nota: Si no desea utilizar una computadora en su configuración (por ejemplo, si está utilizando el MPK225 para controlar un módulo MIDI externo), conecte la entrada de alimentación del MPK225 a un tomacorriente utilizando un adaptador de alimentación opcional (6 V CC, 1 A, centro positivo, que se vende por separado).
Acerca de los modos
El MPK225 tiene cuatro modos de operación diferentes. Ingrese a cada modo pulsando su botón correspondiente. Cada modo está descripto en detalle más adelante en este capítulo. Vea la sección Apéndice: Parámetros de modo para obtener una lista completa de los parámetros y ajustes editables.
•El modo Preset (Configuraciones predeterminadas) le permite cargar, guardar, copiar y cambiar el nombre de las configuraciones predeterminadas –colecciones de información acerca de cómo se comportan los pads, perillas y botones.
•El modo Edit (Edición) le permite editar la configuración del MPK225 –cómo se comporta el teclado, los pads, perillas, botones y otras características.
•El modo Global le permite configurar los parámetros y realizar cambios al funcionamiento general ("global") del MPK225 –los comportamientos y ajustes que no son específicos de un preset.
•El modo Program Change (Cambio de programa) le permite enviar varios mensajes de cambio de programa, permitiéndole conmutar remotamente al banco de sonidos de un programa diferente en su software o dispositivo MIDI externo.
10
Modo Preset (Programas predeterminados)
En modo Preset, es posible cargar, guardar, copiar y cambiar el nombre de los presets. Un preset es un conjunto de información acerca del comportamiento de los pads, perillas y botones. El uso de los presets le permite guardar configuraciones diferentes para luego poder cargarlas rápidamente sin tener que reprogramar el MPK225 cada vez. Éste es también el "modo de interpretación" por defecto.
Para cargar un preset:
1.Pulse Preset para entrar al modo Preset.
2.Gire el cuadrante de valor para seleccionar el preset deseado, el cual aparecerá en la pantalla.
3.Para cargar el preset seleccionado, pulse el cuadrante de valor.
Para cancelar la operación y volver al preset actual, pulse Preset o espere unos segundos.
Para editar un preset, vea la sección Modo Edit (Edición) de este capítulo.
Para guardar o copiar un preset:
Nota: Guardar y copiar un preset son prácticamente la misma operación. La diferencia es que al guardar un preset se lo guardará en el mismo número/número original de preset, mientras que al copiarlo, se lo guardará en un número de preset diferente.
1.Pulse Preset para entrar al modo Preset.
2.Pulse el botón de cursor derecho. Aparece en la pantalla Store Program (Guardar programa).
3.Si desea guardarlo en el preset actual, pulse el cuadrante de valor.
Si desea guardarlo/copiarlo a un preset diferente, gire el cuadrante de valor para seleccionar el número de preset deseado (aparecerá en la pantalla Copy Program [Copiar programa]) y luego pulse el cuadrante de valor.
Para cancelar la operación, pulse Preset.
Para guardar o cambiar el nombre de un preset:
1.Pulse Preset para ingresar al modo Preset.
2.Pulse el botón de cursor derecho para que aparezca Store Program (Guardar programa) en la pantalla.
3.Pulse el botón de cursor abajo para seleccionar el campo Name (Nombre). Parpadeará la primera letra del nombre.
4.Gire el cuadrante de valor para cambiar el carácter parpadeante y utilice los botones de cursor izquierdo y cursor derecho para moverse entre los caracteres.
5.Para guardar el nombre del preset una vez que haya terminado, pulse el cuadrante de valor.
Para cancelar la operación, pulse Preset.
Para restablecer los presets por defecto de fábrica:
1.Pulse Preset para entrar al modo Preset.
2.Pulse el botón de cursor izquierdo para que aparezca Factory Settings (Valores por defecto de fábrica) en la pantalla.
3.Gire el cuadrante de valor y seleccione Presets.
4.Para restaurar los presets por defecto de fábrica del MPK225 (que sobrescriben los que usted haya guardado), pulse el cuadrante de valor.
Para cancelar la operación, pulse Preset.
11
Modo Edit (Edición)
En el modo Edición, puede editar los ajustes del preset actualmente seleccionado. Los ajustes varían según el controlador que se esté editando y están listadas en la sección Apéndice: Parámetros de modo. Note que los cambios que realice solamente se aplicarán al preset actualmente seleccionado.
Para navegar en modo Edición:
1.Pulse Edit para entrar al modo Edición.
2.Seleccione un control a editar (pad, botón, etc.) moviéndolo o pulsándolo. Aparecerán en la pantalla el control seleccionado y sus parámetros editables.
3.En cada página del modo Edición:
•Utilice los botones de cursor arriba y cursor abajo para moverse entre los parámetros de la página actual.
•Si hay varias páginas (indicadas como Pg1, Pg2, etc.), utilice los botones de cursor izquierdo y cursor derecho para moverse entre las distintas páginas.
•Gire el cuadrante de valor para cambiar el valor o ajuste seleccionado en ese momento.
4.Para editar más controles, repita los pasos 2 y 3.
Para volver al modo de interpretación normal, pulse Preset.
Importante: Guarde el preset para retener sus ediciones. Si no graba, se perderán estos cambios cuando cargue un nuevo preset. Vea la sección Modo Preset para aprender a guardar su preset.
Para obtener una descripción de los controles y parámetros disponibles, vea la sección
Apéndice: Parámetros de modo.
Acerca del HID
El protocolo HID (Dispositivo de interfaz humana) permite que los dispositivos envíen pulsaciones de teclas típicas de teclado de computadora. Los controladores de juegos USB son un ejemplo de esto, actuando como una alternativa al teclado de su computadora. El MPK225 también puede utilizar el protocolo HID, permitiéndole configurar ciertos botones para enviar sus pulsaciones de teclas más usadas a su software, para evitarle tener que cambiar su atención constantemente entre el teclado de la computadora y su MPK225.
Cómo configurar un control para que utilice el protocolo HID:
1.Pulse Edit para entrar al modo Edición.
2.Seleccione uno de los interruptores asignables pulsándolo. Aparecerán en la pantalla el botón seleccionado y sus parámetros editables.
3.Gire el cuadrante de valor para cambiar el campo Type (Tipo) a HID.
4.Utilice los botones de cursor arriba y cursor abajo para seleccionar el campo Key#1 (Tecla #1) y gire el cuadrante de valor para cambiarlo a la pulsación de tecla deseada.
5.Si la pulsación de tecla deseada requiere una o más teclas modificadoras (por ejemplo, Shift, Command, etc.), repita el paso 4 para la Key#2 (Tecla #2), lo que le permite seleccionar diferentes combinaciones de 1 a 3 teclas modificadoras.
Importante: Guarde el preset para retener sus ediciones. Si no graba, se perderán estos cambios cuando cargue un nuevo preset. Vea la sección Modo Preset para aprender a guardar su preset.
12

Modo Global
El modo Global le permite configurar los parámetros y realizar cambios en el funcionamiento general ("global") del MPK225. Estos ajustes no son específicos de ningún preset; los afectan a todos.
Para navegar en modo Global:
1.Pulse Global para ingresar al modo Global.
2.En cada página del modo Global:
•Utilice los botones de cursor arriba y cursor abajo para moverse entre los parámetros de la página actual.
•Utilice los botones de cursor izquierdo y cursor derecho para moverse entre las diferentes páginas.
•Gire el cuadrante de valor para cambiar el valor o ajuste seleccionado en ese momento.
3.Para guardar los nuevos ajustes del modo Global, utilice los botones de cursor izquierdo y cursor derecho para seleccionar la página Save Globals (Guardar valores globales) y pulse el cuadrante de valor para confirmar la operación.
Para cancelar la operación, utilice los botones de cursor izquierdo o cursor derecho para seleccionar otra página o pulse Global.
Para restablecer los ajustes por defecto de fábrica del modo Global:
1.Pulse Preset para ingresar al modo Preset.
2.Pulse el botón de cursor izquierdo para que aparezca Factory Settings en la pantalla.
3.Gire el cuadrante de valor y seleccione Globals.
4.Para restaurar los ajustes por defecto de fábrica del modo Global del MPK225 (que sobrescribe la que usted haya guardado), pulse el cuadrante de valor.
Para cancelar la operación, pulse Preset.
Para obtener una descripción de los ajustes y parámetros disponibles, vea la sección Apéndice: Parámetros de modo.
Modo Program Change (Cambio de programa)
Un cambio de programa, también denominado cambio de parche, es un mensaje MIDI desde un dispositivo a otro que hace que este último cambie a un nuevo programa. Mediante los mensajes de cambio de programa, el MPK225 puede indicarle a otro dispositivo de hardware
o software qué sonido reproducir.
Por ejemplo, si su MPK225 está controlando un parche de piano en su software o dispositivo MIDI externo, el envío de un mensaje de cambio de programa desde el MPK225 hará que aquel cambie a un parche sintético.
El MPK225 le permite enviar dos tipos de mensajes de cambio de programa:
•Program Change: Es un mensaje de cambio de programa estándar (0-127) enviado a su software o dispositivo externo, que le permite conmutar entre 128 bancos de programas diferentes.
•Program Change with Bank Change: Es un mensaje de cambio de programa estándar (0-127) más un LSB (Bit menos significativo) de selección de banco (0-127) y un mensaje de MSB (Bit más significativo) de selección de banco (0-127). Esto le da acceso a hasta 16384 bancos de programas distintos. Su software o dispositivo externo debe soportar mensajes LSB y MSB para utilizar esta característica.
Para navegar en modo de cambio de programa:
1.Pulse Program Change (Cambio de programa) para ingresar al modo Cambio de programa.
2.En cada página del modo Cambio de programa:
•Utilice los botones de cursor arriba y cursor abajo para moverse entre los parámetros de la página actual.
•Utilice los botones de cursor izquierdo y cursor derecho para moverse entre las diferentes páginas.
•Gire el cuadrante de valor para cambiar el valor o ajuste seleccionado en ese momento. Importante: Estos cambios no pueden ser guardados en sus presets o ajustes globales. Una vez que apague el MPK225, volverán a sus valores por defecto.
Para obtener una descripción de los ajustes y parámetros disponibles, vea la sección Apéndice: Parámetros de modo.
13

Características
Panel superior
|
|
|
|
8 |
|
|
9 |
11 11 11 11 |
||||
15 |
|
|
|
|
|
|
10 |
11 11 11 11 |
||||
|
|
|
|
|
|
|
|
|||||
|
|
19 |
20 |
21 |
22 |
23 |
13 12 |
12 |
12 |
|
12 |
|
17 16 16 |
16 16 |
2 |
2 |
7 |
5 |
14 |
|
|||||
|
|
18 |
6 |
24 |
|
25 |
25 |
25 |
25 |
25 |
||
3 |
4 |
1 |
1.Teclado: Este teclado de 25 notas es sensible a la velocidad y, en conjunto con los botones Octave Up/Down (Octava arriba/abajo), puede controlar un rango de diez octavas.
2.Octava Up/Down: Utilice estos botones para desplazar el rango del teclado hacia arriba o abajo. Aparecerá en la pantalla la octava actual. Pulse ambos botones simultáneamente para resetear el desplazamiento de octavas a "cero".
3.Rueda de inflexión de pitch: Mueva esta rueda para enviar información de inflexión de pitch MIDI a través de un canal y puerto MIDI seleccionados.
4.Rueda de modulación: Mueva esta rueda para enviar datos del controlador continuo–MIDI CC #01 (modulación), por defecto.
5.Tap Tempo: Toque ligeramente este botón al ritmo deseado para ingresar un nuevo tempo.
Nota: Si recarga el preset actual, el tempo se revierte al tempo del preset, que usted puede configurar en modo de edición.
Importante: Esta característica no funciona cuando el MPK225 está configurado para sincronización External (Externa).
6.Arpegiador encendido/apagado: Pulse este botón para activar o desactivar el arpegiador interno, cuyo ritmo se basa en los ajustes actuales de tempo y división de tiempo. El arpegiador funciona solamente con las notas que se están tocando en el teclado.
Nota: También puede sincronizar el arpegiador con una fuente de reloj MIDI interna o externa.
7.Enganche: Pulse este botón para activar o desactivar la función de enganche del arpegiador. Cuando el arpegiador está encendido y la función de enganche activada, puede pulsar una combinación de teclas en el teclado y el arpegiador continuará arpegiando esas teclas aún después de soltarlas. Al pulsar una nueva combinación de teclas se inicia un nuevo arpegio.
Consejo: Mientras mantiene pulsada una combinación de teclas en el teclado, agregue más notas a ese acorde arpegiado pulsando teclas adicionales.
8.Pantalla: Utilice la pantalla LCD del MPK225 para ver los menús, opciones, parámetros y ajustes.
9.Cuadrante de valor (Presionar para ingresar): Utilice este cuadrante para cambiar el preset, los valores de los parámetros, ajustes, etc. Pulsar el cuadrante tiene el efecto del botón Enter.
14
Loading...