


QUICKSTART GUIDE
ENGLISH
WWW.AKAIPRO.COM

BOX CONTENTS
y |
MPD18 |
y |
Software CD |
y |
USB cable |
y |
Safety Instructions & Warranty Information |
SOFTWARE CD
PC Users: To install the Akai Professional MPD18 Editor, open the contents of the disc, double-click Setup.exe, and follow the on-screen instructions. To open the editor, connect the MPD18 to your computer with a standard USB cable (included) then double-click MPD18 Editor.exe.
Mac Users: Drag the contents of the disc to an appropriate location on your hard drive. To open the editor, connect the MPD18 to your computer with a standard USB cable (included) then double-click the MPD18 Editor.
Note: Always connect the MPD18 to your computer before opening the editor.
TOP PANEL OVERVIEW
1. |
USB CONNECTION – Plug a standard |
|
1 |
|
USB cable into this outlet and into the USB |
|
|
|
port of your computer. The computer’s |
|
|
|
USB port will provide power to the MPD18. |
|
|
2. |
16 REAL MPC PRESSURE AND |
8 |
9 |
|
|
||
|
VELOCITY SENSITIVE PADS – The pads |
6 |
7 |
|
can be used to trigger drum hits or other |
||
|
|
|
|
|
samples in your software. The pads are |
5 |
|
|
pressure and velocity sensitive, which |
|
|
|
|
|
|
|
makes them very responsive and intuitive |
2 |
|
|
to play. |
|
3.NOTE REPEAT – Holding this button while
striking a pad causes the pad to retrigger at |
4 |
|
a rate based on the current Tempo, Time |
|
|
Division, and Swing settings. Note Repeat |
|
|
can be synced to an internal or external |
|
|
MIDI Clock source. It can also function as |
|
|
a momentary or toggle switch. These |
3 |
|
settings are configurable for each Preset |
||
|
||
(see NR CONFIG). |
|
4.ASSIGNABLE FADER – This fader can be
used to send continuous control data to a desktop audio workstation.
5.PAD BANK – This button switches between pad banks A, B, and C. Each bank can address a unique set of 16 sounds, giving you access of up to 48 different sounds you can trigger with the pads. The currently selected pad bank will be indicated with a lit LED.
6.PRESETS – This button allows you to select different preset mappings (of the pads and assignable button and fader). Press and hold it then press the pad with the number of the preset you want (1-16). You can customize these presets in the software editor (see the SOFTWARE EDITOR section for more information). See the PRESETS section for descriptions of the available default presets.
7.MIDI CH – This button allows you to change the master MIDI channel the MPD18 sends. Press and hold it then press the pad with the channel number you want (1-16).
8.FULL LEVEL – When FULL LEVEL is activated, the pads always play back at a maximum velocity (127), no matter how hard or soft you hit them.
9.NR CONFIG (Note Repeat Configuration) – This button is used to adjust the current Note Repeat parameters.
Note: Changes made with the NR CONFIG button will not be stored in the Preset. For these (and additional) parameters to be stored in the Preset, edit them in the software editor.
yTime Division: Hold down NR CONFIG and press any one of Pads 1 through 8 to set the desired Time Division
– the rate of Note Repeat. The Time Division value is next to the pad number on the MPD18.
ySwing: Hold down NR CONFIG and press any one of Pads 9 through 15 to set the desired Swing setting for Note Repeat. The Swing value is next to the pad number on the MPD18. (For finer adjustments to the Swing value, use the software editor.)
yTempo: If Note Repeat is set to the internal clock (the default), the LED above NR CONFIG will flash at the current Note Repeat tempo. To enter a new tempo, hold down NR CONFIG and tap Pad 16 ("Tap Tempo") in time with the desired tempo. (The LED will not flash if Note Repeat is synced to an external clock.)
1
SOFTWARE EDITOR
OPENING THE EDITOR
Always connect the MPD18 to your computer before opening the software editor.
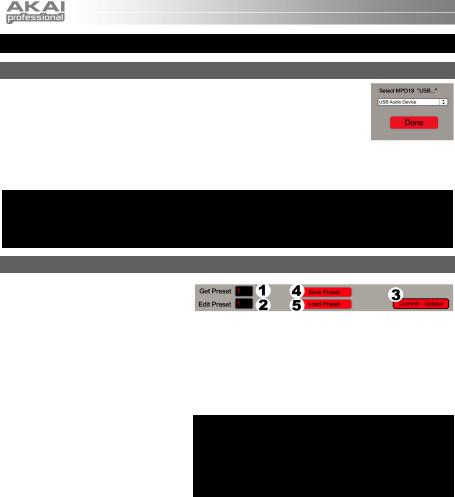
After opening the software editor, you will need to select the MPD18 from the dropdown menu on the opening screen and click "Done."
yFor Mac or Windows Vista users, it will be listed as Akai MPD18.
yFor Windows XP users, it will be listed as USB Audio Device. (If you have other USB audio devices connected to your computer, which may have identical names, you may need to try selecting each one until the MPD18 is recognized.)
IMPORTANT!: The first time you use the software editor, even if the correct device is already shown in the drop-down menu, you still need to click on the menu and select the device. (You will also need to do this if you move your files to a new location.) In future sessions, though, you can simply click "Done" if the correct device is shown in this window.
LOADING & SAVING PRESETS
The editor lets you edit, save, or load presets for the MPD18 on your computer. These buttons and fields are shown at the top of the editor window.
1.GET PRESET – Click on this field to select the number of a preset currently on the MPD18 (1-16). When you select it, its settings will be shown on the software interface.
2.EDIT PRESET – Click on this field to select the number that the currently shown preset will use if you upload it to the MPD18 (by clicking COMMIT – UPLOAD).
3.COMMIT – UPLOAD – Click this button to send the currently shown preset to the MPD18. The number of this preset is determined by the EDIT PRESET field.
4.SAVE PRESET – Click this button to
save the currently shown preset to your computer.
5.LOAD PRESET – Click this button to load a saved preset from your computer. Once it loads, you will see its settings in the software interface.
Note: When you save a preset, the current EDIT PRESET number will be saved with it. When you load that preset later, the EDIT PRESET field will be updated with that number. If you want to change the preset number before uploading it to the MPD18, simply select a new EDIT PRESET number before clicking COMMIT – UPLOAD.
TO COPY A PRESET:
1.Load the preset you want to copy from the MPD18 by clicking GET PRESET field and selecting it.
2.Set the preset you want to copy it to on the MPD18 by clicking EDIT PRESET field and selecting it.
3.Click COMMIT – UPLOAD to send the copied preset to the MPD18.
2
 Loading...