


Warning
Power requirements
Power requirements for electrical equipment differ from area to area. Please ensure that your machine meets the power requirements in your area. If in doubt, consult a qualified electrician. 120 V, 60 Hz for USA and Canada 220 V. 50 Hz for Europe except UK 240 V, 50 Hz for UK and Australia 1 10 V/120 V/220 V/240 V, 50/60 Hz convertible for other coutries.
Voltage conversion
Models for Canada, USA, Europe, UK and Australia are not equipped with this facility. Each machine is preset at the factory according to its destination, but some machines can be set to 110 V, 120 V, 220 V or 240 V as required. If your machine's voltage can be converted: Before connecting the power cord, turn the VOLTAGE SELECTOR located on the beneath the sidewooden panel (right hand side) with a screwdriver until the correct voltage is indicated.
This equipment conforms to EEC standard No. 82/499.
Precautions
FOR CUSTOMERS
IN THE UK
IMPORTANT FOR YOUR, SAFETY
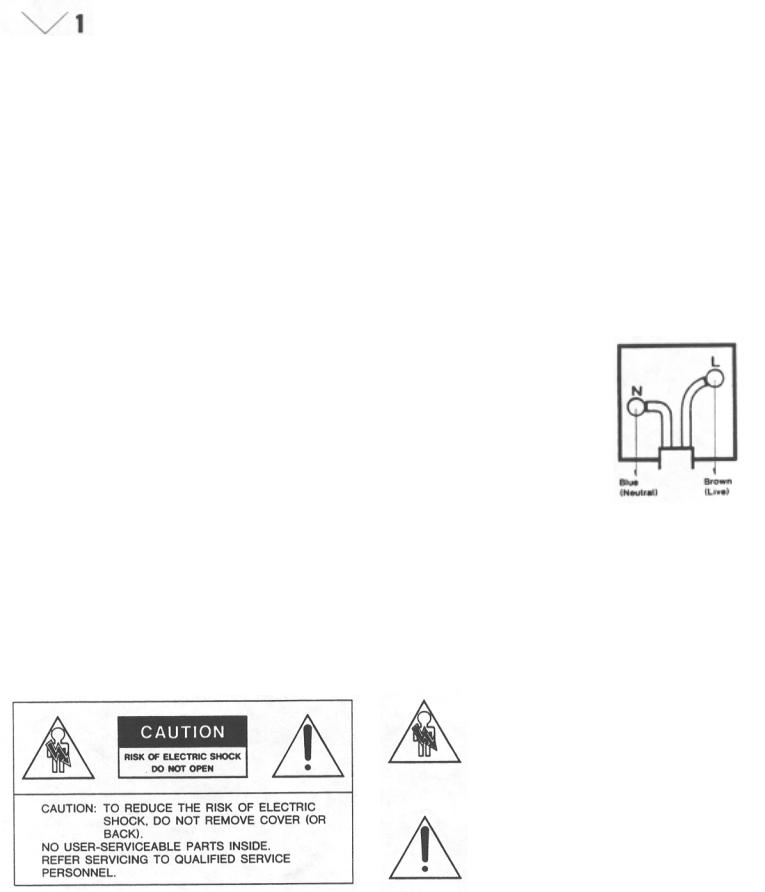
The flex supplied with your machine will have either two wires or three, as shown in the illustrations.
TWO CORE FLEX IMPORTANT
The wires in this mains lead are coloured in accordance with the following code:
Blue: Neutral
Brown: Live
As the colours of the wires in the mains lead of this apparatus may not correspond with the coloured markings indentifying the terminals in your plug, proceed as follows: The wire which is coloured blue must be connected to the terminal which is marked with the letter N or coloured black.
The wire which is coloured brown must be connected to the terminal which is marked with the letter L or coloured red.
Do not connect any wire to the larger pin marked E or -= when wiring a plug. Ensure that all terminals are securely tightened and that no loose strands of wire exist.
The lightning flash with the arrowhead symbol superimposed across a graphical representation of a person, within an equilateral triangle, is intended to alert the user to the presence of uninsulated "dangerous voltage" within the product's enclosure; that may be of sufficient magnitude to constitute a risk of electric shock.
The exclamation point within an equilateral triangle is intented to alert the user to the presence of important operating and maintenance (servicing) instructions in the literature accompanying the appliance.
AKAI MIDI DIGITAL |
Features |
SAMPLER S612 |
|
The Akai MIDI Digital Sampler S612 is an amazingly sophisticated electronic instrument which enables you to record (sample) any kind of sound, and reproduce it at any desired pitch or pitches. The following are only a few examples of the many sounds that the S612 can sample.
1.Sounds of acoustic musical instruments (such as pianos, strings or percussion instruments).
2.Sounds of nature (such as sounds made by animals, wind, wild birds and rain).
3.Human voices, radio, television, CDs, analogue records, me chanical noises, etc.
With the S612, you are able to perform musically with ease using a wide variety of sound sources (only a few of which are listed above). The acoustic instruments can be sampled and reproduced as realistically as the original sound. Existing synthesizers, up to now among the most advanced electronic musical instruments, are unable to sample and reproduce in this way.
The S612 offers entirely new and unique ways to express your musical creativity.
Realization of super high quality sound by 12-bit sampling technology. 6-voice polyphonic performance is possible in connection with MIDI keyboards, synthesizers, sequencers and many others.
Realization of sampling time up to eight seconds.
A short sampled sound can be continuously played with no time restrictions and without sounding awkward. The S612 contains an advanced scanning mode system with "looping" and "alternating" modes. The best splicing point for "looping" can be selected instantly by the automatic splicing system.
A splicing point can be selected at any time by switching to the manual splice mode.
Because the starting or ending point of the sample can be selected at any time, it is possible to play the sound after elimination of an undesired portion of the sample. It is also possible to reproduce the sample in reverse.
It is possible to overdub samples and accumulate various sounds infinitely.
The S612 is equipped with an L.F.O., which can add vibrato effects with a delay.
The S612 is also equipped with continuous variable low-pass filters for adding a milder touch to samples.
2.8 inch sample disks can be used for data files. "Save" and "load" procedures are extremely quick. You can continuously build your own tone sample library with the specially designed Sampler Disk Drive MD280. (optional)
Any type of sound can be tuned to a designated pitch by transposing it by a half step. This can also be done by tuning ±100 cent. The sound can then be stored on a disk.
The S612 is rack mountable (EIA/2U type) for excellent operation in the studio as well as at live performances. It can be handled with ease and offers astonishing performance.
Table of Contents
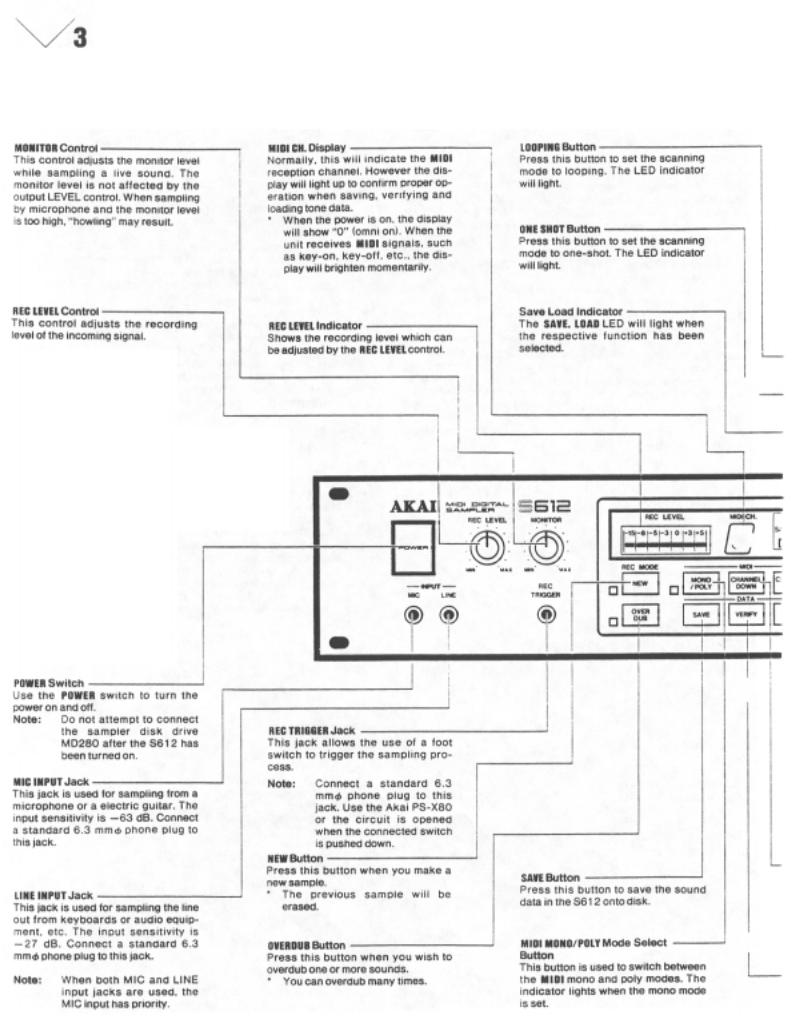
Controls

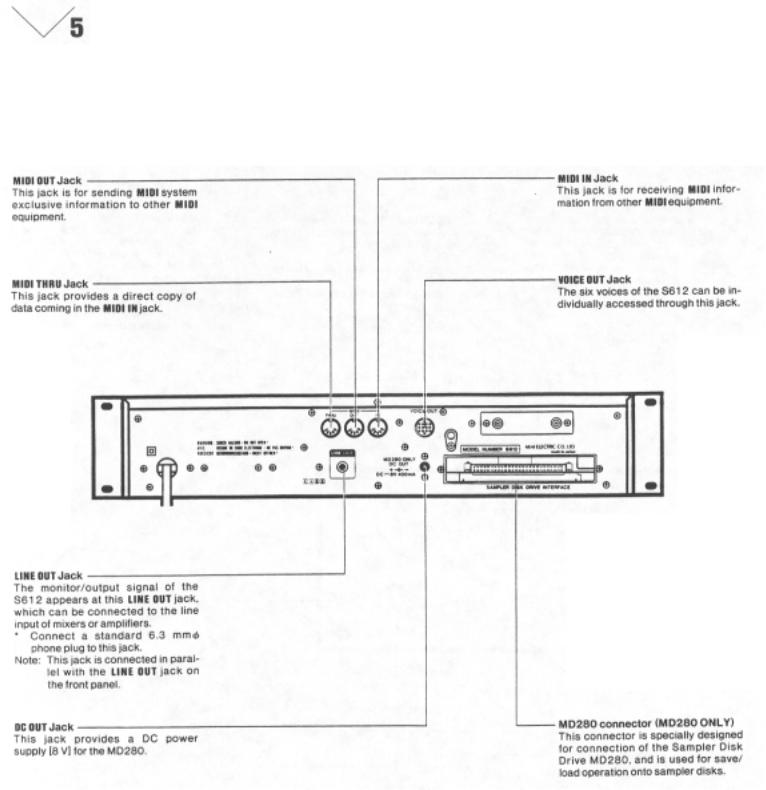
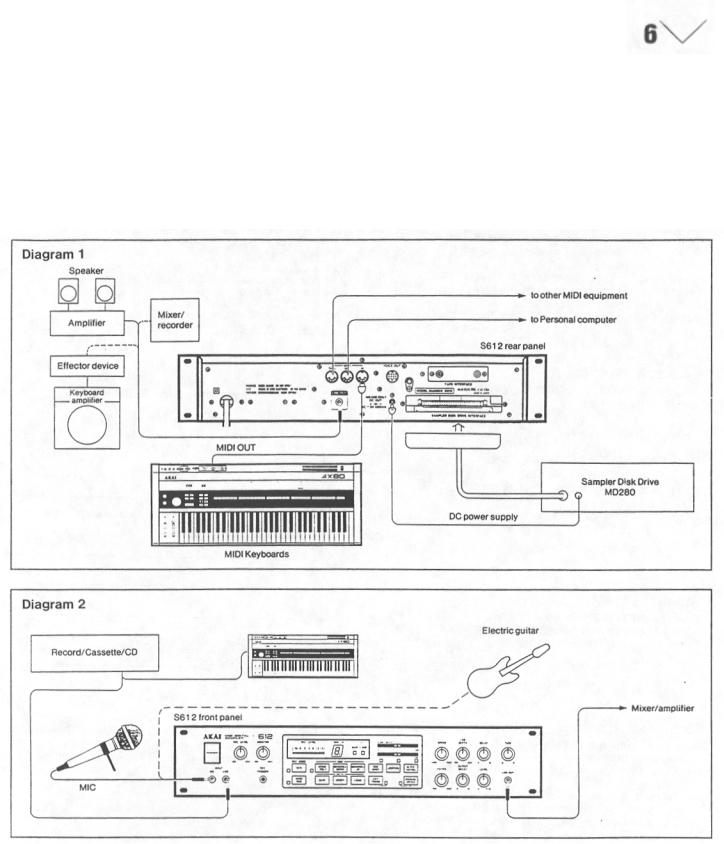
Connections
The S612 is a MIDI digital sampler which will function only if input information is received at MIDI-IN. Ensure that all the correct connections have been made between the MIDI-IN and MIDI-OUT of the S612 and any keyboards (such as the Akai
AX80) or sequencers. Obviously, unless a sound is being input or a sample has been loaded into the S612, it will not reproduce any sounds. The S612 will not "remember" any data after it has been switched off.
Sampler Disk Drive MD280
The Sampler Disk Drive MD280 (optional) is the device which quickly and |
Note: |
If the MD280 is to be used, it should be connected with the S612 |
accurately saves the sound data. The format of 2.8" disk makes the filing |
|
before switching on the S612, Any sampled data in the S612 will |
space very compact. |
|
be lost if the MD280 is plugged in or unplugged while the S612 is |
|
|
switched on. |
Sampling
PREPARATIONS
Before Turning the Power On
Make sure the various connections with MIDI and audio equipment have been completed before turning the power of the S612 on. (Refer to the chapter concerning connection with external equipment on page 6.)
When using the specially designed MD280 Sampler Disk Drive, ensure that the correct connections between the MD280 and the S612 have been made.
Note: Connecting the MD280 while the S612 is switched on will result in the loss of sound data sampled in the S612.
Connections to Input
Connect the sound source that you want to sample to the MIC or
LINE INPUT jacks.
Table 1
Equipment to tie connected. |
Input |
Input Sensitivity. |
Equipment or devices, such as |
MIC |
|
guitars or microphones, have low |
-63 dB |
|
output levels. |
|
|
Audio equipment, such as |
|
|
televisions, cassette tape decks, CO |
|
|
players, tuners or preamplifiers, or |
|
|
musical instruments, such as |
LINE |
-27 dB |
synthesizers or electric keyboards |
|
|
have higher output levels (line level). |
|
|
Note: When both the MIC and LINE INPUT jacks are connect ed, the MIC jack overrides LINE jack.
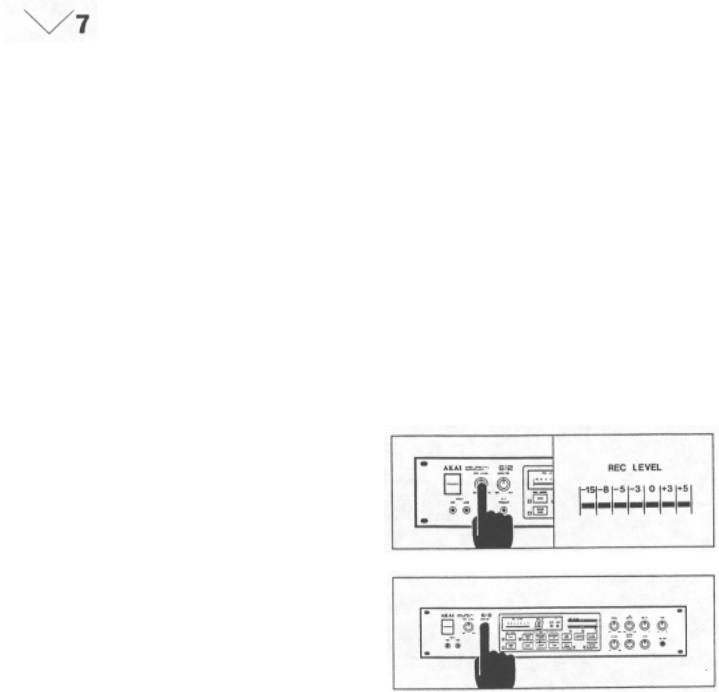
Adjustment of Recording Level
Set the recording level by the REC LEVEL control. To obtain the best results in sampling, bring the level close to "+3" on the REC LEVEL indicator.
Monitor Level
Use the MONITOR level control when monitoring the sound source to be sampled. When using a microphone, feedback may occur if the monitor level is too high.
Designation of the Sampling Frequency
This brief outline may help to clarify some different aspects of sampling technique:
Are you trying to reproduce (a) high or (b) low frequency sounds? (a)To faithfully reproduce high frequency sounds, a faster
(therefore, shorter) sampling time will be required.
The S612 can be "instructed" to accept a wider bandwidth sample by pressing a higher note on the MIDI keyboard prior to making the sample: see Table # 1.
(b)The reproduction of lower frequency sounds, typically much longer in duration, will require a longer sampling time.
The S61 2 can be "instructed" to accept a long sample by pressing a lower note on the MIDI keyboard prior to making the sample; see Table # 1.
(c) For accurate reproduction (pitch) of a sampled sound it is necessary to first press the same note on the MIDI keyboard as that being sampled.
This process can be extended to allow for pitch transposition if required.
Example: Press A2 (lowest A) on the MIDI keyboard, then play (sample) A3 (A string) on a guitar. Now when A3 is played on the MIDI keyboard the actual pitch of the reproduced note will be A4: The pitch has been transposed up by one octave.
This technique can be used to transpose from 1 /2 stops through to several octaves if required.
Note: If the MIDI keyboard or the S612 have just been switched on and no key has been pressed before sampling, the S612 will automatically designate C4 as the desired pitch.
Key No. |
C2 |
C3 |
C4 |
C5 |
MIDI Note No. |
36 |
48 |
60 |
72 |
Sampling |
4 kHz |
I 8 kHz |
' 16 kHz |
32 kHz |
frequency |
|
|
|
|
Sampling Time |
8 sec. |
4 sec. |
2 sec. |
1 sec. |
Note: Although only four (4) keys are depicted, other keys may be selected if intermodiate frequencies are desired.
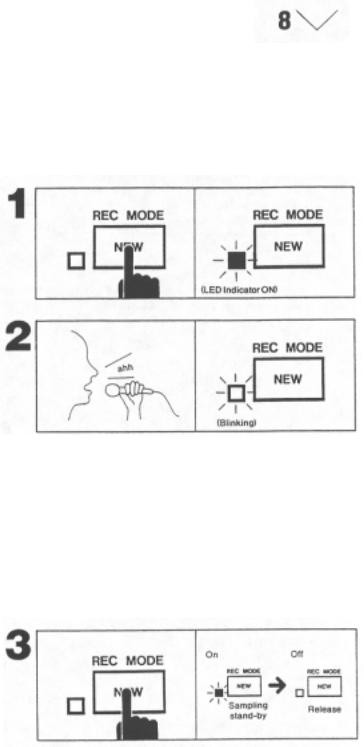
Sampling
1.Once you have adjusted the recording level and designated the desired sampling frequency, you are ready to sample. Press the NEW button. The LED indicator will light. This indicates that the unit is standby for sampling.
2.Using a microphone, make a sample. Say "ahh..." for example. The LED indicator should start blinking from the moment you begin speaking into the microphone. After blinking for the length of time of the designated sampling frequency, the LED indicator will go out automatically. This indicates the completion of the sampling process.
Automatic Trigger
Because the S612 contains an automatic trigger circuit, it will automatically start the sampling process when the sound level reaches a certain preset level. You will notice that the unit may start off the process prematurely by picking up surrounding noise when the sampling is done through a microphone. On the other hand, when the recording level is too low,
the sampling process may not begin because the sound level is not high enough to trigger the circuit. In which case, after increasing the recording level, reset the unit by pressing the NEW button again to get it into the standby mode, then start sampling.
Cancelling the Sampling Standby Mode
To cancel the sampling standby mode, press the NEW button again. The LED will go out.
3.Thus, sampling has been completed. This sampled sound data will be maintained until either the power is turned off, the process is repeated for another sampling or other sampled data is loaded from the disk (tape).
If necessary, save the sound data for later use with the specially designed Sampler Disk Drive MD280 (optional). Refer to page 22.
4.You should now be able to enjoy six-voice polyphonic, veloci ty touch sensitive sounds, from the S612, by playing MIDI keyboard instruments.
Note: |
All six voices may not be able to be heard when music |
|
Is played mostly on the keys around the fifth octave (the |
|
highest octave range for the AX80). This is not a defect |
in the unit.
5. After connecting the MIDI keyboards, if sampling is done with out any keys being pressed down, the sampling frequency
will be set at 16 kHz with a sample time of 2 seconds.
Cautions when Designating the Sample Frequency
1 . Because the last key to be pressed down will determine the sampling frequency, if connected with MIDI keyboards, make sure to press down the key to designate the frequency before going through the sampling process.
2.The range of the keys to which a sampling frequency can be designated is between MIDI key number 36 (C2) and 72 (C5). The keys out of this range are invalid.
 Loading...