

WARNING
Power requirements
Power requirements for electrical equipment differ from area to area. Please ensure
Precautions
FOR CUSTOMERS
T
WO CORE FLEX
that your machine meets the power requirements m your area.
If in doubt. consult a qualified electrician.
120V. 60Hz for USA and Canada
220V. 50Hz for Europe except UK
240V. 50Hz for UK and Australia
What you should know to protect yourself
and the Akai S950.
Watch out! You might get an electric shock
Never touch the plug with wet hands.
Always pull out by the plug and never the cord.
Only let a qualified professional repair or reassemble the Akai S950. An
unauthorized person might touch the internal parts and receive a serious
electric shock.
Never allow a child to put anything, especially metal, info the Akai
S950.
Let's protect the Akai S950 too.
Use only a household AC power source. Never use a DC power
source.
If water is spilled on the Akai 5950, disconnect rt and call your dealer.
Make sure that the Akai S950 is well ventilated and away from direct sunlight.
To avoid damage to the internal circuits and the external surface,
keep away from heal (stoves, etc.).
Avoid using spray type insecticide near the Akai S950. It can damage the finish
and might ignite suddenly.
To avoid damaging the finish, never use denaturated alcohol, paint
thinner or other similar chemicals to clean the Akai S950.
Place the Akai 5950 on a flat and solid surface.
To enjoy the Akai S950 for long time, please read this operator's manual
thoroughly.
Should a problem persist, write down the model and serial numbers and
all pertinent data regarding warranty coverage as well as a clear description of the
existing trouble. Then, contact your nearest authorized Akai Service Station, or Akai
Electric Co., Ltd.. Quality Assurance Dept., Service Section m Tokyo. Japan.
The lightning flash with the arrowhead symbol superimposed
across a graphical representation of a person, within an
equilateral triangle, is intended to alert the user to the presence of
uninsulated "dangerous volts"" within the product's enclosure: that
may be of sufficient. magnitude to constitute a risk of electric
shack.
The exclamation point within an equilateral triangle Is Intended to
alert the user to the presence of important operating end maintenance (servicing) Instructions fn the literature accompanying the
appliance.
IN THE UK
IMPORTANT FOR YOUR SAFETY
The flex supplied with your machine will have two wires, as shown m the illustration.
IMPORTANT
The wires in this mains lead are coloured in
accordance with the following code: Blue: Neutral
Brown: Live As the colours of the wires in the
mains lead of this apparatus may not correspond
with the coloured markings identifying the
terminals in your plug, proceed as follows: The
wire which is coloured blue must be connected to
the terminal which is marked with the letter N or
coloured black. The wire which is coloured brown
must be connected to the terminal which is marked
with the letter L or coloured red.
Do not connect any wire to the larger pin marked E or down when wiring a plug.
Ensure that all terminals are securely tightened and that no loose strands of
wire exist.
Warning -- This equipment generates and uses radio frequency energy and if
not installed and used properly, that is, in strict accordance with the manufacture's
instructions, may cause interference to radio and television- reception. It has been
type tested and found to comply with the limits for a Class 8 computing device in
accordance with the specifications in Subpart J of Part 15 FCC Rules. which are
designed to provide reasonable protection against such interference in a
residential installation. However, there is no guarantee that interference will not
occur in a particular installation. If this equipment dose cause interference to radio
or television reception. which can be determined by turning the equipment off and
on, the user is encouraged to try to correct the interference by one or more of the
following measures:
Reorient the receiving antenna
Relocate the computer wish respect to the receiver Move the
computer away from the receiver
Plug the computer into a different outleet so that computer and receiver are on
different branch circuits.
If necessary, the user should consult the dealer or an experienced radio/
television technician for additional suggestions.
The user may find the following booklet prepared by the Federal Communications
Commission helpful:
"How to Identity and Resolve Radio-TV Interference Problems"
This booklet is available from the U.S. Government Printing Office.
Washington, DC 20402. Stock No. 004-000-00345-4.
"This digital apparatus does not exceed the Class B limits (a radio noise emissions
from digital apparatus set out in the Radio Interference Regulations of the Canadian
Department of Communications"

AKAI S950 SAMPLER MANUAL - INTRODUCTION
Welcome to the Akai S950 Digital Sampler. This versatile instrument provides the
flexibility associated with more expensive machines yet is easy to use once you
become familiar with its operation. It took many months of intensive development
to produce the S950 and it will take some time and practice for you to master
this advanced instrument but the reward for your efforts will be the opportunity
to make creative and exciting music using the latest in sampling technology.
No-one can deny the impact sampling has had on the way we make music - it could
be argued that it is as revolutionary as the invention of the synthesizer itself.
The Akai S900 was the first sampler that brought affordable, studio quality
sampling in an easy to use and flexible rack mounting format to many musicians
and studios the world over becoming an industry standard by which all other
samplers were compared. The new S950 !s the successor to that sampler and
combines the benefits of improved technology with all the best features and
software updates of the S900 plus all those features that people wanted to see on
the S900 such as higher bandwidth, expandable memory, etc.. We are sure you will
enjoy using your S950 for many years.
But first, let's take care of the unit.
If the unit is going to be kept in a rack full of other equipment in a studio,
it's a good idea to make sure there is some ventilation around it if you can.
This can be done by leaving a 1U gap on top of the S950- which can be filled in
with a blank rack panel. This will prevent any overheating of the unit. If you
are going to be transporting the S950, especially if you are gagging with a band,
we recommend the use of a sturdy flight case to protect your investment. Once
again, if it's in a rack with other gear, leave a gap. If you don't have a flight
case, you can use the box the unit came in when transporting your S950.
When you are transporting the S950, ensure that either the supplied disk
protector or a blank disk is inserted in the disk drive to protect the disk
drive's delicate heads.
If the unit gets dirty, you can clean it with a warm, damp cloth and some mild
detergent but do not use any strong solvents or you will ruin the finish.
If your S950 develops a fault, there are no user serviceable parts inside so
don't open the unit up in the unlikely event of anything going wrong. This will
invalidate your warranty as well as potentially damaging the instrument further.
You may also get an electric shock. Please refer the unit to your local Akai
dealer who will have it repaired by an authorized repair center.
If any liquid is spilled into the instrument, turn !t off at the mains supply do not try to switch it off at the front panel as you may get an electric shock.
Do not open it up to try and clean it but take it to your local Akai dealer.
Under no circumstances open the unit up if it is connected to the mains supply
even if the unit is switched off as you may get an electric shock.

There are a variety of options available for the S950 which are discussed
later. To fit these, please take your instrument to your local Akai dealer
who will either fit them for you or will arrange for an authorized service
center to fit them. Trying to fit them yourself will invalidate your
warranty. Similarly, any modifications you might make to your S950 will also
invalidate your warranty.
To avoid damage to the internal circuits and the casework, ensure that the
S950 is kept away from heaters, radiators, stoves. etc..
Never let a child put anything, especially metal, into the S950. Also, keep
children away from the polythene bag that the unit is wrapped in.
Although the S950 has been built to withstand the many rigours of the music
business, it is a precision instrument that must be treated as such. Look
after your new instrument and it will look after you providing you with years
of reliable service.
3

GETTING
STARTED
You are probably impatient to hear your new sampler so let's connect it up.
Referring to Fig. 1, connect the MIDI OUT of a suitable keyboard to the MIDI
IN on the S950 using a standard 5 pin DIN cord. Preferably, to take full
advantage of the S950's expressive capabilities, the MIDI keyboard should
have pitch bend, modulation wheels and touch sensitivity but don't worry if
it hasn't. Naturally, we recommend the use of the Akai MX76 master keyboard
but any MIDI controller can be used including guitar-MIDI converters, wind
controllers such as the Akai EWI or EVI or a MIDI drum controller.
Now take a standard Jack-to-Jack lead from the MIX OUT socket on the rear of
the S950 to the LINE input of a mixer or amplifier. If you are using a
standard guitar amplifier, connect the lend to either the input on the front
of the amp marked 'HI' or, better still, have n look round the back of the
amp to see if there is an input marked 'AMP IN' which will bypass the
amplifiers preamp and so reduce the possibility of distortion. If you are
using a hi-fi amp, then you will probably need to use a hack-to-phono lead
and connect the S950 to the AUX input on the amp.
FIG. 1 Connecting the S950
Making sure that the amplifiers volume control is right down and the S950 is
switched off, insert one of the disks supplied with the S950 with the label
facing upwards. Push gently until the disk locks in place - the push tab will
pop out from below the disk drive when it has been properly inserted. Now
turn the S950's power on - the disk will automatically load. While that is
happening, you may like to adjust the contrast control to the left of the
display for the most legible display.
This should take around 40 seconds depending on how much data is on the disk
and the red light on the disk drive will be lit and you will hear some
clunking and whirring noises from the S950 as the disk contents are loaded.
This is normal so don't worry!!
4
5
CAUTION: UNDER NO CIRCUMSTANCES MUST YOU REMOVE THE DISK WHILE THE RED LIGHT
IS ON AS YOU MAY DAMAGE THE DISK OR THE DRIVE. NEITHER MUST YOU TURN THE
S950'S POWER OFF WHILST A DISK IS LOADING.
After the disk has loaded, you are ready to play your S950 so turn up the
volume on the amplifier and play a few notes on the keyboard - you should
now hear a sound. To see what other sounds are in the S950, simply turn the
grey CONTROL wheel anticlockwise to scroll through the programs. When you
want to change the sound, simply type in the appropriate number using the
blue keypad. Repent that process to select the other sounds.
Once you've heard all the programs on chat disk, you can select another disk
so turn the amplifier volume down, take out the first disk you put in by
pressing the push tab below the disk drive and switch the S950 off.
Now insert another disk as described above and turn the samplers power back
on. After 40 seconds of more clanking and whirring, turn up the amplifiers
volume because you are ready to listen to the sounds on the second disk
scrolling through the different programs using the data wheel as described
above and selecting different programs by typing in the relevant program
number. You can repeat this whole procedure for the remaining two disks.

S950 - AN OVERVIEW
The S950 is a digital sampler that has 16-bit processing and 12-bit sampling
with a maximum sampling rate of 48kHz. As well as allowing you to use any of
the large library of S900 sounds you can also use sounds from the S1000 sample
library and double density or high density disks can be used for storing
samples. The S950 enables you to sample and play sounds with astonishing
clarity and dynamic range and because the bandwidth is variable up to 19.2kHz,
you can be sure that high frequencies are faithfully reproduced.
The basic memory is 750K (which is expandable to 2.25Meg) and the basic
sampling time is variable between over a minute at reduced bandwidth to ,lust
over nine seconds at full bandwidth. Furthermore, bandwidth is totally
variable allowing you to squeeze as much sampling time as possible out of your
S950.
The S950 also has 8 individual monophonic audio outputs which can be used with
drums. and percussion and other instruments for separate processing, EQ and
balancing of individual sounds on a mixer. There are also left and right
outputs for pseudo stereo effects.
The maximum number of samples you can have in memory at ones is 99 but that
depends on how long the samples are of course. You can also have as many as
198 programs.
No sampler would be complete without extensive editing facilities and the S950
is no exception. As-well as the usual looping facilities, the S950 has an
effective AUTOLOOP facility to take the drudgery out of looping end it also
has CROSSFADE LOOPING for obtaining smooth, glitchless loops. There are also
splicing facilities for merging two or more samples together and double speed
MIDI increases the communication speed of sample dumping over MIDI which is
invaluable if you feel the need to use a computer for visual editing of
samples.
There are- also extensive program editing facilities such as envelope shaping,
filtering; pitch sweep and LFO effects as well as a two positional velocity
switch function and positional crossfade functions.
Several new features include a 'load while play' function on the disk drive so
that you can be loading new sounds from disk whilst you play. The S950 is also
the first sampler in its price range to feature TIMESTRETCH which enables you
to lengthen or shorten s sample by as much as 999% without any change in
pitch.
Other features include PRETRIGGER RECORDING which allows you to sample sounds
without losing the all important initial attack transients and the AUTOMATIC
LOCATING OF START POINT function allows easier editing of a samples start
point.
Several options are also available for the S950 including an ATARI/SUPRA and
CD/DAT INTERFACE BOARD (IB105) which allows larger storage and faster disk
access and also enables sampling to and from a CD or RDAT machine for
increased audio fidelity. The internal memory can also be increased using up
to two MEMORY EXPANSION BOARDS (EXM006) which allow maximum internal memory
capacity of 2.25 Meg giving you a maximum sampling time of nearly 30 seconds
at full bandwidth and over three minutes of sampling at the lowest bandwidth
setting.
6

The most important thing about the S950 is that, despite the incredible
wh
ich will be new to you and there may even be a few surprises.
versatility of the instrument, it is very easy to use and won't interfere
with your music making. Naturally, you would rather play with your new
instrument than read a manual but please, read the manual sometime. Even if
you've been an S900 user for some time, there is still information in here
7
S9500
-
BASIC SAMPLING ARCHITECTURE
8
Before we explore the workings of the S950, let us first see how it functions
as there are n few things you need to know about which will make your
understanding of the instrument a lot clearer.
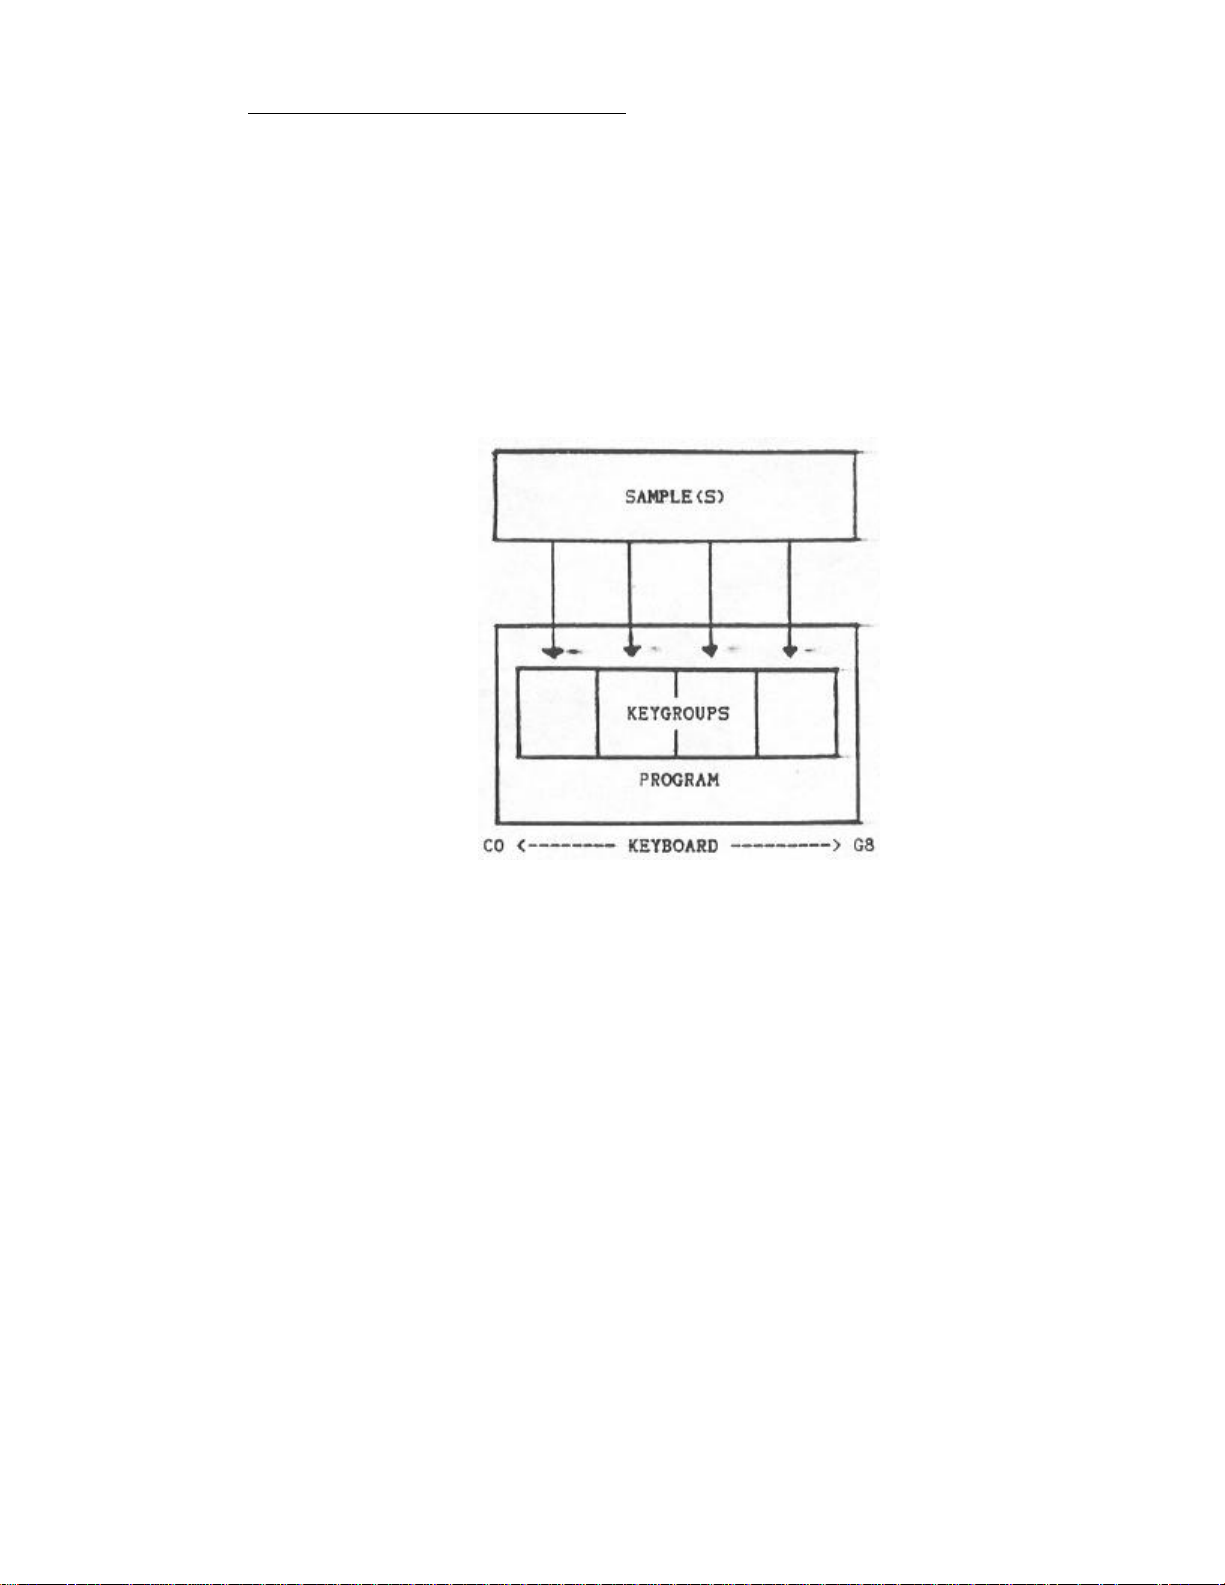
There are basically two things you can have in the S950 - SAMPLES and
PROGRAMS. A sample is a digital recording of a sound. The sound can be
anything from a car crash to a flute. Once you have a sample or a collection
of samples in the S950, you want to be able to play it from the keyboard (or
any other MIDI controller such as a MIDI drum, guitar or wind controller or a
MIDI sequencer). To do this, the sample<s> must be placed in KEYGROUPS and
these allow you to map the sample out across the keyboard within a PROGRAM.
FIG. 1 Basic sampling architecture of the S950 - samples into keygroups
mapped out across the keyboard range within a program
The simplest program you can create is to have one sample that spans the
entire keyboard range. Alternatively, you could assign that one sample to dust
one key or you could have any number of keygroups assigned to individual keys
with separate samples in each of them. You could also have a program which
uses two samples, one spanning the bottom two octaves, the other spanning the
top three octaves. It is also possible to have two samples in one keygroup
each of which are sounded using keyboard dynamics where soft keystrikes plays
the one sample and hard keysstrikes play the other - this !s known as VELOCITY
SWITCHING.
Having done that, each keygroup can have its own envelope shaping, filtering,
fine tuning, vibrato and pitch sweep effects, individual output assignment and
each keygroup can have its own MIDI channel and even the simplest sample can
be radically transformed within a program. Furthermore, because any changes
made to an individual samples keygroup within a program do not affect the
actual sample data itself but are only sound processing functions, you can
have many, many variations of one sample to create an even greater range of
sounds which can be recalled at the touch of a button.
But, how does all this work? Let's find out.

USING THE S950 - THE BASICS
There ere 8 basic modes on the S950 which are selected using the 8 buttons
that run underneath the display. These are PLAY, REC, EDIT SAMPLE, EDIT
PROGRAM, MIDI, UTILITY, DISK and MASTER TUNE. These are all fairly self
explanatory and their basic functions are as follows:
PLAY - This selects the program you wish to play. Different programs can be
viewed using the large grey CONTROL wheel and selected by typing in the
appropriate number on the blue keypad. Alternatively, programs can be
recalled via MIDI from the connected MIDI keyboard.
REC - This is where you do your sampling. There are a number of 'pages' in
this mode which you can scroll through using either the CONTROL wheel, the
keypad or the PAGE UP/DOWN buttons to the right of the blue keypad. In this
mode you can name a sample, set sampling time and bandwidth and set the key
onto which the sample is to be recorded.
EDIT SAMPLE - This also has a number of pages which are similarly selected
using the CONTROL wheel, the keypad or the page up/down buttons. This is the
mode where you can tune a sample, edit the start and end of a sample, reverse
the sample, loop a sample, splice two samples together and stretch or
compress samples. In this mode, also, you can copy, delete and rename
samples.
EDIT PROGRAM - This !s the mode-in which you can map out your samples across
the keyboard as well as add envelope shaping, filtering and fine tuning. You
can also add a special pitch sweep feature called WARP and, in this mode, you
can set things like LFO,. MIDI channels, individual output assignments, etc..
You can also copy, rename and delete programs. This mode, too, has a number
of pages which are selected as above.
MIDI - As you would imagine, this allows you to set the 'global' MIDI
parameters of the S950 such as its basic receive channel, pitch bend and
other MIDI related parameters.
UTILITY - This allows you to program an Akai ME35T audio/drum pad-MIDI
converter for triggering samples.
DISK - This allows you to select different disk drive operations such as
loading and saving.
MASTER TUNE - This allows you to fine tune the S950 to other instruments.
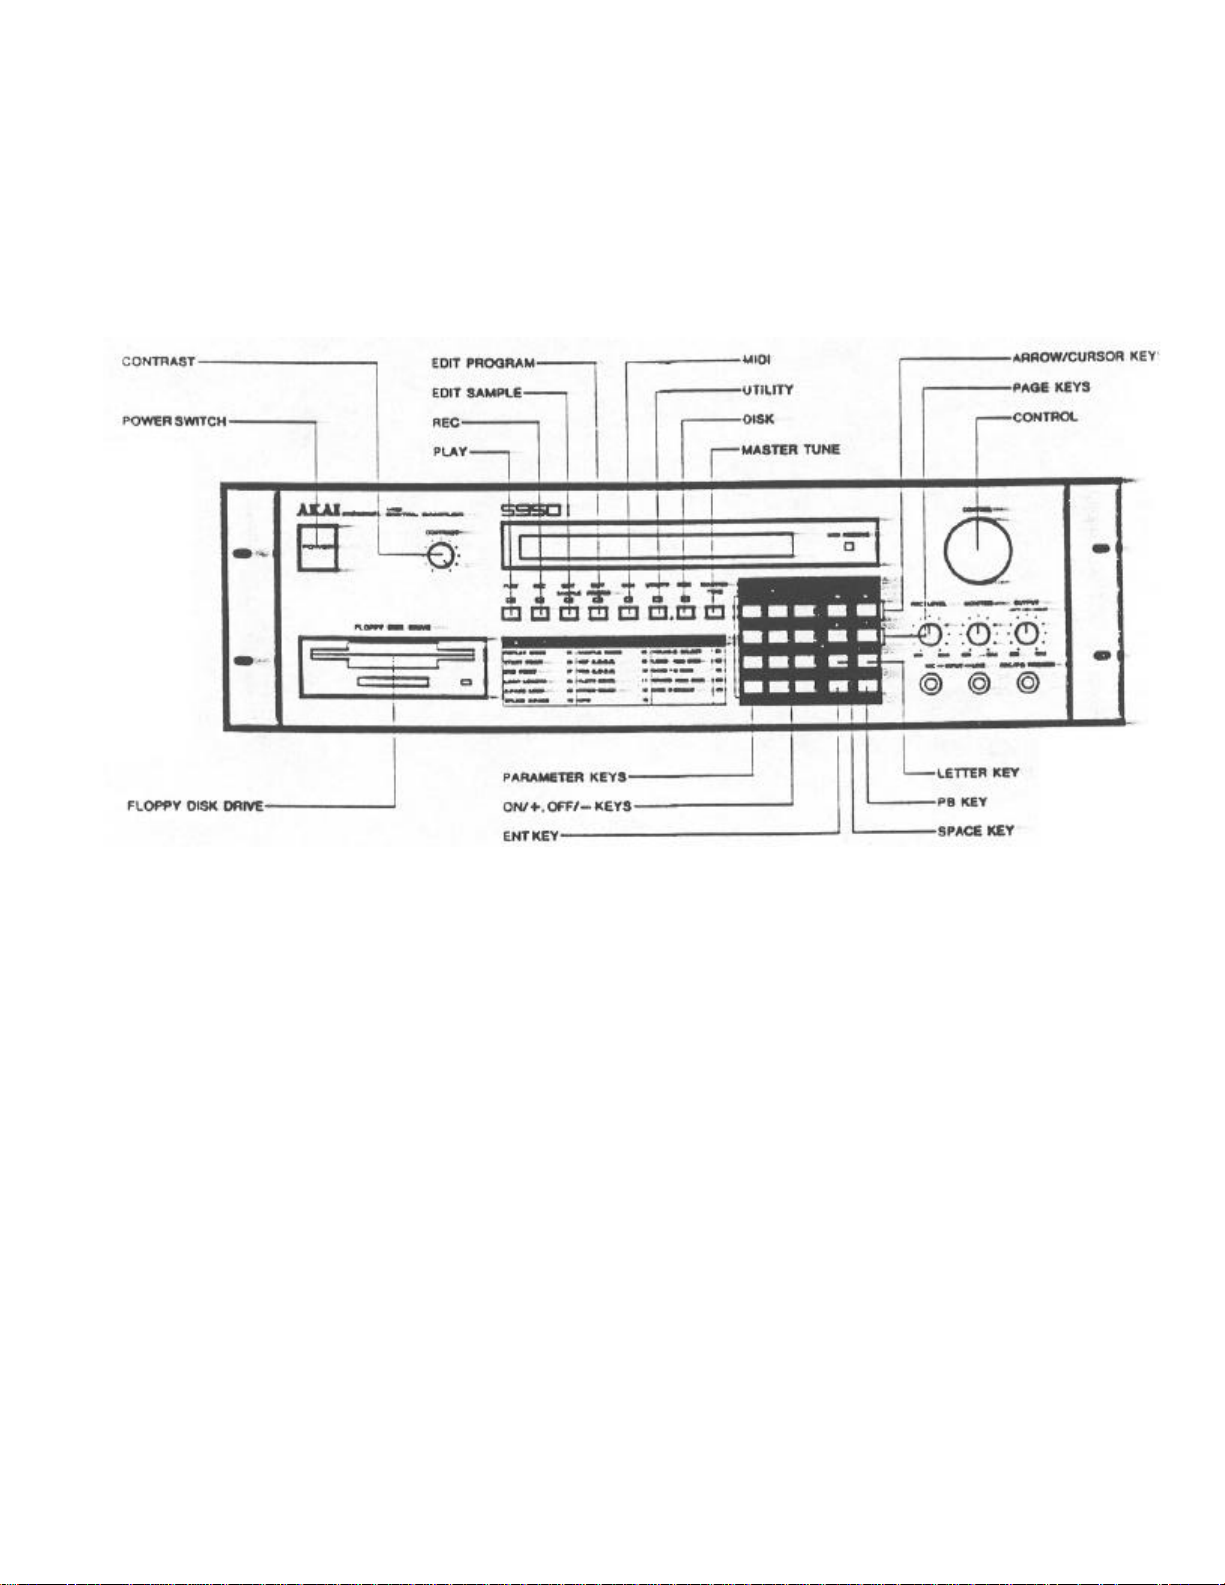
The other controls on the front panel of the S950 include the large grey
CONTROL knob. This is used for a variety of purposes depending what mode you
are in. It can be used to scroll through displayed programs or it can select
pages in the different modes. It can also be used for data entry and for
naming samples and programs.
There is also a large 0-9 keypad which can be used to input data whilst the 8
buttons to the right of .the keypad enable you to move the cursor around the
screen using the ARROW/CURSOR < and > buttons, to select pages using the PAGE
UP/DOWN buttons. There are two ON/OFF buttons which also double as +/- keys
for certain applications and there are two keys to allow you to name samples
and programs. Finally there the ENT button which 'is used to enter data and
the PB or 'playback' button which can be used to play back a sample without
the need to use a MIDI keyboard or controller.

GETTING ROUND THE S950
Behind the deceptively simple control panel of the S950 lies a wealth of
features. As we have seen, the main functions of the S950 are accessed simply
by pressing the required button. After that, each mode (with the exception of
PLAY and MASTER TUNE) have n number of 'pages' or sub-modes which give you
access to further functions.
Accessing any of these pages is simple: select any of the page driven modes
you wish to work in (i.e. REC, EDIT SAMPLE. EDIT PROGRAM, MIDI, etc.) by
pressing the appropriate button underneath the main LCD display. To go to
another page, you can either press the PAGE DOWN button located to the right
of the blue keypad or you can scroll through the pages using the CONTROL
knob. In EDIT SAMPLE, EDIT PROGRAM. MIDI, UTILITY and DISK, because the pages
are actually numbered, when the cursor is in the top left hand corner of the
LCD display (i.e. flashing on the page number), you can type in a two digit
number on the blue numeric keypad which will take you straight to the page
you wish to work on. To further help you with this type of page access, there
is a chart underneath the mode buttons which list the most commonly used
pages in EDIT SAMPLE, EDIT PROGRAM and DISK. As you become more familiar with
the S950, you will be skipping back and forth between pages almost
instinctively.
To further help you with programming and editing, there is a button marked
'Space' to the right of the keypad. This has two functions. In the 'letter'
mode, it is used to enter a space into a name (see ENTERING NAMES) but, when
you are in any of the main modes of operation it allows you to switch between
two positions very quickly. This is done by going to a page-in any of the
modes and making some form of data entry.' Now move to another page and make
another data entry. By pressing the space button, you will be taken back to
where you made your first data entry and pressing the space button again will
take you to the place where you made your second data entry.
Data entry in all modes can be made in any number of ways. Some functions
require a numeric input - this can be done using the CONTROL knob or the blue
0-9 keypad. Some functions allow only keypad entry of data whilst others
require that you use the ON(+)/OFF(-) buttons. To get to any of the data
entry fields in any of the pages, you use the CURSOR > button located to the
top right next to the keypad to move -left to right across the LCD display.
You can also use the CURSOR < button to move back a field (i.e. right to
left). When you are in the field in which you want to make your change, you
enter data using any of the methods described above.
Don't worry if this all seems complicated as this manual will take you
through these functions step by step and soon you will discover how easy it
is to create your own samples and programs on the S950.
10
Of course, there's more to it than that and so we will take you through each
mode, control and function in greater detail so that by the time you have
read through all this, you will have a greater insight to the fantastic
creative possibilities offered to you by the S950.
11

USING THIS
-
MANUAL
This manual has been written to provide you with all the information you need
to fully exploit the facilities on your S950. The sections are not dealt with
in any operational order but deal with the eight basic modes of operation as
the buttons appear from left to right. Of course, this may not necessarily be
the order in which you wish to use the S950 so simply refer to the mode you
wish to learn about.
At the end of the manual are 'KWIKREF' charts. One is summarized step by step
guide to using the most commonly used pages in the various modes for quick
and--easy reference, the other is a guide to optimum bandwidth settings for
sampling. There is also an ADVANCED APPLICATIONS GUIDE for more advanced uses
of S950 functions. For newcomers to the exciting world of sampling and MIDI,
there are also brief explanations of these principles.
Let us now look at the various modes of the S950 and their respective
functions.
12

ENTERING NAMES
You will need to name samples and programs when you begin to create your own
sounds. The S950 allows you to name sounds of up to 10 upper case characters
using ell letters in the alphabet. Numbers 0-9 can be used in a name as well
and you can also include certain symbols such as #, + and -. It is also
possible to insert spaces in a name.
You will need to name a sound in the REC mode (i.e. when you create a new
sample), in EDIT-SAMPLE and in EDIT PROGRAM. In the REC mode, you must give
a new sample a new name otherwise the original sample will be overwritten.
In EDIT PROGRAM, you will need to copy an existing program to use as the
basis of a new program so you will need to enter a new name in this mode as
well. It is only in EDIT SAMPLE that the need to write new names is not so
necessary as the sample name is usually defined in the REC mode. Having said
that, it is often desirable to rename a sample.
So, how do you enter names on the S950.
You will notice that there is a button to the right of the keypad called
'Letter'. Pressing this button turns the S950 into a simple typewriter and
you then use the CONTROL knob to scroll through the alphabet. The CONTROL
knob also gives you access to the numbers 1 to 9 although numbers are more
easily entered using the blue numeric keypad. You can also enter a space in
the name using the CONTROL wheel but there is also a button marked 'Space'
which does this more easily. You can also use the two buttons marked ON(+)
and OFF(-> to enter + and ° signs whilst the CONTROL knob allows you to enter
a # symbol as well.
To enter a name in any of the above modes, you hit the 'Letter' button and
choose the first character of your name as described above. You then hit the
CURSOR > button to advance the cursor to the next character where you select
your new character. Press the CURSOR right button again to move to the next
character and choose a new character and repeat this whole process until you
have entered the name you have chosen. When you have done this, hit the ENT
button to enter the name into the S950's memory.
If, at any time, you make a mistake, you can backstep through the name using
the CURSOR < button and change the character.
13

PLAY MODE
This is probably the easiest mode to get to know and as good a point to start
as any. Basically, it is the mode where you can see what programs-are in the
S950 and it is where you can select any one of them.
To view all the programs, simply turn the large grey CONTROL wheel - this is
called 'scrolling' and will effectively move the programs in memory across
the display. You can now select the required program by typing in a number on
the blue keypad or via MIDI. When you select a program, the program is
shifted to the far left of the display and the cursor flashes at the selected
program somber.
If there are more than 9 programs in memory, the display will prompt you to
type in a two digit number, even if the program you wish to select is
numbered less than 10. For example, if you want to select program 4, type in
04 and if you want to hear program 13, type in 13 - it's as simple as that If
your S950 has less than 10 programs you only need to type in the one digit.
If you wish to select programs from your keyboard using MIDI, simply press
the required program number on the MIDI keyboard. For example, if you want to
hear program 12, press memory location button 12 on the keyboard's front
panel. All being well, program 12 will be automatically selected on the S950
on the screen.. Naturally, if you select program 64 on your keyboard but
there aren't 64 programs in the S950, nothing will happen. and the S950 will
stay on the last selected program.
Note: It is possible to glue a program any MIDI program number you wish In
EDIT PROGRAM. In other words, even though a program may be number 3 on the
S950's display, It !s possible to assign a MIDI program number of 46 to that
program so that recalling program number 46 on. the MIDI controller will call
up program 3 on the S950. For further information refer to EDIT PROGRAM.
14

TROUBLESHOOTING
There can be occasions where something you do on the S950 does not select
the required program. This can be for a number of reasons.
For example, it could be that you have ten or more programs in memory and
you only typed in a one digit number in which case the S950 will stay on the
last selected program.
It could be that you select a program correctly but there is no sound. This
can be for a number of reasons. Firstly, the S950 may be switched to MIDI
OMNI OFF and the program itself may be on a different MIDI channel to the
one you have selected on the keyboard. To get round this problem, you can
either press MIDI on the S950 and switch OMNI to ON so that the S950
responds to all channels (for more information refer to MIDI FUNCTIONS) or
you could change the transmitting channel on your keyboard. Alternatively,
you could edit the programs MIDI channel in EDIT PROGRAM (for more
information see EDIT PROGRAM).
It may be that selecting a different program number on your keyboard has no
effect on the S950. This can be for two reasons. Firstly, your synths
ability to transmit program change information has been switched off.
Alternatively, the S950 has been set not to respond to program changes in
the MIDI mode. In' either case, switch the program change facility on the
controlling keyboard or the S950 to ON (please refer to the section MIDI
FUNCTIONS to find out how to do this on the S950).
Another reason for this is that the program has been assigned a different
MIDI program number in EDIT PROGRAM (see above). To change this, please
refer to EDIT PROGRAM.
Finally, if everything has been set up correctly but you are still not
getting a sound, please check the following:
Is the audio lead from the S950 to the amplifier or mixer alright?
Is the amplifier volume turned up - is the amplifier actually turned on!! It
can happen, even to professionals!! Alternatively, if you are using a mixer,
is the mixer channel fader up or is the correct mixer channel fader up? Are
the master faders up?
Is the MIDI keyboard switched on and is the MIDI lead connected properly? Is
the MIDI lead broken? If the MIDI keyboard and the MIDI connections are
working properly, the little red MIDI monitor LED to the right of the main
display on the S950 will light whenever !t receives any MIDI.
Does your keyboard transmit MIDI volume controller number 07? If it does, it
could be that it has been inadvertently turned down which has remotely
turned the S950's volume down. If this is the case, you will have to turn
the keyboards MIDI volume control up (note: this is not to be confused with
the keyboards master volume control - MIDI volume will more then likely be
present on the controlling keyboards date entry slider). Once you have done
this, go to the MIDI function on the S950 and turn the function marked
VOLUME to OFF to prevent it happening again (please refer to MIDI
FUNCTIONS).
And if all this is beginning to sound difficult, don't worry as we shall
take you through all these other functions very soon. Besides, if you are
only using the disks supplied with the S950 and loading them as described in
GETTING STARTED, you shouldn't be experiencing any of these problems.
15

SAMPLING ON THE S950
-
USING THE RECORD FUNCTION
This is the mode where you actually sample your own sounds into the S950.
Many people are frightened by the process of sampling but it is not very
difficult as you shall see.
To sample on the S950, plug either a microphone into the MIC input or, if you
are using a line level signal such as a synthesizer, another sampler, a tape
or cassette deck or electric guitar, use the LINE Input. Now press the button
marked 'REC'.
The first page you have when you press REC displays:
NAME OF SAMPLE TO BE RECORDED
If there are no samples in the S950 the display will rend:
NAME OF SAMPLE TO BE RECORDED
TONE
If other samples are present, the display could read any one of those sample
names:
When you are sampling, you must always give the new sample a new name that is
different from any other samples name currently in memory. Failure to do this
will result in existing samples being overwritten.
To name a sample, press the button marked 'LETTER' which is to the right of
the blue keypad. You can now enter a name for your new sample scrolling
through the alphabet and numbers 1-9 using the grey CONTROL knob. Spaces can
be inserted using the SPACE button to the right of the keypad and you can
also use '+' and '-' characters in a name by pressing the ON(+) and OFF(->
buttons. When you have done that, hit the button marked 'ENT' next to the
blue keypad to enter the new samples name.
Note: It is good practice to include useful Information in a samples name such
as the pitch of the sample or, if it's one sample of several similar samples,
to give a numeric value. An example would be: VOICE 1 C3 or PIAN04 F2. In this
way, when you are editing a sample, you know exactly what it is.
Now move to the next page by pressing the page down button found to the right
of the blue keypad. The display will read:
NAME OF SAMPLE TO BE MONITORED
Monitor
This page allows you to hear the sound you are sampling through the MONO MIX
output on the back of the 5950. It is also possible to monitor the new sample
in context with an existing program. This will be covered in more detail in
the ADVANCED APPLICATIONS section.
Now go to the next page pressing the page down button. This will display:
AUDIO SOURCE: Analog input
(1),
Digital fibre optic (2), Phono (3) #
where '#' Indicates the current input source selection.
16

The default setting for this page is 1 - Analogue input (l. e. the MIC or LINE
input socket on the front panel of the S950). If you are using the IBI05 HARD
DISK/CD DAT INTERFACE board, you can select 2 or 3 which will allow you to sample
directly from the CD or RDAT's digital or fibre optic output (please refer to the
IB105 documentation for information on this).
Using the 'page down' button, go to the next page which will read:
DIGITAL AUDIO
CD 44kHz (1), DAT 32kHz (2), 48kHz (3) #
where '#' is the current selection.
These parameters relate entirely to the IB105 option so please refer to the
interface's documentation for more information on using this page.
Now move to the next page using the page down button. The display will read:
AUDIO BANDWIDTH (3000Hz to 19,OOOHz) ##,###
where '##,###' is the selected bandwidth.
Here you can set the bandwidth for the sound you are about to sample. You can
enter a number directly from the keypad by typing a 5 digit number or you can use
the CONTROL knob although this is a lot slower. Higher bandwidth settings will
give the sound better high frequency response aid the sound will be brighter but
this also takes up more memory than lower bandwidth settings. To conserve memory,
use the minimum bandwidth necessary for an acceptable sound quality. You may like
to refer to the OPTIMUM BANDWIDTH 'KWIKREF' chart at the back of the manual for a
guide to particular instruments optimum bandwidth.
Having set the bandwidth to your requirements, press ENT to enter the data. Now
move to the next page where the display will read:
RECORDING TIME (250mS to ##,###mS) ^^,^^^mS
where ##,### is the maximum sampling time allowed by the remaining memory and
where ^^,^^^ is the currently selected amount.
Note: the maximum sampling time available (##,###) depends on the bandwidth
selected in the previous page end on how much memory has already been used for
other samples.
To set the sampling time, enter a 5 digit number using the keypad and press ENT.
You can also use the CONTROL knob but, again, this is a lot slower. Use the
minimum time possible to capture the whole of the sound you wish to sample.
Note: if you have the memory expansion board fitted, it is possible to enter e 6
digit number as the maximum sampling available is much larger.
Once you have entered your sampling time, you can move to the next page. This
will read:
PITCH OF SOUND BEING RECORDED: ##
where ## is the currently selected value (the default value is C3).
17

You can now change this parameter if you wish by simply pressing the
appropriate note on the connected MIDI keyboard or controller. You can also use
the CONTROL knob but keypad entry is not possible.
When you have done this, go to the next page which will read:
START SAMPLING WITH - Any key (1)
Footswitch (2), Audio level (3)
where # indicates the current selection (default is 3).
Here you can use the keypad to enter a number as follows:
1 = sampling begins when you hit any key on the keypad.
2 = sampling begins when you press a footswitch connected to the S950's
REC/PB footswitch input on the front panel.
3 = sampling begins when the incoming signal exceeds a threshold level set
on the next page.
The most commonly used mode is 3 - Audio level and, as the default is set for
this, you do not normally need to change anything so you can go to the next
page which will read:
KNOB SETS TRIG LEVEL. ANY KEY WHEN READY
T .......
In this page, the lower half of the display now serves as a bar-graph input
level meter to indicate the incoming signal level. The 'T' Is the THRESHOLD
level and is set using the CONTROL knob. The idea is to set the threshold
relatively low so that, as soon the incoming signal exceeds the level set by
the 'T', sampling begins but be careful not to set it too low so that sampling
is falsely initiated by background noise or whatever. Similarly, do not set it
too high as you may miss part of the sounds attack, especially if the sound has
a slow attack.
You must now set the record level. To do this, play the sound you wish to
sample and adjust the REC LEVEL control on the front panel. You ideally want to
set it so that the bar-graph display is just touching the series of dots in the
bottom right of the display. These dots indicate overload and driving the
signal too far into this region of the display will cause distortion.
To hear the incoming signal, adjust the MONITOR LEVEL control on the front
panel. (NOTE: YOU WILL ONLY HEAR THE INCOMING SIGNAL THROUGH THE S950 IF THE
MONO MIX OUTPUT IS USED.)
Once you are satisfied with the incoming signal level, hit any key on the blue
keypad and play the sample. As soon as signal level exceeds the threshold,
sampling will begin. When you do this the display will change. The top half of
the display will be filled with arrows as sampling time elapses. Note that the
'T' also changes to a '#'. Once the sampling is completed, you will be returned
to the above display.
You can now play the sample by playing a note on the connected MIDI keyboard or
controller. If you don't have a keyboard or controller connected, you can go to
the next page which will display:
HIT ENT TO PLAY
and pressing ENT will cause the sample to sound for its entire duration.
You have just successfully sampled a sound.
18

You will have noticed from all this that most of the pages are set up with
the most sensible option as the default setting. You always have to give a
new sample a new name but, apart from that, the only main things you will
probably need to change are bandwidth, sampling time and the pitch at which
the sample is to be recorded. In this way, you can sample your own sounds
quickly and easily, often ignoring many of the pages.
TROUBLESHOOTING
There isn't much that can go wrong when in the REC mode but anything is
possible!
For example, it could be that you do not get any level from the sound you
wish to sample when you adjust the S950's record level control. This could be
for a number of reasons.
1. Check that the input source on the S950 is correctly set. If you are using
the MIC or LINE inputs, make sure that you are not switched to '2' (Fibre
optic) or '3' (Phono) but that the display reads '1' (Analog).
2. Is the lead connected to the mic or line input alright? Change it if in
doubt.
3. Is the microphone switched on or is the volume from your line level sound
source turned up?
4. Is the REC LEVEL control up?
It might also be possible that you cannot monitor the incoming signal through
the S950. This could also be for a number of reasons.
1. You can only monitor the incoming signal through the MONO MIX output. You
will not be able to monitor anything if you are using either the LEFT, RIGHT
or INDIVIDUAL outputs.
2. Is the MONITOR LEVEL control up? Is the amplifier on or turned up or are
the mixers channel or master faders up?
Once you've sampled a sound, you may find that it is not playing back
properly or even at all. If this is so:
1. Check that the MIDI keyboard or controller is connected properly and that
the MIDI lead is o. k. Also check that it is on the same MIDI channel as the
S950 (see TROUBLE SHOOTING In PLAY).
2. Check that the output audio from the S950 lead is alright and that the
amplifier and/or mixer is working properly.
3. If the sound is muffled, check that the bandwidth was set sufficiently
high before you sampled the sound. If it wasn't high enough, change the
bandwidth and resample the sound.
4. If the sound is at all clipped or too short, check that the sampling time
was set sufficiently long enough.
19

5. If the sound is distorted, check that it wasn't overloading the S950. This
can be done by returning to the functions that dealt with level setting and
play the original sound again to check levels.
6. If 5 checks out o. k., !s the S950 overloading the mixer and/or amplifier
or is the amp overloading the speakers? Of course, to check for distortion,
remove any effects such as EQ, echo or reverb that may be present on the
mixer and/or amplifier.
All being well, you should not experience any of these problems and so you
can now edit the sample you have dust taken.
20

EDIT SAMPLE
The next button along is marked EDIT SAMPLE and. not surprisingly, this is
the mode in which you edit your samples and where you can change the start
and end points of a sample, reverse the sample, loop the sample, splice two
samples together and compress or stretch a sample. You can also copy, rename
and delete a sample as well as tune a sample and change its basic pitch. This
is all' accomplished using a page driven system as in the REC mode.
The first page you encounter when you press EDIT SAMPLE reads:
>01 #Select. Copy ##########
SAMPLE #Rename, Delete (-) #############
where ########## is the currently selected
sample name.
This page allows four options and you can select a sample for editing, copy a
sample, rename a sample and delete a sample.
To select a sample, press the 'cursor >' button (found to the right of the
blue keypad) once so that the cursor is flashing on the top line on the first
letter of the sample name. Using the grey CONTROL knob, you can scroll
through the samples present in the S950's memory. Once you have found the
sample you wish to edit, press ENT.
To copy a sample the cursor must be at the same' place as above and all you
need to do is press the LETTER button and name a sound as described in REC
and ENTERING A NAME. Once this has been done, press ENT.
To rename a sample, select the sample to be renamed as described above and
press ENT then, by pressing the 'cursor >' button once, move the cursor so
that it is flashing on the first character of the sample displayed on the
bottom line of the LCD display (this should be the same as the sample name in
the top line). Now press LETTER and give the sample its new name as described
above. When you have done that, press ENT and the top line will change to
display the new samples name.
To delete a sample, making sure the cursor is on the too line; first select
the sample to be deleted and press ENT. Now move the cursor to the bottom
line using the 'cursor >' button and press the '-' button followed by ENT.
This will delete the currently selected sample from memory. (Note that this
procedure is destructive and unless you have saved the sample to disk, this
sample will be lost forever. We suggest that, unless you are absolutely
positive about deleting the sample, you save it to disk before deleting it
from the S950's memory just in case.)
You can now move to the next page using the 'page down' buttons. The next
page will display:
>02 Select program Monitor
This is the same as the page we found in the REC mode and it allows you to
monitor either the sample directly or in context with a program. The most
common mode is 'monitor' but, if you want to edit the currently selected
sample in conjunction with the program in which it is placed, press the
'cursor >' button to move the cursor one position and scroll through the
programs using the CONTROL wheel (refer to the ADVANCED APPLICATIONS GUIDE
for more information on this).
21

Move to the next page using the 'page down' button. It will display:
>03 #Loudness #Nom pitch #Fine pitch
+00 C3 60 +00
This page allows you to adjust a samples level, its basic pitch and its fine
tuning.
LOUDNESS: This is where you can adjust the level of the sample so that it
matches the level of other samples taken. To change the value, move the
cursor one position using the 'cursor >’ button so that the cursor is
flashing on the + character and use either the CONTROL to enter a new value
or type in a + or - value using the ON(+) or OFF(-) key in conjunction with
the keypad.
Note: This value is a velocity based parameter. If you set the value to +50,
there will be no change in level with varying velocity dynamics. Similarly,
with the setting at -50, velocity dynamics will be extreme... Note also that
these values do not represent dBs but are purely an arbitrary volume unit.
NOM PITCH: This value was set in REC and represents the note on which the
sample was placed in REC. To change it, move the cursor one position to the
right using the 'cursor >' button so that it is flashing on the first
character and use the CONTROL knob to raise or lower the pitch in semitones.
You can also use the keypad for data entry here.
Note: If you are using the PB button to playback the sample, a higher note
number will actually produce a lower pitched sound and vice versa. This is
because as the sample gets higher in pitch, the PB button sends out the same
note lC3) and so the sample will actually get lower in pitch.
FINE PITCH: This is used to fine tune samples and can be effective if you are
taking a lot of samples from instrument such as piano so that you can ensure
that all samples are in tune with each other. To fine tune your sample, move
the cursor so that it is flashing in this field using the 'cursor >' button
and change the data using the CONTROL knob or a + or -value using the ON(+)
or OFF(-) buttons and a numeric entry on the blue keypad.
The next page will display:
>04 #REPLAY MODE One shot (1)
Looping (2), Alternating (3) #
where # is the current selection (default for new sample is 1).
A sample may be played back in three ways. ONE SHOT plays the sample from
start to finish and will then stop. LOOPING will play the sample from start
to finish and wi11 then repeat a part of the sample as set on Page 8 for as
long as a note is held down on the keyboard. ALTERNATING is similar to
LOOPING except that the looped portion of the sound will play back from
beginning to end and then from end to beginning - this can be useful with
rich, ensemble sounds where there will sometimes be glitching. This
backwards/ forwards looping can help to smooth them out. In both loop modes,
the loop length can be as long as the entire sample or as short as one single
cycle of the waveform. For more information on looping, see the section ABOUT
LOOPING later on. in this section.
22

To select the mode, move the cursor one position right using the 'cursor >'
button and make your selection using the CONTROL knob or the keypad.
Now go to the next page using the 'page down' button. This will display:
>05 #TIME DIRECTION
Normal (1), Reverse (2) #
where # is the current setting (default is 1).
This page allows you to set whether the sound is played normally or
backwards. Try setting it to '2' to hear the sound reversed. To do this,
press the 'cursor >' button once and then press 2 on the keypad.
Now go to the next page by pressing the 'page down' button. It will read:
>06 START POINT #Coarse #Fine #AUTO
( 0 - ##,###) 0,000 01
where ##,### is the maximum position to which the start point can be
adjusted.
This page allows you to edit where the sample begins its playback.
Sometimes, it is desirable to remove part of the front of a sample. This can
be due to unwanted noises or too slow an attack or possibly a delay between
the time .when the sampling was initiated and the time the sound was sampled.
To change the start point, move the cursor one position to the right using
the 'cursor >' button. It should be flashing on the first character displayed
under 'Coarse'. By moving the CONTROL knob, adjust this value and, by playing
a repeated notes on the keyboard as you make your adjustment, listen to the
results - you will hear the attack being removed with higher settings. The
next field, 'Fine' which can be selected by moving the cursor one position to
the right using the 'cursor >' button is for fine adjustment of the start
time. In both coarse and fine fields, the data can be input using the CONTROL
knob or the keypad.
The AUTO field enables the S950 to automatically search for the start point
of a sample and the numeric value represents the signal level threshold of
the start point. To use the AUTO function, simply move the cursor to the AUTO
field, enter the start point level you wish the S950 to search for (01 is the
default and will find the lowest start point signal level whilst setting 99
will search for the highest start point signal level) and press the ENT
button.
23

Assuming you have edited the start point to your satisfaction (remember,
however, that it is not obligatory to change the start point - if the sample
sounds good, leave it alone), you can now move to the next page which will
reads
>07 END POINT #Coarse #Fine
(000,100-###,###) 0,000
where ###,### is the maximum position to which the end point can be adjusted.
This is very much the same as page 6 except that here you can edit the end of
a sample. This can be useful in getting rid of any noise that may be present
at the end of a sample as well as being useful for saving memory. The 'Coarse'
field allows you to cutoff the end of the sample in large increments whilst
the 'Fine' field allows finer settings of this value.
To edit the end point, move the cursor to the 'Coarse' field and, playing
repented notes on the keyboard, try editing the end point and listen to the
results. You will hear the sample getting shorter and shorter as you decrease
the numeric value. Again, data entry can be via the CONTROL knob or the keypad.
For finer resolution of end point editing move the cursor to the 'Fine' field
and make your adjustments in the usual way using the CONTROL knob or the
keypad.
Before we move to the next pages, we must first discuss some of the
intricacies of looping.
ABOUT LOOPING
Because any sample you take on the S950 only lasts a finite amount of time,
there will be occasions where you want to sustain that sound longer than the
actual sample - this is especially true if the sample is only a second or so I
ong as will often be the case. This is further compounded by the fact that a
one second sample played en octave up will only lest half a second and, an
octave up from that, It will only lest a quarter of a second. To get round this
problem, a sampler uses a process known as looping. This is a technique where
part of the sample is played over end over again for as long as you keep your
finger on the keyboard. For example, say you have a one second sample of a
flute. Using looping, you can instruct the S950 to play the sample through to
the end and then, while you keep your finger on the keyboard, It can repeatedly
play the last half second of the sample. In this way, you would get the breathy
attack of the flute followed by a smooth sustained tone. Well, that's the
theory - In practice, it can be more difficult.
You see, many sounds, especially acoustic sounds, can have quite varying
amplitude levels and these can be difficult to loop because the loop will be
,dumping abrubtly from one level to another giving rise to unpleasant clicks or
'glitches' as they are called in sampling terminology (see Fig. 1). The length
of this loop is set using, not surprisingly, a parameter called LOOP LENGTH.
24
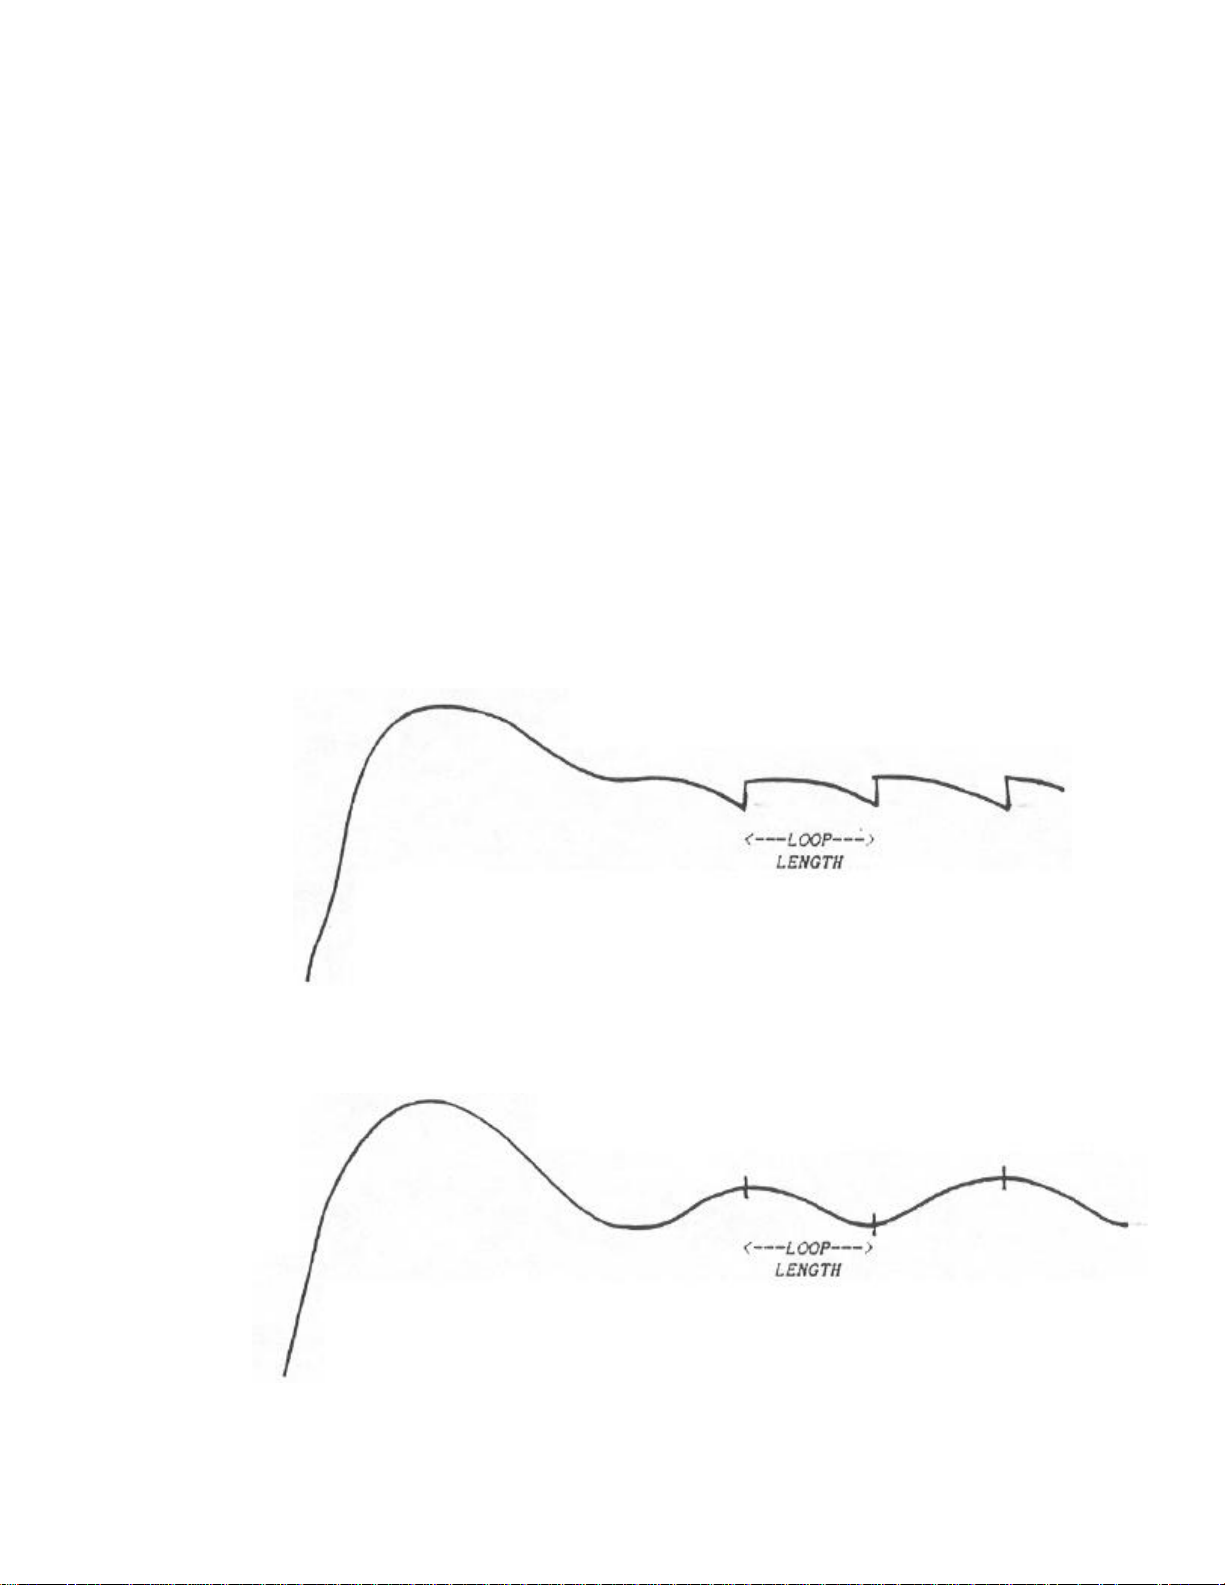
The art of looping is to find two points in the sample which ere of a similar
level so that the end of the loop and the start of the loop are matched (see
Fig. 2) - this 1s called a ZERO CROSSING POINT. Sometimes, this can be easy
to achieve, sometimes it is impossible. To help you with this sometimes
tedious task, the S950 has an AUTOLOOP function where the S950's computer
will automatically look for a good zero crossing point and loop the sound for
you. Sadly, there is only so much a computer can do in the case of a
difficult sound end so the S950 has two looping modes which we looked at
above on Page 4 of EDIT SAMPLE. Mode 2 - LOOPING - will loop the sound as
described immediately above - i.e. the sound will play from start to finish
and then ,lump beck to the point in the sound defined by the LOOP LENGTH
parameters. Made 3 - ALTERNATING - rill cause the sound to play beck to the
end and then, instead of ,lumping beck to the start of the loop, It will play
the loop backwards and then it will play it the right way round then
backwards then forwards then backwards, etc., for as long as you keep your
finger on the keyboard. This is also known as a BACXWARDS/FORWARDS loop and
can certainly help in looping sounds that would otherwise be difficult to
loop using ,lust the normal looping mode. Figs. I and 2 show the difference
between the two modes and you can see how the alternating loop has smoothed
out the loop portion of the sound. In conjunction with the AUTOLOOP function
described above, good loops ere often easy to ttain. But even this is
sometimes not enough to loop certain sounds, especially harmonically rich and
varying sounds so the S950 has one further old in the search for the perfect
loop celled CROSSFADE LOOPING.
FIG. 1 - Normal looping. Note the abrupt level changes giving rise to
'glitches'
FIG. 2 - Alternating or back wards/ forwards looping of the same sound. Note how the
level changes are smoothed out gluing a glitchless loop.
25
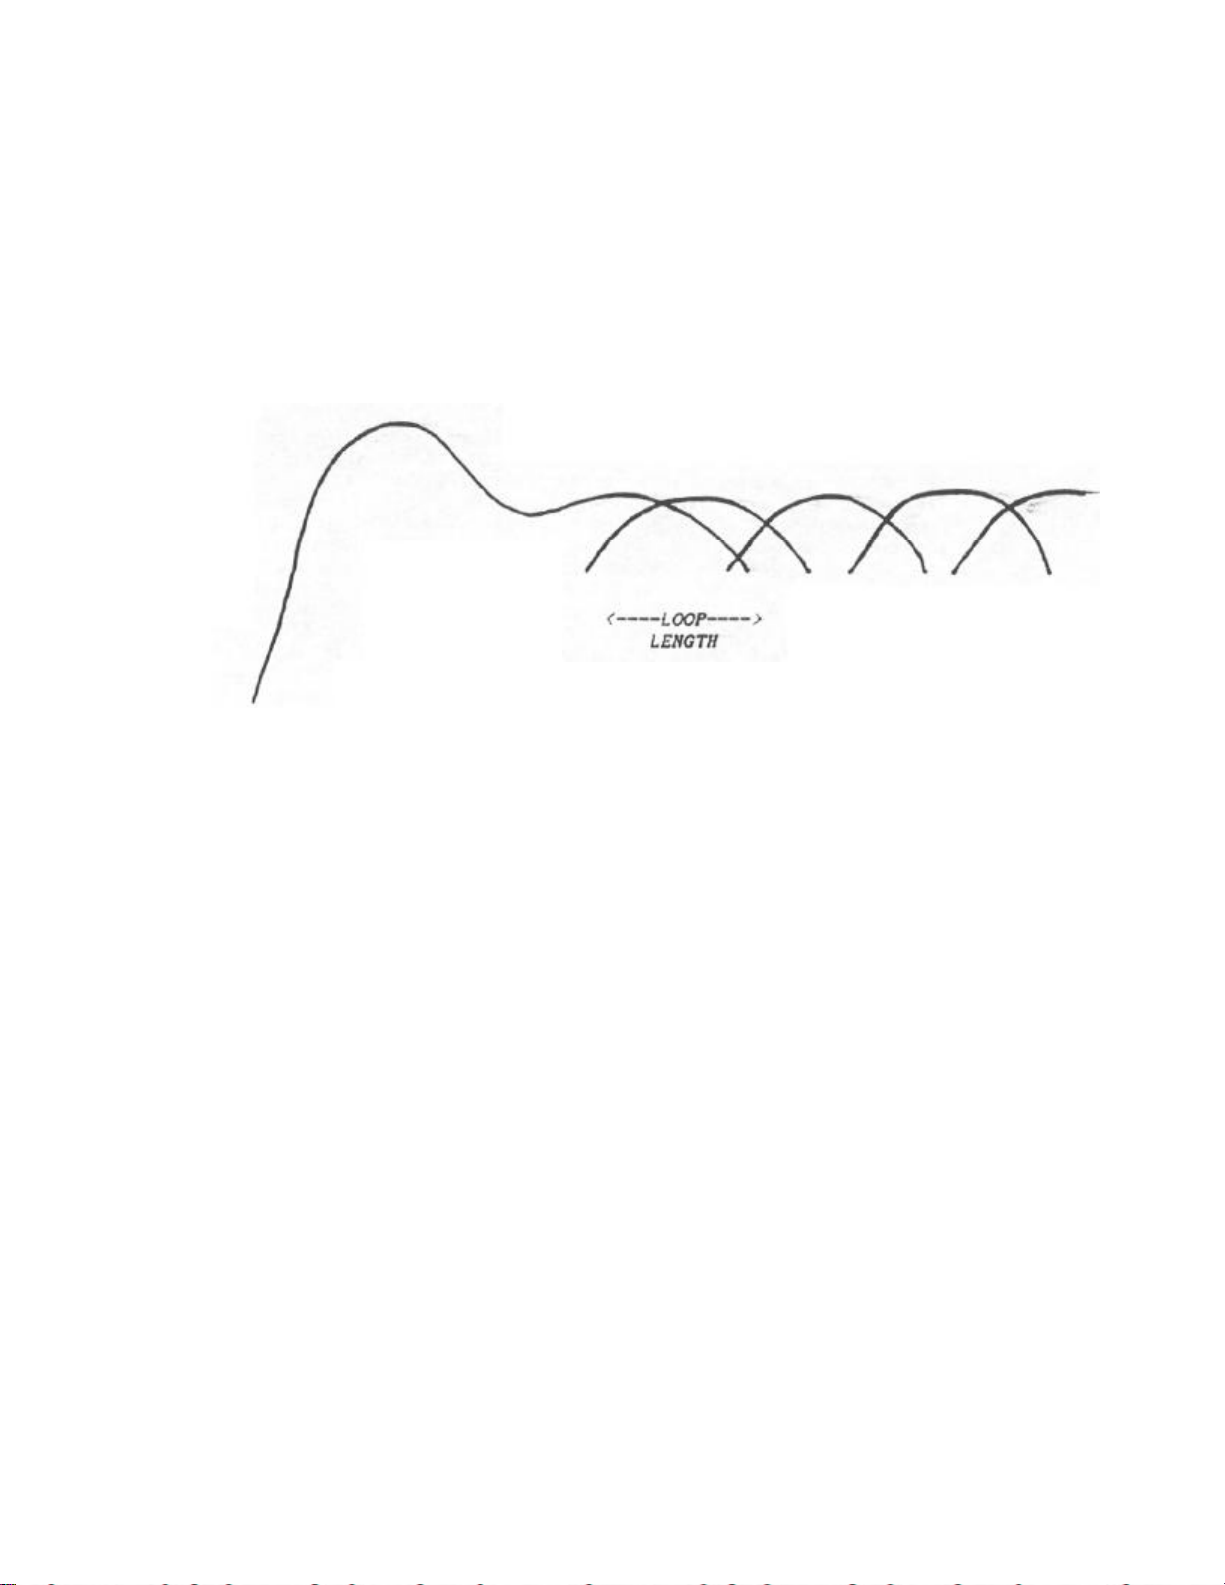
CROSSFADE LOOPING allows you to fade out the glitches that may be present In
a loop. Basically, when you employ crossfade looping, the sound plays to the
end of the sample and then, instead of the sample jumping back to the start
of the loop, the sound begins to fade away as the start of the loop fades in.
At the end of the loop, the loop again fades away whilst the start fades in
(see Fig. 4) - In this way, the nasty clicks end thumps caused by abrupt
amplitude changes at the loop points are faded out enabling a much smoother
loop to be created. This mode is certainly the best for attaining a perfect
loop end even difficult sounds such as thick strings, brass end vocals,
amongst others, can easily be looped and you won't spot the join!
FIG. 3 - Crossfade looping where the start of the loop crossfades with the end
of the loop eliminating glitching.
Utilizing all the various looping modes such as AUTOLOOP, ALTERNATING LOOP and
CROSSFADE LOOPING, the otherwise arduous task of looping a sound is made a lot
easier for you. having said that, some sounds will still be difficult to loop
but this Is not a falling of the S950 or yourself but the sound. On occasions,
even the wealth of technological assistance That the S950's looping functions
offer can encounter sounds that remain stubborn but, as we shall see 1n the
ADVANCED APPLICATIONS GUIDE, there are ways to mask the effect of an awkward
loop.
Bearing ell this In mind, then, we can now move to the next group of pages
which deal with the looping functions on the S950.
Page 08 will display:
>08 LOOP LENGTH #Coarse #Fine #AUTO
<# - #,###) ^,^^^ (ENT)
where '#' is the maximum loop length possible and '^' are the current loop
length setting (default on a new sample is 2,000).
Note: To loop a sound, we must first go back to Page 04 of EDIT SAMPLE using
the 'page up' button and select either 2 (LOOPING) or 3 (ALTERNATING). You can
now return to Page 08 using the 'page down' button.
26

The various functions in Page 08 are as follows:
'Coarse' allows you to set a rough loop length and 'Fine' allows you to set a
finer resolution of loop length. The autoloop function is selected using the
ENT button when the cursor is in the AUTO field.
To set a loop, first move the cursor to the Coarse field by pressing the
'cursor >' button once - the cursor will flash on the first number underneath
Coarse. You can now set a loop length as long as the figures displayed
underneath LOOP LENGTH using either the keypad or the CONTROL knob. To set a
finer resolution of loop length, move the cursor one position to the right
using the 'cursor >' button and, again using the keypad or CONTROL knob, you
can change the data displayed. You might now like to try and play the keyboard
to see how it sounds. You should find that the sound will play through to the
end and will sustain for as long as you keep your finger on the keyboard but
the sustain portion is possibly clicking or thumping or generally glitching.
You can now move the cursor to the AUTO field using the 'cursor >' button and
by pressing the ENT button, the S950 will search for a better loop. You will
note that the loop length you set gets smaller. Try playing the keyboard again
and see if the loop has improved. If it hasn't, hit ENT again and the loop
length will get smaller as the 950 looks for a better loop. Keep repeating this
process until you end up with a satisfactory loop.
Note: It is a good idea to make either a mental or written note of loop lengths
that the autoloop may select as the next choice it makes might not be as good
as the last and you will be able to return to that loop length 1ater.
It could be, as mentioned. above in 'ABOUT LOOPING', that the autoloop function
may not be able to find a smooth loop due to the nature of the sound so it
might be wise to try using the ALTERNATING mode instead. If all else fails, you
can try using CROSSFADE LOOPING described below.
Let us now move to the next page using the 'page down' button. The display will
read:
>09 CROSSFADE LOOP. #Name NEW SAMPLE
X-fade length 32000 #Execute Mem 0%
In this page you can execute a crossfade loop.
To do this you must first make a copy of the sample to be crossfade looped so,
using the LETTER button, create a new sample name and press ENT. You can now
move the cursor to the X-fade length field using the 'cursor >' button. Data
can be input using the keypad or the CONTROL knob. Once you have set the
crossfade loop length, move the cursor one position right using the 'cursor >'
button and hit ENT. There will be a pause while the 5950 calculates the
crossfade loop. To hear the fruits of your labours, hit EDIT SAMPLE to take you
Page 01 and select the new sample with the crossfade loop. By playing a note on
the keyboard or by pressing the PB button, you should find that your loop has
been smoothed out considerably. If it hasn't, delete this sample, go back to
the original and then repeat the crossfade loop procedure selecting a different
loop length.
27

Note: Because the crossfade loop function requires that you create a new
sample, if the S950 already has a memory full of samples, this may not always
be possible and the display will tell you that memory space is full. If this
occurs, delete some samples (ensuring that they hove first been saved to
disk, If necessary! so that you make room for the new crossfade loop sample.
The field marked MEM on Page 09 will tell you how much memory the S950 has
available for the creation of a new sample.
The next page displays:
>10 #Resample at half bandwidth (ENT)
#Discard before start, after end (ENT)
This page allows you to make economical use of the S950 memory. The top line
allows you to resample the sound at half the original bandwidth and this will
free up more memory although the tonal qualities of the sound may suffer. To
use this function, simply move the cursor to the ENT field using 'cursor >'
and hit ENT - after a short pause, the sample will be available but at half
its original bandwidth.
The discard function is similarly executed. Move the cursor to its ENT field
using the 'cursor >' button and hit ENT. Anything you have edited out of the
sound in Pages 06 and 07 will be erased from memory, thereby freeing up more
memory space.
Note: Both of these are destructive functions end there is no way of
retrieving the original sample after they have been carried out so it would
be wise to save that sample to disk before using this function in case the
results are not satisfactory.
The next few pages allows you to merge two samples together to create
interesting composite sounds.
Moving to the next page using the 'page down' buttons, the display will read:
>11 SPLICE #2nd sample name SAMPLE 2
X-FADE #New sample name NEW SAMPLE
The top line of the display allows you to select which sample in the S950
memory is going to be used as the second sample in the splice whilst the
bottom line allows you to name the new sample that will contain both samples
- like the crossfade looping function, splice crossfade. requires that you
create a new sample so make sure you have enough free memory in the S950.
To select the second sample in the crossfade splice, move the cursor to the
SAMPLE 2 field using the 'cursor >' button and scroll through the samples
using the CONTROL knob. When you have chosen your second sample, move to the
NEW SAMPLE field and name the new sample in the usual way.
28

You can now move to the next page which displays:
>12 #Splice crossfade time, (points)
(0 - 0> 1000
This allows you to set (in sample points) the length of time over which the
crossfade will occur. To achieve this, move the cursor one position to the
right using the 'cursor >' button and enter a suitable value using the keypad
or CONTROL knob. When you have done this, move to the next page which will
read:
>13 (SPLICE ORDER: 1st then 2nd (1),
2nd then 1st (2), Together(3) Mem O%
This page allows you to specify which order the samples are to be played in
the crossfade. Mode 1 will play the sound currently selected in EDIT SAMPLE
followed by the sound selected on Page 11. Mode 2 will play the sample
selected on Page 11 followed by the sample currently selected whilst Mode 3
will play them together. To execute this, move the cursor one position right
using 'cursor >' and select the required mode, 1, 2 or 3. After a short
pause, the spliced sample will have been created and to hear it, hit EDIT
SAMPLE and select the new sample on Page 01. If this is not to your liking,
erase the new sample and repeat the procedure entering a different crossfade
time.
Note: As above in crossfede looping, it is necessary to create a new sample
for splicing. If you don't have enough memory, the S950 will not be able to
create the new sample so it may be necessary to delete some samples form
memory.
Also, when you splice two samples together, the original pitch of the sample
is retained. If for example, you splice two samples together, one of which
was sampled on C3, the other on G3, the resultant splice will play the
samples a fifth apart, even If you retune the NOM PITCH of the second sample
on Page 3 of EDIT SAMPLE. If you intend to sample two sounds specifically for
splicing, ensure that they ere sampled on the seine note.
The next page is all to do with TIMESTRETCH.
Timestretch is a facility that allows you to either lengthen or shorten a
sample without changing that samples pitch over a factor of 999% <i.e a one
second sample can be stretched to a maximum length of nearly 10 seconds).
There are many uses for this technique. Firstly, it is possible to change the
tempo of a sampled drum loop without changing its pitch. Alternatively, it is
possible to change the pitch of the drum loop and then change it back to its
original tempo. It can also be used to lengthen samples so that, as you go
higher up the keyboard, the sample length remains constant. It is also
possible to lengthen or shorten backing vocals which could be 'spun in' in an
extended remix. With the EXM006 memory expansion boards fitted it could be
used in audio/visual applications to change the overall time of a voice-over
without changing pitch - you could even change the playing time of a jingle
without changing pitch. Similarly, you could transpose the pitch of the
jingle and then revert to its original tempo.
29

Move to Page 14 using the 'page down' button and the display will read:
>14 STRETCH #New name NEW SAMPLE #200%
D-time 1000 #Auto D_ 4Monl/Pol2 2 #Do_
As with crossfade looping and splice crossfade, it is necessary to create a new
sample so move the cursor one position to the right by pressing the 'cursor >'
button and enter a new name in the usual way and hit the ENT button. Now move
the cursor one more position right and select the' percentage by which you want
to stretch or compress a sample.
Note:. as you have to create a new, longer sample it is quite feasible that
you may not have enough memory. Ensure, then, that if you are stretching a
sample, particularly a long one, that you have enough free memory to
accommodate it. If you do not have enough memory, the display will tell you.
The next field allows you to set what is known as a D-TIME. When you stretch a
sample, you are basically instructing the S950's computer to play the sample
and, in order to lengthen it, to fill it in with bits of information thereby
making it longer. Compressing a sample removes certain bits of information so
making it shorter. With extreme timestretch values, the end result can
sometimes sound slightly metallic. The D-TIME function smooths things out
allowing you to suppress this effect. Longer, D-TIME values will give the
sample a slight tremolo effect whilst shorter D-TIME values give rise to the
metallic effect. Select a D-TIME value as you think appropriate. Of course,
this only happens on extreme stretch or compression percentages. To further
assist you in selecting a suitable D-TIME, there is an AUTO-D function which,
like autoloop, gets the S950 to select a suitable D-TIME value.
The next field, Monl/Po12, allows you to select whether the sample you are
stretching or compressing is a monophonic or polyphonic sample. The 'Monl'
setting is more suitable for lengthening a single tone whilst the 'Po12' is
better suited to lengthening polyphonic samples such as backing vocals, drum
loops, etc.. It is best just to experiment with the various options until you
arrive at the best sounding result.
To change the data in any of these fields, move the cursor to the appropriate
position and change the value displayed using the numeric keypad. When you
have done this, move the cursor to the 'DO' field and press ENT and the S950
will pause for a short while whilst it calculates the new sample (the EDIT
SAMPLE light will remain lit). When this is done (i.e. when the EDIT SAMPLE
light begins to flash again), hit EDIT SAMPLE and select the new sample on
Page 01. Play a note on the keyboard or hit the PB button to hear- the
results. If you are not happy with the new sample, delete it and select the
original sample to repeat the procedure.
Note l: Tlmestretch will require some experimentation. It is not unlike looping
in this respect and you may need several tries at it before you get a
timestretch sample sounding just right. Bear in mind what is going on here in
this process and realize that you can only expect a sample to be stretched or
compressed a certain amount before some degree of irregularity in the samples'
tone becomes apparent.
Note 2: The looping for the stretched/compressed sample will remain the same as
the original samples. As a result, if the original sample was looped, you will
have to edit the new timestretched sample and change its loop length to
something more suitable.
30

That concludes our examination of EDIT SAMPLE. As always, the default
settings in this mode have been well chosen and it is probable that, in the
majority of sample editing situations, you will only need to edit start time,
end time and looping with the rest of the functions being used for special
applications. Having now seen how to sample a sound and edit it, we can now
move on to EDIT PROGRAM where we can further refine the sample (s) we have
taken.
31

EDIT PROGRAM
Once you have your sample(s) In the S950, you will want to organize them so
that they are properly laid out across the keyboard. All this and more is
done in the EDIT PROGRAM mode using KEYGROUPS. We have already had a brief
look at what a keygroup is in the S950 BASIC ARCHITECTURE section of this
manual but before we go on to see what EDIT PROGRAM has in store for us, let
us first find out what a keygroup actually is.
A keygroup is something into which you place a sample within a program. The
keygroup can be given a highest and lowest note assignment and so can be
spread out across the keyboard in any number of configurations. The simplest
program you could have would be to have one sample in one keygroup spread out
across the entire range of the keyboard. A more advanced program would be to
have keygroups assigned to individual notes or groups of notes with a
separate sample in each one so that each note or group of notes on the
keyboard has a different sample on it. This particular application, known as
MULTI-SAMPLING, is useful in sampling certain instruments such as vocal
sounds, piano, guitar, etc., that require a series of different samples
across the keyboard range because the tonal quality of these sounds changes
when a sample is transposed too far from the original pitch. This technique
is also useful for creating drum programs where every drum. can be assigned
to a different note on the keyboard.
Using the keygroups, it is also possible to create split keyboard effects
where you could have, for example, bass guitar on the bottom two octaves and
piano on the top three octaves. It is also possible to layer two keygroups
on- top of each other for layering and chorus effects. Furthermore, a
keygroup can have two totally separate samples within it each of which can be
sounded depending on how hard you hit the keyboard this is known as VELOCITY
SWITCHING where attack velocity switches in one of the two samples depending
on the force with which the keyboard is hit. The prime application of this is
to take a soft sample of a sound and a hard sample of a sound to reproduce
the tonal differences in their dynamic range. For example, you may take a
sample of n softly plucked bass guitar and a slapped bass guitar and you
could switch between them using keyboard dynamics. Alternatively, for special
dynamic effects, the two samples switched using keyboard velocity could be
distorted guitar and feedback or damped and open 'picked guitar or they could
be two different slightly different drum sounds for more authenticity when
creating drum programs. They could even be totally different sounds such as
strings and brass - the possibilities are endless)
As if all this weren't enough, a keygroup allows you to modify the sample
itself and it is possible to affect loudness, adjust the tone with a filter
and tune the sample as well as add amplitude and filter envelope shaping,
vibrato and pitch sweep. You can also assign individual keygroups (and hence
the samples within them) to separate MIDI channels and audio outputs for
mufti-timbral sequencing. EDIT PROGRAM, therefore, is the key to getting the
raw samples sounding great. And remember, because ail the parameters in EDIT
PROGRAM are simply processing variations, those raw samples are not affected
and so you can create any number of variations on one sample without using
any valuable memory.
Having understood that, let us now see what facilities we have to play with
in EDIT PROGRAM.
32

When you hit the EDIT PROGRAM button, the first page displayed reads:
>01 #Select, Copy ##########
PROGRAM #Rename, Delete(-) ##########
where ########## 1 s the program name.
As in EDIT SAMPLE, this allows you to select a program for editing and to
copy, rename and delete a program. if you wish to select a program, move the
cursor one position to the right using the 'cursor >' button so that the
cursor is flashing on the first letter of the program name. You can now
scroll through the programs in the S950 using the CONTROL knob and hitting
ENT when you have found the program you want. To copy a program you simply
type in the new program name using the LETTER button and hit ENT when that is
complete.
To rename a program, you move the cursor to the bottom line using the 'cursor
>' button and, using the LETTER button, give the program a new name, hitting
ENT when that is done. To delete a program, use the - button and ENT to
delete the selected progam. For more detailed information, refer to Page 01
of EDIT SAMPLE which is exactly the same.
Note: There is no 'program Initialize' function. To create a brand new
program from scratch, you must either copy or rename another program (the
TONE PROGRAM, for example) end use that as the basis of your new program.
When you have finished in this page, you can move to the next which will
display:
>02 #MIDI prog 1 #Key-loudness +00
#Positional crossfade OFF
In this page you do a number of things. Firstly, you can set the program
number that this program will respond to over MIDI. For example, the
currently selected program may be program number 4 in the 5950 but you want
to use it with program number 35 on your controlling synth or keyboard. To do
this, simply move the cursor to the MIDI prog field and change the number 1
to 35 using the CONTROL knob or keypad. Whenever you call up program 35 on
your MIDI controller, this program will be recalled. Each program in the S950
can be assigned its own MIDI program number for recall using the MIDI
controller.
Key-loudness refers to the volume of the sound over the keyboard range. For
example, you may have a sound that is too loud down in the bottom octaves and
drowns out the notes in the top registers - moving the cursor to the
key-loudness field using the 'cursor >' button, you can set a value using the
CONTROL knob or the keypad that will compensate for this. A value of +00 will
have no effect on the level of the sample across the keyboard range whilst a
value of -50 will reduce the level in the upper octaves and increase the
level in the lower octaves. Conversely, a value of +50 will increase the
level of the upper octaves and decrease the level in the lower octaves.
Positional crossfade is a facility whereby you can overlap two keygroups and,
with positional crossfade set to ON, as you go from one keygroup to the
other, they crossfade with the one keygroup fading out and the other keygroup
fading in. This can be especially useful when using multi-samples of one
instrument because sometimes the change in tone from keygroup to another can
seem abrupt. Positional crossfade will smooth these transitions
33

out resulting in a more consistent tonal change between keygroups. To switch
positional crossfade on, move the cursor to where it says OFF end press the
ON button.
Fig. 1 - Positional crossfade
You can now move to the next page using the 'page down' button. This will
display:
>03 KEYGROUP: #Select ( 0 to #) ^
where # is the number of keygroups in the selected program and t is the
currently selected keygroup.
This page allows you to select a keygroup to edit as well as copy and delete
individual keygroups. It is also possible to insert a keygroup from another
program into the currently selected program using the GET function and you
can also place a keygroup from the currently selected program into another
program using the PUT function.
To select a keygroup, simply move the cursor to 'Select' by pressing the
'cursor >' button and if there is more than one keygroup in the program, you
can scroll through them using the CONTROL knob or you can select keygroups
with the keypad. You will note that it is possible for you to edit all
keygroups simultaneously when the display reads 'ALL' - this makes 'global'
editing of the program easier. For example, you may want to change the attack
time of all the keygroups - Instead of laboriously editing each one
separately, you can edit them en masse using the ALL selection.
#Put- #Get_ #Copy (+>, Delete <->
34

To copy a keygroup, simply move the cursor to 'Copy (+>, Delete <->' using the
'cursor )' button and press the ON(+) button - this will copy the currently
selected program (note: if your se lection is ALL, this function will not copy
ell the keygroups). To delete a keygroup, simply press the OFF(-> button and
this will delete the selected keygroup.
The PUT/GET function available on this page is invaluable in making or editing
programs that have similar parameters to other programs. For example, you may
be creating or editing a drum program and you want to 'grab' the snare drum
from another program complete with the envelope shaping, tuning, volume end
other keygroup parameters from another drum program currently in the S950.
To achieve this, follow this procedure:
Select the source program (i.e. the program where you want to take the keygroup
from) and go to Page 03 and move the cursor to the 'Select' field to select the
keygroup you want to copy to the other program. When you have done that, move
the cursor to the PUT field and press ENT. Now go back to Page 01 by pressing
EDIT PROGRAM and select the program in which you wish to place that keygroup in
(i.e. the one you were editing/creating). Go to Page 03 and move the cursor to
the GET field and press ENT. You have now copied a keygroup from one program to
another.
IMPORTANT NOTE FOR PAGES 04 to 16
The display shows the currently selected keygroup number underneath each page
number. To change keygroups at any time,. Instead of constantly returning to
Page 03, you can move the cursor one position to the right end select a new
keygroup using either the CONTROL wheel or the keypad. This will speed up your
program editing enormously as well as allowing you to compare different
keygroups parameters with the minimum of button pressing.
The next page, Page 04, allows you to adjust the velocity threshold for
velocity switching and will look like this:
>04
#KG# #Velocity switch threshold 128
where # is the currently selected keygroup.
As you play the MIDI keyboard, it produces a stream of numbers that corresponds
to your playing dynamics. These numbers can be anywhere between 0 and 128 with
0 representing a soft keystrike end 128 representing a hard keystrike. With the
velocity switch function, you may select a value below which only a soft sample
will play and above which only the hard sample will play. This is normally used
to more accurately reproduce the sampled sounds dynamic range but it can be
used for other effects as well such as the muted/picked guitar effect described
earlier. Of course, there is nothing to stop you switching between two totally
different samples such as strings and brass, for example.
To change the data, first select the keygroup you wish to edit by moving the
cursor one position to the right and then move the cursor to the data field
using the 'cursor >' button and input a value using the CONTROL wheel or the
keypad.
35

Note: A setting of 128 will only play the soft sample since 1t is not
possible to play a herd sample with a velocity value of more than 128.
Similarly, a velocity switch threshold of 000 will only play the hard sample
as it is not possible to play a soft sample softer then 000.
Now move to Page 05 which will display something like:
>05 fSoft sample TONE at C3 60
*KG# Low key CO 24 #Hi key GS 127
where # is the currently selected keygroup.
This is a very important page as it is here that you map your keygroups (and
hence individual samples) across the keyboard range and it is possible to
assign a keyboard range of as much as seven octaves or as little as one note.
To assign a sample to a keygroup, first select the appropriate keygroup by
moving the cursor one position to the right using the 'cursor >' button and
make your selection using either the CONTROL knob or the keypad. Now move the
cursor one more position to the right and use the CONTROL knob to scroll
through the samples in memory. When you have found the required sample, press
ENT and this will place the chosen sample in that keygroup. To assign the
samples lowest note, move the cursor to 'Low key' and use either the CONTROL
knob or a three digit number on the keypad to set the lowest note. To adjust
the highest note for the sample, move the cursor to 'Hi key' and enter your
note value using the CONTROL knob or a three digit number on the keypad.
You will notice that for every sample you select in any keygroup, this page
will also show you that samples base note or nominal pitch (i.e. the key it
was sampled onto) in the top right hand corner of the display. This is very
useful in setting up a program that uses extensive multisampling.
(Note: If you have set a velocity switch threshold of 000 on Page 04, this
page will display "No soft sample, vlcty thrsh = 0")
Having placed your sample and assigned its upper and lowest note ranges, you
can now move to the next page which will display:
>06 S Loudness iFilter *Transpose *Fine
#KG# +00 99 +00 +00
where # is the currently selected keygroup.
This page allows you to effect the loudness, tone and tuning of the soft
sample. To do this, simply select the appropriate keygroup by moving the
cursor to the KG field and then move the cursor to the Loudness field and
make your data entry using the CONTROL knob or the keypad in conjunction with
the + or - buttons. You can then move the cursor one position to the right to
affect the filter settings (and hence the samples tone) and you can tune the
sample up or down 50 semitones using the Transpose field and you can fine
tune the sample using the Fine field.
This page is very important in a mufti-sample program as you can balance the
respective levels of every sample, adjust the tone so that timbre is uniform
from one keygroup to another and you can transpose and fine tune individual
keygroups using the transpose and fine tune parameters. Of course, if you
wish to affect all keygroups simultaneously with any of these parameters,
select ALL in the KG field and edit the data as you wish.
36


In this way, you could, for example, transpose the whole program up an
octave or any other interval or you could fine tune the program so that it
is in tune with other programs in memory. You could also turn the whole
program up or down in level to balance the program against other programs.
Note: The loudness parameter is a MIDI velocity based parameter. If it is
set to +50, keyboard velocity dynamics will have no effect on the keygroups
loudness. If this Is a problem when you wish to make a particular keygroup
louder, it Is suggested that you turn the other keygroups loudness down.
The next two pages, 07 and 08, are concerned with the hard sample if
velocity switching is used. These two pages are identical in their function
so please refer to the information given about Pages 05 and 06 above.
Page 09 is used to adjust the filters ADSR settings and the display reads:
>09 VCF #Attk tDcay tSstain fRlse tAmnt
tKG# 20 20 20 20 +00
where # is the current keygroup selection.
The filter in Pages 06 and 08 can be controlled by this envelope generator
which allows control over attack, decay and release time and also sustain
level. The amount of effect this ADSR generator has on the filter is governed
by the AMOUNT (Amnt) parameter which can have a positive or negative going
effect on the filter. This envelope generator has a number of uses. Firstly,
It is possible to treat the 5950 like a conventional analogue synthesizer
adding filter sweep effects to any samples. Alternatively, it can be used to
'shape out' any noise that may be present at the end of a decaying sample.
To adjust the parameters, first select the appropriate keygroup in the usual
way and then move the cursor across the screen using the 'cursor >' or left
buttons making your data entry using the CONTROL wheel or the keypad.
Note: The effect that these controls have on the filter is very dependent on
the filter settings in Pages 06 and 08. With the filter settings et 90 or
more, the envelope will be unable to sweep through the filters cutoff
frequency because it is already at maximum. Hence, the filter value on pages
06 end 08 will have to be reduced to have any effect. Having said that, this
only applies to positive values entered in the 'Amnt' field on Page 09 (i. e.
+01 or more). If you went an inverted filter sweep (i. e. an 'Amnt' value of
-0l or more), you will have to set the filter parameters in Pages 06 and 08
fairly high. Here ere some rules of thumb about filter sweeps.
1: For, a wide positive going sweep, set the FILTER parameters low and the
AMOUNT parameters high 0.e +50).
2: For a mild positive going filter sweep, set the FILTER parameters between
medium and three quarters and set a medium level of AMOUNT.
3: For a wide negative going filter sweep, set the FILTER parameters high and
the AMOUNT parameter to a high negative value (I.e. -50).
4: For a mild negative going sweep, set the FILTER parameters three quarters
to high and a medium level on negative going AMOUNT CI. e. -25)
37


Variations on those should be experimented with for a wide range of filter
effects.
Let us now move to Page 10, the amplitude envelope settings. This page looks
like this:
>10 ENV ;Attack *Decay *Sustain (Release
#KG* 0 80 90 30
where # is the current keygroup selected.
This page. is similar to Page 09 except that this envelope generator affects
the overall amplitude of the keygroup. As well as restoring the natural
envelope of a looped sound, this page is useful for adding new and
interesting envelope shapes to samples and such things as 'bowed piano' are
possible where a piano sample is given a slow attack. This page is also
useful for fading out noise at the end of a sample.
As above, data entry is made by selecting the required keygroup in the KG
field and moving the cursor across the display in the usual way with the
'cursor >' or left buttons.
ABOUT ENVELOPE GENERATORS
The envelope generator is en extremely Important item when synthesizing or
sampling a sound as they allow you to modify the way !n which the sound is
presented to us. For example, a drum sound starts instantly and dies away very
quickly and this is true of most percussive sounds. A violin, however, starts
slowly, sustains for as long as the player bows and then dies away quickly
whilst a piano starts quickly end dies away over a long period of time,
sometimes many seconds. This method of presentation is known as the envelope
end ell synths end most samplers allow quite intricate control over a sounds
envelope. Of course, the beauty of synths and samplers is that It is possible
to apply the envelope of one instrument on another so that we end up with the
bowed piano example given above or we could have e super percussive guitar.
An envelope can be broken down Into four main portions:
ATTACK - This is the time !t takes for the sound to reach its full volume.
DECAY - This is the time it takes for the sound to die away to its sustain
level.
SUSTAIN - This is the level et which the instrument will sustain during held
notes.
RELEASE ° This Is the time it takes for the sound to die away after the note
has finished.
By controlling these parameters, it Is possible to recreate the envelopes of a
wide range of acoustic instruments as well as create some unusual synthesised
effects.
38


Furthermore, most, if not all acoustic instruments exhibit tonal envelope
changes where the tone varies during the course of a note. By providing a
separate envelope generator for the filter, we ere also able to imitate
these effects as well as set up some interesting, electronic effects.
The next page is concerned with the velocity parameters of a keygroup ° l,e
how keyboard dynamics will affect the sound. The display reads:
>il VLCTY Loudness 30 (Attack 0
#KG# SENS Filter 10 #OFF* Release +00
where # is the current keygroup selection.
The parameters function as follows:
LOUDNESS: This allows you set the amount with which velocity will affect a
keygroups volume. With a setting of 00, velocity will have no effect whilst a
setting of 99 will make that keygroup extremely sensitive to velocity.
Default is 30 and gives an average range of velocity extremes.
FILTER: This allows you to modify tone using keyboard velocity. It is common
on most acoustic instruments that their tone will be brighter if played
harder. Similarly, tone is usually softer if the sound is played quietly.
Using this parameter, you can duplicate this effect using keyboard velocity.
As above, 00 represents no effect and 99 represents the most sensitive.
(Note: If the FILTER setting !n Pages 06 and 08 are set to 99, this
parameter will have no effect, however high you set it. To hear the effect,
reduce the FILTER setting in Pages 06 and 08).
ATTACK: This allows you to control the envelope generators attack time using
velocity. This can be especially useful on woodwind and string sounds where
attack time varies with dynamics. With a setting of 0, no effect will be
heard whilst a setting of 99 will have the most effect.
(Note., If attach times are set to 00 on pages 09 end 10, this parameter
will have no effect. To hear velocity control of attack time, set the
envelope generators attack times to around 20 et least).
39


RELEASE: This allows you to control release time using keyboard velocity. A
setting of +00 will have no effect whilst settings of +50 will give the
effect that releasing the keys quickly will give long release times. Values
of down to -50 will have the reverse effect and release time will be shorter
when you take your fingers off the keyboard quickly. (Note: Release times on
both envelope generators have to be set to at least 50 to hear this effect)
OFF: Not all keyboards have release velocity so this function allows you to
use attack velocity to control release times. Selection is made using the
ON(+> or OFF(-> buttons.
All data entry is made in the usual way. First, select the keygroup you want
to edit using the KG field and then move the cursor across the screen using
the 'cursor > and/or <' buttons. Data can be input using the CONTROL knob or
the keypad. The default settings have been sensibly chosen on this page and
it is often unecessary to have to change any of them. As a result, you can go
to the next page which displays:
>12 WARP *Velocity 0 Time 99
#KG# *Attack offset +00
This allows you to add a pitch sweep to a note's attack so that the sound
starter slightly sharp or flat depending on the settings of this page. This
can be used to create more realistic brass, sax and vocal and choir effects
as well as a whole variety of special effects. It can also be used to add
pitch bend to drums to add some 'zest' to a badly tuned kit.
Data is input in the usual way by selecting the required keygroup and moving
the coursor across the display using the 'cursor > and/or <' -buttons and
entering numeric values using the CONTROL knob or the keypad. The various
fields offer the following facilities.
VELOCITY: This field allows you to vary the effect of pitch warp using
keyboard attack velocity. 0 = no effect. Of course, this parameter will have
no effect regardless of its settings if the ATTACK OFFSET field described
below is set to 00.
TIME: This sets the length of time the pitch bend takes. 0 = short with pitch
bend times getting longer with higher settings.
ATTACK OFFSET: This sets the amount of pitch sweep. Negative going values
(i.e. -50> give an upwards rising pitch sweep whereby the pitch slides up to
the note and positive going effects (i.e. +50> have the opposite effect with
the pitch sliding down to the note.
The next page is also concerned with pitch sweep effects and is where you can
set the parameters for the Low Frequency oscillator or LFO. The page rends:
>13 LFO (Depth #Rate *Delay +Desync
fKG# 0 42 64 ON
where # is the currently selected keygroup.
As usual, data can be input by selecting the appropriate keygroup and moving
the cursor to the required fields using the 'cursor < and/or >' buttons and
then setting parameters using the CONTROL wheel or the keypad. The functions
are fairly self-explanatory and are:
40


DEPTH: This sets the amount of LFO sweep. 0 = no effect with modulation depth
increasing with higher numeric values. With any value higher than 1, the LFO
effect will be n permanent part of the sound.
RATE: This sets the speed of the LFO pitch sweep. 0 = very slow and the LFO
rate gets faster as you increase the settings (note: the ranges of 30-45 are
recommended for typical vibrato effects).
DELAY: ,This sets the time it takes for the LFO to fade in with its effect.
This is particularly useful for natural vibrato effects if yuu are not able
to use the modulation wheel.
DESYNC: There are no less than 8 LFO's in the S950, one for each voice. When
DESYNC Is ON, these LFO's run slightly out of phase with each other allowing
you to create more natural ensemble vibrato effects. With DESYNC OFF, the
LFO's are phase locked and so produce LFO effects more like those found on
synthesizers that normally only have one LFO to affect all voices.
DESYNC is switched on or off using the ON and OFF buttons.
The next page, Page 14, is also to do with the LFO and looks like this:
>14 LFO DEPTH #Aftertouch *Mod wheel
IKG# 0 50
where # is the current keygroup selection.
This page allows you to add vibrato and other LFO effects over and above
those set in the DEPTH field on Page 13 using aftertouch (if your keyboard
generates it, of course) and/or the modulation wheel. The display shown is
the default and so will not require much, if any editing. As you would
assume, higher values on either of these parameters increases the amount of
effect either aftertouch or the mod wheel will have on the introduction of
LFO effects.
The next page allows you to control tone over the keyboard range as well as
turn the keyboard off and looks like this:
>15 *Key-filter ;Const pitch *One-shot
*KG# 50 OFF OFF
where, once again, # !s the current keygroup selection.
KEY-FILTER is similar to the 'keyboard track' control available on every
analogue synthesizer and this allows you to vary the tonal balance across the
keyboard. This can be useful when using certain samples that 'screech' in the
upper reaches of their range or samples that are noisy when played a few
octaves down. By setting a higher key-filter setting, the sound will get
mellower further up the keyboard. A setting of 00 has no effect on the sound.
The default is 50 and can usually be left.
The CONST PITCH field allows you to effectively turn the keyboard off so that
it will have no effect on the pitch of the sample. This can be useful in a
number of ways. Far example, with a drum program, it is often desirable to
place certain drums over a small range of notes in order to play rolls and
fill more easily. Unfortunately, if you do this, the pitch of the drum
changes so by switching CONST PITCH to ON, the pitch of these drums will
remain constant regardless of what note you play.
41


The ONE-SHOT function caters for use of the 5950 with certain drum machines
whose note on message is so fast, it cannot trigger samples in the 5950
properly. If you have such s drum machine and don't get a sound even though
everything seems to be working o. k., switch this to ON as this may cure the
problem. If it doesn't, you may have some other problem.
The next page allows you to set the MIDI channel for individual keygroups and
the display reads:
>16 *MIDI Channel This keygroup on
*KG# offsett0-15> MIDI ch. ALL
The 5950 has a very flexible MIDI Implementation. Any keygroup can be
assigned to any of the 16 MIDI channels and this allows you to set up a
program for mufti-timbral operation where each sound plays a different part
on a different MIDI channel.
This page operates as follows:
It !s possible to 'offset' a keygroups MIDI channel against the 5950°s
overall MIDI channel as set !n the main MIDI pages. Say, for example, the
5950 is set to an global MIDI channel of I with OMNI OFF, in this page of
EDIT PROGRAM, you could offset a keygroup by a factor of 3 so that !t would
respond to any incoming messages on MIDI channel 4 (i.e. base channel+3=4>.
Similarly, if the 5950's global channel was set to 5 with OMNI OFF, an offset
of 7 would place that keygroup on MIDI channel 12. In this way, any keygroup
can be addressed on any MIDI channel. A typical example would be where you
wish to run a few instruments on separate MIDI channels for mufti-part
sequencing.
You may have drums !n keygroups 1 to 5, a bass sound !n keygroups 6 to 8, an
electric piano sound !n keygroups 9 to 12 and a simple synth brass sample !n
keygroup 13. The only way to run these sounds from a sequences without the
MIDI OFFSET function would be to ,map them out so that the keygroups do not
overlap each other in their lowest and highest note assignments. This is
actually a perfectly valid way of doing this except that you would only have
limited note ranges for each instrument.
Better would be to map these instruments out as they should over the entire
keyboard range ° if you were to play them with MIDI OMNI ON, all those
samples would sound together. By pressing the main MIDI mode and switching
OMNI to OFF and selecting MIDI channel 1, you can now go back into EDIT
PROGRAM, go to Page 16 and give these keygroups their own MIDI channel. For
instance, as you want the drums on MIDI Channel i, you needn't offset
keygroups 1-5, the bass keygroups you can offset by a factor of 1 which will
place them on MIDI channel 2, the piano keygroups can go on channel 3 so
offset those keygroups by a factor of 2 and the synth brass can be offset by
3 so that !t responds to MIDI channel 4.
If that sounds complicated, it isn't and here's how you achieve that.
Move the cursor to the KG field using the 'cursor >' button and select the
appropriate keygroup. Press 'cursor >' again so that the cursor is on the '
MIDI ch' field and change the data using the CONTROL knob or the keypad.
Press the 'cursor <° button and change the keygroup and press 'cursor )'
again to change that keygroups MIDI channel offset value. Repeat this process
for all the keygroups in the program.
42


Using this page, it is possible to set up whole multi-timbral configurations
and these can be saved to disk for instant retrieval. You can also have the
individual Instruments within this program available as separate programs for
normal playing on the same disk giving you extra flexibility.
Note: If OMNI is switched to ON In the main MIDI mode. the MIDI ch field on
this page will show 'ALL' For multl-tlmbral sequencing as described above,
OMI must be switched to OFF In the MIDI mode.
Of course, for normal playing of programs. It could be that you don't need to
change a programs MIDI channel so Page 16 can be often ignored and the
programs overall MIDI channel can be set in the main MIDI mode.
(For further information on setting the 5950's main MIDI channel and for
setting OMNI refer to the section on the MIDI mode.)
The last page in EDIT PROGRAM is concerned with assigning individual
keygroups to separate outputs. The display shows:
>17 (OUTPUT Al1(00), Mono (01-08)
IKG# VOICES) Left(09), Right(10) 0
where * is the currently selected keygroup.
To assign a keygroup to an output, move the cursor one position to the right
using the 'cursor >' button so that it is on the KG field and select the
required keygroup. Press 'cursor >' again so that it is on the output assign
field and make your data entry using the CONTROL knob or the keypad. This
will assign that keygroup to the chosen output.
As in nearly all the various modes in the S950, there are many default
settings which have been sensibly chosen to optimise the units performance.
Because of this, it is often possible to create a program from scratch
ignoring many of the pages thereby making program editing and creation far
quicker and easier. With more familiarity with the unit, you will soon
discover the versatility of the S950 and how important EDIT PROGRAM is in the
creation of good sounds.
That concludes our look at EDIT PROGRAM. As you can see, there are a lot of
advanced features contained within it that allow you to get the best out of
your samples. We will look at other uses for EDIT PROGRAM in the ADVANCED
APPLICATIONS GUIDE which will show you how to~layer sounds, create split
keyboard programs, use the LFO and WARP functions and how to use the
individual outputs to the full.
43

MIDI FUNCTIONS
Next to the EDIT PROGRAM button is the MIDI button and here you can set the
basic 'global' MIDI parameters for the 5950.
To access the MIDI pages, press the MIDI button and the display will read:
>01 *Basic MIDI channel *Omni on/off
(O1 to 16) 1 ON
These are the default settings if you turn the S950 on with no disk inserted.
It tells you that OMNI is switched to ON (i.e. it will receive all MIDI
channels and so will operate with the MIDI controller regardless of its
setting). To set the S950 so that it responds to one channel only, you must
turn OMNI to OFF and this is done by moving the cursor to the Omni on/off
field by pressing the 'cursor >' button twice and then pressing the OFF(-)
button on the blue keypad. You can now move the cursor to the Basic MIDI
channel field by pressing the 'cursor <' button and make your data entry
using the CONTROL knob or by inputting a two digit number on the keypad. The
5950 will now only receive MIDI on the selected channel only.
Mote: The channel selected here sets the base MIDI channel for the 5950.
Using Page 16 In ED17 PROGRAM. you can. of course, set individual keygroups
to respond to different MIDI channels relative to this base channel using the
MIDI channel offset feature in order to set up a multl-timbral situation
suitable for multi channel sequencing. Please refer to ED17 PROGRAM for more
information on this.
The next page displays:
>02 MIDI #Channel (Key (Velocity
TEST 1 C3 60 64
which is the default setting.
It is possible on the 5950 to sample, edit a sample and create or edit a
program without the need for an external MIDI controller by using the PB or
'playback' button located near the blue keypad. In any of these modes, you
can hear the sound you are working on simply by hitting the PB button. This
page allows you to set the channel, note and velocity of the PB button's
functions. Furthermore, when you hit the PB button, the note parameters
specified in this page are sent through the S950's MIDI output to
simultaneously trigger an external MIDI synth, sampler, drum machine or
module.
To alter the default settings, simply move the cursor to the appropriate
field using the 'cursor > and/or <' buttons and make the data entry using the
CONTROL knob or a two digit number on the blue keypad.
Page 03, the next page, is extremely useful for checking incoming MIDI data
to the 5950. The display reads:
>03 RECEIVE Channel Key Velocity
MONITOR ## ## ## ##
where # Is the incoming data.
Basically, this page 'reads' all incoming MIDI data and then displays it
instantly on the screen. To see this is action, simply play a note on your
MIDI controller and see what happens. The 'Channel' field will display the
44


controllers MIDI channel, she 'Key' field will display the note played and
the 'Velocity' field will display the velocity value with which the key was
struck.
The uses of this page are many. You can use it to troubleshoot, checking
that the 5950 is actually receiving MIDI, what not es and velocity the MIDI
controller is sending and whether it corresponds to the MIDI channel
settings of the 5950.
This page can also be useful if you have a drum program in the 5950 and you
are using the 5950 with a MIDI drum machine or pads as you can determine
what MIDI notes are being sent by which drum pad thereby allowing you to
match your keygroups' note assignments in EDIT PROGRAM to the controllers
drum pads.
As this is solely a MIDI monitor, there are no parameters that you can
change.
Note: the display shows the LAST piece of MIDI Information received. If
chords are played into the 5950, it will display the lest note received.
Similarly, if you are sequencing the 5950 on many different MIDI channels, it
will also display the lest note received along with that notes' MIDI channel.
Page 04 allows you to set the S950's response to program change over MIDI,
whether MIDI volume controller (07) is selected and pitch bend range. The
display reads:
>04 MIDI: tProg change ON *loudness OFF
tPitch wheel range (+/- semitones) 7
which is the default setting if the 5950 is powered up with no disk inserted.
To change any of these settings, move the cursor to the appropriate field
using the 'cursor > and /or <' button and make your data entry using the
ON/OFF buttons, the CONTROL knob and/or the blue keypad.
For example, to select that the S950 will not respond to program change over
MIDI, move the cursor to the 'Prog change' field and press the OFF(-) button.
This will disable program change and changing programs on the MIDI controller
will have no effect on the 5950. To select whether the 5950 responds to MIDI
controller 7 (volume), move the cursor to the 'loudness' field and select
either on or off using the ON(+) or OFF(-) buttons accordingly. With loudness
switched to ON, the S950's output level can be remotely controlled from any
MIDI controller that transmits MIDI control 7. This can be useful if the S950
is out of the way in a rack (i. e. on stage in particular) and you wish to
turn Its volume up or down remotely from the MIDI controller. It can also be
useful if you are sequencing the 5950 multi-timbrally as you can use the
sequencer to mix the various parts on the 5950.
Finally on this page, you can set the range over which the pitch bend wheel
is to have effect. The default setting is 7 semitones and this can be changed
by moving the cursor to the 'Pitch wheel range' field and making data entry
using the CONTROL knob or by entering a two digit number on the blue keypad.
Note: the pitch bend range is common to all programs and samples contained
within the S950's memory.
45


The next page is concerned with the 5950's ability to be controlled using the
RS232 muitipin port found on the rear of the unit. This allows the S950 to be
controlled by computer for sample editing, etc., instead of MIDI.
The display for this page rends:
)05 Control by MIDI (1) RS232 (2> 1
tRS232 Baud rate 9600 ACTUAL: 9615
This is the default setting and the display shows that the 5950 is set for
MIDI operation. To control the 5950 using the RS232 port, you must move the
cursor one position to the right using the 'cursor >' button and select '2'
using the CONTROL knob or the keypad. It is necessary to match the 5950's
RS232 baud rate to the computers and this is done by moving the cursor to the
'RS232 Baud rate' field and inputting data using the CONTROL knob or the blue
keypad. The 'ACTUAL' field displays the incoming signal's baud rate. If it is
more than +/-2x different from the intended Baud rate, you may have problems.
For further Information on the RS232 protocol used on the 5950, please refer
to your local Akal dealer or to your countries distributor who will supply
you with the relevant documentation.
That concludes our examination of the MIDI pages. Once again, as in all modes
of operation in the S950, the default settings of these pages have been
sensibly chosen and it is quite likely that you will not have to change them
and probably the only MIDI function you will need to change is the MIDI
Channel receive number and the OMNI ON/OFF selection on Page 01.
TROUBLE SHOOTING
There is not much in this mode that can cause problems and, more often than
not, these pages will be used to actually solve any MIDI problems you may
have.
The mast basic MIDI problem you will encounter is that,, despite the'jfact
the your MIDI connections seem to be correctly set up, you are not getting a
sound. To check on this, the following procedure is recommended.
Firstly, go to Page 03 - the incoming MIDI data monitor and play a few not es
on the connected MIDI controller. Make a note of the incoming data and go
back to Page 01 using the Page up button. Here, check that the MIDI receive
channel is set to match the channel being transmitted by the controller or
that OMNI is switched to ON. If everything matches up o. k. and you are still
not getting a sound, then the problem is more likely to be with the audio
side of things (l. e. a broken lead, faulty amplifier, volume turned down,
etc.).
If you are using a MIDI controller that transmits MIDI control 7 (volume) go
to Page 04 to check whether or not the 5950 is set to respond to this. If it
is set to ON and you are getting no sound, it could be that your keyboard has
remotely turned the 5950 down with its MIDI volume control.
If you are not able to use pitch bend on the 5950, check 'that the pitch bend
wheel range on Page 04 is set to something, other than 00. If it is, then the
fault lies in the MIDI controller.
46


If the 5950 is not responding to program change over MIDI, check that it is
set to respond to this on Page 04. I f i t is not, switch i t to ON. I f the
problem still persists, then, once again. the fault lies in your MIDI
controller. Alternatively, it could be that the MIDI program number has not
been correctly matched in Page 02 of EDIT PROGRAM (see EDIT PROGRAM for more
information).
If you are sequencing the 5950 (but not multi-timbrally) you may get the
following problems.
1. The 5950 is playing ALL the parts. If this is the case, go to Page 01 of
MIDI where you will find that OMNI is switched to ON (i.e. it is responding
to ALL the incoming MIDI channels simultaneously). You should switch this to
OFF and make sure that the S950's MIDI channel matches the one you wish the
part to play on coming from the sequencer.
2. The 5950 is not playing the correct musical part. Go to page 01 and
ensure that the MIDI channel matches the one you wish it to play.
If you are sequencing the 5950 multi-timbrally, you may encounter the
following problems:
1. The 5950 is playing all the parts but in a confused manner. The problem
here is that you have set the S950's basic receive channel and set the
various keygroups up correctly using the MIDI OFFSET function on Page 16 of
EDIT PROGRAM but OMNI is switched to ON. Go to Page 01 of MIDI and switch
OMNI to OFF.
2. The S950 is playing multi-timbrally but is the wrong parts. Here you have
probably set the wrong base MIDI channel so that MIDI offsets are all wrong.
To change this you can either change the S950's main receive channel on Page
01 of MIDI or you can go to Page 16 in EDIT PROGRAM and change the MIDI
offset parameters. As you would imagine, the former sugestion is the easiest!
47

UTILITY MODE
This button allows access to programming the Akni ME35T Audi-MIDI converter
which allows you trigger samples from audio sources or drum pads. The most
common application of this is to use microphones on a drum kit to trigger
drum or percussion samples. This would necessitate each drum having its own
microphone each of which would be used to trigger the samples. Another
similar application is to use drum sounds on a multitrack tape to trigger
samples in the 5950 to replace drum sounds on tape. Yet another application
is to use the individual audio outputs of a pre-MIDI drum machine to trigger
S950 drum samples. Alternatively, simple dram pads can be used to create a
powerful sampling drum kit.
To use the ME35T, the MIDI OUT of the 5950 must go to the MIDI IN on the
ME35T and the MIDI OUT of the ME35T must be connected to the MIDI IN of the
5950 as shown below.
The first page you encounter when you press UTILITY reads:
>O1 ME35T Audio trigger to MIDI unit
*Send Settings- *Read Settings-
In this mode you can either send parameters set up on the S950 to the ME35T
or you can receive settings from the ME35T for further editing in the 5950 by
moving the cursor to the appropriate field and pressing ENT.
The parameters available for editing are displayed on the next pages:
>02 #Input tMIDI Pitch fOnTime fV-curve .
1 1 C3 60 30 3
and these parameters are as follows:
Input: This is the audio/pad input channel <1-8) currently 'selected for
editing.
MIDI: This is the ME35T's MIDI transmit channel. This must match the
5950'x. Alternatively, if each pad has its own MIDI channel, then
each keygroups MIDI channel must be set to match this using the
MIDI offset function on Page 16 of EDIT PROGRAM.
Pitch: This is the MIDI note number to be transmitted by the ME35T
OnTlme: This allows you to set the duration of the MIDI note transmitted by
the ME35T. Normally, for drum sounds, this is kept short but with
longer settings, you can sustain non-drum sounds for special
effects.
48

V-Curve: This allows you to choose from between 8 velocity response curves
49
to match your own playing technique to the ME35T's triggering
functions.
Page 03 displays further parameters:
>03 #Input #Capture time #Recovery time
1 3 mS 20 mS
These parameters relate to the following functions:
Input: This selects the required audio/pad input channel for editing.
Capture This sets in milliseconds the time before another input signal
time: can retrigger a sample. This is useful for preventing accidental
flamming and retriggering.
Recovery This sets the time in milliseconds of the time it takes for the
time: trigger envelope to settle down.
The next page displays the following parameters:
>04 (Input 1 *Gain 50 -(Trig thresh 25
############ T
and these parameters are as follows:
Input: Again, this selects the incoming audio/pad channel for editing.
Gain: This sets the level of the incoming signal which is shown in the
lower half of the display (##at####) as a bargraph meter.
Trig This sets the threshold above which samples on the S950 will be
thresh: triggered.
All these pages' parameters are selected and edited in the usual way. Move
the cursor using the 'cursor 7.and/or <' buttons to the appropriate field and
input data using the CONTROL wheel or the blue keypad.
All parameters set here can be stored to disk along with the samples, program
and MIDI information.
Note: for further information on the hfE35T's parameters, please refer to Its
manual.

DISK LOADING AND SAVING - THE DISK DRIVE
This is a very important part of the Akai 5950 as it allows you to load
sounds for playback and editing. It also enables you to save the fruits of
your labours onto disk. Because the-S950 will lose the contents of its memory
when power is switched off, we cannot stress the importance of saving your
work to disk. Also, it's a good idea to periodically save your work to disk
in the event of accidental power loss or unforeseen problems.
The 5950 allows you to use both double density (DD) and high density (HD)
disks. The basic 5950 without memory expansion allows you to store a complete
memory's worth onto one DD disk. If you have a memory expansion board fitted,
you will either have to spread the memory's contents over 2 or more DD disks.
This is quite an acceptable practice but it can become tedious when you have
to load as many as three disks to fill the 5950's memory. Better still would
be to use HD disks with their extra storage capacity, Of course, the best
method of storing sounds is to use a hard disk drive. Not only would this
allow you to store vast amounts of sounds but loading and saving samples
takes a fraction of the time of a normal floppy disk.
As well as being possible to load any disk from the large 5900 library, it is
also possible to load S1000 disks into the 5950 so that you can use the
fabulous library created for that instrument.
Insert a disk into the disk drive and press the DISK button and the first
page displayed reads as follows:
>01 VOLUME #Slct,create Floppy S#x##
fHDcontl #Hdrivel Rename Floppy 76%
This page does two things. Firstly, in the top right corner (S####> it shows
whether an S900 or SI000 disk has been inserted and the bottom right hand of
the display shows that disks contents as a percentage-of the Sg50's memory
capacity.
Note 1: If a disk is not Inserted when you press DISK the display will show:
OOPS! Disk not mounted ................
end ail red lights above the mode buttons will flash. To stop this, either
press another-of the mode buttons CI, e. PLAY, EDIT SAMPLE, EDIT PROGRAM or
whatever) or insert a disk end press DISK again.
Note 2: If an 51000 dish is inserted, the memory percentage display may show a
percentage value higher than 100x. This will indicate that the contents of the
disk are larger than the S950's internal memory capacity. You can 1 oed such a
disk but not ell the contents will 1 oed end when the 5950 Is full, the
display will show:
OOPS! Memory sample space is full .....
end the red lights above the mode buttons will flash. To exit this, simply
press PLAY where you can select the required programs.
50

Note 3: The 5950 loads ell programs first. If you use en S1000 disk, it
could be that the 5950 will load all the programs but the samples relating
to those programs may not be loaded. If this happens, when you go to PLAY,
you will be able to choose any of the many programs but not all of them will
make a sound because the samples contained within them are not present.
Note 4: If the memory expansion boards are fitted, the percentage display
changes as appropriate. For example, a full DD disk on an un-expanded 5950
will show 100x. If the full complement of memory expansion boards are fitted
so that the internal memory of the S950 is three times as large, the same
disk would display 33x.
The rest of this page is unused unless you have the ATARI/SUPRA HARD DISK
and CD/DAT INTERFACE BOARD (IB105> installed and the remaining facilities on
this page relate to hard disk control. We suggest you refer to the
documentation of the IBI05 for further information on these functions.
Page 02 displays the following:
>02 (Clear mem i: load disk (1>, Mem
0',G
Load disk (2), Clear prev <3> - Vol ##x
where ##x is the amount of data on the inserted disk relevant to the 5950's
internal memory capacity.
The most commonly used function here is ' i' - Clear memory and load disk.
This will erase anything currently in the 5950 and fill it with the data on
the disk. After loading, the 'Mem' field will display what percentage of the
5950's memory is used.
The other options are as follows:
Load disk <2> - this will load the disk and but will not erase any of the
5950's current memory. This feature also allows you to load a disk while
playing a sound currently selected in memory. Of course, there are
limitations to this function. For example, if the 5950's memory is already
100% full, it is not possible to load any further sounds into it. If this
happens, the memory displays:
MEMORY FULL. Press (3) to clear previous
and continue loading or cancel (ENT)
and you can now press 3 on the keypad to wipe the original data in the 5950
and load the new disk or press the ENT button to cancel that situation.
Either will take you back to Page 02 of the DISK pages.
To select either mode 1 or 2, move the cursor one position to the right and
press either 1 or 2 on the keypad.
Note: as mentioned above, the disk loads programs first followed by samples.
In this instance, it could be that the programs ere loaded but without their
respective samples. Selecting such a program will result in no sound being
heard.
51

The next page allows you to load either an individual program or an
52
individual program with its relevant samples. Press the 'page down' button
and the display will show:
>03 LOAD PROGRAM (ENT) #PR only _ M Ox
*name *########~R APR 3 samples
where ########## is the currently selected program name.
This page is invaluable as it allows you to use a program off disk and load
that without its samples to use as a template for a program using the samples
currently in the 5950's memory.
For example, you may have a selection of drum samples which you have just
taken. Instead of creating a new drum program from scratch, you can load
another drum program off disk and then place the new samples into the
relevant keygroups. That can then be saved onto another disk. In this way, it
is possible that you will only ever create one drum program from scratch and
use that as the basis for all other drum samples you take!! Of course, this
facility is also useful with other instruments, especially intricately
mufti-sampled instruments such as piano, etc..
The other use of this page is to load individual programs with their samples
so that you can create a new disk which !s an amalgamation of programs from
other disks. This is especially useful for live work. where all the required
programs and samples can be placed on one disk for easy access with no
unnecessary and time consuming loading in between songs or it can be useful
when doing pre-production for a studio session.
To select a program to load, move the cursor to the 'name' f field and use
the CONTROL knob to scroll through the programs on disk. Having made your
selection, move the cursor to either the 'PR only' or 'PR 8 samples' field as
appropriate and press the ENT button. The contents of that program will then
be loaded into the 5950. Naturally, if the 5950's memory is full, the display
will read the usual 'OOOPS! Memory space is full ....' message.
The next page is similar to Page 03 except that you can select individual
samples to load. The display reads:
>04 LOAD SAMPLE (ENT) Mem Ox
name ########## *All samples _
where ########## is the currently selected sample.
This page is also invluable in making up programs that are a mixture of many
different samples off different disks. You may, for example, be using a drum
program but prefer the snare on another disk to the one currently in that
program. Using this page, you can 'grab' a sample off another disk and then
insert i t in the new program. Of course, this is true of any program, not
just drums.
To load a single sample, move the cursor one position to the right so that it
is in the 'name' field. You can scroll through the samples on that disk using
the CONTROL knob and then, once you have made your selection, you can hit ENT
and it will be loaded into the 5950.


This page also allows you to load all the samples on a disk into memory but
without the program information. To do this, move the cursor one more
position right to the 'All samples' field and press ENT - this will load all
the samples on that disk into memory.
Once again, if there is insufficient memory space in the S950, the display
will give you the usual 'OOOPS! Memory sample space full' message.
The next pages are concerned with SAVING data onto disk.
Page 05 allows you to wipe a whole disk and save the entire contents of the
S950's memory onto it. The display shows:
>05 Clear volume and save Mem Ox
entire memory Vol 76%
The top right percentage display shows the S950's current memory capacity
whilst the lower percentage display shows how full of data the disk is.
Note: if your 5950 has the full complement of memory expansion boards, the
top right display may only show something like 85x. If you use normal DD
disks, this is too much to be stored on one disk even though the percentage
display indicates that only 85x percent of the memory is full. Of course,
this figure relates to 85x of three times the DD disks capacity. In other
words, either use more than one DD disk or use HD disks o- a hard disk.
To wipe the disk and save the contents of the S950's memory to disk, simply
press ENT but be careful that you are not erasing a valuable disk as there is
no stopping this procedure once it has been initiated.
The next page allows you to save individual programs with or without their
respective samples onto disk. The display reads:
>06 SAVE PROGRAM (ENT) 1PR only _ Vol
#name A~;~k# *Pr & smpls _ 764
where ###~`# is the currently selected program to save.
To select a program for saving, move the cursor to the 'name' field and use
the CONTROL knob to scroll through the programs currently in the S950's
memory. Once you have made your selection, move the cursor to either the 'PR
only' or 'PR & smpls' field and hit the ENT button. This will save that
program onto disk. The .display also shows the disks current memory
percentage and this will increase when you save more samples onto it.
The next page allows you to save individual samples:
>07 SAVE SAMPLE (ENT) Vol
*name ~Y~x~k*~tA~xx 76%
where ######f*#;# is the currently selected sample.
As in Page 06, move the cursor to the 'name' field and scroll through the
samples until you find the one you wish to save. When you have done that, hit
the ENT button and the sample will be saved to disk. The percentage figure
displays the disks current capacity and will increase as you save more
samples.
53


It is also possible to erase samples or programs off disk and this is done on
Page 08.
>08 ERASE FROM *Sample Vol
VOLUME (ENT) *Progrm ~~at~R~ 76%
To erase a program or sample, simply move the cursor to the appropriate field
using the 'cursor >' button and, using the CONTROL knob, scroll through the
programs or samples on disk until you find the one you wish to erase and then
press ENT which will erase it from the disk. Of course, it goes without
saying that you should be careful here so that you don't erase anything
precious: The percentage display will decrease as samples are erased from the
disk.
The next page is concerned with formatting a floppy or hard disk.
Any 3.5 inch double density (DD) or high density (HD) disk can be used with
the 5950 but, before it can be used, it has to be formatted so that it is
compatible with the S950's software. Hard disk drives also need to be
formatted and all this is done on Page 09.
>09 (Format floppy _ Format SH204/5 _
Wipe hard disk _ Total free 34%
To format a floppy disk (i.e. a 3. 5 inch DD or HD disk), move the cursor one
position to the right using the 'cursor >' button and press ENT. The S950
will now format the disk and the the display will slowly fill up with two
rows of dots as the formatting process takes place. When the display is full
of dots and the red disk activity light goes out, the disk is ready for use.
The other funtions are all concerned with the optional ATARI/SUPRA HARD DISK
INTERFACE (IB105) and you are advised to refer to the documentation that
accompanies the IB105 for further information.
IMPORTANT NOTE: FORMATTING A DISK WILL ERASE IT'S CONTENTS ENTIRELY ° THIS IS
TRUE OF BOTH FLOPPY AND HARD DISKS. ALWAYS ENSURE THAT YOU USE A BLANK DISK OR
ONE THAT YOU WANT TO ERASE.
Page 10 allows you to load and save drum settings for use with the ME35T. The
display shows:
>10 Load drum settings (ENT) _ Vol
*Save drum settings (ENT) _ 76%
To load a drum setting, move the cursor to the first field by pressing the
'cursor >' button once and pressing ENT. To save a drum setting, move the
cursor one further position right and hit ENT.
Note: Only one ME357 drum setting can be stored on disk and any other settings
on that disk wJ1J be overwritten by the new settings you wish to save. Make
sure, therefore, that you either use a new disk or that you are happy to
overwrite the existing drum settings.
54

In any of the pages 05 to 10, when you try to save anything onto a disk or
format a disk that has been write-protected the display will read:
OOPS! Disk is write protected. Take it
out and close the switch in the corner
and all the mode lights will flash. This is telling you that you cannot save
onto this disk because the tab in the bottom left of the disk has been
opened. By closing this tab, you will be able to save to disk and format. It
is a good idea to write protect your disks at all times to prevent
accidental erasure of precious programs or samples.
Page li allows you to load sounds from the hard disk using MIDI program
change. The display reads:
)11 MIDI program changes can now load
hard disk volume. Floppy number 0
The volume number attached to the RENAME FLOPPY function on Page 01 of disk
when used to save data to the hard disk can be set to correspond to a MIDI
program number so that pressing the required program number ow the MIDI
controller will initiate a disk load where the equivalent contents of one
floppy disk's worth of data will be loaded from the hard disk. Please refer
to the IB105's documentation for further information.
The final page in DISK allows you to park the hard disk drive's heed making
it safe for transportation. The display shows:
)12 Park hard disk, (ENT). This makes
it safe for transportation.
To execute this function, simply hit the ENT button. Of course, this
function does not apply if you are not using the hard disk option.
That concludes ours examination of the DISK functions. As always, the whole
thing is structured to be very easy to use but, even then, mistakes can
still be made. Try to bear the following things is mind when using the disk
drive.
1. Always keep a track of what you are doing when using the DISK mode. It is
all to easy to be distracted and accidentally load a disk and wipe the
memory instead of saving hours worth of work to disk. Even full time
professional programmers have been known to do this!!
2. Be very careful with Page 05 that you don't accidentally wipe the entire
contents of an important disk when saving data. Always check the disk before
you save any data - this can be done on Page 03 where you can scroll through
the programs on a disk.
3. Similarly, be careful you don't bulk erase an important disk when
formatting.
4. Make sure that you don't accidentally erase the wrong data from disk on
Page 08.
55

DISK HANDLING
Disks are very important pieces of equipment for anyone who owns a sampler
and they represent many hours of work. As a result, it is important that you
take good care of your disks to ensure reliable operation.
Always use branded, high quality disks. Failure to do so may result in
corrupted data on the disk preventing it from loading properly. Cheap disks
can also damage the heads and we cannot guarantee reliable operation.
Always insert disks straight into the drive, then gently push them all the
way in. Trying to force them into the drive may damage the disk or the drive.
Never bend a disk or store them in a position that is likely to apply
pressure to their cases.
When labelling floppy disks, we recommend the use of felt tip pens. Writing
on disks using ball point pens and pencils can exert undue pressure on their
cases.
Always take care when physically handling your disks. Never pull the
protective metal tab on the top of the disk's case back and touch the actual
disk inside as your sweaty fingers will harm the delicate disk surface.
Always keep your disks away from magnetic sources such as speaker cabinets,
TV sets and video monitors, heat and direct sunlight.
Do not keep the disks in a vehicle for any length of time. Not only will this
will prevent damage from temperature changes and excessive sunlight but will
also reduce the risk of theft.
Always keep disks away from drinks and food in case of accidental spillage.
Always try to keep backup copies of all your disks in case of loss, theft or
damage.
When transporting your disks, try to ensure that they are kept in a solid
case. Not only will such a case protect them whilst in transit, these disk
boxes also allow you to keep your disks in some form of logical order and
will save wasted time hunting for particular disks. If you are 'on the road'
doing live shows, it is a good idea to use a flight cased briefcase container
for transporting your disks.
If you are travelling abroad with your disks, never let your disks pass
through a security X-ray machine as these can damage your disks irreparably.
It is a good idea to keep your disks as hand luggage to prevent airport
officials accidentally putting them through X-ray machines. Most security
officers will comply with your request to keep them away from X-ray machines
as long as you allow them to search the case themselves.
If you are posting a disk, wrap it in kitchen foil to prevent stray X-rays
from damaging the disk. Also, wrap the disk in solid cardboard and a padded
envelope to prevent it from bending - you can buy special cardboard
containers for posting disks and these are recommended. Also label the
envelope 'CAUTION - COMPUTER DISK ENCLOSED' and the postal service will take
good care of it. If the disk is valuable, it is a good idea to send it
recorded or registered delivery.
56

Note: If your disk is damaged in any way and the disk drive is unable to
load the data, the 5950 will display:
and ell the red mode lights will flash.
If this happens, I t may not be as bad as you think because 1 t is quite
possible for gust the lest sample or the lest few samples on a disk to be"
corrupted end the rest of the disk may have loaded sucessfully.
MASTER TUNE
Without doubt, this is the easiest mode to understand and it is here that
you can tune the S950 to different instruments.
To tune the S950, press MASTER TUNE and use the CONTROL knob to adjust pitch
up or down so that it is tune with other instruments. And that's it!
,Vote: If the tuning range in this page is not wide enough, you. can tune
samples up or down in either Page 03 of EDIT SAMPLE or in Page 06 of EDIT
PROGRAM end these tunings can be saved to disk.
OOPS! Bed data from disk ..............
57

APPENDIX

5950
-
K4IIKREF PROCEDURE
CHART.
As we have seen throughout this manual, every mode within the 5950 has a
default value. All of these have been sensibly chosen so that you can get on
with your work with the minimum of button pushing and data entry. What
follows now is a quick reference chart that will guide you through the most
61

FOR MORE SPECIFIC FUNCTIONS IN ALL THESE MODES, PLEASE REFER TO THE RELEVANT
SECTION OF THIS MANUAL


5950
-
OPTIMUM BANDWIDTH KWIKREF CHART
The 5950 has a continously variable bandwidth. As a result, it is possible
to sample each and every sound with a different bandwidth thereby optimising
the sound quality and available memory. This KWIKREF chart lists the optimum
bandwidth of a variety of commonly used sounds. Using this as a guide to
your own sampling will enable you to get more samples into the S950.
63

You will note that these bandwidth figures are approximate. Of course, you
DISCARD BEFORE START/AFTER END
function
on
Page !0 of
EDIT SAMPLE.
64
may require higher or lower bandwidths than those shown for certain
instruments - it all depends entirely on the tone of the instrument you are
sampling. If it is bright, It may require a higher bandwidth than the one
recommended but if the sound is relatively mellow, you might like to try a
lower bandwidth setting. The best thing to do is experiment. Take e sample at
your seler,ted bandwidth and play it back from the MIDI controller comparing
it with the original. If it sounds at ail muffled, try a higher bandwidth but
if it sounds good, save that sample end try taking another at a lower
bandwidth to see if you can save even more memory. If the results of that
don't sound too good, recall the original.
Note: to save even more valuable memory in your 5950, don't forget the

ADVANCED APPLICATIONS
We have now covered the basic operation procedures on the 5950 but there is
so much more that we can do with samples and programs once they are in the
instrument. This section will take you through some of the more advanced
possibilities available on the 5950. In EDIT PROGRAM you can create all
sorts of keyboard splits and layering effects and the various processing
possibilities allow the creation of chorus and other effects.
CREATING A SPLIT KEYBOARD
Sometimes it is desirable to have two separate sounds on the keyboard where,
for example, you have a bass guitar sample on the bottom two octaves and a
piano sound on the top three octaves. This is easy to achieve and is simply
an extension of the mufti-sampling procedure where you have anumber of
samples assigned to different key ranges in keygroups.
To create this split keyboard, create a program with, say, 7 keygroups in
it. Move to Page 05 and set the keygroups thus:
KG1 - Bass sample - low key CO 24, hi key B2 62
KG2 - Piano C3 - low key C3 60, hi key E3 64
KG3 - Piano G3 - low key F3 65, hi key Ax3 70
KG4 - Piano C4 - low key B3 71, hi key E4 76
KG5 - Piano G4 - low key F4 77, h! key A#4 82
KG6 - Piano C5 - low key 84 83, hi key E5 88
KG7 - Piano C6 - low key F5 89, hi key G8 127
You can see that the bass sample covers the bottom octaves to B2 and the
multi-sampled piano takes over at C3 up through the top octaves of the
keyboard. (This, of course, is only an example - your samples may be
different and require different keygroup assignments.)
Another application of this technique is to layer the bass sample over the
bottom octaves of the piano. To do this, make a copy of your piano program
and simply create another keygroup !n Page 03 and assign that from CO to B2
as above. The only difference here is that the original piano bass notes will
sound with the bass guitar sample creating a more forceful bass end.
This keyboard split technique can be extended to include a three way keyboard
split with perhaps a bass synth on the bottom two octaves, a string sound
over the next two octaves with a lead line sound or some orchestral hits on
the top octaves - you could even have a few drums on a few notes (i.e. bass
drum on C1, snare on D1, hihat on El and a cymbal on Fi) with the bass guitar
spanning G1 to B2 - the possibilities are almost unlimited.
LAYERING SOUNDS
It is easy to layer samples on top of each other within the 5950 to create
rich chorus effects or composite effects.
All you have to do is to make exact copies of keygroups and then, in Page 06,
detune them slightly using fine tune.
65


For example, with a simple string program with gust one keygroup, to thicken
the sound, simply make a copy of that keygroup in Page 03 and then detune it
in Page 06. In a more complicated mufti-sample program that has, for example,
four keygroups, copy KG1 to create a new keygroup, KGS, copy KG2 so the you
create another new keygroup, KG6, copy KG3 so that you create another
keygroup, KG7 and copy KG4 to create KGB. Now detune keygroups 5-8 slightly.
Of course, you are not limited to gust detuning them slightly as you can use
the TRANSPOSE field in Page 06 to split them in octaves or fifths or any
other interval.
This layering technique can be extended even further to layer, for example,
strings on top of brass. To do this, copy a strings program to create another
program such as STR-BRASS .or whatever. Now, using the PUT and GET functions
in Page 03, place the various keygroups from a brass program into STR-BRASS the original string sound is now layered with the brass program. Of course,
after that, you may choose to detune them slightly or split them in octaves.
It is also possible to layer three sounds on top of each other for an even
greater range of possibilities but please note: LAYERING KEYGROUPS REDUCES
POLYPHONY. WITH TWO KEYGROUPS LAYERED, THE 5950 WILL ONLY BE ABLE TO 'PLAY A
MAXIMUM OF FOUR NOTES SIMULTANEOUSLY AND FURTHER LAYERING WILL REDUCE
POLYPHONY EVEN MORE, Of course, if the sound you are creating is a solo
sound, this needn't be a problem - it's only when you wish to play chords
that you may notice some notes missing if the number of notes played exceeds
4.
One interesting layering technique uses the WARP facility on Page 12. Try
this.
Using a simple vocal program that has gust one keygroup with an 'aaah' vocal
sample in it, copy the keygroup and detune one of them so that you now have a
richer 'aanah' sound. Now go to Page 12 and on gust one of the keygroups, set
the display to read:
>12 WARP Velocity 0 fTlme 75
*KG1 (Attack offset -50
and play a note. You will notice that keygroup 1 slides up to the note whilst
the other remains in tune during the attack. This creates an Interesting
detune effect during the attack portion of the sound. This technique is very
useful on vocal sounds as it is normal for there to be a slight pitch slide
on 'the real thing'. It is also useful on brass sounds which sometimes have a
tendency to slide up into a note. Of course, the settings given above are
only an example so please feel free to experiment. You could, for example set
longer or shorter warp times or have the pitch sliding down - you could even
have one keygroup sliding down and the other sliding up and at different warp
times!! You could also use velocity to control the slide. Again, endless
possibilities.
USING THE LFO
The low frequency oscillator found on Page 14 is a most useful device. Its
prime use is to add vibrato and other pitch sweep effects to a sample in e
keygroup but it can have other uses as well.
66


For example, say you have a sample but the loop is not that good and,
despite your attempts to improve it, you still can't get rid of a slight
glitch or tremolo effect, you can use the LFO to disguise the effects of
this loop by adding some vibrato to that sample. You will probably want to
set the LFO so that it is having effect constantly so you will want to set
the LFO Depth to around 3 or 4 for a hint of continuous vibrato. The actual
LFO rate can be set according to the circumstances and you are advised to
experiment. You may find that the action of the LFO masks the slight
glitching very effectively. To further disguise en awkward loop, you can
layer the sample on top of itself as described above (providing the
restricted polyphony is not a problem, of course) and add this slight
vibrato effect.
The LFO can also be used when layering sounds to create interesting chorus
effects. If you have tried out any of the layering ideas given above, you
will have noticed how using the fine tune on Page 06 for a detune effect
thickens the sound. This can be further enhanced by setting the LFO depth of
just the one keygroup in the layer to a value of around 3 or 4 and leaving
the other keygroup in the layer free of any LFO modulation. What you now have
is two keygroups layered on top of each other with some slight detune and the
one keygroup's pitch is varying ever so slightly to give an 'animated' chorus
effect. To further extend this idea, you could give the other keygroup a
different vibrato with a slightly slower or faster LFO rate. In this example,
you would have the keygroups' pitch shifting against each other creating a
rich, warm ensemble sound. This can be even further enhanced by switching
DESYNC to ON so that all the LFO's are out of phase with each other.
Using Page 14, you can extend these chorusing effects to be under the control
of the MOD WHEEL. By setting just one of the keygroups in a layer to respond
to the modulation wheel, you could introduce a chorus effect with the
modulation wheel. Of course, aftertouch could also be used for the same
effect.
USING THE ENVELOPE GENERATORS
The basic use of the envelope generators is to shape the sound and so restore
the natural envelope characteristics of the sampled sound. They can also be
used to add unusual envelopes to sounds and one example may be to add a
bowing effect to any sound. To do this, set the KG field to ALL and increase
the attack time of the envelope generator in Page 10. By setting an instant
decay with no sustain level (i.e. sustain at 00>, you can create a curious
reversed type sound that is subtly different from actually reversing the
sample in Page 05 of EDIT SAMPLE.
The fact that there are envelope generators for every keygroup (and hence
sample) in a mufti-sample program means that you can set the decay and
release times for every sample. It is common for many acoustic instruments to
become more percussive the higher up in pitch they go. This is especially
true of piano sounds where bass notes can last several seconds whilst high
pitched notes die away almost instantly. You can set the decay and release
times of each keygroup across the keyboard range to simulate this effect with
bass notes having longer decay/release times than higher pitched sounds. You
could, of course, set the opposite for special effects.
The same is true of attack times, especially on stringed instruments where a
'cellos attack is longer than that of a high violin note. By scaling the
attack times of a group of samples in this way, you can create more realistic
string envelopes.
67


It is also possible to control attack time using velocity and this can be put
to a number of expressive uses. For example, you may have n flute sample with
a very percussive 'blowy' attack but you may not always want that attack to
sound on every note. By setting a long attack and controlling attack time
with velocity, playing softly will effectively miss out the percussive attack
because of the soft attack whilst harder keystrikes will produce a faster
attach time thereby allowing the percussive, breathy attack to be heard. Of
course, you can combine this technique with velocity switching for even
greater expressive possibilities.
There are other uses the envelope generators can be put to, however.
For example, it sometimes happens that there is some noise at the end of a
sample. In actual fact, it may not be that the sample is very noisy, it's
dust that as the sound dies sway, the noise becomes more noticeable. This can
be surpressed using the envelope generators by setting a decay or release
that roughly matches the--samples decoy so that the envelope generator fades
out the noise with the sound (see- Fig. i>. The filters envelope generator
can also be used for the same purposes and, of course, the two can be used in
conjunction with each other.
Fig. 1 Fading out noise using the envelope generators
Did you know that you can control revert time using the envelope generators.
By sampling a drum sound with a long revert you can effectively control the
length of the revert using the envelope generators decay and/or release
times. In this way, you could create a number of different drum programs
where each program has increasinly longer revert times on the drums. Also,
because it -is possible to control release times using keyboard velocity, you
could actually control the revert decay with keyboard dynamics.
When you are layering two keygroups on top of each other you can create
interesting crossfade sounds by setting one keygroup in the layer to have an
instant attack and the other to have a slow attack. For example, you could
have a program where a brass sound crossfades with a string sound. By setting
the brass envelope to die away completely (i.e. with a sustain level of 00>
the two sounds would completely crossfnde. This technique can be more
conservative of memory than creating a sample crossfade in EDIT SAMPLE which
requires that you create a new sample.
68

This technique can be extended by layering the same sample on top of itself
and then transposing one sample up two octaves and setting the transposed
sound to fade in slowly. Alternatively, you could layer guitar feedback
effect on top of a distorted guitar sample and. have the feedback fade in
slowly.
As you will have guessed. there are all sorts of possibilities available
when using the envelope generators and we suggest that you experiment to see
the sort of effects you can create with even the simplest sample.
USING THE _INDIVIDUAL OUTPUTS
On the back of the 5950 are a number of audio outputs. There Is the MIX
output which, as the name implies, carries a mix of all 8 voices to an
amplifier or mixer. The LEFT and the RIGHT outputs allow you to create
stereo type effects as well as split keyboard effects and there are also the
8 individual monophonic outputs.
The most basic application for these 8 individual outputs is to handle
individual drum samples where each drum can be given its own channel on a
mixing desk and EQ'd, balanced and effected separately and how to assign the
outputs is explained in EDIT PROGRAM. These individual outputs are
monophonic - that is, they can only play one sound at a time so it is not
possible to play chords through them. It could be, however, when you are
sequencing multl-timbrally using the MIDI OFFSET function found on Page 16
of EDIT PROGRAM that you have chordal parts that you wish to assign to
individual outputs. This can easily be achieved on the 5950 using a
combination of the individual outputs and the left and right outputs.
As mentioned earlier in this manual, the MIX output carries all the 8 voices
regardless of whether they have been assigned to individual outputs or not.
The left output carries voices 1 to 4 and the right output carries voices 5
to 8. What this means is that anything appearing at individual outputs 1 - 4
will also appear at the left output and anything assigned to outputs 5 - 8
will also appear at the right output. This allows you to set up a
multitimbral situation where polyphonic sounds are assigned to either the
left or right outputs with monophonic instruments being assigned to 4 of the
individual outs respectively.
For example, say you wanted to sequence some drums, a bass and a piano part
on different MIDI channels from a sequencer. You could assign the bass drum
to individual output 1, the snare to individual output 2 and the closed and
open hi-hats to individual output 3. The bass sample which is only playing
monophonically can be assigned to output 4. The piano part can then be
assigned to the right output for polyphonic playback. Conversely, if it is
more appropriate, the drums and bass could be assigned to individual outputs
5 - 8 with the piano coming out of the left output (remember that individual
outs 1 - 4 appear at the left output and outputs 5 - 8 appear at the right
output so these can't be used together successfully). To sequence more
instruments, you would have to carefully plan your output assignments but a
lot can be done so long as too many sounds don't appear together. For
example, the snare output could share with a clap or rimshot as long as they
don't sound on the same beat. Similarly, the bass drum could share a cabasa
or whatever as long as they don't sound on the same beat. The left or the
right output, depending on which you are using, could share with a brass
sound or a string sound as long as the total polyphony for this output does
not exceed 4 notes at any given time. With careful planning of output
assignment and great attention paid to the orchestration of your sequencing,
you can achieve astonishing results.
69


Of course, you may not have access to a mixer and so you will want to use the
MIX output. If this is the case. you can mix the various instruments and
control tone in Page 06 of EDIT PROGRAM.
Note: however you sequence your 5950, ensure that total polyphony never
exceeds B voices at any time. In particular, take care if you are using-any
layered programs as these will reduce the available polyphony of the sampler.
USING THE 5950 WITH ANOTHER SYNTH
Using MIDI, it is possible to layer the S950 on top of sounds generated by
another synthesizer. This can be very useful in enriching the sound of either
the synth or the sampler.
For example, you may have a synthesized string sound which needs some extra
'detail' to add more realism. By layering a nice 'bowey' string sound, you
not only create a richer sound but you also add that extra bowed detail. By
EQ'ing each sound and carefully balancing the two together on a mixer, you
can enhance the sound even further and a touch of reverb will add the
finishing touches. The same technique applies to any other combination of
sounds. Of course, the sounds don't have to be the same - french horn and
glockenspiel is a nice combination as is piano and strings with the synth or
the sampler providing either sound. Combining sampled sax with synth brass
and then splitting them in octaves with some slight WARP on the S950 can
create a powerful brass section whilst combinations of sampled voices and
synth sounds allow you to produce beautifully ethereal textures.
One popular technique these days is to graft the attack of a sampled sound
onto a synth sound and this too can be particularly effective and layering
Just the attack of a violin onto even the most lack-lustre synth string sound
can create a very realistic hybrid. The 5950 can be used to do this very
easily and the beauty of using the 5950 in this way is that you can layer
your own samples on top of your own synth programs and not rely on factory
preset samples and programs as is the case in the synths that utilise this
technique. Once again, with the right balancing, EQ and Judicious use of
effects such as reverb, some astonishing textures can be created and the
advantages of this method of layering just sampled attack transients is that
these transients take up very little memory in the 5950 and one disk could
easily hold a few string, brass. breath and percussion attacks to layer over
your synth sounds in a myriad of combinations.
If you are working live, you will probably want to recall these samples with
the synth programs. This is easily achieved by assigning any given program on
the S950 to be recalled via MIDI program change using the 'MIDI prog'
function on Page 02 of EDIT PROGRAM. So, if your synth string program is
number 37, assign MIDI prog 37 to your sampled string attack transients and
the samples will be recalled whenever you select the string sound. If you
want to layer those same samples on too of another sound in another memory
location on your synth. simply copy the program in the S950 giving it a
slightly different name (why not give it the same name as your synth sound?)
and assign the approriate MIDI prog number to the copied program.
Naturally, all this needn't relate only to keyboard control and it is
possible to layer 5950 drum samples on top of a drum machine's drum sounds to
create powerful modern drum hybrids. Similarly, a MIDI drum kit could be used
with the sampled sounds layered on top on the distinctive analogue synth drum
sounds these electronic kits are famous .for. Likewise, layering samples over
your MIDI guitar can create extremely interesting effects.
70


USING MIDI VOLUME CONTROL ON THE S950
There exists in the MIDI specification a special MIDI control code number 07
which allows you to remotely control the volume of the 5950 from another
MIDI controller. This can be switched in and out using Page 04 in the MIDI
mode. This has a variety of uses.
Firstly, you can use a MIDI footpedal to control volume. Assuming your synth
or MIDI keyboard has such a facility, you can simultaneously control the
volume of both the 5950 and the synth using the fOOtpedal. This can be
extremely expressive on string sounds where you can create crescendo and
swell effects.
Another use is simply to remotely control the output volume of the 5950 if
it is stuck away in rack out of harms way but perhaps the most powerful use
of this control is when you are sequencing multi-timbrally because you can
mix the various parts using the MIDI volume control.
Assuming you have a multi-timbral set up programmed using the MIDI offset
function found in EDIT PROGRAM, go to the MIDI buton and ensure that the
parameter LOUDNESS is switched to ON - the S950 is now set up to respond to
MIDI control 07. Now create a multi-channel sequence on your MIDI sequencer.
Having done that, overdub a MIDI volume control setting on, say, MIDI channel
1 using the appropriate data entry facility on your synth or keyboard. You
will note that only the instrument assigned to MIDI channel 1 on the 5950
changes volume as you move the data entry slider whilst the other instruments
don't change volume. Furthermore, that data entry slider movement can be
recorded into your sequencer. You will be able to do this for all tracks and
instruments, fading sounds in and out gradually thereby creating a flexible
automated mixing facility that would embarrass even very sophisticated mixing
consoles!!
Note: all this depends on the capabilities of your particular synth or
keyboard controller and sequencer. It could be that your synth has-no way of
generating MIDI control 07 or, alternatively, your sequencer may not be able
to actually record it. This is for you to establish with your own equipment
set up. Having said that, most synths, keyboards and other MIDI controllers
do generate MIDI control 07 and most sequencers allow you to actually record
that control data as part of a sequence so all this should be no problem.
USING THE MONITOR SELECT
In REC and EDIT SAMPLE, Page 02 has a facility whereby you can monitor the
sound you are sampling or the sample you are editing in the context of a
program. This can be very useful if you are doing any multisampling or if you
are sampling or editing drums.
To monitor, for example, a new snare drum sample in conjunction with other
drums in a program called DRUMS i, go to PAge 02 of the REC mode and, using
the CONTROL knob, scroll through the programs and select DRUMS 1. You will
now be able to hear your new sample in conjunction with the other samples in
the program.
The same is true of EDIT SAMPLE. If you want to hear how your edits sound
within the context of a program, go to Page 02, select the appropriate
program using the control wheel and you will hear the sample currently
selected for editing with the other samples in that program.
71


Note: before you can do this, the program has to have been created and the
sample name used in REC or the sample currently selected for editing has to
have been placed within that program. For example, if the sound you are
sampling or editing is called SNARE 1 but the program DRUMS 1 does not
contain that name in any of its keygroups, you will not be able to
effectively monitor the sample you are working on.
EDITING A THE START POINT OF A SAMPLE - a useful tip
It is often necesaary to trim the start points of a sound to eliminate any
extraneous noises that may have crept in before the sample. This is easy
enough to achieve and is described in EDIT SAMPLE. With some sounds,
particularly percussive sounds and, in particulaar, drums and percussion, the
start points must be very accurately set otherwise the samples may start late
and affect the 'feel' of a piece of music. These days, especially with dance
and pop music, rhythmic perfection is extremely important and if drums are
late by even a few milliseconds, the quantised perfection of your sequenced
parts falls apart. The problem is, even the most critical ear and the S950's
AUTOMATIC START POINT function is sometimes not accurate enough to detect a
slight delay so here's how to set the start points more accurately.
Go into EDIT SAMPLE and select the sound you wish to edit. Let us. assume
that it was sampled at C3 60. Ensuring that Page 02 is set to 'Monitor', play
the selected sound on C1 on your keyboard so that it is playing two octaves
down. When you do this, you effectively slow the sample down and any slight
delays at the start point will be accentuated. Move the start point until
there is no delay - you w111 find that samples edited in this fashion are
much tighter in a strict tempo piece of music.
If you are not using a keyboard to play your samples, you can use the PB
button and the sample can be transposed down two octaves using Page 03 of
EDIT SAMPLE. The same applies if you are using a drum machine or drum pads to
trigger the sample.
Naturally, this doesn't only apply to drum or percussion sounds - any
sample will benefit from this technique.
SAVING MEMORY IN THE 5950
One of your main concerns if you are trying to cram as many sounds into the
5950 as you can is to make economic use of memory. The 5950 has several
fetaures that makes such a thing easy.
To begin with, always select the optimum bandwidth for the sound you are
sampling. It's all too tempting to sample everything at full bandwidth to
ensure that the sound is crystal clear but this is wasteful of memory,
especially on sounds that would not benefit greatly from the increased
bandwidth. For example, what is the point of sampling a bass drum at full
bandwidth when it is unlikely that there will be many frequencies much above
lOkHz - it would be better to sample it with a 10k bandwidth to save memory.
By adopting this approach for every sound you sample, you'll be amazed at how
many samples you can squeeze into the 5950.
It is also important not to waste sampling time 'so select your sampling time
in REC mode carefully. This is not .a big problem, however, as you can always
shorten the sampling time if it's too long by changing the end point in EDIT
SAMPLE. By going to Page 10 of EDIT SAMPLE, you can discard the unwanted end
point and free up more memory.
72


You can also edit the end point on looped sounds without affecting the loop
above.
in some cases.
Let us say that you are editing a sample and have effectively looped it in
Page 08. You can now go back to Page 07 and move the end point back. Play the
sound repeatedly as you edit the end point and you will find that you will be
able to edit out quite a large chunk of the sound before the loop is
affected. You can now go to Page 10 and discard the unwanted portion of the
sample. Of course, this won't always work 100% because of the nature of some
sounds but it is something you can experiment with - if it doesn't work,
revert to the original end point.
Hopefully, all this should give you an insight to the amazing creative
possibilities offered by the Akai 5950 and we hope also that it will act as a
catalyst for you to experiment and create and edit your own samples and
programs. Naturally, there is a large library of S900 and 51000 samples
available from your dealer but these sounds can be personalised to your own
tastes and then expanded even further using some of the techniques outlined
73

5950
-
SPECIFICATIONS
System: Digital sampling (12-bit sampling/16-bit processing)
Sampling rate: 7.5kHz - 48.OkHz (continuously variable)
Bandwidth: 3kHz - 19.2kHz (continuously variable)
Sampling time: 9.89 sets - 03.3 sees
Polyphony: 8 Voice
Data storage: 3.5 inch disk drive (DD and HD disks)
Internal memory: 750k Byte
Max number
of samples: 99
Max number of
programs: 99
Editing facilities:
Sample: Select, copy, rename, delete
Replay mode Cone shot, looping, alternating)
Start point (with AUTO START POINT LOCATE)
End point
Loop length (with AUTOLC!OP function)
Crossfade looping
Resample at half bandwidth
Discard before start/after end
Sample crossfade/splice
Timestretch Cup to 999%)
Transpose, tune and loudness
Program: Select, copy, rename, delete
Individual keygroup copy, delete
PUT/GET function allows keygroups to be copied from
other programs
Velocity switching with variable switch value
Positional crossfade
Individual keygroup control of loudness, filter, transpose
and fine tune
Individual filter ADSR envelope generator per keygroup
Individual amplitude ADSR envelope generator per keygroup
Individual LFO control per keygroup
Mod wheel and aftertouch control of LFO
Warp - automatic pitchbend per keygroup (with velocity
control)
Individual keygroup velocity control of loudness, filter
ADSR attack time, ADSR release time
Individual keygroup control of filter track, constant
pitch (keyboard on/off)
Individual keygroup assignment to outputs
Individual MIDI assignment per keygroup
Other: Akai ME35T audio/pad-MIDI converter control
Master tune
Outputs: Mono mix, left and right, 8 individual assignable outputs
Inputs: Mic, Line
Other: MIDI IN, OUT and THRU. RS232 or equivalent
Record.trigger in
Options: Memory expansion board (EXM006> X 2
Atari/Supra-CD/RDAT hard disk and digital audio interface
Dimensions: 482.6CW) X 132.6(H) X 410 <D>mm <EIA rack mount - 3U>
Weight: 10.8kg
74

MIDI DIGITAL SAMPLER J
Nodes 5950 MIDI Implementation Chart
Transmitted Recognized Remarks
Function ...
Basic Default ~ X 1 without Disk
Channel Changed ~ x 1 - 16 blemorized(Dis
k)
Default ~ x Mode 1 Without Disk
Mode Mode 1 - 4 Nemorized(Disk
)
Messages X Omni
on/off.P/?1
Altered x
Note x 0 - 127
Number : True voice ••••••••••••
24 - 96
••
Velocity Note ON X Q 9n V-I^-127
Note OFF Q 9n V-0 or
8n V-0^-127 used Velocity
release
After Key's X x
Touch Ch's x Q
Pitch Bender X Q 0-12: Half
tone
~ step (7 bit)
Control 1 x 0 Modulation
heal
Change
64 x o Damper pedal
Prog X 1 ^-127 by Preset numChange : True # ••••••••••••
1 127 ber value
••
System Exclusive Q Q ID:47
System : Song Pos X X
Song Sel X x
Common : Tune x x
System :Clock x x
Real Time -
X X
:Commands
Aux :Local ON/OFF x X
:All Notes OFF x Q (123)
Mes° :Active Sense X X
sages: Reset X x
Notes
Mode 1 : OMNI ON, POLY Mode 2 : OMNI ON. MONO Q : Yes
Mode 3 : OMNI OFF. POLY Mode 4
: OMNI OFF. MONO X : no

WHAT IS S
AMPLING'
Sampling is a method of digital recording but, unlike digital tape recorders,
a sampler can only record a short amount of sound. Basically, a sampler is a
bit like a movie camera. As you know, a movie camera does not take one
continuous photograph of a moving object but takes a whole pile of snapshots
which, when played back at the right speed, gives the illusion of motion.
Similarly with sampling. When you sample a sound, it takes a series of
digital audio 'snapshots' which are then stored in computer memory. These
snapshots have to be taken because computers (which is what a sampler is) can
only deal in absolute numbers whereas sound is continuously variable. When
you sample something into your 5950, you actually digitise the sound using a
device known as an ANALOGUE TO DIGITAL CONVERTER or ADC which converts the
contiuously variable waveform into a digital stepped waveform with each of
the steps being one snapshot (see Fig. 1>.
FIG. 1. Digitising an analogue waveform
Probably the most important factor with sampling is the sampling rate as this
decides the BANDWIDTH or the audio quality. The sampling rate has to be very
fast in order to faithfully reproduce the sampled sound. Going back to the
movie camera analogy, you will remember that in the early days of silent
films, the movements always seemed perky. This is because the speed of the
camera was not fast enough to capture every single movement and when it
played the film back, the result was that ,perky, stuttered motion. Nowadays,
camera speed is a lot faster so movement seems smooth and natural. Similarly
with samplers - if you don't have a fast enough sampling rate, the resultant
sound will be distorted and lacking in higher frequencies and so will sound
muffled. There will also be digital noise present in the signal (known as
ALIASING) and the results will not bear much relationship to the original
sound you sampled. If you compare Fig. 2 with Fig. 1 you will see why ° Fig.
2 with the low sampling rate doesn't look anything like the incoming signal
whereas Fig. 1 with the faster sampling rate is a lot more accurate. In order
for the sound in Fig. 2 to sound half decent, heavy filtering has to be used
which will get rid of the distortion and digital noise but this will also
produce a more muffled tone as it will remove the higher frequency component
of the sound even further.
76

FIG. 2. Digitising an analogue waveform with a low sampling rate
But this needn't concern you too much because you can rest safe in the
knowledge that the 5950's sampling rate is up there with the big boys
sampling away at 48kHz giving you a maximum bandwidth of 19.2kHz - it's only
when you want to sample longer sounds that you may have to compromise on
audio quality by bringing the sampling rate down and hence the bandwidth.
Even when you do this, you'll be surprised how good the 5950 sounds even
with a bandwidth as low as lOkHz. Also, the sampling rate (and hence
bandwidth) on the 5950 is continuously and totally variable and this allows
you to maximise the sample memory. For example, say you were sampling a drum
kit. The cracky snare would need a bandwidth of around 16kHz as would the
hi-hats whilst the cymbals may require an even ,higher bandwidth - maybe
18-19kHz. The kick or bass drum, on the other hand, could get away wits a
bandwidth of around IOkHz whilst the toms could still sound good.at a
bandwidth of 12-i4kHz. In this way, you can sample sounds. with the optimum
bandwidth and make more economical use of the 5950's sample memory.
So, once you taken this series of digital snapshots of the sound, what then?
Well, each step of the digitised waveform is given a number so-that the
computer can understand what it's dealing with and held in RANDOM ACCESS
MEMORY or RAM. The more bits your sampler has, the more numbers the computer
can assign to these steps and with more numbers, you can take more snapshots
and so increase dynamic range, audio quality and/or sampling time even
further.
The trouble is, those numbers mean nothing to us so they have to pass
through a thing known as a DIGITAL TO ANALOGUE CONVERTER or DAC and here the
digital sound is reconstituted into a continuous signal again and we hear
the resulting sound. Fig. 3 shows a simplified layout of the 5950.
FIG. 3. Simplified layout of 5950
77

So, once those numbers are in the sampler, you can EDIT the sample. Here, you
can instruct the computer to mess around with the data rather like you can
use a word processor to edit text. The most basic thing you tell it to do is
to actually play the sound.
Let us imagine that we have taken a one second sample at a bandwidth of 16k
to give us a sample that is 39,900 of these digital numbers long, when you
play a note on your MIDI controller, the- computer reads out the numbers from
1 to 39,900 from the RAM - the stream of numbers is then fed through the DAC
and we hear the sound. If we tell the computer to read out those numbers at a
faster speed - the sound will be higher in pitch. Similarly, if we tell the
computer to read out those numbers slower, the sound will be lower in pitch.
Now then, you could also instruct the computer to read those numbers out from
39,900 down to 1 - in other words, the sound will come out backwards.
But we have a problem here with this sample we have just taken because
someone in the background coughed just before the sound and then laughed dust
after the sample was taken. Well, you could instruct the computer to rend out
only numbers 3,000 to 27,350 - now you won't hear the cough at the start or
the laugh at the end of the sample ° you have just edited the start and end
points of the sample.
But we have another problem now.. This one second sample only lasts half a
second when you play it an octave up so you can tell the computer to read out
those numbers from 3,000 to 27,350 but then, when it has finished doing that,
to read out numbers 25,180 to 27,350 over and over and over again for as long
as you keep your finger on the keyboard ° you have just looped a sample so
that it sustains for as long as you hold a key down. If the loop sounds a bit
odd and full of glitches and clicks, you can even tell the computer to help
find a better loop point using an AUTOLOOP function.
FIG. 3. Looping a sound
We do have another problem though:
78

You will notice that as you transpose the sample more than a few semitones up
or down, the tonal characteristic starts to sound, well.. weird! This !s
especially true of voice samples where playing higher up the keyboard
produces a sound not unlike some cheeky cartoon character whilst playing it
lower on the keyboard, your voice sound like a space alien with indigestion!
This happens because certain sounds have unique resonances in certain
frequency ranges and these stay constant on the real thing. When you take one
sample of such an instrument, those resonances are transposed with the sound
and this gives the sound its unusual character. Of coure, this side effect
can be used to great creative effect and voice samples in particular can
sound beautifully ethereal played high on the keyboard or disturbingly
ominous when transposed down a few octaves. If you want to get round this
problem, however, you will need to resort to MULTI-SAMPLING. This technique
requires that you take a sample of the instrument every few semitones and
then map these sounds across the keyboard so that, at any point, the
transposition is never further than a few semitones away before the next
sample is heard and so the resonances and tonal quality remain constant over
the whole keyboard range (see Fig. 4>. Instruments that need multisampling
are things like pianos, strings, voices. guitars, oboes and clarinets amongst
others but some sounds can get away with only one sample across the whole
keyboard.
FIG. 4. Mapping samples (S1-S6) across the keyboard range
Having sampled your sounds and edited them and mapped them out across the
keyboard it doesn't end there because once the signal goes through the DAC
and is back in the analogue world, you can do some analogue things to it like
shove it through filters and amplifiers. If you do that you can also add
envelope shaping and generally treat your sampler like a synthesizer to
radically transform the sound. You can also bring certain samples out of
their own individual audio output so thet they can be further modified on e
mixer - all sorts of possibilities suddenly become available and one single
sample can be the basis of any number of variations.
And that's it basically. Of course, it can get a lot more complex than that
but hopefully, this should help you understand what is happening inside your
5950 every time you poke around in EDIT SAMPLE or EDIT PROGRAM or play a note
on the keyboard.
79

WHAT IS MIDI?
Back in the early days of synthesizers, a system known as voltage control was
used. Basically, when you played a note on the keyboard, you sent a voltage
to voltage controlled oscillators and the value of that voltage determined
the pitch of the oscillators. At the same time, the keyboard sent out a pulse
(known as a trigger or gate pulse) to devices known as envelope generators
which also produced a rising and falling voltage which would sweep through a
voltage controlled filter and open and close a voltage controlled amplifier.
A device known as a low frequency oscillator also generated rising and
falling voltages and this could be routed to the oscillators, filter and/or
amplifier for pitch, tonal and amplitude sweeps.
Most synths at that time were only monophonic - that is they could only play
one note at a time and so it was easy thing to stick four sockets on the back
of the synth. One socket had the keyboard voltage output, another had the
gate pulse output whilst the other two sockets were for voltage and gate
pulse inputs. Using these sockets, it was possible for one synth to play
another and it all worked rather well. The problem was that different
manufacturers used different methods of triggering the envelope generators
and so, without using special interfaces, it was not possible to have a Moog
synth playing a Roland or ARP synth or vice versa. Neither was it possible
for a Korg synth to play a Moog or a Sequential synth. This was also true
with the simple sequencers that were around in those days and, similarly, it
was not possible to use a Moog sequencer with anything other that Moog
equipment - likewise with Korg.
This problem was further complicated with the advent of polyphonic synths
such as the Prophet 5, Oberheim OBX and Roland Jupiter 8 and compitcated even
further with the advent of digitally controlled synthesizers.
In 1983, Dave Smith, president of Sequential Circuits, put forward a proposal
to the Audio Engineering Society (AES) which suggested that as most
manufacturers were using microprocessors at the heart of their synths,
sequencers and drum machines, a standard digital interface could be used that
allowed any manufacturers equipment to be used with another with no
interfacing problems. The Musical Instrument Digital Interface or MIDI had
been born and over the following few years, the specification of MIDI changed
quite radically to the powerful interfacing system it is today. But what is
MIDI?
MIDI is basically a digital communication system. At the heart of every
synth, sampler, drum machine and sequencer is a microprocessor. By getting
the microprocessor from one instrument to directly 'talk' to another
instruments microprocessor it !s possible to play the two instruments. as if
they were one. The most basic use of this is to layer two instruments sounds
on top of each other to create a richer, bigger sound.
If you refer to Fig. 1, you can see the layout of a typical synth or sampler.
As you can see, at the heart of this is the microprocessor or Central
Processing Unit (CPU) and this is controlling practically every aspect of the
instrument from keyboard control to sound editing - some even allow sequencing
and other facilities. Observe the position of the MIDI outputs. If the MIDI
OUT is taken to the MIDI IN of another instrument, anything you do on the
controlling synth is duplicated on the other.
80
 Loading...