


MPK Mini Play
User Guide
English ( 3 – 7 )
Guía del usuario
Español ( 8 – 12 )
Guide d’utilisation
Français ( 13 – 17 )
Guida per l’uso
Italiano ( 18 – 23 )
Benutzerhandbuch
Deutsch ( 24 – 29 )
Appendix
English ( 30 )

2
User Guide (English)
Introduction
Thank you for purchasing the MPK Mini Play. At Akai Professional, we know how serious music is to you. That’s why we design our equipment with only one thing in mind—to make your performance the best it can be.
Box Contents
MPK Mini Play
USB Cable
Software Download Card
User Guide
Safety & Warranty Manual
Support
For the latest information about this product (documentation, technical specifications, system requirements, compatibility information, etc.) and product registration, visit akaipro.com.
For additional product support, visit akaipro.com/support.
3
Quick Start
Playing Sounds
Note: To play internal sounds, the Internal Sounds button must be engaged.
To access the Drum sounds: There are 10 drum kits available. Press the Drums button and rotate the encoder to select a drum kit. Tap the pads to trigger the drum kit sounds.
To access the Keyboard sounds: There are 128 Keys programs available. Press the Keys button and rotate the encoder to select a Keys program. The Keys programs are played with the 25 keys.
Accessing the Favorites: A Favorite consists of a Keys patch, a Drums patch, and your effects knobs settings. To access a Favorite, press the Favorites button then tap one of the pads to call up that Favorite.
Saving a Favorite: You can store up to eight Favorites with MPK Mini Play. To do this, press the Favorites + Internal Sounds buttons, then tap one of the eight pads to store your Favorite to that location.
Setting up MPK Mini Play with GarageBand
1.Adjust the power switch on the MPK Mini Play’s rear panel to the USB position.
2.Connect MPK Mini Play to your computer using a standard USB cable. (If you are connecting MPK Mini Play to a USB hub, make sure it is a powered hub.)
3.Open GarageBand. Go to Preferences > Audio/MIDI in GarageBand and select “MPK Mini Play” as the MIDI input device (the controller may appear as USB Device or USB PnP Audio Device.
4.Choose from the list of instruments in GarageBand and play the keys on MPK Mini Play to hear the instrument being played through your headphones or speakers connected to your computer.
Setting up MPK Mini Play With Other Software
To select MPK Mini Play as a controller for your digital audio workstation (DAW):
1.Adjust the power switch on the rear panel to the USB position.
2.Connect MPK Mini Play to your computer using a standard USB cable. (If you are connecting MPK Mini Play to a USB hub, make sure it is a powered hub.)
3.Open your DAW.
4.Open your DAW's Preferences, Options, or Device Setup, select MPK Mini Play as your hardware controller, and then close that window.
Your MPK Mini Play is now able to communicate with your software.
4

Features
Top Panel
|
|
FAV 5 |
FAV 6 |
|
FAV 7 |
FAV 8 |
|
|
|
|
|
3 |
|
|
|
|
|
|
|
9 |
|
10 |
|
4 |
ARPEGGIATOR |
|
|
2 |
|
|
|
|
|
|
22 |
5 |
FAV 1 |
FAV 2 |
FAV 3 |
FAV 4 |
11 |
12 |
17 |
18 |
|
||
|
|
|
|
|
|||||||
|
6 |
|
|
|
|
|
13 FAVORITES |
14 |
FILTER |
RESONANCE |
|
|
|
|
|
|
|
ATTACK |
RELEASE |
|
|||
7 |
8 |
|
|
|
|
|
15 |
16 |
19 |
20 |
21 |
|
|
|
|
|
|
|
|
|
REVERB AMT |
CHORUS AMT |
VOLUME |
|
|
|
|
|
|
|
|
|
EQ LOW |
EQ HIGH |
|
|
|
|
|
|
1 |
|
|
|
|
|
|
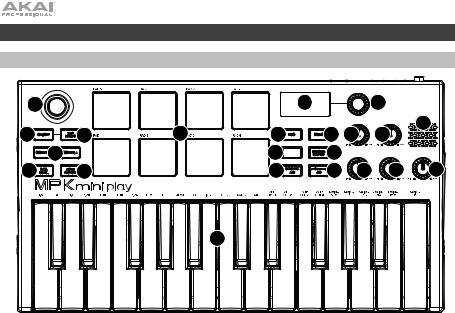
1.Keybed: This 25-note keyboard is velocity-sensitive and, along with the Octave Down / Up buttons, can control a ten-octave range. You can use the keys to access certain additional commands, as well. Hold down the Arpeggiator button and press a key to set the Arpeggiator parameters. Press the Keys button and turn the encoder to change sounds triggered from the keys.
2.Drum Pads: The pads can be used to trigger drum hits or other samples in your software. The pads are velocity-sensitive, which makes them very responsive and intuitive to play. When the Drums button is pressed, you can turn the encoder to change sounds on the drum pads. Access one of the 8 Favorites (a combination of a sound on the keyboard and a sound on the drum pads) by pressing and holding the Favorites button and tapping a drum pad.
3.X-Y Controller: Use this 4-axis thumbstick to send MIDI pitch bend messages or send MIDI CC messages.
4.Arpeggiator: Press this button to turn the Arpeggiator on or off. Pressing it during a latched arpeggio will stop the arpeggio. Hold down this button and press the corresponding key to set the following parameters:
5

•Time Division: 1/4 note, 1/4 note triplet (1/4T), 1/8 note, 1/8 note triplet (1/8T), 1/16 note, 1/16 note triplet (1/16T), 1/32 note, or 1/32 note triplet (1/32T).
•Mode: The mode determines how the arpeggiated notes are played back.
o Up: Notes will sound from the lowest to the highest.
o Down: Notes will sound from the highest to lowest.
oIncl (Inclusive): Notes will sound from the lowest to the highest, and then back down. The lowest and highest notes will sound twice at the directional change.
oExcl (Exclusive): Notes will sound from the lowest to the highest, and then back down. The lowest and highest notes will sound only once at the directional change.
o Order: Notes will sound in the order they were pressed.
o Rand (Random): Notes will sound in random order.
oLatch: The Arpeggiator will continue to arpeggiate the notes even after you lift your fingers. While holding down the keys, you can add more notes to the arpeggiated chord by pressing down additional keys. If you press the keys, release them, and then press down a new combination of notes, the Arpeggiator will memorize and arpeggiate the new notes.
•Octave: Arpeggio octave range (Arp Oct) of 0, 1, 2, or 3 octaves.
•Swing: 50% (no swing), 55%, 57%, 59%, 61%, or 64%.
5.Tap Tempo: Tap this button at the desired rate to determine the tempo of the Arpeggiator.
Note: This function is disabled if the Arpeggiator is synced to external MIDI clock.
6.Octave Down / Up: Use these buttons to shift the keyboard's range up or down (up to four octaves in either direction). When you are higher or lower than the center octave, the corresponding Octave button will light. Press both Octave buttons simultaneously to reset the keyboard to the default center octave.
7.Full Level: Press this button to activate or deactivate Full Level mode in which the pads always play at a maximum velocity (127), no matter how hard or soft you hit them.
8.Note Repeat: Press and hold this button while striking a pad to cause the pad to retrigger at a rate based on the current Tempo and Time Division settings.
9.Display Screen: Shows the sounds, menus, and adjustable parameters.
10.Selector Knob: Select from the internal sounds and menu options with this knob.
11.Keys: When this button is pressed, the current program being played by the keys is displayed. Also, when this button is pressed, you can turn the encoder to change sounds on the keyboard.
12.Drums: When this button is pressed, the current program being played by the Drum Pads is displayed. Also, when this button is pressed, you can turn the encoder to change sounds on the drum pads.
13.Favorites: Press this button and Internal Sounds button, then tap one of the eight pads to store your Favorite to that location. Also, press this button and then tap one of the pads to recall a Favorite.
14.Internal Sounds: Press this button and the Favorites button, then tap one of the eight pads to store your Favorite to that location. Press this button to enable/disable the internal sounds when a key or pad is pressed. When disabled, your MPK Mini Play will send and receive MIDI only using the USB port.
15.Pad Bank A/B: Press this button to switch the pads between Bank A or Bank B.
16.Knob Bank A/B: Press this button to switch the knobs between Bank A or Bank B.
17.Filter/Attack: This assignable 270º knob sends a MIDI CC message and can be switched to its secondary function using the Knob Bank A/B button. When the Knob Bank A/B button is set to Bank A, adjust this knob to change the Filter setting for the internal sounds. When the Knob Bank A/B button is set to Bank B, adjust this knob to change the the Attack setting for the internal sounds. In USB mode, adjust this knob to send assignable MIDI CC messages.
6

18.Resonance/Release: This assignable 270º knob sends a MIDI CC message and can be switched to its secondary function using the Knob Bank A/B button. When the Knob Bank A/B button is set to Bank A, adjust this knob to change the Resonance setting for the internal sounds. When the Knob Bank A/B button is set to Bank B, adjust this knob to change the the Release setting for the internal sounds. In USB mode, adjust this knob to send assignable MIDI CC messages.
19.Reverb Amount/EQ Low: This assignable 270º knob sends a MIDI CC message and can be switched to its secondary function using the Knob Bank A/B button. When the Knob Bank A/B button is set to Bank A, adjust this knob to change the amount of the Reverb effect for the internal sounds. When the Knob Bank A/B button is set to Bank B, adjust this knob to change the low band EQ setting for the internal sounds. In USB mode, adjust this knob to send assignable MIDI CC messages.
20.Chorus Amount/EQ High: This assignable 270º knob sends a MIDI CC message and can be switched to its secondary function using the Knob Bank A/B button. When the Knob Bank A/B button is set to Bank A, adjust this knob to change the amount of the Chorus effect setting for the internal sounds. When the Knob Bank A/B button is set to Bank B, adjust this knob to change the high band EQ setting for the internal sounds. In USB mode, adjust this knob to send assignable MIDI CC messages.
21.Volume: Controls the internal sounds volume sent to the internal speaker and the Headphone Output.
22.Speaker: Hear the internal sounds that are played with the keys and pads from here.
Note: The internal speaker is disabled when the headphone output is used.
Rear Panel
POWER |
2 |
SUSTAIN |
USB |
|
|
||
USB BATT |
|
|
|
1 |
|
3 |
4 |
1.Power Switch: Adjust this switch to the appropriate position when powering the unit through a USB connection or with batteries. When set to USB, with no cable connected, this button will turn off your MPK Mini Play to save battery life.
2.Headphone Output: Connect headphones here to listen to the internal sounds triggered with the keys and pads. You can also connect MPK Mini Play to speakers using an 1/8” adapter.
Note: Connecting this output will disable the internal speaker.
3.Sustain Input: This socket accepts a momentary-contact foot pedal (sold separately). When pressed, this pedal will sustain the sound you are playing without having to keep your fingers pressed down on the keys.
4.USB Port: The USB port delivers power to the keyboard and transmits MIDI data when connected to a computer to trigger a software synth or MIDI sequencer.
Bottom Panel (not shown)
1.Battery Compartment: Install 3 AA alkaline batteries here to power the unit if not being powered through a USB connection.
7

Guía del usuario (Español)
Introducción
Gracias por comprar el MPK Mini Play. En Akai Professional, sabemos que usted se toma la música en serio. Por eso es que diseñamos nuestros equipos con una sola cosa en mente— hacer que pueda tocar su mejor interpretación.
Contenido de la caja
MPK Mini Play
Cable USB
Tarjeta de descarga de software
Guía del usuario
Manual sobre la seguridad y garantía
Soporte
Para obtener la información más reciente acerca de este producto (documentación, especificaciones técnicas, requisitos de sistema, información de compatibilidad, etc.) y registrarlo, visite akaipro.com.
Para obtener soporte adicional del producto, visite akaipro.com/support.
8

Inicio rápido
Reproducción de sonidos
Nota: Para reproducir los sonidos internos, debe usarse el botón Internal Sounds.
Cómo acceder a los sonidos de batería: Hay 10 baterías disponibles. Pulse el botón Drums y gire el codificador para seleccionar una batería. Toque los pads para ejecutar los sonidos de batería.
Cómo acceder a los sonidos de teclado: Hay 128 programas de teclas disponibles. Pulse el botón Keys y gire el codificador para seleccionar un programa de teclas. Los programas de teclas se tocan con las 25 teclas.
Cómo acceder a los favoritos: Un favorito consiste de un parche de teclas, un parche de batería y los ajustes de sus perillas de efectos. Para acceder a un favorito, pulse el botón Favorites y luego toque uno de los pads para cargar ese favorito.
Cómo guardar un favorito: Se pueden guardar hasta ocho favoritos en el MPK Mini Play. Para lograr esto, pulse los botones Favorites + Internal Sounds y luego toque uno de los ocho pads para guardar su favorito en esa ubicación.
Configuración del MPK Mini Play con GarageBand
1.Coloque el interruptor de encendido del panel trasero del MPK Mini Play en la posición USB.
2.Conecte el MPK Mini Play a su ordenador mediante un cable USB estándar. (Si está conectando el MPK Mini Play a un concentrador ["hub"] USB, asegúrese de que sea un concentrador alimentado).
3.Abra GarageBand. Vaya a Preferences > Audio/MIDI en GarageBand y seleccione “MPK Mini Play” como el dispositivo de entrada MIDI (el controlador puede aparecer como USB Device o
USB PnP Audio Device).
4.Elija un instrumento de la lista del GarageBand y toque las teclas del MPK Mini Play para escuchar cómo suena el instrumento a través de sus auriculares o altavoces conectados a su ordenador.
Configuración del MPK Mini Play con otro software
Para seleccionar el MPK Mini Play como controlador para su estación de trabajo de audio digital (DAW):
1.Coloque el interruptor de encendido del panel trasero en la posición USB.
2.Abra su DAW.
3.Abra Preferences (Preferencias), Options (Opciones), o Device Setup (Configuración de dispositivo) de su DAW, seleccione el MPK Mini Play como su controlador de hardware y luego cierre esa ventana.
Su MPK Mini Play es ahora capaz de comunicarse con su software.
9
Características
Panel superior
|
|
FAV 5 |
FAV 6 |
|
FAV 7 |
FAV 8 |
|
|
|
|
|
3 |
|
|
|
|
|
|
|
9 |
|
10 |
|
4 |
ARPEGGIATOR |
|
|
2 |
|
|
|
|
|
|
22 |
5 |
FAV 1 |
FAV 2 |
FAV 3 |
FAV 4 |
11 |
12 |
17 |
18 |
|
||
|
|
|
|
|
|||||||
|
6 |
|
|
|
|
|
13 FAVORITES |
14 |
FILTER |
RESONANCE |
|
|
|
|
|
|
|
ATTACK |
RELEASE |
|
|||
7 |
8 |
|
|
|
|
|
15 |
16 |
19 |
20 |
21 |
|
|
|
|
|
|
|
|
|
REVERB AMT |
CHORUS AMT |
VOLUME |
|
|
|
|
|
|
|
|
|
EQ LOW |
EQ HIGH |
|
|
|
|
|
|
1 |
|
|
|
|
|
|
1.Placa del teclado: Este teclado de 25 notas es sensible a la velocidad y, en junto con los botones Octave Down / Up (subir / bajar octava), puede controlar una gama de diez octavas. También puede utilizar las teclas para acceder a ciertos comandos adicionales. Mantenga pulsado el botón Arpeggiator y pulse una tecla para ajustar los parámetros del arpegiador. Pulse el botón Keys y gire el codificador para cambiar los sonidos que se ejecutan desde las teclas.
2.Pads de batería: Estos pads se pueden usar para disparar golpes de batería u otras muestras existentes en su software. Los pads son sensibles a la velocidad, lo que los hace de rápida respuesta y muy intuitivos para tocar. Al pulsar el botón Drums puede girar el codificador para modificar los sonidos de los otros pads de batería. Acceda a uno de los 8 favoritos (una combinación de un sonido en el teclado y un sonido en los pads de batería) manteniendo pulsado el botón Favorites y tocando un pad de batería.
3.Controlador X-Y: Use este joystick de pulgar para enviar mensajes inflexión del tono MIDI o mensajes de CC de MIDI.
4.Arpegiador: Pulse este botón para encender o apagar el arpegiador. Pulsarlo durante un arpegio trabado detendrá el arpegio. Mantenga este botón y pulse la tecla correspondiente para ajustar los siguientes parámetros:
10
 Loading...