


QUICKSTART GUIDE
ENGLISH ( 1 – 4 )
GUÍA DE INICIO RÁPIDO
ESPAÑOL ( 5 – 8 )
GUIDE D'UTILISATION RAPIDE
FRANÇAIS ( 9 – 12 )
GUIDA RAPIDA
ITALIANO ( 13 – 16 )
KURZANLEITUNG
DEUTSCH ( 17 – 20 )
WWW.AKAIPRO.COM
BOX CONTENTS
•Miniak
•Gooseneck microphone
•Power adapter
•Quickstart Guide
•Reference Manual
•Safety Instructions & Warranty Information Booklet
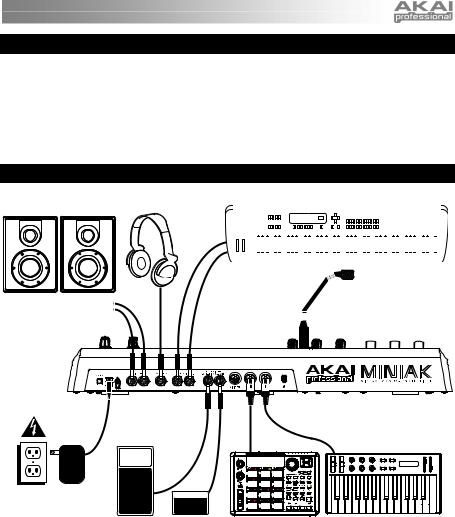
CONNECTION DIAGRAM
Stereo Amp |
Headphones |
|
|
|
|
|
|
|
External Instrument |
|||||||||||||||||||||||||||||||||||||
|
|
|
|
|
|
|
|
|
|
|
|
|
|
|
|
|
|
|
|
|
|
|
|
|
|
|
|
|
|
|
|
|
|
|
|
|
|
|
|
|
|
|
|
|
|
|
|
|
|
|
|
|
|
|
|
|
|
|
|
|
|
|
|
|
|
|
|
|
|
|
|
|
|
|
|
|
|
|
|
|
|
|
|
|
|
|
|
|
|
|
|
|
|
|
|
|
|
|
|
|
|
|
|
|
|
|
|
|
|
|
|
|
|
|
|
|
|
|
|
|
|
|
|
|
|
|
|
|
|
|
|
|
|
|
|
|
|
|
|
|
|
|
|
|
|
|
|
|
|
|
|
|
|
|
|
|
|
|
|
|
|
|
|
|
|
|
|
|
|
|
|
|
|
|
|
|
|
|
|
|
|
|
|
|
|
|
|
|
|
|
|
|
|
|
|
|
|
|
|
|
|
|
|
|
|
|
|
|
|
|
|
|
|
|
|
|
|
|
|
|
|
|
|
|
|
|
|
|
|
|
|
|
|
|
|
|
|
|
|
|
|
|
|
|
|
|
|
|
|
|
|
|
|
|
|
|
|
|
|
|
|
|
|
|
|
|
|
|
|
|
|
|
|
|
|
|
|
|
|
|
|
Gooseneck
Microphone
Power
Expression |
Footswitch |
External Sound |
External MIDI Device |
Pedal |
|
Module |
|
|
|
|
CONNECTING AC POWER
Before making any power connections, make sure the Miniak’s power switch is turned off. Then, plug the power adapter into the Miniak’s power input and into a power outlet.
MAKING AUDIO CONNECTIONS
STEREO: Connect two cables from the Miniak’s left and right outputs to two inputs of an amp or mixer. HEADPHONES: Plug a set of headphones into the headphone jack on the rear panel.
CONNECTING THE FOOT PEDALS
Connect a keyboard sustain pedal (not included) to the (SUSTAIN) input. When you turn the Miniak on, the Miniak will automatically sense and calibrate itself to the pedal.
You can plug an optional continuous controller expression pedal into the (EXPRESSION) input.
1
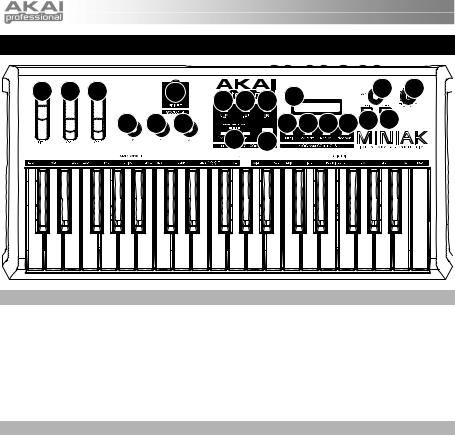
OVERVIEW OF THE CONTROLS
2 |
1 |
1 |
|
9 |
|
|
18 |
14 |
15 |
|
|
|
|
|
|||||
|
|
|
|
8 |
6 |
7 |
|
|
|
|
|
3 |
3 |
3 |
|
|
13 1211 10 16 17 |
|
|
|
|
|
|
|
4 |
5 |
|
|
|
REAL-TIME CONTROLLERS
Despite its small size, the Miniak has six powerful real-time controllers. These controls put the incredible expressivity of virtual analog synthesis at your fingertips.
1.(MOD1) and (MOD2) wheels: The (MOD1) wheel generally adds vibrato. (MOD2) most often sweeps the filter.
2.(PITCH) wheel: The (PITCH) wheel typically raises or lowers the pitch by a whole step, allowing you to gently or heavily detune your sound.
3.(X/Y/Z) knobs: The (X/Y/Z) knobs have different effects depending upon the program.
PERFORMANCE CONTROLS
The performance buttons are clustered together to the left of the display.
4.[OCTAVE]: Extend the Miniak’s playing range by using the two [OCTAVE] buttons. Each press of the [DOWN] or [UP] button shifts the transposition by one octave. The appropriate button glows with increasing intensity as the octave transposition increases.
5.[TAP TEMPO]: The [TAP TEMPO] LED always blinks at the current tempo. Tap this button at the desired rate to determine the tempo. (For finer control, you can also hold down [TAP TEMPO] and turn the control knob.)
6.[PHRASE ARP]: Use [PHRASE ARP] to capture and play back riffs that you play on the keyboard.
7.[LATCH ARP]: [LATCH ARP] acts like a sustain pedal. When [LATCH ARP] is selected, notes continue to play even after you remove your hands from the keyboard. Press [LATCH ARP] a second time to turn the function off.
8.[PATTERN PLAY]: [PATTERN PLAY] works along with Multis. When [PATTERN PLAY] is glowing, the accompaniment feature is active, allowing you to trigger Sequences and Rhythms within Multi Mode. When [PATTERN PLAY] is not glowing, all sequencing features are disabled, and the Miniak only plays the keys you press.
9.MIC INPUT: Connect the included gooseneck microphone to this input. (Note that the microphone will be bypassed when the left audio input is being used.)
2
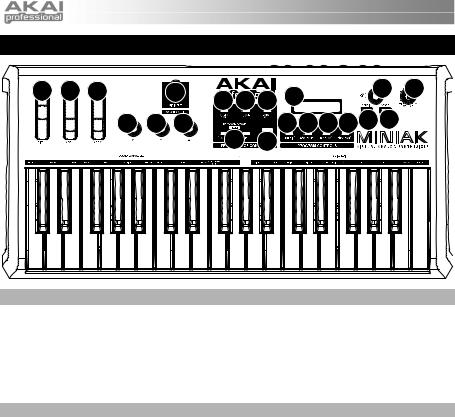
PROGRAM CONTROLS
The Program Control buttons access the Miniak’s four different modes: Programs, Rhythms, Sequences, and Multi. Press one of the buttons to enter its mode. Then spin the DATA DIAL for different sounds.
10.PROGRAMS: Programs are the heart of the Miniak – its lead, bass, drum, pad, and other virtual analog sounds. To jump to a Program category, hold down the [PROGRAMS] button while pressing the appropriate white key on the keyboard. The "recent" category remembers the most recent Programs you’ve used. Add a Program to the "faves" category by pressing the DATA DIAL twice.
11.RHYTHMS: Drum grooves comprised of one or more drum sounds, each playing its own rhythm. Play the left side of the keyboard to hear the complete groove. Trigger individual drums using the keys on the right side.
12.SEQUENCES: Melodic passages that you can compose and then trigger chromatically, beginning on any key.
13.MULTI: The Miniak’s most powerful and sophisticated mode, simultaneously combining multiple programs, rhythms, sequences, and more into powerful and expressive combinations.
DATA & VOLUME CONTROLS
14.DATA DIAL: This dial can also be used to increment and decrement values and settings.
15.VOLUME KNOB: Adjusts the Miniak's master volume level.
16.[CONFIG]: The Miniak’s configuration options. Global transposition and tuning, keyboard velocity curve, MIDI settings, and more.
17.[STORE]: The [STORE] button lights when you have made edits. Press it to save your changes.
18.LCD: The display is used for navigating menus, displaying data, and affecting change on Miniak's options and parameters.
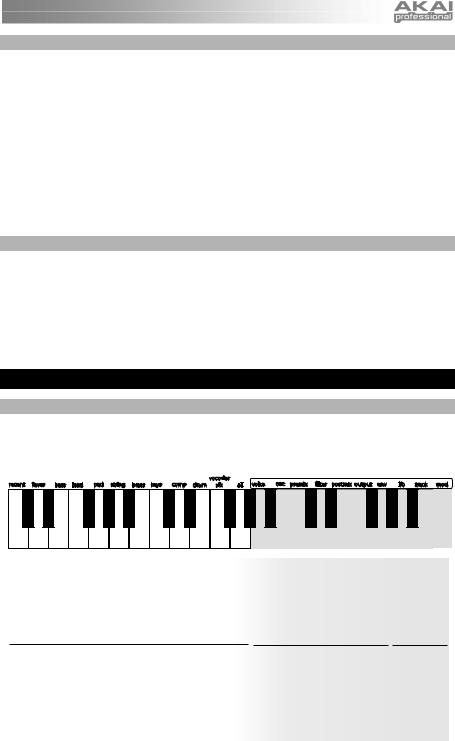
SHORTCUTS
PRESS-AND-HOLD SHORTCUTS FOR THE PROGRAM CONTROLS
Hold down one of the [PROGRAMS], [RHYTHMS], [SEQUENCES] or [MULTI] buttons while playing the keyboard to access various editing and selection shortcuts.
The text printed just above the keyboard provides a key to many of these shortcuts.
Programs
Select a category |
|
Edit this parameter for the current Program |
Multi
Select a category for the most recent part |
Edit part A–G |
Edit beat A–C |
Sequences
Select a category for the current Sequence's Program |
|
(no shortcut) |
Rhythms
(no shortcut) |
|
Edit drum A–G |
|
(no shortcut) |
3

MODE-JUMPING SHORTCUTS
Access each of these shortcuts by holding one of the [PROGRAMS], [RHYTHMS], [SEQUENCES] or [MULTI] buttons and then pressing one of the other buttons.
[PROGRAMS]
Press [MULTI]: set the most recent part’s Program. Press [SEQUENCES]: set the Sequence’s Program.
Press [RHYTHMS]: set the most recent drum’s Program (for drum Programs only).
[MULTI]
Press [PROGRAMS]: jump to the most recent part’s Program.
Press [SEQUENCES]: jump to the Sequence of the most recent part (if any). Press [RHYTHMS]: jump to the Rhythm of the most recent beat (if any).
[SEQUENCES]
Press [PROGRAMS]: jump to the Sequence’s Program. Press [MULTI]: set the most recent part’s Sequence. Press [RHYTHMS]: (no shortcut).
[RHYTHMS]
Press [PROGRAMS]: jump to the Program of the most recent drum. Press [MULTI]: set the most recent beat’s Rhythm.
Press [SEQUENCES]: (no shortcut).
OTHER SHORTCUTS
In most areas, pressing the control knob twice (double-click) restores the default value.
Button-specific shortcuts:
[OCTAVE]: Press both [OCTAVE] buttons simultaneously to return to the default octave range of C3 through C6.
[TAP TEMPO]: Hold [TAP TEMPO] and turn the control knob for fine control over the tempo.
[PROGRAMS]: When editing a parameter, hold down the control knob and wiggle an (X/Y/Z) knob to assign the knob to that parameter.
[MULTI]: For each part, hold down [MULTI] and move a slider or the pitch wheel to jump to the controller assignment options for that part. Do the same with the (X/Y/Z) knobs.
EDITING ON THE MINIAK
Right out of the box, the Miniak offers all the great sounds and operation that most users will ever want. But, if you’re a "power user," you’ll find a wealth of easy-to-access editing capabilities.
To dig deep into the Miniak’s capabilities, push the DATA DIAL to edit the parameters associated with the current operating mode (Programs, Multi, Sequences, Rhythms, or Config). The current mode’s light will glow red once you begin editing.
Turn the DATA DIAL to cycle through various parameters. Push and turn the DATA DIAL to edit; push once more to accept your changes.
The [STORE] button lights when you have made edits. Press it to save your changes.
Push the DATA DIAL twice in quick succession to reset a parameter to its default (factory) value.
For much more detail on editing, see the Reference Manual.
4

CONTENIDO DE LA CAJA
•Miniak
•Micrófono cuello de cisne
•Adaptator de alimentación
•Guía de inicio rápido
•Manuale de referencia
•Folleto de información sobre la seguridad y la garantía
DIAGRAMA DE CONEXIÓN
Instrumento externo
Amplificador estéreo |
Auriculares |
|
Micrófono cuello de cisne
Alimentación
Pedal de |
Interruptore |
Módulo de |
Dispositivo MIDI externo |
expresión |
de pedal |
sonido externo |
|
CONEXION DE LA FUENTE DE CORRIENTE ALTERNA
Antes de realizar cualquier conexión eléctrica, asegúrese de que el interruptor de alimentación del Miniak esté desconectado. Luego, conecte el adaptador de alimentación a la entrada de alimentación del Miniak y a un tomacorriente.
CONEXIONES DE AUDIO
Estéreo. Conecte dos cables desde las salidas derecha e izquierda del Miniak a dos entradas de un amplificador o mezclador.
Auriculares. Enchufe unos auriculares en el jack de auriculares situado en el panel trasero.
CONEXION DE LOS PEDALES
Conecte un pedal de sostenido del teclado (no incluido) a la entrada (SUSTAIN). Cuando encienda el Miniak, el equipo detectará automáticamente el pedal y se calibrará para este último.
Puede enchufar un pedal de expresión opcional con controlador continuo en la entrada (EXPRESSION).
5
DESCRIPCIÓN GENERAL DE LOS CONTROLES
2 |
1 |
1 |
|
9 |
|
|
18 |
14 |
15 |
|
|
|
|
|
|||||
|
|
|
|
8 |
6 |
7 |
|
|
|
|
|
3 |
3 |
3 |
|
|
13 1211 10 16 17 |
|
|
|
|
|
|
|
4 |
5 |
|
|
|
CONTROLES DE TIEMPO REAL
A pesar de su pequeño tamaño, el Miniak cuenta con seis controladores potentes de tiempo real. Estos controles le ponen al alcance de la mano la increíble expresividad de la síntesis analógica virtual.
1.Ruedas (MOD1) y (MOD2): La rueda (MOD1) normalmente agrega vibrato. (MOD2) suele barrer el filtro.
2.rueda (PITCH): La rueda (PITCH) típicamente aumenta o disminuye el pitch por un paso entero, lo que le permite desafinar su sonido suavemente o en gran medida.
3.botones (X/Y/Z): Los botones (X/Y/Z) tienen diferentes efectos según el programa.
CONTROLES DE RENDIMIENTO
Los botones de rendimiento están agrupados a la izquierda de la pantalla.
4.[OCTAVE]: Extienda el rango de sonido del Miniak usando los dos botones [OCTAVE]. Cada vez que presiona el botón [DOWN] o [UP] cambia la transposición en una octava. El botón correspondiente se ilumina más fuerte cada vez que la transposición de octavas aumenta.
5.[TAP TEMPO]: El LED [TAP TEMPO] parpadea al tempo actual. Golpee este botón al ritmo deseado para determinar el tempo. (Para un control más fino, puede mantener presionado [TAP TEMPO] y girar el BOTÓN DATA.)
6.[PHRASE ARP]: Use [PHRASE ARP] para capturar y reproducir melodías que toque en el teclado.
7.[LATCH ARP]: [LATCH ARP] actúa como un pedal de sostenido. Cuando selecciona [LATCH ARP], las notas continúan reproduciéndose después de que retire las manos del teclado. Presione [LATCH ARP] una segunda vez para apagar esta función.
8.[PATTERN PLAY]: [PATTERN PLAY] funciona junto con los ajustes. Cuando [PATTERN PLAY] se ilumina, la característica de acompañamiento está activa, lo que le permite disparar Secuencias y Ritmos dentro del Modo de Multi. Cuando [PATTERN PLAY] no está iluminado, todas las características de secuencia están deshabilitadas y el Miniak reproduce solamente los tonos que presione.
9.ENTRADA DE MICRÓFONO: Conecte a esta entrada el micrófono cuello de cisne incluido. (Tenga en cuenta que se puentea el micrófono cuando se usa la entrada de audio izquierda.)
6
 Loading...