


instructions
Kenwood Chef KM030 series/Major KM040 series
Congratulations on buying a Kenwood. With such a wide range of attachments available, it’s more than just a mixer. It’s a state-of-the-art kitchen machine. We hope you’ll enjoy it.
Robust. Reliable. Versatile. Kenwood.
3 |
4 |
2 |
5 |
|
6 1
min
P
3 |
4 |
2 |
5 |
|
6 1
min
P
KENWOOD CHEF AND MAJOR KM030 – KM040 series
know your Kenwood kitchen machine
safety
●Switch off and unplug before fitting or removing tools/attachments, after use and before cleaning.
●Keep your fingers away from moving parts and fitted attachments.
●Never leave the machine on unattended.
●Never use a damaged machine. Get it checked or repaired: see ‘service’, page 8.
●Never use an unauthorised attachment or more than one attachment at once.
●Never exceed the maximum capacities on page 4.
●When using an attachment, read the safety instructions that come with it.
●Take care when lifting this appliance as it is heavy. Ensure the head is locked and that the bowl, tools, outlet covers and cord are secure before lifting.
●Never let the cord hang down where a child could grab it.
●Never let the power unit, cord or plug get wet.
●Do not let infirm people use the appliance without supervision.
●Do not let children use or play with the appliance.
●Only use the appliance for its intended domestic use. Kenwood will not accept any liability if the appliance is subject to improper use, or failure to comply with these instructions.
before plugging in
important - UK only ● Make sure your electricity supply is the same as the one shown on the underside of your machine.
●The wires in the cord are coloured as follows:
Green and Yellow = Earth, Blue = Neutral, Brown = Live.
●The appliance must be protected by a 13A approved (BS1362) fuse.
●WARNING: THIS APPLIANCE MUST BE EARTHED. Note:
●For non-rewireable plugs the fuse cover MUST be refitted when replacing the fuse. If the fuse cover is lost then the plug must not be used until a replacement can be obtained. The correct fuse cover is identified by colour and a replacement may be obtained from your Kenwood Authorised Repairer (see Service).
●If a non-rewireable plug is cut off it must be DESTROYED IMMEDIATELY. An electric shock hazard may arise if an unwanted non-rewireable plug is inadvertently inserted into a 13A socket outlet.
●This machine complies with European Economic Community Directive
89/336/EEC.
before using for the first time
1Remove all packaging.
2Wash the parts: see ‘care and cleaning’, page 8.
3Push excess cord into the cord stowage compartment at the back of the machine.
1

KENWOOD CHEF AND MAJOR KM030 – KM040 series
know your Kenwood kitchen machine attachment outlets high-speed outlet
medium speed outletslow-speed outlettool socket
the mixer mixer headoutlet catchbowl
bowl seating pad head-lift lever
speed switchpower unitK-beater
whisk
dough hookspatula
splashguard


control panel
timer display
power on indicator lighttimer decrease buttontimer increase buttonfold button
 start/stop button
3 |
4 |
2 |
5 |
6 1
in m
P
|
|
|
|
|
|||
min sec


|
|
2
KENWOOD CHEF AND MAJOR KM030 – KM040 series
the mixer
the mixing tools and some of their uses
K-beater ● For making cakes, biscuits, pastry, icing, fillings, éclairs and mashed potato.
whisk ● For eggs, cream, batters, fatless sponges, meringues, cheesecakes, mousses, soufflés. Don’t use the whisk for heavy mixtures (eg creaming fat and sugar) - you could damage it.
dough hook ● For yeast mixtures.
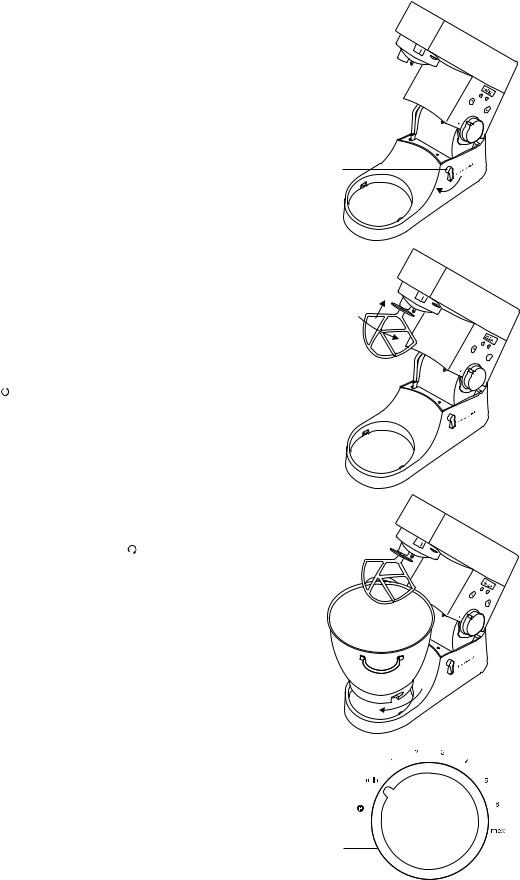
to insert a tool
to remove a tool
|
to use your mixer |
|
|
1 |
Turn the head-lift lever clockwise and raise the mixer head till it locks. |
|
|
2 |
Push up till it stops then turn. |
|
|
3 |
Fit the bowl onto the base - press down and turn clockwise |
|
|
4 |
To lower the mixer head, raise it slightly, then turn the head lift lever |
||
|
|||
|
clockwise. Lower into the locked position. |
|
|
● |
Turn and remove. |
|
5Connect the mixer to the power supply. The display will show 88:88 and then clear leaving the power on indicator illuminated  .
.
6Turn the speed switch to the desired setting and then press the start/stop
button  to start the mixer. The timer will count up in 1 second intervals. The speed can be changed at any time whilst the mixer is operating.
7Stop the mixer by pressing the start/stop button  . The operating time will
be displayed and if the machine is re started the timer will continue counting |
|
||
providing no longer than 3 minutes has elapsed. If the mixer is not used |
|
||
within this time the display will re set to 00:00. |
|
||
Important - If at any time, the mixer head is raised during an operation, |
|
||
the mixer will automatically stop and it will not re start when the mixer head is |
|
||
lowered. It will only restart when the head is lowered and the start/stop |
|
||
button |
|
is pressed. |
|
|
|
||
|
|
||
pulse position
To select pulse turn the speed switch anti clockwise to the  position. The mixer will run at maximum speed for as long as the switch is held in this position. When the switch is released it will return to the ‘min’ position and the mixer will stop.
Note: If the mixer is running in the timer mode the pulse function will not operate.
|
|
fold button |
|
|
|
Press and release the fold button |
and the mixer will automatically operate |
|
|
on minimum speed for 2-3 seconds. The button can be held down for a |
|
|
|
longer operation or pressed repeatedly as needed to combine ingredients. |
|
|
|
Note: If the mixer is running in the timer mode the fold function will not |
|
|
|
operate. |
|
|
|
speed switch |
|
K-beater |
● |
creaming fat and sugar start on min, gradually increasing to ‘max’. |
|
|
● |
beating eggs into creamed mixtures 4 - ‘max’. |
|
|
● |
folding in flour, fruit etc Min - 1 |
|
|
● |
all in one cakes start on min speed, gradually increase to max. |
|
|
● |
rubbing fat into flour min - 2. |
|
whisk |
● |
Gradually increase to ‘max’. |
|
dough hook |
● |
Start on ‘min’, gradually increasing to 1. |
|
CHEF
1 |
2 |
3 |
min |
|
4 |
P
CHEF
1 |
2 |
3 |
min |
|
4 |
P
CHEF
1 |
2 |
3 |
min |
|
4 |
|
|
P
3
 Loading...