


6424D+M
Avaya 6424D+M, Definity 6408+, 6408D+, 6416D+, 6416D+M User Manual
...
6408+, 6408D+, 6416D+, 6416D+M, 6424D+,
and 6424D+M Telephones
User’s Guide
Contents
6400 Series Multi-line Telephones. . . . . . . . . . . . . . . . . . . 5
Headsets. . . . . . . . . . . . . . . . . . . . . . . . . . . . . . . . . . . . . . . . 6
Headpieces . . . . . . . . . . . . . . . . . . . . . . . . . . . . . . . . . . . . 7
Using the Softkeys. . . . . . . . . . . . . . . . . . . . . . . . . . . . . . . . 8
Using the S o ft ke y F e ature Men u s. . . . . . . . . . . . . . . . . . 8
Other Softkey Features That May Be On Your Display. 9
Call-Han d l in g Fe a tures . . . . . . . . . . . . . . . . . . . . . . . . . . . . 9
Getting Messages . . . . . . . . . . . . . . . . . . . . . . . . . . . . . . . 13
Selecting a Personalized Ring . . . . . . . . . . . . . . . . . . . . . 13
Selected Voice Features . . . . . . . . . . . . . . . . . . . . . . . . . . 14
Display Features . . . . . . . . . . . . . . . . . . . . . . . . . . . . . . . . 21
Time and Date . . . . . . . . . . . . . . . . . . . . . . . . . . . . . . . . . 21
Call Information . . . . . . . . . . . . . . . . . . . . . . . . . . . . . . . 21
Modular Interface Capabilities . . . . . . . . . . . . . . . . . . . . . 24
Telephone Installation. . . . . . . . . . . . . . . . . . . . . . . . . . . . 25
Desktop Installation . . . . . . . . . . . . . . . . . . . . . . . . . . . .25
Wall Installation . . . . . . . . . . . . . . . . . . . . . . . . . . . . . . . 26
Removing the Telephone Tray . . . . . . . . . . . . . . . . . . . 29
Installing the Designation Card. . . . . . . . . . . . . . . . . . . 30
Line and Feature Button Lights . . . . . . . . . . . . . . . . . . . . 32
555-230-739
Comcode 108339029
Issue 3
April 1999

Some versions of DCP display telephones are intended for export outside of the
U.S. These telephones initialize with “EXPORT VERSION” on the display. Display
features are not operative until after this display disappears.
If the “EXPORT VERSION” display does not disappear within a few seconds,
activate the Test function by pressing the Transfer button. If this action does not
remove the “EXPORT VERSION” display, contact your system administrator.
NOTICE
While reasonable efforts were made to ensure that the information in this
document was complete and accurate at the time of printing, Avaya can
assume no responsibility for any errors. Changes or corrections to the
information contained in this document may be incorporated into future issues.
ORDERING INFORMATION
Call: Avaya Publications Center
US Voice:1 800 457 1235
US Fax:1 800 457 1764
non-US Voice:+1 207 866 6701
non-US Fax:+1 207 626 7269
Write: Globalware Solutions
200 Ward Hill Avenue
Haverhill, MA 01835 USA
HEARING AID COMPATIBILITY
The 6400-Series telep hon es are Hearing Aid Comp ati ble (HAC), and thus all
units have “HAC” printed on them.
YOUR RESPONSIBILITY FOR YOUR SYSTEM’S SECURITY
You are responsible for the security of your system. Avaya does not warrant
that this product is immune from or will prevent unauthorized use of commoncarrier telecommu nication services or fa cilities accessed thr ough or conn ected
to it. Avaya will not be responsible for any charges that result from such
unauthorized use. Product administration to prevent unauthorized use is your
responsibility and your system manager should read all documents provided
with this product to fully understand the features available that may reduce
your risk of incurring charge s .
TRADEMARKS
DEFINITY and AUDIX are registered trademarks of Avaya, Inc.
Mirage, Star Set, and Supra are registered trademarks of Plantronics, Inc.
THE “CE” MARK
If the “CE” mark is affixed to this equipment. it means that it conforms to the
European Union Electromagnetic Compatibility Directive (89/336/EEC) and
the Low Voltage Directive (73/23/EEC).
Prepared by © 1999 Avaya, Inc.
BCS Product Publications All Rights Reserved
Middletown, New Jersey 07748-1998 Printed in USA

IMPORTANT USER SAFETY
INSTRUCTIONS
The most careful attention has been devoted to quality standards in the
manufacture of your new telephone. Safety is a major factor in the design of
every set. But, safety is YOUR responsibility too.
Please read careful ly the he lpful tip s liste d below and on the nex t page. The se
suggestions will enable you to take full advantage of your new voice terminal.
Then, retain these tips for later use.
!
CAUTION:
This telephone is NOT for residential use. It is for business systems
applications ONLY. It will NOT operate on public networks. It MUST
BE connected to a DEFINITY Enterprise Communications Server.
Use in a residential environment could result in an electrical short
circuit when the telephone wiring is set up to provide other
applications, for example, for appliance control or power
transformers. T he AC power used i n these applic ati ons m ay cre ate a
safety hazard by placing a direct short circuit across the telephone
wiring.
Use
When using your telephone equipment, the following safety precautions
should alway s be fol lowed to re duce the risk o f fire, el ectric shock, an d injury to
persons.
• Read and understand all instructions.
• Follow all warnings and instructions marked on the telephone.
• This telephone can be hazardous if immersed in water. To avoid the
possibility of electric shock, do not use it while you are wet. If you
accidentally drop the telep hon e into wate r, do not retrieve it until you hav e
first unplugged the li ne cord fr om the modula r wall jack. Then, call se rvice
personnel to ask about a replacement.
• Avoid using the telephone during electrical storm s in your immediate ar ea.
There is a risk of electric shock from lightning. Urgent calls should be
brief. Even though protective measures may have been installed to limit
electrical surges from entering your business, absolute protection from
lightning is impo ssible.
• If you suspect a natural gas leak, report it immediately, but use a
telephone away from the area in question. The telephone’s electrical
contacts coul d gen erate a tiny spark. While unlikely, it is possible that this
spark could ignite heavy concentrations of gas.
• Never push objects of any kind into the equipment through housing slots
since they may touch hazardous voltage points or short out parts that
could result in a risk of electric shock. Never spill liquid of any kind on the
telephone. If liquid is spilled, however, refer servicing to proper service
personnel.

• To reduce the risk of electric shock, do not disassemble this telephone.
There are no user serviceable parts. Opening or removing covers may
expose you to hazardous voltages. Incorr ect reassembly can cause
electric shock when the telephone is subsequently used.
Service
1. Before cleaning, unplug the telephone from the modular wall jack. Do
not use liquid cleaners or aerosol cleaners. Use a damp cloth for
cleaning.
2. Unplug the telephone from the modular wall jack. Be sure to refer
servicing to qualified service personnel when these conditions exist:
— If liquid has been spilled into the telephone.
— If the telephone has been exposed to rain or water.
— If the telephone has been dropped or the housing has been
damaged.
— If you note a distinct change in the performance of the telephone.
SAVE THESE INSTRUCTIONS
When you see this w arning symb ol on the pro duct, refer
to this instructions booklet packed with the product for
!
more information before proceeding.
6400 Series Multi-line Telephones
The 6400 Series multi-line telephones include the following:
• The 6408+ Telephone — has eight call appearance/feature buttons with
a two-way speakerpho ne.
• The 6408D+ Telephone — has eight call appearance/feature buttons, a
2-line by 24-character display, and a two-way speakerphone.
• The 6416D+ and 6416D+M Telephones — have 16 call appearance/
feature buttons, a 2-line by 24-character display, and a two-way
speakerphone.
• The 6424D+ and 6424D+M Telephones — have 24 call appearance/
feature buttons, a 2-line by 24-character display, and a two-way
speakerphone.
Note: Only the 6416D+M and 6424D+M have modular capabilities.
For more information on this feature, see
Capabilities” on page 24.
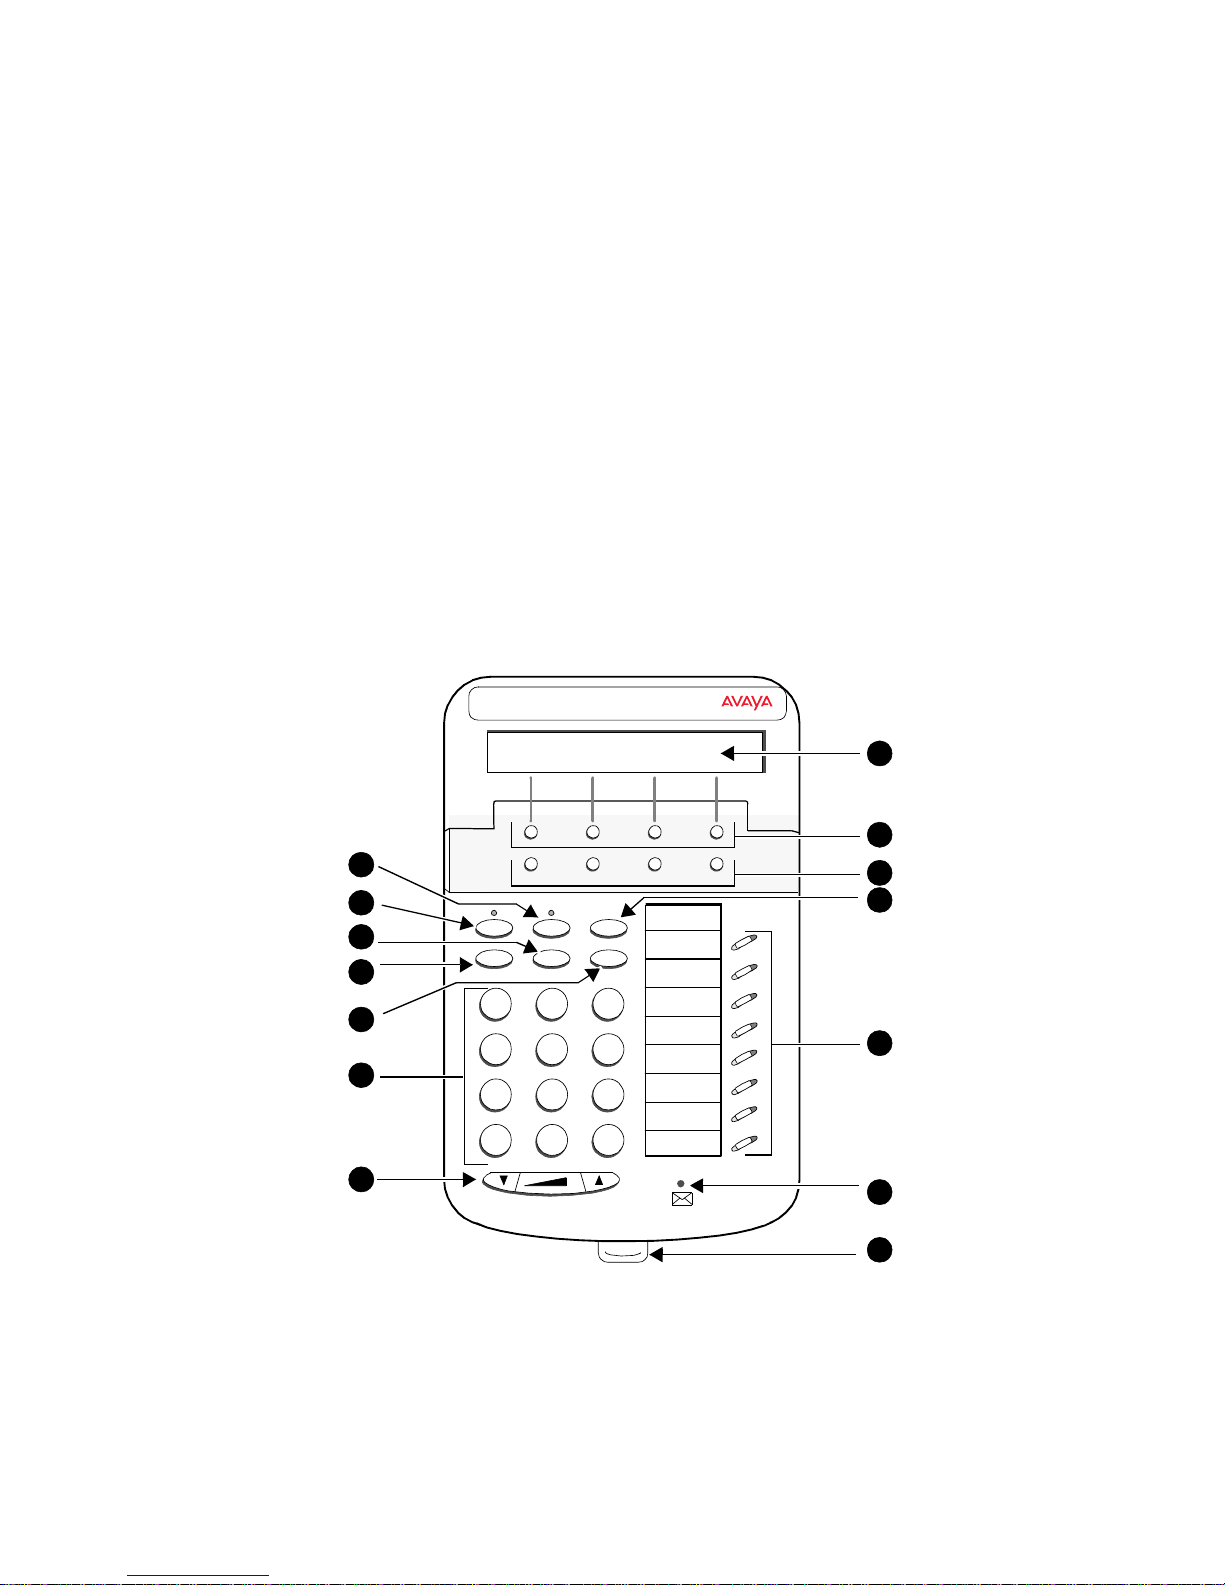
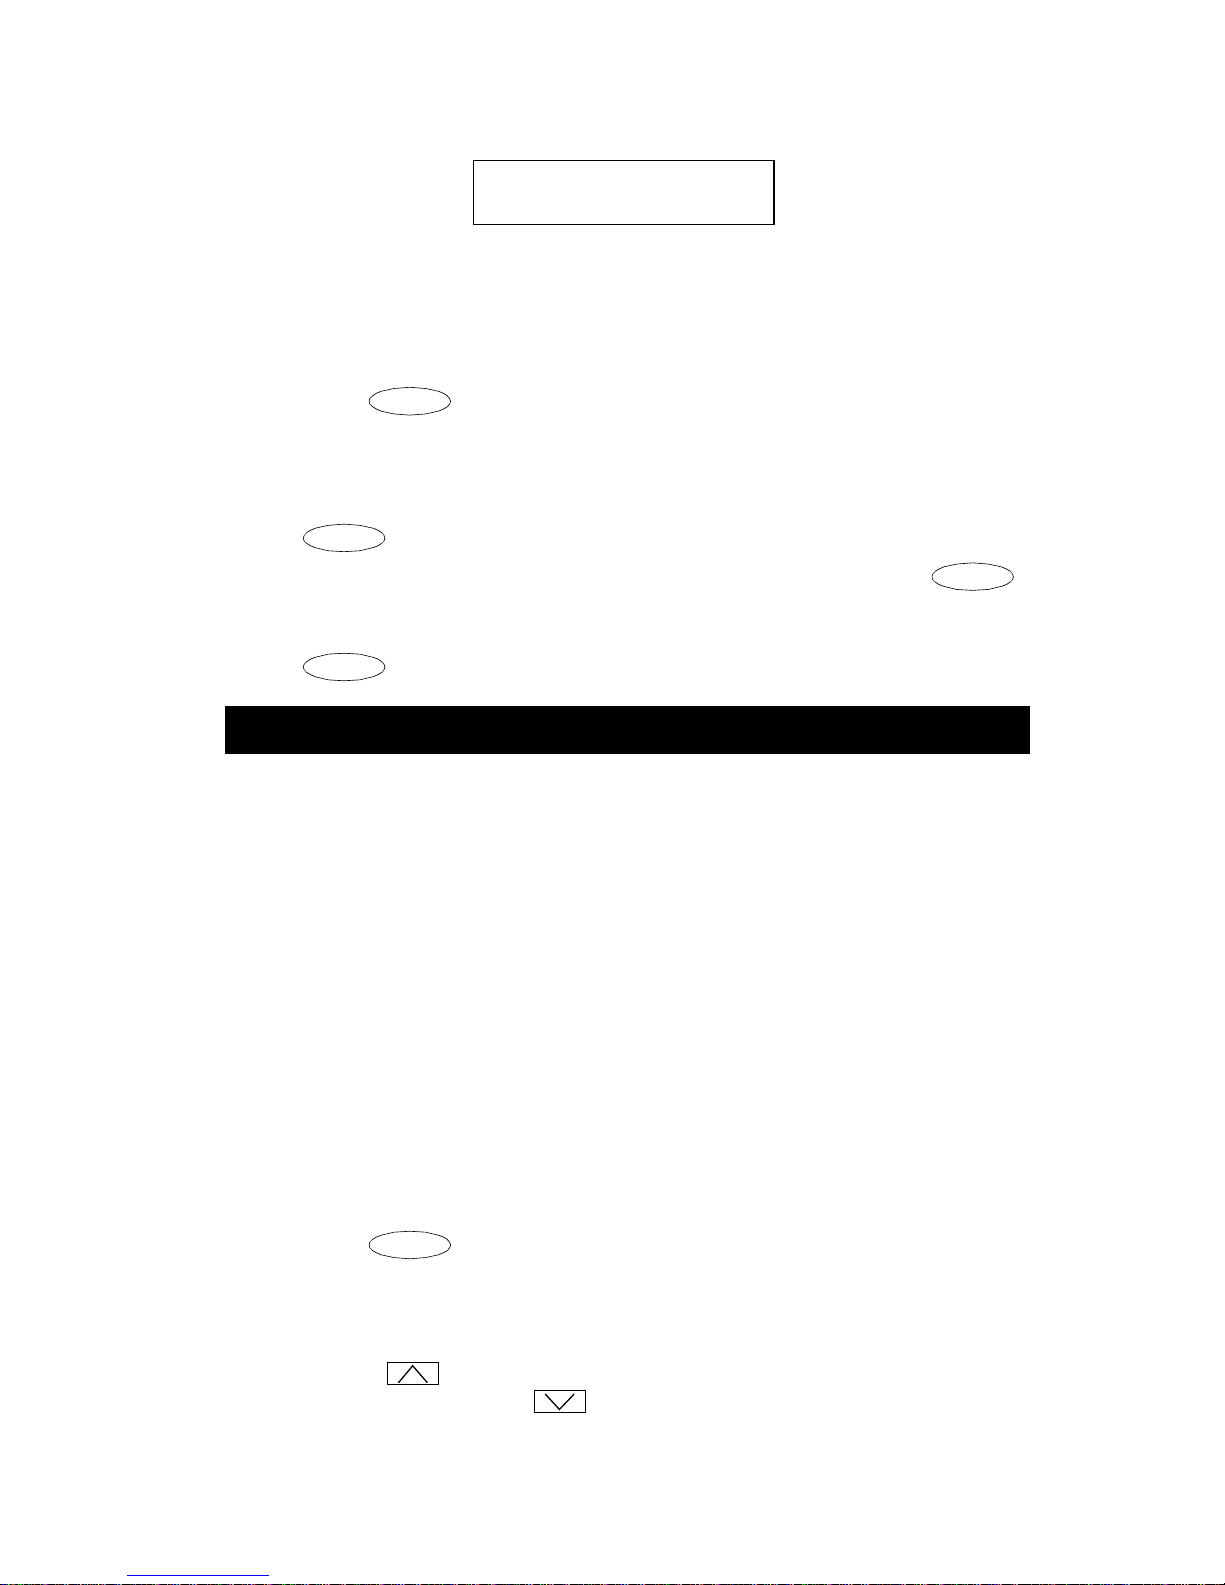
Use Figure 1 below to familiarize yourself with your 6400 Series telephone.
(The 6408D+ is shown in Figure 1.)
“Modular Interface
1
2
3
4
5
6
Menu Exit Prev Next
Spkr
Mute Hold
Redial Trnsfr Conf
GHI
PQRS
1
4
7
Test Ring
ABC
2
56
TUV
8
O#
*
7
FIGURE 1 The 6408D+ Telephone
DEF
3
MNOJKL
WXYZ
9
Tel #
8
9
10
11
12
13
14
5
The following features correspond to the numbers in Figure 1.
1) Mute button 8) Display — availa bl e on ly on t he
6408D+, 6416D+ an d 6416D+M, and
the 6424D+ and 6424D+M
2) Speaker button 9) Soft keys
3) Transfer/Test button 10) Display control buttons
4) Redial button 11) Hold button
5) Conf/Ring button 12) Call appearance/feature butt ons
6) Dial pad 13) Message light — l abe le d
7) Volume control button 14) Tray handle
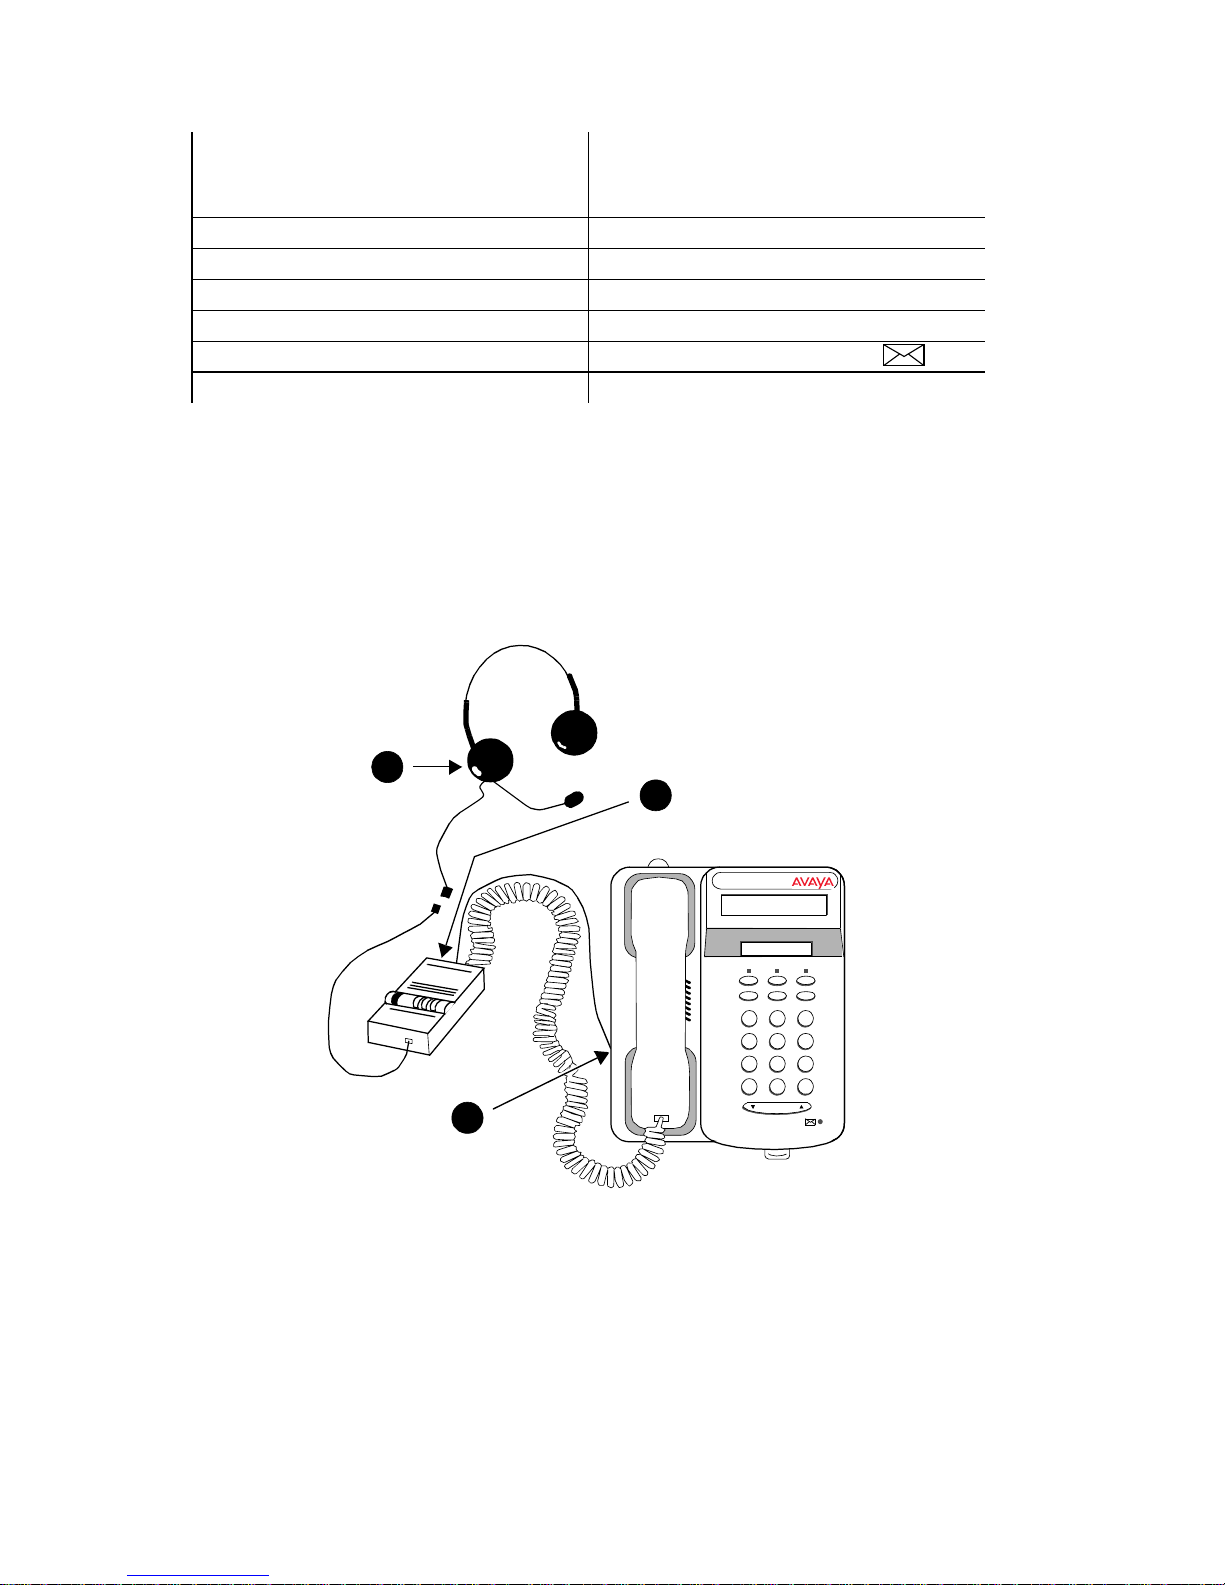
Headsets
On all of the 6400 Series telephones except the 6416D+M and 6424D+M, the
headset connection consists of a headpiece (shown as 1 in
and modular base uni t (shown as 2 in Figure 2). In this ins tan ce , the ba se unit
plugs into the Handset jack (shown as 3 in Figure 2).
Figure 2 below)
1
2
321
4*56
7
89
O#
3
Volume
FIGURE 2 The Headset Attached to the Handset Jack on a 6400 Series
Telephone (via a Modular Base Unit)
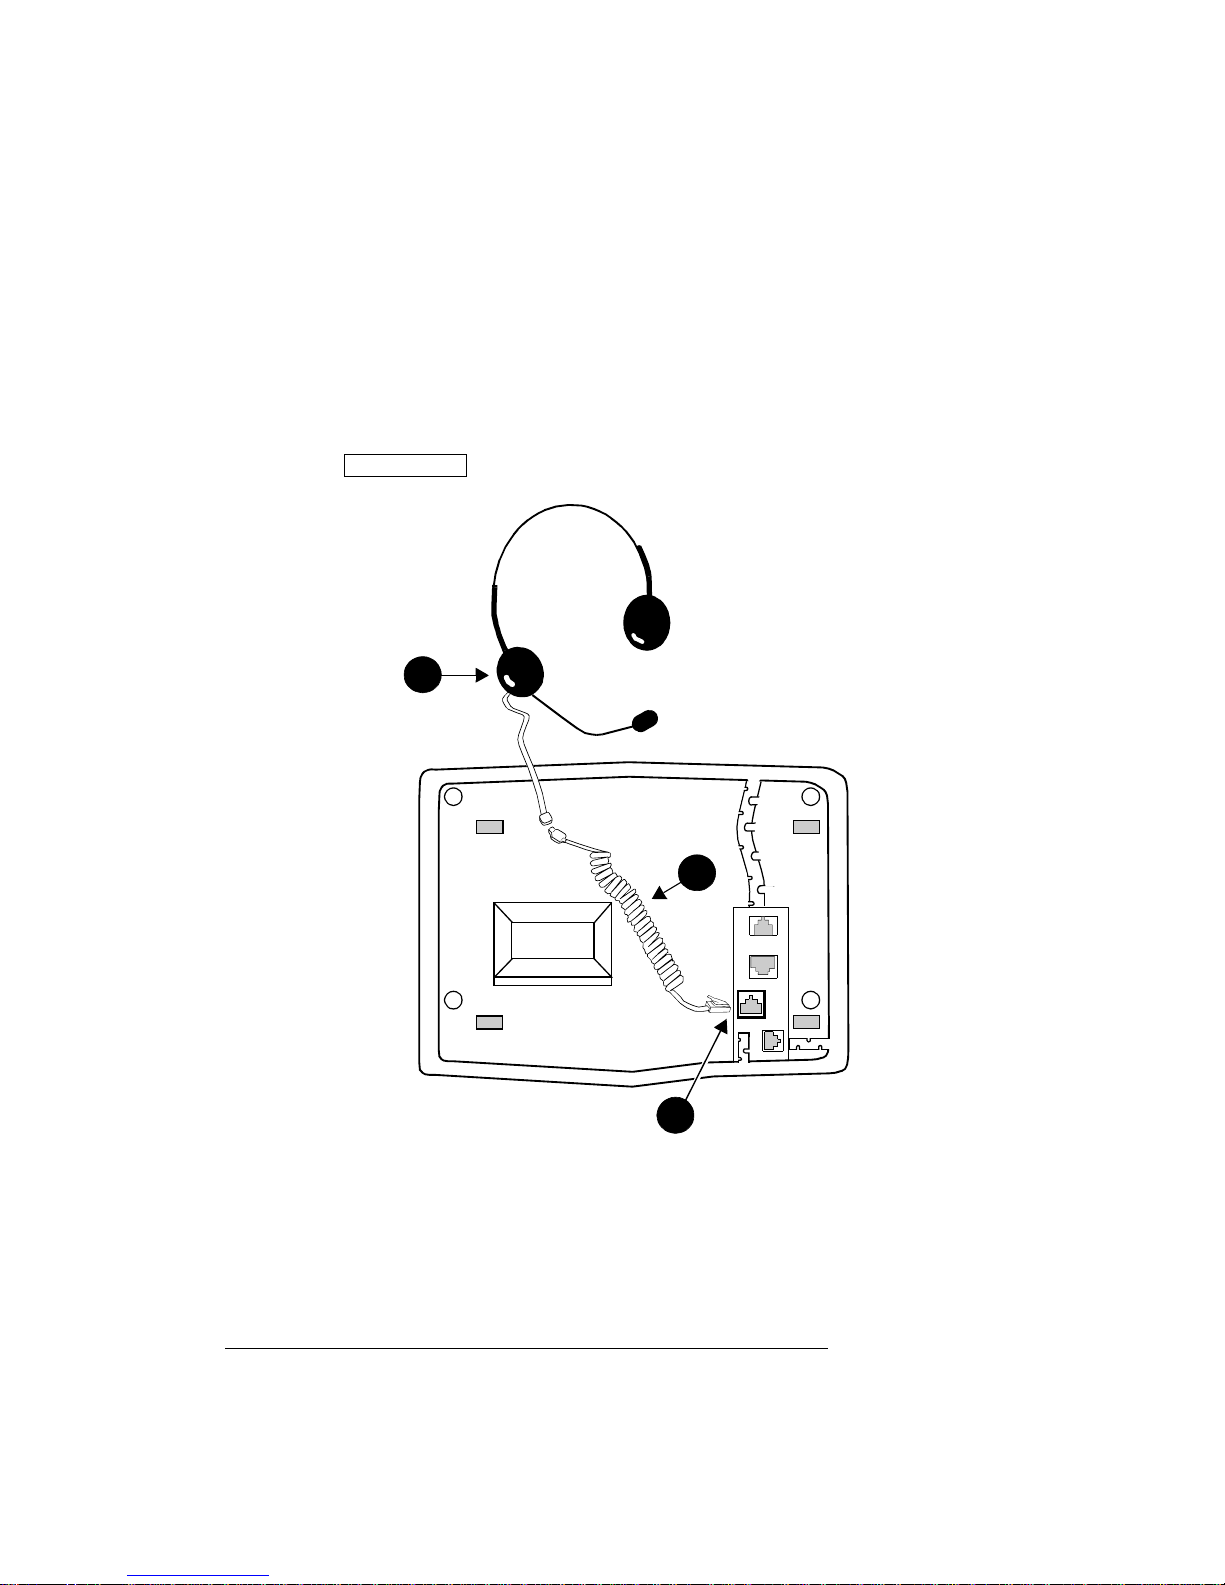
On the 6416D+M and 6424D+M sets, there is a jack provided for ONLY the
headset. In
Figure 3, the headset is shown as 1; the Headset jack is shown
as 2. On these sets, the headset can either be connected , with an adapt er cord
(shown as 3 in
Figure 3), to the Headset jack on the back of the telephone or
connected to a modular base unit which then plugs into the Headset jack.
6
Note: When a modular base unit is used with the Headset jack, the handset
Headset On/Off
should remain plugged into the Handset jack.
The privacy of the Wh is per Pa ge announcement ca nnot be guaranteed
when telephones have modular base units other than the M10L-8400
(Comcode: 407639715; PEC: 3122-022). The M10L-8400 is the only
modular base unit that should be used for the 6400 Series telephones.
Note that this does NOT apply to headsets plugged into the Headset
jack on the back of the 6416 D+ M and 6424D+M telepho nes tha t do no t
requir e a modular base. For more information, see the instructions for
the Whisper Page feature in the Voice Features secti on.
Note: If you plug the headset directly into the Headset jack, you may use a
button on the adapter cord, if so equipped, to go off-hook and on-hook,
or a
button may be administered.
1
3
2
FIGURE 3 The Headset Connecte d to the Headset Jack on th e 6416D +M
and 6424D+M Telephones (No Modular Base Unit Required)
Headpieces
The following headpieces can be used with these telephones:
Headpieces with Modular Bases or with Adapter Cords
— Mirage® — Receiver fits over either ear. Not for noisy environments.
— StarSet® — Eartip fits in ear canal.
— Supra® Monaural — Adjustable headband and soft ear cushion.
7
— Supra Monaural Noise-Canceling (NC) — Same as above with
noise-canceling microphone that reduces background noise transmission
by up to 7 5 percent.
— Supra Binaural — Sound in both ears.
— Supra Binaural Noise-Canceling (NC) — Same as above with
noise-canceling microphone on flexible boom; features windscreen and
reduces background noise transmission by up to 75 percent.
Note: For direct connection to the Headset jack on the 6416D+M and
6424D+M, use the following cord: HIC-01; Comcode: 408122950;
PEC: 3124-IC/A.
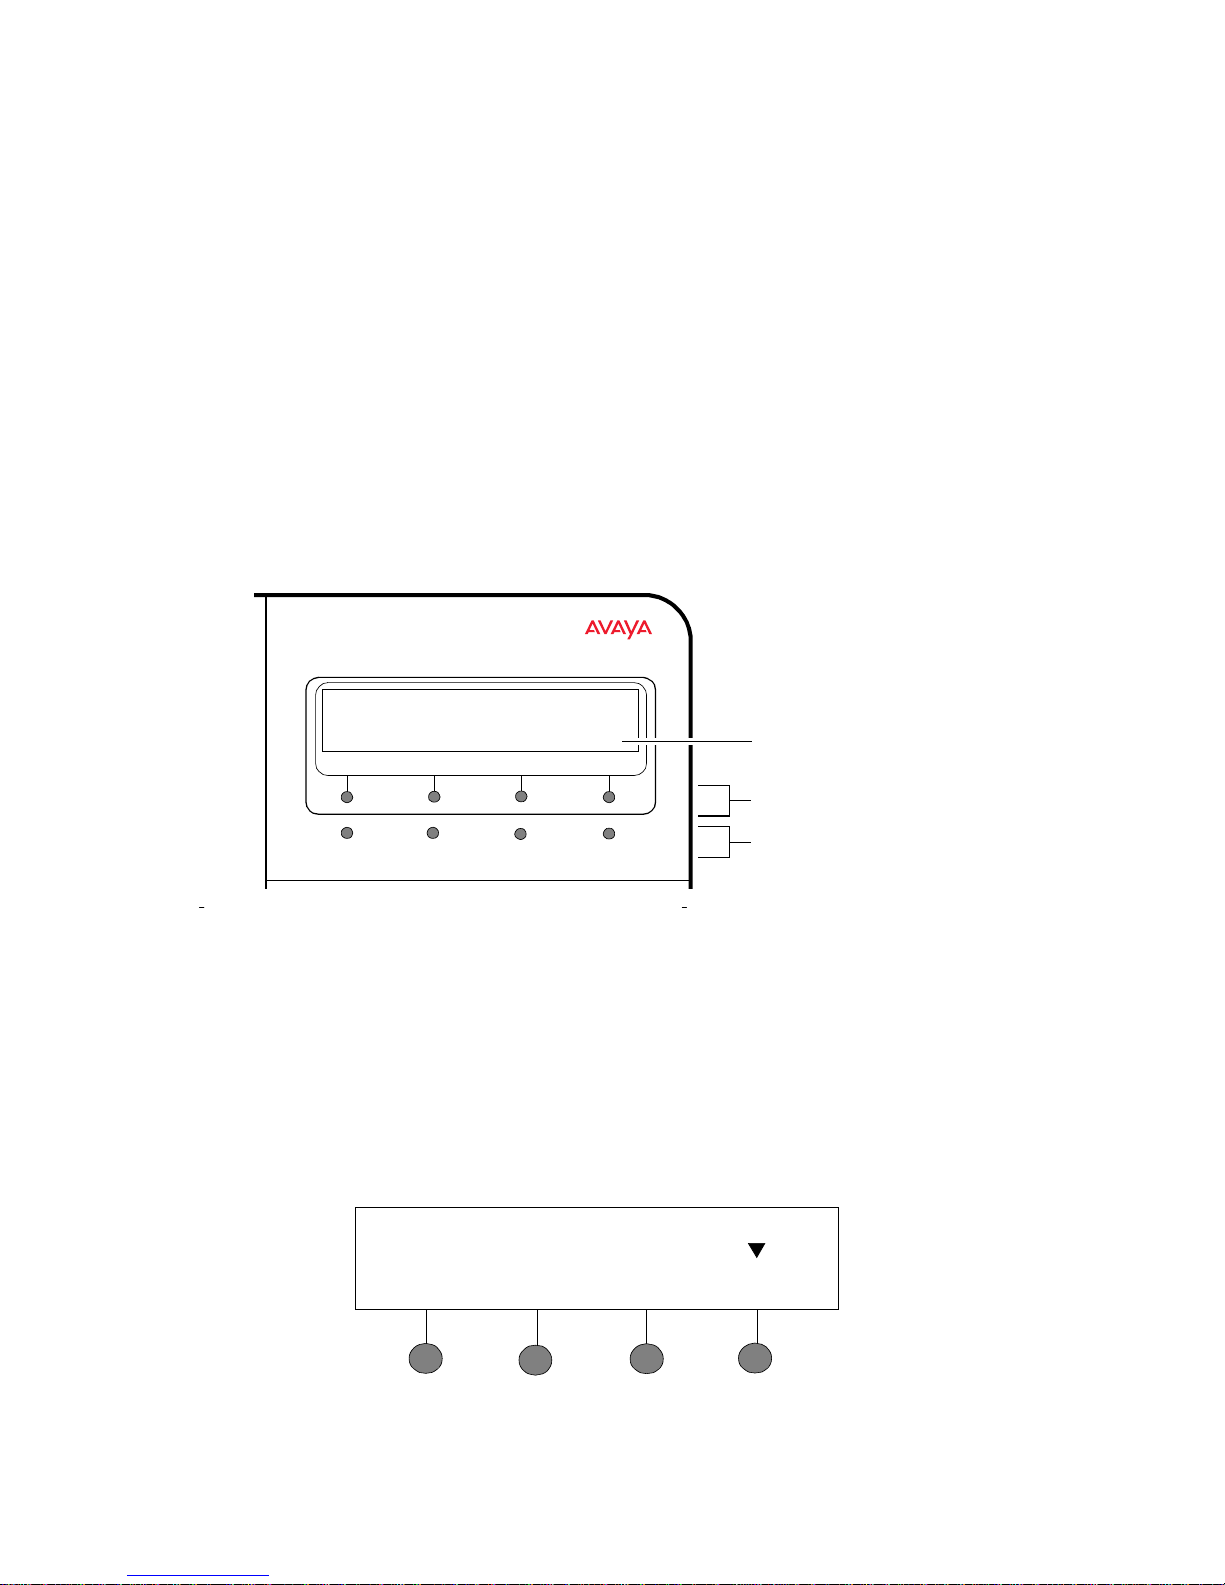
Using the Softkeys
The softkeys are the four unlabeled round keys located directly below the
display. The four round display control buttons, labeled Menu, Exit, Prev, and
Next are located under the softkeys. See Figure 4.
Display
Softkeys
NextPrevMenu Exit
FIGURE 4 The Display, Softkeys, and Display Control Buttons
Display
control buttons
Using the Softkey Feature Menus
There are three separate softkey feature menus. Each of these menus allows
you to select from four different features.
You can enter Softkey Mode (and view the softkey feature menu) by pressing
the display control button labeled Menu. The following is an example of a
softkey feature menu.
Dir Drop HFAns Timer
8

The top line of each softkey feature menu screen shows you the status of
Conf
Conf
Conf
each of the four features. An arrow appears above the feature name or
abbreviation if that feature is active. In the above example, the arrow above
the Timer feature indicates that feature is active.
The second line on each softkey feature menu shows the features you can
access. To use any of these features, you must press the softkey b elow the
feature name or abbreviation.
Press the Next or Prev button u ntil th e featu re you want to us e appe ars on the
display.
Note: An error tone (one beep) sounds when you have made an
inappropriate softkey entry.
Press the Exit button at a ny time to exit the softk ey featu re menus and
return to normal call-handling operation.
Other Softkey Features That May Be On Your Display
There are 12 default features that can be accessed with the softkeys on a
6400 Series telephone. However, the system manager may substitute other
softkey features in their place.
Call-Handling Features
Conference
The Conference feature allows you to conference up to six parties (including
yourself) on a call.
To add another party to a call (for a total of six parties)
1. Press . [dial tone]
2. Dial the number of the new party and wait for an answer.
3. When you want to add the new person, press again.
4. Repeat Steps 1 through 3 for additional conference connections.
To add a call you have put on hold to another call you are connected to
1. Press . [dial tone]
2. Press the call appearance button of the call on hold (first call).
3. Press again.
To drop the last person added to the conference call
1. With a display: Press the Menu button and then press the softkey
below Drop.
Without a display: Press the button (if administered).
Drop
Conf
9

Hold
The Hold feature puts a call on hold until you can return to it.
To put a call on hold while you answer another call or perform another
task
1. Press .
Hold
To answer a new call while active on another
1. Press .
Hold
2. Press the call appearance button of the incoming call.
To return to the held call
1. Press the call appearance button of the held call.
Note: If your telephone is connected to DEFINITY Release 7.1 or a later
release and if the re is o nly on e call on hol d at yo ur tele phone, you can
transfer the call or initiate a conference call by pressing or
Conf
without first returning to the held call.
Trnsfr
Redial
The Redial (or Last Number Dialed) feature automatically redials the last
extension or outside number (up to 24 digits) you dialed.
To redial the last number that you dialed
1. Press .
.
Redial
Speaker (Listen-Only) and Group Listen
The Speaker feature allows you to place calls or access other features
without lifting the handset. However, in order to speak to the other party, you
must use the handset. With the Group Listen feature, the handset and
speaker are active at the same time.
Note: All of the 6400 Series telephones described in this manual can be
optioned for either a two-way speakerphone or a one-way, listen-only
speaker. Check with your system manager to see which feature you
can use on your telephone.
To use the listen-only speaker to place a call withou t lifti ng the handset
or for any listening-only feature (such as monitoring a call on which
you have been put on hold or for group listening)
1. Press .
2. Place a call or access the selected feature.
3. Adjust speaker volume if necessary:
To raise the volume , pre ss th e rig ht h al f of t he Speaker Volume c ontro l
button labeled
Speaker Volume control button labeled .
Spkr
; to lower the volume, press the left half of the
10
If you have a display, it shows the volume level: (There are eight
Spkr
Spkr
volume levels.)
->>>>>> +
To turn off the speaker and return to handset
1. Pick up the handset.
To end a call (while the handset is on-hook and only the speaker is
active)
1. Press .
T o ac tivate the speak er while using the handset so th at both are active a t
the same time (the Group Listen feature, if administered)
1. While you are using the handset, activate the speaker by pressing
Spkr
.
Note: If you hang up the handset within 10 seconds after pressing ,
Spkr
the call remains active on the speaker.
If you hang up the handset more than 10 seconds after pressing
Spkr
, the speaker will also turn off, and the call is disconnected.
Speakerphone
The two-way built-in speakerphone allows you to place and answer calls
without lifting your handset.
Note: Your telephone may be set for the two-way speakerphone or for the
one-way, listen-only speaker. Check with your syste m man ager to s ee
which of these features you can use.
Note: Speakerphones may not operate satisfactorily in every environment
(such as in very noisy locations). In such an environment, the
one-way, listen only speaker should be used.
Note: Some locations may wish to use the speakerphone for the Group
Listen feature. With this feature y ou can hear t he othe r person throu gh
the handset and speakerphone, but in order to speak to the other
person, you must use the handset. Ask your system manager if the
Group Listen feature has been administered for your telephone.
To place or answer a call without lifting the handset, or to use the
speakerphone with any feature
1. Press .
2. Place or answ er the call, or access the selected feature.
3. Adjust speakerphone volume if necessary:
To raise the volume, press the right half of the Volume control button
labeled
control button labeled .
; to lower the volume, press the left half of the Volume
11
 Loading...