


Installation |
Installation |
Precautions
•Do not tamper with the four holes on the upper surface of the unit. They are for tuner adjustments to be made only by service technicians.
•Choose the installation location carefully so that the unit will not interfere with the driver wile driving.
•Avoid installing the unit where it would be subject to high temperatures, such as from direct sunlight or hot air from the heater, or where it would be subject to dust, dirt or excessive vibration.
•Use only the supplied mounting hardware for a safe and secure installation.
Mounting angle adjustment
Adjust the mounting angle to less than 60°.
Précautions
•Ne pas toucher les quatre orifices sur le panneau supérieur de l’appareil. Ils servent aux réglages du tuner qui ne doivent être effectués que par un technicien.
•Choisir soigneusement l’emplacement de l’installation, pour que l’appareil ne gêne pas la conduite.
•Eviter d’installer l’appareil dans un endroit exposé à des températures élevées, comme en plein soleil ou à proximité d’une bouche d’air chaud, ou à de la poussière, saleté ou vibrations violentes.
•Pour garantir un montage sûr, n’utiliser que le matériel fourni.
Réglage de l’angle de montage
Ajuster l’inclinaison à un angle inférieur à 60°.
How to detach and attach the front panel
Before installing the unit, detach the front panel.
A To detach |
B To attach |
Before detaching the front panel, be sure to press |
Align the parts A and B, and push the front panel |
(OFF) to turn off the unit. Then press (RELEASE), |
until it clicks. |
slide the front panel a little to the left, and pull it |
|
off toward you. |
|
Retrait et pose du panneau avant
Avant d’installer l’appareil, déposer la panneau avant.
A Retrait |
B Pose |
Avant de détacher la façade, appuyez sur (OFF) |
Aligner les points A et B, puis pousser l’appareil |
pour arrêter l’appareil. Ensuite, appuyez sur la |
jusqu’au déclic. |
touche ensuite sur (RELEASE), poussez la façade |
|
légèrement vers la gauche et tirez vers vous pour |
|
l’enlever. |
|
A B
(OFF)
A
B
(RELEASE)
Mounting example
Installation in the dashboard
1
182 |
mm |
|
TOP
1
With the TOP marking up
Avec l’inscription TOP vers le haut
53 |
mm |
|
Exemple de montage
Installation dans le tableau de bord
2
Bend these claws, if necessary. Si nécessaire, plier ces griffes.
To support the unit Pour installer l’appareil
Dashboard
Tableau de bord
6
Fire wall |
|
Paroi ignifuge |
2 |
|
3max. size M4 × 6 mm Dimension max. M4 × 6 mm
TOP
4
1
First attach 6 to the unit, then insert the unit into 1.
Fixez d’abord 6 sur l’appareil et introduisez ensuite l’appareil dans 1.
Reset button |
Touche de réinitialisation |
||
When the installation and connections are over, be sure to press the reset button with a ball-point pen etc. |
Quand l’installation et les connexions sont terminées, appuyer sur la touche de réinitialisation avec un stylo |
||
|
|
bille ou un objet pointu. |
|
|
|
|
|
|
|
|
|
Mounting the unit in a Japanese car
Montaje de la unidad en un automóvil japonés
You may not be able to install this unit in some makes of Japanese cars. In such a case, consult your Sony dealer.
Si vous ne pouvez pas installer l’appareil dans une voiture japonaise, consultez votre revendeur Sony.
1 |
With nippers or similar, cut off claws on both side of the unit. |
Coupez les onglets des deux côtés de l‘appareil à l‘aide de tenailes |
ou d‘un outil similaire.
Claws
Onglets
2 TOYOTA
5
max. size |
|
|
5 × 8 mm |
to dashboard/center console |
|
Dimension |
||
au tableau de bord/console centrale |
||
max. |
||
|
||
5 × 8 mm |
|
|
5 |
|
max. size |
Bracket |
5 × 8 mm |
Support |
Dimension |
|
max. |
|
5 × 8 mm |
|
Bracket |
|
Support |
Existing parts supplied to your car
Pièces existantes fournies avec la voiture
NISSAN
5
max. size |
|
|
5 × 8 mm |
to dashboard/center console |
|
Dimension |
||
au tableau de bord/console centrale |
||
max. |
||
|
||
5 × 8 mm |
|
|
5 |
|
|
max. size |
|
|
5 × 8 mm |
|
Bracket |
Dimension |
|
max. |
||
Support |
||
5 × 8 mm |
||
|
Bracket
Support
Existing parts supplied to your car
Pièces existantes fournies avec la voiture
Note
To prevent malfunction, install only with the supplied screws 5.
Remarque
Pour éviter tout dysfonctionnement, utilisez uniquememt les vis de montage fournies 5.
3-861-718-31 (1)
FM/AM
Compact Disc
Player
Installation/Connections
Installation/Connexions
CDX-C580
CDX-C480
Sony Corporation 1998 Printed in Korea
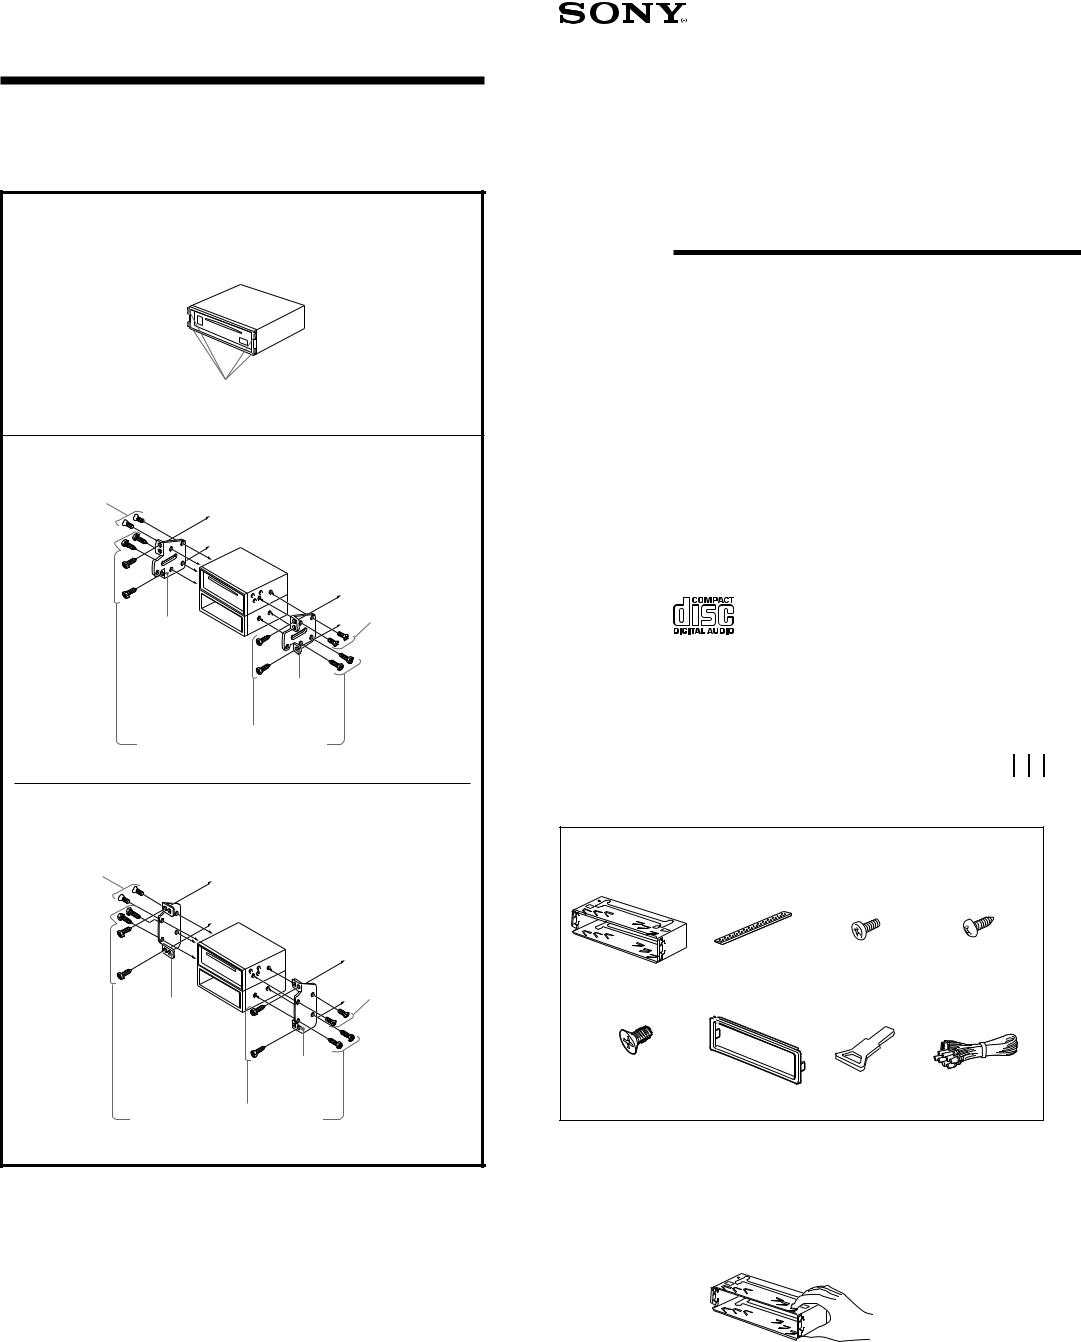
Parts for installation and |
Pièces de montage et de |
||
connections |
|
raccordement |
|
The numbers in the list are keyed to those |
Les numéros de la liste correspondent à ceux |
||
in the instructions. |
|
des instructions. |
|
1 |
2 |
3 |
4 |
T |
|
|
|
OP |
|
|
|
5 |
6 |
7 |
8 |
× 5
(incl. 1 reserve)
(1 réserves comprises)
The release key 7 is used for dismounting |
La clé de dégagement 7 est nécessaire pour |
the unit. See the operating instructions |
démonter l’appareil. Consulter le mode d’emploi |
manual for details. |
pour plus de détails. |
Caution |
Attention |
Cautionary notice for handling the bracket |
Remarque importante pour la manipulation du |
1. |
support 1. |
Handle the bracket carefully to avoid |
Manipulez précautionneusement le support pour |
injuring your fingers. |
éviter de vous blesser aux doigts. |
T |
|
OP |
|
 Loading...