


4-233-601-13 (1)
Compact Disc
Player
Operating Instructions |
|
GB |
|||||||
|
|
||||||||
|
|
|
|
|
|
|
|||
Mode d’emploi |
|
|
|
FR |
|||||
|
|
|
|
||||||
|
|
|
|
|
|
|
|
|
|
|
|
|
|
|
|
|
|
|
|
|
|
|
|
|
|
|
|
|
|
|
|
|
|
|
|
|
|
|
|
CDP-XE570
CDP-XE370
CDP-XE270
© 2001 Sony Corporation
WARNING
To reduce the risk of fire or electric shock, do not expose this apparatus to rain or moisture.
To avoid electrical shock, do not open the cabinet. Refer servicing to qualified personnel only.
This appliance is classified as a CLASS 1 LASER product.
This marking is located on the rear exterior.
AC power cord must be changed only at the qualified service shop.
Do not install the appliance in a confined space, such as a bookcase or built-in cabinet.
To prevent fire, do not Cover the ventilation of the apparatus with news papers, table-cloths, curtains, etc. And don’t place lighted candles on the apparatus.
To prevent fire or shock hazard, do not place objects filled with liquids, such as vases, on the apparatus.
Don’t throw a battery, dispose it as the injurious wastes.
NOTICE FOR THE CUSTOMERS IN CANADA
CAUTION:
TO PREVENT ELECTRIC SHOCK, DO NOT USE THIS POLARIZED AC PLUG WITH AN EXTENSION CORD, RECEPTACLE OR OTHER OUTLET UNLESS THE BLADES CAN BE FULLY INSERTED TO PREVENT BLADE EXPOSURE.
About this manual
The instructions in this manual are for CDP-XE570, CDP-XE370, and CDP-XE270. CDP-XE570 is the model used for illustration purposes only. Any difference in operation is clearly indicated in the text, for example, “CDP-XE570 only.”
Tip
Instructions in this manual describe the controls on the player.
You can also use the controls on the remote if they have the same or similar names as those on the player (CDP-XE570/XE370 only).
2GB

Table of Contents |
|
Parts Identification |
4 |
Front Panel .............................................................................................................................. |
4 |
Rear Panel ................................................................................................................................ |
5 |
Remote Control (CDP-XE570/XE370 only) ........................................................................... |
6 |
Getting Started |
|
Inserting Batteries Into the Remote Control (CDP-XE570/XE370 only) ............................... |
7 |
Hooking Up the System .......................................................................................................... |
7 |
Playing CDs |
|
Loading the CD ....................................................................................................................... |
8 |
Playing the CD –– Normal Play/Shuffle Play/Repeat Play ..................................................... |
9 GB |
Using the CD display ............................................................................................................ |
10 |
Repeating a Specific Portion (AyB Repeat) (CDP-XE570 only) ...................................... |
11 |
Programming the CD tracks .................................................................................................. |
12 |
Fading In or Out (CDP-XE570/XE370 only) ........................................................................ |
13 |
Recording From CDs (CDP-XE570 only) |
|
Recording a CD by Specifying Tape Length (Time Edit) ..................................................... |
13 |
Adjusting the Recording Level (Peak Search) ...................................................................... |
14 |
Additional Information |
|
Using the CONTROL A1II control system (CDP-XE570 only) .......................................... |
15 |
Precautions ............................................................................................................................ |
17 |
Notes on CDs ......................................................................................................................... |
17 |
Troubleshooting ..................................................................................................................... |
18 |
Specifications ........................................................................................................................ |
18 |
3GB

Parts Identification
Front Panel
The items are arranged in alphabetical order.
Refer to the pages indicated in parentheses ( ) for details.
CDP-XE570
CDP-XE370/XE270
CHECK qf (12)
CLEAR qg (12)
Disc compartment 6 (8) Display qj (10)
FADER 4 (13)
PEAK SEARCH qd (14) PHONES jack ql (9)
PLAY MODE 2 (9, 12, 14) POWER 1 (8)
Remote sensor qh (7) (CDP-XE570/XE370 only)
REPEAT 3 (9, 11) TIME w; (10)
TIME EDIT qs (13, 14) TIME/TEXT 5 (10)
BUTTON DESCRIPTIONS
AOPEN/CLOSE 7 (8, 10, 12) H8 (9, 11, 12, 14)
X9 (9, 14) x0 (9, 14)
lAMSLdial qa (9, 12, 14) m/Mqk (9, 13)
4GB
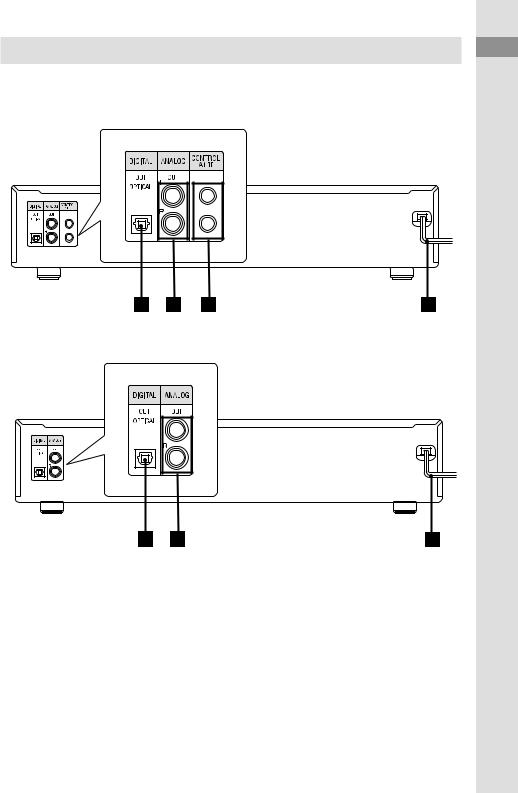
Rear Panel
CDP-XE570
CDP-XE370/XE270
ANALOG OUT L/R jacks 2 (7) CONTROL A1II jacks 3 (8, 15) DIGITAL OUT OPTICAL jack 1 (8) Mains lead 4 (7)
Identification Parts
5GB
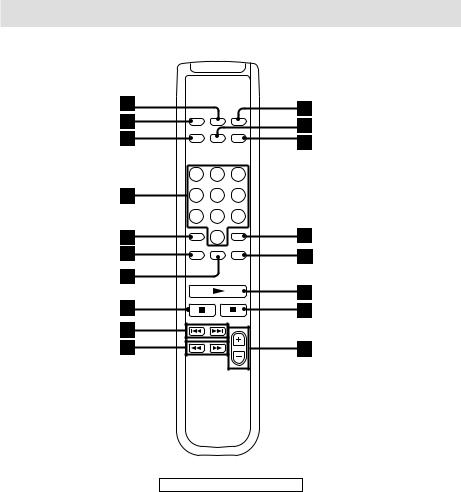
Remote Control (CDP-XE570/XE370 only)
AyB 7 (11) (CDP-XE570 only) ANALOG OUT LEVEL +/–qk (7,
9)
CHECK qg (12)
CLEAR qf (12) CONTINUE 2 (9, 14) DISPLAY ON/OFF qs (11) FADER qd (13)
Number buttons 4 (9, 12) PROGRAM qa (9) REPEAT 6 (9) SHUFFLE 1 (9)
TIME 3 (10)
BUTTON DESCRIPTIONS
>10 5 (9, 12)
Nqh (9, 11, 12, 14)
X8 (9, 14) xqj (9, 14)
.AMS >9 (9, 12, 14) m/M0 (9, 13)
6GB

Getting Started
Inserting Batteries Into the Remote Control (CDPXE570/XE370 only)
You can control the player using the supplied remote.
Insert two R6 (size AA) batteries by matching the + and – on the batteries to the diagram inside the battery compartment.
Insert the negative (–) end first, then push in and down until the positive (+) end clicks into position.
When using the remote, point it at the remote sensor on the player.
Tip
When the remote no longer operates the system, replace both batteries with new ones.
Note
•Do not leave the remote near an extremely hot or humid place.
•Do not drop any foreign object into the remote casing, particularly when replacing the batteries.
•Do not expose the remote sensor to direct sunlight or lighting apparatuses. Doing so may cause a malfunction.
•If you don’t use the remote for an extended period of time, remove the batteries to avoid possible damage from battery leakage and corrosion.
Hooking Up the System
Hookups
This section describes how to hook up the CD |
Getting |
||
|
|||
player to an amplifier. Be sure to turn off the |
|
||
power of each component before making the |
|
||
connections. |
|
|
Started |
|
|
CD player |
|
|
|
|
|
ANALOG |
ANALOG OUT |
To mains |
|
OUT |
(White) (L) |
|
|
(Red) (R) |
|
|
|
Audio input |
Audio input |
|
|
(White) (L) |
(Red) (R) |
Amplifier |
|
|
|
|
|
: Signal flow |
To mains |
Note
Install this system so that the power cord can be unplugged from the wall socket immediately in the event of trouble.
Tip (CDP-XE570/XE370 only)
You can adjust the analog output level to the amplifier using the remote comes with this player. Press ANALOG OUT LEVEL +/– on the remote. You can reduce the analog output level up to –20 dB. When you reduce the analog output level, “FADE” (or FADE for the CDP-XE370) appears in the display. When you turn off the player, the output level automatically returns to the maximum level.
continued
7GB

Hooking Up the System (continued)
Making digital hookups
If you have a digital component such as a digital amplifier, D/A converter, DAT, or MD, connect the component via the DIGITAL OUT (OPTICAL) connector using the optical cable (not supplied). Take off the cap and plug in the optical cable.
Note that you cannot use the following functions when making this connection:
•Fading In or Out (CDP-XE570/XE370 only) (see page 13)
•Adjusting the output level using the ANALOG OUT LEVEL +/–buttons on the remote (CDP-XE570/XE370 only)
|
|
|
|
|
POC-15 |
||||||
|
|
|
|
|
|
|
|
|
|
||
|
Optical cable (not supplied) |
||||||||||
CD player |
Digital component |
||||||||||
DIGITAL |
DIGITAL |
||||||||||
INPUT |
|||||||||||
|
|
|
|
|
|||||||
|
OUT |
OPTICAL |
|||||||||
OPTICAL |
|||||||||||
|
|
|
|
|
|
|
|
|
|
|
|
|
|
|
|
|
|
|
|
|
|
|
|
|
|
|
|
|
|
|
|
|
|
|
|
Note
When you connect via the DIGITAL OUT (OPTICAL) connector, noise may occur when you play CD software other than music, such as a CDROM.
Tip (CDP-XE570 only)
If you have a Sony component with the CONTROL A1II jack, connect the component via the CONTROL A1II jack. You can simplify the operation of audio systems composed of separate Sony components. For details, see “ Using the CONTROL A1II control system” on page 15.
8GB

Playing the CD
––Normal Play/Shuffle Play/Repeat Play
This unit lets you play the CD in different play modes.
1 Press PLAY MODE repeatedly until the mode you want appears.
Select |
To play |
CONTINUE |
The CD in the original order. |
|
|
SHUFFLE |
The tracks on the CD in random |
|
order. |
|
|
PROGRAM |
The tracks on the CD in the |
|
order you want them to be |
|
played (see “ Programming the |
|
CD tracks” on page 12). |
|
|
2 Press H.
Tip (CDP-XE570/XE370 only)
You can select the playing mode by pressing CONTINUE, SHUFFLE, or PROGRAM on the remote.
Repeat Play Operations
You can play the CD tracks repeatedly in any play modes.
To activate the Repeat Play function, press REPEAT until “ REPEAT’ appears in the display.
To |
Press REPEAT |
Repeat only one track |
Until “ REPEAT 1” appears |
|
while playing the track you |
|
want to repeat. |
|
|
Cancel Repeat Play |
Until “ REPEAT” or |
|
“ REPEAT1” disappears. |
|
|
When you are in the Repeat Play function, the player repeats the tracks as follows:
When the disc is |
The player repeats |
played in |
|
|
|
Continuous Play |
All the tracks |
|
|
Shuffle Play |
All the tracks in random |
|
order |
|
|
Programme Play |
The same programme |
(page 12) |
|
|
|
Other Operations
To |
Do this |
Stop playback |
Press x. |
|
|
Pause |
Press X. Press Xagain or |
|
Hto resume play. |
|
|
Select a track |
During play or pause, turn |
|
lAMSLclockwise |
|
(to go forward) or |
|
counterclockwise (to go |
|
backward) |
|
(or press >( to go |
|
forward) or .(to go |
|
backward) on the remote |
|
(CDP-XE570/XE370 |
|
only)). |
|
|
Select a track directly |
Press the number button on |
|
the remote.* |
|
|
Find a point in a track |
Press and hold Mor m |
|
during playback, and |
|
release at the desired point. |
|
|
Play tracks in random |
Press PLAY MODE until |
order |
“ SHUFFLE” appears in the |
|
display. |
|
|
Remove the CD |
Press AOPEN/CLOSE. |
|
|
Adjust the volume |
Press ANALOG OUT |
|
LEVEL +/–on the remote. |
|
|
*When you directly locate a track numbered over 10, press >10 first, then the corresponding number buttons. To enter “ 0,” use button 10.
Example: To play track number 30
Press >10 first, then 3 and 10.
Tips
•You can adjust the analog output level with the ANALOG OUT LEVEL +/–on the remote (page 7) (CDP-XE570/XE370 only).
•You can adjust the headphones volume on the remote. To adjust the volume, connect the headphones to the PHONES jack and adjust the volume with the ANALOG OUT LEVEL +/–on the remote (CDP-XE570 only).
•If there is no CD in the player, “–NO DISC–”(or “ no dISC” for the CDP-XE370/XE270) appears in the display.
Note
If “–OVER –”(or “ 
 ” for the CDP-XE370/ XE270) appears in the display, the disc has reached the end while you were pressing M. Press mor turn lAMSLcounterclockwise to go back.
Started Getting
CDs Playing
9GB

Using the CD display
You can check information about the disc using the display.
In the stop mode
Press TIME/TEXT (or TIME for the CDPXE370/XE270 ).
CDP-XE570
|
|
TRACK INDEX |
|
MIN |
SEC |
|
|
|
|
|
|
|
|
||||||||||
|
|
|
1 |
2 |
3 |
4 |
5 |
|
|
||||||||||||||
|
|
10 |
|
|
|
|
|
|
|
|
45 28 |
|
|
6 |
7 |
8 |
9 |
10 |
|
|
|||
|
|
|
|
|
|
|
|
|
|
|
|
|
|
|
|||||||||
|
|
|
|
|
|
|
|
|
|
|
|
|
|
|
|
|
|
||||||
|
|
|
|
|
|
|
|
|
|
|
|
|
|
|
|
|
|
|
|
|
|
|
|
|
|
|
|
|
|
|
|
|
|
|
|
|
|||||||||||
|
|
|
|
|
|
|
|
|
|
|
|
|
|
||||||||||
Total number of |
|
|
|
|
|
Music calendar |
|||||||||||||||||
tracks |
Total playing time |
|
|
|
|
|
|
|
|||||||||||||||
|
|
|
|
|
|
|
|
|
|
|
|
|
|
|
|
|
|
||||||
CDP-XE370/XE270 |
|
|
|
|
|
|
|
|
|
|
|
||||||||||||
|
|
|
|
|
|
|
|
|
|
|
|
|
|
|
|
|
|
|
|
|
|
|
|
|
|
|
|
|
|
|
10 |
|
|
|
MIN |
SEC |
1 |
2 |
3 |
4 |
5 |
|
|
||||
|
|
|
|
|
|
|
|
|
|
45 28 |
|
|
6 |
7 |
8 |
9 |
10 |
|
|
||||
|
|
|
|
|
|
|
|
||||||||||||||||
|
|
|
|
|
|
|
|
|
|
|
|
|
|
|
|
|
|
|
|
|
|
|
|
|
|
|
|
|
|
|
|
|
|
|
|
|
|
|
|
|
|
|
|||||
Total number of |
|
|
|
|
|
Music calendar |
|||||||||||||||||
tracks |
Total playing time |
|
|
|
|
|
|
|
|||||||||||||||
|
|
|
|
|
|
|
|
|
|
|
|
|
|
|
|
|
|
||||||
The display shows the total number of tracks, total playing time, and music calendar.
While in Shuffle Play mode (“ SHUFFLE” appears in the display; see page 9), a onesecond access time blank is added between each track. This increase is automatically added to the total playing time in the display.
The information also appears when you press AOPEN/CLOSE to close the disc tray.
During normal playback
While playing a disc, the display shows the current track number, playing time, and the music calendar.
The track numbers in the music calendar disappear after they are played.
To check the remaining time
Press TIME/TEXT (or TIME for the CDPXE370/XE270) during playback.
Each time you press this button while playing a disc, the display changes as shown in the chart below.
Playing time on the current track t Remaining time on the current track t Remaining time on the disc
Notes
•If the track number exceeds 25, “– –.– –appears” instead of the remaining time on the current track.
•When the disc has more than 25 tracks in Shuffle or Programme Play, “– –.– –appears” instead of the remaining time.
While playing a CD TEXT disc (CDP-XE570 only)
CD TEXT discs have information, such as the disc titles or artist names, memorised in a blank space on the discs where, on normal discs, there is no information. The display shows the CD TEXT information of the disc so that you can check the current disc title, artist name, and track title. When the player detects CD TEXT discs, the “ CD TEXT” indication appears in the display.
In the Stop Mode
Press TIME/TEXT.
Each time you press this button, the display changes as shown in the chart below.
Disc title t Artist name t Total number of tracks and total playing time
10GB
During normal playback
Press TIME/TEXT.
Each time you press this button, the display changes as shown in the chart below.
Track title t Playing time on the current disc t Remaining time on the current track t Remaining time on the disc
If a title or name has more than 12 characters, the first 12 characters will light up after the title or name scrolls by in the display.
Notes
•If the track number exceeds 25, “– –.– –appears” instead of the remaining time on the current track.
•When the disc has more than 25 tracks in Shuffle or Programme Play, “– –.– –appears” instead of the remaining time.
•The display may not show all the characters depending on the disc.
•This player can only display the disc titles, track titles and artist names from CD TEXT discs. Other information cannot be displayed.
Turning off indications in the display (CDP-XE570/XE370 only)
Press DISPLAY ON/OFF on the remote.
Each time you press this button while playing a disc, the display turns off and on alternately.
Even when the display is turned off, the display turns on if you pause or stop play. When you resume play, the display turns off again.
Before you start playing, when you press DISPLAY ON/OFF to turn off the display,
“ DISPLAY OFF” (or “ d–OFF” for the CDPXE370) appears, and when you press the button to turn on the display, “ DISPLAY ON” (or “ d– ON” for the CDP-XE370) appears.
Repeating a Specific Portion (AyB Repeat) (CDP-XE570 only)
You can play a specific portion in a track repeatedly. This might be useful when you want to memorise lyrics.
Note that you cannot repeat a portion extending to two tracks.
1 While playing a disc, press A y B on the remote when you find the starting point (point A) to be played repeatedly.
“ A-” of “ REPEAT A-” flashes in the display.
2 When you reach the ending point (point B), press A y B again.
“ REPEAT A-B” appears. The player plays this specific portion repeatedly.
To cancel AyB Repeat
Press REPEAT.
Setting a new starting point
When you press A y B during AyB Repeat Play, the ending point B becomes the new starting point (point A). Then press A y B again when you reach the ending point (new ending point B).
“ REPEAT A-B” appears and the player repeats between the new starting and ending points.
Tip
When you want to restart from the starting point A, press Hduring AyB Repeat.
CDs Playing
11GB
 Loading...