


(044)361-05-06 ICQ:495-089-192 (067)469-02-12 ICQ:613-211-859 (099)048-99-03 (093)672-77-76
User's Manual
CD receiver Sony CDX-GT290
In the online store Winauto you also can buy car receiver Sony CDX-GT290 . Delivery in Kiev and throughout Ukraine with payment upon receipt!
http://winauto.ua
Car Receivers - Facia Plates - Head Units - Car TVs and Monitors - Antennas - Car Audio - DVR - GPS Navigation - Trip Computers - Alarm Systems - Mechanical Locking - Parking Systems - Car Cameras - Xenon and Lights - Established Optics - Tuning - Car Heating and Cooling - Sound Marine and Electronics - Car Accessories - Isolation - Installation Components - Batteries, Power - Oils and Fluids -
Car audio and car goods internet store Winauto
4-149-110-51(1)
FM/MW/SW ua
Compact Disc. Player
winauto
Operating Instructions
Manual de instrucciones
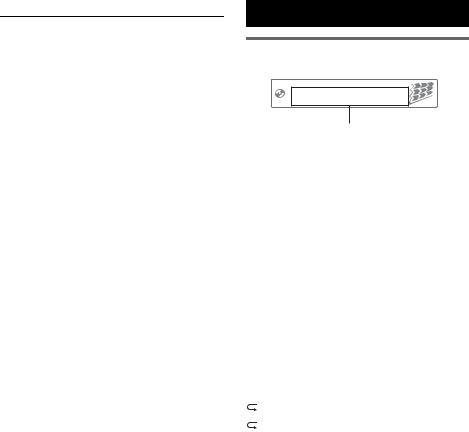
To cancel the demonstration (DEMO) display, see page 4.
Para cancelar la pantalla de demostración (DEMO), consulte la página 4.
GB
ES
CDX-GT292 CDX-GT290S CDX-GT290 CDX-GT290EB CDX-GT29M
©2009 Sony Corporation

2

Car audio and car goods internet store Winauto
Other functions
Changing the sound settings . . . . . . . . . . . . . . 10 Adjusting the sound characteristics
— BAL/FAD/SUB. . . . . . . . . . . . . . . . . . . 10 Customizing the equalizer curve
— EQ3 . . . . . . . . . . . . . . . . . . . . . . . . . . . . 10 Adjusting setup items — SET . . . . . . . . . . . . 10 Using optional equipment . . . . . . . . . . . . . . . . 11 Auxiliary audio equipment. . . . . . . . . . . . . 11
Additional Information
Main unit. . . . |
. . . . . . . . . . . . . . . . . . . . . . . . |
6 |
Precautions |
||
Card remote commander RM-X151 |
6 |
||||
|
Notes on discs |
||||
|
|
|
|
||
Radio |
|
|
|
Playb ck order of MP3/WMA files . . . . . . |
|
|
|
|
Abo t MP3 files |
||
|
|
|
|
||
Storing and receiving stations |
8 |
|
. . . . . . . . . . . . . . . . . . . .Abo t WMA files |
||
Maintenance |
|||||
Storing automatically — BTM |
8 |
||||
Removing the nit |
|||||
Storing manually |
8 |
||||
Specifications |
|||||
Receiving the stored stations |
8 |
||||
.ua |
|||||
|
|
|
|||
Tuning automatically |
8 |
Tr ubleshooting . . . . . . . . . . . . . . . . . . . . . . . |
|||
|
Err r displays/Messages |
||||
RDS |
|
8 |
|
||
. . . . . . . . . . . . . . . . . . . . . . . . |
|
|
|||
Overview. . . . |
. . . . . . . . . . . . . . . . . . . . . . . . |
8 |
|
|
|
Selecting PTY |
. . . . . . . . . . . . . . . . . . . . . . . . |
8 |
|
|
|
Setting CT . . . |
. . . . . . . . . . . . . . . . . . . . . . . . |
9 |
|
|
|
CD |
|
|
|
|
|
Display items |
. . . . . . . . . . . . . . . . . . . . . . . . |
9 |
|
|
|
Repeat and shuffle play. . . . . . . . . . . . . . . . . |
9 |
|
|
||
|
winauto |
|
|||
12
12
12
12
12
13
14
14
15
17
3

Car audio and car goods internet store Winauto
Getting Started
Playable discs on this unit
This unit can play CD-DA (also containing CD TEXT) and CD-R/CD-RW (MP3/WMA files (page 12)).
Preparing the card remote commander
Remove the insulation film.
|
|
Type of discs |
|
|
Label on the disc |
|
|
|
|
|
|
|
|||||
|
|
CD-DA |
|
|
|
|
|
|
|
|
|
|
|
|
|
|
|
|
|
|
|
|
|
|
|
|
|
|
|
Tip |
|
|
|
|
|
|
|
|
|
|
|
|
|
|
|
|
|
|
|
|
|
|
|
|
|
|
|
|
|
|
|
|
|
|
|
For how to replace the battery, see page 13. |
|||||
|
|
|
|
|
|
|
|
|
|
|
|
|
|
|
|
|
|
|
|
MP3 |
|
|
|
|
|
|
|
|
|
Setting the clock |
|||||
|
|
|
|
|
|
|
|
|
|
|
|||||||
|
|
|
|
|
|
|
|
|
|
|
|||||||
|
|
|
|
|
|
|
|
|
|
|
|
|
|
|
|
|
|
|
|
WMA |
|
|
|
|
|
|
|
|
|
The clock uses 12-hour digital indication. |
|||||
|
|
|
|
|
|
|
|
|
|
|
|
||||||
|
|
|
|
|
|
|
|
|
|
|
|
1 Press |
nd hold the select button. |
||||
|
|
|
|
|
|
|
|
|
|
|
|
The set |
p displ y ppears. |
||||
|
|
|
|
|
|
|
|
|
|
|
|
||||||
|
|
|
|
|
|
|
|
|
|
|
|
2 Press the select button repeatedly |
|||||
|
|
Canceling the DEMO mode |
|||||||||||||||
|
|
|
ntil “CLOCK-ADJ” appears. |
||||||||||||||
|
|
|
|
|
|
|
|
|
|
|
|
3 Press (SEEK) +. |
|||||
|
|
|
|
|
|
|
|
|
|
|
|||||||
|
|
|
|
|
|
|
|
|
|
|
|
ua |
|||||
|
|
You can cancel the demonstration display which |
|
.The hour indication flashes. |
|||||||||||||
|
|
appears during turning off. |
|
4 R tate the control dial to set the hour |
|||||||||||||
|
|
1 Press and hold the select button. |
|
||||||||||||||
|
|
|
and minute. |
||||||||||||||
|
|||||||||||||||||
|
|
The setup display appears. |
|
To move the digital indication, press (SEEK) |
|||||||||||||
|
|||||||||||||||||
|
|
2 Press the select button repe tedly |
|
–/+. |
|
|
|
|
|
||||||||
|
|
|
5 After setting the minute, press the |
||||||||||||||
|
|
until “DEMO” appears. |
|
||||||||||||||
|
|
3 Rotate the control dial select |
|
select button. |
|||||||||||||
|
|
|
The setup is complete and the clock starts. |
||||||||||||||
|
|
“DEMO-OFF.” |
|
|
|
|
|
|
|
|
|||||||
|
|
|
|
|
|
|
|
|
|
|
|
|
|
|
|
||
|
|
4 Press and hold the select button. |
|
To display the clock, press (DSPL/SCRL). Press |
|||||||||||||
|
|
The setup is complete and the display returns |
|
(DSPL/SCRL) again to return to the previous |
|||||||||||||
to normal reception/playwinautomode. display.
Tip
You can set the clock automatically with the RDS feature (page 9).
4
Car audio and car goods internet store Winauto
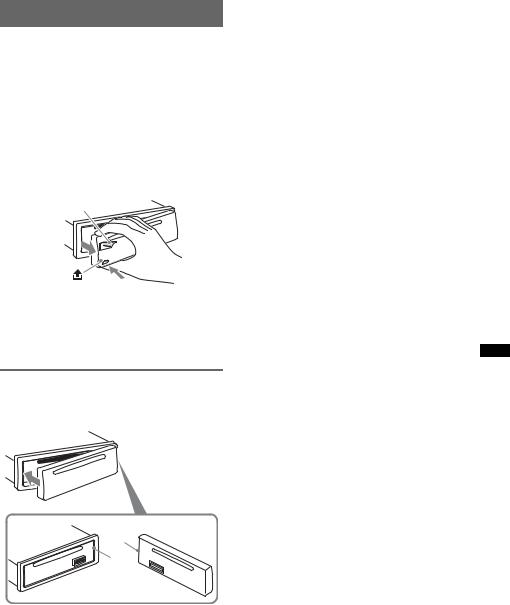
Detaching the front panel
You can detach the front panel of this unit to prevent theft.
Caution alarm
If you turn the ignition switch to the OFF position without detaching the front panel, the caution alarm will sound for a few seconds. The alarm will only sound if the built-in amplifier is used.
1Press and hold (SOURCE/OFF).
The unit is turned off.
2 Press  , then pull it off towards you.
(SOURCE/OFF)
Notes |
winauto |
|
• Do not drop or put excessive pressure on the fr nt |
.ua |
|
panel and display window. |
||
• Do not subject the front panel to heat/high temperature or moisture. Avoid leaving it in a parked car or on a dashboard/rear tray.
Attaching the front p nel
Engage part A of the front p nel with p rt B of the unit, as illustrated, d push the left side into position until it clicks.
A
B
Note
Do not put anything on the inner surface of the front panel.
5
Car audio and car goods internet store Winauto
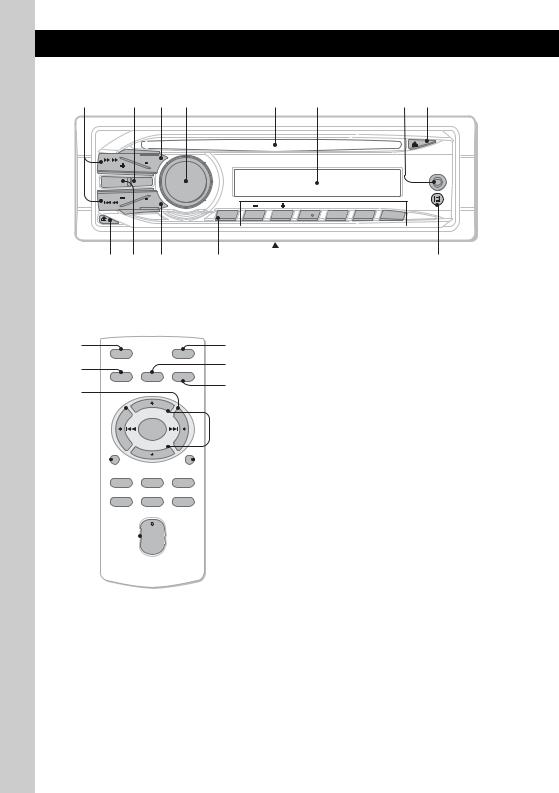
Location of controls and basic operations
Main unit
1 |
2 3 4 |
|
|
5 |
6 |
|
|
7 8 |
|
SOURCE |
|
|
|
|
|
|
|
SEEK |
OFF |
|
|
|
|
|
|
|
|
|
|
|
|
|
|
AUX |
|
|
|
C |
|
|
|
|
|
|
|
|
T |
|
|
|
|
|
|
|
|
E |
|
|
|
|
|
|
|
|
L |
|
|
|
|
|
|
MODE |
EQ3 |
E |
|
|
|
|
|
|
S |
|
|
|
|
|
|
||
|
|
H |
|
|
|
|
|
|
|
|
S |
|
|
|
|
|
|
|
|
U |
|
|
|
|
|
|
SEEK |
|
P |
|
|
|
|
|
|
SCRL |
|
|
|
|
|
|
|
|
|
|
|
|
|
|
|
|
|
|
DSPL |
|
|
ALBUM |
REP |
SHUF |
|
PAUSE |
|
|
PTY |
1 |
2 |
3 |
4 |
5 |
6 |
|
|
9 Q; QA |
|
|
|
|
|
|
|
|
|
|
|
|
|||
|
|
|
|
|
|
|
|
|
|
|
|
|
|
||||
|
|
|
|
QS |
QD QF |
QG |
|||||||||||
Card remote commander |
|
This section contains instructions on the location |
|||||||||||||||
RM-X151 |
|
|
|
|
|
|
|
|
|
|
|
of controls and basic operations. |
|||||
winauto |
|
||||||||||||||||
W; |
|
|
|||||||||||||||
|
|
|
|
|
|
|
|
|
|
|
|
|
|
For details, see the respective pages. |
|||
|
|
|
|
|
|
|
|
|
|
|
|
|
|
The c rresponding buttons on the card remote |
|||
QH |
|
OFF |
|
ATT |
|
WA |
|
c.mmanderuacontrol the same functions as those |
|||||||||
QJ |
|
|
|
|
|
|
|
WS |
|
the unit. |
|
||||||
|
|
|
SOURCE |
SEL |
MODE |
|
Q; |
|
A SEEK +/– buttons |
|
|||||||
QK |
|
|
|
|
|
|
|
|
|
|
|
|
CD: |
|
|||
|
|
|
|
|
|
|
|
|
|
|
|
|
|
To skip tracks (press); skip tracks |
|||
|
|
|
|
|
+ |
|
|
|
|
|
|
|
|
continuously (press, then press again within |
|||
|
|
|
|
|
|
|
|
|
|
WD |
|
about 1 second and hold); reverse/fast- |
|||||
|
|
|
|
|
– |
|
|
|
|
|
|
|
|
forward a track (press and hold). |
|||
|
|
|
|
|
|
|
|
|
|
|
|
|
Radio: |
|
|||
QL |
|
|
|
|
|
|
|
|
|
WF |
|
|
|||||
|
|
DSPL |
|
SCRL |
|
|
|
|
To tune in stations automatically (press); find |
||||||||
|
|
|
|
|
|
|
|||||||||||
|
|
|
|
|
|
|
|
|
|
|
|
|
|
a station manually (press and hold). |
|||
|
|
|
1 |
|
2 |
3 |
|
|
|
|
WG |
|
B EQ3 (equalizer) button |
|
|||
|
|
|
4 |
|
5 |
6 |
|
|
|
|
|
page 10 |
|||||
|
|
|
|
|
|
|
|
|
|||||||||
|
|
|
|
|
|
|
|
|
|
|
To select an equalizer type (XPLOD, |
||||||
|
|
|
|
|
|
|
|
|
|
|
|
|
|
||||
|
|
|
|
|
|
|
|
|
|
|
|
|
|
||||
|
|
|
|
|
|
|
|
|
|
|
|
|
|
VOCAL, EDGE, CRUISE, SPACE, |
|||
|
|
|
|
|
+ |
|
|
|
|
|
|
|
|
GRAVITY*1, CUSTOM or OFF). |
|||
|
|
|
|
|
VOL |
|
|
|
|
|
|
|
|
|
|
|
|
– |
C SOURCE/OFF button |
|
|
|
Press to turn on the power/change the source |
|
(Radio/CD/AUX). |
|
Press for 1 second to turn off the power. |
|
Press for more than 2 seconds to turn off the |
|
power and the display disappears. |
|
D Control dial/select button page 10 |
|
To adjust volume (rotate); select setup items |
|
(press and rotate). |
6

Car audio and car goods internet store Winauto
|
|
|
|
|
|
E Disc slot |
|
The following buttons on the card remote |
|||
|
Insert the disc (label side up), playback |
commander have also different buttons/functions |
|||
|
starts. |
|
from the unit. Remove the insulation film before |
||
F Display window |
use (page 4). |
||||
QH OFF button |
|||||
G AUX input jack page 11 |
|||||
|
To turn off; stop the source. |
||||
|
To connect a portable audio device. |
|
|||
|
QJ SOURCE button |
||||
H Z (eject) button |
|||||
|
To turn on; change the source (Radio/CD/ |
||||
|
To eject the disc. |
|
|||
|
|
AUX). |
|||
|
|
|
|
||
I |
(front panel release) button page 5 |
QK < (.)/, (>) buttons |
|||
J MODE button page 8 |
|
To control radio/CD, the same as (SEEK) |
|||
|
To select the radio band (FM/MW/SW). |
|
–/+ on the unit. |
||
|
|
Setup, sound setting, etc., can be operated by |
|||
|
|
|
|
||
K DSPL (display)/SCRL (scroll) button |
|
< ,. |
|||
|
page 8, 9 |
|
QL DSPL (displ y) button |
||
|
To change display items (press); scroll the |
||||
|
|
To ch nge displ y items. |
|||
|
display item (press and hold). |
|
|||
|
W; VOL (vol me) +*2/– button |
||||
L PTY button page 8 |
|||||
|
To adj st volume. |
||||
|
To select PTY in RDS. |
|
|||
|
|
|
|||
M Frequency select switch (located on he |
WA ATT (attenuate) button |
||||
.ua |
|||||
|
bottom of the unit) |
|
To attenuate the sound. To cancel, press |
||
|
|
again. |
|||
|
See “Frequency select switch” in the |
|
|||
|
WS SEL (select) button |
||||
|
supplied installation/connections man al. |
||||
N Number buttons |
|
The same as the select button on the unit. |
|||
WD M (+)/M (–) buttons |
|||||
|
CD: |
|
|||
|
(1)/(2): ALBUM –/+ (during MP3/WMA |
|
To control CD, the same as (1)/(2) |
||
|
playback) |
|
|
(ALBUM –/+) on the unit. |
|
|
To skip albums (press); skip albums |
|
Setup, sound setting, etc., can be operated by |
||
|
continuously (press d hold). |
|
M M. |
||
|
(3): REP*2 |
page 9 |
WF SCRL (scroll) button |
||
|
(4): SHUF page 9 |
||||
|
|
To scroll the display item. |
|||
|
(6): PAUSE |
|
|||
|
|
|
|||
|
To pause playback. To cancel, press |
WG Number buttons |
|||
|
again. |
winauto |
To receive stored stations (press); store |
||
|
Radio: |
||||
|
stations (press and hold). |
||||
|
To receive stored stations (press); store |
|
|
||
|
stations (press and hold). |
*1 |
|
||
OReceptor for the card remote commander
*2
Note
If the unit is turned off and the display disappears, it cannot be operated with the card remote commander unless (SOURCE/OFF) on the unit is pressed, or a disc is inserted to activate the unit first.
7
Car audio and car goods internet store Winauto
Radio
Storing and receiving stations
Caution
When tuning in stations while driving, use Best Tuning Memory (BTM) to prevent an accident.
RDS
Overview
FM stations with Radio Data System (RDS) service send inaudible digital information along with the regular radio program signal.
Storing automatically — BTM
1Press (SOURCE/OFF) repeatedly until
“TUNER” appears.
To change the band, press (MODE) repeatedly. You can select from FM1, FM2, FM3, MW, SW1 or SW2.
Display items
Program service name, Clock, Frequency*, Preset number
|
|
2 Press and hold the select button. |
|
* While receiving the RDS station, “ *” is displayed on |
|
|
|
|
the left of the frequency indication. |
||
|
|
The setup display appears. |
|
||
|
|
|
|
||
|
|
3 Press the select button repeatedly |
|
To change displ y items, press (DSPL/SCRL). |
|
|
|
|
|
||
|
|
until “BTM” appears. |
|
RDS services |
|
|
|
4 Press (SEEK) +. |
|
||
|
|
|
This nit tomatically provides RDS services as |
||
|
|
The unit stores stations in order of frequency |
|
||
|
|
|
follows: |
||
|
|
on the number buttons. |
|
||
|
|
|
|
||
|
|
A beep sounds when the setting is stored. |
|
PTY (Program Types) |
|
|
|
|
|
|
.ua |
|
|
|
|
|
Displays the currently received program type. |
|
|
Storing manually |
|
Also searches your selected program type. |
|
|
|
|
|
||
|
|
|
CT (Clock Time) |
||
|
|
1 While receiving the station that you |
|
||
|
|
|
The CT data from the RDS transmission sets |
||
|
|
want to store, press and hold |
|
the clock. |
|
|
|
number button ((1) to (6)) until |
|
|
|
|
|
|
Notes |
||
|
|
“MEMORY” appears. |
|
||
|
|
|
• Depending on the country/region, not all RDS |
||
|
|
|
|
|
|
|
|
Note |
|
|
functions may be available. |
|
|
If you try to store another stat on on the same number |
|
• RDS will not work if the signal strength is too weak, |
|
|
|
button, the previously stored stat on w ll be replaced. |
|
or if the station you are tuned to is not transmitting |
|
|
|
|
|
|
RDS data. |
|
|
|
|
|
|
|
|
Receiving the stored stations |
|
|
|
|
|
|
Selecting PTY |
||
|
|
1 Select the band, then press number |
|
||
|
|
|
1 Press (PTY) during FM reception. |
||
|
|
button ((1) to (6)). |
|
||
|
|
|
winauto |
||
|
|
|
|
|
|
Tuning automatically
1Select the band, then press (SEEK) +/– to search for the station.
Scanning stops when the unit receives a station. Repeat this procedure until the desired station is received.
Tip
If you know the frequency of the station you want to listen to, press and hold (SEEK) +/– to locate the approximate frequency, then press (SEEK) +/– repeatedly to fine adjust to the desired frequency (manual tuning).
The current program type name appears if the station is transmitting PTY data.
2Press (PTY) repeatedly until the desired program type appears.
3Press (SEEK) +/–.
The unit starts to search for a station broadcasting the selected program type.
8
Car audio and car goods internet store Winauto
Type of programs
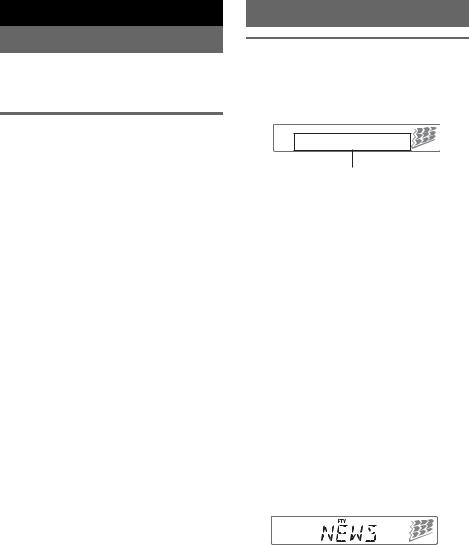
NEWS (News), AFFAIRS (Current Affairs), INFO (Information), SPORT (Sports), EDUCATE (Education), DRAMA (Drama), CULTURE (Culture), SCIENCE (Science), VARIED (Varied), POP M (Pop Music), ROCK M (Rock Music), EASY M (M.O.R. Music), LIGHT M (Light Classical), CLASSICS (Serious classical), OTHER M (Other Music), WEATHER (Weather), FINANCE (Finance), CHILDREN (Children’s program), SOCIAL A (Social Affairs), RELIGION (Religion), PHONE IN (Phone In), TRAVEL (Travel), LEISURE (Leisure), JAZZ (Jazz Music), COUNTRY (Country Music),
CD
Display items
Track name*1, Disc/artist name*1, Artist name*1, Album number*2, Album name*1, Track number/ Elapsed playing time, Clock
NATION M (National Music), OLDIES (Oldies |
|
*1 The information of a CD TEXT, MP3/WMA is |
|
||||
Music), FOLK M (Folk Music), DOCUMENT |
|
|
displayed. |
|
|
|
|
|
*2 Album number is displayed only when the album is |
|
|||||
(Documentary) |
|
|
|
||||
|
.ua |
|
|
|
|||
|
|
|
|
changed. |
|
|
|
Notes |
|
|
To change displ y items, press (DSPL/SCRL). |
|
|||
• You cannot use this function in countries/regions |
|
|
|
|
|
|
|
where no PTY data is available. |
|
Tip |
|
|
|
||
• You may receive a different radio program from the |
|
Displayed items may differ depending on model, disc |
|
||||
one you select. |
|
|
type, recording format and settings. For details on |
|
|||
|
|
|
MP3/WMA, see page 12. |
|
|
|
|
|
|
|
|
|
|
|
|
Setting CT |
winauto |
|
|
|
|
||
|
|
Repeat and shuffle play |
|
||||
1 Set “CT-ON” setup (page 10). |
|
|
|||||
|
1 During playback, press (3) (REP) or |
|
|||||
Notes |
|
|
|
||||
|
|
||||||
|
|
|
(4) (SHUF) repeatedly until the |
|
|||
• The CT function may not work even tho gh an RDS |
|
|
|
||||
|
|
desired setting appears. |
|
||||
station is being received. |
|
|
|
||||
|
|
|
|
|
|
||
• There might be a difference between the time set by |
|
|
|
|
|
|
|
|
Select |
To play |
|
||||
the CT function and the actual time. |
|
|
|||||
|
|
|
|
|
|
||
|
|
|
|
TRACK |
track repeatedly. |
|
|
|
|
|
|
|
|
|
|
|
|
|
|
ALBUM* |
album repeatedly. |
|
|
|
|
|
|
|
|
|
|
|
|
|
SHUF ALBUM* |
album in random order. |
|
||
|
|
|
|
|
|
|
|
|
|
|
SHUF DISC |
disc in random order. |
|
||
|
|
|
|
|
|
|
|
* When an MP3/WMA is played.
To return to normal play mode, select “ OFF” or “SHUF OFF.”
9
Car audio and car goods internet store Winauto
|
|
Other functions |
|
Adjusting setup items — SET |
|
|
|
|
|
|
|
Changing the sound settings |
|
1 Press and hold the select button. |
|
|
|
|
The setup display appears. |
|
|
|
|
2 Press the select button repeatedly |
|
|
Adjusting the sound |
||
|
|
|
until the desired item appears. |
|
|
|
characteristics — BAL/FAD/SUB |
|
|
|
|
|
3 Rotate the control dial to select the |
|
|
|
You can adjust the balance, fader, and subwoofer |
|
|
|
|
|
setting (example “ON” or “OFF”). |
|
|
|
volume. |
|
|
|
|
|
4 Press and hold the select button. |
|
|
|
1 Press the select button repeatedly |
|
|
|
|
|
The setup is complete and the display returns |
|
|
|
until “BAL,” “FAD” or “SUB” appears. |
|
to normal reception/play mode. |
|
|
The item changes as follows: |
|
Note |
|
|
|
|
|
|
|
LOW*1 T MID*1 T HI*1 T |
|
Displayed items will differ, depending on the source |
|
|
BAL (left-right) T FAD (front-rear) T |
|
and setting. |
|
|
SUB (subwoofer volume)*2 T AUX*3 |
|
The following items can be set (follow the page |
|
|
|
|
|
|
|
*1 When EQ3 is activated (page 10). |
|
reference for details): |
|
|
*2 When the audio output is set to “SUB-OUT” |
|
|
|
|
(page 10). |
|
|
|
|
|
CLOCK-ADJ (Clock Adjust) (page 4) |
|
|
|
“ATT” is displayed at the lowest setting, and can |
|
|
|
|
|
|
|
|
|
be adjusted up to 21 steps. |
|
CT (Clock Time) |
|
|
*3 When AUX source is activated (page 11). |
|
Activates the CT function: “ON,” “OFF” |
|
|
2 Rotate the control dial to adjust the |
|
(page 8, 9). |
|
|
selected item. |
|
BEEP |
|
|
After 5 seconds, the setting is complete and |
|
Activates the beep sound: “ON,” “OFF.” |
|
|
the display returns to normal reception/play |
|
.ua |
|
|
|
AUX-A*1 (AUX Audio) |
|
|
|
mode. |
|
Activates the AUX source display: “ON,” |
|
|
|
|
|
|
|
|
|
“OFF” (page 11). |
|
|
Customizing the equalizer c rve |
|
|
|
|
|
A.OFF (Auto Off) |
|
|
|
— EQ3 |
|
Shuts off automatically after a desired time |
|
|
“CUSTOM” of EQ3 allows you to m ke your |
|
when the unit is turned off: “NO,” “30S |
|
|
|
(Seconds),” “30M (Minutes),” “60M (Minutes).” |
|
|
|
own equalizer settings. |
|
|
|
|
|
|
|
|
|
1 Select a source, then press (EQ3) |
|
SUB/REAR*1 |
|
|
|
Switches the audio output: “SUB-OUT” |
|
|
|
repeatedly to select “CUSTOM.” |
|
|
|
|
|
(subwoofer), “REAR-OUT” (power amplifier). |
|
|
|
|
|
|
|
|
2 Press the select button repeatedly |
|
|
|
|
|
B.OUT (Black Out) |
|
|
|
until “LOW,” “MID” or “HI” appears. |
|
Turns off the illumination automatically for any |
|
|
|
|
|
|
|
3 Rotate the control dial adjust the |
|
source (e.g., during radio/CD playback |
|
|
selected item. |
|
reception, etc.) if no operation is performed for |
|
|
|
|
5 seconds: “ON,” “OFF.” |
The volume levelwinautois adjustable in 1 dB steps,
from –10 dB to +10 dB. |
To bring the light back on, press any button on |
|
the unit. (When activated, remote operation is |
||
|
||
|
unavailable.) |
Repeat steps 2 and 3 to adjust the equalizer curve.
To restore the factory-set equalizer curve, press and hold the select button before the setting is complete.
After 5 seconds, the setting is complete and the display returns to normal reception/play mode.
Tip
Other equalizer types are also adjustable.
DEMO (Demonstration)
Activates the demonstration: “ON,” “OFF.”
DIM (Dimmer)
Changes the display brightness: “ON,” “OFF.”
M.DSPL (Motion Display)
–“ON”: to show moving patterns.
–“OFF”: to deactivate the Motion Display.
A.SCRL (Auto Scroll)
Scrolls long items automatically: “ON,” “OFF.”
10
Car audio and car goods internet store Winauto
LOCAL (Local Seek Mode) |
|
Using optional equipment |
|||||||||||||||
– “ON”: to only tune into stations with stronger |
|
||||||||||||||||
|
|
|
|
|
|
|
|
|
|
|
|
|
|
|
|
|
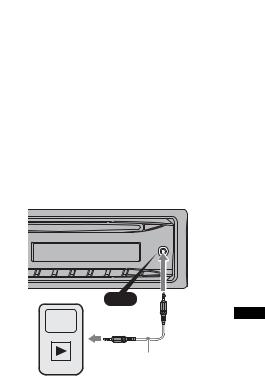
|
signals. |
|
|
|
|
|
|
|
|
|
|
|
|
|
|
|
|
|
– “OFF”: to tune normal reception. |
|
Auxiliary audio equipment |
|||||||||||||||
|
|
||||||||||||||||
MONO*2 (Monaural Mode) |
|
||||||||||||||||
|
By connecting an optional portable audio device |
||||||||||||||||
Selects monaural reception mode to improve |
|
||||||||||||||||
|
to the AUX input jack (stereo mini jack) on the |
||||||||||||||||
poor FM reception: “ON,” “OFF.” |
|
||||||||||||||||
|
unit and then simply selecting the source, you |
||||||||||||||||
|
|
||||||||||||||||
LPF*3 (Low Pass Filter) |
|
can listen on your car speakers. The volume level |
|||||||||||||||
Selects the subwoofer cut-off frequency: “OFF,” |
|
is adjustable for any difference between the unit |
|||||||||||||||
“80Hz,” “100Hz,” “120Hz,” “140Hz,” “160Hz.” |
|
and the portable audio device. Follow the |
|||||||||||||||
|
|
procedure below: |
|
|
|
|
|
|
|||||||||
LPF NORM/REV*3 (Low Pass Filter Normal/ |
|
|
|
|
|
|
|
||||||||||
Reverse) |
|
Connecting the portable audio |
|||||||||||||||
Selects the subwoofer phase: “NORM,” “REV.” |
|
||||||||||||||||
|
device |
|
|
|
|
|
|
||||||||||
|
|
|
|
|
|
|
|
||||||||||
HPF (High Pass Filter) |
|
|
|
|
|
|
|
||||||||||
|
|
|
|
|
|
|
|
|
|
|
|
|
|
|
|
|
|
Selects the front/rear speaker cut-off frequency: |
|
1 Turn off the portable audio device. |
|||||||||||||||
“OFF,” “80Hz,” “100Hz,” “120Hz,” “140Hz,” |
|
2 Turn down the volume on the unit. |
|||||||||||||||
“160Hz.” |
|
3 Connect to the unit. |
|
|
|
|
|
|
|||||||||
LOUD (Loudness) |
|
|
|
|
|
|
|
||||||||||
|
|
|
|
|
|
|
|
|
|
|
|
|
|
|
|
|
|
Reinforces bass and treble for clear sound at low |
|
|
|
|
|
|
|
|
|
|
|
|
|
|
|
|
|
volume levels: “ON,” “OFF.” |
|
|
|
|
|
|
|
|
|
|
|
|
|
|
|
|
|
|
|
|
|
|
|
|
|
|
|
|
|
|
|
|
|
|
|
BTM (page 8) |
|
|
|
|
|
|
|
|
|
|
|
|
|
|
|
|
|
. |
|
ua |
|
|
AUX |
||||||||||||
|
|
|
|
||||||||||||||
*1 When the unit is turned off. |
|
||||||||||||||||
|
|
|
|
|
|
|
|||||||||||
*2 When FM is received. |
|
|
|
|
|
|
|
||||||||||
|
|
|
|
|
|
|
|||||||||||
*3 When the audio output is set “SUB-OUT.” |
|
|
|
|
|
|
|
||||||||||
|
|
|
|
|
|
|
|
|
|
|
|
|
|||||
winauto* Be sure to use a straight type plug.
AUX
Connecting cord*
(not supplied)
Adjust the volume level
Be sure to adjust the volume for each connected audio device before playback.
1 Turn down the volume on the unit.
2 Press (SOURCE/OFF) repeatedly until “AUX” appears.
“FRONT IN” appears.
3 Start playback of the portable audio device at a moderate volume.
4 Set your usual listening volume on the unit.
5 Press the select button repeatedly until “AUX” appears, and rotate the control dial to adjust the input level (–8 dB to +18 dB).
11
 Loading...