


3-237-887-11 (1)
FM/AM
Compact Disc
Player
Operating Instructions
Mode d’emploi
Owner’s Record
US
FR
The model and serial numbers are located on the bottom of the unit. Record these numbers in the space provided below.
Refer to these numbers whenever you call upon your Sony dealer regarding this product.
Model No. CDX-CA720X/CA700X/CA705M Serial No.
For installation and connections, see the supplied installation/connections manual. En ce qui concerne l’installation et les connexions, consulter le manuel d’installation/raccordement fourni.
CDX-CA720X
CDX-CA700X
CDX-CA705M
© 2002 Sony Corporation
Warning
This equipment has been tested and found to comply with the limits for a Class B digital device, pursuant to Part 15 of the FCC Rules. These limits are designed to provide reasonable protection against harmful interference in a residential installation. This equipment generates, uses, and can radiate radio frequency energy and, if not installed and used in accordance with the instructions, may cause harmful interference to radio communications. However, there is no guarantee that interference will not occur in a particular installation. If this equipment does cause harmful interference to radio or television reception, which can be determined by turning the equipment off and on, the user is encouraged to try to correct the interference by one or more of the following measures:
–Reorient or relocate the receiving antenna.
–Increase the separation between the equipment and receiver.
–Connect the equipment into an outlet on a circuit different from that to which the receiver is connected.
–Consult the dealer or an experienced radio/TV technician for help.
You are cautioned that any changes or modifications not expressly approved in this manual could void your authority to operate this equipment.
CAUTION
The use of optical instruments with this product will increase eye hazard.
CDX-CA705M only:
This label is located on the bottom of the chassis.
CAUTION INVISIBLE LASER RADIATION WHEN OPEN DO NOT STARE INTO BEAM OR
VIEW DIRECTLY WITH OPTICAL INSTRUMENTS
This label is located on the drive unit’s internal chassis.
Welcome !
Thank you for purchasing this Sony Compact Disc Player. You can enjoy its various features even more with:
•Optional CD/MD units (both changers and players)*1.
•CD TEXT information (displayed when a CD TEXT disc*2 is played).
•Supplied controller accessory
Card remote commander RM-X118
•Optional controller accessory
Rotary commander RM-X4S
*1 This unit works with Sony products only.
*2 A CD TEXT disc is an audio CD that includes information such as the disc name, artist name, and track names. This information is recorded on the disc.
The “XM Ready” logo indicates that this product will control a Sony XM tuner module (sold separately).
Please see your nearest authorized Sony dealer for details on the XM tuner module.
For instructions on XM tuner operation, please refer to the XM tuner module’s included instruction manual.
2

Table of Contents
Location of controls. . . . . . . . . . . . . . . . . . . . 4 Precautions . . . . . . . . . . . . . . . . . . . . . . . . . . 6 Notes on discs . . . . . . . . . . . . . . . . . . . . . . . . 6
Getting Started
Resetting the unit . . . . . . . . . . . . . . . . . . . . . . 7 Detaching the front panel . . . . . . . . . . . . . . . 8 Setting the clock . . . . . . . . . . . . . . . . . . . . . . 9
CD Player
CD/MD Unit (optional)
Playing a disc. . . . . . . . . . . . . . . . . . . . . . . . . 9 Display items . . . . . . . . . . . . . . . . . . . . . . . . 10 Playing tracks repeatedly
— Repeat Play . . . . . . . . . . . . . . . . . . . . 11 Playing tracks in random order
— Shuffle Play . . . . . . . . . . . . . . . . . . . . 11 Labeling a CD
— Disc Memo*. . . . . . . . . . . . . . . . . . . . 11 Locating a disc by name
— List-up* . . . . . . . . . . . . . . . . . . . . . . . 12
* Functions available with optional CD/MD unit
Radio
Storing stations automatically
— Best Tuning Memory (BTM). . . . . . . 13 Receiving the stored stations . . . . . . . . . . . . 13 Storing only the desired stations . . . . . . . . . 14 Storing station names
— Station Memo. . . . . . . . . . . . . . . . . . . 14 Tuning in a station through a list
— List-up . . . . . . . . . . . . . . . . . . . . . . . . 15
Other Functions
Using the rotary commander. . . . . . . . . . . . 16 Adjusting the sound characteristics . . . . . . 17 Quickly attenuating the sound . . . . . . . . . . 17 Changing the sound and display settings
— Menu . . . . . . . . . . . . . . . . . . . . . . . . . 18 Setting the equalizer (EQ7). . . . . . . . . . . . . 19 Setting the Dynamic Soundstage Organizer
(DSO) . . . . . . . . . . . . . . . . . . . . . . . . . . . 19
MP3 playable CD Unit (optional)
Listening to an MP3 file . . . . . . . . . . . . . . . 20 Display items . . . . . . . . . . . . . . . . . . . . . . . 20 Playing tracks repeatedly
— Repeat Play . . . . . . . . . . . . . . . . . . . . 21 Playing tracks in random order
— Shuffle Play . . . . . . . . . . . . . . . . . . . . 21
Additional Information
Maintenance . . . . . . . . . . . . . . . . . . . . . . . . 22 Removing the unit. . . . . . . . . . . . . . . . . . . . 23 Specifications . . . . . . . . . . . . . . . . . . . . . . . 24 Troubleshooting . . . . . . . . . . . . . . . . . . . . . 25 Error displays/Messages . . . . . . . . . . . . . . . 26
3
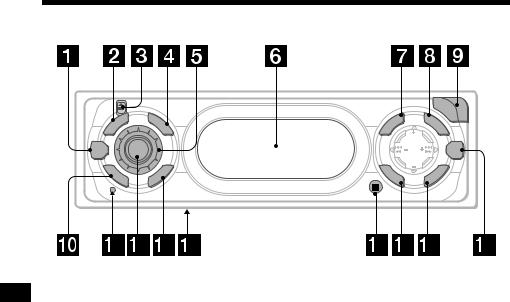
Location of controls
|
E |
D |
|
D |
S |
|
O |
L |
M |
|
P |
|
|
DSO SOURCE
O |
|
R |
L |
F |
|
|
|
F |
C |
|
|
|
S |
|
|
OP
E
N
|
U |
LI |
|
|
N |
S |
|
M |
E |
T |
|
/PR |
|||
|
|||
|
C |
ES |
|
|
IS |
T |
|
|
D |
E |
|
SEEK EQ7
D |
SET |
I |
|
S |
|
C/PRE |
|
O |
R |
S |
|
U |
|
|
|
E |
N |
|
T |
||
N |
|
|||
|
D |
E |
|
|
CDX-CA720X/CA700X/CA705M
Refer to the pages listed for details.
a DSO button 19 b MODE button
To change the operation.
cZ (eject) button (located on the front side of the unit, behind the front panel) 9
d DSPL (display mode change) button e Volume control dial
f Display window g MENU button
To display the menus. h LIST button 12, 15 i OPEN button 8, 9
j OFF (Stop/Power off) button*1 8, 9
k RESET button (located on the front side of the unit, behind the front panel) 7
lSOURCE (Power on/Radio/CD/MD) button
To select the source.
m SCRL (scroll) button 10
nFrequency select switch (located on the bottom of the unit)*2
The AM (FM) tuning interval is factory-set to the 10 k (200 k) position. Make sure that the 9 k (50 k) position is selected.
oReceptor for the card remote commander
p SOUND button 17
qENTER button
To enter a setting.
r EQ7 button 19
*1 Warning when installing in a car without an ACC (accessory) position on the ignition switch
After turning off the ignition, be sure to press (OFF) on the unit for 2 seconds to turn off the clock display.
Otherwise, the clock display does not turn off and this causes battery drain.
*2 CDX-CA705M only
4

OP
E
N
|
U |
LI |
|
|
N |
S |
|
M |
E |
T |
|
/PR |
|||
|
|||
|
C |
ES |
|
|
IS |
T |
|
|
D |
E |
|
|
|
||
SEEK EQ7
D |
SET |
I |
|
S |
|
C/PRE |
|
O |
R |
S |
|
U |
|
|
|
E |
N |
|
T |
||
N |
|
|||
|
D |
E |
|
|
(DISC/PRESET)
|
(+): to select upwards |
|
||||
(SEEK) |
|
|
|
|
|
(SEEK) |
(–): to select |
|
|
C/P |
R |
|
(+): to select |
|
|
S |
|
|
||
leftwards/ |
I |
|
E |
|
rightwards/ |
|
D |
|
|
E |
|||
. |
|
|
|
S |
|
> |
|
|
|
T |
|||
|
D |
SEEK |
|
|
||
|
|
I |
|
|
|
|
|
|
S |
|
T |
|
|
|
|
|
C/ |
|
|
|
|
|
|
E |
|
||
|
|
|
PRES |
|
|
|
(DISC/PRESET)
(–): to select downwards
In menu mode, the currently selectable button (s) of these four are indicated with a “ M” in the display.
sDISC/PRESET buttons (+/–)
To receive preset stations, change the disc* and select a menu.
* When an optional CD/MD unit is connected.
tSEEK buttons (–/+)
To skip tracks, fast-forward, reverse a track, tune in stations automatically, find a station
manually, and select a setting.
Card remote commander RM-X118
 DSPL
DSPL
REP |
SHUF |
|
1 |
2 |
3 |
4 |
5 |
6 |
DSO |
MODE |
EQ7 |
MENU |
DISC + |
LIST |
SEEK– |
SOURCE |
SEEK+ |
|
||
SOUND |
DISC – |
ENTER |
OFF |
|
ATT |
|
VOL |
|
The corresponding buttons of the card remote commander control the same functions as those on this unit.
a DSPL button
bNumber buttons
(1)REP
(2)SHUF
To store stations, receive stored stations. c DSO button
d MENU button e SOURCE button
f SEEK (</,) buttons g SOUND button
h OFF button
i VOL (+/–) buttons j EQ7 button
k MODE button l LIST button
m DISC (M/m) buttons n ENTER button
o ATT button
Note
If the unit is turned off by pressing (OFF) for
2 seconds, it cannot be operated with the card remote commander unless (SOURCE) on the unit is pressed, or a disc is inserted to activate the unit first.
Tip |
|
See “Replacing the lithium battery” on page 22 for |
5 |
details on how to replace the batteries. |
|
|
Precautions
•If your car has been parked in direct sunlight, allow the unit to cool off before operating it.
•Power antennas will extend automatically while the unit is operating.
If you have any questions or problems concerning your unit that are not covered in this manual, please consult your nearest Sony dealer.
Moisture condensation
On a rainy day or in a very damp area, moisture condensation may occur inside the lenses and display of the unit. Should this occur, the unit will not operate properly. In such a case, remove the disc and wait for about an hour until the moisture has evaporated.
To maintain high sound quality
Be careful not to splash juice or other soft drinks onto the unit or discs.
Notes on discs
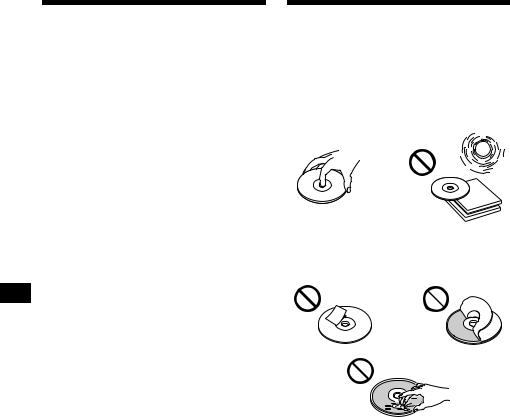
•To keep the disc clean, do not touch the surface. Handle the disc by its edge.
•Keep your discs in their cases or disc magazines when not in use.
Do not subject the discs to heat/high temperature. Avoid leaving them in parked cars or on dashboards/rear trays.
•Do not attach labels, or use discs with sticky ink/residue. Such discs may stop spinning when used, causing a malfunction, or may ruin the disc.
•Do not use discs with any labels or stickers attached.
The following malfunctions may result from using such discs:
–Inability to eject a disc (due to a label or sticker peeling off and jamming the eject mechanism).
–Inability to read audio data correctly (e.g., playback skipping, or no playback) due to heat shrinking of a sticker or label causing a disc to warp.
•Discs with non-standard shapes (e.g., heart, square, star) cannot be played on this unit. Attempting to do so may damage the unit. Do not use such discs.
•You cannot play 8 cm CDs.
6
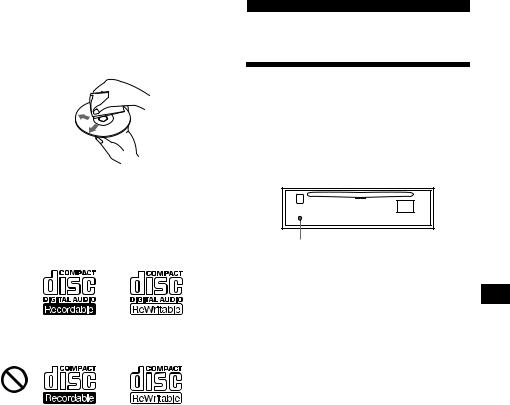
•Before playing, clean the discs with a commercially available cleaning cloth. Wipe each disc from the centre out. Do not use solvents such as benzine, thinner, commercially available cleaners, or antistatic spray intended for analog discs.
Notes on CD-R/CD-RW discs
•You can play CD-Rs (recordable CDs)/CDRWs (rewritable CDs) designed for audio use on this unit.
Look for these marks to distinguish CD-Rs/ CD-RWs for audio use.
These marks denote that a disc is not for audio use.
•Some CD-Rs/CD-RWs (depending on the equipment used for its recording or the condition of the disc) may not play on this unit.
•You cannot play a CD-R/a CD-RW that is not finalized*.
*A process necessary for a recorded CD-R/CD-RW disc to be played on the audio CD player.
Getting Started
Resetting the unit
Before operating the unit for the first time, or after replacing the car battery or changing the connections, you must reset the unit.
Remove the front panel and press the RESET button with a pointed object, such as a ball-point pen.
RESET button
Note
Pressing the RESET button will erase the clock setting and some stored contents.
7
Detaching the front panel
You can detach the front panel of this unit to protect the unit from being stolen.
Caution alarm
If you turn the ignition switch to the OFF position without removing the front panel, the caution alarm will beep for a few seconds.
If you connect an optional amplifier and do not use the built-in amplifier, the beep sound will be deactivated.
1 Press (OFF)*.
CD/MD playback or radio reception stops (the key illumination and display remain on).
*If your car has no ACC position on the ignition switch, be sure to turn the unit off by pressing (OFF) for 2 seconds to avoid car battery drain.
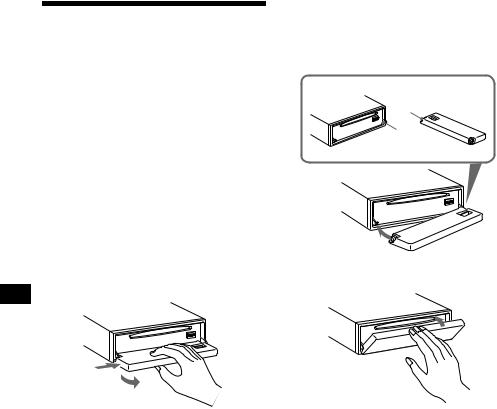
2 Press (OPEN), then slide the front panel to the right, and gently pull out the left end of the front panel.
1
2
Notes
•If you detach the panel while the unit is still turned on, the power will turn off automatically to prevent the speakers from being damaged.
•Do not drop or put excessive pressure on the front panel and its display window.
•Do not subject the front panel to heat/high temperature or moisture. Avoid leaving it in parked car or on a dashboard/rear trays.
Tip
When carrying the front panel with you, use the supplied front panel case.
Attaching the front panel
Place hole A of the front panel onto the spindle B on the unit, then lightly push the left side in. Press (SOURCE) (or insert a CD) to operate the unit.
A
B
x
Note
Do not put anything on the inner surface of the front panel.
8
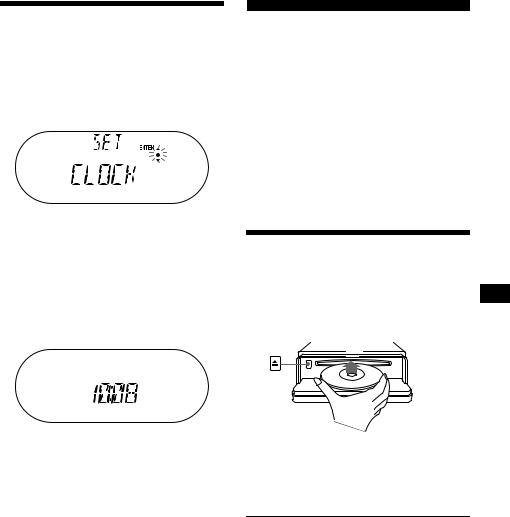
Setting the clock
The clock uses a 12-hour digital indication.
Example: To set the clock to 10:08
1 Press (MENU), then press either side of (DISC/PRESET) repeatedly until
“CLOCK” appears.
1Press (ENTER).
The hour indication flashes.
2Press either side of (DISC/PRESET) to set the hour.
3Press the (+) side of (SEEK).
The minute indication flashes.
4Press either side of (DISC/PRESET) to set the minute.
2 Press (ENTER).
The clock starts. After the clock setting is completed, the display returns to normal play mode.
Tip
When D.INFO mode is set to ON, the time is always displayed (page 18).
CD Player
CD/MD Unit (optional)
In addition to playing a CD with this unit, you can also control external CD/MD units.
If you connect MP3 playable CD units (eg. MP3 CD changer), you can play MP3 files; compressed audio files with quality sound. See “MP3 playable CD Unit (optional)” on page 20.
Note
If you connect an optional CD unit with the CD TEXT function, the CD TEXT information will appear in the display when you play a CD TEXT disc.
Playing a disc
(With this unit)
1 Press (OPEN) and insert the disc
(labeled side up).
2 Close the front panel.
Playback starts automatically.
If a disc is already inserted, press (SOURCE) repeatedly until “CD” appears to start playback.
To |
Press |
Stop playback |
(OFF) |
|
|
Eject the disc |
(OPEN) then Z |
|
|
Skip tracks |
(SEEK) (./>) |
– Automatic |
[once for each track] |
Music Sensor |
|
|
|
Fast-forward/ |
(SEEK) (m/M) |
reverse |
[hold to desired point] |
– Manual Search |
|
|
|
|
continue to next page t |
9
 Loading...