


Gigaset 504 AGU
Table of contents
 Loading...
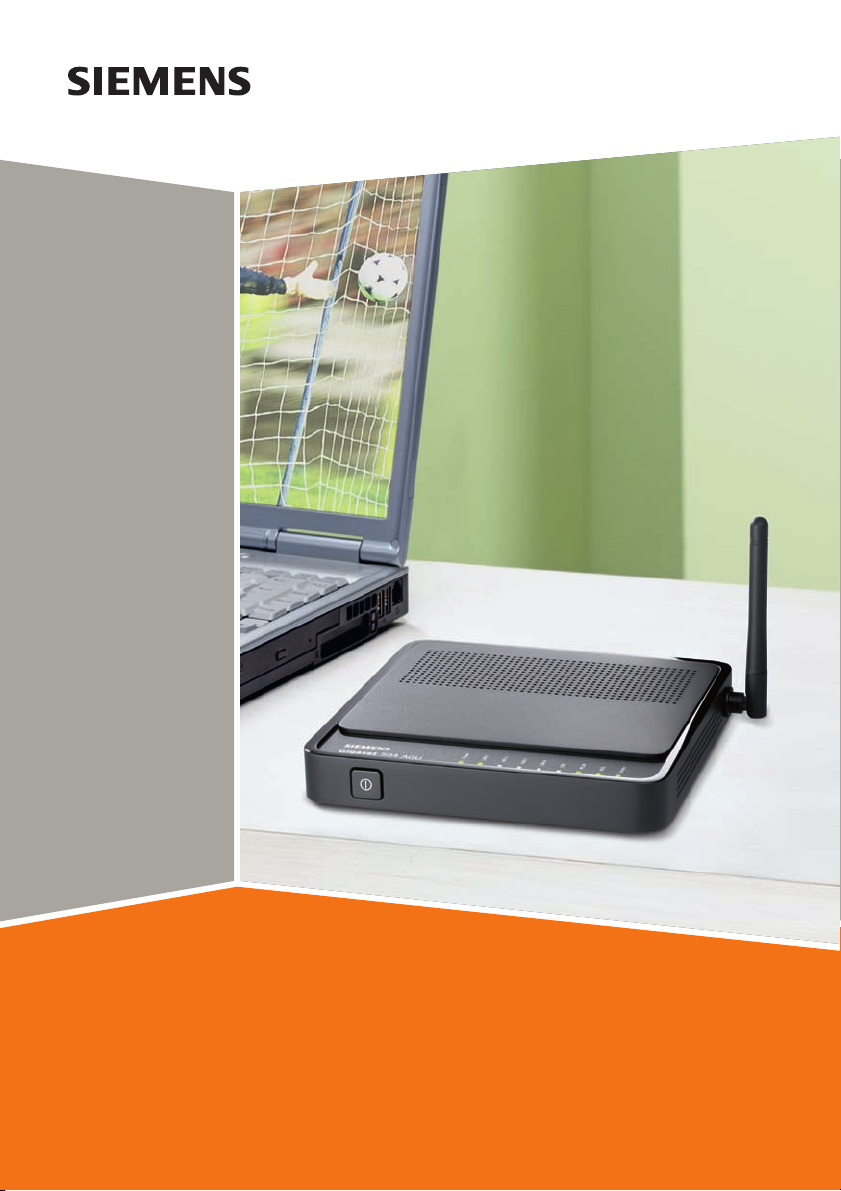
Dca[m_n ~}=>DR
Dca[m_n

2
Contents
Contents
The product series Gigaset 501/504 . . . . . . . . . . . . . 4
Do your part for the environment (ECO) . . . . . . . . . . . . . . . . . . . . . . . . . . . . . . . . . . . . 5
Features and applications . . . . . . . . . . . . . . . . . . . . . . . . . . . . . . . . . . . . . . . . . . . . . . . 5
The device . . . . . . . . . . . . . . . . . . . . . . . . . . . . . . . . . . 7
Operating elements . . . . . . . . . . . . . . . . . . . . . . . . . . . . . . . . . . . . . . . . . . . . . . . . . . . . 7
LED panel . . . . . . . . . . . . . . . . . . . . . . . . . . . . . . . . . . . . . . . . . . . . . . . . . . . . . . . . . . . .8
Ports on the rear panel . . . . . . . . . . . . . . . . . . . . . . . . . . . . . . . . . . . . . . . . . . . . . . . . . 9
Bottom . . . . . . . . . . . . . . . . . . . . . . . . . . . . . . . . . . . . . . . . . . . . . . . . . . . . . . . . . . . . . 10
System requirements . . . . . . . . . . . . . . . . . . . . . . . . . . . . . . . . . . . . . . . . . . . . . . . . . . 11
Installing the device . . . . . . . . . . . . . . . . . . . . . . . . 12
Overview of the installation steps . . . . . . . . . . . . . . . . . . . . . . . . . . . . . . . . . . . . . 12
Setting up the router Gigaset 504 AGU . . . . . . . . . . . . . . . . . . . . . . . . . . . . . . . . . 12
Connecting to the splitter data port . . . . . . . . . . . . . . . . . . . . . . . . . . . . . . . . . . . 13
Wired connection to the PC . . . . . . . . . . . . . . . . . . . . . . . . . . . . . . . . . . . . . . . . . . 15
Connecting to the mains power supply . . . . . . . . . . . . . . . . . . . . . . . . . . . . . . . . . 16
Checking the operating state . . . . . . . . . . . . . . . . . . . . . . . . . . . . . . . . . . . . . . . . . 16
Making the basic settings . . . . . . . . . . . . . . . . . . . . . . . . . . . . . . . . . . . . . . . . . . . 16
Network configuration of the PCs . . . . . . . . . . . . . . . . . . . . . . . . . . . . . . . . . . . . . . . . 17
The user interface . . . . . . . . . . . . . . . . . . . . . . . . . . 18
Starting the user interface . . . . . . . . . . . . . . . . . . . . . . . . . . . . . . . . . . . . . . . . . . . . . . 18
The start screen . . . . . . . . . . . . . . . . . . . . . . . . . . . . . . . . . . . . . . . . . . . . . . . . . . . . . . 19
Selecting a language . . . . . . . . . . . . . . . . . . . . . . . . . . . . . . . . . . . . . . . . . . . . . . . . . . 20
Connecting to the Internet manually . . . . . . . . . . . . . . . . . . . . . . . . . . . . . . . . . . . . . 20
Elements in the user interface . . . . . . . . . . . . . . . . . . . . . . . . . . . . . . . . . . . . . . . . . . . 21
Configuring Advanced Settings . . . . . . . . . . . . . . . 22
Internet . . . . . . . . . . . . . . . . . . . . . . . . . . . . . . . . . . . . . . . . . . . . . . . . . . . . . . . . . . . .23
Internet selection . . . . . . . . . . . . . . . . . . . . . . . . . . . . . . . . . . . . . . . . . . . . . . . . . . 23
Internet Connection . . . . . . . . . . . . . . . . . . . . . . . . . . . . . . . . . . . . . . . . . . . . . . . . 25
Firewall . . . . . . . . . . . . . . . . . . . . . . . . . . . . . . . . . . . . . . . . . . . . . . . . . . . . . . . . . . . . .28
Setting up access control to the Internet . . . . . . . . . . . . . . . . . . . . . . . . . . . . . . . . 28
Setting up the NAT function . . . . . . . . . . . . . . . . . . . . . . . . . . . . . . . . . . . . . . . . . . . . 30
Port Forwarding . . . . . . . . . . . . . . . . . . . . . . . . . . . . . . . . . . . . . . . . . . . . . . . . . . . 32
Opening the firewall for a selected PC (Exposed Host) . . . . . . . . . . . . . . . . . . . . . 34
Dynamic DNS . . . . . . . . . . . . . . . . . . . . . . . . . . . . . . . . . . . . . . . . . . . . . . . . . . . . . 35
Qos (Quality of Service) . . . . . . . . . . . . . . . . . . . . . . . . . . . . . . . . . . . . . . . . . . . . . 36
LAN configuration . . . . . . . . . . . . . . . . . . . . . . . . . . . . . . . . . . . . . . . . . . . . . . . . . . . . 37
Assigning static IP addresses to individual PCs . . . . . . . . . . . . . . . . . . . . . . . . . . . 38

3
Contents
Configuring wireless connections . . . . . . . . . . . . . . . . . . . . . . . . . . . . . . . . . . . . . . . . 39
Setting encryption . . . . . . . . . . . . . . . . . . . . . . . . . . . . . . . . . . . . . . . . . . . . . . . . . 41
WPA2-PSK and WPA-PSK/WPA2-PSK . . . . . . . . . . . . . . . . . . . . . . . . . . . . . . . . . . . . 41
WEP encryption . . . . . . . . . . . . . . . . . . . . . . . . . . . . . . . . . . . . . . . . . . . . . . . . . . . 42
Connecting PCs wirelessly . . . . . . . . . . . . . . . . . . . . . . . . . . . . . . . . . . . . . . . . . . . 44
Permitted clients . . . . . . . . . . . . . . . . . . . . . . . . . . . . . . . . . . . . . . . . . . . . . . . . . . 45
Repeater function (WDS) . . . . . . . . . . . . . . . . . . . . . . . . . . . . . . . . . . . . . . . . . . . . 46
Administration . . . . . . . . . . . . . . . . . . . . . . . . . . . . . 49
Regional Options . . . . . . . . . . . . . . . . . . . . . . . . . . . . . . . . . . . . . . . . . . . . . . . . . . . . . 49
System Password . . . . . . . . . . . . . . . . . . . . . . . . . . . . . . . . . . . . . . . . . . . . . . . . . . . . . 50
System management . . . . . . . . . . . . . . . . . . . . . . . . . . . . . . . . . . . . . . . . . . . . . . . . . . 51
Backing up and restoring a configuration . . . . . . . . . . . . . . . . . . . . . . . . . . . . . . . . . . 52
Backing up configuration data . . . . . . . . . . . . . . . . . . . . . . . . . . . . . . . . . . . . . . . . 53
Restoring the saved data . . . . . . . . . . . . . . . . . . . . . . . . . . . . . . . . . . . . . . . . . . . . 53
Restoring factory settings . . . . . . . . . . . . . . . . . . . . . . . . . . . . . . . . . . . . . . . . . . . 53
Reboot . . . . . . . . . . . . . . . . . . . . . . . . . . . . . . . . . . . . . . . . . . . . . . . . . . . . . . . . . . . . .53
Updating firmware . . . . . . . . . . . . . . . . . . . . . . . . . . . . . . . . . . . . . . . . . . . . . . . . . . . . 54
System Log . . . . . . . . . . . . . . . . . . . . . . . . . . . . . . . . . . . . . . . . . . . . . . . . . . . . . . . . . . 55
Status information . . . . . . . . . . . . . . . . . . . . . . . . . . 56
Overview . . . . . . . . . . . . . . . . . . . . . . . . . . . . . . . . . . . . . . . . . . . . . . . . . . . . . . . . . . . 56
Security . . . . . . . . . . . . . . . . . . . . . . . . . . . . . . . . . . . . . . . . . . . . . . . . . . . . . . . . . . . .57
Internet . . . . . . . . . . . . . . . . . . . . . . . . . . . . . . . . . . . . . . . . . . . . . . . . . . . . . . . . . . . .58
Local Network . . . . . . . . . . . . . . . . . . . . . . . . . . . . . . . . . . . . . . . . . . . . . . . . . . . . . . . 59
Wireless Network . . . . . . . . . . . . . . . . . . . . . . . . . . . . . . . . . . . . . . . . . . . . . . . . . . . . . 60
Device . . . . . . . . . . . . . . . . . . . . . . . . . . . . . . . . . . . . . . . . . . . . . . . . . . . . . . . . . . . . . .61
Appendix . . . . . . . . . . . . . . . . . . . . . . . . . . . . . . . . . . 62
Troubleshooting . . . . . . . . . . . . . . . . . . . . . . . . . . . . . . . . . . . . . . . . . . . . . . . . . . . . . . 62
Local area networks with Gigaset products . . . . . . . . . . . . . . . . . . . . . . . . . . . . . . . . . 66
Wired local area network (Ethernet) . . . . . . . . . . . . . . . . . . . . . . . . . . . . . . . . . . . 67
Wireless local area network (WLAN) . . . . . . . . . . . . . . . . . . . . . . . . . . . . . . . . . . . 68
Linking a wireless network to an Ethernet . . . . . . . . . . . . . . . . . . . . . . . . . . . . . . 70
Extending the wireless network coverage with a repeater . . . . . . . . . . . . . . . . . . 71
Deactivating HTTP proxy and configuring a pop-up blocker . . . . . . . . . . . . . . . . . . . . 72
Deactivating the HTTP proxy . . . . . . . . . . . . . . . . . . . . . . . . . . . . . . . . . . . . . . . . . 72
Configuring the pop-up blocker . . . . . . . . . . . . . . . . . . . . . . . . . . . . . . . . . . . . . . 72
Specifications . . . . . . . . . . . . . . . . . . . . . . . . . . . . . . . . . . . . . . . . . . . . . . . . . . . . . . . . 74
Authorisation . . . . . . . . . . . . . . . . . . . . . . . . . . . . . . . . . . . . . . . . . . . . . . . . . . . . . . . . 75
Glossary . . . . . . . . . . . . . . . . . . . . . . . . . . . . . . . . . . 76
Index . . . . . . . . . . . . . . . . . . . . . . . . . . . . . . . . . . . . . 89
4
The product series Gigaset 501/504
The product series Gigaset 501/504
The devices of the product series Gigaset 501/504 are powerful but easy-to-use commu-
nication devices for connecting your PC or local area network (LAN) to the Internet. They
contain an integrated ADSL modem (ADSL /ADSL2+), allowing you easy access to the
Internet.
With the router Gigaset 504 you can also connect a set-top box to watch IPTV, if this is
supported by your Internet service provider.
You can connect your PC via cable or wirelessly and create a wired local network (LAN)
or wireless local area network (WLAN). For network security, wireless transmission can
be encrypted using the WPA/WPA2 standard or 64/128-bit WEP.
Your device allows several users to access the Internet simultaneously. A single user
account can be shared if your Internet service provider permits this. If you want to surf
the Internet, watch IPTV and make calls using the Internet at the lowest possible cost,
the Gigaset devices are a convenient and simple solution.
The devices have an extensive range of functions but remain simple to use. They can be
configured and operational within a few minutes.

5
The product series Gigaset 501/504
Do your part for the environment (ECO)
Thanks to a switch-mode power supply unit, all of our broadband prod-
ucts offer significantly reduced power consumption - for more energy-
efficient use, which helps make a cleaner environment for everyone.
You can turn the WLAN off completely when you're not using it. It's our
goal to ensure a sustainable economic process by using an environmentally friendly pro-
duction and management system - which makes it easy for us to meet the strict ISO
14001 standards for international environmental management.
Features and applications
The router Gigaset 504 AGU's wide range of features makes it ideal for a large number
of applications.
Depending on your device, some of the features may differ from the description in this
instruction manual.
u Internet access
The router supports shared Internet access for up to 252 users via the integrated
ADSL /ADSL2+ modem. This means several users in your network can surf the Inter-
net at the same time, all using the same Internet account.
u Setting up a local area network
The router offers the following possibilities:
– Depending on the device up to four devices connected via Ethernet ports with a
transmission speed of 10 or 100 Mbps (with automatic recognition).
– Up to 252 mobile terminals connected via a radio interface with a transmission
speed of up to 54 Mbps. It complies with IEEE 802.11g standard and can work
with all products that satisfy Standard IEEE 802.11b or 802.11g.
– Using the router Gigaset 504 AGU makes it easy to set up a network at home or
in small offices. For example, users can exchange data or share resources in the
network, such as a file server or printer.
– The router Gigaset 504 AGU supports DHCP for dynamic IP configuration of the
local area network, and DNS for domain name mapping.
An introduction into the various options of establishing a local network can be found
in the appendix in section "Local area networks with Gigaset products" on page 66.
u Security functions
The router Gigaset 504 AGU offers comprehensive security features:
– Firewall protection against unauthorised access from the Internet
All PCs in the local area network use the Public IP address of the router to establish
Internet connections, making them 'invisible' to other Internet users. The router
only allows access from the Internet if it has been requested from the local area
network.
Thanks to the firewall, the router also offers comprehensive protection against
attacks from computer hackers.

6
The product series Gigaset 501/504
– Service filtering and URL blocking
The router can filter Internet access, allowing you to determine which PCs may
access which Internet services.
You can also deactivate access to certain Internet domains and sites (URL block-
ing).
– Access control and encryption for the local area network
You can use various encryption methods and authentication methods (WEP, WPA/
WPA2-PSK, WPA/WPA2, MAC access control) to prevent unauthorised access to
your wireless LAN or to make data illegible to unauthorised parties. The security
settings available to you depend on the components used in your local network.
With MAC access control you can allow wireless access to selected PCs.
u Offering your own services on the Internet
– If you want to offer your own services on the Internet, you can set up the router
as a virtual server without permitting further access to the local area network.
– DMZ (Exposed Host)
This allows you to release a PC in your local area network for unlimited access
from the Internet. Note that in this case your local area network will no longer be
adequately protected against Internet attacks.
7
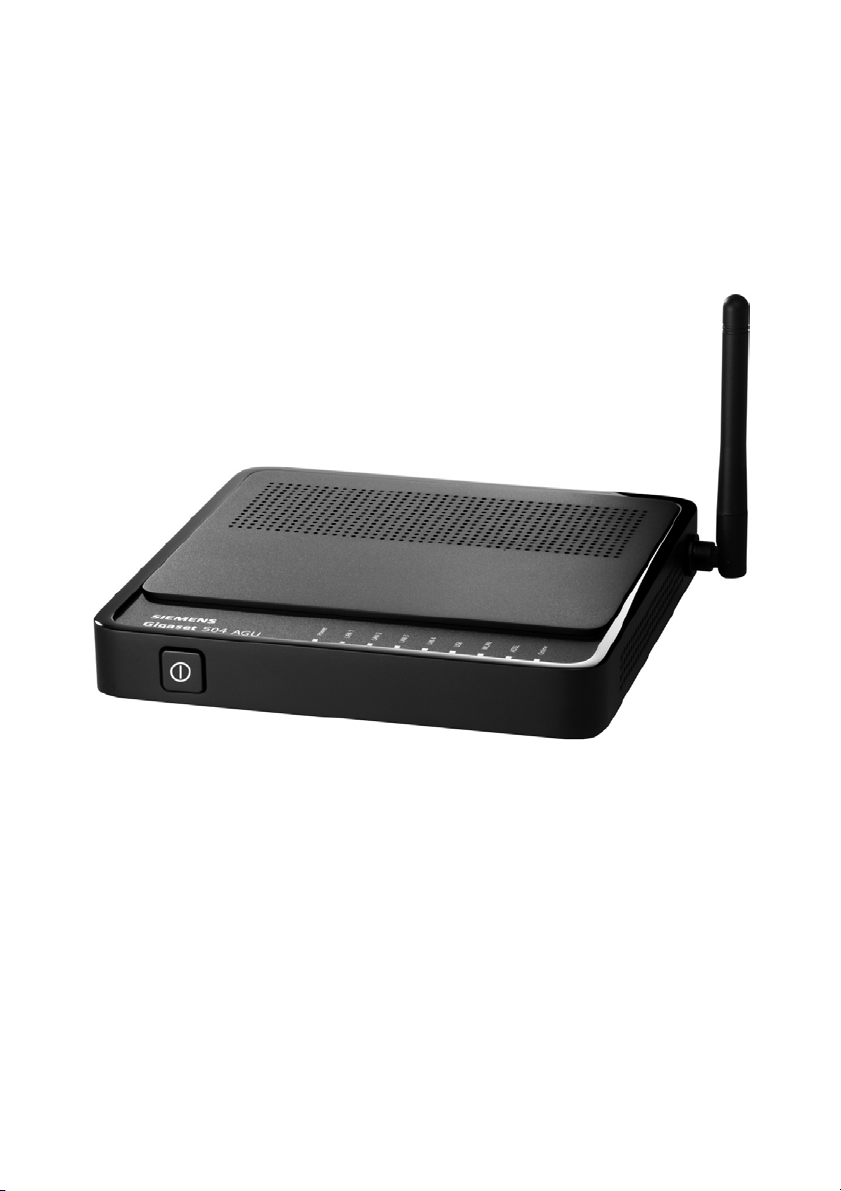
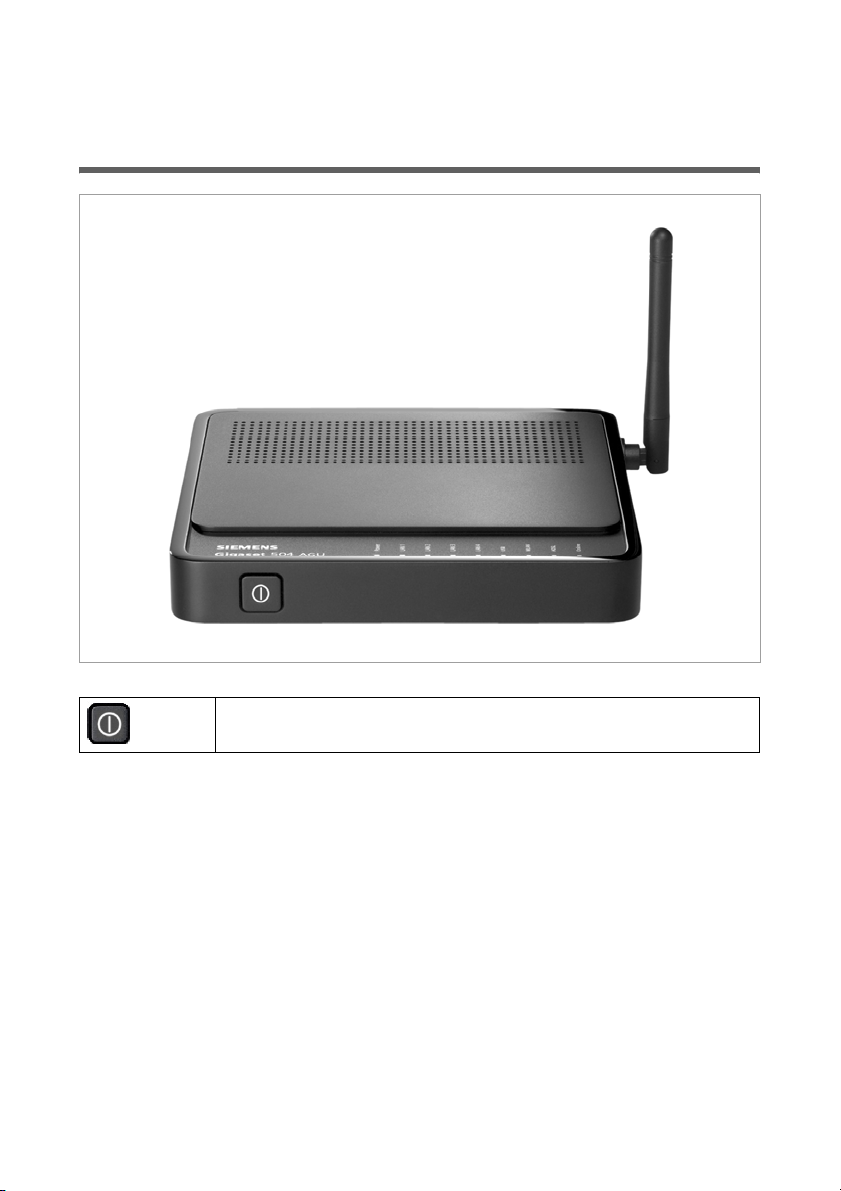
The device
The device
Operating elements
Button to switch the device on and off.
8
The device
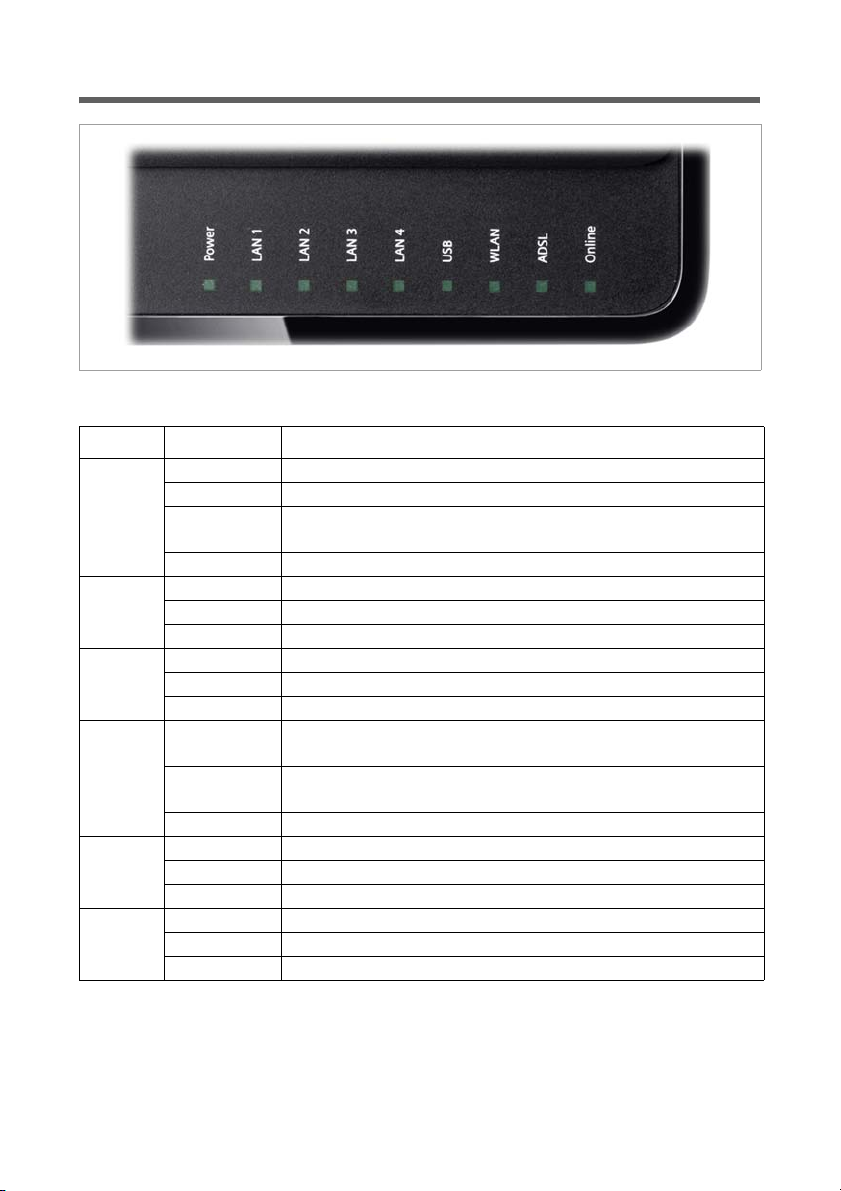
LED panel
The LEDs (from left to right) have the following functions:
LED State Status
Power
On (green) The router is connected to the mains.
Flashing Firmware update is running.
Frequently
flashing
Self-test failure. Device is not bootable or device malfunc-
tion.
Off The router is disconnected from the mains.
LAN /
LAN1 –
LAN4
On A device is connected to the relevant LAN port.
Flashing The relevant LAN port is sending or receiving data (traffic).
Off There is no device connected.
USB
On (green) A device is connected to the router via the USB port.
Flashing The USB port is sending or receiving data.
Off There is no device connected.
WLAN
On The radio interface is activated, no data transmission at
present.
Flashing The router is sending or receiving data on the radio inter-
face.
Off The radio interface is deactivated.
ADSL
On A DSL connection is established.
Flashing The DSL line is being synchronised.
Off DSL is deactivated.
Online
On Connection to the Internet has been established.
Flashing Data is being sent to or received from the Internet.
Off There is no Internet connection.
9
The device
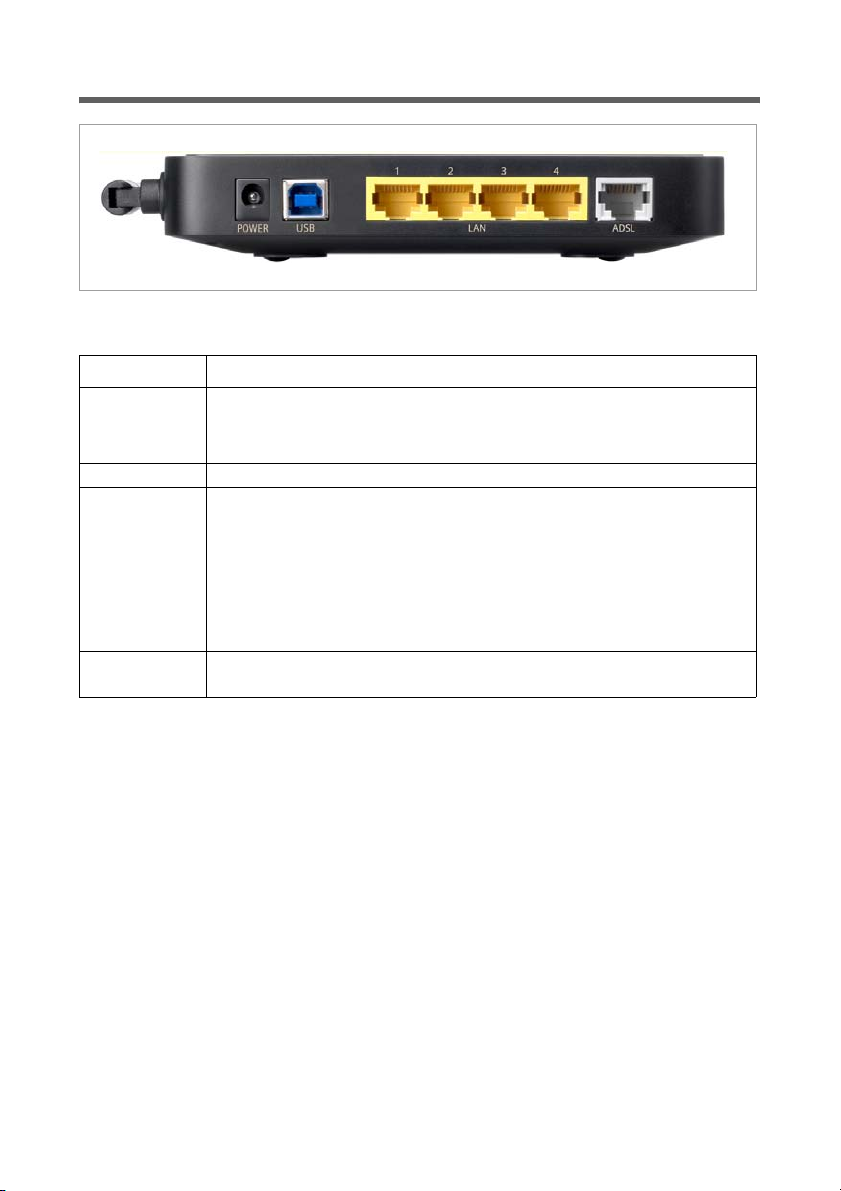
Ports on the rear panel
The rear panel of the router houses the ports.
Element Description
POWER Socket for the mains adapter supplied
Warning: Using the wrong power supply unit may damage the
router.
USB USB port for connecting a PC via USB cable.
LAN1 – LAN4
(yellow)
Four 10/100 Mbps switch ports with automatic recognition (RJ-45).
You can connect up to four devices with Ethernet ports (such as PCs,
a Hub or Switch).
You can connect an external modem (e.g. a VDSL or cable modem)
to the LAN1 port. The integrated ADSL modem is then deactivated.
You will find additional information on the configuration settings on
page 23.
ADSL
(grey)
DSL socket for connecting the integrated modem to the DSL port of
the splitter
10
The device
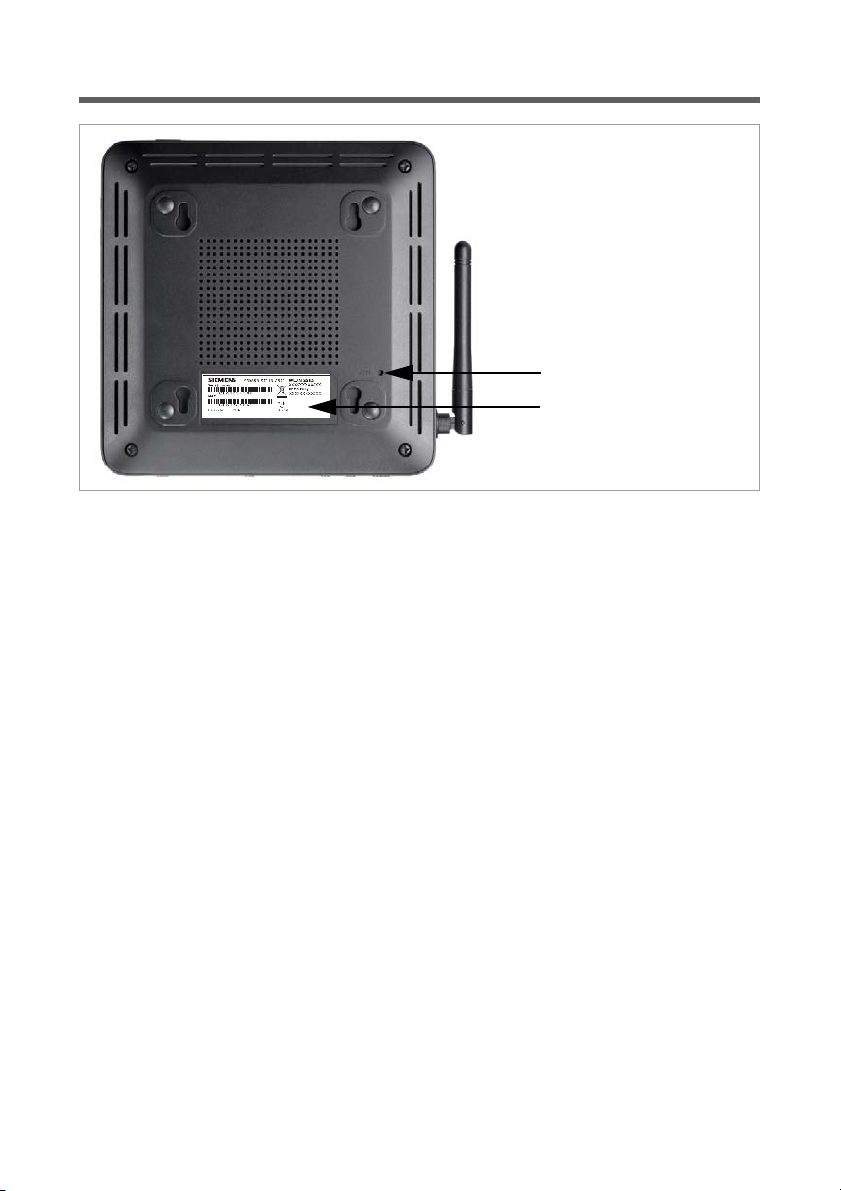
Bottom
Reset button
The underside of the router houses the reset button providing the following functions:
Label
On the label you will find the serial number of your device.
Reboot function: Press and hold the button behind the opening for more than 1 sec-
ond but less than 5 seconds to reboot the device. This does not
affect the configuration settings.
Reset function: Press and hold the button behind the opening for at least 5 sec-
onds to return all settings to factory settings. Warning: This will
clear all the configuration settings you have made since the initial
startup. Updated firmware will not be affected.
Reset button
Label
11
The device
System requirements
You require the following components to operate your router Gigaset 504 AGU:
u A PC with
– an 802.11g or 802.11b compatible wireless Network adapter.
or
–an Ethernet port (10Base-T or 100Base-TX)
u A Web browser such as Microsoft Internet Explorer V 6.0 or higher or Mozilla Firefox
V 1.0 or higher for configuring your router.
u To access the Internet you require
– a DSL port (splitter),
– the access data for your Internet service provider.
Trademarks
Gigaset Communications GmbH is a trademark licensee of Siemens AG.
Microsoft, Windows 98/SE, Windows ME, Windows 2000, Windows XP, Windows Vista
and Internet Explorer are registered trademarks of the Microsoft Corporation.
Mozilla Firefox is a registered trademark of the Mozilla Organisation.
Note:
An 802.11b-compatible network adapter has a maximum transmission speed of
11 Mbps. An 802.11g-compatible network adapter has a maximum transmission
speed of 54 Mbps.
Note:
We recommend you use a PC with the Windows Vista or Windows XP operating
system because only then are all system requirements for using the device ful-
filled.
For experienced users
The default settings for the router Gigaset 504 AGU are:
– IP address: 192.168.254.254
– Subnet mask: 255.255.255.0
–WLAN: Off
– SSID: AlShamil
– Radio channel: 1 or automatic
– System password: admin
12
Installing the device
Installing the device
Overview of the installation steps
1. First install an Ethernet network card in the PCs you want to connect to the router
Gigaset 504 AGU. The installation is described in the user guides for these products.
2. Then make the necessary connections (PCs, splitter) on the router Gigaset 504 AGU
and activate the device (page 15).
3. Then configure the router Gigaset 504 AGU to activate the device's Internet access
(refer to the section entitled "Internet" on page 23). To do this you will need the ac-
cess data for your Internet service provider.
4. If you wish to use other functions of the router Gigaset 504 AGU, for example the
comprehensive security features, use the Advanced Settings (page 22).
Setting up the router Gigaset 504 AGU
The router can be set up in any suitable location in the home or office. You do not need
any special wiring. However, you should comply with the following guidelines:
u Operate the router only indoors within a temperature range of 0 to +40 °C. Do not
position the router near sources of heat. Do not cover the ventilation slots. High
temperatures can damage the device.
u A mains socket for 220/230 V~ and a connection socket for the splitter or LAN must
be available in the place where you set up the router.
u Do not position the device in the immediate vicinity of stereo equipment, TV sets,
microwave ovens or the like. This may cause interference.
u Position the router so that it is as near to the centre of your wireless network as pos-
sible. The general rule is: The higher you place the antenna, the better the perform-
ance. Make sure that the place where you position the router offers optimum recep-
tion throughout the house, apartment or office.
u Make sure the router cannot fall down, as this could damage the antenna. Position
the router on a non-slip surface.
u Do not place the router on any furniture surface that could be affected by the heat
from the device.
u Lay the cables so that nobody can trip over them. You should not cover the cables
with anything.
Note:
Before the PCs can communicate with the router and with each other in a local net-
work, you may have to change your network settings (see page 17). Configure these
network settings on one PC first so that it can establish a connection to the router. You
can then use this PC to configure the device. To find out how to do this, refer to the
document entitled "Configuring the local area network" on the CD-ROM.
13
Installing the device
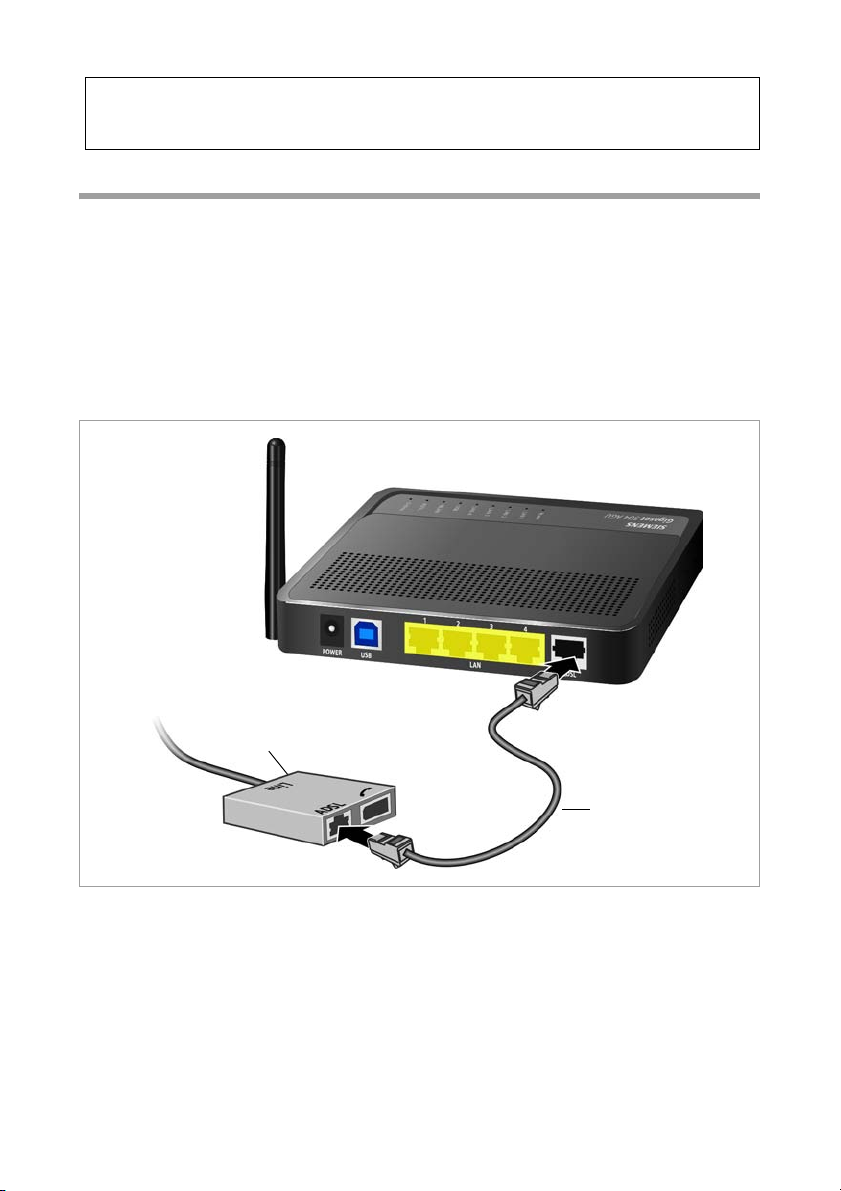
Connecting to the splitter data port
You can operate the router in two different operating modes in order to set up an Inter-
net connection:
– with an integrated ADSL modem
– with an external modem, such as a VDSL or cable modem
Using the integrated ADSL modem
ì Connect the ADSL port (grey) on the router to the ADSL socket on the splitter. To do
this, use the DSL cable supplied (grey).
Please remember:
Network connections (LAN) via cables and telephone lines may only be set up with
the router within enclosed rooms.
Splitter
ADSL cable (grey)
14
Installing the device
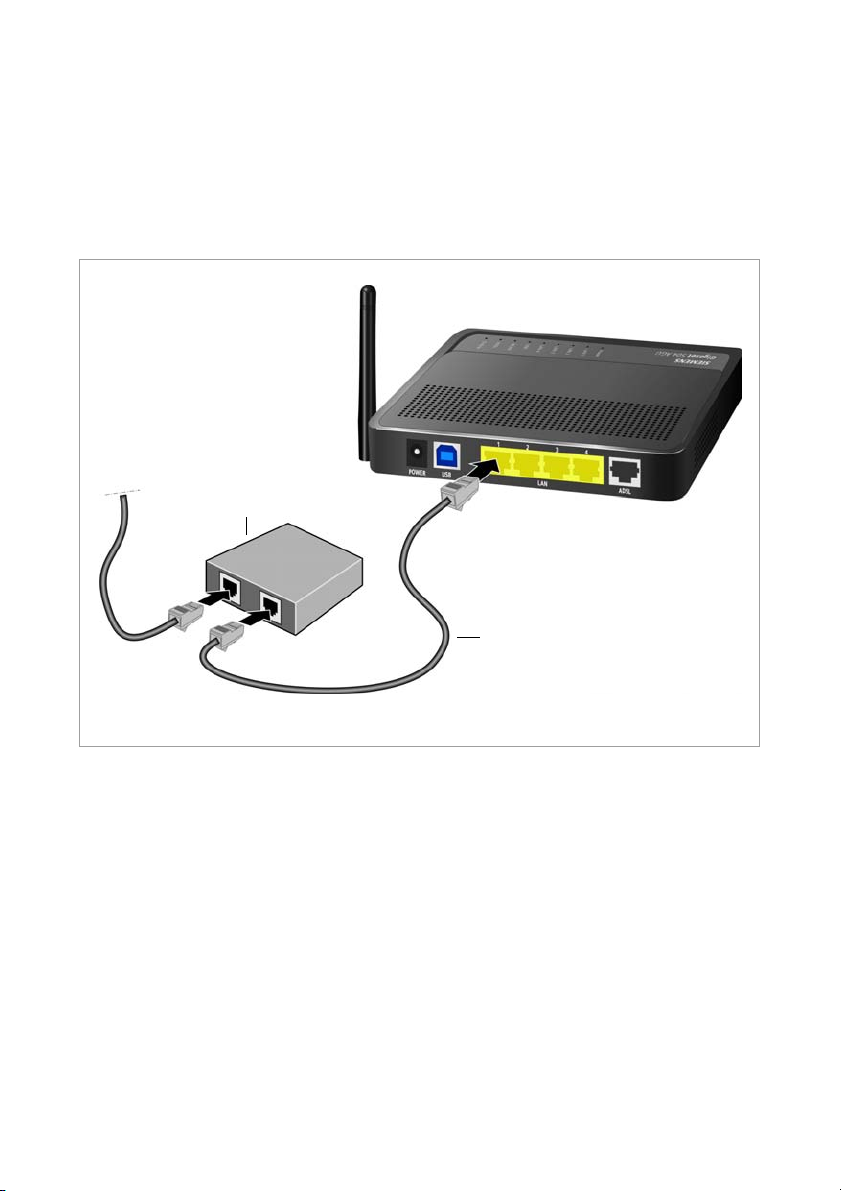
Using an external modem
In this case the LAN1 port is used as WAN port. The integrated ADSL modem is then
deactivated.
ì Connect the LAN1 port on the router with an external modem. To do this, use the
cable supplied with your modem or any Ethernet straight cable having an RJ45 con-
nector on both sides.
ì Then connect this modem to the relevant communications port (e.g. splitter).
To put the LAN port into operation for a WAN connection you have to change the Con-
nection type of the Internet connection to Ethernet (see page 23).
Modem
Ethernet cable
15
Installing the device
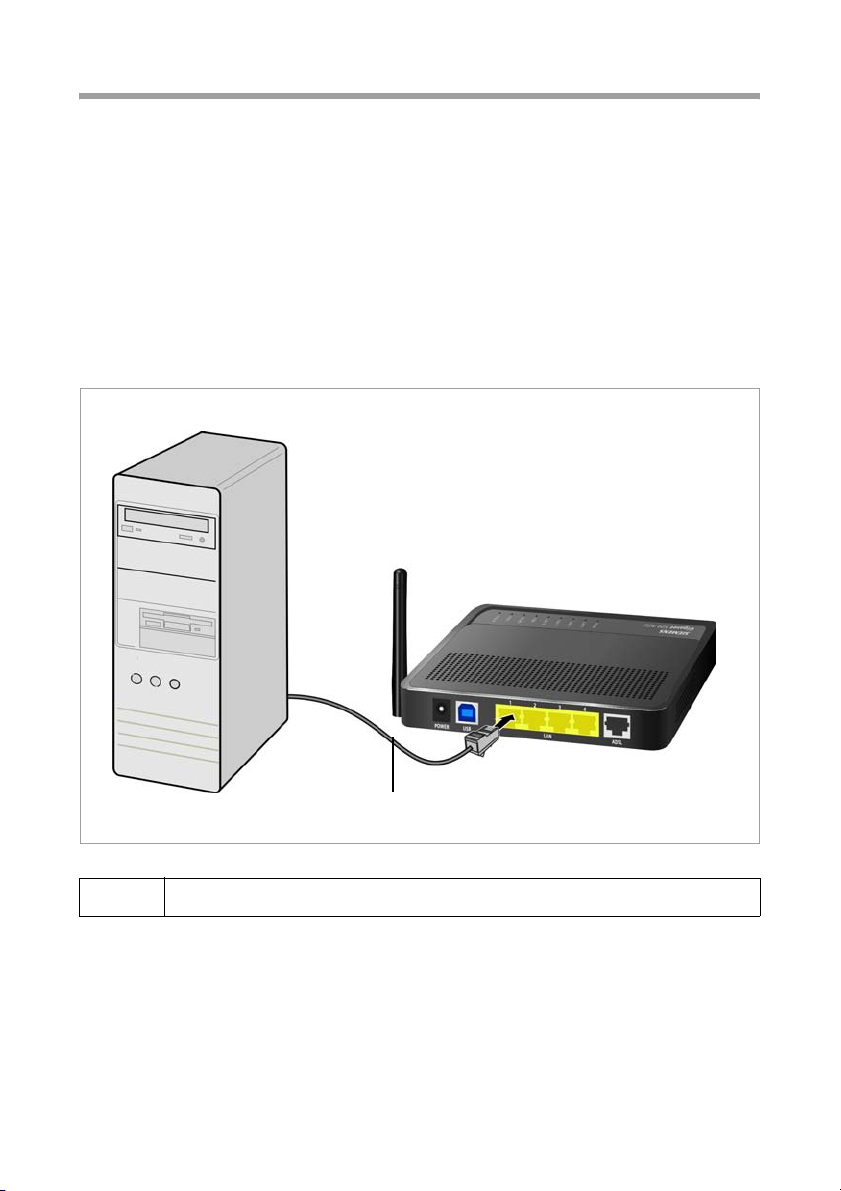
Wired connection to the PC
You can connect wired or wireless PCs to your router to create a local area network
(LAN).
First connect just one PC to the router via cable. You can then carry out the general con-
figuration.
Wireless connection is possible after completing the installation of the router and
switching on the WLAN function via the configuration program. You will find informa-
tion about this topic in the chapter "Configuring wireless connections" on page 39.
ì Connect one of the LAN ports (LAN1 – LAN4, yellow) on the router to the Ethernet
network card in your PC. To do this, use the LAN cable supplied
(CAT5, yellow).
i
Alternatively you can also connect a PC via the USB port (blue).
LAN cable (yellow)
16
Installing the device
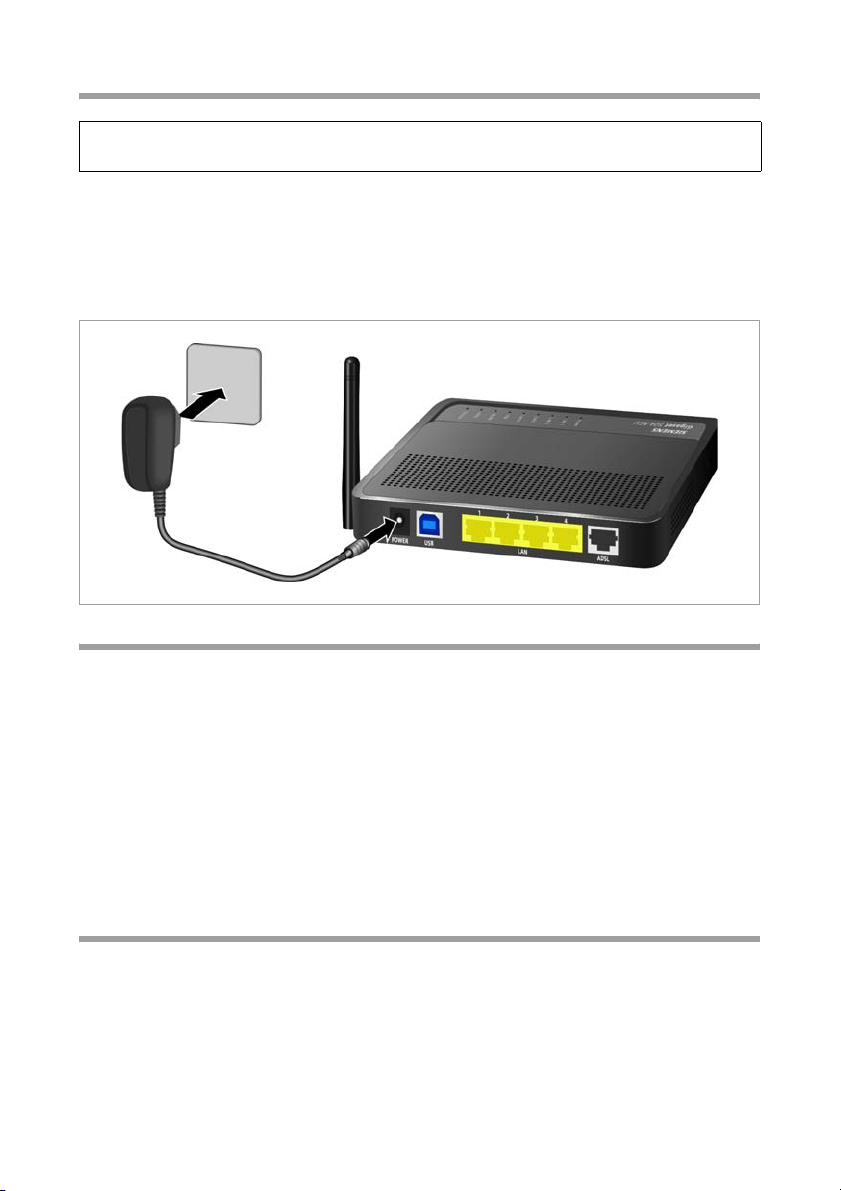
Connecting to the mains power supply
ì Connect the mains adapter cable to the POWER socket on the router.
ì Plug the mains adapter into a mains socket.
ì Switch on the device.
The router is now switched on and ready for operation.
Checking the operating state
Your router Gigaset 504 AGU is now ready for use. The LED displays on the front panel
of the router provide information about the operating state (see page 8).
When the device is ready for use, the LEDs light up as follows:
u The Power LED on the front lights up.
u The ADSL LED flashes to indicate that the DSL connection is being synchronised.
Once this process is complete, the ADSL LED lights up permanently.
u The LAN LEDs light up if a device is connected to the corresponding LAN port.
u The USB LED lights up if a device is connected to the USB port.
If this is not the case, refer to the section entitled Troubleshooting on (page 62).
Making the basic settings
You can now make the basic settings for Internet access using the user interface of the
router (page 18).
Please remember:
Only use the mains adapter supplied with the device (9 V DC, 1 A).

17
Installing the device
Network configuration of the PCs
In order to communicate via the router Gigaset 504 AGU, the network configuration
may have to be set up on the connected PCs.
This usually takes place automatically provided you have not made any changes to the
standard settings for the network configuration and you use one of the following oper-
ating systems:
u Windows Vista
u Windows XP
u Windows 2000
With Windows 98/SE, you have to carry out the network configuration.
The description of the network configuration can be found on the CD-ROM.
18
The user interface
The user interface
You have connected a PC to the router Gigaset 504 AGU and possibly made the settings
in the local area network. You can now configure the router using this PC from the user
interface of the router. As Internet browser we recommend Microsoft Internet Explorer
V 6.0 or higher, or Mozilla Firefox V 1.0 or higher.
Starting the user interface
To access the user interface of the router Gigaset 504 AGU:
ì Start your Internet browser.
ì Enter the IP address of the router in the browser's address field:
http://192.168.254.254
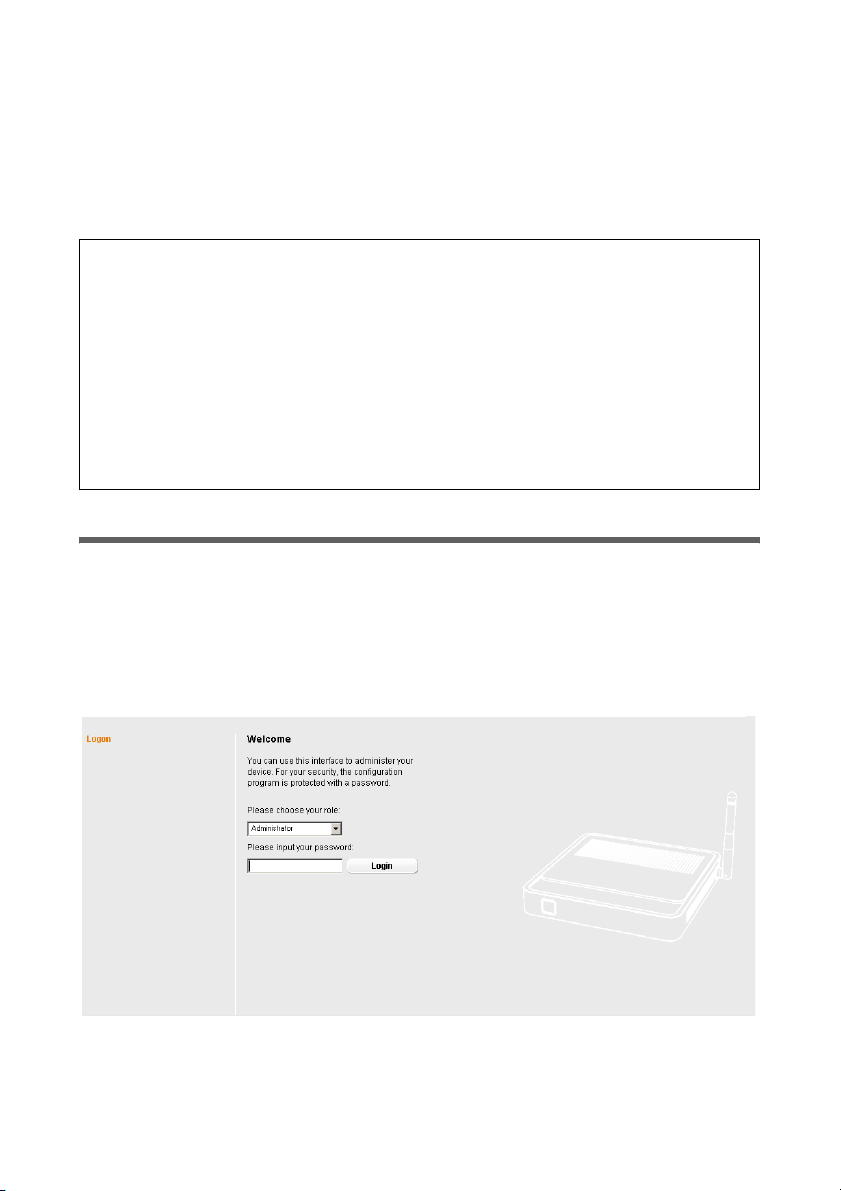
The login screen appears:
For your security, the configuration program is protected with a password. The default
password generally required is admin. This may differ depending on the provider set-
tings. If necessary, check the details on the device label.
Note:
To start the configuration environment, you may need to deactivate the HTTP proxy
for your browser.
If you use Window Vista or Windows XP Service Pack 2, you will need to configure the
popup blocker.
You will find additional information on these two points on "Deactivating HTTP proxy
and configuring a pop-up blocker" on page 72.
If you use a firewall, it must allow connection to the router. For details, refer to the
user guide for your firewall. If necessary, deactivate the firewall before you configure
your router. You can re-activate the firewall afterwards.

19
The user interface
ì Enter the password.
ì Click Login.
A page with security information will appear. If you carry out all the general and security
settings using the user interface, your device and network will be fully protected. If not,
the next time you log on you will be informed of security gaps in the configuration pro-
gram.
ì Click OK.
The start screen is displayed.
The start screen
The start screen is the starting point for all configuration and administration proce-
dures.
Start screen functions
You can start the following actions on the start screen:
u Select the language for the user interface (page 20).
u When you have configured an Internet connection for the first time, you can view
the selected connection service and the status of the Internet connection, choose a
different connection service and set up or close an Internet connection (page 20).
The start screen shows the status and also the Connect or Disconnect button.
u Open the Status menu to obtain status information about the router (page 56).
u Open the Advanced Settings menu for additional configuration options (page 22).
You can call up the Advanced Settings menu and Status information at any time and
on any user interface screen using the tabs at the upper margin of the user interface.
Note:
For security reasons you should change this password at a later stage (page 50).
20
The user interface
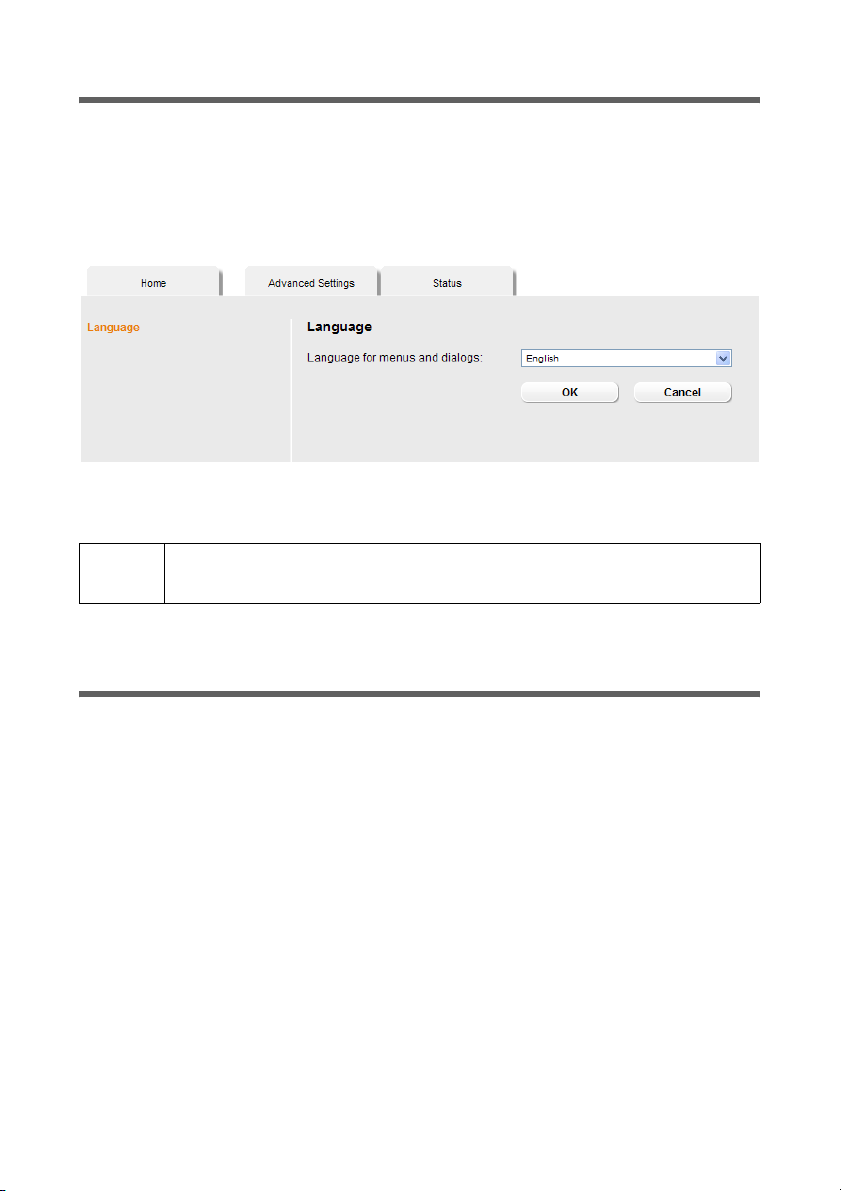
Selecting a language
The user interface exists in various languages. The language modules available are
located on the CD supplied. If you wish to change the preset language, proceed as fol-
lows:
ì Insert the CD into the CD drive of your PC.
ì Click Language at the top right of the start screen.
ì Select the new language you require from the list.
ì Click OK to load the desired language.
Once the procedure has been concluded, the start screen will be displayed again.
Connecting to the Internet manually
Once you have configured your Internet access (see page 25), you can establish a man-
ual connection to the Internet on the start screen if you have selected Connect on
demand or Connect manually as the Connection mode.
To establish or end an Internet connection manually:
ì Open the start screen of the router as described on page 18.
If you have already started the user interface, click the start screen tab at the top left
of the window.
If you have not yet started the user interface, do so now and log on.
ì Click Connect to establish a connection to the Internet.
ì Click Disconnect if you no longer require the connection.
!
Do not switch off the device during loading, as this could render your
device inoperative.

21
The user interface
Elements in the user interface
The user interface screens contain the following elements:
Help
Log Off button
The Log Off button is always displayed on the right of the user interface. If you click Log
Off, the session is ended and the login screen appears again.
Buttons in the Advanced Settings menu
Other buttons may be displayed depending on the function in question. These are
explained in the relevant sections.
Click this tab top right on the screen to display explanations about
the current user interface screen.
OK Transfers the settings you have made to the router configuration.
Cancel Deletes all the entries on a screen since the last time you clicked OK.

22
Configuring Advanced Settings
Configuring Advanced Settings
In the Advanced Settings menu, you can configure all the options for the router
Gigaset 504 AGU. The following table contains the options available in this menu.
Menu Description
Internet This menu comprises all the setting options relating to the
Internet. In particular, you can do the following:
u Check and change the configuration for Internet access
(page 25),
u Configure the firewall, i.e. a number of security and special
functions, for example access control from local PCs to the
Internet or the blocking of certain Web sites (page 28),
u Make the NAT settings required to provide your own serv-
ices on the Internet (page 30),
u Set up dynamic DNS for a fixed Internet address on the
device (page 35),
u Configure the Quality of Service (QoS) (page 36).
Local Network You can chang e the Private IP address of the router here and
make settings on the DHCP server (page 37).
Wireless Network You can configure the options for wireless communication
(SSID and encryption) here and restrict access to the router
(page 39).
Administration You can make or change various system settings here, for
example change the password (page 50), set the time
(page 49) or activate remote management (page 51).
In addition, you can also back up the data on the router or
update the firmware (page 52).

23
Configuring Advanced Settings
Internet
If you have configured the router Gigaset 504 AGU using the Gigaset Installer, you have
also configured the WAN connection (Internet access). You can check or change these
settings in the Internet menu.
This menu also offers you a wide range of possibilities for setting up security settings
and limiting access to the Internet as well as for providing your own services on the
Internet.
You can carry out the following via the Internet menu:
Internet selection
You can activate or deactivate the Internet connection for the router on this screen. You
can choose the connection type and set up and edit a number of connection services.
ì In the Advanced Settings menu, select: Internet.
ì Select the appropriate option to activate or deactivate the Internet function of the
router.
Internet Activate/deactivate the Internet connection, set up
additional connection services and edit the virtual
connection parameters (see page 23),
Internet Connection Check and edit the configuration of the Internet connection
(see page 25),
Firewall Protect the network against unauthorised external access
(see page 28),
Address Translation
(NAT)
Provide your own services on the Internet (NAT, see
page 30),
Dynamic DNS Set up dynamic DNS (page 35),
Qos Quality of service: You can define the settings and quality for
data transfer (see page 36)

24
Configuring Advanced Settings
ì Choose the desired Connection type for your Internet connection:
– Choose the ADSL if you are using the integrated ADSL modem of the router.
–Choose Ethernet if you are setting up the connection to the Internet via an Eth-
ernet network connection (e.g. if you are using an external modem with an Eth-
ernet connection).
If you change the connection type, you must also modify your Internet access settings
accordingly (page 25).
ì If you have selected Ethernet, click OK to save and apply the changes.
ì If you have selected ADSL, you can now set up multiple connection services.
Configure multiple connection services
Your Internet service provider can permit you to set up a number of Connection serv-
ices. You can set up these services here.
ì Select the appropriate option to activate or deactivate Configure multiple connec-
tion services.
If you have already configured an Internet connection, this is shown as Connection
service selected to edit. This is then also displayed on other pages of the Internet
menu.
ì Make the following settings:
–Enter the VPI / VCI values for each connection service that you have received from
your Internet service provider.
– Enter a description to identify the respective connection service.
– Click Add to create a new entry.
– Click Delete to delete an entry.
ì Click OK to save and apply the changes.
25
Configuring Advanced Settings
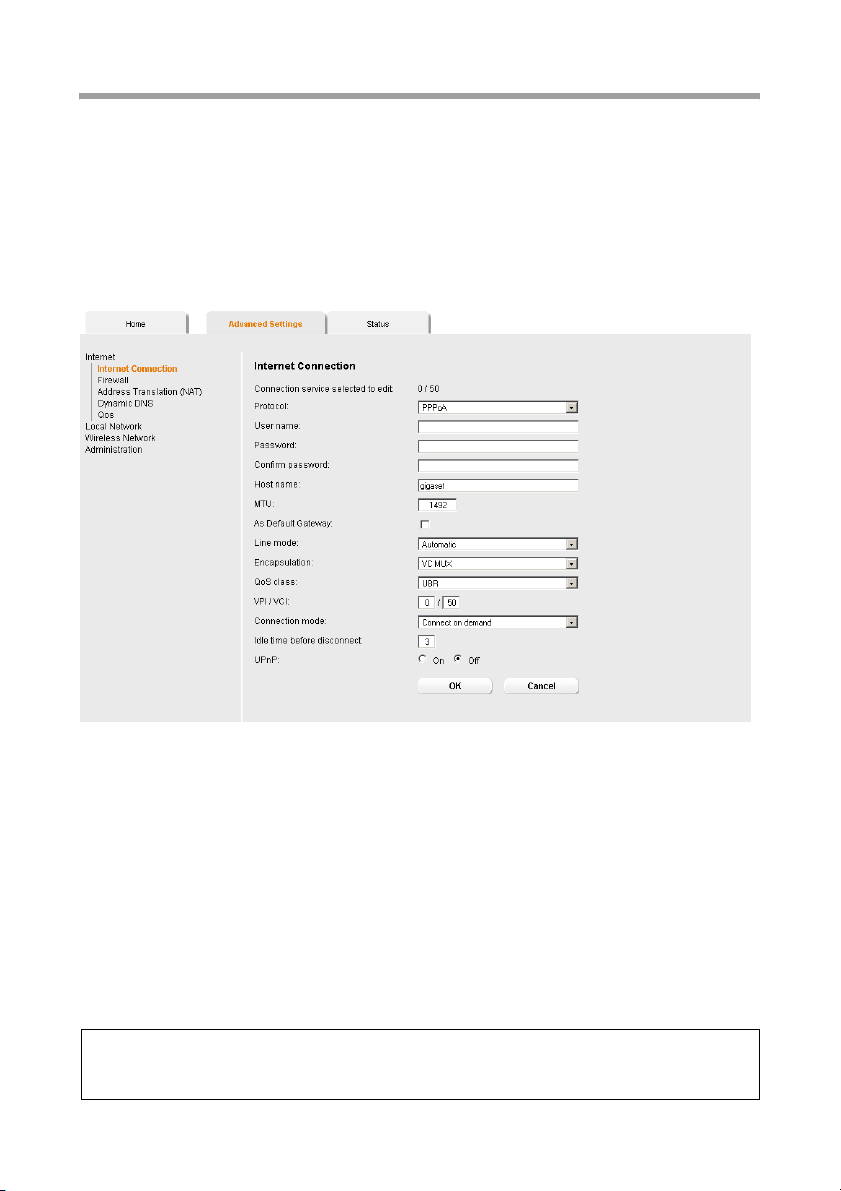
Internet Connection
You can set up or change the configuration of your Internet connection on this screen.
All the settings you make here must coincide with the features your Internet service pro-
vider makes available to you. False information can lead to problems with your Internet
connection.
ì If you want to configure or modify settings for the Internet connection, select from
the Advanced Settings menu: Internet – Internet Connection.
Connection type ADSL
All settings apply for the displayed connection service that you selected for editing on
the Advanced Settings – Internet (page 23) screen. If you only set up one connection
service, no selection is displayed.
ì Enter the account data you have been given by your service provider: Protocol, User
name, Password.
ì Enter a Host name for your router
ì Choose if your router should be used As Default Gateway for this Internet connec-
tion.
ì Apply the default settings for the parameters MTU, Line mode, Encapsulation,
QoS class and VPI / VCI unless your service provider has provided you with other
data.
Note:
Please ensure that you enter all the details from your provider correctly, otherwise the
configuration may fail and you will not be able to connect to the Internet.
26
Configuring Advanced Settings
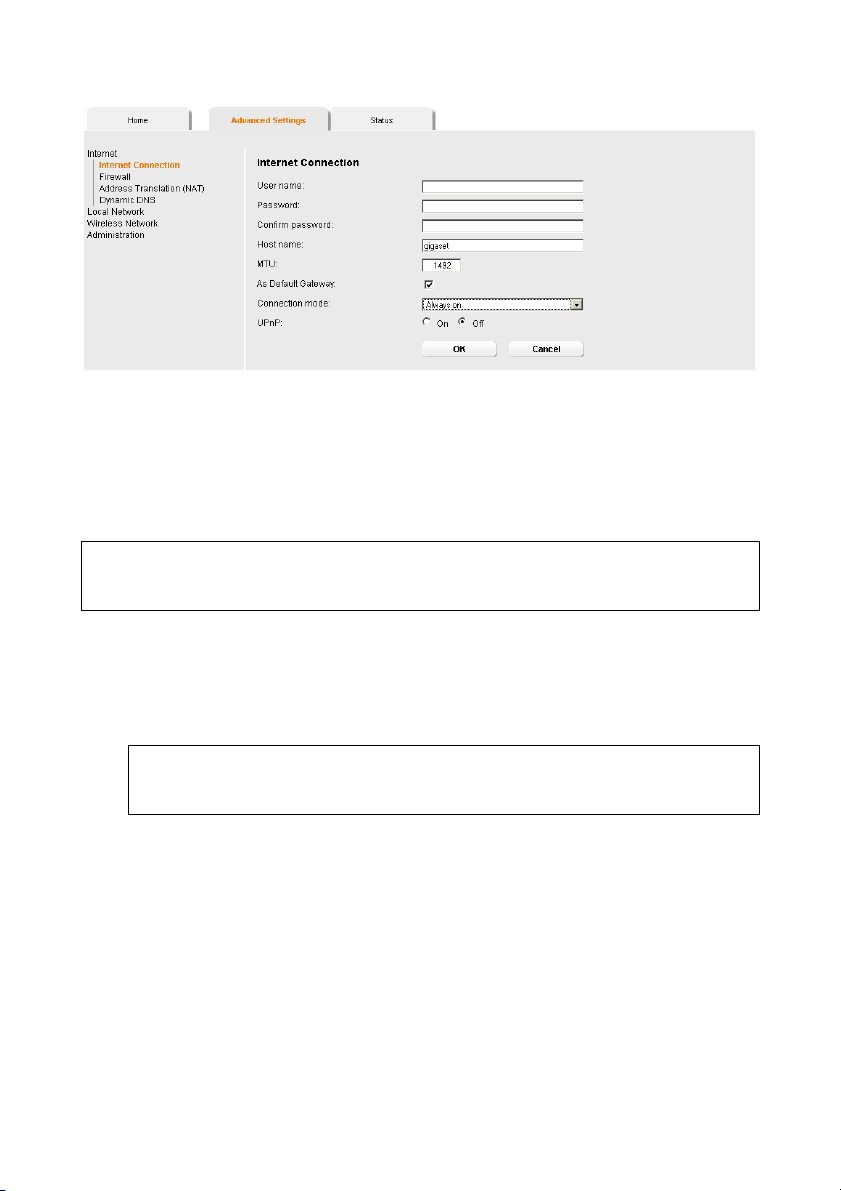
Connection type Ethernet
ì Enter the account data you have been given by your service provider: User name,
Password.
ì Enter a Host name for your router
ì Apply the default setting for the parameter MTU, unless your service provider has
provided you with other data.
Setting the Connection mode
ì Specify how Internet sessions are to be established via Connection mode:
–Select Always on if the connection is to exist at all times when the router is
turned on.
–Select Connect on demand if applications such as an Internet browser or an e-
mail program are to connect to the Internet automatically.
–In the Idle time before disconnect field, enter a period after which the Internet
connection is to end automatically if no data is transmitted (the default setting is
3minutes).
This time setting only applies to the Connect on demand and Connect manu-
ally options.
–Select Connect manually if you always want to establish and end the Internet
connection manually. If you are on a time-based tariff this will save you high con-
nection charges.
ì Click OK to apply the settings.
Note:
Please ensure that you enter all the details from your provider correctly, otherwise the
configuration may fail and you will not be able to connect to the Internet.
Note:
If you are on a time-based tariff, this option can result in high connection
charges.
27
Configuring Advanced Settings
Using UPnP (Universal Plug and Play)
PCs with UPnP (Universal Plug & Play) can offer their own network services and automat-
ically use services offered in the network.
As soon as you have installed UPnP on a PC operating system and activated it on the
router, applications on this PC (e.g. Microsoft Messenger) can communicate via the
Internet without you needing to expressly authorise it. In this case, the router automat-
ically implements Port forwarding, thereby facilitating communication via the Internet.
The task bar on the PC on which UPnP is installed contains an icon for the router. Click
this icon to open the user interface. On Windows XP system, this icon is also shown
under network connections.
ì In the Advanced Settings menu, select: Internet – Internet Connection.
ì Click UPnP.
ì Click OK to apply the settings.
Note:
The operating system Windows ME, Windows XP or Windows Vista must run on the
PC. Check, if the UPnP function has been installed on the PCs operating system. Maybe
you have to install the UPnP components retroactively. Please consult the documen-
tation of your operating system.
Note:
When the UPnP function is active, system applications can assign and use Ports on a
PC. This poses a security risk.
28
Configuring Advanced Settings
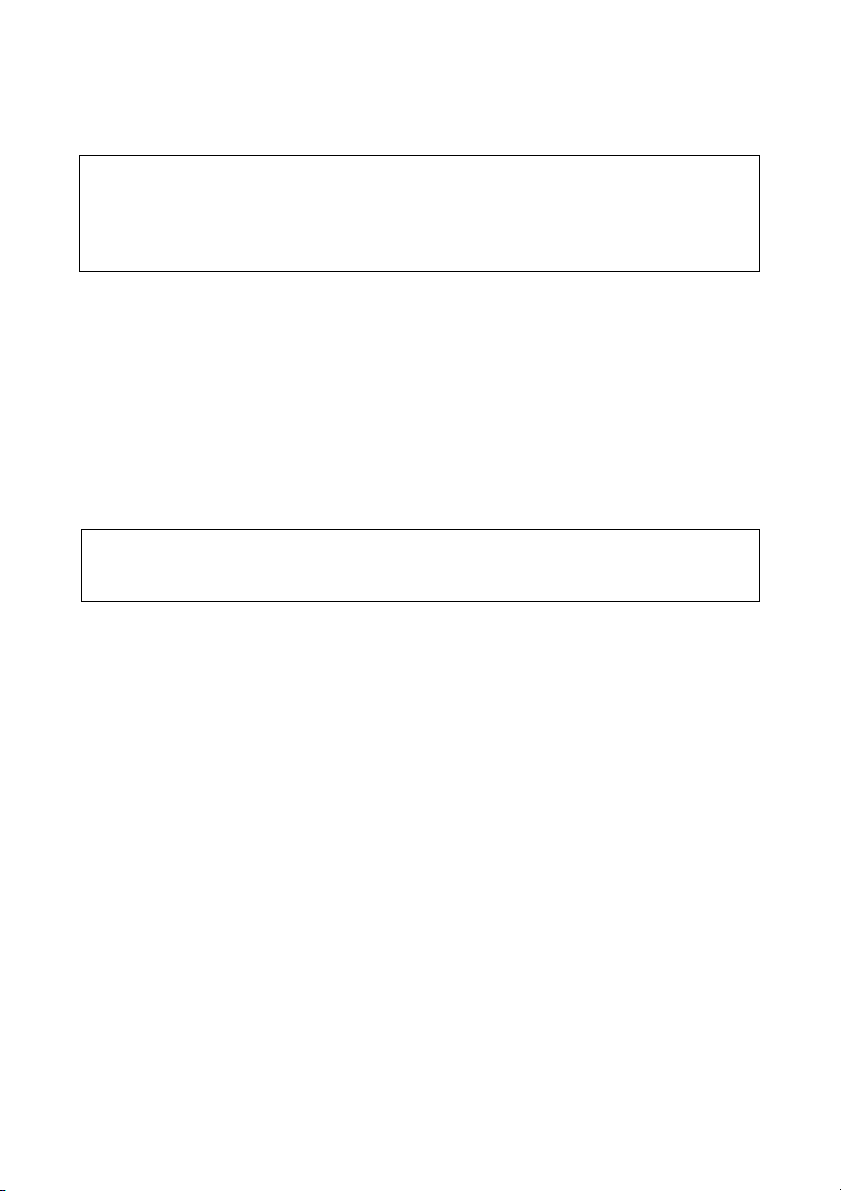
Firewall
The firewall functions of the router Gigaset 504 AGU include various security functions
for the local network.
You can do the following:
u Enable or disable the router firewall.
u Block access by individual PCs to selected services or Web sites.
The firewall functions for the router are activated and configured in the factory. If you
want to deactivate the firewall, carry out the following steps:
ì In the Advanced Settings menu, select: Internet – Firewall.
ì Click the required option.
ì Click OK to apply the settings.
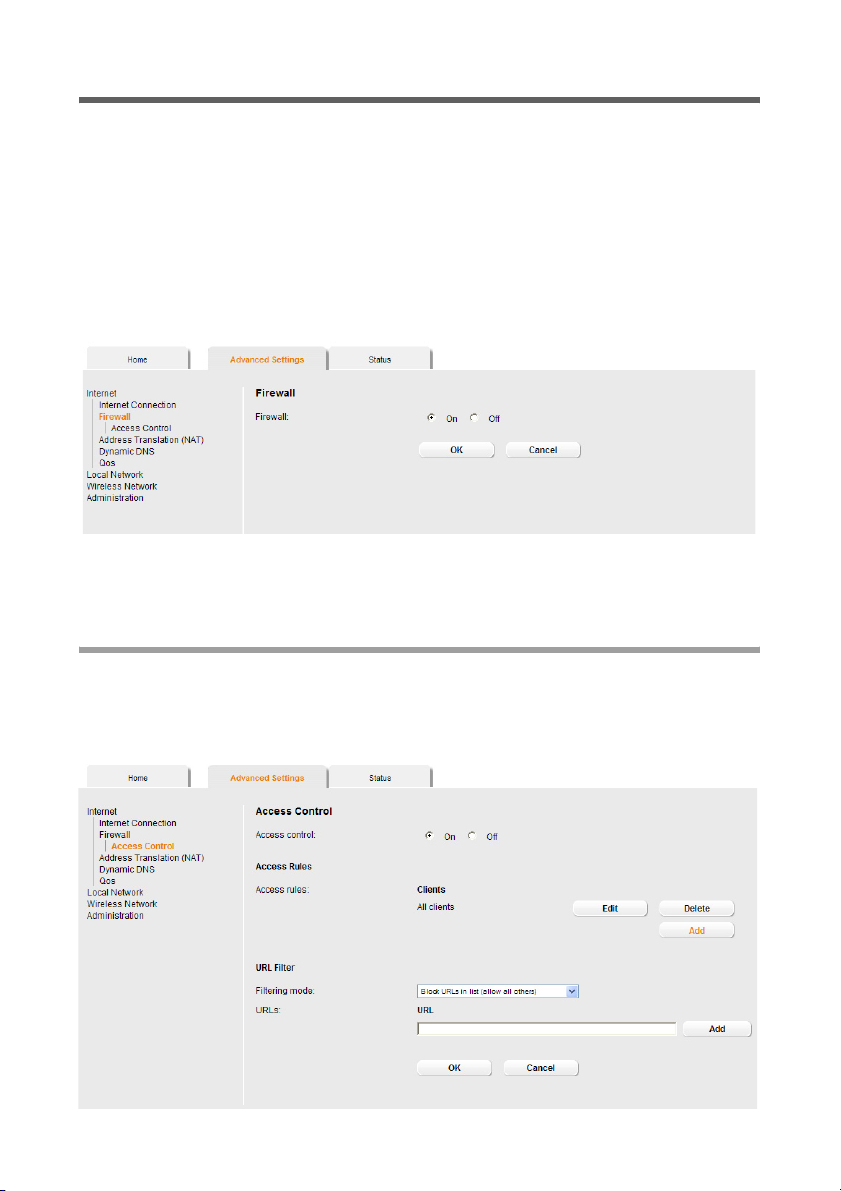
Setting up access control to the Internet
The Access Control function allows you to control access to various services for one or
more PCs. You can permit or block access to URLs and services at certain times.
ì In the Advanced Settings menu, select: Internet – Firewall – Access Control.
Loading...