


 Loading...
Contents
Contents
The Giga762SX WLAN dsl . . . . . . . . . . . . . . . . . . . . . 7
Do your part for the environment (ECO) . . . . . . . . . . . . . . . . . . . . . . . . . . . . . . . . . 8 Local area networks with Gigaset products . . . . . . . . . . . . . . . . . . . . . . . . . . . . . . . . . . 9 Wired local area network (Ethernet) . . . . . . . . . . . . . . . . . . . . . . . . . . . . . . . . . . . 10 Wireless local area network (WLAN) . . . . . . . . . . . . . . . . . . . . . . . . . . . . . . . . . . . 11 Linking a wireless network to an Ethernet . . . . . . . . . . . . . . . . . . . . . . . . . . . . . . 13 Extending the wireless network coverage with a repeater . . . . . . . . . . . . . . . . . . 14 Internet telephony and connecting analogue phones . . . . . . . . . . . . . . . . . . . . . . . . 14 WPS . . . . . . . . . . . . . . . . . . . . . . . . . . . . . . . . . . . . . . . . . . . . . . . . . . . . . . . . . . . . . . . 15 Features and applications . . . . . . . . . . . . . . . . . . . . . . . . . . . . . . . . . . . . . . . . . . . . . . 17
First steps . . . . . . . . . . . . . . . . . . . . . . . . . . . . . . . . . |
20 |
System requirements . . . . . . . . . . . . . . . . . . . . . . . . . . . . . . . . . . . . . . . . . . . . . . . . . |
. 20 |
Overview of the installation steps . . . . . . . . . . . . . . . . . . . . . . . . . . . . . . . . . . . . . . . |
. 21 |
Setting up the Giga762SX WLAN dsl . . . . . . . . . . . . . . . . . . . . . . . . . . . . . . . . . . . . . . |
22 |
Front panel . . . . . . . . . . . . . . . . . . . . . . . . . . . . . . . . . . . . . . . . . . . . . . . . . . . . . . . |
22 |
Connecting and activating the Giga762SX WLAN dsl . . . . . . . . . . . . . . . . . . . . . . . . . |
25 |
Ports on the rear panel . . . . . . . . . . . . . . . . . . . . . . . . . . . . . . . . . . . . . . . . . . . . . |
25 |
Connecting to the splitter data port . . . . . . . . . . . . . . . . . . . . . . . . . . . . . . . . . . . |
27 |
Connecting to the analogue phone port . . . . . . . . . . . . . . . . . . . . . . . . . . . . . . . . |
29 |
Connecting to the phone . . . . . . . . . . . . . . . . . . . . . . . . . . . . . . . . . . . . . . . . . . . . |
30 |
Connecting wired to the PC . . . . . . . . . . . . . . . . . . . . . . . . . . . . . . . . . . . . . . . . . . |
31 |
Connecting to the mains power supply . . . . . . . . . . . . . . . . . . . . . . . . . . . . . . . . . |
32 |
Connecting wireless to the PC . . . . . . . . . . . . . . . . . . . . . . . . . . . . . . . . . . . . . . . . |
33 |
Checking the operating state . . . . . . . . . . . . . . . . . . . . . . . . . . . . . . . . . . . . . . . . |
34 |
Network configuration of the PCs . . . . . . . . . . . . . . . . . . . . . . . . . . . . . . . . . . . . . . . . |
35 |
Making the basic settings . . . . . . . . . . . . . . . . . . . . . . . . . . . . . . . . . . . . . . . . . . . . . . |
35 |
Connecting and configuring additional PCs (optional) . . . . . . . . . . . . . . . . . . . . . . . . |
36 |
The user interface . . . . . . . . . . . . . . . . . . . . . . . . . . 37
Starting the user interface . . . . . . . . . . . . . . . . . . . . . . . . . . . . . . . . . . . . . . . . . . . . . . 37 The start screen . . . . . . . . . . . . . . . . . . . . . . . . . . . . . . . . . . . . . . . . . . . . . . . . . . . . . . 38 Selecting a language . . . . . . . . . . . . . . . . . . . . . . . . . . . . . . . . . . . . . . . . . . . . . . . . . . 40 Connecting to the Internet manually . . . . . . . . . . . . . . . . . . . . . . . . . . . . . . . . . . . . . 40 Elements in the user interface . . . . . . . . . . . . . . . . . . . . . . . . . . . . . . . . . . . . . . . . . . . 41
3
Contents
Basic Setup Wizard . . . . . . . . . . . . . . . . . . . . . . . . . . 42
Regional Options . . . . . . . . . . . . . . . . . . . . . . . . . . . . . . . . . . . . . . . . . . . . . . . . . . . . . 43 Configuring Internet connections . . . . . . . . . . . . . . . . . . . . . . . . . . . . . . . . . . . . . . . . 44 Telephony . . . . . . . . . . . . . . . . . . . . . . . . . . . . . . . . . . . . . . . . . . . . . . . . . . . . . . . . . . . 47 WPS Registration . . . . . . . . . . . . . . . . . . . . . . . . . . . . . . . . . . . . . . . . . . . . . . . . . . . . . 48 Summary . . . . . . . . . . . . . . . . . . . . . . . . . . . . . . . . . . . . . . . . . . . . . . . . . . . . . . . . . . . 50
Security Setup Wizard . . . . . . . . . . . . . . . . . . . . . . . 50
Assigning a password . . . . . . . . . . . . . . . . . . . . . . . . . . . . . . . . . . . . . . . . . . . . . . . . . |
52 |
SSID . . . . . . . . . . . . . . . . . . . . . . . . . . . . . . . . . . . . . . . . . . . . . . . . . . . . . . . . . . . . . . . |
53 |
Setting up security functions for the wireless network . . . . . . . . . . . . . . . . . . . . . . . . |
54 |
WPA2/WPA with pre-shared key (PSK) . . . . . . . . . . . . . . . . . . . . . . . . . . . . . . . . . . |
54 |
WEP encryption . . . . . . . . . . . . . . . . . . . . . . . . . . . . . . . . . . . . . . . . . . . . . . . . . . . |
56 |
Access control within the wireless network . . . . . . . . . . . . . . . . . . . . . . . . . . . . . . . . |
58 |
Saving settings . . . . . . . . . . . . . . . . . . . . . . . . . . . . . . . . . . . . . . . . . . . . . . . . . . . . . . . |
59 |
Configuring Advanced Settings . . . . . . . . . . . . . . . 60
Internet . . . . . . . . . . . . . . . . . . . . . . . . . . . . . . . . . . . . . . . . . . . . . . . . . . . . . . . . . . . . 61 Internet selection . . . . . . . . . . . . . . . . . . . . . . . . . . . . . . . . . . . . . . . . . . . . . . . . . . 62 Internet Connection . . . . . . . . . . . . . . . . . . . . . . . . . . . . . . . . . . . . . . . . . . . . . . . . 64 DNS server . . . . . . . . . . . . . . . . . . . . . . . . . . . . . . . . . . . . . . . . . . . . . . . . . . . . . . . 67 MAC Address . . . . . . . . . . . . . . . . . . . . . . . . . . . . . . . . . . . . . . . . . . . . . . . . . . . . . 68
Firewall . . . . . . . . . . . . . . . . . . . . . . . . . . . . . . . . . . . . . . . . . . . . . . . . . . . . . . . . . . . . . 69 Attack Detection . . . . . . . . . . . . . . . . . . . . . . . . . . . . . . . . . . . . . . . . . . . . . . . . . . . 70 Setting up access control to the Internet . . . . . . . . . . . . . . . . . . . . . . . . . . . . . . . . 71 Setting up the NAT function . . . . . . . . . . . . . . . . . . . . . . . . . . . . . . . . . . . . . . . . . . . . 73 Port Triggering . . . . . . . . . . . . . . . . . . . . . . . . . . . . . . . . . . . . . . . . . . . . . . . . . . . . 75 Port Forwarding . . . . . . . . . . . . . . . . . . . . . . . . . . . . . . . . . . . . . . . . . . . . . . . . . . . 76 Opening the firewall for a selected PC (Exposed Host) . . . . . . . . . . . . . . . . . . . . . 78 Dynamic DNS . . . . . . . . . . . . . . . . . . . . . . . . . . . . . . . . . . . . . . . . . . . . . . . . . . . . . 79 Routing . . . . . . . . . . . . . . . . . . . . . . . . . . . . . . . . . . . . . . . . . . . . . . . . . . . . . . . . . . 81 LAN configuration . . . . . . . . . . . . . . . . . . . . . . . . . . . . . . . . . . . . . . . . . . . . . . . . . . . . 82 Assigning static IP addresses to individual PCs . . . . . . . . . . . . . . . . . . . . . . . . . . . 84 Configuring wireless connections . . . . . . . . . . . . . . . . . . . . . . . . . . . . . . . . . . . . . . . . 85 Starting WPS registration and configuring WPS . . . . . . . . . . . . . . . . . . . . . . . . . . 87 Setting encryption . . . . . . . . . . . . . . . . . . . . . . . . . . . . . . . . . . . . . . . . . . . . . . . . . 88 WPA2-PSK and WPA2-PSK / WPA-PSK . . . . . . . . . . . . . . . . . . . . . . . . . . . . . . . . . . . 89 WEP encryption . . . . . . . . . . . . . . . . . . . . . . . . . . . . . . . . . . . . . . . . . . . . . . . . . . . 92 Permitted clients . . . . . . . . . . . . . . . . . . . . . . . . . . . . . . . . . . . . . . . . . . . . . . . . . . 95 Repeater function (WDS) . . . . . . . . . . . . . . . . . . . . . . . . . . . . . . . . . . . . . . . . . . . . 96 Setting up Internet telephony (VoIP) . . . . . . . . . . . . . . . . . . . . . . . . . . . . . . . . . . . . . . 98 VoIP settings . . . . . . . . . . . . . . . . . . . . . . . . . . . . . . . . . . . . . . . . . . . . . . . . . . . . . . 99 Extensions . . . . . . . . . . . . . . . . . . . . . . . . . . . . . . . . . . . . . . . . . . . . . . . . . . . . . . 102 Dialing Plans . . . . . . . . . . . . . . . . . . . . . . . . . . . . . . . . . . . . . . . . . . . . . . . . . . . . . 106 Quick dial . . . . . . . . . . . . . . . . . . . . . . . . . . . . . . . . . . . . . . . . . . . . . . . . . . . . . . . 107
4

Contents
USB . . . . . . . . . . . . . . . . . . . . . . . . . . . . . . . . . . . . . . . . . . . . . . . . . . . . . . . . . . . . . . . 108 File Server . . . . . . . . . . . . . . . . . . . . . . . . . . . . . . . . . . . . . . . . . . . . . . . . . . . . . . 110 Web Server . . . . . . . . . . . . . . . . . . . . . . . . . . . . . . . . . . . . . . . . . . . . . . . . . . . . . . 112 Print Server . . . . . . . . . . . . . . . . . . . . . . . . . . . . . . . . . . . . . . . . . . . . . . . . . . . . . . 115
Call guide . . . . . . . . . . . . . . . . . . . . . . . . . . . . . . . . 117
Advanced options . . . . . . . . . . . . . . . . . . . . . . . . . . . . . . . . . . . . . . . . . . . . . . . . . . . 117 Toggling telephone calls . . . . . . . . . . . . . . . . . . . . . . . . . . . . . . . . . . . . . . . . . . . 118 Conference call between three participants . . . . . . . . . . . . . . . . . . . . . . . . . . . . 118
Administration . . . . . . . . . . . . . . . . . . . . . . . . . . . . 120
Regional Options . . . . . . . . . . . . . . . . . . . . . . . . . . . . . . . . . . . . . . . . . . . . . . . . . . . . 121 Internet Time . . . . . . . . . . . . . . . . . . . . . . . . . . . . . . . . . . . . . . . . . . . . . . . . . . . . 122 System Password . . . . . . . . . . . . . . . . . . . . . . . . . . . . . . . . . . . . . . . . . . . . . . . . . . . . 122 System management . . . . . . . . . . . . . . . . . . . . . . . . . . . . . . . . . . . . . . . . . . . . . . . . . 124 Backing up and restoring a configuration . . . . . . . . . . . . . . . . . . . . . . . . . . . . . . . . . 126 Backing up configuration data . . . . . . . . . . . . . . . . . . . . . . . . . . . . . . . . . . . . . . 126 Restoring the saved data . . . . . . . . . . . . . . . . . . . . . . . . . . . . . . . . . . . . . . . . . . . 126 Restoring factory settings . . . . . . . . . . . . . . . . . . . . . . . . . . . . . . . . . . . . . . . . . . 127 Reboot . . . . . . . . . . . . . . . . . . . . . . . . . . . . . . . . . . . . . . . . . . . . . . . . . . . . . . . . . . . . 127 Updating firmware . . . . . . . . . . . . . . . . . . . . . . . . . . . . . . . . . . . . . . . . . . . . . . . . . . . 127 System Log . . . . . . . . . . . . . . . . . . . . . . . . . . . . . . . . . . . . . . . . . . . . . . . . . . . . . . . . . 128
Status information . . . . . . . . . . . . . . . . . . . . . . . . . 130
Overview . . . . . . . . . . . . . . . . . . . . . . . . . . . . . . . . . . . . . . . . . . . . . . . . . . . . . . . . . . 130 Security . . . . . . . . . . . . . . . . . . . . . . . . . . . . . . . . . . . . . . . . . . . . . . . . . . . . . . . . . . . 131 Internet . . . . . . . . . . . . . . . . . . . . . . . . . . . . . . . . . . . . . . . . . . . . . . . . . . . . . . . . . . . 132 Local Network . . . . . . . . . . . . . . . . . . . . . . . . . . . . . . . . . . . . . . . . . . . . . . . . . . . . . . 134 Wireless Network . . . . . . . . . . . . . . . . . . . . . . . . . . . . . . . . . . . . . . . . . . . . . . . . . . . . 134 Telephony . . . . . . . . . . . . . . . . . . . . . . . . . . . . . . . . . . . . . . . . . . . . . . . . . . . . . . . . . 135 Device . . . . . . . . . . . . . . . . . . . . . . . . . . . . . . . . . . . . . . . . . . . . . . . . . . . . . . . . . . . . 136
Using the USB port . . . . . . . . . . . . . . . . . . . . . . . . . 137
Installing the printer port for network printers . . . . . . . . . . . . . . . . . . . . . . . . . . . . . |
137 |
Introduction . . . . . . . . . . . . . . . . . . . . . . . . . . . . . . . . . . . . . . . . . . . . . . . . . . . . . |
137 |
Installing a standard TCP/IP printer port under Windows Vista . . . . . . . . . . . . . . |
138 |
Installing a standard TCP/IP printer port under Windows XP/2000 . . . . . . . . . . . |
144 |
Installing a printer on the TCP/IP port retrospectively . . . . . . . . . . . . . . . . . . . . . |
150 |
Instructions for setting up a printer on the PC . . . . . . . . . . . . . . . . . . . . . . . . . . |
151 |
5
Contents
Using the data on a USB mass storage device . . . . . . . . . . . . . . . . . . . . . . . . . . . . . . 152 Checking network services . . . . . . . . . . . . . . . . . . . . . . . . . . . . . . . . . . . . . . . . . 152 Share Inter Process Communication for the network . . . . . . . . . . . . . . . . . . . . . 154 Starting the computer browser . . . . . . . . . . . . . . . . . . . . . . . . . . . . . . . . . . . . . . 154 Enabling file and printer sharing in the Windows firewall . . . . . . . . . . . . . . . . . 155
Appendix . . . . . . . . . . . . . . . . . . . . . . . . . . . . . . . . . 157
Troubleshooting . . . . . . . . . . . . . . . . . . . . . . . . . . . . . . . . . . . . . . . . . . . . . . . . . . . . . |
157 |
Deactivating HTTP proxy and configuring a pop-up blocker . . . . . . . . . . . . . . . . . . . |
163 |
Deactivating the HTTP proxy . . . . . . . . . . . . . . . . . . . . . . . . . . . . . . . . . . . . . . . . |
163 |
Configuring the pop-up blocker . . . . . . . . . . . . . . . . . . . . . . . . . . . . . . . . . . . . . |
164 |
Specifications . . . . . . . . . . . . . . . . . . . . . . . . . . . . . . . . . . . . . . . . . . . . . . . . . . . . . . . |
165 |
Authorisation . . . . . . . . . . . . . . . . . . . . . . . . . . . . . . . . . . . . . . . . . . . . . . . . . . . . . . . |
166 |
Open Source Software used in the product . . . . . . . . . . . . . . . . . . . . . . . . . . . . . . . |
167 |
Glossary . . . . . . . . . . . . . . . . . . . . . . . . . . . . . . . . . 168
Index . . . . . . . . . . . . . . . . . . . . . . . . . . . . . . . . . . . . 182
6
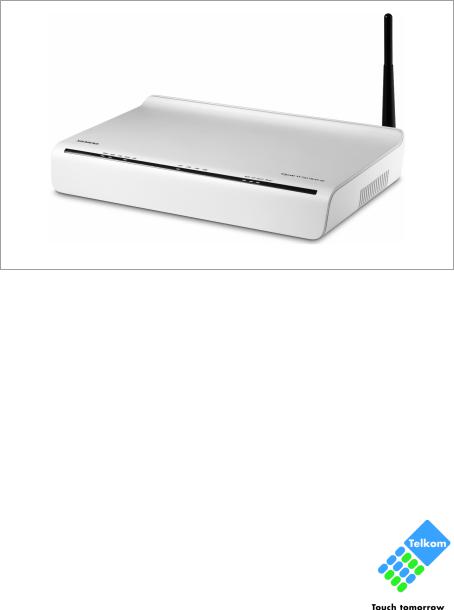
The Giga762SX WLAN dsl
The Giga762SX WLAN dsl
The Siemens Giga762SX WLAN dsl is a powerful but simple communications device for connecting your PC or local area network (LAN) to the Internet (via DSL). It contains an integrated ADSL modem (ADSL /ADSL2+) enabling you to access the Internet easily.
You can connect your PC wirelessly to the Giga762SX WLAN dsl and create a wireless local area network (WLAN). For network security, wireless transmission can be encrypted using the WPA/WPA2 standard or 64/128-bit WEP.
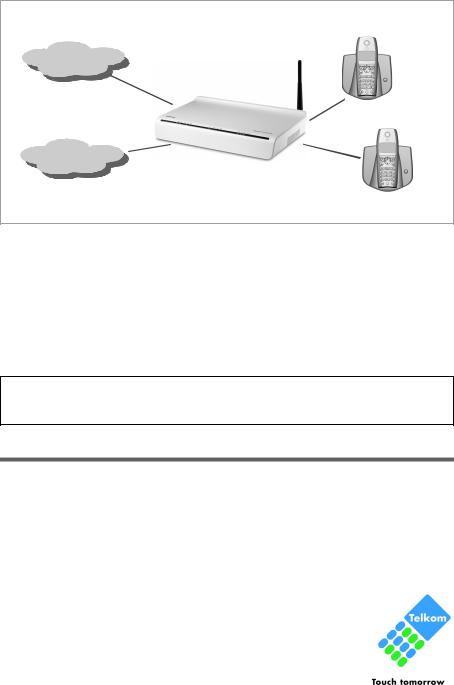
The Giga762SX WLAN dsl also offers the functions of a PABX for Internet telephony (VoIP) and fixed network telephony. You can connect up to two traditional analogue terminals and then use these analogue phones both to make calls via the Internet or also via an existing analogue telephone line. In addition, you can operate SIP clients (wireless SIP telephones and PCs with appropriate software) as PABX extensions and therefore also make calls via the Internet or fixed network.
The Giga762SX WLAN dsl allows several users to access the Internet simultaneously. A single user account can be shared if your Internet service provider permits this. If you want to surf the Internet and make calls using the Internet at the lowest possible cost, the Giga762SX WLAN dsl is a convenient and simple solution.
The Giga762SX WLAN dsl provides the new WPS function for wireless connection of PCs or notebooks. You can activate this function via the user interface or – depending on the hardware type of your device – with the registration (Scan) button on the back panel. If the other clients in your wireless network such as the Gigaset PC Card 300 also support WPS, you can connect with a simple click.
7

The Giga762SX WLAN dsl
The Giga762SX WLAN dsl has an extensive range of functions but remains simple to use. It can be configured and operational within a few minutes.
Note:
This user guide is based on the software release 2.3.
Do your part for the environment (ECO)
Thanks to a switch-mode power supply unit, all of our broadband products offer significantly reduced power consumption - for more energyefficient use. Each device also lets you variably reduce WLAN transmission power based on the size of your home or office network via the
user interface, which helps make a cleaner environment for everyone. You can even turn the WLAN off completely when you're not using it. Some of our broadband products also offer you the convenience of switching the WLAN on or off with a handy button directly on the device itself - or have a timer do it for you. It's our goal to ensure a sustainable economic process by using an environmentally friendly production and management system - which makes it easy for us to meet the strict ISO 14001 standards for international environmental management.
8
The Giga762SX WLAN dsl
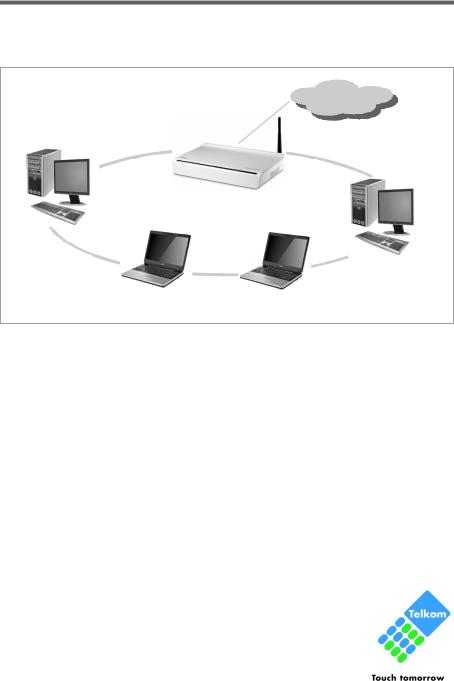
Local area networks with Gigaset products
You can use the Siemens Giga762SX WLAN dsl to set up a local area network, for example a home network. All PCs in this network can communicate with each other and have access to the Internet.
Giga762SX WLAN dsl |
Internet |
Windows ME
Windows 2000
Local Network
|
|
|
|
|
|
Windows XP |
Windows Vista |
|
There are various ways in which you can set up the network using a Giga762SX WLAN dsl.
uSet up a wired local area network (Ethernet) and allow the connected PCs access to the Internet (page 10).
uSet up a wireless local area network (WLAN) and allow the connected PCs access to the Internet (page 11).
uSet up a local area network comprising wireless and wired network components (page 13).
9
The Giga762SX WLAN dsl
Wired local area network (Ethernet)
In a wired local area network, PCs communicate with one another via an Ethernet cable. When the Siemens Giga762SX WLAN dsl is used, it establishes the connection between the PCs. For this it has four Ethernet LAN ports for connecting four PCs. The PCs have to be equipped with a network port (Ethernet). New PCs frequently already have this port. For older PCs you need to install an Ethernet network card. The PC and the Ethernet LAN port on the Giga762SX WLAN dsl are connected using an Ethernet cable (CAT5). There is one supplied. You can obtain additional Ethernet cables from your retailer.
The Giga762SX WLAN dsl allows all PCs to access the Internet simultaneously.
Internet |
Ethernet |
10

The Giga762SX WLAN dsl
Wireless local area network (WLAN)
In a wireless local area network (WLAN), PCs are linked without wires or cables. The PCs have to be equipped with a wireless local area network adapter (WLAN adapter), for example a Gigaset USB Adapter 54.
We generally differentiate between two types of wireless network: u Infrastructure mode
u Ad-hoc mode
Infrastructure mode
Infrastructure mode connects wireless and wired networks with one another. In addition to the mobile stations, infrastructure mode needs an access point such as the Giga762SX WLAN dsl. In infrastructure mode, the stations in the network always communicate via this access point. The access point sets up the wireless network on a permanent basis. Each station that wants to be part of the wireless network must first register with the access point before it can exchange data.
The access point establishes the connection between the mobile stations of a wireless network and a wired LAN (Ethernet) or the Internet. In this case this is described as the device's router functionality. The router sends data packets that are not addressed to stations within the network "outside" and forwards data packets originating from "outside" to the appropriate station within the network.
You can use the Giga762SX WLAN dsl to connect u wirelessly networked PCs to the Internet and
u wirelessly networked PCs to an Ethernet network.
Infrastructure mode is the default configuration for the Giga762SX WLAN dsl.
Ad-hoc mode
An ad-hoc network is a wireless network that has been configured without an access point or a router. The mobile network components that communicate with each other directly and wirelessly form the network on an "ad-hoc" basis, i.e. as and when required. All the stations in the network have the same rights. Ad-hoc networks are used wherever communications networks have to be set up quickly and there is no existing network infrastructure, and where the participants are on the move.
11

The Giga762SX WLAN dsl
Linking wireless networks with the Internet
The Giga762SX WLAN dsl has an ADSL interface that permits all stations within its local area network to access the Internet simultaneously. To be able to use this functionality, you need a DSL connection obtainable from an Internet service provider. Find out whether your service provider supports parallel access by several PCs.
Internet
((( )))
|
((( |
|
|
|
((( |
|
|
|
|
|
|
||
|
|
|
|
|
|
|
|
|
|
WLAN |
|
|
|
|
|
((( |
((( |
|
|
|
|
|
|
|
|
||
|
|
|
|
|
||
|
|
|
|
|
||
|
|
|
|
|
|
|
|
|
|
|
|
|
|
12

The Giga762SX WLAN dsl
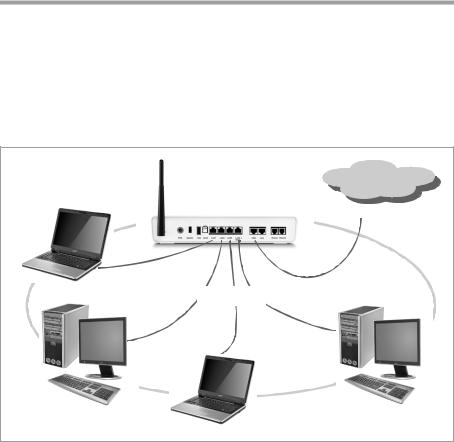
Linking a wireless network to an Ethernet
Wireless local area networks can work easily together with existing Ethernet networks. If you wish to connect mobile stations to an existing wired network, you must group together all mobile stations into a wireless local area network in infrastructure mode.
))) |
|
|
|
((( |
|
WLAN (wireless) |
))) |
|
|
|
|
((( |
))) |
|
|
Access Point |
|
((( |
|
|
Ethernet |
|
|
(wired) |
|
|
The Giga762SX WLAN dsl has four Ethernet interfaces (LAN ports). Up to four PCs can be connected directly to these LAN ports.
All PCs can access the Internet via the Giga762SX WLAN dsl.
Please remember:
You can also connect an Ethernet router or switch to a LAN port to access a larger Ethernet. If you want to link the Gigaset WLAN network to an existing network, a large number of settings have to be applied. Therefore we cannot provide a general example for this use; the configuration depends greatly on the networks in question. We advise having the configuration of such a network carried out by a specialist.
13
The Giga762SX WLAN dsl
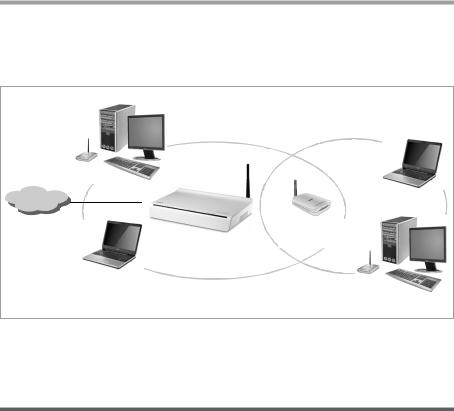
Extending the wireless network coverage with a repeater
Using the Gigaset WLAN Repeater, you can extend your wireless network's coverage. Set it up within the range of your network. The repeater will now transmit data traffic into its own wireless area. This technology allows you to set up wireless networks that cover a much larger area than is possible with a single Giga762SX WLAN dsl.
WLAN
(((
)))
Internet
)))
)))
))) |
))) |
((( |
Gigaset WLAN
Repeater (((
PCs to be connected in a wireless local area network via a repeater must be equipped with an integrated wireless network adapter or you have to connect an external wireless network adapter (e.g. a USB adapter).
Internet telephony and connecting analogue phones
The Giga762SX WLAN dsl allows a combination of analogue fixed network telephony and Internet telephony (VoIP) over DSL for two analogue telephones and four other wired or wireless VoIP telephones or SIP clients.
This provides you with the full benefits of both technologies. You can make use of the low-cost call rates of Internet telephony without any additional equipment. In addition, you have the option of using your analogue fixed network connection. The type of calls that are cheaper for you will depend on what calls you make and when you make them, and the rates offered by your service provider. The Giga762SX WLAN dsl gives you complete freedom of choice at any time.
14
The Giga762SX WLAN dsl
Internet
Fixed network
You can choose whether to connect any two analogue phones, a fax machine or an answering machine to the phone ports. You can configure these ports using the Giga762SX WLAN dsl.
The PABX of the Giga762SX WLAN dsl allows you to connect wireless SIP phones (WLAN handsets) and PCs with SIP clients (software for Internet telephony) as extensions. You can use all functions of your PABX for Internet telephony also.
You will need the relevant access data for your VoIP provider to configure Internet telephony.
Please remember:
You can only be reached via the Internet (VoIP) when an active Internet connection is established. You can still be called any time via the fixed network, however.
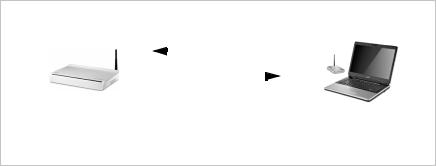
WPS
Wi-Fi Protected Setup (WPS) makes it easier to establish and encrypt a wireless network (1 click only). You no longer need to configure and synchronise the individual components of your wireless network manually.
A wireless network is assigned a name (SSID) and requires the encryption of data traffic to protect against the risk of unauthorised access. The access point requires authentication with an SSID and - if encryption is activated - a key to allow a WLAN adapter to access services.
WPS uses the encryption methods WPA-PSK or WPA2-PSK. Devices with WPS can automatically synchronise each other. The predefined individual SSID and pre-shared key is used for encryption.
WPS is not possible in networks that use WEP encryption or WPA2/ WPA authentication. WPS may be used without encryption.
Clients without WPS can be connected manually.
15
The Giga762SX WLAN dsl
WPS provides two possibilities for registration:
uVia registration button
The access point (e.g. the Giga762SX WLAN dsl) has a registration button. The registration button is available either:
–as hardware: a specific button (labelled Scan) is provided on the device’s back panel.
–as software: registration can be started via the WPS Registration page of the user interface.
In the description that follows, the term registration button refers to both the Scan button and the corresponding function in the user interface.
Depending on your hardware version, WPS registration may only be possible via the user interface.
Once the registration button has been activated, the device allows the registration of a WLAN client (repeater or wireless network adapter) during a two-minute interval.
Registering a PC
Access Point |
|
Registering |
|
|
|
||
|
|
|
|
|
|
|
|
|
SSID and pre-shared key |
||
Pushing the registration button (Scan) or activating WPS registration via software
WLAN network adapter
(((
Pushing the registration button or activating WPS registration via software
The first time this button is pressed, the device automatically creates a SSID and a pre-shared key, if these had not been already set on delivery or has been configured before manually. If a client activates WPS registration within the two-minute interval, the security data is exchanged and a connection is established. Only one client may synchronise during the two-minute interval. After the successful synchronization the registration is closed.
The automatically or manually created security data is valid for all further WPS registration processes. If you change this security data again manually or after a factory reset the clients have to be registered again.
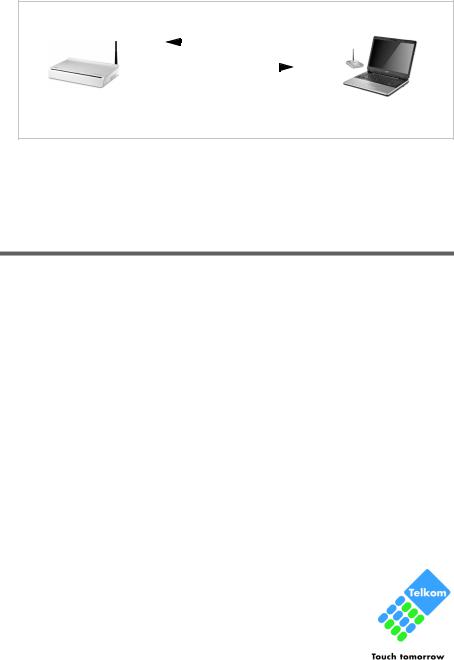
uVia Personal Identification Number (PIN)
The PIN offers improved security for registration. No other device (e.g. in an adjacent room) can log in unnoticed. A PIN is used for registration which must be identical on both devices. If a client logs in with this PIN, the security data is synchronised. Usually the th PIN of the access point is used. For security reasons a new PIN can be created.
It is also possible to create the PIN on one of the clients.
16
The Giga762SX WLAN dsl
Further information you will find in chapter "Starting WPS registration and configuring WPS" on page 87.
Access Point |
|
|
|
Repeater or |
|
Registering |
WLAN network adapter |
||
|
|
|
||
|
|
|
|
((( |
|
|
|
|
|
|
|
|
|
|
|
SSID and pre-shared key |
|
||
Generating the PIN via configuration user interface
Entering and activating the PIN via configuration user interface
WLAN adapters without WPS can also be set up manually, i.e. the SSID and key must be entered manually. How you can find out which SSID and which pre-shared key is set, you can read in chapter "Configuring wireless connections" on page 85.
WPS cannot be used together with WEP encryption or WPA/WPA2 authentication.
Features and applications
The Giga762SX WLAN dsl's wide range of features makes it ideal for a large number of applications.
Depending on your device, some of the features may differ from the description in this instruction manual.
uInternet access
The Giga762SX WLAN dsl allows several users to have Internet access via the integrated ADSL /ADSL2+ modem.
–Since many DSL providers permit communication with end users via the PPPoE protocol, the Giga762SX WLAN dsl has an integrated Client for this protocol, so you no longer have to install this service on your PC.
–The Giga762SX WLAN dsl supports shared Internet access for up to 252 users. This means several users in your network can surf the Internet at the same time, all using the same Internet account.
uSetting up a local area network
The Giga762SX WLAN dsl offers the following possibilities:
–Four devices connected via Ethernet ports with a transmission speed of 10 or 100 Mbps (with automatic recognition).
–Up to 252 mobile terminals connected via a radio interface with a transmission speed of up to 54 Mbps. It complies with IEEE 802.11g standard and can work with all products that satisfy Standard IEEE 802.11b or 802.11g.
–Using the Giga762SX WLAN dsl makes it easy to set up a network at home or in small offices. For example, users can exchange data or share resources in the network, such as a file
17
The Giga762SX WLAN dsl
server or printer. You can connect a USB hard disk or a printer to the USB interface of the Giga762SX WLAN dsl and make them available to all users in your network.
The Giga762SX WLAN dsl supports DHCP for dynamic IP configuration of the local area network, and DNS for domain name mapping.
uConnecting phones and Internet telephony
The Giga762SX WLAN dsl permits
–Internet telephony via the DSL port.
–Fixed network telephony via the analogue port.
–Connection of two analogue phones for Internet telephony and for fixed network calls as well as connection of wireless SIP phones and PCs with SIP clients for Internet telephony.
–Connection of an answering machine or fax.
Data transfer for VoIP is handled by the SIP protocol with high connection and voice quality. If the Internet connection has been interrupted or you do not want to make a call via VoIP, you can simply make a call via the fixed network (if a fixed network phone is connected).
uSecurity functions
The Giga762SX WLAN dsl offers comprehensive security measures:
–Firewall protection against unauthorised access from the Internet
All PCs in the local area network use the Public IP address of the Giga762SX WLAN dsl for their Internet connections, which makes them 'invisible' on the Internet. The Giga762SX WLAN dsl only allows access from the Internet if this has been requested from within the local area network.
With the firewall, the Giga762SX WLAN dsl also offers comprehensive protection against hacker attacks.
–Service filtering
The Giga762SX WLAN dsl can filter Internet access. Here you determine which PCs may access which Internet services.
–Access control and encryption for the local area network
The Giga762SX WLAN dsl is delivered with a predefined individual encryption (WPA2-PSK/WPA-PSK with pre-shared key). You will find the corresponding information at the label on the devices bottom. So, your wirless network is protected against unauthorised access.
If there are wireless network adapters of your PCs which do not support this encryption method, you can use other encryption methods and authentication methods (WEP, WPA/WPA2, 802.1x) to prevent unauthorised access to your wireless LAN or to make data illegible to unauthorised parties.
With MAC access control you can allow wireless access to selected PCs.
18

The Giga762SX WLAN dsl
uOffering your own services on the Internet
–If you want to offer your own services on the Internet, you can set up the Giga762SX WLAN dsl as a virtual server without permitting further access to the local area network.
–DMZ (Exposed Host)
This allows you to release a PC in your local area network for unlimited access from the Internet. Note that in this case your local area network will no longer be adequately protected against Internet attacks.
uProviding an HTTP or FTP server via USB interface
–You can easily establish an FTP or an HTTP server for Internet access with the Giga762SX WLAN dsl.
–You can connect a USB hub to the USB port on your Giga762SX WLAN dsl and thereby at the same time provide a printer and a storage medium for all clients in your local area network.
19

First steps
c
First steps
System requirements
You require the following components to operate your Giga762SX WLAN dsl:
uA PC with
– an 802.11g or 802.11b compatible wireless Network adapter.
Note:
An 802.11b-compatible network adapter has a maximum transmission speed of 11 Mbps. An 802.11g-compatible network adapter has a maximum transmission speed of 54 Mbps.
or
– an Ethernet port (10Base-T or 100Base-TX)
A Web browser such as Microsoft Internet Explorer V 6.0 or higher or Mozilla Firefox V 1.0 or higher for configuring your Giga762SX WLAN dsl.
Note:
We recommend you use the Giga762SX WLAN dsl with the Windows Vista or Windows XP operating system because only then are all system requirements for using the device fulfilled.
uTo access the Internet you require
–a DSL port (splitter),
–the access data for your Internet service provider.
uFor Internet telephony you also require
–the access data for your VoIP service provider and
–a phone for connecting to the Giga762SX WLAN dsl or a PC with a SIP client or a VoIP telephone.
20

First steps
For experienced users
The default settings for the Giga762SX WLAN dsl are:
–IP address: 10.0.0.2
–Subnet mask: 255.255.255.0
–SSID: individually preset, see the label on the devices bottom
Caution: The Giga762SX WLAN dsl is delivered with a preset individual encryption (WPA2-PSK/ WPA-PSK with pre-shared key). You will find the key at the label on the devices bottom.
Trademarks
Microsoft, Windows 98/SE, Windows ME, Windows 2000, Windows XP, Windows Vista and Internet Explorer are registered trademarks of the Microsoft Corporation.
Mozilla Firefox is a registered trademark of the Mozilla Organisation.
Overview of the installation steps
1.First install an Ethernet network card or a wireless Network adapter in the PCs you want to connect to the Giga762SX WLAN dsl. The installation is described in the user guides for these products.
Please remember:
When installing wireless network adapters, use the preset SSID and key which are shown at the label on the devices bottom.
2.Then make the necessary connections (PCs, phones, splitter) on the Giga762SX WLAN dsl and activate the device (page 25).
3.Before the PCs can communicate with the Giga762SX WLAN dsl and with each other in a local network, you may have to change your network settings (page 35). Configure these network settings on one PC first so that it can establish a connection to the Giga762SX WLAN dsl. You can then use this PC to configure the device. To find out how to do this, refer to the section entitled "Configuring the local area network" on the CD-ROM.
4.With a wireless connection, you establish the link from the PC's wireless network adapter to the Giga762SX WLAN dsl. This is described in the user guide for the network adapter. If the wireless network adapter provides WPS, you can establish the connection with a simple click (see page 33).
5.Then configure the Giga762SX WLAN dsl to activate the device's Internet access (refer to the section entitled "Basic Setup Wizard" on page 42"). To
do this you will need the access data for your Internet service provider.
6.If you want to connect more PCs to the Giga762SX WLAN dsl, configure their network settings and set up the local area network accordingly (refer to the section entitled "Configuring the local area network" on the CD-ROM).
21
First steps
7.If you want to use the Giga762SX WLAN dsl for Internet telephony, you must configure your VoIP provider's registration data (refer to the section entitled "Setting up Internet telephony (VoIP)" on page 98).
8.If you wish to use other functions of the Giga762SX WLAN dsl, for example the comprehensive security features, use the Security Setup (page 50) or the Advanced Setup (page 60).
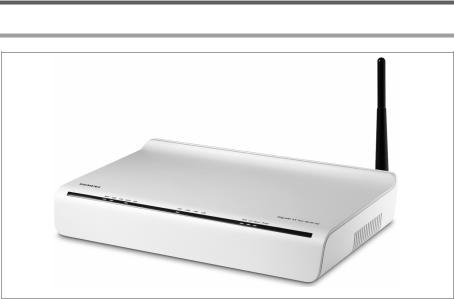
Setting up the Giga762SX WLAN dsl
Front panel
The LEDs (from left to right) have the following functions:
LED |
State |
Status |
|
|
|
|
|
Power |
On (green) |
The Giga762SX WLAN dsl is connected to the mains. |
|
|
|
||
Off |
The Giga762SX WLAN dsl is disconnected from the mains. |
||
|
|||
|
|
|
|
|
On |
A DSL connection is established. |
|
|
|
|
|
|
Flashing |
The DSL line is being synchronised. The synchronisation |
|
|
|
phases are shown as slow flashing (registering) and fast |
|
ADSL |
|
flashing (training). |
|
|
|
If no DSL cable is connected, the LED will flash at uniform |
|
|
|
intervals. |
|
|
|
|
|
|
Off |
DSL is deactivated. |
|
|
|
|
22
|
|
First steps |
|
|
|
|
|
LED |
State |
Status |
|
|
|
|
|
|
On |
One of the connected phones' receivers has been lifted for a |
|
|
|
call (fixed network telephony). |
|
Line |
|
|
|
Flashing |
The phone is ringing and a fixed network call is being |
||
|
|
received or someone is waiting on the line. |
|
|
|
|
|
|
Off |
There is currently no fixed network connection. |
|
|
|
|
|
Online |
On |
Connection to the Internet has been established. |
|
|
|
||
Off |
There is no Internet connection. |
||
|
|||
|
|
|
|
|
On (green) |
A device is connected to the Giga762SX WLAN dsl via the |
|
|
USB port. |
||
|
|
||
USB |
|
|
|
Flashing |
The device connected on the USB port is using too much |
||
|
power (see page 163). |
||
|
|
||
|
|
|
|
|
Off |
There is no device connected. |
|
|
|
|
|
LAN1 – |
On |
A device is connected to the relevant LAN port. |
|
|
|
||
Flashing |
The relevant LAN port is sending or receiving data (traffic). |
||
LAN4 |
|||
|
|
||
Off |
There is no device connected. |
||
|
|||
|
|
|
|
|
In normal operation |
||
|
|
|
|
|
On |
The radio interface is activated, no data transmission at |
|
|
|
present. |
|
|
|
|
|
|
Flashing |
The Giga762SX WLAN dsl is sending or receiving data on the |
|
|
|
radio interface. |
|
|
|
|
|
|
Off |
The radio interface is deactivated. |
|
|
|
|
|
|
During WPS |
registration |
|
WLAN |
|
|
|
On (300 sec) |
WPS registration was successful. |
||
|
|
|
|
|
Flashing |
WPS registration is in progress. |
|
|
slowly |
||
|
|
||
|
|
|
|
|
Flashing |
WPS registration was not successful. |
|
|
quickly |
||
|
|
||
|
|
|
|
|
Flashing |
|
|
|
quickly with |
More than one client tried to register. |
|
|
interruption |
|
|
|
|
|
|
|
On |
At least one port is configured for VoIP and VoIP access is |
|
|
|
registered with the provider. |
|
VoIP |
|
|
|
Flashing |
A call is currently being made via the Internet. |
||
|
|
|
|
|
Off |
There is currently no connection for Internet telephony or no |
|
|
|
VoIP port has been configured. |
|
|
|
|
|
23

First steps
LED |
State |
Status |
|
|
|
|
On |
The receiver of the phone connected to the port has been |
Phone 1/ |
|
lifted. |
|
|
|
Flashing |
The phone is ringing and a call is being received or a call is |
|
Phone 2 |
|
being conducted. |
|
|
|
|
|
|
|
Off |
No phone is connected or the connection is idle. |
|
|
|
The Giga762SX WLAN dsl can be set up in any suitable location in the home or office. You do not need any special wiring. However, you should comply with the following guidelines:
uOperate the Giga762SX WLAN dsl only indoors within a temperature range of 0 to +40 °C. Do not position the Giga762SX WLAN dsl near sources of heat. Do not cover the ventilation slots. High temperatures can damage the device.
uA mains socket for 220/230 V~ and a connection socket for the splitter or LAN must be available in the place where you set up the Giga762SX WLAN dsl.
uDo not position the device in the immediate vicinity of stereo equipment, TV sets, microwave ovens or the like. This may cause interference.
uPosition the Giga762SX WLAN dsl so that it is as near to the centre of your wireless network as possible. The general rule is: The higher you place the antennae, the better the performance. Make sure that the place where you position the Giga762SX WLAN dsl offers optimum reception throughout the house, apartment or office.
uPosition the Giga762SX WLAN dsl so that it cannot fall down and damage the antennae. Position the Giga762SX WLAN dsl on a non-slip surface.
uDo not place the Giga762SX WLAN dsl on any furniture surface that could be affected by the heat from the device.
uLay the cables so that nobody can trip over them. You should not cover the cables with anything.
Please remember:
Network connections (LAN) via cables and telephone lines may only be set up with the Giga762SX WLAN dsl within enclosed rooms.
24
First steps
Connecting and activating the Giga762SX WLAN dsl
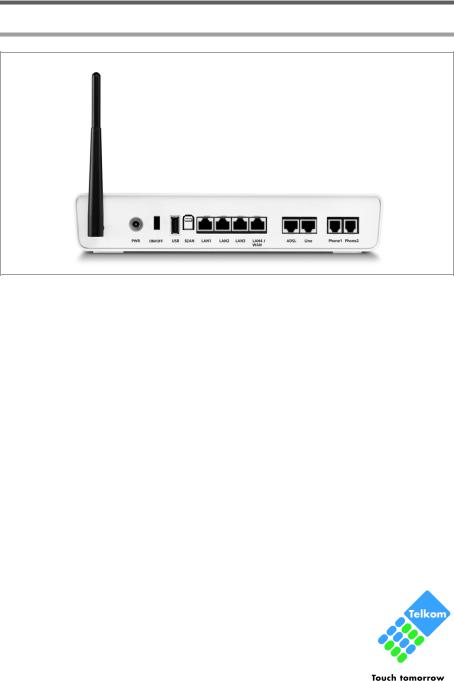
Ports on the rear panel
The rear panel of the Giga762SX WLAN dsl houses the ports.
Element |
Description |
|
|
PWR |
Socket for the mains adapter supplied |
|
Warning: Using the wrong power supply unit may damage the |
|
Giga762SX WLAN dsl. |
|
Depending on the device variant, there may be an on/off button |
|
beside the PWR port. |
|
|
Scan |
Button for WPS activation. You can use this button to quickly establish |
|
a secure wireless connection to PCs. The same function is provided via |
|
the device’s user interface (see page 87). |
|
Note: You can deactivate the Scan (registration) button to protect it |
|
against unauthorised access (see page 125). |
|
|
USB |
USB port for printer or USB memory. |
|
|
25
First steps
Element |
Description |
|
|
LAN1 – |
Four 10/100 Mbps switch ports with automatic recognition (RJ-45). |
LAN4/WAN |
You can connect up to four devices with Ethernet ports (such as PCs, a |
(yellow) |
Hub or Switch). |
|
You can connect an external modem (e.g. a VDSL or cable modem) to |
|
the LAN4 port. The integrated ADSL modem is then deactivated. You |
|
will find additional information on the configuration settings on |
|
page 62. |
|
|
ADSL |
DSL socket for connecting the integrated modem to the DSL port of the |
(black) |
splitter |
|
|
Line |
Socket for connecting the phone line to the telephone port on the |
(green) |
splitter |
|
|
Phone1/2 |
Sockets for connecting two phones, fax or answering machine |
|
|
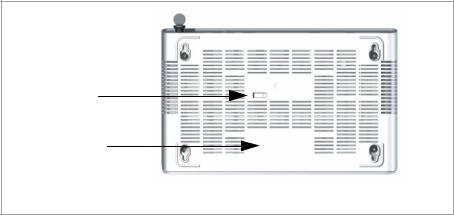
Reset button
The underside of the Giga762SX WLAN dsl houses the reset button.
Reset button
Label with WPA key „SX762xxxxxx“
Reboot function: Press and hold the right end of the button for more than 1 second but less than 5 seconds to reboot the device. This does not affect the configuration settings.
Reset function: Press and hold the right end of the button for at least 5 seconds to return all settings to factory settings.
Warning: This will clear all the configuration settings you have made since the initial startup.
Updated firmware will not be affected.
26
First steps
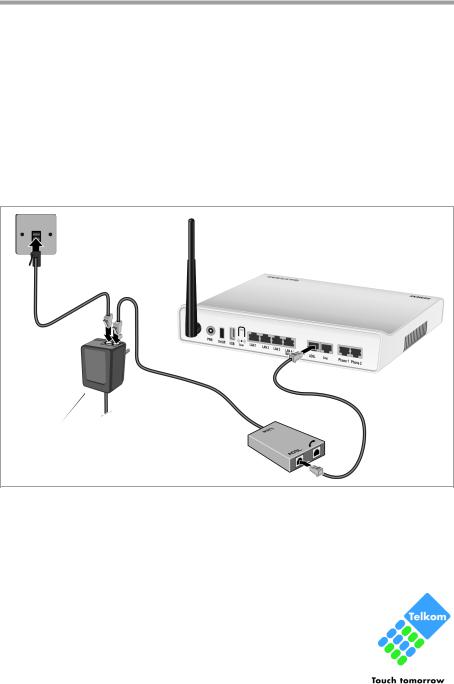
Connecting to the splitter data port
You can operate the Giga762SX WLAN dsl in two different operating modes in order to set up an Internet connection:
–with an integrated ADSL modem
–with an external modem, such as a VDSL or cable modem
Using the integrated ADSL modem
ìConnect the ADSL port (black) on the Giga762SX WLAN dsl to the ADSL socket on the splitter. To do this, use the DSL cable supplied (black).
ìConnect the splitter with one oft the RJ11 sockets on the top of the power supply.
ìConnect the other RJ11 socket on the top of the power supply with your phone connector. To do this, use the RJ11 cable supplied.
Power supply
Splitter |
|
|
|
DSL cable |
|
|
|||
|
|
|
|
|
|
|
|
|
(black) |
27

First steps
Using an external modem
ìConnect the LAN4/WAN port on the Giga762SX WLAN dsl with an external modem. To do this, use the cable supplied (black).
ìThen connect this modem to the relevant communications port (e.g. splitter).
Modem
Cable (black)
28

First steps
Connecting to the analogue phone port
To make conventional calls via the fixed network, you must connect your Giga762SX WLAN dsl with the phone port of the splitter.
ìConnect the Giga762SX WLAN dsl with the splitter as follows:
–Insert one plug of the telephone cable supplied (green) into the Line port (green) on the Giga762SX WLAN dsl.
–Plug the other connector on the telephone cable into the phone socket on the splitter.
Telephone cable
Splitter
29
First steps
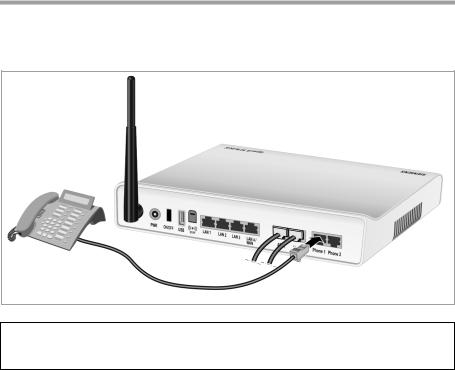
Connecting to the phone
ìConnect the Giga762SX WLAN dsl with the analogue phone as follows:
–Insert the plug of the telephone into the Phone 1 or Phone 2 port on the Giga762SX WLAN dsl.
Note:
In the event of power failure you cannot make a VoIP call. In this case all outgoing calls are directed to the PSTN line via the analog line.
30
First steps
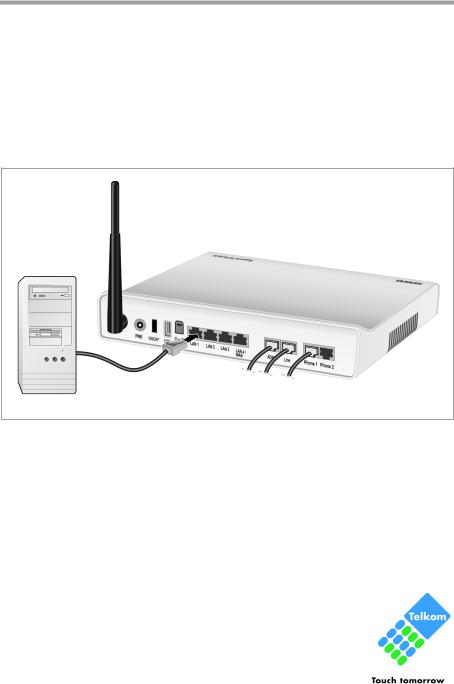
Connecting wired to the PC
You can connect wired or wireless PCs to your Giga762SX WLAN dsl to create a local area network (LAN). Wireless connection is possible after connecting the Giga762SX WLAN dsl to the power supply (see page 32).
First connect just one PC to the Giga762SX WLAN dsl, wired connection is recommended. You can then carry out the general configuration. (If you wish to connect more PCs, please turn to page 36.)
ìConnect one of the LAN ports (LAN1 – LAN4, yellow) on the Giga762SX WLAN dsl to the Ethernet network card in your PC. To do this, use the LAN cable supplied (CAT5, yellow).
 LAN cable (yellow)
31
First steps
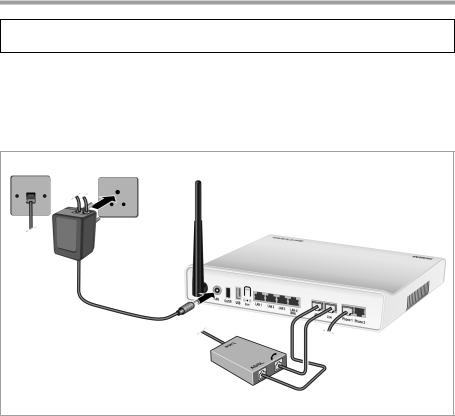
Connecting to the mains power supply
Please remember:
Only use the mains adapter supplied with the device (12V 1.5A DC).
ìConnect the mains adapter cable to the PWR socket on the Giga762SX WLAN dsl.
ìPlug the mains adapter into a mains socket.
ìIf your device has an on/off button, switch on the device.
The Giga762SX WLAN dsl is now switched on and ready for operation.
32
Loading...