


 Loading...
EN Dear Customer,
Gigaset Communications GmbH is the legal successor to Siemens Home and Office Communication Devices GmbH & Co. KG (SHC), which in turn continued the Gigaset business of Siemens AG. Any statements made by Siemens AG or SHC that are found in the user guides should therefore be understood as statements of Gigaset Communications GmbH.
We hope you enjoy your Gigaset.
DE Sehr geehrte Kundin, sehr geehrter Kunde,
die Gigaset Communications GmbH ist Rechtsnachfolgerin der Siemens Home and Office Communication Devices GmbH & Co. KG (SHC), die ihrerseits das Gigaset-Geschäft der Siemens AG fortführte. Etwaige Erklärungen der Siemens AG oder der SHC in den Bedienungsanleitungen sind daher als Erklärungen der Gigaset Communications GmbH zu verstehen.
Wir wünschen Ihnen viel Freude mit Ihrem Gigaset.
FR Chère Cliente, Cher Client,
la société Gigaset Communications GmbH succède en droit à Siemens Home and Office Communication Devices GmbH & Co. KG (SHC) qui poursuivait elle-même les activités Gigaset de Siemens AG. Donc les éventuelles explications de Siemens AG ou de SHC figurant dans les modes d’emploi doivent être comprises comme des explications de Gigaset Communications GmbH.
Nous vous souhaitons beaucoup d’agrément avec votre Gigaset.
IT Gentile cliente,
la Gigaset Communications GmbH è successore della Siemens Home and Office Communication Devices GmbH & Co. KG (SHC) che a sua volta ha proseguito l’attività della Siemens AG. Eventuali dichiarazioni della Siemens AG o della SHC nei manuali d’istruzione, vanno pertanto intese come dichiarazioni della Gigaset Communications GmbH.
Le auguriamo tanta soddisfazione con il vostro Gigaset.
NL Geachte klant,
Gigaset Communications GmbH is de rechtsopvolger van Siemens Home and Office Communication Devices GmbH & Co. KG (SHC), de onderneming die de Gigaset-activiteiten van Siemens AG heeft overgenomen. Eventuele uitspraken of mededelingen van Siemens AG of SHC in de gebruiksaanwijzingen dienen daarom als mededelingen van Gigaset Communications GmbH te worden gezien.
Wij wensen u veel plezier met uw Gigaset.
ES Estimado cliente,
la Gigaset Communications GmbH es derechohabiente de la Siemens Home and Office Communication Devices GmbH & Co. KG (SHC) que por su parte continuó el negocio Gigaset de la Siemens AG. Las posibles declaraciones de la Siemens AG o de la SHC en las instrucciones de uso se deben entender por lo tanto como declaraciones de la Gigaset Communications GmbH.
Le deseamos que disfrute con su Gigaset.
PT SCaros clientes,
Gigaset Communications GmbH é a sucessora legal da Siemens Home and Office Communication Devices GmbH & Co. KG (SHC), que, por sua vez, deu continuidade ao sector de negócios Gigaset, da Siemens AG. Quaisquer declarações por parte da Siemens AG ou da SHC encontradas nos manuais de utilização deverão, portanto, ser consideradas como declarações da Gigaset Communications GmbH.
Desejamos que tenham bons momentos com o seu Gigaset.
DA Kære Kunde,
Gigaset Communications GmbH er retlig efterfølger til Siemens Home and Office Communication Devices GmbH & Co. KG (SHC), som fra deres side videreførte Siemens AGs Gigaset-forretninger. Siemens AGs eller SHCs eventuelle forklaringer i betjeningsvejledningerne skal derfor forstås som Gigaset Communications GmbHs forklaringer.
Vi håber, du får meget glæde af din Gigaset.
FI Arvoisa asiakkaamme,
Gigaset Communications GmbH on Siemens Home and
Office Communication Devices GmbH & Co. KG (SHC)-yri- tyksen oikeudenomistaja, joka jatkoi puolestaan Siemens AG:n Gigaset-liiketoimintaa. Käyttöoppaissa mahdollisesti esiintyvät Siemens AG:n tai SHC:n selosteet on tämän vuoksi ymmärrettävä Gigaset Communications GmbH:n selosteina.
Toivotamme Teille paljon iloa Gigaset-laitteestanne.
SV Kära kund,
Gigaset Communications GmbH övertar rättigheterna från Siemens Home and Office Communication Devices GmbH & Co. KG (SHC), som bedrev Gigaset-verksamheten efter Siemens AG. Alla förklaringar från Siemens AG eller SHC i användarhandboken gäller därför som förklaringar från Gigaset Communications GmbH.
Vi önskar dig mycket nöje med din Gigaset.
NO Kjære kunde,
Gigaset Communications GmbH er rettslig etterfølger etter Siemens Home and Office Communication Devices GmbH & Co. KG (SHC), som i sin tur videreførte Gigaset-geskjeften i Siemens AG. Eventuelle meddelelser fra Siemens AG eller SHC i bruksanvisningene er derfor å forstå som meddelelser fra Gigaset Communications GmbH.
Vi håper du får stor glede av din Gigaset-enhet.
EL Αγαπητή πελάτισσα, αγαπητέ πελάτη,
η Gigaset Communications GmbH είναι η νομική διάδοχος της Siemens Home and Office Communication Devices GmbH & Co. KG (SHC), η οποία έχει αναλάβει την εμπορική δραστηριότητα Gigaset της Siemens AG. Οι δηλώσεις της Siemens AG ή της SHC στις οδηγίες χρήσης αποτελούν επομένως δηλώσεις της Gigaset Communications GmbH.
Σας ευχόμαστε καλή διασκέδαση με τη συσκευή σας Gigaset.
HR Poštovani korisnici,
Gigaset Communications GmbH pravni je sljednik tvrtke Siemens Home and Office Communication Devices GmbH & Co. KG (SHC), koji je nastavio Gigaset poslovanje tvrtke Siemens AG. Zato sve izjave tvrtke Siemens AG ili SHC koje se nalaze u uputama za upotrebu treba tumačiti kao izjave tvrtke Gigaset Communications GmbH.
Nadamo se da sa zadovoljstvom koristite svoj Gigaset uređaj.
SL Spoštovani kupec!
Podjetje Gigaset Communications GmbH je pravni naslednik podjetja Siemens Home and Office Communication Devices GmbH & Co. KG (SHC), ki nadaljuje dejavnost znamke Gigaset podjetja Siemens AG. Vse izjave podjetja Siemens AG ali SHC v priročnikih za uporabnike torej veljajo kot izjave podjetja Gigaset Communications GmbH.
Želimo vam veliko užitkov ob uporabi naprave Gigaset.
Issued by
Gigaset Communications GmbH Schlavenhorst 66, D-46395 Bocholt
Gigaset Communications GmbH is a trademark licensee of Siemens AG
© Gigaset Communications GmbH 2008 All rights reserved.
Subject to availability. Rights of modifications reserved.
www.gigaset.com

CS Vážení zákazníci,
společnost Gigaset Communications GmbH je právním nástupcem společnosti Siemens Home and Office Communication Devices GmbH & Co. KG (SHC), která dále přejala segment produktůGigaset společnosti Siemens AG. Jakékoli prohlášení společnosti Siemens AG nebo SHC, které naleznete v uživatelských příručkách, je třeba považovat za prohlášení společnosti Gigaset Communications GmbH.
Doufáme, že jste s produkty Gigaset spokojeni.
SK Vážený zákazník,
Spoločnosť Gigaset Communications GmbH je právnym nástupcom spoločnosti Siemens Home and Office Communication Devices GmbH & Co. KG (SHC), ktorá zasa pokračovala v činnosti divízie Gigaset spoločnosti Siemens AG. Z tohto dôvodu je potrebné všetky vyhlásenia spoločnosti Siemens AG alebo SHC, ktoré sa nachádzajú v používateľských príručkách, chápať ako vyhlásenia spoločnosti Gigaset Communications GmbH.
Veríme, že budete so zariadením Gigaset spokojní.
RO Stimate client,
Gigaset Communications GmbH este succesorul legal al companiei Siemens Home and Office Communication Devices GmbH & Co. KG (SHC), care, la rândul său, a continuat activitatea companiei Gigaset a Siemens AG. Orice afirmaţii efectuate de Siemens AG sau SHC şi incluse în ghidurile de utilizare vor fi, prin urmare, considerate a aparţine Gigaset Communications GmbH.
Sperăm ca produsele Gigaset să fie la înălţimea dorinţelor dvs.
SR Poštovani potrošaču,
Gigaset Communications GmbH je pravni naslednik kompanije Siemens Home and Office Communication Devices GmbH & Co. KG (SHC), kroz koju je nastavljeno poslovanje kompanije Gigaset kao dela Siemens AG. Stoga sve izjave od strane Siemens AG ili SHC koje se mogu naći u korisničkim uputstvima treba tumačiti kao izjave kompanije Gigaset Communications GmbH.
Nadamo se da ćete uživati u korišćenju svog Gigaset uređaja.
BG Уважаеми потребители,
Gigaset Communications GmbH е правоприемникът на Siemens Home and Office Communication Devices GmbH & Co. KG (SHC), коятонасвойредпродължибизнесана подразделението Siemens AG. По тази причина всякакви изложения, направени от Siemens AG или SHC, които се намират в ръководствата за потребителя, следва да се разбират като изложения на
Gigaset Communications GmbH.
Надяваме се да ползвате с удоволствие вашия Gigaset.
HU Tisztelt Vásárló!
A Siemens Home and Communication Devices GmbH & Co. KG (SHC) törvényes jogutódja a Gigaset Communications GmbH, amely a Siemens AG Gigaset üzletágának utódja. Ebből következően a Siemens AG vagy az SHC felhasználói kézikönyveiben található bármely kijelentést a Gigaset Communications GmbH kijelentésének kell tekinteni.
Reméljük, megelégedéssel használja Gigaset készülékét.
Issued by
Gigaset Communications GmbH Schlavenhorst 66, D-46395 Bocholt
Gigaset Communications GmbH is a trademark licensee of Siemens AG
PL Szanowny Kliencie,
Firma Gigaset Communications GmbH jest spadkobiercą prawnym firmy Siemens Home and Office Communication Devices GmbH & Co. KG (SHC), która z kolei przejęła segment produktów Gigaset od firmy Siemens AG. Wszelkie oświadczenia firm Siemens AG i SHC, które można znaleźć w instrukcjach obsługi, należy traktowaćjako oświadczenia firmy Gigaset Communications GmbH.
Życzymy wiele przyjemności z korzystania z produktów Gigaset.
TR Sayın Müşterimiz,
Gigaset Communications GmbH, Siemens AG'nin Gigaset işletmesini yürüten Siemens Home and Office Communication Devices GmbH & Co. KG (SHC)'nin yasal halefidir. Kullanma kılavuzlarında bulunan ve Siemens AG veya SHC tarafından yapılan bildiriler Gigaset Communications GmbH tarafından yapılmışbildiriler olarak algılanmalıdır.
Gigaset'ten memnun kalmanızı ümit ediyoruz.
RU Уважаемыи покупатель!
Компания Gigaset Communications GmbH является правопреемником компании Siemens Home and Office Communication Devices GmbH & Co. KG (SHC), которая,
в свою очередь, приняла подразделение Gigaset всвое управление от компании Siemens AG. Поэтому любые заявления, сделанные от имени компании Siemens AG или SHC и встречающиеся в руководствах пользователя, должны восприниматься как заявления компании Gigaset Communications GmbH.
Мы надеемся, что продукты Gigaset удовлетворяют вашим требованиям.
© Gigaset Communications GmbH 2008 All rights reserved.
Subject to availability. Rights of modifications reserved.
www.gigaset.com

First steps
II
Contents
Contents
Safety precautions . . . . . . . . . . . . . . . . . . . . . . . . . . . 5
The Gigaset SE555 WLAN dsl . . . . . . . . . . . . . . . . . . 6
Local area networks with Gigaset products . . . . . . . . . . . . . . . . . . . . . . . . . . . . . . . . . . 7 Wired local area network (Ethernet) . . . . . . . . . . . . . . . . . . . . . . . . . . . . . . . . . . . . 8 Wireless local area network (WLAN) . . . . . . . . . . . . . . . . . . . . . . . . . . . . . . . . . . . . 9 Linking a wireless local area network (WLAN) to an Ethernet (LAN) . . . . . . . . . . 11 Extending the wireless network coverage with a repeater . . . . . . . . . . . . . . . . . . 12
Features and applications . . . . . . . . . . . . . . . . . . . . . . . . . . . . . . . . . . . . . . . . . . . . . . 13
First steps . . . . . . . . . . . . . . . . . . . . . . . . . . . . . . . . . |
15 |
Contents . . . . . . . . . . . . . . . . . . . . . . . . . . . . . . . . . . . . . . . . . . . . . . . . . . . . . . . . . . . |
. 15 |
System requirements . . . . . . . . . . . . . . . . . . . . . . . . . . . . . . . . . . . . . . . . . . . . . . . . . |
. 15 |
Overview of the installation steps . . . . . . . . . . . . . . . . . . . . . . . . . . . . . . . . . . . . . . . . |
16 |
Setting up the Gigaset SE555 WLAN dsl . . . . . . . . . . . . . . . . . . . . . . . . . . . . . . . . . . . |
17 |
Connecting and activating the Gigaset SE555 WLAN dsl . . . . . . . . . . . . . . . . . . . . . . |
18 |
Ports on the rear panel . . . . . . . . . . . . . . . . . . . . . . . . . . . . . . . . . . . . . . . . . . . . . |
18 |
Connecting to the splitter data port . . . . . . . . . . . . . . . . . . . . . . . . . . . . . . . . . . . |
19 |
Connecting to the PC . . . . . . . . . . . . . . . . . . . . . . . . . . . . . . . . . . . . . . . . . . . . . . . |
19 |
Connecting to the mains power supply . . . . . . . . . . . . . . . . . . . . . . . . . . . . . . . . . |
21 |
Switching on . . . . . . . . . . . . . . . . . . . . . . . . . . . . . . . . . . . . . . . . . . . . . . . . . . . . . |
21 |
Checking the operating state . . . . . . . . . . . . . . . . . . . . . . . . . . . . . . . . . . . . . . . . . |
22 |
Network configuration of the PCs . . . . . . . . . . . . . . . . . . . . . . . . . . . . . . . . . . . . . . . . |
23 |
Making the basic settings . . . . . . . . . . . . . . . . . . . . . . . . . . . . . . . . . . . . . . . . . . . . . . |
23 |
Connecting and configuring additional PCs (optional) . . . . . . . . . . . . . . . . . . . . . . . . |
23 |
The user interface . . . . . . . . . . . . . . . . . . . . . . . . . . 24
Launching the user interface . . . . . . . . . . . . . . . . . . . . . . . . . . . . . . . . . . . . . . . . . . . . 24 The start screen . . . . . . . . . . . . . . . . . . . . . . . . . . . . . . . . . . . . . . . . . . . . . . . . . . . . . . 25 Selecting a language . . . . . . . . . . . . . . . . . . . . . . . . . . . . . . . . . . . . . . . . . . . . . . . . . . 27 Connecting to the Internet manually . . . . . . . . . . . . . . . . . . . . . . . . . . . . . . . . . . . . . 28 Elements on the user interface . . . . . . . . . . . . . . . . . . . . . . . . . . . . . . . . . . . . . . . . . . 29
Basic Setup Wizard . . . . . . . . . . . . . . . . . . . . . . . . . . 30
Regional Options . . . . . . . . . . . . . . . . . . . . . . . . . . . . . . . . . . . . . . . . . . . . . . . . . . . . . 31 Configuring Internet connections . . . . . . . . . . . . . . . . . . . . . . . . . . . . . . . . . . . . . . . . 32 Summary . . . . . . . . . . . . . . . . . . . . . . . . . . . . . . . . . . . . . . . . . . . . . . . . . . . . . . . . . . . 34
1
Contents
Security Setup Wizard . . . . . . . . . . . . . . . . . . . . . . . 35
Assigning a password . . . . . . . . . . . . . . . . . . . . . . . . . . . . . . . . . . . . . . . . . . . . . . . . |
. 36 |
SSID . . . . . . . . . . . . . . . . . . . . . . . . . . . . . . . . . . . . . . . . . . . . . . . . . . . . . . . . . . . . . . |
. 37 |
Setting up security functions for the wireless network . . . . . . . . . . . . . . . . . . . . . . . |
. 38 |
WPA2/WPA with pre-shared key (PSK) . . . . . . . . . . . . . . . . . . . . . . . . . . . . . . . . . |
. 39 |
WEP encryption . . . . . . . . . . . . . . . . . . . . . . . . . . . . . . . . . . . . . . . . . . . . . . . . . . . |
40 |
Access control within the wireless network . . . . . . . . . . . . . . . . . . . . . . . . . . . . . . . . |
42 |
Saving settings . . . . . . . . . . . . . . . . . . . . . . . . . . . . . . . . . . . . . . . . . . . . . . . . . . . . . . . |
43 |
Configuring Advanced Settings . . . . . . . . . . . . . . . |
44 |
Internet . . . . . . . . . . . . . . . . . . . . . . . . . . . . . . . . . . . . . . . . . . . . . . . . . . . . . . . . . . . . |
45 |
Internet selection . . . . . . . . . . . . . . . . . . . . . . . . . . . . . . . . . . . . . . . . . . . . . . . . . . |
46 |
Internet Connection . . . . . . . . . . . . . . . . . . . . . . . . . . . . . . . . . . . . . . . . . . . . . . . . |
47 |
DNS server . . . . . . . . . . . . . . . . . . . . . . . . . . . . . . . . . . . . . . . . . . . . . . . . . . . . . . . |
50 |
MAC Address . . . . . . . . . . . . . . . . . . . . . . . . . . . . . . . . . . . . . . . . . . . . . . . . . . . . . |
51 |
Traffic Control . . . . . . . . . . . . . . . . . . . . . . . . . . . . . . . . . . . . . . . . . . . . . . . . . . . . |
52 |
Firewall . . . . . . . . . . . . . . . . . . . . . . . . . . . . . . . . . . . . . . . . . . . . . . . . . . . . . . . . . . . . . |
54 |
Attack Detection . . . . . . . . . . . . . . . . . . . . . . . . . . . . . . . . . . . . . . . . . . . . . . . . . . . |
55 |
Setting up access control to the Internet . . . . . . . . . . . . . . . . . . . . . . . . . . . . . . . . |
58 |
Setting up the NAT function . . . . . . . . . . . . . . . . . . . . . . . . . . . . . . . . . . . . . . . . . . . . |
62 |
Port Triggering . . . . . . . . . . . . . . . . . . . . . . . . . . . . . . . . . . . . . . . . . . . . . . . . . . . . |
64 |
Port Forwarding . . . . . . . . . . . . . . . . . . . . . . . . . . . . . . . . . . . . . . . . . . . . . . . . . . . |
65 |
Opening the firewall for selected PCs (Exposed Host) . . . . . . . . . . . . . . . . . . . . . |
67 |
Dynamic DNS . . . . . . . . . . . . . . . . . . . . . . . . . . . . . . . . . . . . . . . . . . . . . . . . . . . . . |
68 |
QoS (Quality of Service) . . . . . . . . . . . . . . . . . . . . . . . . . . . . . . . . . . . . . . . . . . . . |
69 |
LAN configuration . . . . . . . . . . . . . . . . . . . . . . . . . . . . . . . . . . . . . . . . . . . . . . . . . . . . |
70 |
Assigning static IP addresses to individual PCs . . . . . . . . . . . . . . . . . . . . . . . . . . . |
72 |
Configuring wireless connections . . . . . . . . . . . . . . . . . . . . . . . . . . . . . . . . . . . . . . . . |
73 |
Setting up wireless security . . . . . . . . . . . . . . . . . . . . . . . . . . . . . . . . . . . . . . . . . . |
76 |
WPA2-PSK and WPA2-PSK / WPA-PSK . . . . . . . . . . . . . . . . . . . . . . . . . . . . . . . . . . . |
77 |
WEP encryption . . . . . . . . . . . . . . . . . . . . . . . . . . . . . . . . . . . . . . . . . . . . . . . . . . . |
79 |
Allowed clients . . . . . . . . . . . . . . . . . . . . . . . . . . . . . . . . . . . . . . . . . . . . . . . . . . . . |
81 |
Repeater function (WDS) . . . . . . . . . . . . . . . . . . . . . . . . . . . . . . . . . . . . . . . . . . . . |
83 |
USB . . . . . . . . . . . . . . . . . . . . . . . . . . . . . . . . . . . . . . . . . . . . . . . . . . . . . . . . . . . . . . . . |
84 |
File Server . . . . . . . . . . . . . . . . . . . . . . . . . . . . . . . . . . . . . . . . . . . . . . . . . . . . . . . |
85 |
Web Server . . . . . . . . . . . . . . . . . . . . . . . . . . . . . . . . . . . . . . . . . . . . . . . . . . . . . . . |
88 |
Print Server . . . . . . . . . . . . . . . . . . . . . . . . . . . . . . . . . . . . . . . . . . . . . . . . . . . . . . . |
91 |
Administration . . . . . . . . . . . . . . . . . . . . . . . . . . . . . 92
Regional Options . . . . . . . . . . . . . . . . . . . . . . . . . . . . . . . . . . . . . . . . . . . . . . . . . . . . . 92 Internet Time . . . . . . . . . . . . . . . . . . . . . . . . . . . . . . . . . . . . . . . . . . . . . . . . . . . . . 93 System Password . . . . . . . . . . . . . . . . . . . . . . . . . . . . . . . . . . . . . . . . . . . . . . . . . . . . . 93 Setting up Remote Management . . . . . . . . . . . . . . . . . . . . . . . . . . . . . . . . . . . . . . . . . 95 Backing up and restoring a configuration . . . . . . . . . . . . . . . . . . . . . . . . . . . . . . . . . . 96 Backing up configuration data . . . . . . . . . . . . . . . . . . . . . . . . . . . . . . . . . . . . . . . . 97 Restoring the saved data . . . . . . . . . . . . . . . . . . . . . . . . . . . . . . . . . . . . . . . . . . . . 97 Restoring factory settings . . . . . . . . . . . . . . . . . . . . . . . . . . . . . . . . . . . . . . . . . . . 97
2
Contents
Reboot . . . . . . . . . . . . . . . . . . . . . . . . . . . . . . . . . . . . . . . . . . . . . . . . . . . . . . . . . . . . . 97 Updating firmware . . . . . . . . . . . . . . . . . . . . . . . . . . . . . . . . . . . . . . . . . . . . . . . . . . . . 98 System Log . . . . . . . . . . . . . . . . . . . . . . . . . . . . . . . . . . . . . . . . . . . . . . . . . . . . . . . . . . 99
Status information . . . . . . . . . . . . . . . . . . . . . . . . . 100
Overview . . . . . . . . . . . . . . . . . . . . . . . . . . . . . . . . . . . . . . . . . . . . . . . . . . . . . . . . . . 100 Security . . . . . . . . . . . . . . . . . . . . . . . . . . . . . . . . . . . . . . . . . . . . . . . . . . . . . . . . . . . 102 Internet . . . . . . . . . . . . . . . . . . . . . . . . . . . . . . . . . . . . . . . . . . . . . . . . . . . . . . . . . . . 104 Traffic Control . . . . . . . . . . . . . . . . . . . . . . . . . . . . . . . . . . . . . . . . . . . . . . . . . . . . . . 106 Local Network . . . . . . . . . . . . . . . . . . . . . . . . . . . . . . . . . . . . . . . . . . . . . . . . . . . . . . 107 Wireless Network . . . . . . . . . . . . . . . . . . . . . . . . . . . . . . . . . . . . . . . . . . . . . . . . . . . . 108 Device . . . . . . . . . . . . . . . . . . . . . . . . . . . . . . . . . . . . . . . . . . . . . . . . . . . . . . . . . . . . . 109
Configuring the local network . . . . . . . . . . . . . . . 111
Network configuration with Windows XP . . . . . . . . . . . . . . . . . . . . . . . . . . . . . . . . . 111 Configuring the network . . . . . . . . . . . . . . . . . . . . . . . . . . . . . . . . . . . . . . . . . . . 112 Selecting a computer name and workgroup . . . . . . . . . . . . . . . . . . . . . . . . . . . . 114 Checking the network settings and completing the installation procedure . . . . 114 TCP/IP settings . . . . . . . . . . . . . . . . . . . . . . . . . . . . . . . . . . . . . . . . . . . . . . . . . . . 115 Deactivating the HTTP proxy . . . . . . . . . . . . . . . . . . . . . . . . . . . . . . . . . . . . . . . . 118 Configuring a popup blocker . . . . . . . . . . . . . . . . . . . . . . . . . . . . . . . . . . . . . . . . 118 Synchronising TCP/IP settings with the Gigaset SE555 WLAN dsl . . . . . . . . . . . . 119
Network configuration with Windows 2000 . . . . . . . . . . . . . . . . . . . . . . . . . . . . . . . 120 Installing network services . . . . . . . . . . . . . . . . . . . . . . . . . . . . . . . . . . . . . . . . . 120 Selecting a computer name and workgroup . . . . . . . . . . . . . . . . . . . . . . . . . . . . 121 Installing the TCP/IP protocol . . . . . . . . . . . . . . . . . . . . . . . . . . . . . . . . . . . . . . . . 122 TCP/IP settings . . . . . . . . . . . . . . . . . . . . . . . . . . . . . . . . . . . . . . . . . . . . . . . . . . . 124 Deactivating the HTTP proxy . . . . . . . . . . . . . . . . . . . . . . . . . . . . . . . . . . . . . . . . 126 Deactivating the popup blocker . . . . . . . . . . . . . . . . . . . . . . . . . . . . . . . . . . . . . . 126 Synchronising the TCP/IP settings with the Gigaset SE555 WLAN dsl . . . . . . . . . 127
Network configuration for Windows 98, 98 SE, ME . . . . . . . . . . . . . . . . . . . . . . . . . 128 Setting up a PC as the client for Microsoft networks . . . . . . . . . . . . . . . . . . . . . 128 Selecting a computer name and workgroup . . . . . . . . . . . . . . . . . . . . . . . . . . . . 129 Installing the TCP/IP protocol . . . . . . . . . . . . . . . . . . . . . . . . . . . . . . . . . . . . . . . . 130 Making TCP/IP settings . . . . . . . . . . . . . . . . . . . . . . . . . . . . . . . . . . . . . . . . . . . . . 131 Deactivating the HTTP proxy . . . . . . . . . . . . . . . . . . . . . . . . . . . . . . . . . . . . . . . . 135 Deactivating the popup blocker . . . . . . . . . . . . . . . . . . . . . . . . . . . . . . . . . . . . . . 135 Synchronising the TCP/IP settings with the Gigaset SE555 WLAN dsl . . . . . . . . . 136
Checking the connection to the Gigaset SE555 WLAN dsl . . . . . . . . . . . . . . . . . . . . 137
Installing the printer port for network printers . 138
Introduction . . . . . . . . . . . . . . . . . . . . . . . . . . . . . . . . . . . . . . . . . . . . . . . . . . . . . . . . |
138 |
Installing a standard TCP/IP printer port under Windows XP/2000 . . . . . . . . . . . . . . |
139 |
Installing a printer on the TCP/IP port retrospectively . . . . . . . . . . . . . . . . . . . . . . . . |
145 |
Installing a printer driver under Windows 98 SE or ME . . . . . . . . . . . . . . . . . . . . . . . |
146 |
Instructions for setting up a printer on the PC . . . . . . . . . . . . . . . . . . . . . . . . . . . . . |
147 |
3
Contents
Appendix . . . . . . . . . . . . . . . . . . . . . . . . . . . . . . . . . 148
Troubleshooting . . . . . . . . . . . . . . . . . . . . . . . . . . . . . . . . . . . . . . . . . . . . . . . . . . . . . 148 Specifications . . . . . . . . . . . . . . . . . . . . . . . . . . . . . . . . . . . . . . . . . . . . . . . . . . . . . . . 151 Authorisation . . . . . . . . . . . . . . . . . . . . . . . . . . . . . . . . . . . . . . . . . . . . . . . . . . . . . . . 152 Disposal . . . . . . . . . . . . . . . . . . . . . . . . . . . . . . . . . . . . . . . . . . . . . . . . . . . . . . . . . . . 152 Service (Customer Care) . . . . . . . . . . . . . . . . . . . . . . . . . . . . . . . . . . . . . . . . . . . . . . 153 Guarantee Certificate United Kingdom . . . . . . . . . . . . . . . . . . . . . . . . . . . . . . . . . . . 154 Guarantee certificate Ireland . . . . . . . . . . . . . . . . . . . . . . . . . . . . . . . . . . . . . . . . . . . 154
Glossary . . . . . . . . . . . . . . . . . . . . . . . . . . . . . . . . . 156 Index . . . . . . . . . . . . . . . . . . . . . . . . . . . . . . . . . . . . 168
4
Safety precautions
Safety precautions
uOnly use the router with the mains adapter that is supplied.
When connecting the router to the mains, make sure that the connection values are not exceeded.
u Protect the equipment from moisture.
uNever open the router. For reasons of electrical safety, the router may only be opened by authorised service staff.
uThe router may affect medical equipment. Be aware of the conditions of your environment.
uMake sure you include these operating instructions when you pass on your router to someone else.
5

The Gigaset SE555 WLAN dsl
The Gigaset SE555 WLAN dsl
The Siemens Gigaset SE555 WLAN dsl is a powerful but simple communications device for connecting your PC or local area network (LAN) to the Internet (via DSL). It contains an integrated ADSL modem enabling you to access the Internet easily.
You can connect your PC wirelessly to the Gigaset SE555 WLAN dsl and create a wireless local area network (WLAN). The device supports Super G technology making this possible. The transmission rate in the wireless local area network can be increased to 108 Mbps thanks to channel bundling. For network security, wireless transmission can be encrypted using the WPA standard or 64-/128-bit WEP.
The Gigaset SE555 WLAN dsl allows several users to access the Internet simultaneously. A single user account can be shared if your Internet service provider permits this.
The Gigaset SE555 WLAN dsl has an extensive range of functions but remains simple to handle. It can be configured and operational within a few minutes.
6
The Gigaset SE555 WLAN dsl
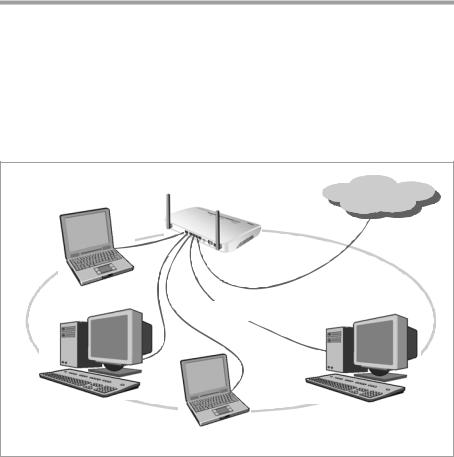
Local area networks with Gigaset products
You can use the Siemens Gigaset SE555 WLAN dsl to set up a local area network, for example a home network. All PCs in this network can communicate with each other and have access to the Internet.
Gigaset SE555 WLAN dsl |
Internet |
Windows ME
Windows 2000
Local area network
|
|
|
|
|
Windows XP |
|
|
|
|
|
Windows 98 SE |
|||
There are various ways in which you can set up the network using a Gigaset SE555 WLAN dsl. You can
uset up a wired local area network (Ethernet) and allow the connected PCs access to the Internet (see page 8).
uset up a wireless local area network (WLAN) and allow the connected PCs access to the Internet (see page 9).
uset up a local area network comprising wireless and wired network components (see page 11).
7
The Gigaset SE555 WLAN dsl
Wired local area network (Ethernet)
In a wired local area network, PCs communicate with one another via an Ethernet cable. When the Siemens Gigaset SE555 WLAN dsl is used, it establishes the connection between the PCs. For this it has four Ethernet LAN ports for connecting four PCs. The PCs have to be equipped with a network port (Ethernet). New PCs frequently already have this port. For older PCs you need to install an Ethernet network card. The PC and the Ethernet LAN port on the Gigaset SE555 WLAN dsl are connected using an Ethernet cable (CAT5). There is one supplied. You can obtain additional Ethernet cables from your retailer.
The Gigaset SE555 WLAN dsl allows all PCs to access the Internet simultaneously.
Internet |
Ethernet |
8

The Gigaset SE555 WLAN dsl
Wireless local area network (WLAN)
In a wireless local area network (WLAN) PCs are linked without wires or cables. The PCs have to be equipped with a wireless local area network adapter (WLAN adapter), for example a Gigaset PC Card 108.
We generally differentiate between two types of wireless network: u Infrastructure mode
u Ad-hoc mode
Infrastructure mode
Infrastructure mode connects wireless and wired networks with one another. In addition to the mobile stations, infrastructure mode needs an access point such as the Gigaset SE555 WLAN dsl. In infrastructure mode, the stations in the network always communicate via this access point. The access point sets up the wireless network on a permanent basis. Each station that wants to be part of the wireless network must first register with the access point before it can exchange data. The range of the wireless network can be increased by using an access point.
The access point establishes the connection between the mobile stations of a wireless network and a wired LAN (Ethernet) or the Internet. In this case this is described as the device's router functionality. The router sends data packets that are not addressed to stations within the network "outside" and forwards data packets originating from "outside" to the appropriate station within the network.
You can use the Gigaset SE555 WLAN dsl to connect u wirelessly networked PCs to the Internet and
u wirelessly networked PCs to an Ethernet network.
Infrastructure mode is the default configuration for the Gigaset SE555 WLAN dsl. This configuration is described in the quick guide enclosed with the router.
Ad-hoc mode
An ad-hoc network is a wireless network that has been configured without an access point or a router. The mobile network components that communicate with each other directly and wirelessly form the network on an "ad-hoc" basis, i.e. as and when required. All the stations in the network have the same rights. Ad-hoc networks are used wherever communications networks have to be set up quickly and there is no existing network infrastructure, and where the participants are on the move.
9

The Gigaset SE555 WLAN dsl
Linking wireless networks with the Internet
The Gigaset SE555 WLAN dsl has an ADSL interface that permits all stations within its local area network to access the Internet simultaneously. To be able to use this functionality you need a DSL connection obtainable from an Internet service provider. Find out whether your service provider supports parallel access by several PCs.
(((
(((
((( ))) ((( ))) 
 Internet


(((
(((
10

The Gigaset SE555 WLAN dsl
Linking a wireless local area network (WLAN) to an Ethernet (LAN)
Wireless local area networks can work easily together with existing Ethernet networks. If you wish to connect mobile stations to an existing wired network, you must group together all mobile stations into a wireless local area network in infrastructure mode.
(((
(((
((( |
((( |
|
Wireless local area network (WLAN)
((( ))) ((( ))) Access point
Ethernet
The Gigaset SE555 WLAN dsl has four Ethernet interfaces (LAN ports). Up to four PCs can be connected directly to these LAN ports.
All PCs can access the Internet via the Gigaset SE555 WLAN dsl.
Please remember:
You can also connect an Ethernet router to a LAN port to access a larger Ethernet. If you want to link the Gigaset WLAN network to an existing network, a large number of settings have to be applied. Therefore we cannot provide a general example for this use; the configuration depends greatly on the networks in question. We advise having the configuration of such a network carried out by a specialist.
11
The Gigaset SE555 WLAN dsl
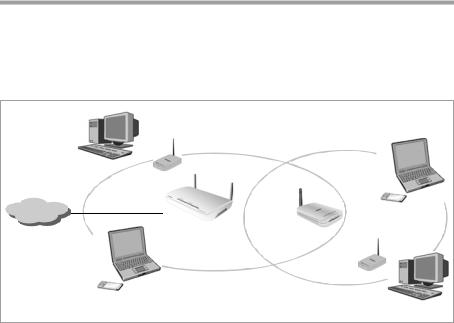
Extending the wireless network coverage with a repeater
Using a repeater, for example the Gigaset WLAN Repeater, you can extend your wireless network's coverage. Set it up within the range of your network. The repeater will now transmit data traffic into its own wireless area. This technology allows you to set up wireless networks that cover a much larger area than is possible with a single Gigaset SE555 WLAN dsl.
(((
)))
Internet
)))
))) |
|
))) |
((( |
|
|
|
|
|
))) |
|
|
|
|
||
|
|
|
|
|
|
|
|
Gigaset WLAN Repeater |
|
|
|
|
|
||
((( |
|
|
|
|
|||
|
|
|
|
|
|
|
|
|
|
|
|
|
|
|
|
|
|
|
|
|
|
|
|
PCs to be connected in a wireless local area network via a repeater must be equipped with a wireless network adapter or a USB adapter.
12

The Gigaset SE555 WLAN dsl
Features and applications
The Gigaset SE555 WLAN dsl's wide range of features makes it ideal for a large number of applications, such as:
uInternet access
The Gigaset SE555 WLAN dsl allows several users to have Internet access via the integrated ADSL modem.
–Since many DSL providers permit communication with end users via the PPPoE protocol, the Gigaset SE555 WLAN dsl has an integrated Client for this protocol, so you no longer have to install this service on your PC.
–If your Internet service provider permits this, the Gigaset SE555 WLAN dsl supports shared Internet access for up to 252 users. This means several users in your network can surf the Internet at the same time, all using the same Internet account.
uSetting up a local area network
The Gigaset SE555 WLAN dsl offers the following possibilities:
–Four devices connected via Ethernet ports with a transmission speed of 10 or 100 Mbps (with automatic recognition).
–Up to 252 mobile terminals connected via a radio interface with a transmission speed of up to 108 Mbps. It complies with IEEE 802.11g standard and can work with all products that satisfy Standard IEEE 802.11b or 802.11g. The Super G technology allows for high transmission speed.
–Using a Gigaset SE555 WLAN dsl makes it easy to set up a network at home or in small offices. For example, users can exchange data or share resources in the network, such as a file server or printer. You can connect a USB hard disk or a printer to the USB interface of the Gigaset SE555 WLAN dsl and make them available to all users in your network.
The Gigaset SE555 WLAN dsl supports DHCP for dynamic IP configuration of the local area network, and DNS for domain name mapping.
13
The Gigaset SE555 WLAN dsl
uSecurity functions
The Gigaset SE555 WLAN dsl offers comprehensive security measures:
–Firewall protection against unauthorised access from the Internet
All PCs in the local area network use the Public IP address of the Gigaset SE555 WLAN dsl for their Internet connections, which makes them 'invisible' on the Internet. The Gigaset SE555 WLAN dsl only allows access from the Internet if it has been requested from the local area network.
With the firewall the Gigaset SE555 WLAN dsl also offers comprehensive protection against hacker attacks.
–Service filtering and URL blocking
The Gigaset SE555 WLAN dsl can filter Internet access. Here you determine which PCs may access which Internet services.
In addition, you can deactivate access to certain Internet domains and sites (URL blocking).
–Access control and encryption for the local area network
You can use various encryption methods and authentication methods (WEP, WPA/ WPA2, 802.1x MAC access control) to prevent unauthorised access to your wireless LAN or make data illegible to unauthorised parties.
uOffering your own services on the Internet
–If you want to offer your own services on the Internet, you can set up the Gigaset SE555 WLAN dsl as a virtual server without permitting further access to the local area network.
–Static IP address
This allows you to release a PC in your local area network for unlimited access from the Internet. Please note that in this case your local area network will no longer be adequately protected against Internet attacks.
–You can use the Gigaset SE555 WLAN dsl to easily set up an FTP server and/or HTTP server for access from the Internet.
14
First steps
First steps
Contents
The package contains the following components: u 1 Gigaset SE555 WLAN dsl,
u 1 mains adapter (220 V/12V 1.2A DC), u 2 CAT5 cables (grey),
u1 CD with this User Guide and the driver software for operating a network printer on the Gigaset SE555 WLAN dsl via Windows 98 SE/ME,
u 1 supplementary sheet with information about security and disposing of the device.
System requirements
To operate your Gigaset SE555 WLAN dsl you need
uA PC with
–an 802.11g or 802.11b compatible wireless Network adapter.
Owing to the superior range and the high data throughput from the Super G technology, we recommend you use the Gigaset PC Card 108 or the Gigaset USB Adapter 108.
Note:
An 802.11b-compatible network adapter has a maximum transmission speed of 11 Mbps. An 802.11g-compatible network adapter has a maximum transmission speed of 54 Mbps. A network adapter that supports Super G has a maximum transmission speed of 108 Mbps.
or
– an Ethernet port (10Base-T or 100Base-TX)
uA Web browser such as Microsoft Internet Explorer V 6.0 or higher and Mozilla Firefox V 1.0 or higher for configuring your Gigaset SE555 WLAN dsl.
uFor Internet access:
–a DSL port (splitter),
–the access data for your Internet service provider.
15

First steps
For experienced users
The default settings for the Gigaset SE555 WLAN dsl are:
–IP address: 192.168.2.1
–Subnet mask: 255.255.255.0
–SSID: ConnectionPoint
–Radio channel: 11
Caution: By default there is no encryption active. Please be sure to make your network secure. You will find information about this in the section entitled "Configuring wireless connections" on page 73.
Trademarks
Microsoft, Windows 98, Windows 98 SE, Windows ME, Windows 2000, Windows XP and Internet Explorer are registered trademarks of the Microsoft Corporation.
Mozilla Firefox is a registered trademark of the Mozilla Organisation. Super G is a registered trademark of Atheros Communications, Inc.
Overview of the installation steps
1.First install an Ethernet network card or a wireless Network adapter such as the Gigaset PC Card 108 in the PCs you want to connect to the Gigaset SE555 WLAN dsl. The installation is described in the products' user guides.
Please remember:
When installing wireless network adapters, use the default SSID for the Gigaset SE555 WLAN dsl: ConnectionPoint.
2.Then make the necessary connections (PCs, splitters) on the Gigaset SE555 WLAN dsl and activate the device (see page 18).
3.Before the PCs can communicate with the Gigaset SE555 WLAN dsl and with each other in a local network, you may have to change your network settings (see
page 23). Configure these network settings on one PC first so that it can establish a connection to the Gigaset SE555 WLAN dsl. You can then use this PC to configure the device. To find out how to do this, refer to the section entitled "Configuring the local network" on page 111.
4.In a wireless connection you establish the link from the PC's wireless network adapter to the Gigaset SE555 WLAN dsl. This is described in the user guide for the network adapter.
5.Then configure the Gigaset SE555 WLAN dsl to activate the device's Internet access (refer to the section entitled "Basic Setup Wizard" on page 30). To do this you will require the access data from your Internet service provider.
6.If you want to connect more PCs to the Gigaset SE555 WLAN dsl, configure their network settings so as to set up the local network (refer to the section entitled "Configuring the local network" on page 111).
16
First steps
7.If you wish to use other functions of the Gigaset SE555 WLAN dsl, for example the comprehensive security features, use the Security Setup (see page 35) or the Advanced Setup (see page 44).
Setting up the Gigaset SE555 WLAN dsl
Front panel
The Gigaset SE555 WLAN dsl can be set up in any suitable location in the home or office. You do not need any special wiring. However, you should comply with the following guidelines:
uOperate the Gigaset SE555 WLAN dsl only indoors within a temperature range of +5 to +40 °C. Do not position the Gigaset SE555 WLAN dsl near sources of heat. Do not cover the ventilation slots. High temperatures can damage the device.
uA mains socket for 220/230 V~ and a connection socket for the splitter or LAN must be available in the place where you set up the Gigaset SE555 WLAN dsl.
uDo not position the device in the immediate vicinity of stereo equipment, TV sets or microwave ovens. This may cause interference.
uPosition the Gigaset SE555 WLAN dsl so that it is as near to the centre of your wireless network as possible. The general rule is: the higher you place the antennae, the better the performance. Make sure that the place where you position the Gigaset SE555 WLAN dsl offers optimum reception throughout the house or office.
uPosition the Gigaset SE555 WLAN dsl on a non-slip surface. The router feet do not normally leave any traces on the surface they are on. However, some furniture surfaces may contain substances that attack and soften the router's rubber feet. The feet may well mark the furniture surface in this case.
uPosition the Gigaset SE555 WLAN dsl so that it cannot fall down and damage the antenna.
17
First steps
uDo not place the Gigaset SE555 WLAN dsl on any furniture surface that could be affected by the heat from the device.
uLay the cables so that nobody can trip over them. You should not cover the cables with anything.
Connecting and activating the Gigaset SE555 WLAN dsl
Ports on the rear panel
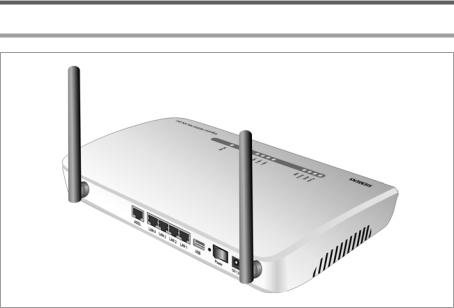
The back panel of the Gigaset SE555 WLAN dsl houses the various ports.
Element |
Description |
|
|
ADSL |
DSL socket for connecting the integrated modem to the DSL port of the |
|
splitter. |
|
|
LAN1 – |
Four 10/100/1000 Mbps switch ports with automatic recognition (RJ- |
LAN4 |
45). You can connect up to four devices with Ethernet ports (such as |
|
PCs, a Hub or Switch). |
|
|
USB |
USB port for printer or USB memory. |
|
|
Reset |
Reboot function: Press and hold the button behind the small opening |
|
for more than 1 second but less than 5 seconds to reboot the device. |
|
This does not affect the configuration settings. |
|
Reset function: Press and hold the button behind the small opening for |
|
at least 5 seconds to return all settings to factory settings. |
|
Warning: This will clear all the configuration settings you have made |
|
since the initial startup. |
|
Updated firmware will not be affected. |
|
|
18
First steps
Element |
Description |
|
|
Power |
Use this switch to turn the device on and off. |
|
|
12V 1.5 A |
Socket for the mains adapter supplied. |
|
Warning: Using the wrong power supply unit may damage the |
|
Gigaset SE555 WLAN dsl. |
|
|
Connecting to the splitter data port
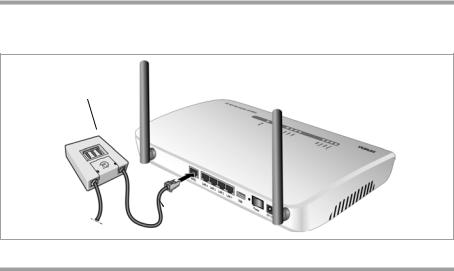
ìConnect the ADSL port on the Gigaset SE555 WLAN dsl with the DSL socket on the splitter. To do this, use one of the CAT5 cables supplied (grey).
Splitter
CAT5 cable
Connecting to the PC
You can connect wired or wireless PCs to your Gigaset SE555 WLAN dsl to create a local area network (LAN).
First connect just one PC to the Gigaset SE555 WLAN dsl. You can then carry out the general configuration. (If you wish to connect more PCs, please turn to page 23.)
Wireless
A wireless connection is made using a wireless network adapter that must be installed in your PC. This can be an 802.11g or 802.11b-compatible wireless network adapter. Owing to the superior range and the high data throughput, we recommend that you use the Gigaset PC Card 108 or the Gigaset USB Adapter 108.
A wireless network is defined by assigning an identical SSID to all the devices.
ìYou should therefore enter the SSID for the Gigaset SE555 WLAN dsl in your network adapter configuration. The default SSID for the Gigaset SE555 WLAN dsl is
ConnectionPoint.
If you use a wireless network adapter from the Gigaset range, enter the SSID using the
Gigaset WLAN Adapter Monitor.
19
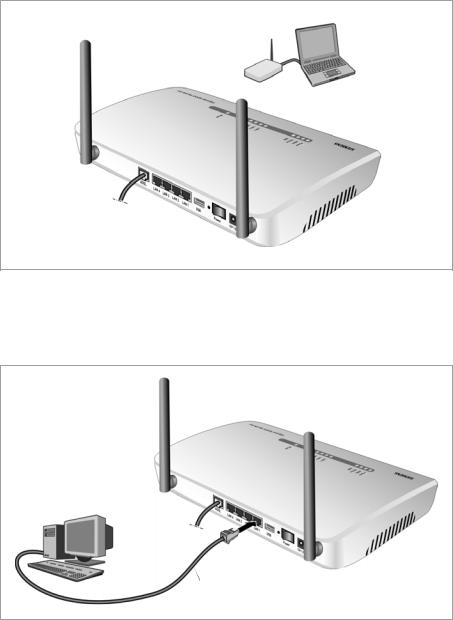
First steps
If the correct SSID has been entered in your PC's wireless network adapter, the wireless link will be established automatically as soon as you activate your Gigaset SE555 WLAN dsl (see page 21).
Wired
ìConnect one of the LAN ports (LAN1 – LAN4) on the Gigaset SE555 WLAN dsl to the Ethernet network card in your PC. To do this, use the other CAT5 cable supplied (grey).
CAT5 cable
20
First steps
Connecting to the mains power supply
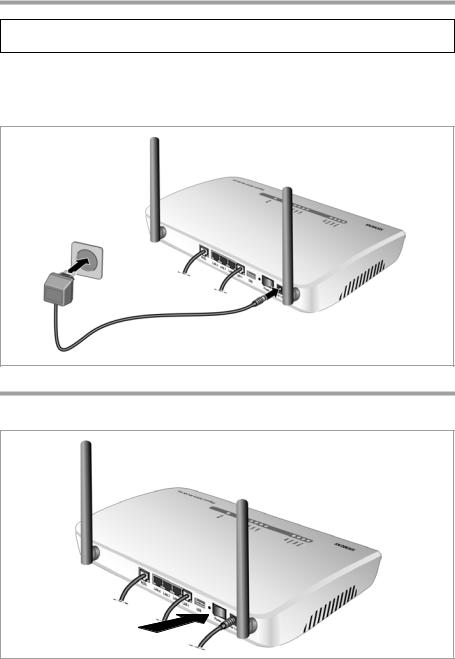
Please remember:
Only use the mains adapter supplied with the device (12V 1.5A DC).
ìConnect the mains adapter cable to the 12 V 1.5 A socket on the Gigaset SE555 WLAN dsl.
ìPlug the mains adapter into a mains socket.
Switching on
ì Switch on the Gigaset SE555 WLAN dsl with the Power switch.
21

First steps
Checking the operating state
Your Gigaset SE555 WLAN dsl is now ready for use. The LED displays on the top panel of the Gigaset SE555 WLAN dsl provide information about the operating state:
The LEDs (from right to left) have the following functions:
LED |
State |
Status |
|
|
|
|
|
Power |
On |
The Gigaset SE555 WLAN dsl is on. |
|
|
|
||
Off |
The Gigaset SE555 WLAN dsl is off. |
||
|
|||
|
|
|
|
|
On |
The DSL line is connected and the DSL port is ready for |
|
|
|
use. |
|
ADSL |
|
|
|
Flashing |
The DSL line is being synchronised. |
||
|
|
|
|
|
Off |
The DSL line is not connected or the interface is not syn- |
|
|
|
chronised. |
|
|
|
|
|
Online |
On |
Connection to the Internet has been established. |
|
|
|
||
Off |
There is no Internet connection. |
||
|
|||
|
|
|
|
|
On |
A device is connected to the Gigaset SE555 WLAN dsl via |
|
USB |
|
the USB port. |
|
|
Off |
There is no device connected. |
|
|
|
|
|
|
On |
A device is connected to the relevant LAN port. |
|
LAN1 – |
|
|
|
Flashing |
The relevant LAN port is sending or receiving data (traf- |
||
LAN4 |
|
fic). |
|
|
|
|
|
|
Off |
There is no device connected. |
|
|
|
|
|
|
On |
The radio interface is active. |
|
|
|
|
|
|
Flashing |
The Gigaset SE555 WLAN dsl is sending or receiving data |
|
WLAN |
|
on the radio interface. |
|
|
|
|
|
|
Off |
The radio interface has been deactivated or no radio sig- |
|
|
|
nal is being received. |
|
|
|
|
When the device is ready for use, the LEDs light up as follows: u The Power LED on the front lights up.
uThe ADSL LED flashes to indicate that the DSL connection is being synchronised. Once this process is complete, the ADSL LED lights up permanently.
uThe WLAN LED lights up to indicate that the Gigaset SE555 WLAN dsl is ready to establish wireless connections.
The radio link to a PC that is connected by means of a wireless network adapter is opened automatically provided the network adapter has been configured with the same SSID as the Gigaset SE555 WLAN dsl. It can take a few seconds for the wireless connection to be established. The WLAN LED flashes when data is sent or received via this connection.
u The LAN LEDs light up if a device is connected to the corresponding LAN port. If this is not the case, refer to the section entitled "Troubleshooting" on page 148.
22

First steps
Network configuration of the PCs
In order to communicate via the Gigaset SE555 WLAN dsl, network configuration must be performed on the connected PCs.
With
u Windows XP (see page 111) or u Windows 2000 (see page 120)
operating systems, this usually takes place automatically provided you have not made any changes to the standard settings for the network configuration.
uWith Windows 98/SE you have to carry out the network configuration (see page 128).
Making the basic settings
You can now make the basic settings for Internet access on the user interface of the Gigaset SE555 WLAN dsl (see page 24).
If you want to connect additional PCs to the Gigaset SE555 WLAN dsl, please read the next section.
Connecting and configuring additional PCs (optional)
Once you have configured one PC as described above you can connect additional PCs to the Gigaset SE555 WLAN dsl. You will need an additional cable for each PC you want to connect via cable. For the wireless connection of additional PCs, you will need a wireless network adapter.
Wireless
ìInstall wireless network adapters in each other PC as described in the corresponding user guide, making sure that the SSID of all wireless network components (Gigaset SE555 WLAN dsl and network adapters) is identical. If you have not changed the SSID in the Basic Setup Wizard wizard, the default setting will be ConnectionPoint.
ìIf necessary, set up the network for each newly connected PC (see page 23).
Wired
ìConnect the network card of each additional PC to a free LAN port (LAN1 – LAN4) on the Gigaset SE555 WLAN dsl using an Ethernet cable.
ìMake sure that the corresponding LAN LED on the front of your Gigaset SE555 WLAN dsl flashes.
ìIf necessary, set up the network for each newly connected PC (see page 23).
ìReboot the additional PCs.
23
The user interface
The user interface
Once the network settings have been configured for a PC in your local network (see page 23), you can then use that PC to configure the Gigaset SE555 WLAN dsl with the user interface of the Gigaset SE555 WLAN dsl. For the configuration we recommend Microsoft Internet Explorer V 6.0 or higher, or Mozilla Firefox V 1.0 or higher.
Note:
To start the configuration environment you may need to deactivate the HTTP proxy for your browser (see page 135 for Windows 98 SE/ME, page 118 for Windows XP and page 126 for Windows 2000).
If you use Windows XP Service Pack 2 you need to configure the popup blocker (see page 118).
If you use a firewall it must allow connection to the Gigaset SE555 WLAN dsl. For details, refer to the user guide for your firewall. If necessary, deactivate the firewall while you configure your Gigaset SE555 WLAN dsl.
Launching the user interface
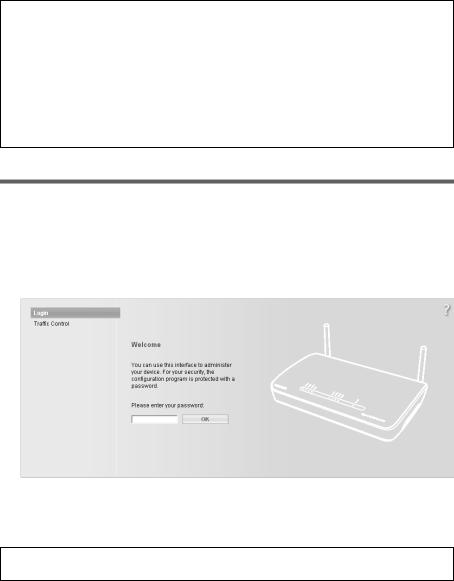
To access the user interface of the Gigaset SE555 WLAN dsl:
ìLaunch your Web browser.
ìEnter the IP address of the Gigaset SE555 WLAN dsl in the browser's address field: http://192.168.2.1 or http://se555
The login screen appears:
For your security, the configuration program is protected with a password. The default password is admin.
ì Enter the password.
Note:
For security reasons you should change this password at a later stage (see page 36).
24

The user interface
Traffic Control
You will find information about the currently used and available time and data volume for your Internet connection by clicking Traffic Control. To do this, you must first configure the time and volume control. This is described on page 52.
ì Click OK.
A screen appears with security information; you can skip this for the initial configuration. If you carry out all the general and security settings using the wizard as described below, your device and network will be fully protected. If not, the next time you log on you will be informed of security gaps in the configuration program.
ì Click OK.
You will now see the start screen.
The start screen
The start screen is the starting point for all configuration and administration procedures.
25
The user interface
Start screen functions
On the start screen you can
u select the language for the user interface (see page 27),
uview the status of the Internet connection or establish or end an Internet connection (see page 28); depending on the selected connection mode, the start screen shows the status and also the Connect or Disconnect button,
uopen the Status menu to obtain status information about the Gigaset SE555 WLAN dsl (see page 100),
u call up the wizard for the basic configuration: Basic Setup Wizard (see page 30), u call up the Security Setup Wizard (see page 35),
uopen the Advanced Settings menu for additional configuration options (see page 44).
You can call up the wizards, the Advanced Settings menu and status information at any time and on any user interface screen using the tabs at the upper margin of the user interface.
The configuration program comprises the following functions:
Basic Setup Wizard |
Use this wizard to make the settings required for connecting |
|
to the Internet. You can set up data for your region. This is |
|
described from page 30. |
Security Setup Wizard |
This wizard allows you to take security precautions against |
|
unauthorised access to the Gigaset SE555 WLAN dsl and the |
|
local network. For example, you can assign a password and |
|
set up encryption for wireless traffic. This is described from |
|
page 35. To protect your network, we strongly recommend |
|
that you carry out this setup. |
Advanced Settings |
Additional functions are offered in the Advanced Settings |
|
menu. For example, you can back up and restore the configu- |
|
ration data, set up the Gigaset SE555 WLAN dsl as a virtual |
|
server for the network, configure an HTTP or FTP server for |
|
access from the Internet and much more. These configuration |
|
steps are optional and can be carried out at a later stage. This |
|
is described from page 44. |
Status |
You can view information about the configuration and status |
|
of the Gigaset SE555 WLAN dsl in the Status menu. This is |
|
described from page 100. |
Internet status |
You can view the status of the Internet connection and set up |
|
a manual connection to the Internet (see page 28). |
Language |
You also have the opportunity to specify the language for the |
|
user interface (see page 27). |
26
Loading...