


 Loading...
AR-FR20 U
This manual contains very important information. Please keep the manual in a safe place where it will not be lost.
Ce manuel contient des informations très importantes. Conservez-le précieusement et veillez à ce qu'il ne soit pas égaré.
Diese Bedienungsanleitung enthält wichtige Informationen. Bewahren Sie die Bedienungsanleitung zum späteren Nachschlagen an einem sicheren Ort auf.
Este manual contiene información muy importante. Mantenga el manual en un lugar seguro donde sea fácil de encontrar.
AR-FR20 U
APPLICATION NUMBER
NUMERO D'APPLICATION
ANWENDUNGSNUMMER
NÚMERO DE APLICACIÓN
MACHINE SERIAL
NUMBER
NUMERO DE SERIE DE
LA MACHINE
SERIENNUMMER
NÚMERO DE SERIE DE
LA MÁQUINA
PRODUCT KEY
CLE PRODUIT
PRODUKTSCHLÜSSEL
CLAVE DE PRODUCTO
Data |
Security |
Kit |
|
|
Operation Manual |
|
ENGLISH |
||
|
|
|
||
|
|
|
|
|
Kit de |
sécurité |
des |
FRANÇAIS |
|
données |
|
|||
|
|
|||
Mode d'emploi |
|
|
||
|
|
|
|
|
Daten- |
|
|
|
|
Sicherheitspaket |
|
DEUTSCH |
||
Bedienungsanleitung |
||||
|
||||
|
|
|
|
|
Kit de |
seguridad |
de |
|
|
datos |
Manual |
de |
ESPAÑOL |
|
instrucciones |
|
|||
|
|
|||
|
|
|
|
|
This Class A digital apparatus complies with Canadian ICES-003.
Get appareil numérique de la classe A est conforme à la norme NMB-003 du Canada.

English
Contents
Introduction .................................. |
1 |
When the security kit is installed.. 1
KEY OPERATOR PROGRAMS... 2
● KEY OPERATOR PROGRAM |
|
LIST ........................................ |
2 |
● Using the key operator |
|
programs ................................ |
2 |
● Security settings ..................... |
3 |
● Product key ............................ |
5 |
Français |
|
Sommaire |
|
Introduction................................... |
7 |
Lorsque le kit de sécurité est |
|
installé .......................................... |
7 |
PROGRAMMES DU |
|
RESPONSABLE........................... |
8 |
● LISTE DES PROGRAMMES |
|
DU RESPONSABLE ............... |
8 |
● Utilisation des programmes du |
|
responsable ............................. |
8 |
● Paramétrage et utilisation de la |
|
fonction de sécurité................. |
9 |
● Clés produit........................... |
11 |
Deutsch |
|
Inhalt |
|
Einführung.................................. |
13 |
Bei installiertem Daten- |
|
Sicherheitspaket ........................ |
13 |
GERÄTEBETREUER- |
|
PROGRAMME ........................... |
14 |
● GERÄTEBETREUER- |
|
PROGRAMMLISTE ............... |
14 |
● Verwendung der Gerätebetreuer- |
|
Programme ............................. |
14 |
● Einstellung und Verwendung |
|
der Sicherheitsfunktion......... |
15 |
● Prod.schluess....................... |
17 |
Español |
|
Contenido |
|
Introducción ................................ |
19 |
Cuando se instala el kit de |
|
seguridad.................................... |
19 |
PROGRAMAS DEL OPERADOR |
|
PRINCIPAL ................................. |
20 |
● LISTA DE PROGRAMAS DEL |
|
OPERADOR PRINCIPAL ....... |
20 |
● Uso de los programas del |
|
operador principal ................. |
20 |
● Ajustes y uso de la función de |
|
seguridad .............................. |
21 |
● Clave de producto................. |
23 |

Introduction
The AR-FR20 U adds a security function to the Digital Full Color Multifunctional System. When the copy function of a Digital Full Color Multifunctional System with the security function is used, data held in memory for the copy job is erased as soon as the job is finished. In addition, when the printer, the network scanner (Including the scanner function using the TWAIN driver) or fax function is used, the data of each job is erased from memory or the hard disk as soon as the job is finished.
This operation manual is described based on the American spelling standard.
When the security kit is installed
When the security kit is installed, the following icon appears on the touch panel.
|
|
|
|
|
NOTE |
|
|
Touch the icon ( ) to view information on the |
OUTPU |
|
|
|
security kit version. |
|
|
|
|
When the security kit is installed, data remaining in the unit is automatically erased after each copy, print, scan, and fax job.
When clearing of the data on the built-in hard disk drive begins, the following message appears for 6 seconds*.
Note that if more than 6 seconds* is required to clear the data, the message will be displayed until data clearing is finished.
|
|
* The duration of the message display can |
|
|
be changed with the key operator program, |
DATA IS BEING CLEARED. |
||
|
|
"MESSAGE TIME SETTING". (See page |
|
|
10 of the key operator’s guide.) |
|
|
NOTES
Using the printer function
●After a normal print job in printer mode is completed, the data is automatically cleared from memory and the hard disk. Please note, however, that when the job retention function (see page 5-2 of the "Operation Manual for printer" on the "PRINTER UTILITIES" CD-ROM) is used for printing, the data is retained on the hard disk. The retained data can be erased by displaying the Print hold job list on the touch panel and deleting the job from the list (see page 5-2 of the "Operation Manual for printer" on the "PRINTER UTILITIES" CD-ROM).
●When the security kit is installed, the "DELETE THE PRINT HOLD DATA" key operator program on page 6-5 of the "Operation Manual for printer" cannot be used. To erase all retained data, use the "CLEAR ALL MEMORY" (page 4 of this manual).
●If the unit power is turned off while image data is being cleared from the hard disk drive or before jobs are finished, the data may not be completely erased. If you do not wish to leave partially cleared data when the power is turned off, it is recommended that you use the key operator program, "CLEAR ALL MEMORY" (page 4 of this manual), to complete data clearing before turning off the power.
ENGLISH
1

Note:
To ensure that the data security function of the machine provides maximum security, observe the following:
●The key operator plays an important role in maintaining security. Exercise appropriate care in selecting the person that will assume the job of key operator.
●Always keep "POWER UP AUTO CLEAR" (page 5 of this manual) enabled.
●Be sure to change the key operator code immediately each time a new person takes over as key operator.
●Change the key operator code on a regular basis (at least once every 60 days).
●During the procedure for changing the key operator code, the current key operator code and new key operator code appear in the display. Be sure to complete the procedure promptly.
●Do not select a number for the key operator code that can be easily guessed.
●The key operator programs are very important for security management. The administrator of the machine should inform users that they are not to access the key operator programs without permission.
●If the administrator and users of the machine are to be out of the office, security measures such as locking the door of the office should be taken to prevent unauthorized access.
●The customer bears responsibility for control of copies of documents made on the machine and faxes received on the machine.
●Even when the data security kit is installed, note that fax data in the public memory box used by the facsimile expansion kit (AR-FX10) can be read.
CAUTION
When "POWER UP AUTO CLEAR" (explained on page 5 of this manual) is enabled, the wait time when the machine is powered on may occasionally be very long.
KEY OPERATOR PROGRAMS
This section explains the key operator programs in the unit that are related to the security function.
KEY OPERATOR PROGRAM LIST
Program name |
Page |
|
|
DEVICE CONTROL |
|
SECURITY SETTINGS |
|
CLEAR ALL MEMORY |
4 |
NUMBER OF TIMES CLEAR ALL MEMORY PROGRAM IS REPEATED |
4 |
POWER UP AUTO CLEAR |
5 |
DISABLE PRINTING OF SENDING ADDRESS LIST |
5 |
|
|
PRODUCT KEY |
|
DATA SECURITY KIT |
5 |
|
|
Using the key operator programs
Follow the procedure on pages 3 and 4 of the key operator's guide to configure the settings in the key operator programs.
For explanations of each of the settings, see the following pages.
2
Security settings
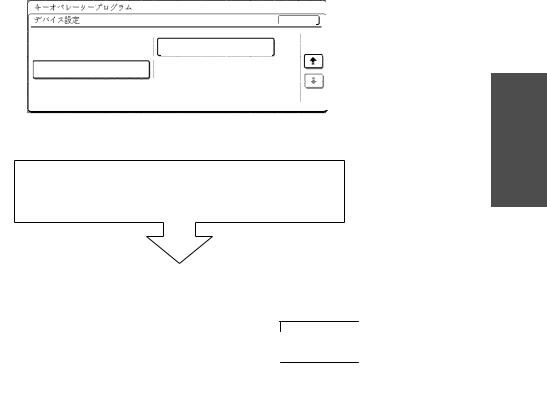
When the security kit is installed, the "SECURITY SETTINGS" key is added to the "DEVICE CONTROL" screen of the key operator programs. Touch this key to display the menu screen for the security setting programs.
|
KEY OPERATOR PROGRAMS |
|
|
|
|
|
|
|
|
|
OK |
|
|
DEVICE CONTROL |
|
|
||||
|
|
|
RETURN FROM COPY MODE |
3/3 |
|
|
|
|
|
TIMING |
|
||
|
SECURITY SETTINGS |
|
|
|
||
|
|
|
|
|
||
|
|
|
|
|
|
|
|
|
|
|
|
|
|
Third "DEVICE CONTROL" screen
When the "SECURITY SETTINGS" key is touched, the following screen appears.
ENGLISH
|
|
KEY OPERATOR PROGRAMS |
|
||||||
|
|
|
|
|
|
|
|||
|
|
SECURITY SETTINGS |
|||||||
1-(1) |
|
|
|
|
|
|
|||
|
|
|
CLEAR ALL MEMORY |
||||||
|
|
|
|
|
|
|
|||
|
|
|
|
|
|
|
|||
2 |
|
|
|
|
|
|
|
|
|
POWER UP AUTO CLEAR |
|||||||||
|
|
|
|
||||||
NUMBER OF TIMES CLEAR ALL MEMORY PROGRAM IS REPEATED
DISABLE PRINTING OF
SENDING ADDRESS LIST
NUMBER OF TIMES AUTO CLEAR AT JOB END PROGRAM IS REPEATED
OK
1-(2)
1
3
1
*The number of display screens and layout of the keys may differ slightly from the above depending on the peripheral devices installed on your machine.
3
■ SECURITY SETTINGS
1-(1) CLEAR ALL MEMORY
Use this setting when you wish to manually clear data stored in the unit's memory and on the hard disk.
NOTE
We recommend that you execute this program before turning off the power.
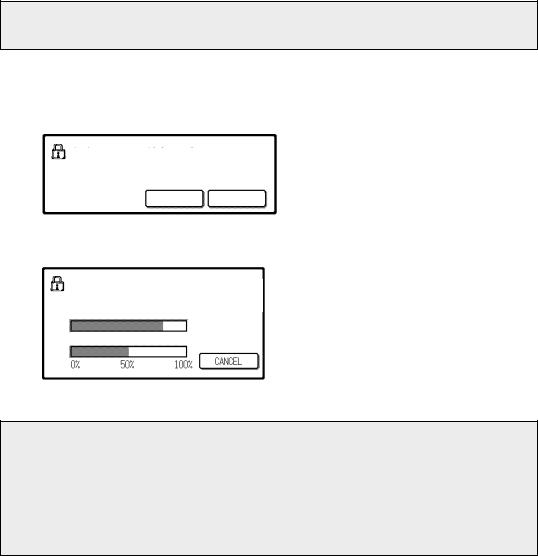
Touch the [CLEAR ALL MEMORY] key. The following screen appears to confirm your selection.
[Clear screen 1]
CLEAR ALL MEMORY?
(RESERVED JOB DATA WILL BE CLEARED.)
NO YES
[Clear screen 2]
●To return to the "SECURITY SETTINGS" screen, touch the [NO] key.
●When the [YES] key is touched, the following screen appears.
Example: When the hard disk drive is installed.
CLEARING ALL MEMORY. AUTO REBOOT IS IMPLEMENTED AFTER CLEARING.
PROGRESS STATUS
|
|
|
|
|
|
CANCEL |
|
0% |
50% |
100% |
|
||||
|
●Each time the top bar reaches all the way to the right, the bottom bar, which indicates data clearing progress, advances 1%. (When the bottom bar reaches 100%, data clearing is finished.)
●When the data has been cleared, the power briefly turns off and then automatically turns on again.
NOTE
If you wish to cancel after data clearing has begun
Touch the [CANCEL] key. When the [CANCEL] key is touched, the key operator code entry screen appears. Enter your key operator code with the numeric keys. Note that data that has already been cleared at the time you enter your 5-digit key operator code will not be restored. Data already cleared will be lost. When data clearing is canceled, the machine will power off temporarily and then automatically power back on.
1-(2) NUMBER OF TIMES CLEAR ALL MEMORY PROGRAM IS REPEATED
This program is used to enhance the security function. The repeat count for "CLEAR ALL MEMORY" can be set to any number from 1 to 7. The factory setting is 1. Touch the [NUMBER OF TIMES CLEAR ALL MEMORY PROGRAM IS REPEATED] key, and set the desired number of times with the  or
or  key.
key.
When finished, touch the [OK] key.
(See "About the repeat count setting" on page 5 of this manual.)
4

About the repeat count setting
When the repeat count is increased to enhance the security function, the time required for data clearing will increase. It is recommended that "NUMBER OF TIMES CLEAR ALL MEMORY PROGRAM IS REPEATED" be set to the most suitable number for your security requirements.
2 POWER UP AUTO CLEAR
This program automatically clears all data stored in the unit when the main switch is turned on.
To enable "POWER UP AUTO CLEAR", touch the checkbox so that a checkmark appears and then touch the [OK] key.
By default, a checkmark does not appear.
NOTE
Note for models that have the fax function installed
Fax data not yet printed such as faxes received at night will not be cleared.
NOTE
Print hold data that is stored on the hard disk will not be cleared.
NOTE
If you wish to cancel after data clearing has begun
See the explanations in "Clear screen 2" and "NOTE" in "CLEAR ALL MEMORY" on page 4 of this manual.
3 DISABLE PRINTING OF SENDING ADDRESS LIST
This program is used to disable printing of the following lists, which are printed using "LIST PRINT" in the user settings (page 2-14 of the "Operation Manual (for general information and copier operation)").
"SENDING ADDRESS LIST(FAX)"*1, "SENDING ADDRESS LIST(SCANNER)"*2 *1This list can be printed when the fax function is enabled.
*2This list can be printed when the network scanner function is enabled.
Touch the checkbox of the list or lists that you wish to disable so that a checkmark appears and then touch the [OK] key.
By default, a checkmark does not appear.
Product key
■ DATA SECURITY KIT
To initially enable the security function, you must use a key operator program to enter the product key (password). The name of the key operator program used for this purpose is "DATA SECURITY KIT". Please ask your dealer for the product key.
*After using this program to enter the product key, be sure to power off and then power on the machine.
ENGLISH
5

This equipment complies with the requirements of Directives 89/336/EEC and 73/23/EEC as amended by 93/68/EEC. Dieses Gerät entspricht den Anforderungen der EG-Richtlinien 89/336/EWG und 73/23/EWG mit Änderung 93/68/EWG.
Ce matériel répond aux exigences contenues dans les directives 89/336/CEE et 73/23/CEE modifiées par la directive 93/68/CEE.
Dit apparaat voldoet aan de eisen van de richtlijnen 89/336/EEG en 73/23/EEG, gewijzigd door 93/68/EEG. Dette udstyr overholder kravene i direktiv nr. 89/336/EEC og 73/23/EEC med tillæg nr. 93/68/EEC.
Quest’ apparecchio è conforme ai requisiti delle direttive 89/336/EEC e 73/23/EEC, come emendata dalla direttiva 93/68/EEC.
Este equipamento obedece às exigências das directivas 89/336/CEE e 73/23/CEE, na sua versão corrigida pela directiva 93/68/CEE.
Este aparato satisface las exigencias de las Directivas 89/336/CEE y 73/23/CEE, modificadas por medio de la 93/68/CEE. Denna utrustning uppfyller kraven enligt riktlinjerna 89/336/EEC och 73/23/EEC så som kompletteras av 93/68/EEC. Dette produktet oppfyller betingelsene i direktivene 89/336/EEC og 73/23/EEC i endringen 93/68/EEC.
Tämä laite täyttää direktiivien 89/336/EEC ja 73/23/EEC vaatimukset, joita on muutettu direktiivillä 93/68/EEC.
The CE mark logo label is affixed on an equipment in case that the directives described in the above sentence are applicable to the product. (This sentence is not applicable in any country where the above directives are not required.)
6

Introduction
Le kit AR-FR20 U ajoute une fonction de sécurité au système multifonction numérique couleur. Lorsqu’on utilise la fonction copieur du système multifonction numérique couleur avec la fonction de sécurité, les données stockées en mémoire pour les besoins du travail de copie sont effacées aussitôt le travail terminé. En outre, lorsque l'imprimante, le scanner réseau (y compris la fonction de scanneur réseau utilisant le pilote TWAIN) ou la fonction télécopieur (fax) est utilisé, les données de chaque travail sont effacées de la mémoire ou du disque dur dès que le travail est terminé.
Lorsque le kit de sécurité est installé
Lorsque le kit de sécurité est installé, l'icône suivante apparaît sur l'écran tactile.
RECTO VE |
|
REMARQUE |
|
||
|
|
Appuyez sur cette icône ( ) pour afficher des |
SORTI |
|
informations sur la version de votre kit de sécurité. |
|
|
|
Lorsque le kit de sécurité est installé, les données restant dans la machine sont automatiquement effacées après chaque travail de copie, d'impression, de numérisation ou de télécopie.
Quand l’effacement des données du disque dur interne débute, le message suivant apparaît pendant 6 secondes*.
Si l’effacement des données prend plus de 6 secondes*, un message s’affiche pour signaler que les données sont en cours d’effacement.
* La durée d'affichage de ce message peut être
LES DONNEES SONT EFFACEES. modifiée à l'aide du programme du responsable intitulé "REGLAGE DE LA
DUREE DES MESSAGES". (Voir page 10 du manuel du responsable.)
REMARQUES
Utilisation de la fonction imprimante
●Une fois qu'un travail d'impression en mode imprimante est terminé, les données sont automatiquement effacées de la mémoire et du disque dur. Remarquez, cependant, que lorsque vous employez pour l'impression la fonction de conservation du travail (voir la page 5-2 du "Manuel d'utilisation (pour imprimante)" sur le CD-ROM "PRINTER UTILITIES"), les données sont conservées sur le disque dur. Les données retenues peuvent ensuite être effacées en affichant la liste d'état des travaux sur l'écran tactile et en supprimant la tâche de la liste (voir page 5-2 du "Manuel d'utilisation pour imprimante" fourni sur le CD-ROM "PRINTER UTILITIES").
●Lorsque le kit de sécurité est installé, le programme du responsable intitulé "EFFACER LES DONNEES D’IMPRESSION RETENUES" décrit en page 6-5 du "Manuel d'utilisation pour imprimante" ne peut pas être utilisé. Employez "EFFACER TOUTE LA MEMOIRE" pour effacer toutes les données conservées (voir page 10 de ce manuel).
●Si l’on met la machine hors tension avant la fin de l’effacement des données du disque dur ou avant la fin de l’exécution d’un travail, les données peuvent ne pas être complètement effacées. Pour éviter tout risque que des données partiellement effacées ne puissent subsister à cause d’une mise hors tension prématurée, il est conseillé d’utiliser le programme du responsable intitulé "EFFACER TOUTE LA MEMOIRE" (voir page 10 de ce manuel) après un travail pour effacer manuellement toutes les données avant que la machine ne puisse être mise hors tension.
FRANÇAIS
7
Loading...