


Aquos LC-32PX5X
Sharp Aquos LC-32PX5X, Aquos LC-37PX5X, Aquos LC-42PX5X, LC-42BX5X, Aquos LC-32PX5M Operation Manual
...
MODEL
LC-32PX5X
LC-37PX5X
LC-42PX5X
LCD COLOUR TELEVISION
OPERATION MANUAL


LC-32PX5X
LC-37PX5X
LC-42PX5X
LCD COLOUR TELEVISION
OPERATION MANUAL
Dear SHARP customer
Thank you for your purchase of the SHARP LCD colour TV product. To ensure safety and many years of
trouble-free operation of your product, please read the Important Safety Precautions carefully before
using this product.
Contents
Dear SHARP customer ........................................... 1
Contents .................................................................. 1
Trademarks ............................................................. 2
Important Safety Precautions ............................... 3
Supplied accessories ............................................. 4
Preparation ............................................................. 5
Inserting the batteries ......................................... 5
Using the remote control unit .............................. 5
Cautions regarding remote control unit ........... 5
Attaching the stand ..............................................6
Setting the TV ..................................................... 7
Basic connection ................................................ 8
Connecting to an antenna .............................. 8
Connecting to the AC outlet ........................... 8
Setting the TV on the wall ................................... 9
Removing the stand ............................................ 9
Part names .............................................................10
TV (Front) ...........................................................10
TV (Rear) ............................................................11
Remote control unit ...........................................12
Watching TV ...........................................................13
Turning on the power .........................................13
Turning off the power .........................................13
Simple button operations for changing
channels ..........................................................13
Using Flashback (A) on the remote
control unit ......................................................14
Using MPX on the remote control unit ................14
Simple button operation for changing
volume/sound .................................................15
Sleep timer ........................................................15
Still image ..........................................................15
Basic adjustment settings ....................................16
Menu operation buttons .....................................16
On-Screen Display .............................................16
TV/AV input mode menu items ..........................17
PC input mode menu items ...............................17
Auto installation .................................................18
Programme setup ..............................................18
Auto search ...................................................18
Manual setting for each channel ....................19
Search tuning ...........................................19
Fine tuning ................................................19
Colour system ..........................................19
Sound system (Broadcasting system) ...... 20
Skipping channels ................................... 20
Sort .............................................................. 20
Label ............................................................ 21
Erase Programme ........................................ 21
AV mode selection ............................................ 22
OPC (Optical Picture Control) setting ................ 22
Picture adjustments .......................................... 23
Advanced ......................................................... 24
C.M.S. (Colour Management System) .......... 24
Colour temperature ...................................... 24
3D-Y/C ........................................................ 24
Film mode .................................................... 25
AV mode selection ............................................ 26
Audio adjustment .............................................. 26
Surround ...................................................... 26
1

Contents
Useful adjustment settings .................................. 27
Password setting for child lock
(for TV input mode) ........................................ 27
Input Label ........................................................ 28
Image position .................................................. 28
Wide Screen Signalling (WSS) ........................... 29
Picture aspect ratio ........................................... 29
WIDE mode (for TV/AV input mode) .................. 30
WIDE mode (for PC input mode) ....................... 31
Language setting for on-screen display ............. 32
Audio Only ........................................................ 33
DNR (Digital Noise Reduction) ........................... 33
Input Select ...................................................... 33
Blue Screen ...................................................... 34
Colour system setting ....................................... 34
Power Control .................................................. 35
HDMI Setup ...................................................... 36
PC Setup .......................................................... 36
Input Signal (PC input mode only) ................. 36
Auto Sync. adjustment
(PC input mode only) .................................. 37
Fine Sync. adjustment
(PC input mode only) .................................. 37
Useful features ..................................................... 38
Dual screen functions ....................................... 38
Teletext language setting .................................. 39
Teletext function ............................................... 40
Using external equipment .................................... 42
Displaying an external equipment image .......... 42
Displaying a DVD image (Example) ................... 42
Connecting a VCR ........................................... 42
Connecting a DVD player ................................. 43
Connecting a game console or camcorder ....... 43
Connecting an HDTV tuner ............................... 44
Viewing an image from a PC ............................. 45
Connecting a PC .......................................... 45
Displaying an image from a PC ..................... 45
Appendix ............................................................... 46
Troubleshooting ................................................ 46
PC compatibility chart ....................................... 46
RS-232C port specifi cations ............................. 47
Specifi cations ................................................... 49
Optional accessory ........................................... 49
Dimensional drawings.......................................... 50
Trademarks
• “HDMI, the HDMI logo and High-Defi nition Multimedia Interface are trademarks or registered trademarks of HDMI
Licensing LLC.”
2
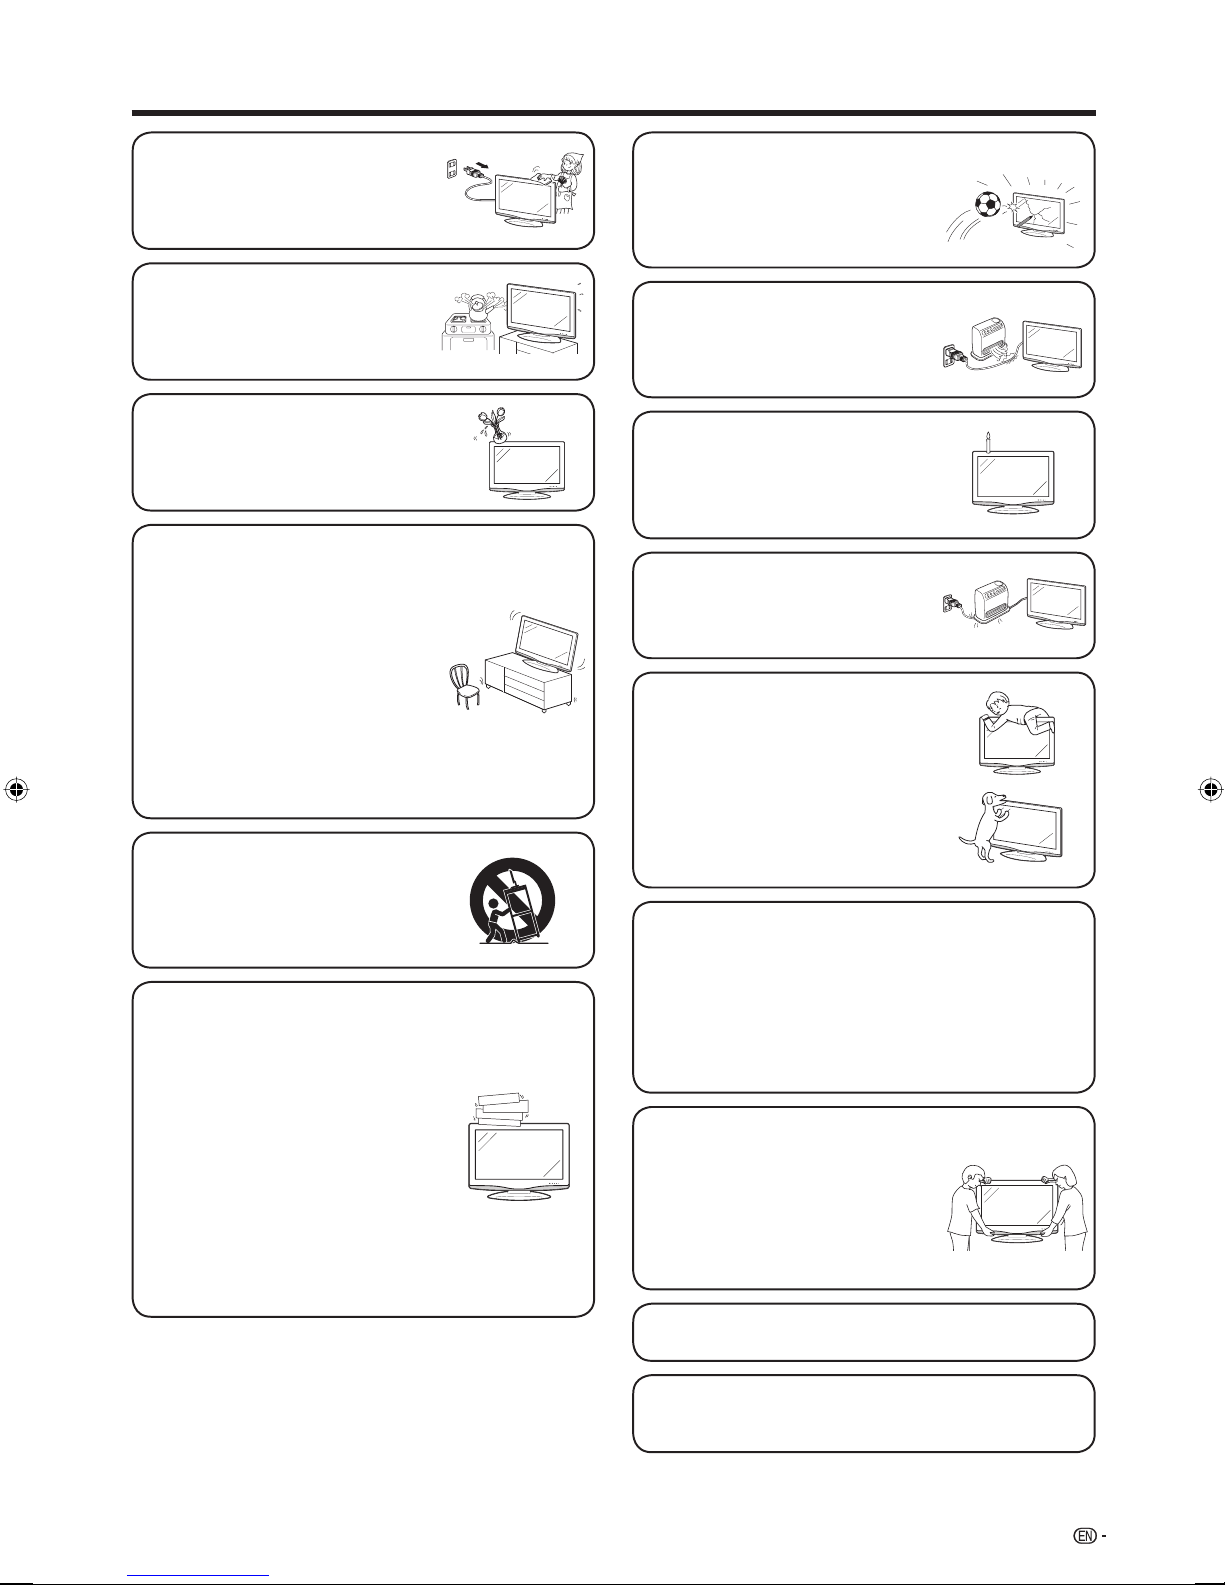
Important Safety Precautions
• Cleaning — Unplug the AC cord
from the AC outlet before cleaning
the product. Use a damp cloth to
clean the product. Do not use liquid
cleaners or aerosol cleaners.
• Water and moisture — Do not use
the product near water, such as
bathtub, washbasin, kitchen sink,
laundry tub, swimming pool and in a
wet basement.
• Do not place vases or any other
water-fi lled containers on this
product.
The water may spill onto the product
causing fi re or electric shock.
• Stand — Do not place the product
on an unstable cart, stand, tripod
or table. Doing so can cause the
product to fall, resulting in serious
personal injuries as well as damage
to the product. Use only a cart,
stand, tripod, bracket or table
recommended by the manufacturer
or sold with the product. When
mounting the product on a wall, be
sure to follow the manufacturer's
instructions. Use only the mounting
hardware recommended by the
manufacturer.
• The LCD panel used in this product
is made of glass. Therefore, it can
break when the product is struck
forcefully or with a sharp object. If
the LCD panel is broken, be careful
not to be injured by broken glass.
• Heat sources — Keep the product
away from heat sources such as
radiators, heaters, stoves and other
heat-generating products (including
amplifi ers).
• To prevent fi re, never place any type
of candle or naked fl ames on the
top or near the TV set.
• To prevent fi re or shock hazard, do
not place the AC power cord under
the TV set or other heavy items.
• Do not place heavy objects on this
product or stand on it. Doing so
could cause injury if the product
overturns. Take special care near
children and pets.
• When relocating the product
placed on a cart, it must be moved
with utmost care. Sudden stops,
excessive force and uneven fl oor
surface can cause the product to fall
from the cart.
• Ventilation — The vents and other
openings in the cabinet are designed
for ventilation. Do not cover or block
these vents and openings since
insuffi cient ventilation can cause
overheating and/or shorten the life
of the product. Do not place the
product on a bed, sofa, rug or other
similar surface, since they can block
ventilation openings. This product is
not designed for built-in installation;
do not place the product in an
enclosed place such as a bookcase
or rack, unless proper ventilation
is provided or the manufacturer's
instructions are followed.
The LCD panel is a very high technology product
with 3,147,264 thin fi lm transistors, giving you fi ne
picture details.
Due to the very large number of pixels, occasionally
a few non-active pixels may appear on the screen
as a fi xed point of blue, green or red.
This is within product specifi cations and does not
constitute a fault.
Precautions when
transporting the TV
Be sure to always carry the TV
by two people holding it with two
hands — one hand on each side
of the TV.
• Do not display a still picture for a long time, as this could
cause an afterimage to remain.
• Install the product on the place where the AC cord can
be unplugged easily from the AC outlet, or from the AC
INPUT terminal on the rear of the product.
3
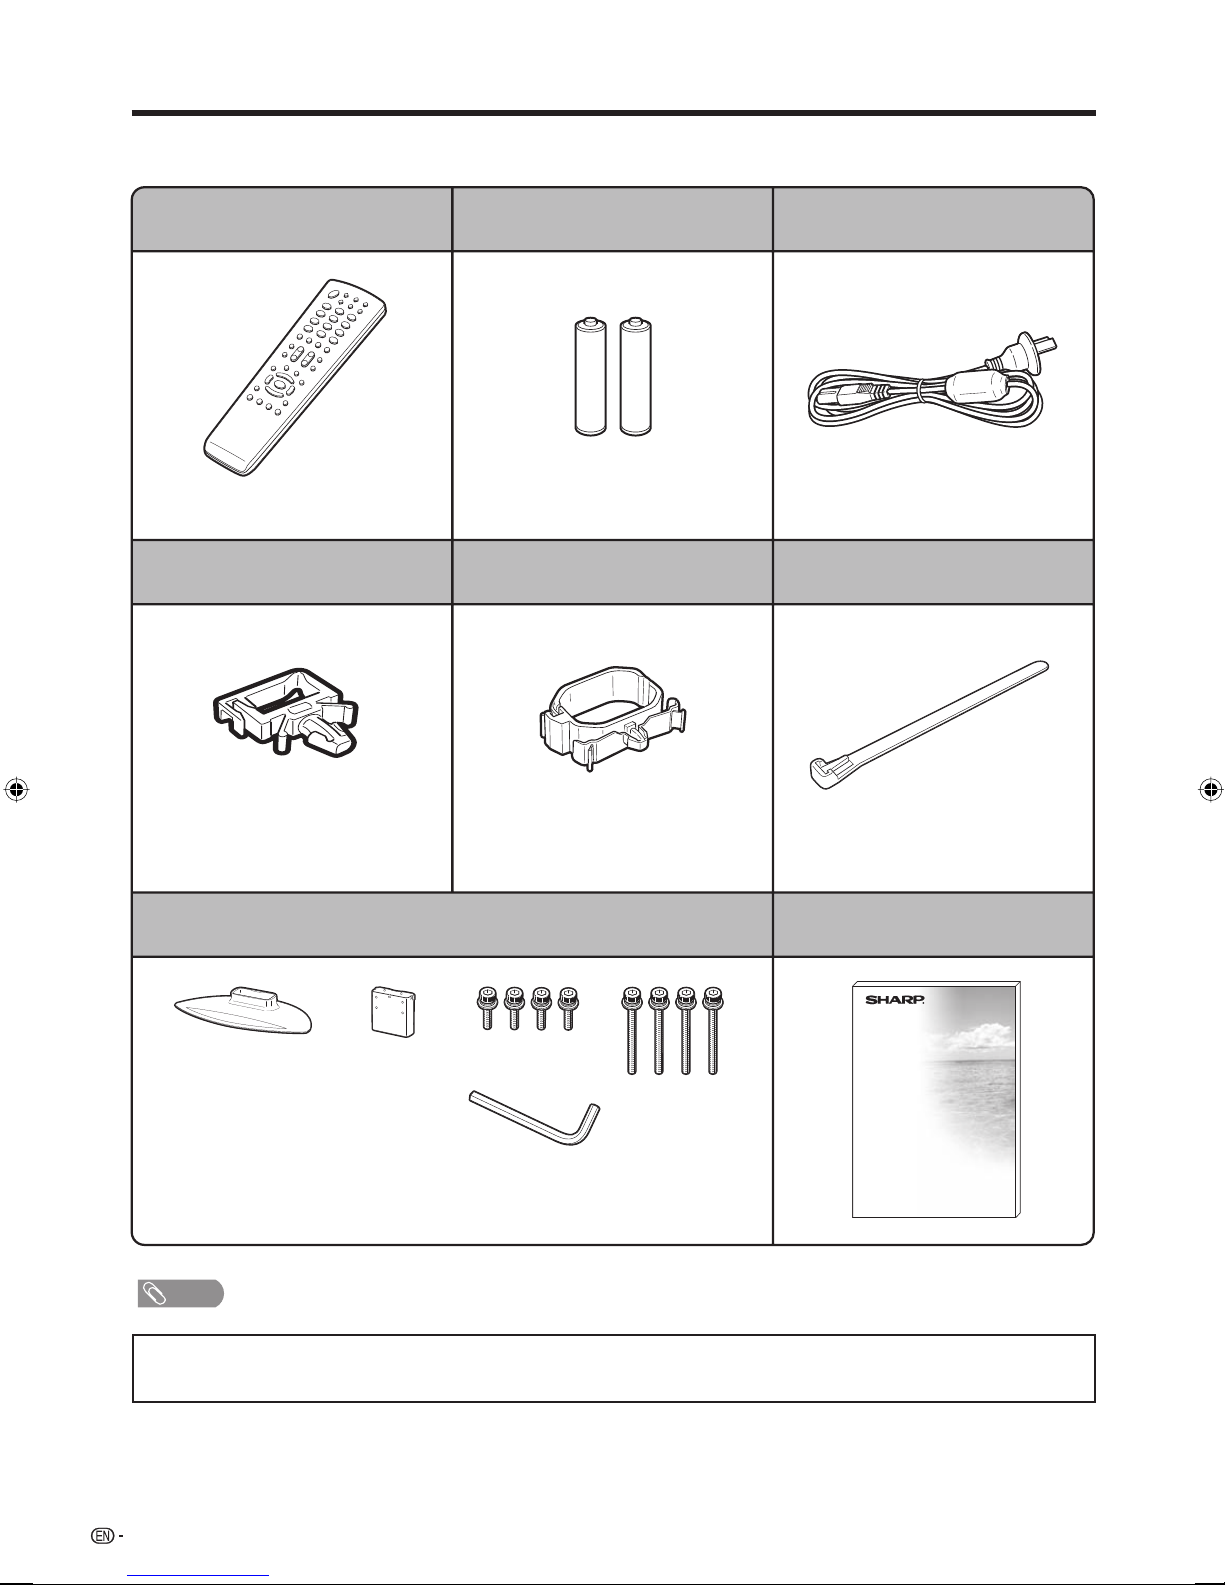
Supplied accessories
Make sure the following accessories are provided with the product.
Remote control unit “AAA” size battery (g2) AC cord
Page 12 Page 5 Page 7
AC cord clamp Cable clamp
Page 7 Page 7
Stand base Stand post
Short screws (g4)
Cable tie
Page 7
Operation manualStand unit
Long screws
(g4)
NOTE
• Always use the AC cord supplied with the TV.
• The illustrations and on-screen displays in this operation manual are for explanation purposes and may vary slightly from the
actual operations.
• The illustrations used throughout this manual are based on LC-37PX5X.
4
Hex key
Page 6
Preparation
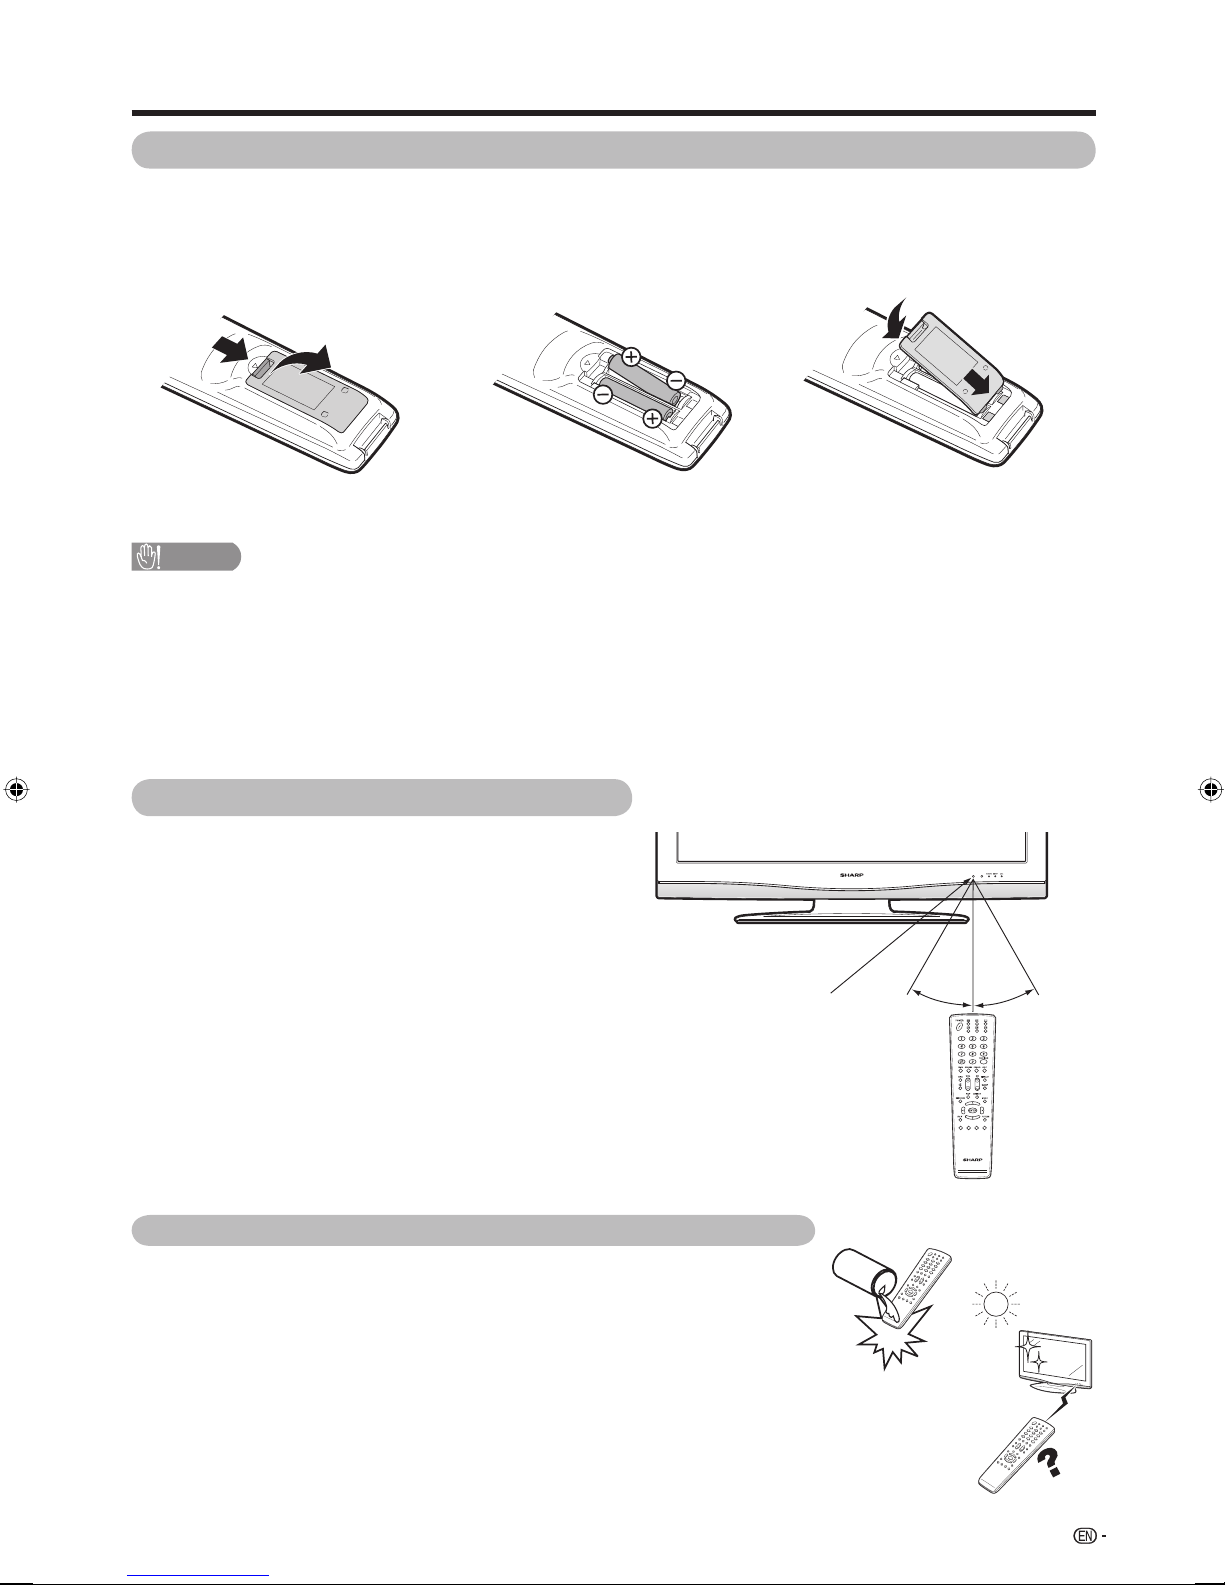
Inserting the batteries
Before using the TV for the fi rst time, insert two “AAA” size batteries (supplied). When the batteries become
depleted and the remote control fails to operate, replace the batteries with new “AAA” size batteries.
1 Open the battery cover.
CAUTION
Improper use of batteries can result in chemical leakage or explosion. Be sure to follow the instructions below.
• Do not mix batteries of different types. Different types of batteries have different characteristics.
• Do not mix old and new batteries. Mixing old and new batteries can shorten the life of new batteries or cause chemical
leakage in old batteries.
• Remove batteries as soon as they have worn out. Chemicals that leak from batteries can cause a rash. If you fi nd any
chemical leakage, wipe thoroughly with a cloth.
• The batteries supplied with this product may have a shorter life expectancy due to storage conditions.
• If you will not be using the remote control unit for an extended period of time, remove the batteries from it.
2 Insert two supplied “AAA” size
batteries.
• Place batteries with their terminals
corresponding to the (e) and (f)
indications in the battery compartment.
3 Close the battery cover.
Using the remote control unit
Use the remote control unit by pointing it towards the
remote sensor window.
Objects between the remote control unit and sensor
window may prevent proper operation.
Remote control
sensor
Cautions regarding remote control unit
• Do not subject the remote control unit to shock.
In addition, do not soak the remote control unit with liquids, or place it in an
area with high humidity.
• Do not install or place the remote control unit under direct sunlight.
The heat may cause deformation of the unit.
• The remote control unit may not work properly if the remote sensor window
of the TV is under direct sunlight or strong lighting. In such case, change the
angle of the lighting or TV, or operate the remote control unit closer to the
remote sensor window.
5 m
30°30°
5

Preparation
Attaching the stand
• Before attaching (or detaching) the stand, unplug the AC cord from the AC INPUT terminal.
• Before performing work spread cushioning over the base area to lay the TV on. This will prevent it from being
damaged.
CAUTION
• Attach the stand in the correct direction.
• Be sure to follow the instructions. Incorrect installation of the stand may result in the TV falling over.
Confi rm the 8 screws supplied with the TV.
1 3
2
Short screws (g4)
(used in step 2)
Set the post for the stand unit onto the
1
Long screws (g4)
(used in step3)
box.
Attach the base to the post.
2
Insert and tighten the 4 screws into the 4
3
holes on the bottom of the base.
Hex key
Screw
Insert the stand into the openings on the
1
bottom of the TV.
Insert and tighten the 4 screws into the 4
2
holes on the rear of the TV.
Hex key
Screw
Soft cushion
6
NOTE
• To detach the stand, perform the steps in reverse order.
Preparation
Setting the TV
Notes on installing the TV
• Avoid direct sunlight and place the TV in a well-ventilated location.
• Place the TV in a level location.
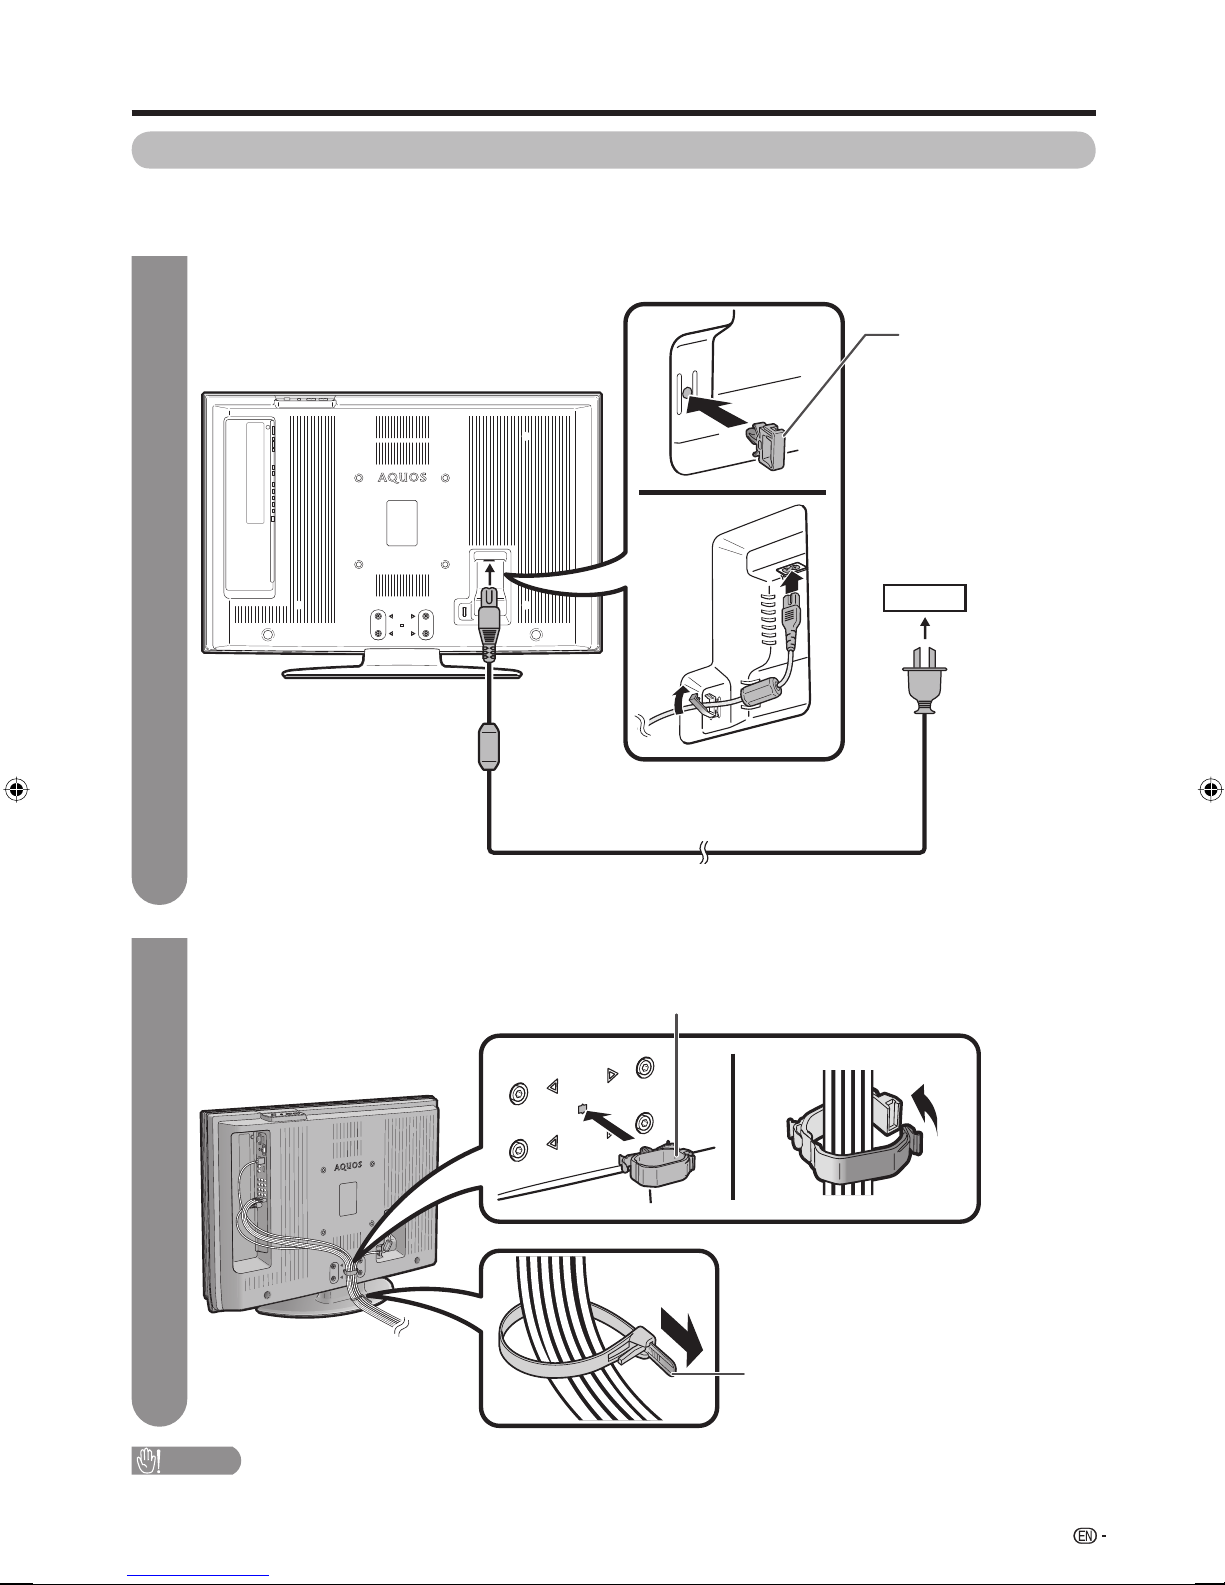
Connecting the AC cord, antenna, and external equipment to the TV
1
TV (rear view)
AC cord clamp
See pages 8 and 42—45 for
connecting antennas and
external equipment, such
as VCR and DVD player.
AC outlet
• Place the TV close to the AC outlet, and keep the power plug within reach.
Bundling the cables
2
Insert the cable clamp in the hole on the TV as shown.
Cable clamp
AC cord
Cable tie
CAUTION
• TO PREVENT RISK OF ELECTRIC SHOCK, DO NOT TOUCH UN-INSULATED PARTS OF ANY CABLES WITH THE
AC CORD CONNECTED.
7
Preparation
Simple operations for watching a TV programme
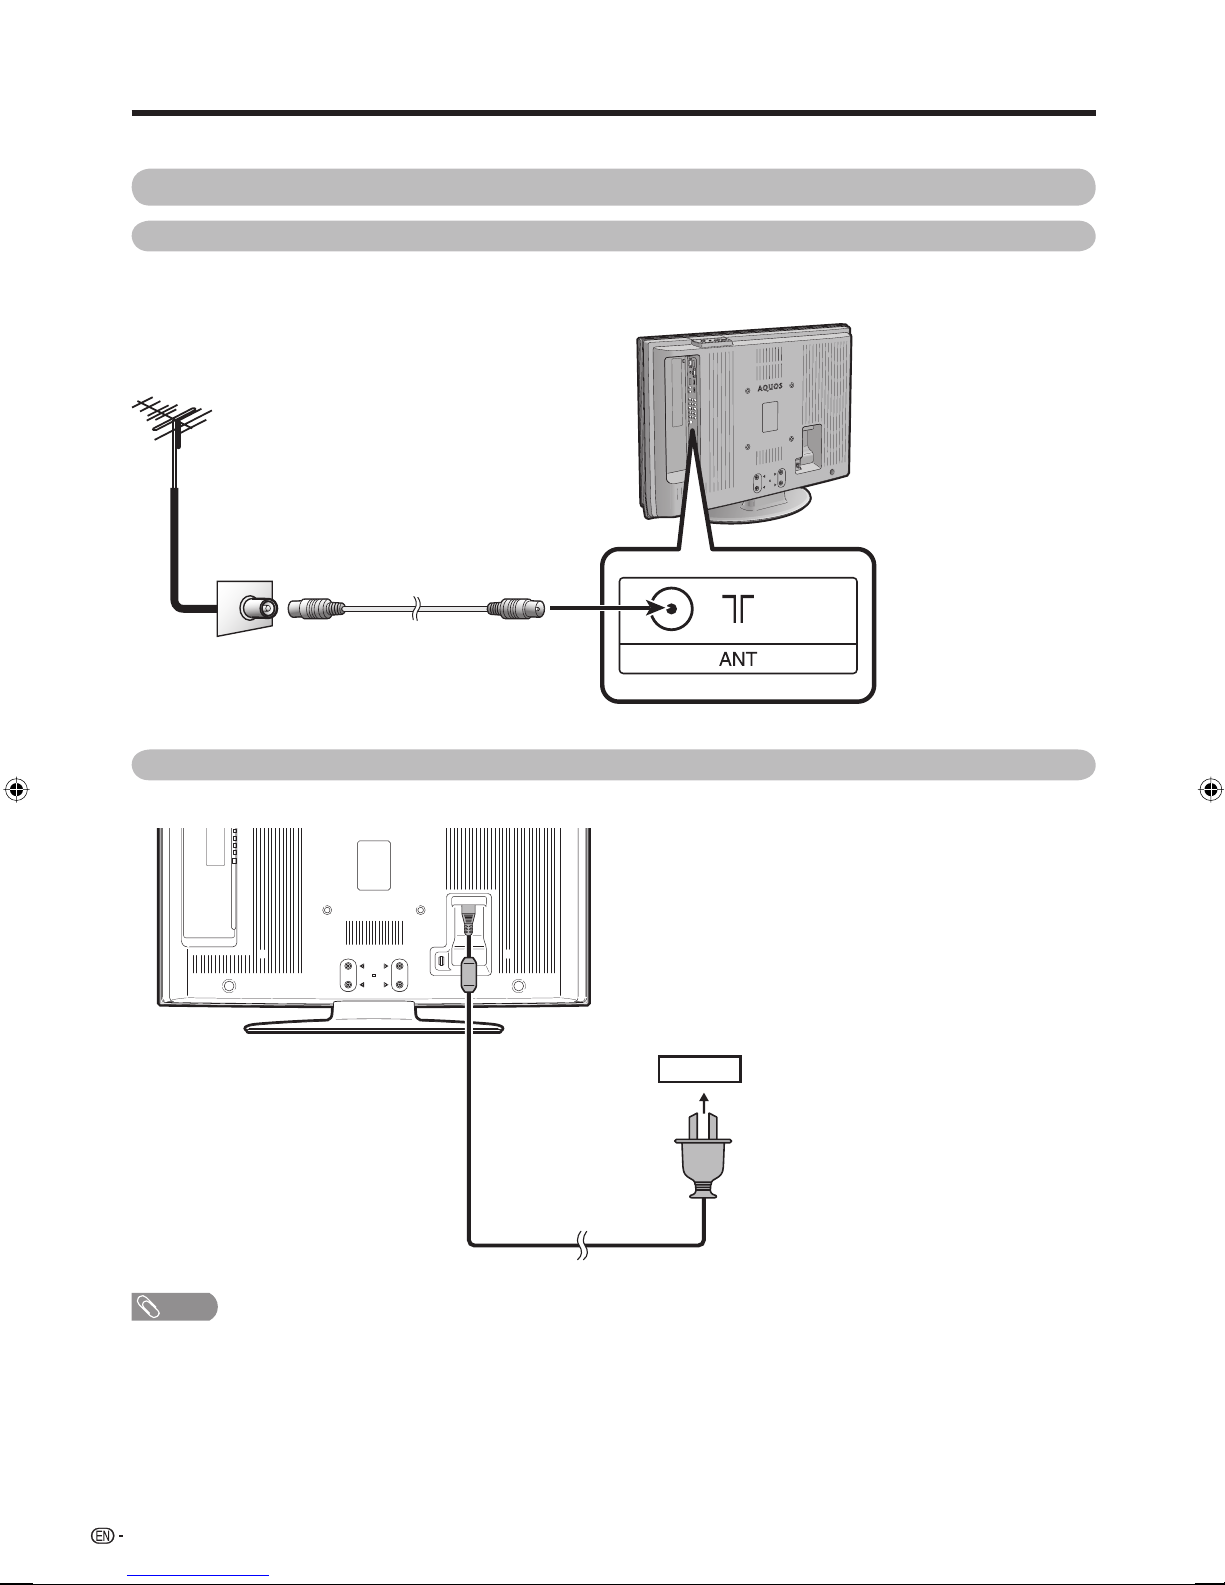
Basic connection
Connecting to an antenna
To enjoy a clearer picture, use an outdoor antenna. The following is a brief explanation of the types of connections
that are used for coaxial cable.
Standard DIN45325 plug (IEC169-2)
75-ohm coaxial cable (round cable)
(commercially available)
To antenna terminal
Room antenna terminal
(75-ohm type)
Connecting to the AC outlet
Antenna cable
Rear view
AC outlet
NOTE
• Always turn off the power of the TV when connecting the AC cord.
• Disconnect the AC cord from the AC outlet if the TV will not be used for a long period of time.
8
Preparation
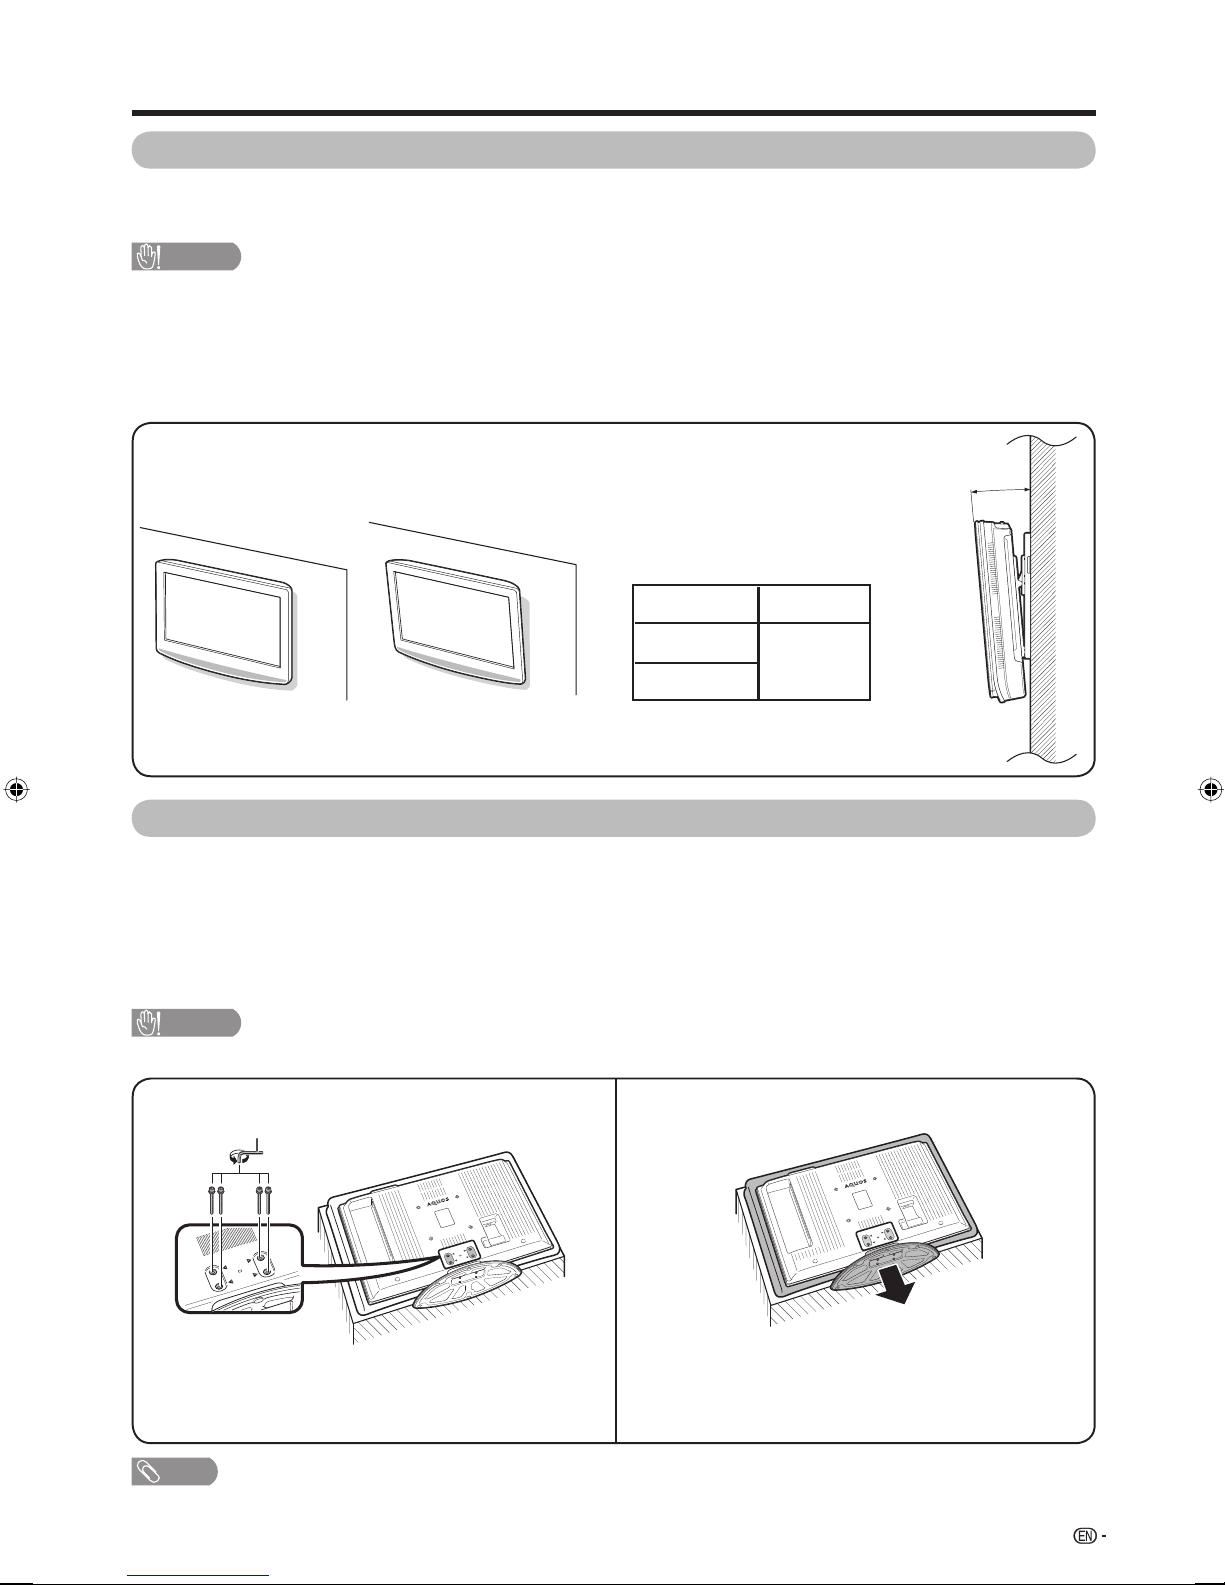
Setting the TV on the wall
• You can mount the TV on the wall, using the optional AN-37AG2 bracket.
• For details, refer to the instructions supplied with the optional bracket.
CAUTION
• This TV should be mounted on the wall only with the AN-37AG2 (SHARP) wall mount bracket. The use of other wall
mount brackets may result in an unstable installation and may cause serious injuries.
• Installing the Liquid Crystal Television requires special skill that should only be performed by qualifi ed service
personnel. Customers should not attempt to do the work themselves. SHARP bears no responsibility for improper
mounting or mounting that results in accident or injury.
<Example>
Hanging on the wall
AN-37AG2 wall mount bracket.
(See the bracket instructions for details.)
Regarding the angle when
mounting the TV on the wall
• The maximum angle to which you
can tilt the wall-mounted TV is as
follows. Do not tilt it more than the
maximum angle.
0°, 5°, 10°
0°, 5°
Vertical mounting
Angular mounting
LC-32PX5X
LC-37PX5X
LC-42PX5X
• Tilt the wall-mounted TV slowly
when adjusting its angle.
Removing the stand
For wall mounting with the optional bracket, remove the stand.
Before detaching/attaching the stand
• Before detaching (or attaching) the stand, unplug the AC cord from the AC outlet.
• Remove all terminal covers and connected cables.
• Lay the TV down on cushioning (such as a blanket) over a table.
• Make sure two or more people perform the operation.
CAUTION
• Do not remove the stand from the TV unless using an optional bracket to mount it.
1
Hex key
Unfasten the four screws used to secure the stand in
place.
NOTE
• To attach the stand, perform the above steps in reverse order.
2
Detach the stand from the TV.
(Hold the stand so it will not drop from the edge of
the base area.)
9
Part names
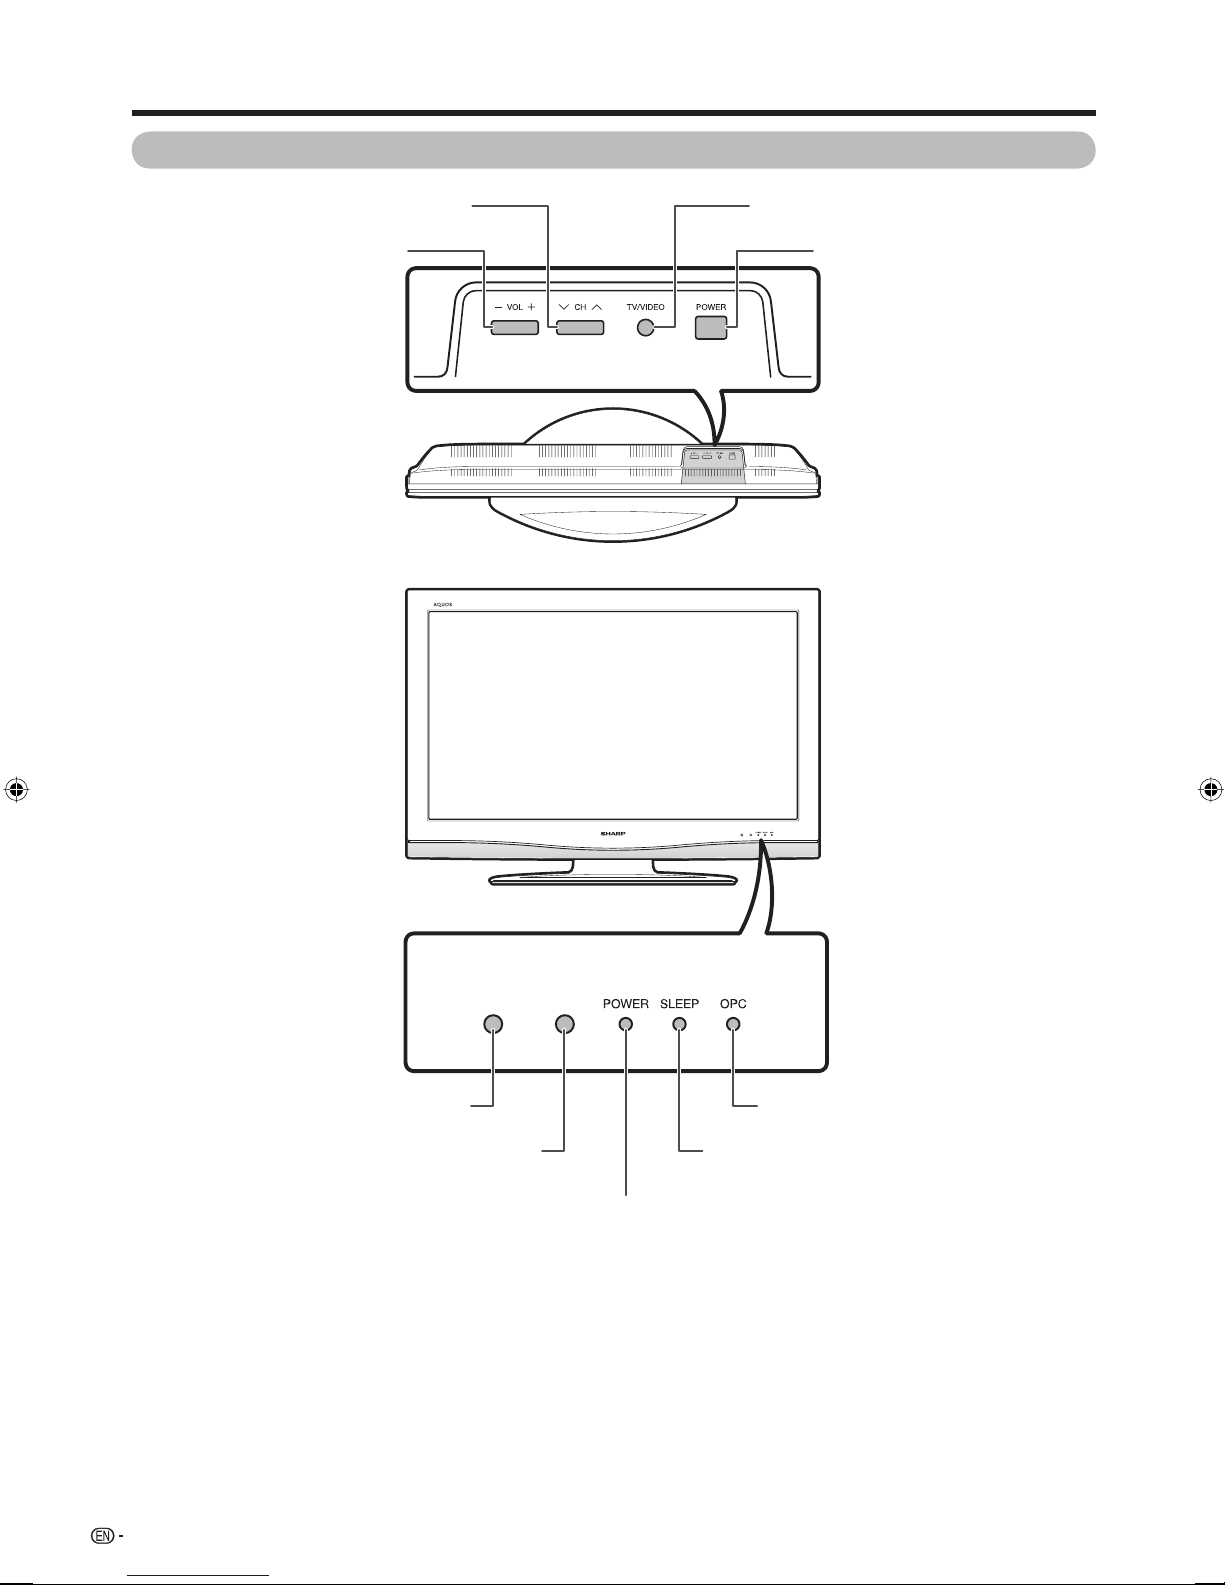
TV (Front)
Channel up (r)/down (s) buttons
Volume up (e)/down (f) buttons
TV/VIDEO button
POWER (On/Off) button
Remote control sensor
10
OPC sensor
POWER indicator
OPC indicator*
SLEEP timer indicator
*OPC: Optical Picture Control
(See page 22.)
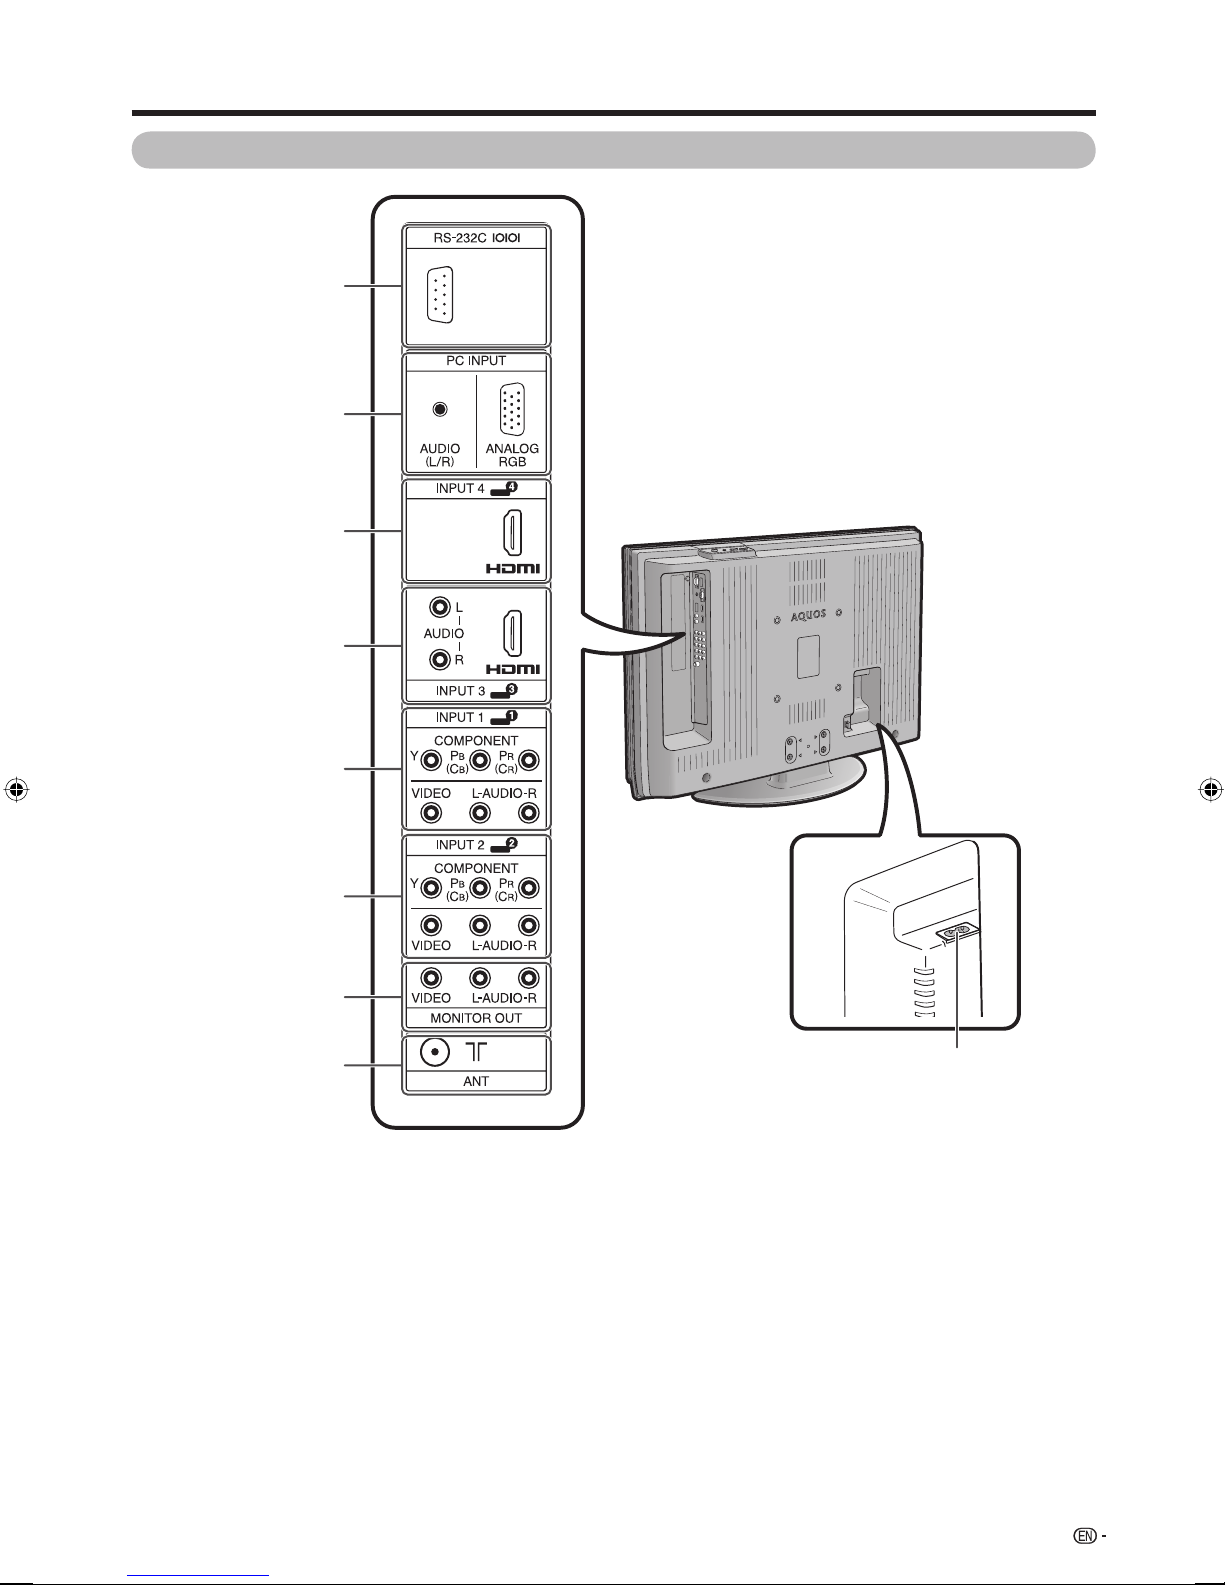
Part names
TV (Rear)
RS-232C terminal
PC INPUT terminals
INPUT 4 (HDMI) terminal
INPUT 3 (HDMI) terminals
INPUT 1 terminals
INPUT 2 terminals
MONITOR OUTPUT
terminals
Antenna input terminal
AC INPUT terminal
11
Part names
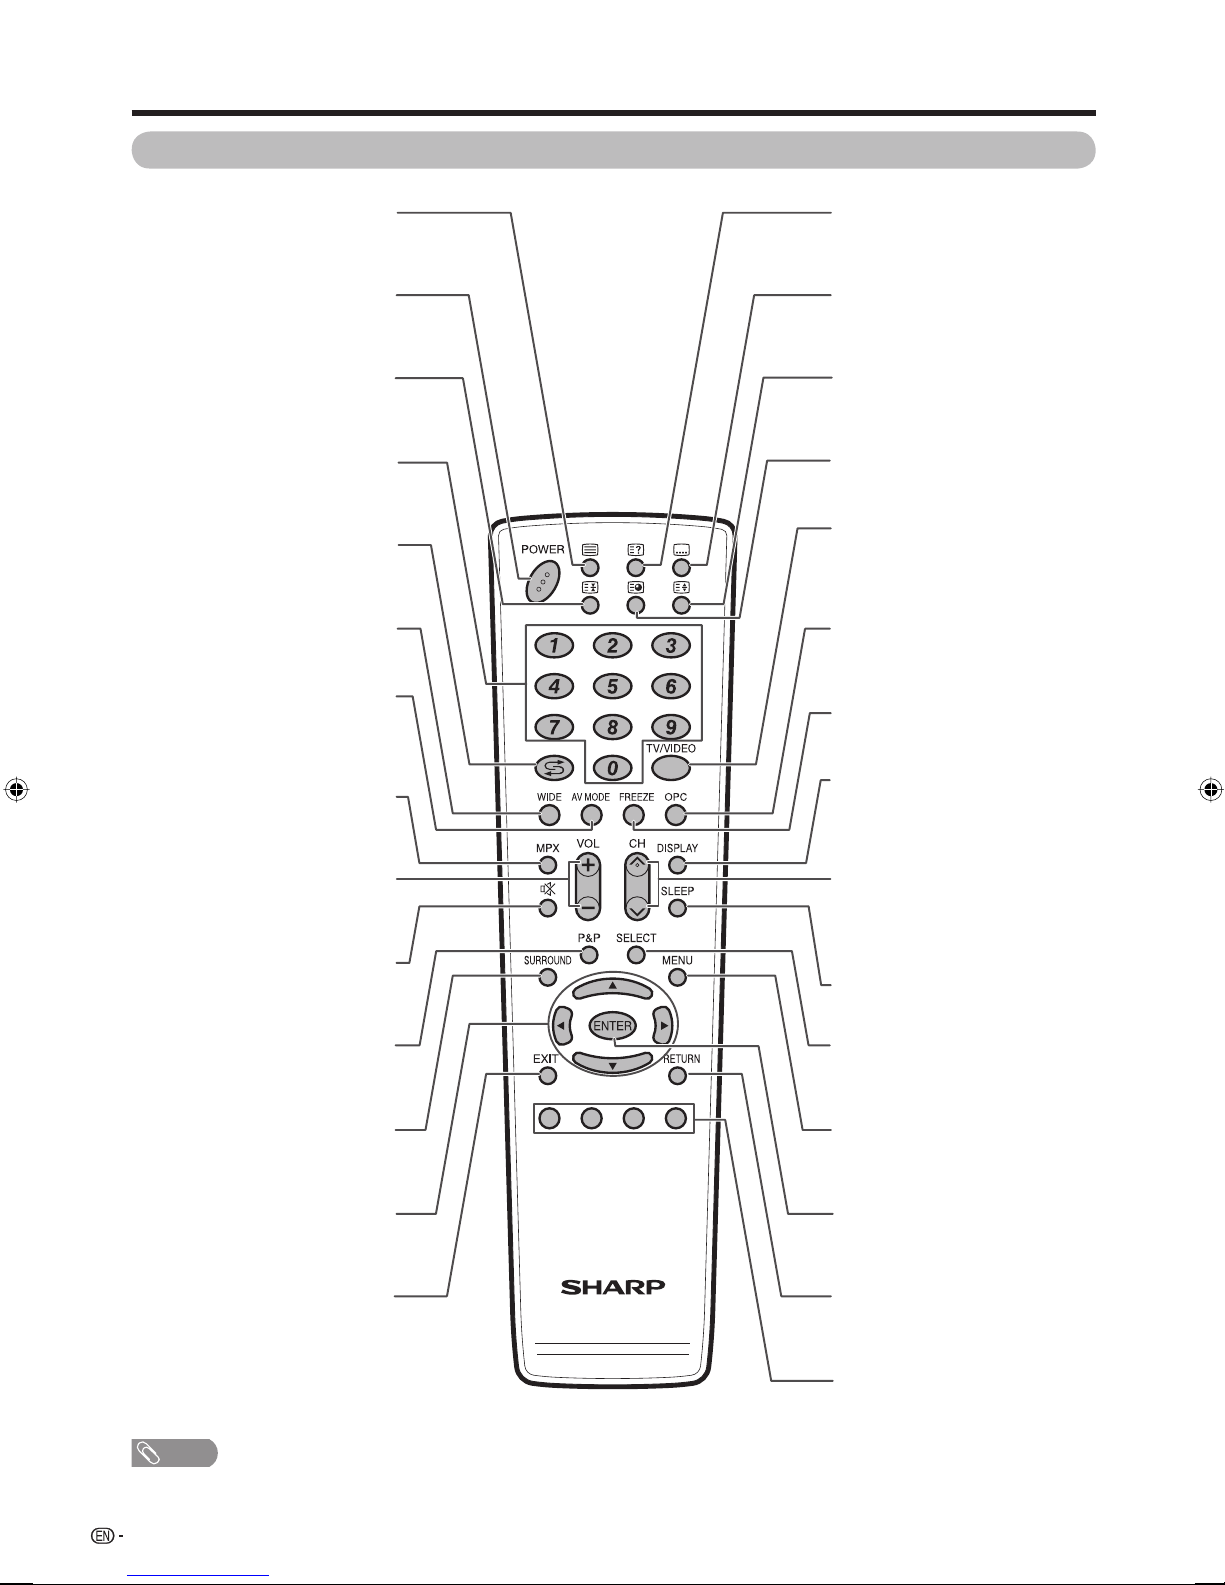
Remote control unit
(TELETEXT)
Select the TELETEXT mode. (all TV
image, all TEXT image, TV/TEXT
image) (See pages 40 and 41.)
m
POWER (STANDBY/ON)
To switch the power on and off. (See
page 13.)
(Hold)
TELETEXT mode: Stop updating
Teletext pages automatically. Press
again to release the hold mode.
3
(See page 40.)
Set the channel. (See page 13.)
TELETEXT mode: Set the page. (See
page 40.)
Press to return to the previous channel
or external input mode. (See page 14.)
3
(Flashback)
A
0 — 9
WIDE
Change the wide image mode. (See
pages 30 and 31.)
AV MODE
Select a video setting: AV MODE
(STANDARD, MOVIE, GAME, USER,
DYNAMIC, DYNAMIC (FIXED)), PC MODE
(STANDARD, USER) (See page 22.)
MPX
Select the sound multiplex mode. (See
page 14.)
(Reveal hidden for
k
TELETEXT)
TELETEXT mode: Display hidden
characters. (See page 40.)
(SUBTITLE for TELETEXT)
[
To turn the subtitles on and off. (See
page 41.)
(Top/Bottom/Full)
v
TELETEXT mode: Set the area of
magnifi cation. (See page 40.)
(Subpage)
1
Display the Teletext subpage directly.
(See page 41.)
TV/VIDEO (INPUT SOURCE)
Select an input source. (TV, INPUT 1,
INPUT 2, INPUT 3, INPUT 4, PC) (See
pages 33, 42 and 45.)
OPC
To switch Optical Picture Control on
and off. (See pages 22.)
FREEZE
Freeze a motion picture on the screen.
(See pages 15 and 38.)
DISPLAY
Display the channel and input source.
Set the volume. (See page 15.)
VOLk/VOL
Mute the sound. (See page 15.)
(Mute)
e
l
P&P
Set the dual picture mode. Press P&P
again to return to normal view. (See
page 38.)
SURROUND
Select Surround settings. (See page
26.)
Select a desired item on the setting
a/b/c/d
screen. (See page 16.)
(Cursor)
EXIT
Return to the default screen.
NOTE
• When using the remote control unit, point it at the TV.
CHr/CH
TV input mode: Select the channel.
(See page 13.)
TELETEXT mode: Select the page.
(See page 40.)
s
SLEEP
Set the Sleep timer. (See page 15.)
SELECT
To select either screen to be active in
Dual screen mode.
MENU
Display the menu screen. (See page
16.)
ENTER
Execute a command.
RETURN
MENU mode: Return to the previous
menu screen. (See page 16.)
Colour (Red/Green/Yellow/
Blue)
TELETEXT mode: Select a page. (See
page 40.)
12
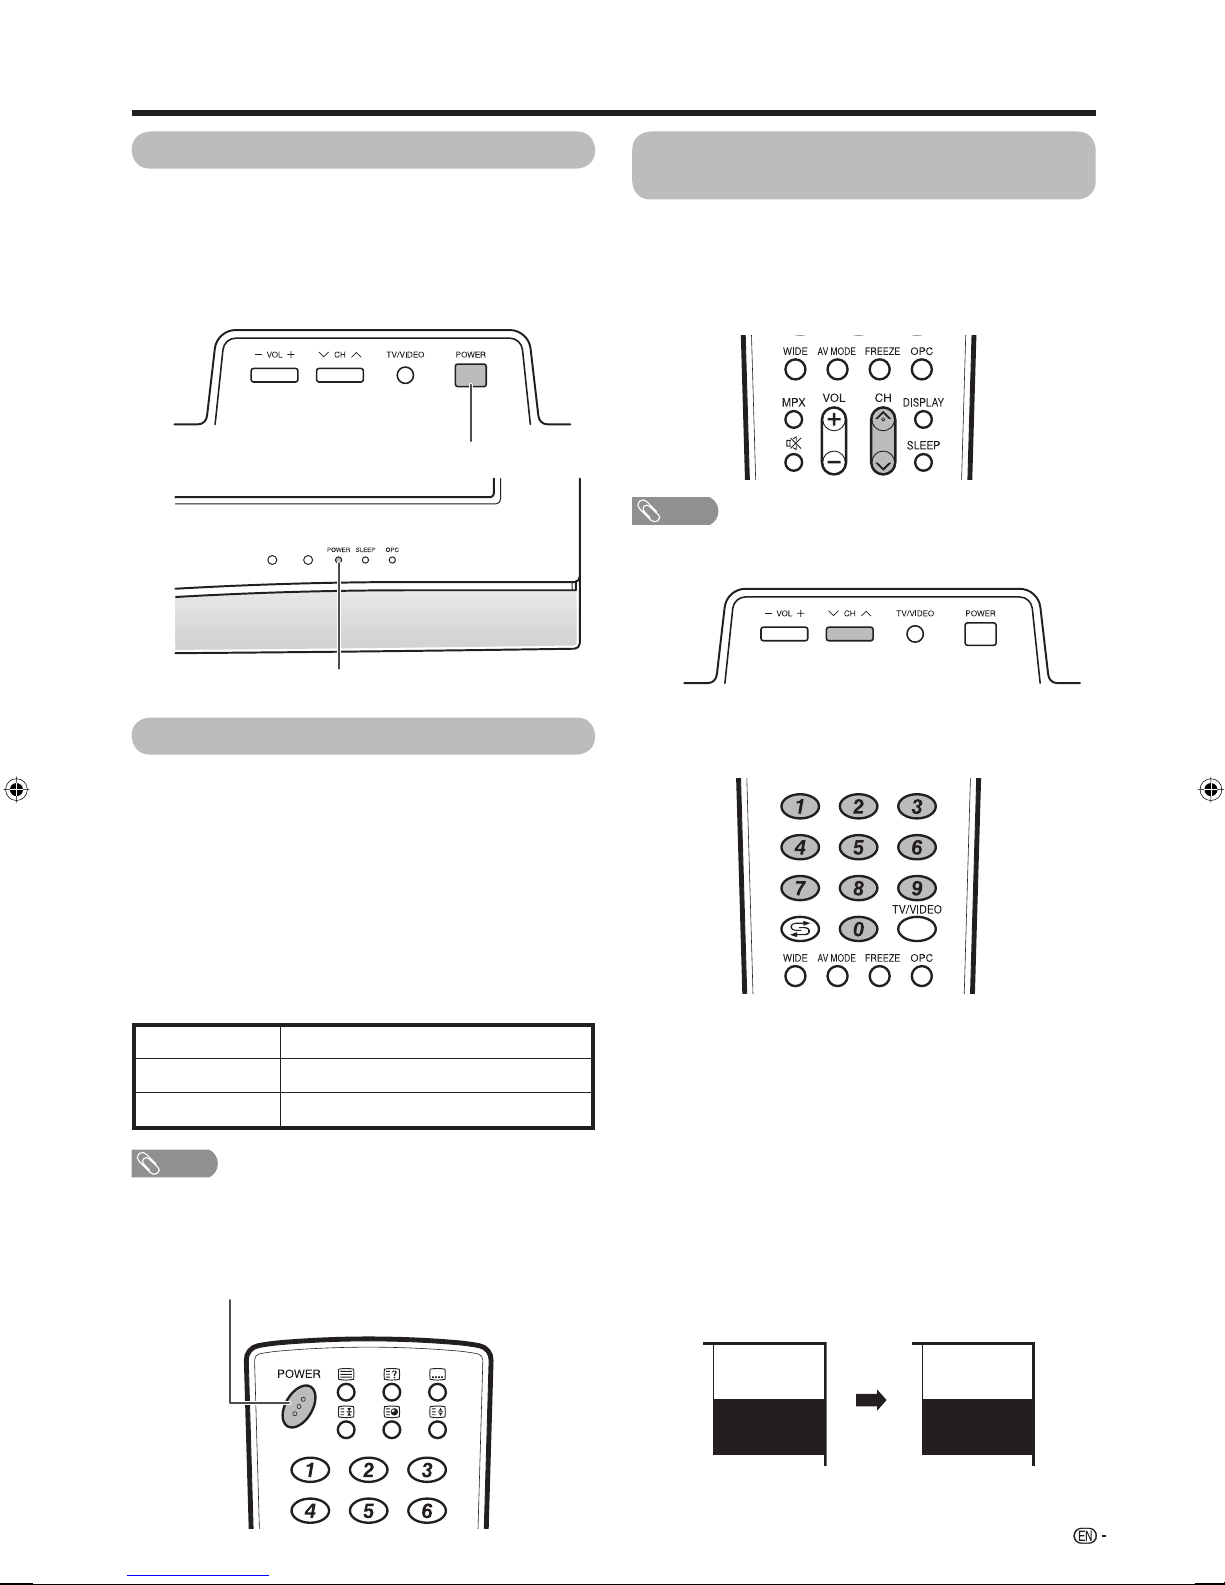
Watching TV
Turning on the power
Press POWER on the TV.
• POWER indicator (Green): The TV is on. (After a few
seconds, an image appears with sound.)
• After turning the power “ON” by pressing POWER on the
TV, you can turn the power ON/OFF by pressing POWER
on the remote control.
POWER button
POWER indicator
Turning off the power
Press POWER on the remote control.
• The TV enters standby mode and the image on the screen
disappears.
• The POWER indicator on the TV changes from green to
red.
Press POWER on the TV.
• The POWER indicator on the TV turns off.
• When the TV is turned off by POWER on the TV, you
cannot turn on the power by pressing POWER on the
remote control.
Simple button operations for
changing channels
You can change channels in several ways.
Using CHr/s on the remote control unit
• Press CHr to increase the channel number.
• Press CHs to decrease the channel number.
NOTE
• CHr/s on the TV operates the same as CHr/s on
the remote control unit.
Using 0 — 9 on the remote control unit
Select the channels directly by pressing buttons 0 to 9.
POWER indicator
Off Power off
Red
NOTE
• If you are not going to use this TV for a long period of time,
be sure to remove the AC cord from the AC outlet.
• Minor power is consumed when the unit is in standby
mode.
POWER button
The TV is in standby mode.
The TV is on.Green
a
To select a 1-digit channel (e.g. channel 2):
• Press 0, followed by 2.
To select a 2-digit channel (e.g. channel 12):
• Press 1, followed by 2.
When viewing Teletext information
View a page directly which is 3-digit page number from
100 to 899 by pressing buttons 0 to 9.
Channel display
Channel display changes approximately after 3
seconds as shown below.
(Example)
SAT.1
12
SAT.1
12
PAL
B/G
MONO
13
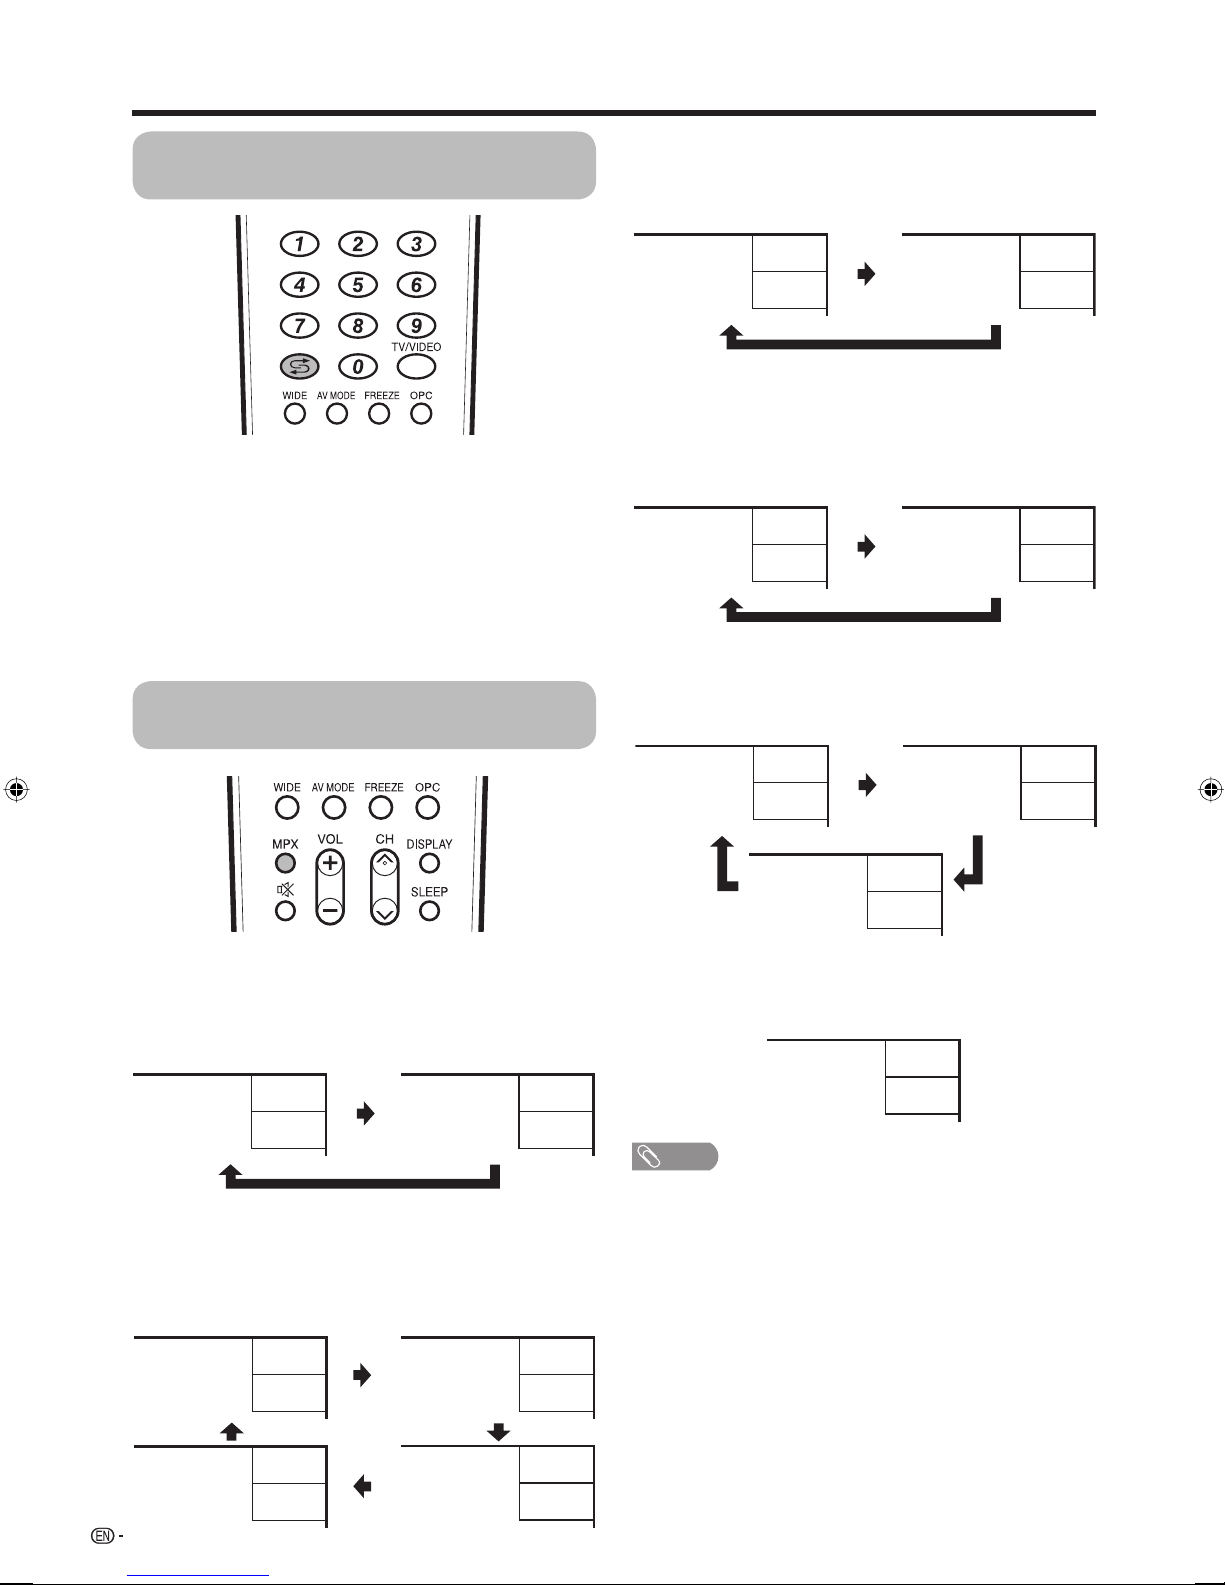
Watching TV
Using Flashback (A) on the remote
control unit
Press A to switch the currently tuned channel to the
previously tuned channel.
Press A again to switch back to the currently tuned
channel.
Press A to toggle between the currently selected
input source and the previously selected one.
Press A to return to the previous page in TELETEXT
mode.
Using MPX on the remote control
unit
When receiving a monaural signal
Each time you press MPX, the mode switches
between NICAM MONO and MONO.
Monaural mode
BBC2
99
NICAM
MONO
BBC2
99
MONO
In the TV mode of A2 TV broadcasts
When receiving a stereo signal
Each time you press MPX, the mode switches
between STEREO and MONO.
Stereo mode
BBC2
99
STEREO
BBC2
99
MONO
When receiving a bilingual signal
Each time you press MPX, the mode switches among
CH A, CH B and CH AB.
Bilingual mode
BBC2
99
BBC2
99
In the NICAM TV broadcasts
When receiving a stereo signal
Each time you press MPX, the mode switches
between NICAM STEREO and MONO.
Stereo mode
BBC2
99
NICAM
STEREO
BBC2
99
MONO
When receiving a bilingual signal
Each time you press MPX, the mode switches among
NICAM CH A, NICAM CH B, NICAM CH AB and
MONO.
Bilingual mode
BBC2
99
NICAM
CH A
BBC2
99
NICAM
CH B
CH A
BBC2
99
CH AB
CH B
When receiving a monaural signal
When you press MPX, “MONO” displays.
Monaural mode
BBC2
99
MONO
NOTE
• “BBC2” and “99” are tentative network name and channel.
BBC2
99
MONO
14
BBC2
99
NICAM
CH AB
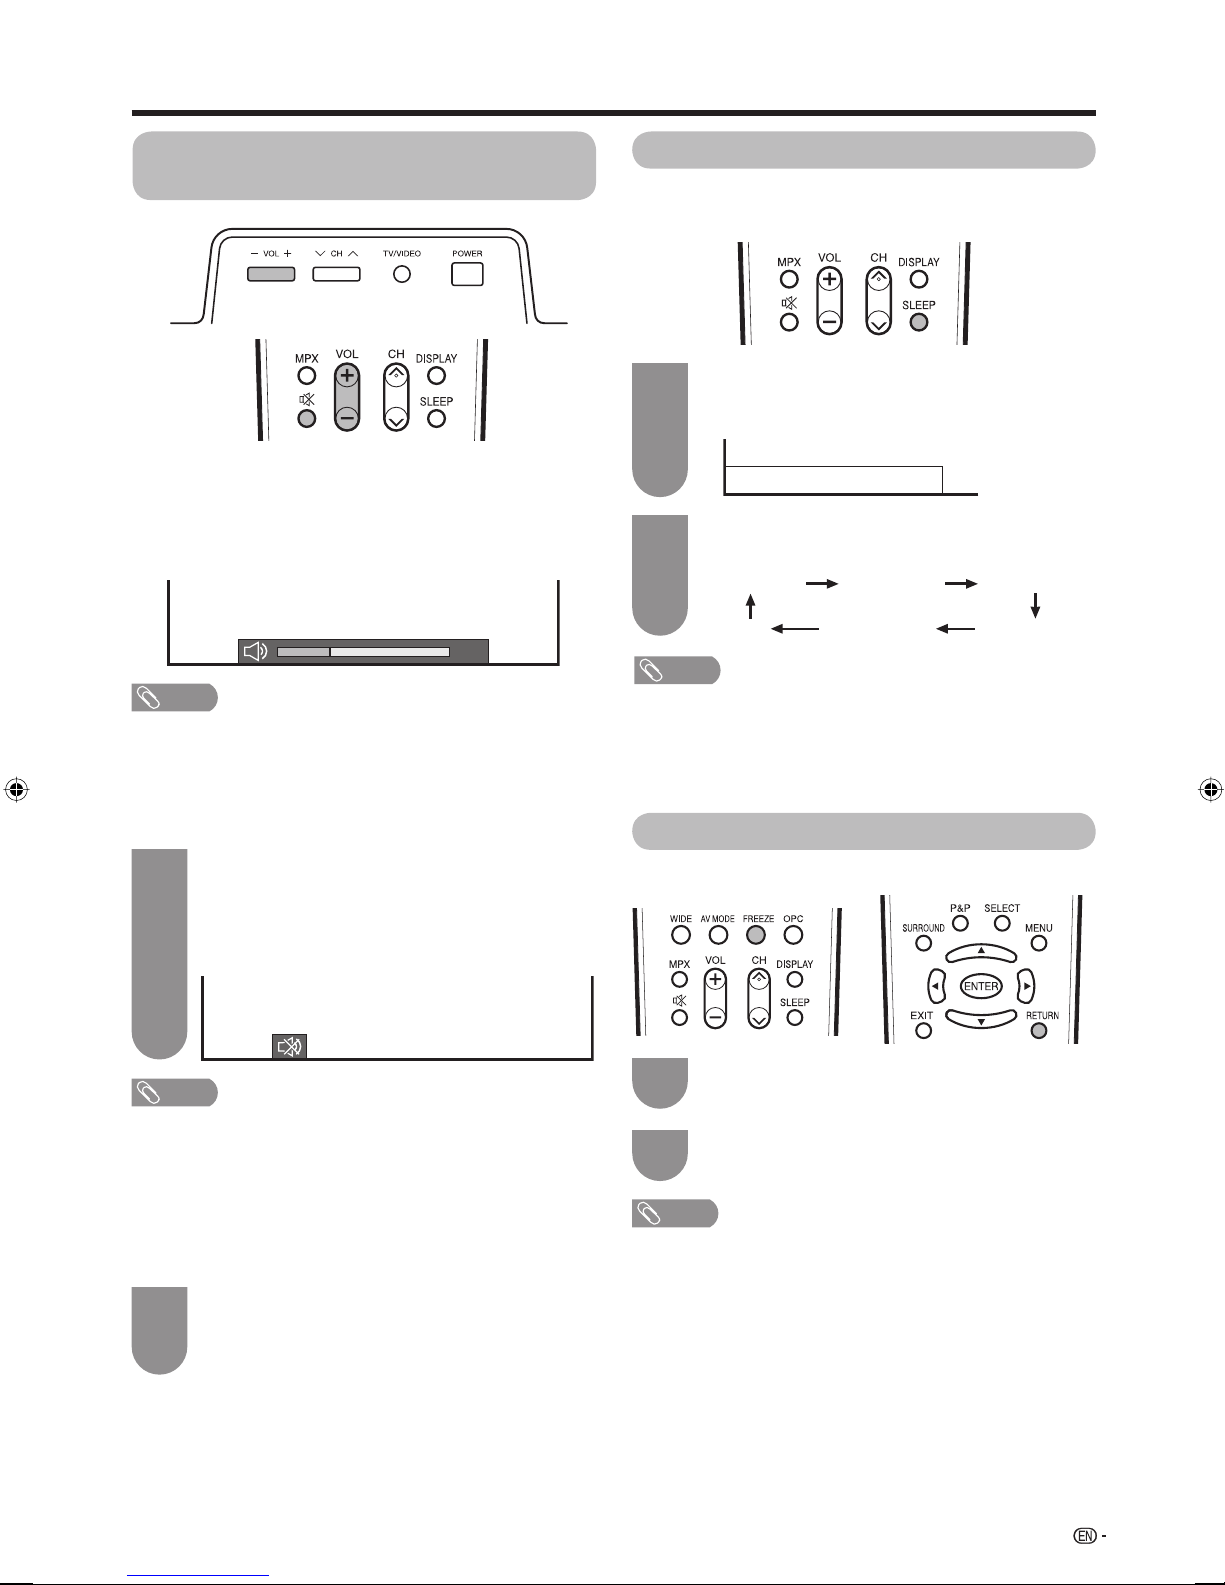
Watching TV
Simple button operation for
changing volume/sound
Changing the volume
You can change the volume on the TV or on the
remote control unit.
• To increase the volume, press VOLk.
• To decrease the volume, press VOLl.
20
NOTE
• “TV”, “INPUT1”, “INPUT2”, “INPUT3”, “INPUT4” and “PC”
modes can store volume adjustment values separately.
Using Mute (e) on the remote control unit
mutes the current sound output.
e
Press e.
1
• The sound is silenced.
• “M” has been displayed on the screen for 30
minutes.
Mute
Sleep timer
Allows you to set a time when the TV automatically
switches to standby.
Press SLEEP.
1
• Remaining time displays when sleep timer has
been set.
Sleep Timer: Remain 2 hr. 00 min.
Each time you press SLEEP, the remaining
2
time switches as shown below.
0 hr. 30 min. 1 hr. 00 min. 1 hr. 30 min.
Off
NOTE
• When the time has been set, countdown automatically
starts.
• Five minutes before the preset of time expires, the
remaining time displays each minute.
• Select “Off” by pressing SLEEP to cancel the sleep timer.
2 hr. 30 min. 2 hr. 00 min.
Still image
You can freeze a motion picture on the screen.
NOTE
• Within 30 minutes after pressing e, press one of the
buttons below to cancel the mute.
— VOLl/VOL
—
e
• Mute will be cancelled after 30 minutes. However,
the TV will not suddenly output loud sound as the
volume level will be set to 0 automatically. Increase
the volume level by pressing VOLk.
Press e again within 30 minutes to cancel the
2
mute.
• Before 30 minutes, the volume level returns to the
k
previous setting.
Press FREEZE.
1
Press RETURN to exit still image.
2
NOTE
• When this function is not available, “No still image
available.” will display.
• The still image automatically goes out after 30 minutes.
15
 Loading...