


MODEL
AR-M237
AR-M277
DIGITAL MULTIFUNCTIONAL SYSTEM
OPERATION MANUAL (for copier)
• BEFORE USING |
Page |
|
|
THE MACHINE |
8 |
• COPY FUNCTIONS |
21 |
• CONVENIENT COPY |
|
FUNCTIONS |
35 |
• USER SETTINGS |
51 |
• TROUBLESHOOTING |
|
AND MAINTENANCE |
57 |
• PERIPHERAL DEVICES |
|
AND SUPPLIES |
76 |
• APPENDIX |
80 |

|
|
||||
|
|
||||
|
FOR YOUR RECORDS ... |
||||
|
|
||||
|
To protect against loss or theft, record and retain for reference the |
|
|||
|
copier’s serial number located on the back of the unit. |
|
|||
|
Model Number |
|
|
|
|
|
Serial Number |
|
|
|
|
|
Date of Purchase |
|
|
|
|
|
Place of Purchase |
|
|
|
|
|
Authorized Sharp Copier |
|
|||
|
Service Department Number |
|
|
|
|
|
|
||||
|
|
||||
Do not make copies of anything which is prohibited from copying by law. The following items are normally prohibited from copying by national law. Other items may be prohibited by local law.
● Money |
● Stamps |
● Bonds |
● Stocks |
● Bank drafts |
● Checks |
● Passports |
● Driver's licenses |
|
|

CONTENTS |
|
CAUTIONS................................................................................................................................................. |
3 |
● CAUTIONS ON USING THE MACHINE........................................................................................................... |
3 |
● IMPORTANT POINTS WHEN SELECTING AN INSTALLATION SITE ........................................................... |
3 |
● CAUTIONS ON HANDLING THE MACHINE.................................................................................................... |
4 |
● ENVIRONMENTAL INFORMATION................................................................................................................. |
5 |
USING THE MANUAL ............................................................................................................................... |
5 |
● ABOUT THE OPERATION MANUALS............................................................................................................. |
5 |
● THE MEANING OF "R" IN ORIGINAL AND PAPER SIZE INDICATIONS ....................................................... |
6 |
● CONVENTIONS USED IN THIS MANUAL....................................................................................................... |
6 |
MAIN FEATURES ...................................................................................................................................... |
7 |
1 BEFORE USING THE MACHINE
PART NAMES AND FUNCTIONS ..................... |
8 |
● OPERATION PANEL ...................................... |
10 |
● TOUCH PANEL .............................................. |
11 |
POWER ON AND OFF..................................... |
13 |
● POWER ON .................................................... |
13 |
● POWER OFF .................................................. |
13 |
● INITIAL SETTINGS......................................... |
14 |
● POWER SAVE MODES.................................. |
14 |
LOADING PAPER............................................ |
15 |
● PAPER............................................................ |
15 |
● LOADING PAPER........................................... |
17 |
● CHANGING A TRAY’S PAPER TYPE AND |
|
PAPER SIZE SETTINGS................................ |
19 |
2 COPY FUNCTIONS |
|
MAIN SCREEN OF COPY MODE ................... |
21 |
NORMAL COPYING ........................................ |
22 |
● COPYING FROM THE DOCUMENT GLASS .... |
22 |
● COPYING FROM THE RSPF ......................... |
23 |
● POINTS TO NOTE WHEN MAKING COPIES ... |
24 |
● BYPASS FEED (special paper) ...................... |
26 |
AUTOMATIC TWO-SIDED COPYING............. |
27 |
● USING THE DOCUMENT GLASS.................. |
27 |
● USING THE RSPF.......................................... |
28 |
EXPOSURE ADJUSTMENT ............................ |
29 |
● SELECTING THE ORIGINAL IMAGE TYPE AND |
|
MANUALLY ADJUSTING THE EXPOSURE...... |
29 |
REDUCTION/ENLARGEMENT/ZOOM............ |
30 |
● AUTOMATIC RATIO SELECTION ................. |
30 |
● MANUAL RATIO SELECTION........................ |
31 |
●SELECTING THE VERTICAL AND HORIZONTAL COPY RATIOS SEPARATELY
(XY ZOOM copying)........................................ |
32 |
INTERRUPTING A COPY RUN ....................... |
34 |
3 CONVENIENT COPY FUNCTIONS
COPY FINISHING FUNCTIONS ...................... |
35 |
● SORT COPY .................................................. |
35 |
● GROUP COPY............................................... |
35 |
● OFFSET FUNCTION ..................................... |
35 |
● STAPLE SORT (when the finisher |
|
(AR-FN5N) is installed) .................................. |
37 |
● ORIENTATION OF THE ORIGINAL AND |
|
STAPLING POSITIONS................................. |
37 |
SPECIAL MODES............................................ |
39 |
● GENERAL PROCEDURE FOR USING THE |
|
SPECIAL FUNCTIONS .................................. |
40 |
● MARGIN SHIFT COPY .................................. |
41 |
● ERASE COPY................................................ |
42 |
● DUAL PAGE COPY ....................................... |
43 |
● PAMPHLET COPY ........................................ |
44 |
● JOB BUILD MODE......................................... |
45 |
● MULTI SHOT COPY ...................................... |
46 |
● ORIGINAL SIZE ............................................. |
47 |
● COVER COPY ............................................... |
48 |
● B/W REVERSE COPY ................................... |
50 |
4 USER SETTINGS |
|
CUSTOM SETTINGS....................................... |
51 |
● GENERAL PROCEDURE FOR CUSTOM |
|
SETTINGS ..................................................... |
52 |
● SETTINGS ..................................................... |
53 |
JOB PROGRAM MEMORY ............................. |
54 |
● STORING A JOB PROGRAM........................ |
54 |
● EXECUTING A JOB PROGRAM ................... |
55 |
● DELETING A STORED JOB PROGRAM ...... |
55 |
AUDITING MODE ............................................ |
56 |
● COPYING WHEN AUDITING MODE IS |
|
ENABLED ...................................................... |
56 |
1

5 TROUBLESHOOTING AND MAINTENANCE
DISPLAY MESSAGES..................................... |
58 |
TROUBLESHOOTING ..................................... |
60 |
MISFEED REMOVAL....................................... |
64 |
● MISFEED REMOVAL GUIDANCE ................. |
64 |
● MISFEED IN THE RSPF................................. |
65 |
● MISFEED IN THE BYPASS TRAY ................. |
66 |
● MISFEED IN THE MACHINE.......................... |
66 |
● MISFEED IN THE CENTER TRAY................. |
68 |
● MISFEED IN THE UPPER PAPER TRAY ...... |
68 |
● MISFEED IN THE LOWER PAPER TRAY ..... |
69 |
●MISFEED IN THE UPPER EXIT AREA (when a job separator tray kit or finisher
(AR-FN5N) is installed) ................................... |
70 |
● MISFEED IN AN OUTPUT TRAY |
|
(when a finisher (AR-FN5N) is installed)......... |
70 |
REPLACING THE TONER CARTRIDGE ........ |
72 |
STAPLE CARTRIDGE REPLACEMENT......... |
73 |
● STAPLE JAM REMOVAL ............................... |
74 |
CHECKING THE TONER QUANTITY AND |
|
TOTAL OUTPUT COUNT ................................ |
74 |
CLEANING THE MACHINE............................. |
75 |
● DOCUMENT GLASS AND RSPF ................... |
75 |
● THE BYPASS TRAY PAPER |
|
FEED ROLLER ............................................... |
75 |
6 PERIPHERAL DEVICES AND SUPPLIES
PERIPHERAL DEVICES.................................. |
76 |
● FINISHER (AR-FN5N) .................................... |
77 |
● 500-SHEET PAPER FEED UNIT/ |
|
2 x 500-SHEET PAPER FEED UNIT.............. |
78 |
STORAGE OF SUPPLIES ............................... |
79 |
● PROPER STORAGE ...................................... |
79 |
7 APPENDIX |
|
SPECIFICATIONS ........................................... |
80 |
MATERIAL SAFETY DATA SHEET................ |
82 |
INDEX............................................................... |
90 |
● INDEX BY PURPOSE..................................... |
93 |
2
CAUTIONS
Follow the cautions below when using this machine.
CAUTIONS ON USING THE MACHINE
 Warning:
•The fusing area is hot. Exercise care in this area when removing misfed paper.
•Do not look directly at the light source. Doing so may damage your eyes.
 Caution:
•Do not switch the machine rapidly on and off. After turning the machine off, wait 10 to 15 seconds before turning it back on.
•Machine power must be turned off before installing any supplies.
•Place the machine on a firm, level surface.
•Do not install the machine in a humid or dusty location.
•When the machine is not used for a long time, for example, during prolonged holidays, turn the power switch off and remove the power cord from the outlet.
•When moving the machine, be sure to turn the power switch off and remove the power cord from the outlet.
•Do not cover the machine with a dust cover, cloth or plastic film while the power is on. Doing so may prevent heat dissipation, damaging the machine.
•Use of controls or adjustments or performance of procedures other than those specified herein may result in hazardous laser radiation exposure.
•The socket-outlet should be installed near the machine and should be easily accessible.
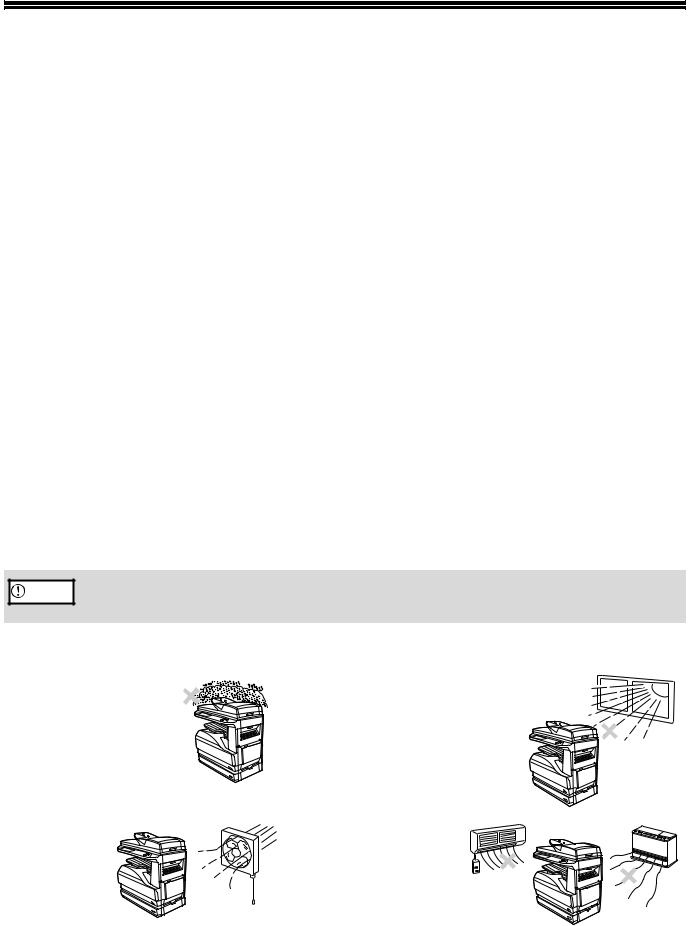
IMPORTANT POINTS WHEN SELECTING AN INSTALLATION SITE
Improper installation may damage the machine. Please note the following during initial installation and whenever the machine is moved.
Caution |
If the machine is moved from a cool place to a warm place, condensation may form inside the machine. Operation |
in this condition will cause poor copy quality and malfunctions. Leave the machine at room temperature for at least |
|
|
2 hours before use. |
Do not install your machine in areas that are:
• damp, humid, or very |
• exposed to direct sunlight |
dusty |
|
• poorly |
• subject to extreme |
ventilated |
temperature or humidity |
|
changes, e.g., near an |
|
air conditioner or |
|
heater. |
3

The machine should be installed near an accessible power outlet for easy connection and disconnection.
Be sure to connect the power cord only to a power outlet that meets the specified voltage and current requirements. Also make certain the outlet is properly grounded.
 Note Connect the machine to a power outlet which is not used for other electric appliances. If a lighting fixture is connected to the same outlet, the light may flicker.
Be sure to allow the required space around the machine for servicing and proper ventilation.
|
12" (30cm) |
12" |
12" |
(30cm) |
(30cm) |
A small amount of ozone is produced within the machine during operation. The emission level is insufficient to cause any health hazard.
Note:
The present recommended long term exposure limit for ozone is 0.1 ppm (0.2 mg/m3) calculated as an 8 hr. timeweighted average concentration.
However, since the small amount that is emitted may have an objectionable odor, it is advisable to place the machine in a ventilated area.
CAUTIONS ON HANDLING THE MACHINE
Observe the following precautions when handling the machine to maintain top performance.
Do not drop the machine, subject it to shock or strike it against any object.
Store spare toner cartridges in a cool dry place without removing from the package before use.
•If they are exposed to direct sunlight or excessive heat, poor copies may result.
Do not touch the photoconductive drum (green portion).
•Scratches or smudges on the drum will cause dirty copies.
Safety precautions:
This Digital Copier is rated Class I and complies with 21 CFR 1040.10 and 1040.11 of the CDRH standards. This means that the machine does not produce hazardous laser radiation. For your safety, observe the precautions below.
•Do not remove the cabinet, operation panel or any other covers.
•The machine’s exterior covers contain several safety interlock switches. Do not bypass any safety interlock by inserting wedges or other items into switch slots.
Trademark acknowledgements
•Microsoft® Windows® operating system is a trademark or copyright of Microsoft Corporation in the U.S.A. and other countries.
•Windows® 95, Windows® 98, Windows® Me, Windows NT® 4.0, Windows® 2000, and Windows® XP are trademarks or copyrights of Microsoft Corporation in the U.S.A. and other countries.
•IBM and PC/AT are trademarks of International Business Machines Corporation.
•Acrobat® Reader Copyright© 19872002 Adobe Systems Incorporated. All rights reserved. Adobe, the Adobe logo, Acrobat, and the Acrobat logo are trademarks of Adobe Systems Incorporated.
•PostScript® is a registered trademark of Adobe Systems Incorporated.
•Macintosh, Power Macintosh, Mac OS, LaserWriter, and AppleTalk are trademarks of Apple Computer, Inc.
•All other trademarks and copyrights are the property of their respective owners.
4
ENVIRONMENTAL INFORMATION
As an ENERGY STAR® Partner, SHARP has determined that this product meets the ENERGY STAR® guidelines for energy efficiency.
The Environmental Choice Program guidelines are applied to the products only in Canada. The products that meet the Environmental Choice Program guidelines carry the logo shown to the left. The products without the logo may not meet the Environmental Choice Program guidelines.
"BATTERY DISPOSAL"
THIS MACHINE CONTAINS MANGANESE DIOXIDE BATTERY WHICH MUST BE DISPOSED OF PROPERLY. CONTACT YOUR SHARP DEALER OR SERVICER FOR INSTRUCTIONS.
This product utilizes tin-lead solder, and a fluorescent lamp containing a small amount of mercury. Disposal of these materials may be regulated due to environmental considerations.
For disposal or recycling information, please contact your local authorities or the Electronics Industries Alliance: www.eia.org
USING THE MANUAL
This machine has been designed to provide convenient copying features in a minimum amount of office space and with maximum operational ease. To get full use of all machine features, be sure to familiarize yourself with this manual and the machine. For quick reference during machine use, keep this manual in a handy location.
ABOUT THE OPERATION MANUALS
The operation manuals for the machine are as follows:
Operation Manual for copier (this manual)
This manual contains explanations of the product and procedures for using the machine as a copier.
Online manual (for printer)
This manual is on the CD-ROM, and explains the procedures for using the machine as a printer, network printer, and network scanner.
Software setup guide (for printer)
This manual contains instructions for installing the software that allows the machine to be used with your computer and procedures for establishing initial printer settings.
Operation manual (for network scanner) (When the network scanner is installed.)
This manual contains explanations of the product and procedures for using the machine as a network scanner.
Key operator's guide
This explains key operator programs for machine management and copier related functions. Key operator programs for the fax functions are explained in the operation manual for facsimile.
5
THE MEANING OF "R" IN ORIGINAL AND PAPER SIZE INDICATIONS
An "R" appearing at the end of an original or paper size (5-1/2" x 8-1/2"R, 8-1/2" x 11"R, etc.) indicates that the original or paper is oriented horizontally as shown below.
<Horizontal (Landscape) orientation>
Sizes that can be placed only in the horizontal (landscape) orientation (8-1/2" x 14", 11" x 17"), do not contain the "R" in their size indication.
CONVENTIONS USED IN THIS MANUAL
Warning

 Caution
 Note
Note
Warns that injury may result if the contents of the warning are not properly followed.
Cautions that damage to the machine or one of its components may result if the contents of the caution are not properly followed.
Notes provide useful information on the specifications, functions, performance, and operation of the machine.
Explanation of words and illustration
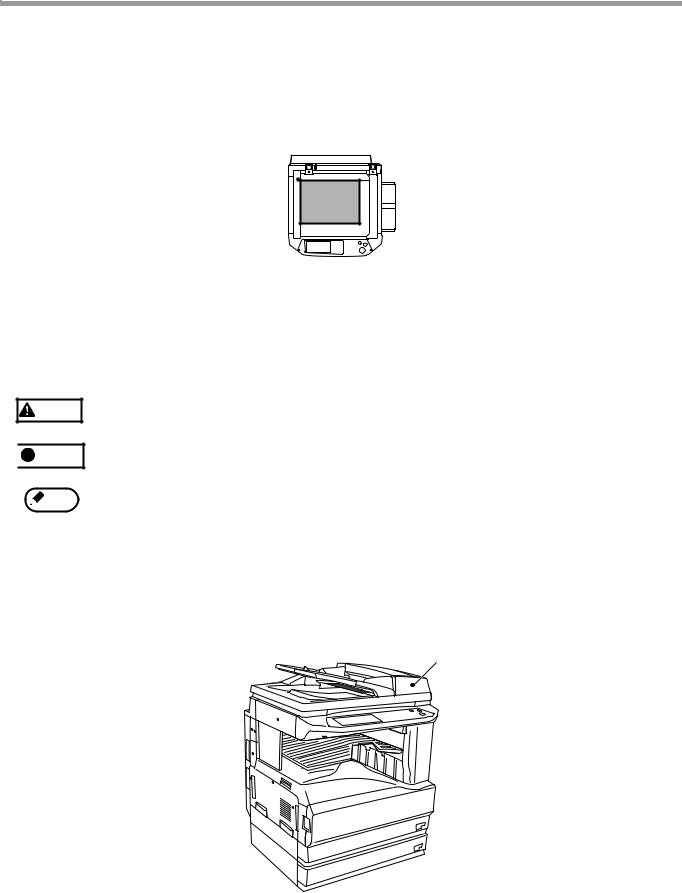
•This operation manual refers to the Reversing Single Pass Feeder as the "RSPF".
•The illustrations in this manual show the AR-M237/AR-M277 with the optional job separator tray kit (AR-TR3) installed.
The appearance of your machine may be different depending on the model and options installed, however, the basic operations are the same.
RSPF
• For peripheral devices that can be installed, see "PERIPHERAL DEVICES" (p.76).
6
MAIN FEATURES
High-speed laser copying
•First-copy time*1 at 600 dpi*2 is only 4.8 seconds.
•Copying speed is 23 copies/min. (AR-M237) or 27 copies/min. (AR-M277) at 600 dpi (not in the super photo
mode). This is ideal for business use and provides a big boost to workplace productivity.
*1 |
First-Copy time may vary depending on the power-supply voltage, ambient temperature, and other operating conditions. |
*2 |
"dpi" ("dots per inch") is unit that is used to measure resolution. Resolution indicates how much detail can be reproduced in |
a printed or scanned image.
High-quality digital image
•High-quality copying at 600 dpi or 1200 dpi (super photo mode) is performed.
•In addition to automatic exposure adjustment, four original type modes are available: "TEXT mode" for text-only originals, "TEXT/PHOTO mode" for mixed text and photo originals, "PHOTO mode" for photos, and "SUPER PHOTO mode" for high-quality reproduction of photos. The exposure can be manually adjusted to 5 levels in each mode.
Enhanced copying features
•Zoom copies can be made from 25% to 400% in increments of 1%.
•Continuous copying of up to 999 copies is possible.
•Automatic two-sided copying can be performed.
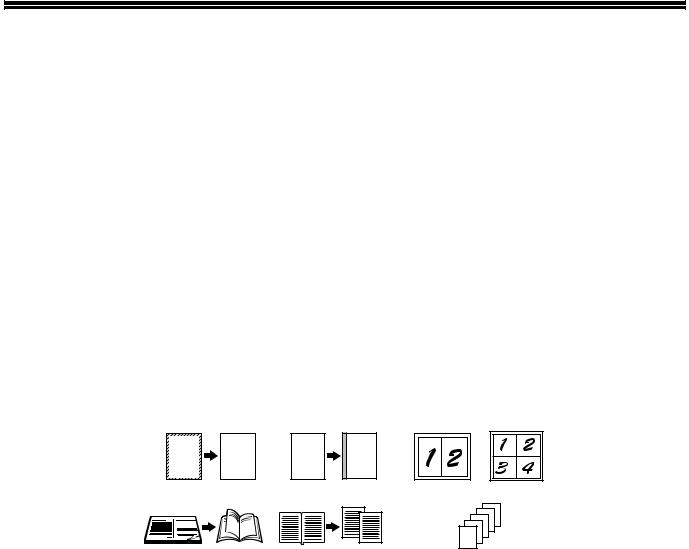
•Useful special features such as erase, margin shift, 2 in 1 and 4 in 1, pamphlet copy, dual page copy and cover copy are available.
A |
A |
A |
A |
|
|
Erase copy |
Margin shift copy |
2in1 copy |
4in1 copy |
||
|
|
|
|
|
4 |
|
|
|
|
|
3 |
|
|
|
|
2 |
|
|
|
|
|
1 |
|
|
|
|
|
SHARP |
|
Pamphlet copy |
Dual page copy |
Cover copy |
|||
•Key operator programs allow the setting or modification of functions to meet your specific needs. The key operator programs can also be used to enable audit mode, which allows the machine administrator to control use of the machine.
Black and white LCD touch panel makes it easy to operate the machine
•Employing a backlit black and white LCD display, the touch panel provides step-by-step guidance for each function of the machine. The touch panel even provides instructions for removing paper misfeeds and other problems that occur.
Optional features
•An optional finisher allows automatic stapling of up to 30 sheets.
•This machine can be used as a network printer if the optional printer expansion kit is installed.
•This machine can be used as a facsimile machine if the optional facsimile expansion kit is installed.
•This machine can be used as a network scanner if the optional network scanner expansion kit is installed.
Environment and people friendly design
•Preheat and auto power shut-off modes are provided to reduce power consumption when the machine is not in use.
•A universal design has been implemented in the product whereby the height of the operation panel and shape of the keys are designed to be useable by as many people as possible.
7
1 |
Chapter 1 |
BEFORE USING THE MACHINE |
This chapter contains basic information that should be read before using the machine.
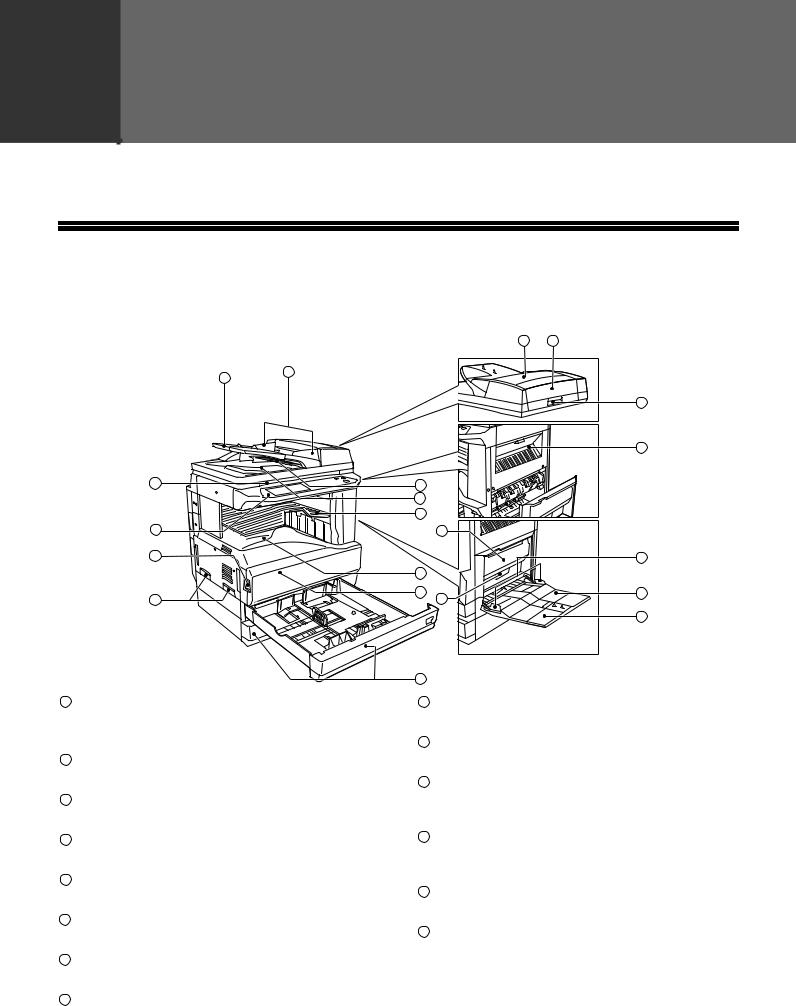
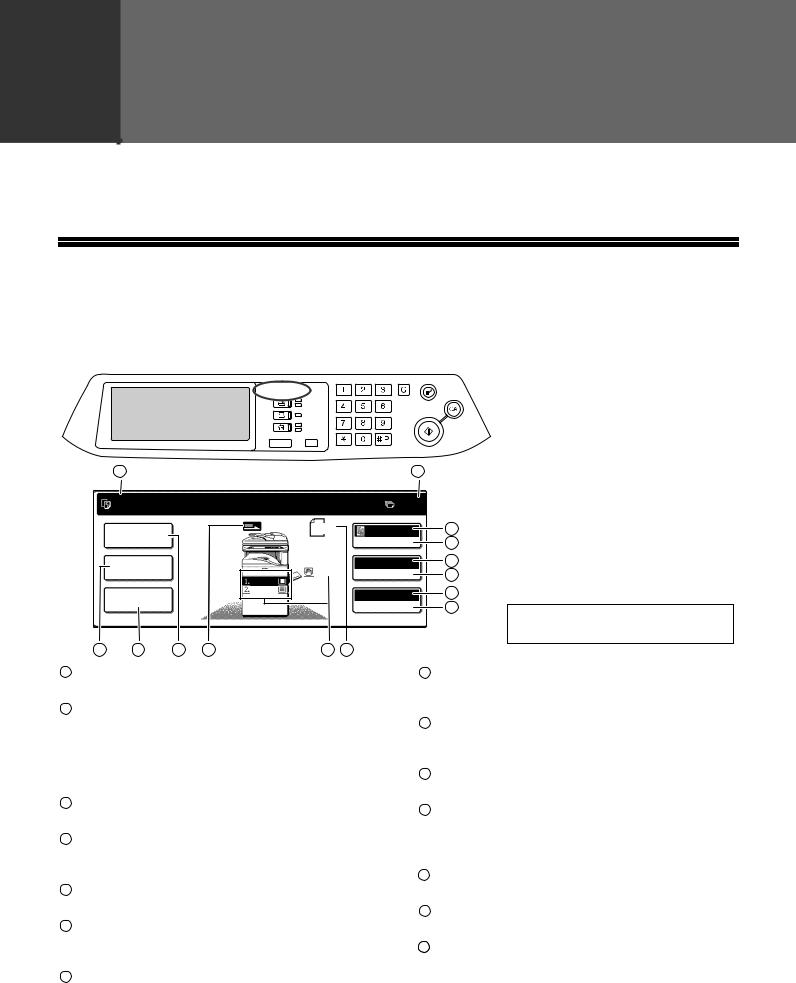
PART NAMES AND FUNCTIONS
Exterior
|
|
3 |
6 |
|
1 |
2 |
|
|
|
|
|
|
|
|
7 |
|
|
|
16 |
8 |
|
4 |
|
|
|
5 |
|
|
|
12 |
|
11 |
|
17 |
|
9 |
|
|
19 |
13 |
14 |
18 |
20 |
10 |
|
|
|
|
21 |
1Document feeder tray
Place the original(s) that you wish to scan face up here. (p.23)
2Original guides
Adjust to the size of the originals.
3Document feeder cover
Open to remove misfed originals. (p.65)
4Reversing tray
Pull out to remove misfed originals. (p.65)
5Exit area
Originals exit the machine here after copying.
6Document transport cover
Open to remove misfed originals. (p.65)
7Document transport cover knob
Pull to open the document transport cover (p.65)
8Document glass
15
9Power switch
Press to turn the machine power on and off. (p.13)
10Handles
Use to move the machine.
11Operation panel
Contains operation keys and the touch panel. (p.10)
12Job separator tray (Upper tray) (optional)
Print jobs and received faxes are delivered to this tray.
13Center tray
Finished copies are delivered to the center tray.
14Front cover
Open to remove paper misfeeds and perform machine maintenance. (p.66)
Place an original that you wish to scan face down here. (p.22)
8
BEFORE USING THE MACHINE
Interior
22
23 |
27 |
1 |
|
||
|
|
24
25
26
15Paper trays
Each tray holds 500 sheets of copy paper. (p.15)
16Upper right side cover
Open to remove misfeeds when an optional job separator tray kit or a optional finisher is installed. (p.70)
17Side cover
Open to remove misfeeds. (p.66)
18Side cover handle
Pull to open the side cover. (p.66)
19Bypass tray paper guides
Adjust to the width of the paper. (p.18)
20Bypass tray
Regular paper and special paper (such as transparency film) can be fed from the bypass tray. (p.18)
21Bypass tray extension
Pull out the bypass tray extension before placing paper in the bypass tray. (p.18)
22Toner cartridge lock release lever
Use to unlock the toner cartridge. (p.72)
23Toner cartridge
Contains toner. (p.72)
24Roller rotating knob
Turn to remove misfed paper. (p.66)
25Photoconductive drum
Copy images are formed on the photoconductive drum.
Caution |
Do not touch the photoconductive drum |
(green portion). Doing so may damage the |
|
|
drum and cause smudges on copies. |
26Fusing unit release levers
To remove a paper misfeed in the fusing unit, push up on these levers and remove the paper. (p.67)
Warning |
The fusing unit is hot. Do not touch |
the fusing unit when removing |
|
|
misfed paper. Doing so may cause a |
|
burn or injury. |
27Fusing unit paper guide
Open to remove misfed paper. (p.67)
 Note The model name is on the front cover of the machine.
9
BEFORE USING THE MACHINE
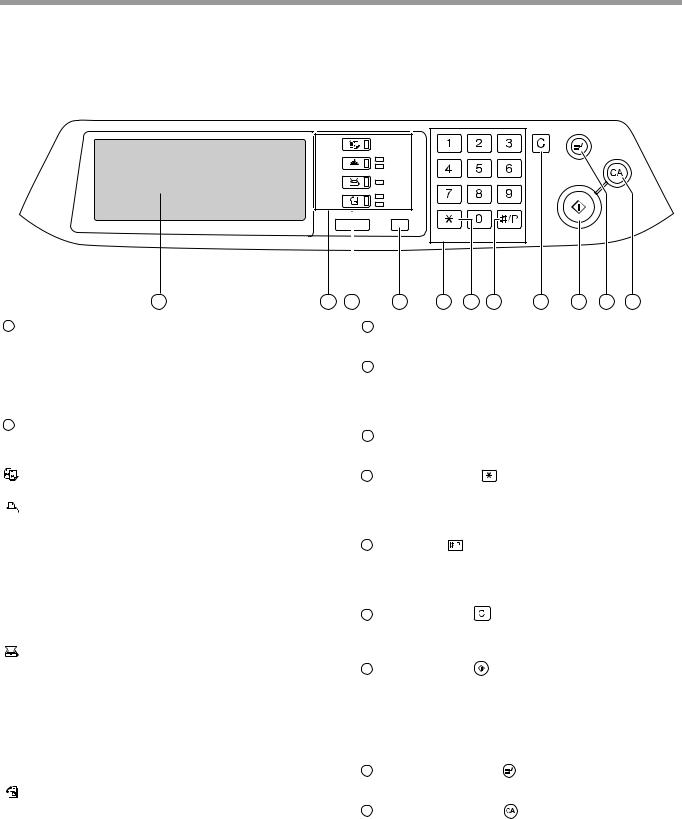
OPERATION PANEL
COPY |
|
|
ON LINE |
||
DATA |
||
|
||
SCAN |
DATA |
|
FAX |
LINE |
|
DATA |
||
|
||
JOB STATUS |
CUSTOM SETTINGS |
|
|
ACC.#-C |
|
1 |
2 |
3 |
4 |
5 |
6 |
7 |
8 |
9 |
10 |
11 |
1 Touch panel |
|
3 |
[JOB STATUS] key |
|
|
|
|
||||
The machine status, messages and touch keys are |
|
|
Press to display the current job status. (p.12) |
||||||||
displayed on the panel. The display will show the |
|
4 |
[CUSTOM SETTINGS] key |
|
|
|
|||||
status of printing, copying or network scanning |
|
|
|
|
|||||||
|
|
Use to adjust various settings of the machine |
|||||||||
according to the mode that is selected. For details |
|
|
|||||||||
|
|
including the contrast of the touch panel and key |
|||||||||
see the next page. |
|
|
|||||||||
|
|
operator programs. (p.52) |
|
|
|
||||||
2 Mode select keys and indicators |
|
|
|
|
|
||||||
|
5 |
Numeric keys |
|
|
|
|
|
||||
Use to change modes and the corresponding |
|
|
|
|
|
|
|||||
|
|
Use to enter numeric values for various settings. |
|||||||||
display on the touch panel. |
|
|
|||||||||
|
|
|
|
|
|
|
|
|
|
||
[COPY] key |
|
6 |
[ACC.#-C] key ( |
) |
|
|
|
|
|||
Press to select copy mode. |
|
|
When auditing mode is enabled, press this key |
||||||||
[PRINT] key/ONLINE indicator/ |
|
|
after finishing a job to return the machine to |
||||||||
DATA indicator |
|
|
account number entry standby. |
|
|
|
|||||
Press to select print mode. |
|
7 |
[#/P] key ( |
) |
|
|
|
|
|
||
• |
ONLINE indicator |
|
|
|
|
|
|
||||
|
|
Use this key to execute a job program in copy |
|||||||||
|
Print jobs can be received when this indicator is lit. |
|
|
||||||||
|
|
|
mode. |
|
|
|
|
|
|
|
|
• |
DATA indicator |
|
|
|
|
|
|
|
|
|
|
|
|
The key is also used to dial in fax mode. |
|
||||||||
|
A print job is in memory. The indicator lights |
|
8 |
[CLEAR] key ( |
) |
|
|
|
|
||
|
steadily while the job is held in memory, and |
|
|
|
|
|
|||||
|
|
|
Press to clear a copy number setting or cancel a |
||||||||
|
blinks while the job is printed. |
|
|
||||||||
[SCAN] key/DATA indicator (When the |
|
|
job. |
|
|
|
|
|
|
|
|
|
|
|
|
|
|
|
|
|
|
||
network scanner option is installed.) |
|
9 |
[START] key ( |
) |
|
|
|
|
|||
Press to select network scan mode when the |
|
|
Press in copy mode, scanner mode, or fax mode to |
||||||||
network scanner option is installed. |
|
|
|||||||||
|
|
begin copying, network scanning, or faxing. |
|||||||||
• |
DATA indicator |
|
|
||||||||
|
|
This key blinks when auto power shut mode has |
|||||||||
|
Lights steadily or blinks while a scanned image |
|
|
||||||||
|
|
|
activated. Press the key to return to normal |
||||||||
|
is being sent. |
|
|
operation. |
|
|
|
|
|
|
|
|
(See "Operation manual (for network |
|
10 |
[INTERRUPT] key ( |
) |
|
|
|
|||
|
scanner)".) |
|
|
|
|
||||||
|
|
|
Use to perform an interrupt copy job. (p.34) |
||||||||
[FAX] key/LINE indicator/DATA indicator |
|
|
|||||||||
|
|
|
|
|
|
|
|
|
|
||
(When the fax option is installed.) |
|
11 |
[CLEAR ALL] key ( |
) |
|
|
|
||||
Press to select fax mode when the fax option is |
|
|
Resets the settings to the initial settings. |
|
|||||||
installed. |
|
|
|
||||||||
|
|
|
|
|
|
|
|
|
|
||
•LINE indicator
this lights up while faxes are being sent or received.
•DATA indicator
Blinks when a fax has been received to memory and lights steadily when a fax is waiting in memory for transmission. (See operation manual for facsimile.)
10
BEFORE USING THE MACHINE
TOUCH PANEL
Using the touch panel
[Example 1]
JOB QUEUE |
SETS / PRO |
||
COPY |
003 |
/ |
00 |
SHARP001 |
003 |
/ |
00 |
Beep
tone
[Example 2]
1/13 COMPLETE
Items on the touch panel are selected by touching the key associated with the item. A beep will sound to confirm that the item was selected and the key will be highlighted.
*A double-beep is sounded when an invalid key is touched.
Keys which are grayed out cannot be selected.
The confirmation beeps can be disabled in the key operator programs. (See "Key operator's guide".)
The touch panel screens shown in this manual are printed images and may differ from the actual screens.
Selecting a function
[Example 1]
|
|
Items which are |
CANCEL |
OK |
highlighted at the time a |
LEFT |
|
screen appears are |
BINDING |
|
already selected and will |
take effect when the [OK]
key is touched.
1
[Example 2]
If you need to cancel a selection, simply press the key once again so that it is not highlighted.
DUAL PAGE |
1/ |
COPY
MULTI SHOT
The key is no longer highlighted and the
DUAL PAGE |
1/ |
COPY |
selection is canceled. |
|
|
MULTI SHOT |
|
[Example 3]
READY TO COPY.
SPECIAL MODES
2-SIDED COPY
OUTPUT
When the machine is used in copy mode or fax
|
ORIGIN |
mode and a special |
||
|
|
|
|
|
|
|
|
|
mode is selected, a icon |
|
|
|
|
|
|
|
|
|
representing the feature |
|
|
|
|
|
|
|
|
|
|
|
|
|
|
will appear on the touch |
|
|
|
|
|
|
|
|
|
panel. If this icon is |
|
|
|
|
touched, the setting |
|
|
|
|
screen of the function (or |
|
|
|
|
a menu screen) will |
|
|
|
|
appear, allowing the |
|
|
|
|
settings to be checked, |
|
|
|
|
adjusted, or canceled. |
11

BEFORE USING THE MACHINE
Job status screen (common to copy, print, network scan and fax)
This screen appears when the [JOB STATUS] key on the operation panel is pressed.
A job list showing the current job and the stored jobs or a list showing completed jobs can be displayed.
The contents of jobs can be viewed and jobs can be deleted from the queue. The following screen shows the job queue for print jobs.
|
1 |
|
|
|
|
|
|
|
|
|
|
|
|
|
|
|
|
|
|
|
|
|
|
|
|
|
|
|
|
|
|
|
|
|
|
|
2 |
|
|||
|
|
|
|
|
|
|
|
|
|
|
|
|
|
|
|
|
|
|
|
|
|
|
|
|
|
|
|
|
|
|
|
|
|
|
|
|
|
|
|
|
|
|
|
|
|
JOB QUEUE |
|
|
|
|
SETS / PROGRESS |
|
STATUS |
|
|
|
|
|
|
|
|
|
|
|
|
JOB QUEUE |
|
|
|
|
|
|
|||||||||||
|
|
|
|
|
|
|
|
|
|
|
|
|
|
|
|
|
|
|
|
|
|
|
|
|
|
|
|
|
|
||||||||||||
|
|
|
|
|
COPY |
|
|
|
|
003 / 000 |
|
|
PAPER EMPTY*1 |
|
|
|
1/1 |
|
|
|
|
COMPLETE |
|
|
|
|
|
|
|||||||||||||
|
|
|
|
|
|
|
|
|
|
|
|
|
|
|
|
|
|
|
|
|
|
|
|
|
|
|
|
|
|
|
|
|
|
|
|
|
|
|
|
|
|
|
|
|
|
|
SHARP001 |
|
|
|
|
003 / 000 |
|
|
WAITING |
|
|
|
|
|
|
|
|
|
|
|
|
|
|
|
|
|
|
|
|
|
|||||||
|
|
|
|
|
|
|
|
|
|
|
|
|
|
|
|
|
|
|
|
|
|
|
|
|
|
|
|
|
|
|
|
|
DETAIL |
|
|
|
|
|
|
||
|
|
|
|
|
|
|
|
|
|
|
|
|
|
|
|
|
|
|
|
|
|
|
|
|
|
|
|
|
|
|
|
|
|
|
|
|
|
|
|||
|
|
|
|
|
|
|
|
|
|
|
|
|
|
|
|
|
|
|
|
|
|
|
|
|
|
|
|
|
|
|
|
|
|
|
|
|
|
|
|||
|
|
|
|
|
|
|
|
|
|
|
|
|
|
|
|
|
|
|
|
|
|
|
|
|
|
|
|
|
|
|
|
|
|
|
|
|
|
|
|
|
|
|
|
|
|
0666211221 |
|
|
|
|
|
010 / 000 |
|
|
WAITING |
|
|
|
|
|
|
|
|
|
|
|
|
|
|
|
|
|
|
|
|
|
|||||||
|
|
|
|
|
|
|
|
|
|
|
|
|
|
|
|
|
|
|
|
|
|
PRIORITY |
|
|
|
|
|
|
|||||||||||||
|
|
|
|
|
|
|
|
|
|
|
|
|
|
|
|
|
|
|
|
|
|
|
|
|
|
|
|
|
|
|
|
|
|
|
|
|
|
|
|||
|
|
|
|
|
|
|
|
|
|
|
|
|
|
|
|
|
|
|
|
|
|
|
|
|
|
|
|
|
|
|
|
|
|
|
|
|
|
|
|
|
|
|
|
|
|
|
|
|
|
|
|
|
|
|
|
|
|
|
|
|
|
|
|
|
|
|
|
|
|
|
|
|
|
|
|
|
|
|
|
|
|
|
|
|
|
|
|
|
|
|
|
|
|
|
|
|
|
|
|
|
|
|
|
|
|
|
|
|
|
|
|
|
|
|
|
STOP/DELETE |
|
|
|
|
|
|
|||
|
|
|
|
|
|
|
|
|
|
|
|
|
|
|
|
|
|
|
|
|
|
|
|
|
|
|
|
|
|
|
|
|
|
|
|
|
|
|
|
|
|
|
|
|
|
|
|
|
|
|
|
|
|
|
|
|
|
|
|
|
|
|
|
|
|
|
|
|
|
|
|
|
|
|
|
|
|
|
|
|
|
|
|
|
|
|
|
|
|
PRINT JOB |
|
|
|
|
E-MAIL/FTP |
|
|
|
FAX JOB |
|
|
|
|
|
|
|
|
|
|
|
|
|
|
|
|
|
|
|
|
||||||
|
|
|
|
|
|
|
|
|
|
|
|
|
|
|
|
|
|
|
|
|
|
|
|
|
|
|
|
|
|
||||||||||||
|
3 |
|
|
|
4 |
|
|
5 |
|
|
|
6 |
|
|
|
|
7 |
|
|
8 |
9 |
||||||||||||||||||||
1 |
Job list |
|
|
|
|
|
|
|
3 |
[PRINT JOB] key |
|
|
|
|
|
|
|
|
|
||||||||||||||||||||||
|
Shows stored jobs and the job currently being |
|
|
|
Use to view the list of output jobs for all modes |
||||||||||||||||||||||||||||||||||||
|
executed. Touch one of keys |
3 to 5 in the above |
|
|
|
(print, copy, and fax). |
|
|
|
|
|
||||||||||||||||||||||||||||||
|
illustration to select the type of job. The icon next |
4 |
[E-MAIL/FTP] key |
|
|
|
|
|
|
|
|
|
|||||||||||||||||||||||||||||
|
to each job name indicates the mode of the job as |
|
|
|
|
|
|
|
|
|
|||||||||||||||||||||||||||||||
|
|
|
|
Displays a network scanner job (When the network |
|||||||||||||||||||||||||||||||||||||
|
follows: |
|
|
|
|
|
|
|
|
|
|
||||||||||||||||||||||||||||||
|
|
|
|
|
|
|
|
|
|
|
scanner function is installed.). |
|
|
|
|
|
|||||||||||||||||||||||||
|
|
|
|
|
|
|
|
|
|
|
|
|
|
|
|
|
|
|
|
|
|
|
|
|
|
||||||||||||||||
|
|
Copy mode |
|
|
Printer mode |
5 |
[FAX JOB] key |
|
|
|
|
|
|
|
|
|
|||||||||||||||||||||||||
|
|
Network scanner mode |
|
|
|
This displays stored fax jobs and the fax job |
|||||||||||||||||||||||||||||||||||
|
|
|
|
|
currently being executed (When the fax option is |
||||||||||||||||||||||||||||||||||||
|
|
Fax mode |
|
|
Fax mode |
|
|
|
installed.). |
|
|
|
|
|
|
|
|
|
|||||||||||||||||||||||
|
|
|
|
|
|
|
Display switching keys |
|
|
|
|
|
|||||||||||||||||||||||||||||
|
|
(Send jobs) |
|
|
(Receive jobs) |
6 |
|
|
|
|
|
||||||||||||||||||||||||||||||
|
The jobs in the job list appear in the form of keys. |
|
|
|
Use to change the page of the displayed job list. |
||||||||||||||||||||||||||||||||||||
|
To give priority to a job or pause or delete a job, |
7 |
[STOP/DELETE] key |
|
|
|
|
|
|||||||||||||||||||||||||||||||||
|
touch the key of the job and then use the key |
|
|
|
|
|
|||||||||||||||||||||||||||||||||||
|
|
|
|
Use to pause or delete a job currently being |
|||||||||||||||||||||||||||||||||||||
|
described in 7 or 8 . |
|
|
|
|
|
|
|
|
|
|
||||||||||||||||||||||||||||||
|
|
|
|
|
|
|
|
|
|
|
executed, or to delete a stored job. Copy jobs and |
||||||||||||||||||||||||||||||
|
*1:"PAPER EMPTY" in the job status display |
|
|
|
|||||||||||||||||||||||||||||||||||||
|
|
|
|
received faxes cannot be paused or deleted with |
|||||||||||||||||||||||||||||||||||||
|
"PAPER EMPTY" in the job status display |
|
|
|
|||||||||||||||||||||||||||||||||||||
|
|
|
|
this key. Copy jobs can be canceled by pressing |
|||||||||||||||||||||||||||||||||||||
|
indicates that the machine is out of the specified |
|
|
|
|||||||||||||||||||||||||||||||||||||
|
|
|
|
the [CLEAR] key ( |
) or [CLEAR ALL] key ( ). |
||||||||||||||||||||||||||||||||||||
|
size of paper. Add the specified size of paper. If |
|
|
|
|||||||||||||||||||||||||||||||||||||
|
|
|
|
[PRIORITY] key |
|
|
|
|
|
|
|
|
|
||||||||||||||||||||||||||||
|
the specified size of paper is not available and |
8 |
|
|
|
|
|
|
|
|
|
||||||||||||||||||||||||||||||
|
you are in printer mode, another size of paper |
|
|
|
Touch this key after selecting a stored job in this |
||||||||||||||||||||||||||||||||||||
|
can be loaded in the bypass tray to allow printing |
|
|
|
[JOB QUEUE] list to print the job ahead of the |
||||||||||||||||||||||||||||||||||||
|
to take place. (See the "Online manual".) |
|
|
|
other jobs. |
|
|
|
|
|
|
|
|
|
|||||||||||||||||||||||||||
2 |
Mode switching keys |
|
|
|
|
|
|
|
9 |
[DETAIL] key |
|
|
|
|
|
|
|
|
|
||||||||||||||||||||||
|
Use to select the job list mode: "JOB QUEUE" |
|
|
|
Shows information on the selected job. This |
||||||||||||||||||||||||||||||||||||
|
(Stored/currently executing jobs) or "COMPLETE" |
|
|
|
cannot be used for a received fax. |
|
|
|
|
|
|||||||||||||||||||||||||||||||
|
(Finished jobs). |
|
|
|
|
|
|
|
|
|
|
|
|
|
|
|
|
|
|
|
|
|
|
|
|
|
|
|
|
|
|
|
|||||||||
"JOB QUEUE":
Shows jobs that have been stored and the job that is currently being executed.
"COMPLETE":
Shows the jobs that have been finished. Note that copy jobs do not appear in this list.
If the power is turned off, or if auto power shut-off mode activates when there are no jobs, the jobs in the "COMPLETE" list will be erased.
12
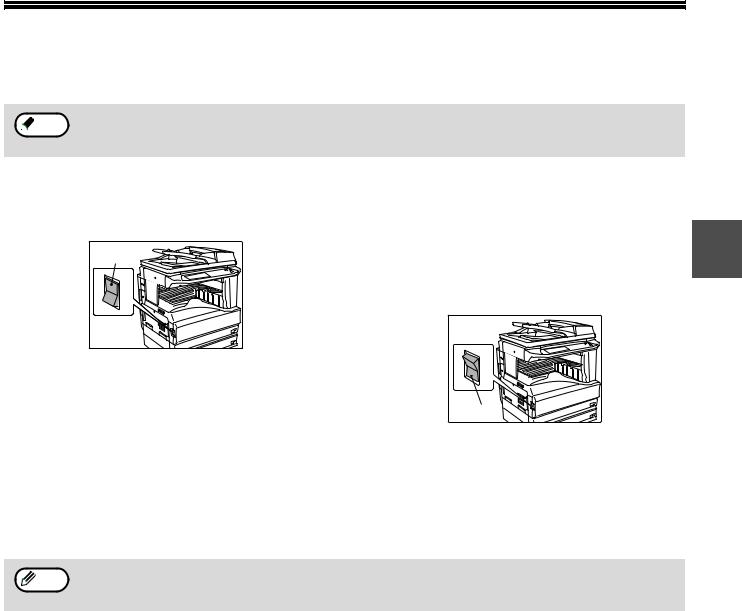
POWER ON AND OFF
The power switch is located on the left side of the machine.
 Note When the power switch is turned on, the machine starts up in the previously used mode. The following explanations assume that the previously used mode was copy mode.
POWER ON
Turn the power switch to the "ON" position.
ON
•When the power switch is turned to the "ON" position, the message "WARMING UP. A COPYING JOB CAN BE SET NOW." will appear in the message display and the machine will start warming up. When "READY TO COPY." appears, the machine is ready to copy. Copy settings can be selected during warm-up.
•If auditing mode is enabled, "ENTER YOUR ACCOUNT NUMBER." will appear. When a valid account number is entered, the account status will appear on the main screen for several seconds. Then copying can be performed. (See "Key operator’s guide".)
POWER OFF
When the machine is not used for a long time, be sure to turn it off.
Make sure that the machine is not in operation 1 and then turn the power switch to the "OFF" position.
OFF
If the power switch is turned off while the machine is in operation, a misfeed may occur and the job that was in progress will be canceled.
Note |
If the fax option is installed, be sure to keep the power turned on. Faxes cannot be received when the power is |
|
turned off. |
13
BEFORE USING THE MACHINE
INITIAL SETTINGS
The machine reverts to the initial settings when it is first turned on, when the [CLEAR ALL] key ( ) is pressed, or the preset "auto clear time" elapses after the last copy is made in any mode. When the machine reverts to the initial settings, all settings and functions selected to that point are canceled. The auto clear time can be changed in the key operator programs. (See the "Key operator’s guide".)
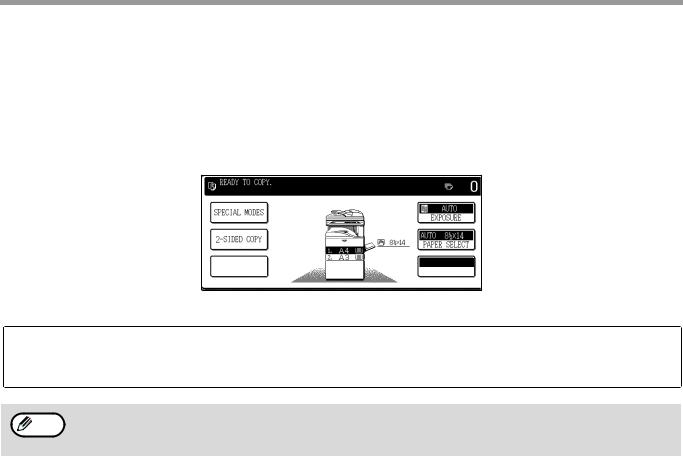
The initial settings that appear in the display are shown below.
|
READY TO COPY. |
|
|
|
|
|
|
|
0 |
||
|
|
|
|
|
|
|
|
|
|||
|
|
|
|
|
|
|
|
|
|
|
|
SPECIAL MODES |
|
|
|
|
|
|
|
AUTO |
|
||
|
|
|
|
|
|
|
|
|
|
||
|
|
|
|
|
|
|
EXPOSURE |
|
|||
|
|
|
|
|
|
|
|
|
|
||
|
|
|
|
|
|
|
|
|
|
|
|
2-SIDED COPY |
|
|
|
|
|
|
AUTO 8½x11 |
|
|||
|
|
|
|
8½x11 |
|
PAPER SELECT |
|
||||
|
|
|
|
|
|
|
|
||||
|
|
|
|
|
|
|
|
|
|||
|
|
|
|
8½x11 |
|
|
|
|
|
||
|
|
|
|
|
|
|
|||||
|
|
|
|
8½x14 |
|
|
|
|
|
||
100%
OUTPUT
COPY RATIO
Functions and settings are explained based on the above screen as applicable.
Copy ratio: 100%, Exposure: Automatic, Copy quantity: 0, Automatic two-sided: One side to One side, Auto paper selection: On,
Paper tray: Upper paper tray (at power on, the previously selected paper tray will again be selected.)
The initial settings can be changed in the key operator programs. (See the "Key operator’s guide".)
Note For the initial settings (initial screen) of printer, fax, and scanner modes, see the operation manuals of those modes.
POWER SAVE MODES
The machine has two power save modes to reduce overall power consumption and thereby reduce the cost of operation. These modes help conserve natural resources and reduce environmental pollution. The two power save modes are "Preheat mode" and "Auto power shut-off mode".
The time settings for each mode can be changed in the key operator programs. (See the "Key operator’s guide".)
Preheat mode
When the set time elapses, the temperature of the fusing unit is automatically lowered to reduce power consumption while on standby. The factory default setting is 15 minutes. To return to normal operation, touch any key on the operation panel. To make a copy when the machine is in this mode, simply select the desired copy selections and then press the [START] key (  ).
).
Auto power shut-off mode
When the set time elapses, the power to the fusing unit automatically turns off to reduce power consumption (This is based on the guidelines of the International Energy Star Program.). The factory default setting is 60 minutes. When the machine enters this mode, the touch panel screen turns off and only the [START] key (  ) blinks. To return to normal operation, press the [START] key (
  ). To copy after warm-up starts, make desired copy selections and press the [START] key (
  ). When the machine receives a fax or a print job, Auto power shut-off mode automatically deactivates and the machine returns to normal operation.
14
LOADING PAPER
When a tray runs out of paper, a message appears in the touch panel. Load paper in the tray.
|
|
OPEN TRAY 1 AND ADD PAPER. |
|
|
|
|
|
|
|
|
|
|
|
0 |
|
|
|||
|
|
|
|
|
|
|
|
|
|
|
|
|
|
|
|
||||
|
|
|
|
|
|
|
|
|
|
|
|
|
|
|
|
|
|
|
|
|
|
|
|
|
|
ORIGINAL |
|
|
8½x11 |
|
|
|
|
|
|
|
|
|
|
|
SPECIAL MODES |
|
|
AUTO |
|
|
|
|
|||||||||||
|
|
|
|
|
|
|
|
|
|
|
|
|
|
|
|
||||
|
|
|
|
|
|
|
|
|
|
|
|
|
|
|
|
||||
|
|
|
|
|
|
|
|
|
|
|
|
|
|
|
|
|
|
||
|
|
|
|
|
|
|
|
|
|
|
|
EXPOSURE |
|
|
|
|
|||
|
|
|
|
|
|
|
|
|
|
|
|
|
|
|
|
|
|||
|
|
|
|
|
|
|
|
|
|
|
|
|
|
|
|
|
|
|
|
|
2-SIDED COPY |
|
|
|
|
|
|
|
|
|
|
AUTO 8½x11 |
|
|
|||||
|
|
|
|
|
|
|
|
|
|
|
PAPER SELECT |
|
|
|
|
||||
|
|
|
|
|
|
|
|
|
|
|
|
|
|
|
|
|
|||
|
|
|
|
|
8½x11 |
|
|
|
|
|
|
|
|
|
|
|
|||
|
|
|
|
|
|
|
|
|
|
|
|
|
|||||||
|
|
|
|
|
|
|
|
|
|
|
|
|
|
|
|
|
|||
|
|
|
|
|
8½x14 |
|
|
|
|
|
|
|
|
|
|
||||
|
|
OUTPUT |
|
|
|
|
|
|
|
|
|
|
100% |
|
|
|
|
|
|
|
|
|
|
|
|
|
|
|
|
|
|
|
COPY RATIO |
|
|
|
|
||
|
|
|
|
|
|
|
|
|
|
|
|
|
|
|
|
||||
|
|
|
|
|
|
|
|
|
|
|
|
|
|
|
|
|
|
|
|
PAPER |
|
|
|
1 |
|||||||||||||||
The specifications for the types and sizes of paper that can be loaded in the paper trays are shown below. For best results, use only SHARP recommended paper.
Tray |
Paper tray type |
Paper type |
Size |
Weight |
Capacity |
|||
No. |
||||||||
|
|
|
|
|
|
|
||
|
|
|
|
|
|
|
|
|
1 |
Upper paper tray*1 |
Plain paper |
|
5-1/2" x 8-1/2" to |
15 lbs. to 28 lbs. |
500 sheets*4 |
||
|
|
Letterhead |
paper |
11" x 17" |
(56 g/m2 to 105 g/m2) |
|
||
2 |
Lower paper tray*2 |
|
||||||
Recycled paper |
(A5 to A3) |
|
|
|||||
3 |
500-sheet paper |
Color paper |
|
|
|
|||
|
feed unit/ |
|
|
|
|
|
|
|
|
Upper paper tray of |
|
|
|
|
|
|
|
|
2 x 500-sheet paper |
|
|
|
|
|
|
|
|
feed unit |
|
|
|
|
|
|
|
|
|
|
|
|
|
|
|
|
4 |
Lower paper tray of |
|
|
|
|
|
|
|
|
2 x 500-sheet paper |
|
|
|
|
|
|
|
|
feed unit |
|
|
|
|
|
|
|
|
|
|
|
|
|
|
||
|
Bypass tray |
Plain paper |
|
5-1/2" x 8-1/2" to |
15 lbs. to 34.5 lbs. |
100 sheets*4 |
||
|
|
Letterhead |
paper |
11" x 17" |
(56 g/m2 to 128 g/m2) *3 |
|
||
|
|
Recycled paper |
(A6 to A3) |
|
|
|||
|
|
Color paper |
|
|
|
|||
|
|
|
|
|
|
|
||
|
|
Thin paper |
|
|
14 lbs. to 15 lbs. |
100 sheets |
||
|
|
|
|
|
|
(52 g/m2 to 56 g/m2) |
|
|
|
|
Heavy paper |
|
Max. 54 lbs. |
30 sheets |
|||
|
|
|
|
|
|
(200 g/m2) |
|
|
|
|
Labels |
|
|
|
40 sheets |
||
|
|
|
|
|
|
|||
|
|
Transparency film |
|
|
40 sheets |
|||
|
|
|
|
|
|
|
||
|
|
Envelope |
|
International DL |
|
|
5 sheets |
|
|
|
|
|
(110 x 220 mm) |
|
|
|
|
|
|
|
|
International C5 |
|
|
|
|
|
|
|
|
(162 x 229 mm) |
|
|
|
|
|
|
|
|
Commercial 10 |
|
|
|
|
|
|
|
|
(4-1/8" x 9-1/2") |
|
|
|
|
|
|
|
|
|
|
|
|
|
*1 5-1/2" x 8-1/2" (A5) size paper can only be loaded in tray 1 and the bypass tray. *2 B5 size paper cannot be loaded in tray 2 (However, B5R paper can be loaded.).
*3 When loading paper larger than 8-1/2" x 11" (A4) size, do not use paper of weight greater than 28 lbs. (105 g/m2). *4 The number of sheets of paper which can be loaded varies depending on the weight of the paper.
15

BEFORE USING THE MACHINE
Special papers
Follow these guidelines when using special papers.
Envelopes
Do not use the following envelopes (Misfeeds will occur.).
•Envelopes with metal tabs, clasps, strings, holes, or windows.
•Envelopes with rough fibers, carbon paper, or glossy surfaces.
•Envelopes with two or more flaps.
•Envelopes with tape, film, or paper attached to the flap.
•Envelopes with a fold in the flap.
•Envelopes with glue on the flap to be moistened for sealing.
•Envelopes with labels or stamps.
•Envelopes that are slightly inflated with air.
•Envelopes with glue protruding from the seal area.
•Envelopes with part of the seal area peeled off.
Letterhead paper
Letterhead paper is paper with information pre-printed at the top such as a company name and address.
SHARP
•Use SHARP recommended transparency film and label sheets. Using other than SHARP recommended paper may result in misfeeds or smudges on the output. If other than SHARP recommended media must be used, feed each sheet one at a time using the bypass tray (Do not attempt continuous copying or printing.).
•There are many varieties of special paper available on the market, and some cannot be used with this machine. Before using special paper, contact a SHARP service center.
•Before using other than SHARP recommended paper, make a test copy to see if the paper is suitable.
16

BEFORE USING THE MACHINE
LOADING PAPER
Make sure that the machine is not copying, printing, or printing a received fax, and then follow these steps to load paper.
Loading the paper in the paper tray
1 Pull out the paper tray until it stops.
If you are loading the same size of paper as was loaded previously, go to step 4. If you are loading a different size of paper, continue with the following step.
2 Squeeze the lock lever of the front guide and slide the front guide to match the width of the paper.
Front guide
Left guide 
3 Move the left guide to the appropriate slot as marked on the tray.
When using 11" x 17" copy paper, store the left guide in the slot at the left front of the paper tray.
5 Load paper in the tray.
Maximum height line
1
Note |
• |
Load the paper with the print side facing up. |
• |
Insert the paper along the guides. |
•The tray holds up to 500 sheets of 21 lb. (80g/m2) bond paper.
•Do not load paper above the maximum height line.
•When adding paper, first remove any paper remaining in the tray, combine it with the paper to be added, and then reload as a single stack.
6 Push the paper tray firmly back into the machine.
If you loaded a different size of paper that was loaded previously, place the appropriate paper size card in the front of the paper tray to indicate the new paper size.
4 Fan the copy paper.
Paper size card
Paper size card |
|
|
|
2 |
EXTRA |
2 |
2 |
81/X13 |
|
81/X14 |
81/X11R |
51/2X81/2 |
A4 |
11X17 |
81/2X11 |
If you loaded a different size of paper that
Note was loaded previously, go to "CHANGING A
TRAY’S PAPER TYPE AND PAPER SIZE
SETTINGS" (p.19).
17
BEFORE USING THE MACHINE
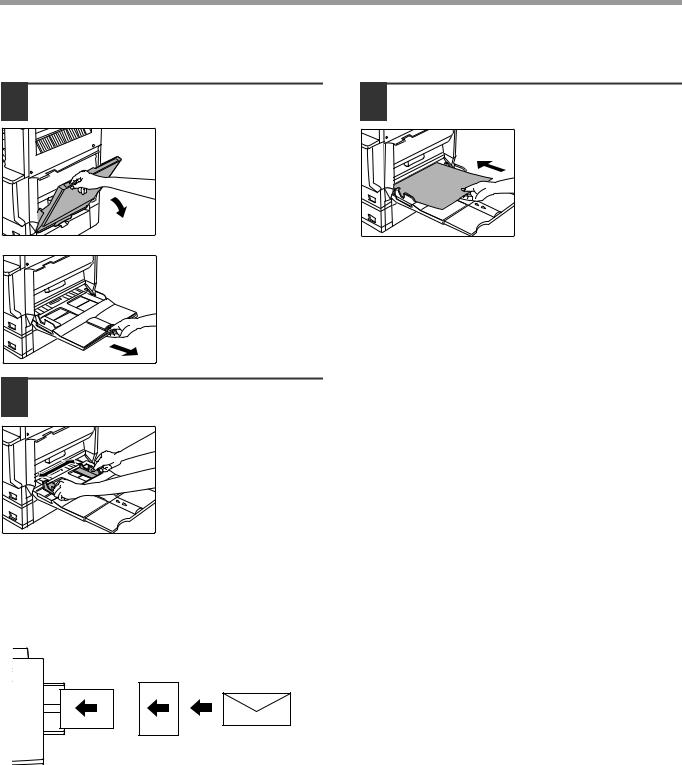
Loading paper in the bypass tray
1 Unfold the bypass tray. |
3 Insert the copy paper (print side |
|
down) all the way into the bypass tray. |
To enable correct detection of the paper size, be sure to pull out the bypass tray extension.
2 Set the paper guides to the copy paper width.
Important points when inserting paper in the bypass tray
•Be sure to place envelopes horizontally as shown in the following diagram.
•Load the paper with the print side facing down.
Landscape Portrait orientation orientation
•When loading envelopes, make sure that they are straight and flat and do not have loosely glued construction flaps (not the closure flap).
•When adding paper, first remove any paper remaining in the bypass tray, combine it with the paper to be added, and then reload as a single stack. The paper to be added must be the same size and type as the paper already in the bypass tray.
•Do not use paper that is smaller than the original image. This may cause smudges or unclean images.
•Do not use paper that has already been printed on by a laser printer or plain paper fax machine. This may cause smudges or unclean images.
18
BEFORE USING THE MACHINE
CHANGING A TRAY’S PAPER TYPE AND PAPER SIZE SETTINGS
When you change the paper in a tray, follow the steps below to change the tray’s paper type and paper size settings. The settings cannot be changed when operation has stopped because the paper ran out or a misfeed occurred, or when an interrupt copy job is being performed.
Even in copy mode, the settings cannot be changed while a print job or received fax is being printed.
Note |
• |
5-1/2" x 8-1/2" (A5) size paper can only be set for tray 1. |
|
|
• |
B5 size paper cannot be set for tray 2 (However, B5R size paper can be set.). |
|
||
|
• |
Tray settings for trays other than the bypass tray can be prohibited in the key operator programs. (See the |
1 |
|
|
|
"Key operator's guide".) |
||
|
|
|
|
|
|
|
|
|
|
1 Load paper in the tray as explained in "Loading the paper in the paper tray" (p.17).
2 Press the [CUSTOM SETTINGS] key.
The custom settings
LINE menu screen will appear.
DATA
5 Select the size and type of paper that is loaded in the tray.
CUSTOM |
SETTINGS |
|
|
|
|
|
TRAY 1 |
TYPE/SIZE SETTING |
|
|
|
OK |
|
|
|
TYPE |
|
SIZE |
AB |
INCH |
|
PLAIN |
LETTER HEAD |
11x17 |
8½x14 |
|
8½x13 |
|
RECYCLED |
COLOR |
8½x11 |
8½x11R |
|
5½x8½ |
B STATUS CUSTOM SETTINGS
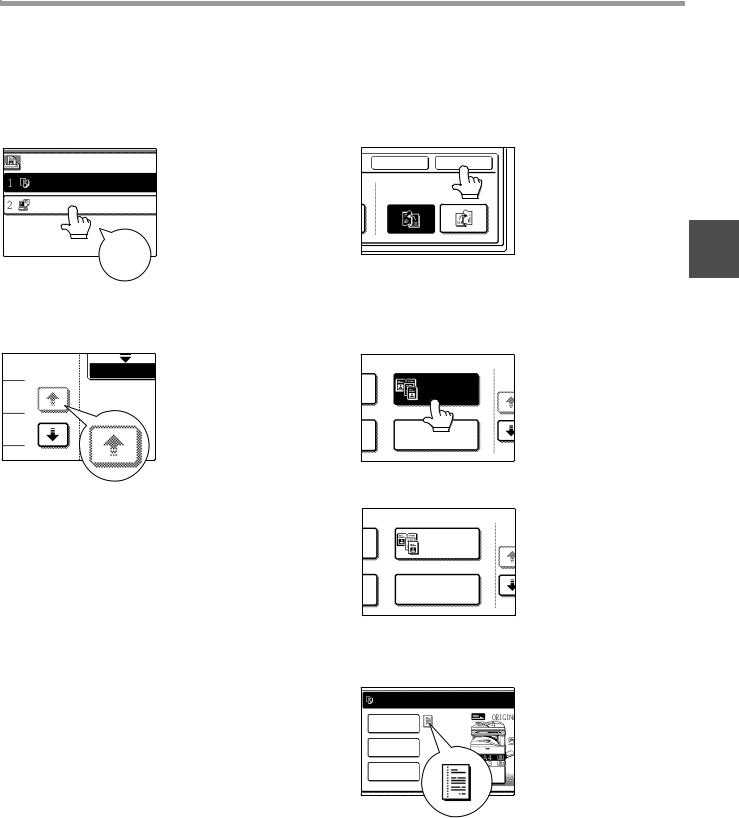
3 Touch the [TRAY SETTINGS] key.
TOT L COUNT |
CONTRA The tray settings screen |
|
|
||
|
will appear. |
|
TRAY SETTINGS |
ADDRE |
|
CONTR |
||
|
||
SELECT |
KEY |
|
|
The currently selected paper type will be highlighted.
•To change the paper type selection, touch the appropriate type key.
•To change the paper size selection, touch the appropriate size key.
•To change the displayed size selections to AB sizes, touch [AB  INCH].
6 Touch the [OK] key.
7 A message appears prompting you to check the paper in the tray. Check the paper and then touch the [OK] key.
You will return to the tray settings screen.
4 Select the tray in which you loaded paper.
|
|
TYPE / SIZE |
TRAY 1 |
PLAIN / 8½x11 |
|
TRAY |
2 |
PLAIN / 8½x14 |
TRAY |
3 |
PLAIN / 11x17 |
For the tray numbers, see "PAPER" (p.15). If the desired tray does
not appear in the display, use the  key or
  key to scroll until it appears.
19

BEFORE USING THE MACHINE
Setting the paper type in the bypass tray
Use either of the following two methods to set the bypass tray's paper type setting.
From the [CUSTOM SETTINGS] key |
From the [PAPER SELECT] key |
1 Load paper in the bypass tray as explained in "Loading paper in the bypass tray" (p.18).
2 Press the [CUSTOM SETTINGS] key.
The custom settings
LINE menu screen will appear.
DATA
B STATUS CUSTOM SETTINGS
3 Touch the [TRAY SETTINGS] key.
1 Load paper in the bypass tray as explained in "Loading paper in the bypass tray" (p.18).
2 Touch the [PAPER SELECT] key.
EXPOSURE
AUTO 8½x11
PAPER SELECT
100%
3 Touch the paper type selection key.
TOT L COUNT |
CONTRA The tray settings screen |
|
|
|
|
|
|
will appear. |
|
|
|
READY TO COPY.
0
TRAY SETTINGS |
ADDRE |
|
|
|
AUTO |
|
CONTR |
8½x11 |
PLAIN |
11x17 |
|||
|
EXPOSURE |
|||||
|
|
|
|
|
|
8½x14 |
RECYCLED |
PLAIN |
|
|
SELECT |
KEY |
|
|
PAPER |
SELECT |
|
|
|
|
|
|
|
|
|
EXTRA |
100% |
|
|
|
|
|
COPY |
RATIO |
4 Touch the [BYPASS TRAY] key.
|
|
|
TYPE / SIZE |
|
|
|
|
|
|
TRAY 4 |
|
|
PLAIN / 11x17 |
|
BYPASS |
PLAIN |
|
TRAY |
||
|
5 Select the type of paper that is loaded in the tray.
CUSTOM SETTINGS |
|
|
|
BYPASS TRAY TYPE SETTING |
|
OK |
|
SELECT THE PAPER TYPE. |
|
|
|
PLAIN |
LETTER HEAD |
ENVELOPE |
JAPANESE P/C |
RECYCLED |
COLOR |
LABELS |
|
HEAVY PAPER |
THIN PAPER |
TRANSPARENCY |
|
"JAPANESE P/C" refers to official postcards used in Japan.
4 Select the paper type.
READY TO COPY. |
|
|
0 |
|
|
|
|
||
PLAIN |
LETTER HEAD |
ENVELOPE |
AUTO |
|
EXPOSURE |
||||
|
|
|
||
RECYCLED |
COLOR |
LABELS |
|
|
HEAVY PAPER |
THIN PAPER |
TRANSPARENCY |
PAPER SELECT |
|
|
||||
|
|
|
100% |
|
|
|
JAPANESE P/C |
COPY RATIO |
"JAPANESE P/C" refers to official postcards used in Japan.
5 Touch the [PAPER SELECT] key.
You will return to the main screen of copy mode.
6 Touch the [OK] key.
You will return to the tray settings screen.
20
2 |
Chapter 2 |
COPY FUNCTIONS |
This chapter explains basic copying functions such as normal copying, reduction or enlargement, and exposure adjustment.
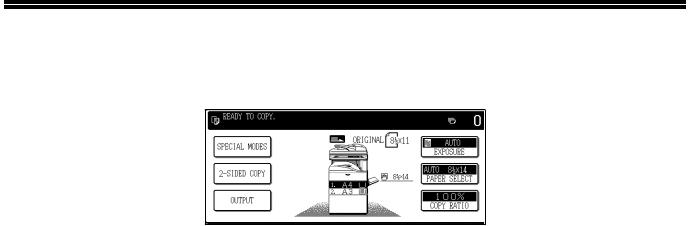
MAIN SCREEN OF COPY MODE
The main screen of copy mode shows messages, keys, and settings that are used for copying. Touch a key to make a selection. The main screen of copy mode appears when the [COPY] key is pressed (Except when the custom settings screen appears.).
COPY 
ON LINE
DATA
SCAN |
DATA |
|
FAX |
LINE |
|
DATA |
||
|
||
JOB STATUS |
CUSTOM SETTINGS |
ACC.#-C
1 |
|
|
|
2 |
|
READY TO COPY. |
|
|
0 |
||
|
|
|
|||
SPECIAL MODES |
ORIGINAL 8½x11 |
|
AUTO |
9 |
|
|
EXPOSURE |
10 |
|||
|
|
||||
2-SIDED COPY |
8½x11 |
AUTO |
8½x11 |
11 |
|
PAPER SELECT |
12 |
||||
|
|||||
|
|
||||
|
8½x11 |
|
|
|
8½x14 |
13 |
|
OUTPUT |
100% |
||
COPY RATIO |
14 |
||
|
3 |
4 |
5 |
6 |
7 |
8 |
The screen will vary depending on the equipment installed.
1Message display
Status messages are displayed here.
2Copy number display
Displays the selected number of copies before the
[START] key ( ) is pressed or the number of remaining copies after the [START] key (
 ) is pressed. A single copy can be made when "0" is displayed.
3[2-SIDED COPY] key (p.27)
Touch to open the duplex copy mode setting screen.
4[OUTPUT] key (p.35)
Touch to select sort, group, staple sort, and other output settings.
5[SPECIAL MODES] key (p.39)
Touch to open the special modes selection screen.
6Original feed display
This appears when an original is placed in the RSPF.
7Paper size display
This shows the location of the paper trays, the size of
the paper in the trays. " " indicates whether or not there is paper. A paper tray can be touched to change the paper tray selection.
8Original size display
Displays the original size only when an original is placed for copying.
9Exposure display
Displays the icon of the selected exposure type and the exposure scale.
10[EXPOSURE] key (p.29)
Use this key to adjust the copy exposure.
11Paper select display
Displays the selected paper size. When auto paper select mode is selected, "AUTO" appears when auto paper select mode is selected.
12[PAPER SELECT] key (p.22, p.26)
Use this key to select the paper size.
13Copy ratio display
Displays the selected copy ratio.
143[COPY RATIO] key (p.31)
Use this key to select the copy ratio.
21
NORMAL COPYING
COPYING FROM THE DOCUMENT GLASS
 Note If "AUDITING MODE" (p.56) has been enabled, enter your 5-digit account number.
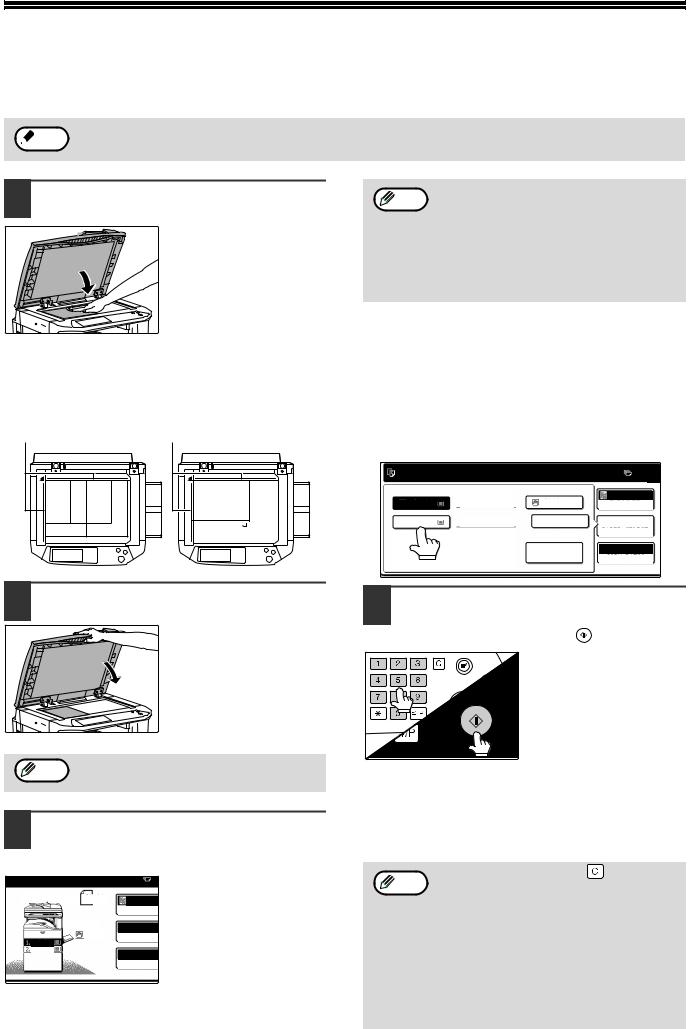
1 Open the RSPF and place the original face down on the document glass.
[How to place the original]
Align the corner or the original with the tip of the arrow ( ) at the left rear corner of the glass as shown in the illustration.
Original scale |
Original scale |
5-1/2" x |
8-1/2" x |
8-1/2" |
14" |
|
8-1/2" x 11" R |
8-1/2" x 11" |
11" x 17" |
• To load paper, see "LOADING PAPER" Note (p.15). If you change the paper size in the
tray, you will also need to change the tray's paper size and paper type settings. (p.19)
•The paper types for the auto paper selection function can be selected, or the function disabled, in the key operator programs. (See the "Key operator's guide".)
Manually selecting the paper size (paper tray)
If auto paper selection is disabled in the key operator programs, or if you wish to use a different size of paper than the original, touch the [PAPER SELECT] key and select the paper tray with the desired paper size. (The selected paper will be highlighted and the paper selecting screen will close.)
To close the screen without selecting a paper size, touch the [PAPER SELECT] key again.
READY TO COPY. |
|
|
0 |
|
|
|
|
|
PLAIN |
11x17 |
AUTO |
1.8½x11 |
EXPOSURE |
||
2.8½x14 |
RECYCLED |
PLAIN |
|
|
|
|
PAPER SELECT |
|
|
EXTRA IMAGE |
100% |
|
|
ADJUST |
COPY RATIO |
2 Close the RSPF. |
|
4 Select the number of copies and any |
|
The original size appears |
other desired copy settings, and then |
|
press the [START] key ( ). |
|
|
in the touch panel. |
|
|
|
Note
If the original size is not automatically detected, manually set the original size. (p.47)
3 Make sure that the same size of paper as the original is automatically selected.
|
|
|
The selected tray is |
ORIGINAL |
8½x11 |
AUTO |
highlighted. If the tray |
|
|
contains a different size of |
|
|
|
EXPOSURE |
|
|
8½x11 |
AUTO 8½x |
paper than the original, |
|
PAPER SELE |
"LOAD xxxx PAPER." will |
|
8½x11 |
|
||
8½x14 |
|
100% |
appear. |
|
|
||
|
|
COPY RATI |
|
|
|
|
Even if the message above is displayed, copying can be performed using the selected paper tray.
ACC.#-C
•The number in the copy quantity display will decrease by 1 each time a copy is made.
•If you are only making a single copy, the copy can be made with the copy number display showing "0".
•To clear a mistake, press the [CLEAR] key ( ).
).
• |
Press the [CLEAR] key ( |
) to stop |
Note |
copying in the middle of a run. |
|
•To repeat the same copy sequence for a
different original, simply replace the original and press the [START] key ( ).
).
•If copying stops because the tray has run out of paper, you can resume copying by touching the [PAPER SELECT] key and selecting the bypass tray or a paper tray that has the same size and type of paper loaded in the same orientation.
22
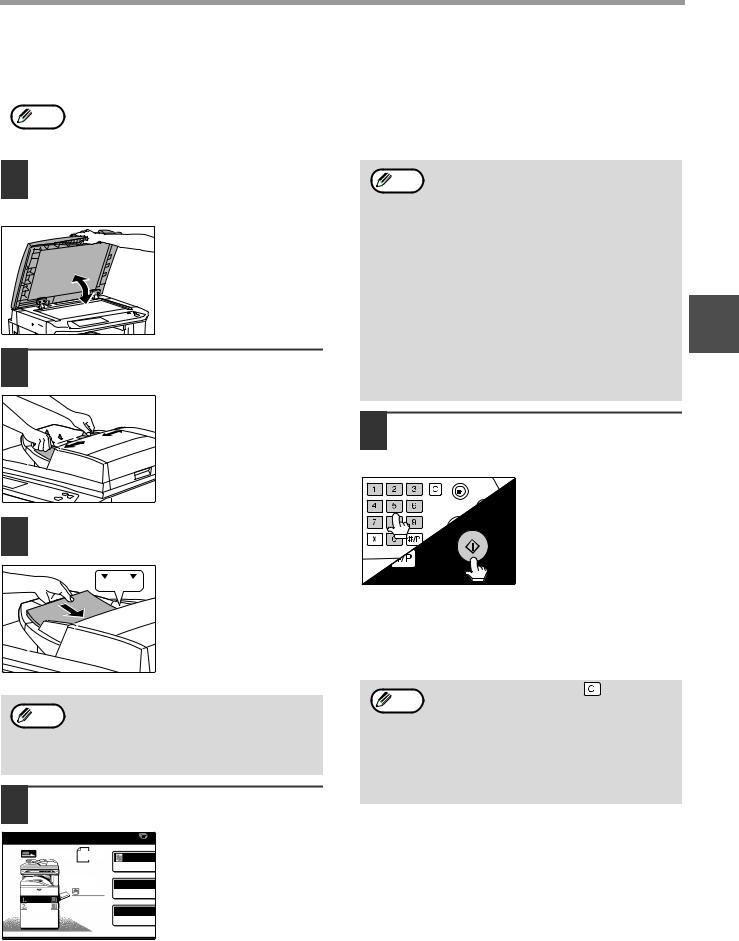
COPY FUNCTIONS
COPYING FROM THE RSPF
Note |
• |
If "AUDITING MODE" (p.56) is enabled, enter your 5-digit account number. |
||
• |
If the RSPF is disabled in the key operator programs, the RSPF cannot be used. See the "Key operator's |
|||
|
||||
|
|
guide". |
||
|
|
|
|
|
|
|
|
|
|
1 Make sure that an original has not been left on the document glass and then close the RSPF.
If an original remains on the document glass after a copy was made, "REMOVE THE ORIGINAL FROM THE DOCUMENT GLASS." will appear in the touch panel.
2 Adjust the original guides to the size of the original.
3 Place the originals face up in the document feeder tray.
Insert the originals all the way into the feed slot. The original size appears in the touch panel.
• |
Up to 100 pages (24 lbs. (90 g/m2)) can |
Note |
be inserted at once. |
• |
If the original size is not automatically |
|
detected, manually set the original size. |
|
(p.47) |
4 Make sure that the same size of paper as the original is selected.
|
|
|
The selected tray is |
ORIGINAL |
8½x11 |
AUTO |
highlighted. If none of the |
|
|
trays have the same size |
|
|
|
EXPOSURE |
|
|
|
|
|
|
8½x11 |
AUTO 8½x |
of paper as the original, |
|
PAPER SELE |
"LOAD xxxx PAPER." |
|
8½x11 |
|
||
|
|
||
8½x14 |
|
100% |
will appear. |
|
|
||
|
|
COPY RATI |
Even if the message above is displayed, copying can be performed using the selected paper tray.
• To load paper, see "LOADING PAPER" Note (p.15). If you change the paper size in the
tray, you will also need to change the tray's paper size and paper type settings. (p.19)
•If needed, manually select the paper tray that has the desired size of paper as explained on page 22.
•The paper types for the auto paper selection
function can be selected, or the function
disabled, in the key operator programs. (See 2 the "Key operator's guide".)
•If the original size is larger than the paper size, the result of copying from the document glass may differ from the result of copying from the RSPF. (p.22)
5 Select the number of copies and any other desired copy settings, and then press the [START] key ( ).
).
ACC.#-C
•The number in the copy quantity display will decrease by 1 each time a copy is made.
•If you are only making a single copy, the copy can be made with the copy number display showing "0".
•To clear a mistake, press the [CLEAR] key ( ).
).
• |
Press the [CLEAR] key ( |
) to stop |
Note |
copying in the middle of a run. |
|
•If copying stops because the tray has run out of paper, you can resume copying by touching the [PAPER SELECT] key and selecting the bypass tray or a paper tray that has the same size and type of paper loaded in the same orientation.
Stream feeding mode
If stream feeding mode is enabled in the key operator programs, "SET ORIGINALS FOR STREAM FEEDING." will appear in the touch panel for approximately 5 seconds after the originals are fed. Any new originals placed in the RSPF while this message appears will be fed and copied automatically.
Copying a large number of originals
Job Build mode is useful when you need to copy more originals that can be placed in the RSPF at once. For information on Job Build mode, see "JOB BUILD MODE" (p.45).
23

COPY FUNCTIONS
POINTS TO NOTE WHEN MAKING COPIES
Document glass and RSPF
•Paper in a different orientation from the original can be selected if the auto paper select or auto image function has been selected. In this case, the image of the original will be rotated.
•When copying a book or an original that has been folded or crumpled, press down gently on the RSPF. This will reduce shadow lines caused by uneven contact between the original and the document glass.
•When the center tray counter function is enabled, the number of pages that can be delivered to the output tray is
limited to 500 (A4 and 8-1/2" x 11" sizes only; the limit for all other sizes is 300 pages.). When the offset function is
used, the limit is approximately 300 pages. When the limit is reached, copying stops and the [START] key ( ) light turns off. Remove the copies from the center tray and then press the [START] key (
 ) to resume copying. The center tray counter function can be disabled in the key operator programs. (See the "Key operator’s guide".)
Originals that can be used in the RSPF
A maximum of 100 sheet originals of equal size (8-1/2" x 11", 24 lbs. (90g/m2)) can be placed in the RSPF. Originals of different length can be placed together in the RSPF as long the widths are equal; however, some copy functions may not operate correctly.
Acceptable originals
Originals of size 5-1/2" x 8-1/2" to 11" x 17" having a weight of 9 lbs. to 34 lbs. (35g/m2 to 128g/m2) or 14 lbs. to 28 lbs. (52g/m2 to 105g/m2) for two-sided originals can be used.
Other considerations
•Use originals that are within the specified size and weight ranges. Originals outside the specified ranges may cause misfeeds.
•Make sure that there are no paper clips or staples on the original.
•If an original has damp spots from correction fluid or ink, or glue from pasteups, be sure it has dried completely before using it to make a copy. Otherwise the interior of the RSPF or the document glass may become soiled.
•The following originals cannot be used. These may cause misfeeds, smudging, and unclear images.
•Transparencies, tracing paper, other transparent or translucent paper, photographs
•Carbon paper
•Thermal paper
•Originals that are creased, folded, or torn
•Glued originals, cut-out originals
•Originals with binder holes
•Originals printed using an ink ribbon (thermal transfer printing), originals printed on thermal transfer paper
24
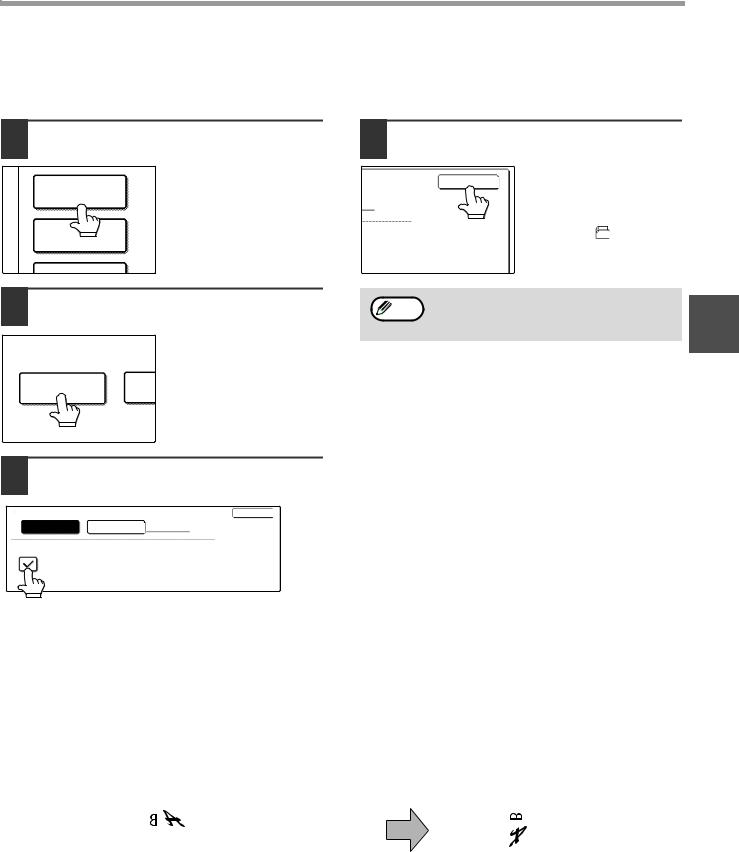
COPY FUNCTIONS
Copying originals of mixed length (Mixed feeding)
When using the RSPF, originals of mixed length can be fed together as long as the width of the originals is the same. To copy originals of mixed length, follow these steps:
1 Touch the [SPECIAL MODES] key.
SPECIAL MODES
2-SIDED COPY
2 Touch the  key and then the [ORIGINAL SIZE] key.
ORIGINAL
3 Select the "MIX SIZE ORIGINAL
FEEDING MODE" checkbox.
ORIGINAL SIZE |
OK |
AUTO MANUAL
MIX SIZE ORIGINAL FEEDING MODE
4 Touch the [OK] key.
|
The setting is entered and |
OK |
you return to the main |
|
screen. |
The original size icon changes to ( 8½x11 ) to indicate that mixed feeding is selected.
When copying is started in mixed feeding
Note |
mode, all originals are scanned before |
2 |
|
||
|
|
|
|
copying begins. |
|
Automatic copy image rotation (Rotation copying)
If the originals are placed in a different orientation than the copy paper, the original image will be automatically rotated 90°. (When an image is rotated, a message will be displayed.) If a function is selected that is not suitable for rotation, such as enlarging the copy to greater than 8-1/2" x 11" (A4) size or margin shift copy, rotation will not be possible.
[Example]
Orientation of |
Orientation of |
Copy after rotation |
||||||||||
the placed original |
the loaded paper |
|||||||||||
|
|
|
|
|
|
|
|
|
|
|
|
|
|
|
|
|
|
|
|
|
|
|
|
|
|
|
|
|
|
|
|
|
|
|
|
|
|
|
|
|
|
|
|
|
|
|
|
|
|
|
|
|
|
|
|
|
|
|
|
|
|
|
|
|
|
|
|
|
|
|
|
|
|
|
|
|
|
|
|
|
|
|
|
|
|
|
|
|
|
|
|
|
|
|
|
|
|
|
|
|
|
|
|
Face down |
Face down |
•This function operates in both the auto paper select and auto image modes. Rotation copying can be disabled in the key operator programs. (See the "Key operator's guide".)
25
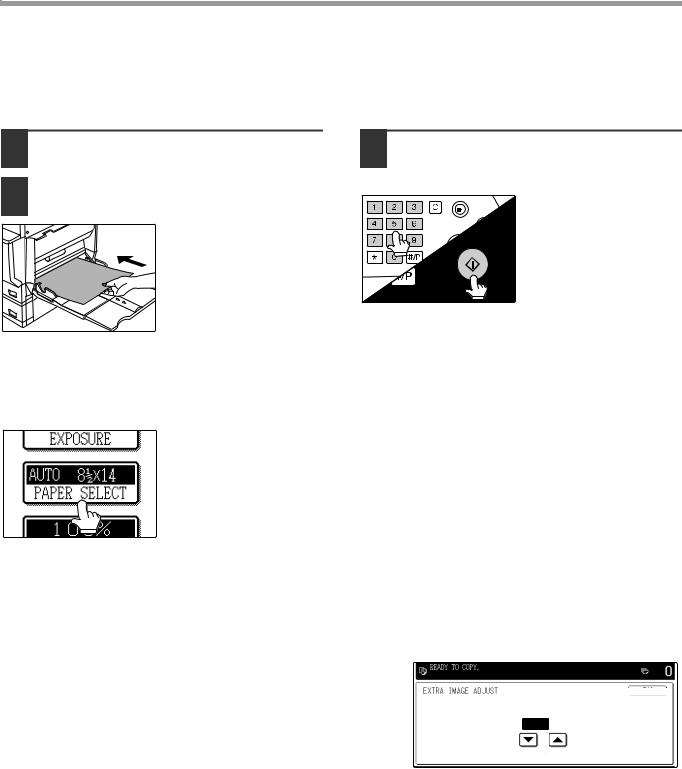
COPY FUNCTIONS
BYPASS FEED (special paper)
The bypass tray must be used to feed special papers such as transparency film and labels. The bypass tray can also be used to feed standard copy paper.
1 Place the original(s). (p.22, p.23)
2 Insert the paper (print face down) all the way into the bypass tray.
For paper that can be used in the bypass tray, see "PAPER" (p.15). To load paper, see "Loading paper in the bypass tray" (p.18).
4 Select the number of copies and any other desired copy settings, and then press the [START] key ( ).
).
ACC.#-C
3 |
Touch the [PAPER SELECT] key or |
||
|
the tray in the image of the machine in |
||
|
the touch panel, and select the bypass |
||
|
tray. |
|
|
|
|
|
Set the type of paper that |
|
EXPOSURE |
|
|
|
|
you loaded in the bypass |
|
|
|
|
|
|
|
|
tray. (p.20) |
|
AUTO 8½x11 |
|
|
|
|
|
|
|
|
|
|
|
PAPER SELECT |
|
|
|
|
|
|
|
|
|
|
Shifting the starting position of copying
When copying on a special size of paper in the bypass tray, the starting position of printing can be shifted vertically for fine adjustment of the image position. To adjust the starting position of printing, follow the steps below. This function can only be used when feeding special sizes of paper from the bypass tray.
1Touch the [PAPER SELECT] key and then touch the [EXTRA IMAGE ADJUST] key on the bypass tray.
2Use the  key or
  key to adjust the printing position, and then touch the [OK] key.
•The position can be adjusted from -0.5 inch to +0.5 inch in 0.02 inch increments.
•When a setting from -0.5 inch to -0.02 inch is selected, the starting position of printing is moved to front from the standard position. When a setting from +0.02 inch to +0.5 inch is selected, the starting position of printing is moved to rear.
|
READY TO COPY. |
|
0 |
|
|
|
|
|
|
|
|
|
OK |
|
EXTRA IMAGE ADJUST |
|
|||
0.00 (inch-0.5 0.5)
0.5)
TO FRONT TO REAR
26
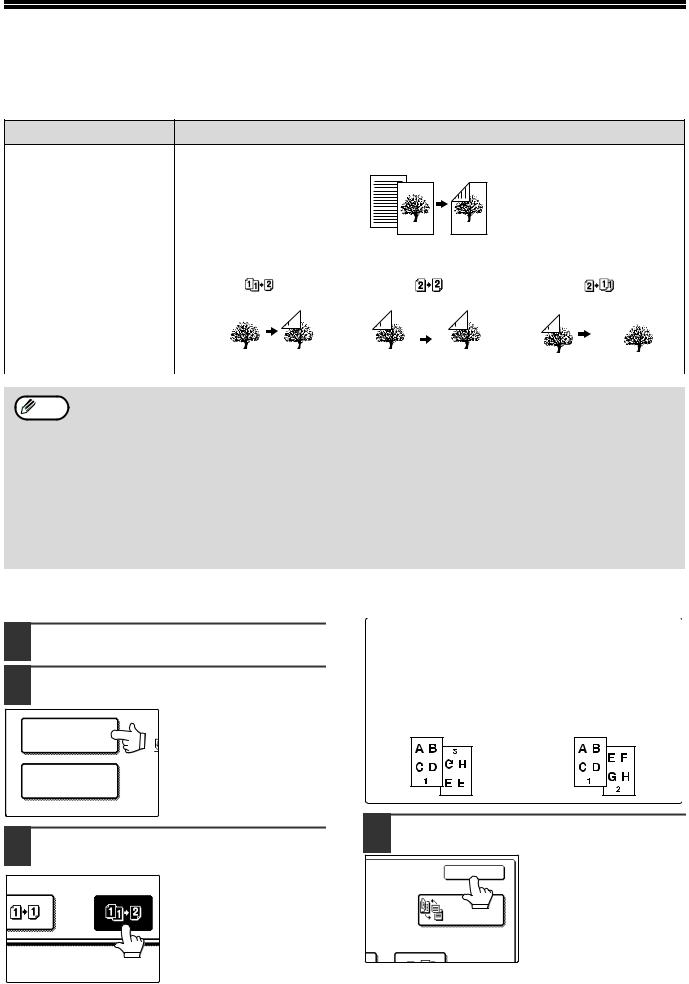
AUTOMATIC TWO-SIDED COPYING
Two originals can be automatically copied onto both sides of a single sheet of paper. When the RSPF is used, two-sided copies of two-sided originals can easily be made.
Original → Paper
One-sided original → Two sides (  )
)
Document glass
|
|
|
|
One-sided original |
|
|
Two-sided original |
|
|
Two-sided original |
|
|||||||||||||||||||||||||||||||||||||||||||||||||||
|
|
|
|
→ Two sides |
|
|
|
|
|
|
|
→ Two sides |
|
|
|
|
|
|
|
→ One side |
||||||||||||||||||||||||||||||||||||||||||
|
( |
) |
|
|
|
|
|
|
|
|
|
( |
) |
|
|
|
|
|
|
|
( |
) |
|
|
|
|
|
|
|
|
|
|||||||||||||||||||||||||||||||
|
|
|
|
|
|
|
|
|
|
|
|
|
|
|
|
|
|
|
|
|
|
|
|
|
|
|
|
|
|
|
|
|
|
|
|
|
|
|
|
|
|
|
|
|
|
|
|
|
|
|
|
|
|
|
|
|
|
|
|
|
|
|
RSPF |
|
|
|
|
|
|
|
|
|
|
|
|
|
|
|
|
|
|
|
|
|
|
|
|
|
|
|
|
|
|
|
|
|
|
|
|
|
|
|
|
|
|
|
|
|
|
|
|
|
|
|
|
|
|
|
|
|
|
|
|
2 |
|
|
|
|
|
|
|
|
|
|
|
|
|
|
|
|
|
|
|
|
|
|
|
|
|
|
|
|
|
|
|
|
|
|
|
|
|
|
|
|
|
|
|
|
|
|
|
|
|
|
|
|
|
|
|
|
|
|
|
|
|
|
|
|
• |
Paper sizes that can be used are 8-1/2" x 11", 8-1/2" x 11"R, 8-1/2" x 13", 8-1/2" x 14" and 11" x 17" (A5, B5, |
|||||||||||||||||||||||||||||||||||||||||||||||||||||||||||||
Note |
B5R, A4, A4R, B4, and A3). |
|
|
|
|
|
|
|
|
|
|
|
|
|
|
|
|
|
|
|
|
|
|
|
|
|
|
|
|
|
|
|
|
|
|
|
|
|
|
|
|
|
|
|
|
|
|
|
|
|
|
|
|
|
||||||||
•When making two-sided copies on letterhead paper, place the side with the letterhead face down if using a tray, or face up if using the bypass tray (This is the opposite of normal.).
•Automatic two-sided copying is not possible on thick paper, thin paper, labels, transparency film, envelopes, and other special types of paper.
•If automatic two-sided copying is performed using super photo mode, the memory may become full ("MEMORY IS FULL, SELECT ANOTHER EXPOSURE MODE." will appear.). Touch the [OK] key to cancel automatic two-sided copying, set the exposure setting to other than super photo mode, and select automatic two-sided copying once again.
•Automatic two-sided copying can be disabled in the key operator programs. (See the "Key operator’s guide".)
•When dual page copy (p.43) is selected, two-sided original to two sides or two-sided original to one side cannot be used.
USING THE DOCUMENT GLASS
1 Place the original on the document glass. (p.22)
2 Touch the [2-SIDED COPY] key.
2-SIDED COPY
OUTPUT
3 Touch the [One-sided to two-sided copy] key.
Touch the [BINDING CHANGE] key when making the tablet binding, or when making automatic two-sided copies of a one-sided 11" x 17" or 8-1/2" x 14" size portrait original, touch the [BINDING CHANGE] key.
Portrait-oriented original
(11" x 17" or 8-1/2" x 14" size)
Before [BINDING CHANGE] After [BINDING CHANGE]
4 Touch the [OK] key.
OK
CHANGE
27
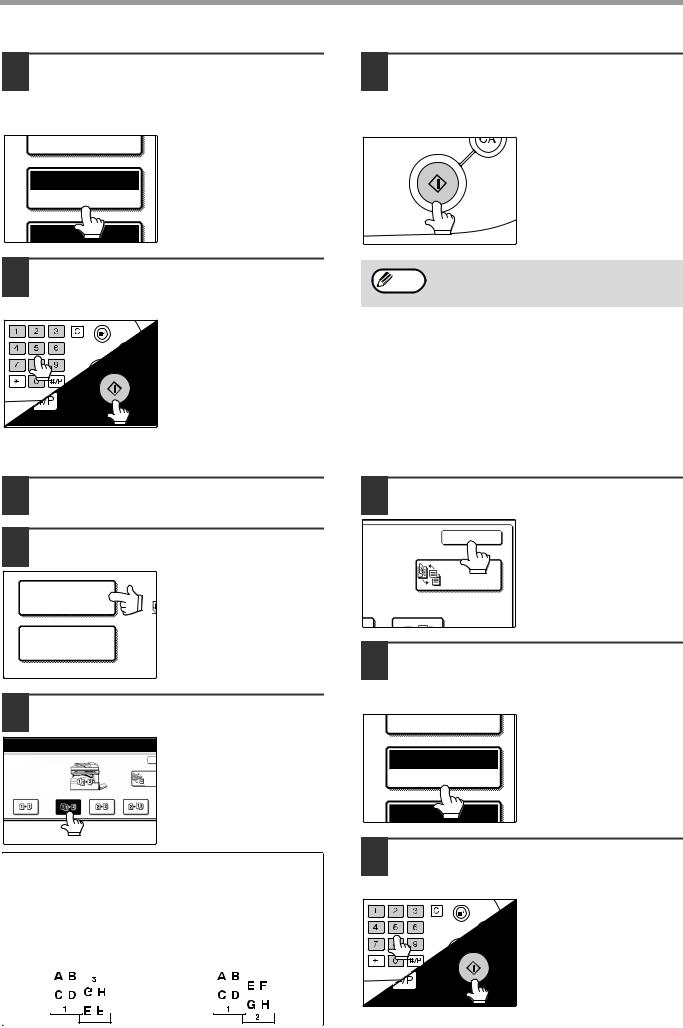
COPY FUNCTIONS
5 Make sure that a suitable paper size is automatically selected, or select another size using the [PAPER SELECT] key.
EXPOSURE
AUTO 8½x11
PAPER SELECT
100%
6 Select the number of copies and any other desired copy settings, and then press the [START] key ( ).
).
The original for the front side is scanned.
ACC.#-C
7 Remove the first original and then place the original for the back side on the document glass. Close the RSPF and then press the [START] key ( ).
).
To cancel automatic two-sided copying, press the [CLEAR] key ( ).
).
When making two-sided copies of an odd Note number of originals, touch the [READ-END]
key after scanning the last original.
USING THE RSPF
1 Place the original(s) in the document feeder tray. (p.23)
2 Touch the [2-SIDED COPY] key.
2-SIDED COPY
OUTPUT
3 Touch the desired copy mode.
Y TO COPY.
COPY
BIN
CH
Touch the [BINDING CHANGE] key when making the tablet binding, or when making automatic two-sided copies of a one-sided 11" x 17" or 8-1/2" x 14" size portrait original, touch the [BINDING CHANGE] key.
Portrait-oriented original
(11" x 17" or 8-1/2" x 14" size)
Before [BINDING CHANGE] After [BINDING CHANGE]
4 Touch the [OK] key.
OK
CHANGE
5 Make sure that a suitable paper size is automatically selected, or select another size using the [PAPER SELECT] key.
EXPOSURE
AUTO 8½x11
PAPER SELECT
100%
6 Select the number of copies and any other desired copy settings, and then press the [START] key ( ).
).
ACC.#-C
28
 Loading...