


AR-5415
DIGITAL LASER COPIER
OPERATION MANUAL
WBAHJDJQ KFPTHZSQ RJGBHJDFKMZSQ FGGFHFN
РУКОВОДСТВО ПО ЭКСПЛУАТАЦИИ
DIGITÁLISLÉZERSUGARASMÁSOLÓ
HASZNÁLATIUTASÍTÁS
DIGITÁLNÍ LASEROVÝ KOPÍROVACÍ STROJ
NÁVODKOBSLUZE
CYFROWA KOPIARKA LASEROWA
INSTRUKCJAOBSŁUGI
DIGITÁLNALASEROVÁKOPÍRKA
NÁVODNAOBSLUHU
RUS GB
CZ H
SK PL

CLASS 1 LASER PRODUCT |
VAROITUS! |
|
|
||
|
LAITTEEN KÄYTTÄMINEN |
|
LASER KLASSE 1 |
||
MUULLA KUIN TÄSSÄ |
||
|
KÄYTTÖOHJEESSA MAINITULLA |
|
LUKOAN 1 LASERLAITE |
TAVALLASAATTAAALTISTAA |
|
|
KÄYTTÄJÄN |
|
KLASS 1 LASERAPPARAT |
TURVALLISUUSLUOKAN 1 |
|
|
YLITTÄVÄLLE |
|
|
NÄKYMÄTTÖMÄLLE |
|
|
LASERSÄTEILYLLE. |
VARNING
OM APPARATEN ANVÄNDS PÅ
ANNAT SÄTT ÄN I DENNA
BRUKSANVISNING
SPECIFICERATS, KAN
ANVÄNDAREN UTSÄTTAS FÖR
OSYNLIG LASERSTRÅLNING,
SOM ÖVERSKRIDER GRÄNSEN
FÖR LASERKLASS 1.
|
|
|
|
|
|
|
CAUTION AVOID EXPOSURE TO BEAM. |
ADVERSEL |
UNNGÅ EKSPONERING FOR STRÅLEN. |
|
|
Laserstrahl |
INVISIBLE LASER RADIATION WHEN OPEN AND INTERLOCKS DEFEATED. |
|
|
USYNLIG LASERSTRÅLING NÅR DEKSEL ÅPNES OG SIKKERHEDSLÅS BRYTES. |
|
VORSICHT SICHERHEITSVERRIEGELUNG ÜBERERÜCKT. NICHT DEM STRAHL AUSSETZEN. |
VARNING URKOPPLADE. STRÅLEN ÄR FARLIG. BETRAKTA EJ STRÅLEN. |
|
|||
|
UNSICHTBARE LASERSTRAHLUNG WENN ABDECKUNG GEÖFFNET UND |
|
|
OSYNLIG LASERSTRÅLNING NÄR DENNA DEL ÄR ÖPPNAD OCH SPÄRRAR ÄR |
|
|
USYNLIG LASERSTRÅLING VED ÅBNING, NÅR SIKKERHEDSAFBRYDERE ER |
VARO! |
AVATTAESSA JA SUOJALUKITUS OHITETTAESSA OLET ALTTIINA NÄKYMÄTÖNTÄ |
|
|
|
ADVARSEL UDE AF FUNKTION. UNDGA UDSAETTELSE FOR STRÅLING. |
LASERSÄTEILYLLE. ÄLÄ KATSO SÄTEESEEN. |
|
||
|
|
|
|
|
|
CLASS 1
LASER PRODUCT
LASER KLASSE 1
Caution
This product contains a low power laser device. To ensure continued safety do not remove any cover or attempt to gain access to the inside of the product. Refer all servicing to qualified personnel.
Pozor
Tento výrobek obsahuje laser nízkého výkonu. Pro zajištění trvalé bezpečnosti nesundávejte žádné kryty přístroje ani se nesnažte dostat se k vnitřním částem. Veškeré servisní práce přenechte výlučně kvalifikovaným osobám.
Внимание
В данном изделии используется лазер низкой мощности. В целях безопасности не снимайте крышки и панели и не пытайтесь проникнуть внутрь изделия. Доверьте все работы по обслужтиванию аппарата квалифицированным специалистам.
Uwaga
Produkt zawiera urządzenie laserowe niskiej mocy. W celu zachowania bezpieczeństwa nie zdejmuj żadnej pokrywy i nie próbuj dostać się do wnętrza. Prace serwisowe zlecaj tylko wykwalifikowanemu personelowi.
Figyelem
A termék alacsony energiájú lézereszközt tartalmaz. A folyamatos biztonság érdekében ne távolítson el bármilyen fedőt vagy próbáljon a termék belsejéhez férkőzni. Hagyjon mindenfajta szerelést a szakemberekre.
Pozor
Tento výrobok obsahuje laser nízkeho výkonu. Pre zaistenie trvalej bezpečnosti neodstraňujte žiadne kryty prístroja, ani sa nesnažte dostať k vnútorným častiam. Všetky servisné práce prenechajte výlučne kvalifikovaným osobám.

A. Information on Disposal for Users (private households) 1. In the European Union
Attention: If you want to dispose of this equipment, please do not use the ordinary dust bin!
Used electrical and electronic equipment must be treated separately and in accordance with legislation that requires proper treatment, recovery and recycling of used electrical and electronic equipment.
Following the implementation by member states, private households within the EU states may return their used electrical and electronic equipment to designated collection facilities free of charge*. In some countries* your local retailer may also take back your old product free of charge if you purchase a similar new one.
*) Please contact your local authority for further details.
Attention: Your product is marked with this symbol. It means that used electrical and electronic products should not be mixed with general household waste. There is a separate collection system for these products.
If your used electrical or electronic equipment
has batteries or accumulators, please dispose of these separately beforehand according to local requirements.
By disposing of this product correctly you will help ensure that the waste undergoes the necessary treatment, recovery and recycling and thus prevent potential negative effects on the environment and human health which could otherwise arise due to inappropriate waste handling.
2. In other Countries outside the EU
If you wish to discard this product, please contact your local authorities and ask for the correct method of disposal.
For Switzerland: Used electrical or electronic equipment can be returned free of charge to the dealer, even if you don’t purchase a new product. Further collection facilities are listed on the homepage of www.swico.ch or www.sens.ch.
B. Information on Disposal for Business Users. 1. In the European Union
If the product is used for business purposes and you want to discard it:
Please contact your SHARP dealer who will inform you about the take-back of the product. You might be charged for the costs arising from take-back and recycling. Small products (and small amounts) might be taken back by your local collection facilities.
For Spain: Please contact the established collection system or your local authority for take-back of your used products.
2. In other Countries outside the EU
If you wish to discard of this product, please contact your local authorities and ask for the correct method of disposal.

CAUTIONS
Cautions on using
Follow the cautions below when using this unit.
 Warning:
•The fusing area is hot. Exercise care in this area when removing misfed paper.
•Do not look directly at the light source. Doing so may damage your eyes.
•Do not switch the unit rapidly on and off. After turning the unit off, wait 10 to 15 seconds before turning it back on.
•Unit power must be turned off before installing any supplies.
 Caution:
•Place the unit on a firm, level surface.
•Do not install the unit in a humid or dusty location.
•When the unit is not used for a long time, for example for consecutive holidays, turn the power switch off and remove the power cord from the outlet.
•When moving the unit, be sure to turn the power switch off and remove the power cord from the outlet.
•Do not cover the unit with a dust cover, cloth or plastic film while the power is on. Doing so may prevent heat radiation, damaging the unit.
•Use of controls or adjustments or performance of procedures other than those specified herein may result in hazardous radiation exposure.
•The socket-outlet shall be installed near the equipment and shall be easily accessible.
Important points when selecting an installation site
Do not install your unit in areas that are:
•damp, humid, or very dusty
•exposed to direct sunlight
•poorly ventilated
•subject to extreme temperature or humidity changes, e.g., near an air conditioner or heater.
Be sure to connect the power cord only to a power outlet that meets the specified voltage and current requirements. Also make certain the outlet is properly grounded.
Connect the unit to a power outlet which is not used for other electric appliances. If a lighting fixture is connected to the same outlet, the light may flicker.
Be sure to allow the required space around the machine for servicing and proper ventilation.
10cm
20cm
10cm
1

Cautions on handling
Be careful in handling the unit as follows to maintain the performance of this unit.
Do not drop the unit, subject it to shock or strike it against any object.
Store spare toner cartridges in a cool dry place without removing from the package before use.
• If they are exposed to direct sunlight or excessive heat, poor copies may result.
Do not touch the photoconductive drum (green portion).
• Scratches or smudges on the drum will cause dirty copies.
Cautions on laser
Wave length |
770 nm – 795 nm |
Pulse times |
11.82 µs / 7 mm |
Output power |
0.17 mW ± 0.01 mW |
|
|
Proper storage for supplies
Store the supplies (paper and toner cartridges) in a location that is:
•clean and dry
•at a stable temperature
•not exposed to direct sunlight.
Store paper in the wrapper and lying flat.
•Paper stored out of the wrapper or in packages standing on end may curl or get damp, resulting in paper misfeeds.
Trademark acknowledgements
•Microsoft and Windows are trademarks of Microsoft Corporation in the U.S.A. and other countries.
•IBM and PC/AT are trademarks of International Business Machines Corporation.
•Adobe and Acrobat are trademarks of Adobe Systems Incorporated.
•All other trademarks and copyrights are the property of their respective owners.
Products that have earned the ENERGY STAR® are designed to protect the environment through superior energy efficiency.
In some areas, the "POWER" switch positions are marked "I" and "O" on the copier instead of "ON" and "OFF".
The symbol "O" denotes the copier is not completely de-energized but in a stand-by condition at this "POWER" switch position.
If your copier is so marked, please read "I" for "ON" and "O" for "OFF".
Caution!
For a complete electrical disconnection, pull out the main plug.
The socket-outlet shall be installed near the equipment and shall be easily accessible.
2

CONTENTS
1 INTRODUCTION |
|
USING THE MANUAL ................... |
4 |
PART NAMES ............................... |
5 |
OPERATION PANEL..................... |
6 |
2 LOADING PAPER |
|
PAPER........................................... |
7 |
LOADING THE PAPER TRAY....... |
8 |
BYPASS FEED (including special |
|
paper) .......................................... |
10 |
3 MAKING COPIES |
|
COPY FLOW ............................... |
11 |
CONNECTING THE POWER CORD12 |
|
ORIGINAL PLACEMENT............. |
14 |
SET THE COPY QUANTITY ....... |
15 |
EXPOSURE ADJUSTMENT/ |
|
PHOTO COPYING ...................... |
15 |
REDUCTION/ENLARGEMENT/ |
|
ZOOM .......................................... |
17 |
4 SPECIAL FUNCTIONS |
|
DESCRIPTION OF SPECIAL |
|
FUNCTIONS................................ |
18 |
TONER SAVE MODE.................. |
18 |
USER PROGRAMS..................... |
19 |
DISPLAYING TOTAL NUMBER OF |
|
COPIES ....................................... |
20 |
5 MAINTENANCE |
|
TONER CARTRIDGE |
|
REPLACEMENT .......................... |
21 |
TONER CARTRIDGE LIFE.......... |
23 |
CLEANING THE UNIT ................. |
24 |
6 TROUBLESHOOTING THE UNIT |
|
TROUBLESHOOTING................. |
26 |
STATUS INDICATORS................ |
27 |
MISFEED REMOVAL .................. |
28 |
DEVELOPER REQUIRED ........... |
31 |
MAINTENANCE REQUIRED....... |
31 |
SCAN HEAD LOCKING SWITCH ...... |
31 |
7 APPENDIX |
|
SPECIFICATIONS ....................... |
32 |
ABOUT SUPPLIES AND OPTIONS... |
33 |
INDEX................................................. |
34 |
1
2
3
4
5
6
7
3

1 |
INTRODUCTION |
|
This chapter provides basic information for using the unit.
USING THE MANUAL
The operation manual contains explanations of how to operate the unit, important considerations, and maintenance procedures. To get the most out of the unit, please read the operation manual. Please keep the operation manuals in a suitable location that will allow for convenient future reference.
Conventions used in the manual
In this manual, the following icons are used to provide the user with information pertinent to the use of the unit.
Warns the user that injury may result if the contents of the warning are not properly followed.
Cautions the user that damage to the unit or one of its components may result if the contents of the caution are not properly followed.
Notes provide information relevant to the unit regarding specifications, functions, performance, operation and such, that may be useful to the user.
Indicates a letter displayed in the display.
4

PART NAMES
|
|
Original cover |
1 |
|
|
|
|
1 |
|
|
|
2 |
5 |
|
8 |
|
|
||
|
6 |
|
|
3 |
|
9 |
|
|
|
||
4 |
|
|
10 |
|
|
11 |
|
|
7 |
|
|
|
|
12 |
|
|
|
|
Single bypass
13 |
5 |
3 |
14 |
|
15 |
Photoconductive drum
Toner cartridge
1 |
Original table |
10 |
Power switch |
2 |
Operation panel |
11 |
Handle |
3 |
Front cover |
12 |
Power cord socket |
4 |
Paper tray |
13 |
Fusing unit release lever |
5 |
Side cover |
14 |
Transfer charger |
6 |
Side cover open button |
15 |
Charger cleaner |
7Bypass paper guides
8Paper output tray
9Paper output tray extension
5
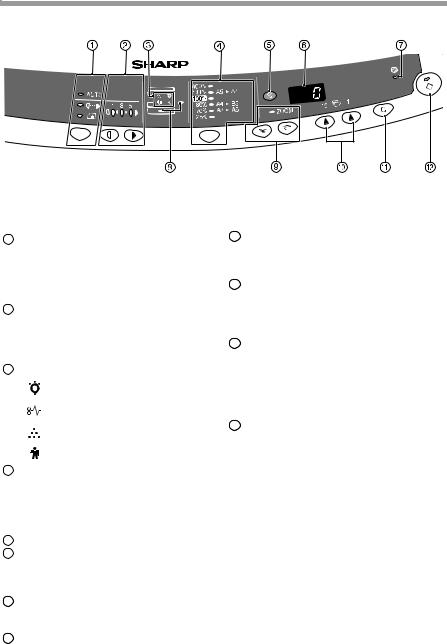
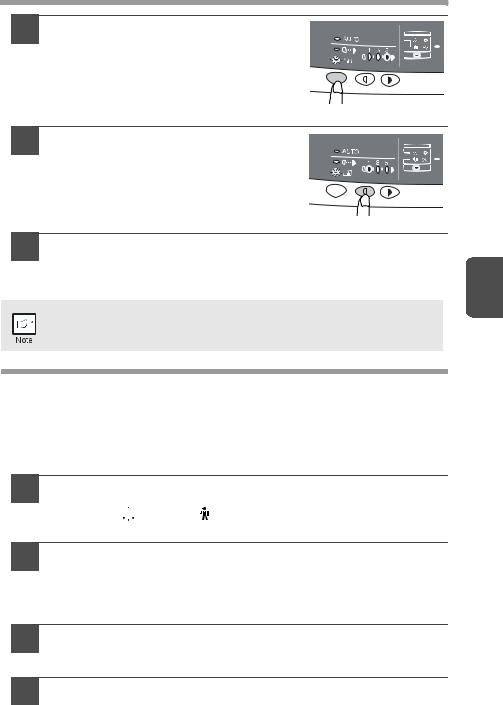
OPERATION PANEL
AR-5415 |
1Exposure mode selector key and indicators
Use to sequentially select the exposure modes: AUTO, MANUAL or PHOTO. Selected mode is shown by a lit indicator. (p.15)
2Light and dark keys and indicators
Use to adjust the MANUAL or PHOTO exposure level. Selected exposure level is shown by a lit indicator. (p.15) Use to start and terminate user program setting. (p.19)
3Alarm indicators
Developer replacement required

 indicator (p.31) Misfeed indicator (p.28)
Toner cartridge replacement required indicator (p.21)
Maintenance indicator (p.31)
4Copy ratio selector key and indicators
Use to sequentially select preset reduction/enlargement copy ratios. Selected copy ratio is shown by a lit indicator. (p.17)
5Copy ratio display (%) key (p.17)
6Display
Displays the specified copy quantity, zoom copy ratio, user program code, and error code.
97 Power save indicator
Lights up when the unit is in a power save mode. (p.18, p.19)
108Paper feed location indicators
Light up to show the selected paper feed station.
119 ZOOM keys and indicator
Use to select any reduction or enlargement copy ratio from 25% to 400% in 1% increments. (p.17)
102Copy quantity keys
•Use to select the desired copy quantity (1 to 99). (p.15)
•Use to make user program entries. (p.19)
113Clear key
•Press to clear the display, or press during a copy run to terminate copying. (p.15)
•Press and hold down during standby to display the total number of copies made to date. (p.20)
124Start key and indicator
•Copying is possible when the indicator is on.
•Press to start copying.
•Use to set a user program. (p.19)
6
2 |
LOADING PAPER |
|
Follow the steps below to load paper into the tray.
PAPER
For best results, use only paper recommended by SHARP.
Type of paper |
Type of media |
Size |
Weight |
2 |
|
|
|||||
feeding |
|
||||
|
|
|
|
|
|
|
|
|
|
|
|
Paper tray |
Standard paper |
A4 |
56g/m2 to |
|
|
|
|
|
A5 |
80g/m2 |
|
|
|
|
B5 |
|
|
|
|
|
Letter |
|
|
|
|
|
Legal |
|
|
|
|
|
Invoice |
|
|
|
|
|
|
|
|
Single bypass |
Standard paper and |
A4 |
52g/m2 to |
|
|
|
thick paper |
A5 |
128g/m2** |
|
|
|
|
|
A6 |
|
|
|
|
|
B5 |
|
|
|
|
|
B6 |
|
|
|
|
|
Letter** |
|
|
|
|
|
Legal |
|
|
|
|
|
Invoice |
|
|
|
|
|
|
|
|
|
Special |
Transparency |
A4 |
|
|
|
media |
film |
Letter |
|
|
|
|
|
|
|
|
|
|
Envelope* |
International DL |
|
|
|
|
|
International C5 |
|
|
|
|
|
Commercial 10 |
|
|
|
|
|
Monarch |
|
|
|
|
|
|
|
|
*Do not use non-standard envelopes, and envelopes that have metal clasps, plastic snappers, string closures, windows, linings, self-adhesive, patches or synthetic materials. Do not use envelopes that are filled with air or envelopes that have
labels or stamps attached. These will cause physical damage to the unit.
**For paper weighing from 104g/m2 to 128g/m2, A4 is the maximum size that can be fed through the single bypass.
•Special papers such as transparency film, labels and envelope must be fed one sheet at a time through the single bypass.
7
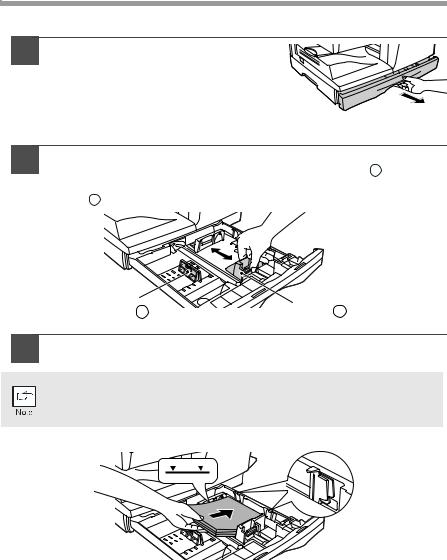
LOADING THE PAPER TRAY
1Raise the handle of the paper tray and pull the paper tray out until it
stops.
2Adjust the paper guides on the paper tray to the copy paper width and length. Squeeze the lever of paper guide A and slide the guide to match with the width of the paper. Move paper guide B to the appropriate slot as marked on the tray.
Paper |
Paper |
guide B |
guide A |
3Fan the paper and insert it into the tray. Make sure the edges go under the corner hooks.
Do not load paper above the maximum height line ( 
 ). Exceeding the line will cause a paper misfeed.
8

4Gently push the paper tray back into the unit.
• |
After loading paper, to cancel the blinking |
without restarting |
|
||
|
copying, press the clear ( |
) key. The |
in the display will go out |
|
|
|
and the start ( |
) indicator will light up. |
|
|
|
• |
Be sure that paper is free of rips, dust, wrinkles, and curled or bent edges. |
|
|||
• |
Make sure all the paper in the stack is the same size and type. |
|
|||
• |
When loading paper, ensure there is no space between the paper and |
2 |
|||
|
the guide, and check if the guide is not set too narrow causing the |
||||
|
paper to bend. Loading paper in these ways will result in document |
||||
skew or a paper jam.
•When not using the unit for an extended period, remove all paper from the paper tray and store it in a dry place. If paper is left in the unit for an extended period, the paper will absorb moisture from the air, resulting in paper jams.
•When adding new paper to the paper tray, remove the old paper already contained in the tray. Placing new paper on top of the paper already contained in the tray may result in feeding two sheets at one time.
9

BYPASS FEED (including special paper)
The single bypass can be used to feed standard paper, transparency film, labels, envelopes, and other special purpose paper. Paper measuring from A6 to A4 and in the weight range of 52g/m2 to 128g/m2 can be used in this tray. (For paper weighing from 104g/m2 to 128g/m2, A4 is the maximum size.)
• The single bypass can hold one sheet of paper.
• The original image must be smaller than the paper or media for copying. If the original image is bigger than the paper or media, this may cause smudges on the edges of the copies.
•If you insert a sheet of paper into the single bypass when multiple copies have been set with the copy quantity setting (p.15), the copy quantity setting will change to "0" and only one copy will be made.
•When copying onto transparency film, remove each copy promptly. Do not let copies stack up.
1 Select copy settings before you begin the copy job.
For information on the copy settings, see "MAKING COPIES" (p.11)".
2Set the paper guides to the paper width. Insert a single sheet of copy (print face down) into the feed slot of the single bypass.
When you insert the paper, the unit will automatically draw in the paper and begin copying.
Print face
Note for loading envelopes
•Envelopes must be fed narrow side into the feed slot one at a time.
•Do not use non-standard envelopes, and envelopes that have metal clasps, plastic snappers, string closures, windows, linings, self-adhesive, patches or synthetic materials. Do not use envelopes that are filled with air or envelopes that have labels or stamps attached.
•Envelopes of which the surface is not flat because of embossing may cause the copies/prints to become smudged.
•Under high humidity and temperature conditions the glue flaps on some envelopes may become sticky and be sealed closed when copied/printed.
•Use only envelopes which are flat and crisply folded. Curled or poorly formed envelopes may be poorly copied/printed or may cause misfeeds.
10

3 |
MAKING COPIES |
|
This chapter explains basic and other copying functions.
The unit is equipped with a one-page memory buffer. This memory allows the unit to scan an original once only and make up to 99 copies. This feature improves workflow, reduces operation noise from the copier, and provides higher reliability by reducing wear and tear on the scanning mechanism.
If the unit does not function properly during use, or if a function cannot be used, see "TROUBLESHOOTING THE UNIT" (p.26).
COPY FLOW |
3 |
|
1Make sure that paper has been loaded in the paper tray (p.8), and check the paper size (p.7).
If paper is not loaded, see page 8. If you are using the single bypass, check the paper size and then proceed to the next step without loading paper.
2Turn on the unit (p.12).
3Place the original.
If you are using the original table, see "ORIGINAL PLACEMENT" (p.14). When copying onto A4 paper or a large size, pull out the paper output tray extension.
4Select the copy settings.
If you wish to copy using the initial settings (p.13), proceed to the next step.
To set the number of copies, see page 15.
To adjust the resolution and contrast settings, see page 15. To enlarge or reduce the copy, see page 17.
5 Start copying. |
If you are using the single bypass |
|
Press the start ( ) key. |
||
Do not press the start ( ) key. Insert a |
||
|
||
|
sheet of paper into the single bypass. |
|
|
(Page 10) |
|
|
Multiple copies are not possible |
|
|
using the single bypass. |
11
Do not insert paper in the single bypass when a copy job from the paper tray is in progress. This will cause a misfeed.
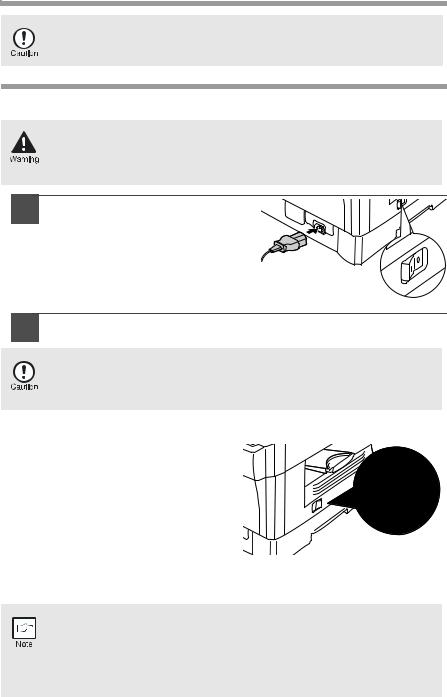
CONNECTING THE POWER CORD
If you use the unit in a country other than the country where the unit was purchased, you will need to make sure that your local power supply is compatible with your model. If you plug the unit into an incompatible power supply, irreparable damage to the unit will result.
1 Ensure that the power switch of the unit is in the OFF position. Insert the attached power cord into the power cord socket at the rear of the unit.
2Plug the other end of the power cord into the nearest outlet.
Only insert the power cord into a properly grounded wall socket. Do not use extension cords or power strips.
Power on
Ensure that the power switch of the unit is in the OFF position. Plug the other end of the power cord into the nearest outlet.
Turn the power switch on the left side of the unit to the "ON" position. The start
( ) indicator will light up and other indicators which show the initial settings of the operation panel will also light up to indicate the ready condition. For the initial settings, see the "Initial settings of
operation panel" described on the next page.
• The unit will enter a power save mode once the set time has elapsed without any unit operation. The settings of the power save modes can be modified. See "USER PROGRAMS" (p.19).
•The unit will return to the initial settings a preset amount of time after the end of copy or scanning job. The preset amount of time (auto clear time) can be changed. See "USER PROGRAMS" (p.19).
12

About the scan head
The scan head lamp remains on constantly when the unit is in the ready condition (when the start ( ) indicator is illuminated).
The unit adjusts the scan head lamp periodically to maintain copying quality. At this time, the scan head moves automatically. This is normal and does not indicate unit trouble.
Initial settings of operation panel
When the unit power is on, the operation panel will revert to the initial settings when the time set with the "Auto clear time" setting (p.18) elapses after a copy is finished, or when the clear ( ) key is pressed twice.
The initial settings of the operation panel are shown below.
AR-5415 |
3 |
|
"0" is displayed in the display.
When copying is begun in this state, the settings in the following table are used.
Copy quantity |
1 copy |
Exposure adjustment |
AUTO |
Zoom |
100% |
Tray |
Paper tray 1 |
Power off methods
If not used for a certain period of time, the unit will automatically enter auto power shut-off mode (p.19) in order to minimise power consumption. In cases where the machine will not be used for a long time, turn off the power switch and remove the power cord from the outlet.
13
ORIGINAL PLACEMENT
• The original table can read up to A4 original.
• Image loss 4mm can occur at the leading and trailing edges of the copies. Also image loss 4.5mm in total can occur along the other edges of the copies.
•When copying a book or an original which has been folded or a crumpled original, press down the original cover lightly. If the original cover is not securely closed, the copies may be striped or blurred.
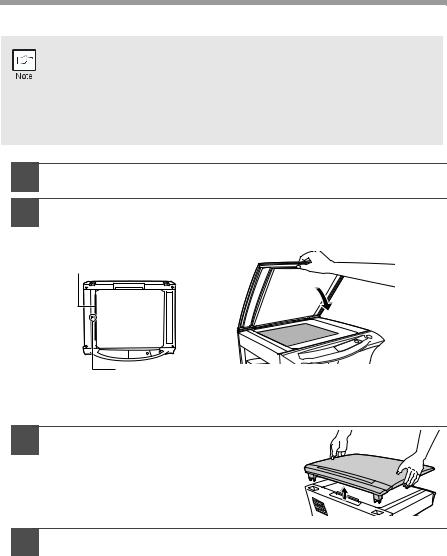
1Open the original cover, and place the original.
2Place an original face down on the original table. Align it with the original scale and the centring ( ) mark. Gently close the original cover.
Original scale
 mark
mark
Setting a large original
The original cover can be removed to allow copying of bulky objects.
1Simply lift the original cover straight
up.
2To reattach the original cover, reverse the above procedure.
14

SET THE COPY QUANTITY
Set the number of copies using the two copy quantity ( ,
,  ) keys when copying from the original table.
• Press the clear ( ) key to clear an entry if a mistake is made.
• A single copy can be made with the initial setting, i.e., when "0" is displayed.
• Press the right copy quantity key to set the unit digit from 0 to 9. This key will not change the tens digit.
• Press the left copy quantity key to set the tens digit from 1 to 9.
Tens digit Unit digit |
3 |
|
EXPOSURE ADJUSTMENT/PHOTO COPYING
Exposure adjustment
Copy density adjustment is not required for most originals in the automatic exposure mode. To adjust the copy density manually or to copy photographs, the exposure level can be adjusted in 2 steps manually.
The copy resolution used for AUTO and MANUAL (  ) mode can be changed. (p.19)
1Press the exposure mode selector key to
select the MANUAL (  ) mode or PHOTO (
  ) mode.
2Use the light (  ) and dark (
  ) keys to
adjust the exposure level. If exposure level 2 is selected, the two left-handmost indicators for that level will light up simultaneously. Also, if level 4 is selected, the two right-handmost indicators for that level will light up simultaneously.
15

Automatic exposure adjustment
This automatic exposure level will remain in effect until you change it again by this procedure.
The automatic exposure level can be adjusted to suit your copying needs. This level is set for copying from the original table.
1Press the exposure mode selector key to
select the PHOTO ( ) mode.
2Press and hold down the exposure mode
selector key for approximately 5 seconds. The PHOTO ( ) indicator will go out and the AUTO indicator will begin to blink. One or two light and dark indicators corresponding to the automatic exposure level which has been selected will light up.
3Press the light (  ) or dark (
 ) key to
lighten or darken the automatic exposure level as desired. If exposure level 2 is selected, the two left-handmost indicators for that level will light up simultaneously. Also, if level 4 is selected, the two righthandmost indicators for that level will light up simultaneously.
4Press the exposure selector key. The AUTO indicator will stop blinking and light up steadily.
16
REDUCTION/ENLARGEMENT/ZOOM
Three preset reduction ratios and two enlargement ratios can be selected. The zoom function enables copy ratio selection from 25% to 400% in 1% increments.
1Set the original and check the paper size.
2Use the copy ratio selector key and/or ZOOM ( ,
,  ) keys to select the desired copy ratio.
|
• |
To verify a zoom setting without changing the zoom ratio, |
|
|
|
press and hold down the copy ratio display (%) key. When the |
|
|
|
|
|
|
|
|
|
|
|
key is released, the display will return to the copy quantity |
|
|
|
display. |
3 |
|
• |
To reset the ratio to 100%, press the copy ratio selector key |
|
|
|
repeatedly until the 100% indicator lights up. |
|
|
|
|
|
|
|
|
|
3Set the reduction/enlargement ratio.
To decrease or increase the zoom ratio rapidly, press and hold down the ZOOM ( ) or (
 ) key. However the value will stop at the preset reduction or enlargement ratios. To move beyond these ratios, release the key and then press and hold it down again.
To select a preset copy ratio:
Preset reduction and enlargement ratios are: 25%, 70%, 86%, 141%, and 400%.
To select a zoom ratio:
When a ZOOM ( or
or  ) key is pressed, the ZOOM indicator will light up and the zoom ratio will be displayed in the display.
17

4 |
SPECIAL FUNCTIONS |
|
This chapter describes the special functions of this unit. Use these functions as needed.
DESCRIPTION OF SPECIAL FUNCTIONS
Toner save mode (page 18)
Reduces toner consumption by approximately 10%.
Power save modes (page 19)
The unit has two power save modes of operation: preheat mode and auto power shut-off mode.
Preheat mode
When the unit enters the preheat mode, the power save (  ) indicator will light up and other indicators will remain on or off as before. In this condition, the fuser in the unit is maintained at a lower heat level, thereby saving power. To copy from the preheat mode, make desired copier selections and press the start (
 ) key using the normal copying procedure.
Auto power shut-off mode
When the unit enters the auto power shut-off mode, the power save (  ) indicator will light up and other indicators will go out. The auto power shut-off mode saves more power than the preheat mode but requires a longer time before starting copying. To copy from the auto power shut-off mode, press the start (
 ) key. Then make desired copier selections and press the start (
  ) key using the normal copying procedure.
Auto clear (page 19)
The unit returns to the initial settings a preset amount of time after the end of copy. This preset amount of time (auto clear time) can be changed.
Resolution of AUTO & MANUAL mode (page 19)
You can set the copy resolution used for AUTO and MANUAL (  ) exposure mode.
TONER SAVE MODE
1Press the exposure mode selector key
to select the MANUAL (  ) mode.
18
2Press and hold down the exposure mode
selector key for approximately 5 seconds. The MANUAL (  ) indicator will go out and the PHOTO (
 ) indicator will begin to blink. The light and dark indicator marked "5" will light up, indicating the standard toner mode is active.
3To enter the toner save mode, press the
light ( ) key. The light and dark indicator marked "1" will light up, indicating the toner save mode is selected.
4 Press the exposure mode selector key. The PHOTO ( )
)
indicator will stop blinking and will light up steadily. The light |
4 |
|
and dark indicator marked "3" will light up. The toner save |
||
mode is now active. |
||
|
To return to the standard mode, repeat the procedure but use the dark ( ) key to select exposure level "5" in step 3.
USER PROGRAMS
The user programs allow the parameters of certain functions to be set, changed, or cancelled as desired.
Setting the power save modes, auto clear time, stream feeding mode and resolution of AUTO & MANUAL mode
1Press and hold down the light ( ) and dark (
 ) keys simultaneously for more than 5 seconds until all the alarm
indicators (
 ,
,  ,
,  , ) blink and "
 " appears in the display.
2Use the left copy quantity ( ) key to select a user program number (1: auto clear time, 2: preheat mode, 3: auto power shut-off timer, 5: auto power shut-off mode 6: resolution of AUTO & MANUAL mode). The selected number will blink in the left side of the display.
3Press the start ( ) key. The entered program number will be steadily lit and the currently selected parameter number for the program will blink on the right side of the display.
4Select the desired parameter using the right copy quantity ( ) key. The entered parameter number will blink on the right of the display.
19

|
|
|
|
|
|
|
|
|
|
|
|
|
|
|
|
|
Program |
Mode |
|
Parameters |
|
|
|
|
No. |
|
|
|
|||
|
|
|
|
|
|
|
|
|
|
|
|
|
|
|
|
1 |
Auto clear time |
0 |
OFF, 1 |
10sec., 2 |
30sec. |
|
|
*3 |
60sec., 4 |
90sec., 5 |
120sec. |
|
|||
|
|
|
|
||||
|
|
|
|
|
|
|
|
2 |
Preheat mode |
*0 |
30sec., 1 |
60sec., 2 |
90sec. |
|
|
|
|
|
|
|
|
|
|
3 |
Auto power shutoff |
0 |
2min., *1 |
5min., 2 |
15min., |
|
|
timer |
3 |
30min., 4 |
60 min., 5 |
120min. |
|
||
|
|
|
|||||
Auto power shutoff
5 0 OFF, *1 ON mode
Resolution of AUTO
6 *0 300dpi, 1 600dpi & MANUAL mode
* Factory default settings are indicated with an asterisk (*).
5Press the start ( ) key. The right-hand number in the display will be steadily lit and the entered value will be stored.
To change the setting or to set another mode, press the clear ( ) key. The unit will return to step 2.
6Press the light ( ) or dark (
 ) key to return to the normal copy mode.
DISPLAYING TOTAL NUMBER OF COPIES
Use the following procedure to display the total number of copies.
Press and hold down the clear ( ) key for approximately 5 seconds. The total number of copies will appear in two steps, each with three digits.
Example: Total number of copies is 1,234.
20

5 |
MAINTENANCE |
|
This chapter describes how to replace the toner cartridge and how to clean unit.
Be sure to use only genuine SHARP parts and supplies.
For best copying results, be sure to use only SHARP Genuine Supplies which are designed, engineered, and tested to maximise the life and performance of SHARP copiers. Look for the Genuine Supplies label on the toner package.
TONER CARTRIDGE REPLACEMENT
When the toner cartridge replacement required ( ) indicator lights up, replacement of the toner cartridge will be needed soon. Obtain a new cartridge. When the toner cartridge replacement required (
 ) indicator blinks, the toner cartridge must be replaced before copying can be resumed. Replace the toner cartridge by following the procedure below.
During long copy run of a dark original, the start ( ) indicator may |
5 |
blink, the indicator light up, and the unit stop, even though toner is left. |
|
The unit will feed toner up to 2 minutes and then the start ( ) indicator |
|
will light up. Press the start ( ) key to restart copying. |
|
1 Open the side cover while |
|
pressing the side cover open |
|
button. |
|
2 Push gently on both sides of the front cover to open the cover.
21
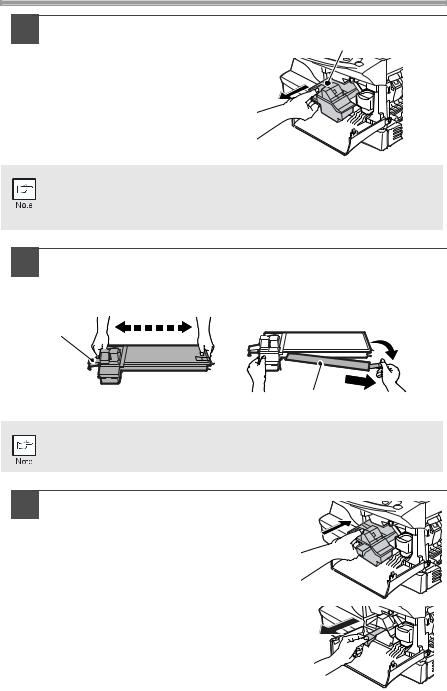
3 Gently pull the toner cartridge |
Toner cartridge lock |
|
out while pressing the lock |
release lever |
|
release lever. |
||
|
• After removing the toner cartridge, do not shake it or tap on it. Doing so may cause toner to leak from the cartridge. Put the old cartridge immediately in the bag contained in the box of the new cartridge.
• Dispose of the old toner cartridge in accordance with local regulations.
4Remove the toner cartridge from the bag. Grasp the cartridge on both sides and shake it horizontally four or five times. After shaking the cartridge, remove the toner seal.
4 or 5 times
Shutter
Toner seal
Grasp the toner cartridge as shown in the illustration. Do not hold the cartridge by the shutter. Be sure to only shake the cartridge before the toner seal is removed.
5 Gently insert the toner cartridge along the guides until it locks in place while pushing the lock release lever.
Remove the tape from the shutter. Pull the shutter out of the toner cartridge as shown in the illustration. Discard the shutter.
22

6Close the front cover and then the side cover by
pressing the round projections near the side cover open button. The indicator (  ) will go out and the start (
 ) indicator will light up.
When closing the covers, be sure to close the front cover securely and then close the side cover. If the covers are closed in the wrong order, the covers may be damaged.
Even after a new toner cartridge is installed, the start (  ) indicator may not light up, indicating copying cannot be restarted (toner is not sufficiently fed). In this case, open and close the side cover. The
copier will feed toner again approximately 2 minutes and then 5 copying can be restarted.
TONER CARTRIDGE LIFE
To find out the approximate quantity of toner remaining, follow the procedure described below.
1Press and hold down the light ( ) and dark (
 ) keys simultaneously for more than 5 seconds until all the alarm indicators (
 ,
,  ,
,  ,
,  ) blink and "
 " appears in the display.
2Press and hold down the copy ratio display (%) key for more thn
5 seconds.
The approximate quantity of toner remaining will be indicated in the display
as a percentage ("100", "75", "50", "25" or "10" is displayed). When the percentage is less than 10%, (


 ) will be displayed.
3Press the light ( ) or dark (
 ) key.
All alarm indicators wil go out.
23

CLEANING THE UNIT
Proper care is essential in order to get clean, sharp copies. Be sure to take a few minutes to regularly clean the unit.
• Before cleaning, be sure to turn the power switch off and remove the power cord from the outlet.
• Do not use thinner, benzene or other volatile cleaning agents. Doing so may cause deformation, discoloration, deterioration or malfunction.
Cabinet
Wipe the cabinet with a soft, clean cloth.
Original table and the back side of the original cover
Stains on the glass or cover will also be copied. Wipe the glass and cover with a soft, clean cloth. If necessary, dampen the cloth with a glass cleaner.
Original table |
Original cover |
24

Transfer charger
If copies start becoming streaky or blotchy, the transfer charger may be dirty. Clean the charger using the following procedure.
1Turn the power switch off. (p.13)
2Open the side cover while pressing the side cover open button.
3Take the charger cleaner out by holding the tab. Set the charger cleaner onto the right end of the transfer charger, gently slide the cleaner to the left end, and then remove it. Repeat this operation two or three times.
Slide the charger cleaner from the right end to the left end along the groove of the transfer charger. If the cleaner is stopped on the way, smudges on copies may occur.
5
4 Return the charger cleaner to its original position. Close the side cover by pressing the round projections near the side cover open button.
5Turn the power switch on. (p.12)
25

 6
6
 TROUBLESHOOTING THE UNIT
This chapter describes misfeed removal and troubleshooting.
TROUBLESHOOTING
If any problem occurs, check the list below before contacting your authorised service representative.
Problem |
Possible cause |
Solution |
Page |
|
|
Unit plugged in? |
Plug the unit into a grounded outlet. |
12 |
|
Unit does not |
Power switch on? |
Turn the power switch on. |
12 |
|
Side cover closed securely? |
Gently close the side cover. |
23 |
||
operate. |
||||
|
Front cover closed? |
Gently close the front cover and then |
23 |
|
|
|
close the side cover. |
||
|
|
|
||
Blank copies |
Is the original placed face |
Place the original face down on the |
14 |
|
down on the original table? |
original table. |
|||
|
|
|||
|
Is original image too dark or |
Adjust the exposure manually. |
15 |
|
|
too light? |
|
||
|
|
|
||
Copies are too |
Is the unit in the automatic |
Adjust the automatic exposure level. |
16 |
|
dark or too light. |
exposure mode? |
|
||
|
|
|||
|
Is the unit in the photo |
Cancel the photo exposure mode. |
15 |
|
|
exposure mode? |
|
||
|
|
|
||
Dust, dirt, |
Original table or original |
Clean regularly. |
24 |
|
cover dirty? |
|
|||
smudges appear |
|
|
||
Original smudged or |
Use a clean original. |
|
||
on copies. |
– |
|||
blotchy? |
|
|||
|
|
|
||
Striped copies |
Is transfer charger clean? |
Clean the transfer charger. |
25 |
|
|
Non-standard paper used? |
Use standard paper. If using special |
|
|
|
|
papers, feed the paper through the |
7 |
|
|
|
single bypass. |
|
|
|
Paper curled or damp? |
Store paper flat in the wrapper in a |
– |
|
Paper misfeeds |
|
dry location. |
||
|
|
|||
frequently. |
Pieces of paper inside unit? |
Remove all pieces of misfed paper. |
28 |
|
|
Paper guides in the paper |
Set the guides properly depending on |
8 |
|
|
tray not set properly? |
the paper size. |
||
|
|
|||
|
Too much paper in the |
Remove excessive paper from the |
8 |
|
|
paper tray? |
tray. |
||
|
|
|||
|
Is the paper too heavy? |
Use paper within the specified range. |
7 |
|
Images rub off the |
Paper damp? |
Replace with dry paper. If the unit is |
|
|
copy easily. |
|
not used for long time, remove the |
2 |
|
|
paper from the paper tray and store it |
|||
|
|
|
||
|
|
in its wrapper in a dry location. |
|
|
|
|
|
|
26
 Loading...