


 Loading...
AQUOS R2 compact
User Guide
AQUOS R2 compact User Guide Contents
|
1 |
Introduction |
|
About the User Guide........................................................ |
3 |
Getting Started |
|
Package Contents............................................................... |
6 |
Parts & Functions.............................................................. |
6 |
SIM Card.............................................................................. |
8 |
Internal Storage and SD Card............................................ |
9 |
Charging Handset.............................................................. |
13 |
Power On/Off................................................................... |
16 |
Making Initial Settings.................................................... |
17 |
Google Account................................................................. |
18 |
Unlocking Screen............................................................... |
21 |
Basic Operations |
|
Basic Operations............................................................... |
24 |
Using Manner Mode.......................................................... |
24 |
Using Airplane Mode......................................................... |
26 |
Using Fingerprint Authentication Function.................... |
26 |
Updating the System........................................................ |
29 |
Using ROBOQUL................................................................ |
30 |
Touchscreen/Text Entry |
|
Using Touchscreen............................................................ |
34 |
Text Entry......................................................................... |
35 |
Handset Interface |
|
Handset Screens............................................................... |
38 |
Icons at Display Top (Status Bar)................................... |
45 |
Checking Notifications (Notifications Window)............. |
46 |
Checking Notifications (Quick Settings Window).......... |
48 |
Capturing Screenshots (Clip Now)................................... |
50 |
Scrolling Screen Automatically (ScrollAuto)................... |
51 |
Phone |
|
Placing/Answering Calls................................................... |
54 |
Optional Services.............................................................. |
58 |
Handset Phone Number.................................................... |
65 |
Making Phone Settings..................................................... |
65 |
Address Book.................................................................... |
67 |
Messaging |
|
Sending Messages ( (+Message))................ |
72 |
Using Gmail....................................................................... |
73 |
Using Email........................................................................ |
76 |
Internet |
|
Using the Internet (Chrome)............................................ |
80 |
Camera |
|
Capturing Photos/Videos................................................. |
86 |
Music & Images |
|
Listening to Music (Play Music)...................................... |
92 |
compact R2 AQUOS
2
Viewing & Managing Photos/Videos (Album).................. |
94 |
Application Basics
Confirmation when First Activating Applications |
......... 98 |
Applications....................................................................... |
99 |
Adding/Deleting Applications........................................ |
101 |
Managing Data
File Storage..................................................................... |
108 |
Backup & Restore........................................................... |
108 |
Importing Data from Other Mobiles............................. |
109 |
Wi-Fi/Bluetooth®
Connecting by Wi-Fi....................................................... |
114 |
Using Bluetooth® Function............................................ |
120 |
Using Tethering.............................................................. |
124 |
Handset Settings
About Settings............................................................... |
126 |
Data Usage Settings...................................................... |
127 |
Battery Settings............................................................. |
134 |
Display Settings............................................................. |
136 |
Sound Settings................................................................ |
143 |
AQUOS Useful Settings.................................................. |
148 |
Security & Location Settings........................................ |
152 |
System Settings.............................................................. |
164 |
Other Handset Settings................................................. |
171 |
Global Services
Global Roaming............................................................... |
182 |
Calling from Outside Japan........................................... |
183 |
For Assistance
Handset Powers Off...................................................... |
188 |
Handset Does Not Power On......................................... |
188 |
Cannot Charge / Charging Stops / Charging Is Slow... |
189 |
Battery Runs Out Quickly............................................. |
189 |
Display Turns Off Suddenly.......................................... |
190 |
Display Goes Dark Suddenly.......................................... |
190 |
Screen Freezes / Operation Is Unstable....................... |
191 |
SIM Card Not Recognized.............................................. |
191 |
Cannot Use SD Card....................................................... |
192 |
Cannot Send/Receive Mail.............................................. |
192 |
Cannot Connect to Internet.......................................... |
193 |
Cannot Talk on Phone / Cannot Hear Other Party...... |
193 |
Cannot Use Applications................................................ |
194 |
Warranty/Specifications/Customer Service
Warranty & After-Sales Service................................... |
196 |
Specifications.................................................................. |
196 |
Customer Service............................................................ |
197 |
Safety Precautions
Handset & Hardware Care............................................. |
208 |
General Notes................................................................. |
210 |
Radio Wave Exposure and Specific Absorption Rate (SAR) |
|
Information..................................................................... |
213 |
Water & Dust Resistance.............................................. |
214 |
Safety Precautions......................................................... |
200 |
Important Product Information..................................... |
207 |

About the User Guide
In the User Guide, most operation descriptions are based on handset at time of purchase.
Unless noted otherwise, descriptions are for Home Screen (AQUOS Home). Some operation descriptions may be omitted.
Before Using This Product
Read "Safety Precautions" thoroughly beforehand for proper usage.
Accessible services may be limited by subscription contract conditions.
Data Communication
Handset is designed to be always connected to the Internet. Communication is initiated automatically for some functions such as data syncing.
Large-volume data communication, such as downloading applications and viewing videos, incurs expensive transmission fees. Subscription to a flat-rate plan is strongly recommended.
Even if connected by Wi-Fi, some applications and services incur transmission fees.
Screenshots & Key Labels
Screenshots in the User Guide may differ in appearance with actual Display. Key labels in the User Guide are simplified for description purposes and differ with actual Display.
Other Notations
In the User Guide, the product is referred to as "handset." microSD™/microSDHC™/microSDXC™ Card is referred to as "SD Card."
"803SH" here refers to this mobile phone "AQUOS R2 compact."
3
Introduction
compact R2 AQUOS
4

Getting Started |
|
Package Contents............................................................... |
6 |
Parts & Functions.............................................................. |
6 |
SIM Card.............................................................................. |
8 |
Internal Storage and SD Card............................................ |
9 |
Charging Handset.............................................................. |
13 |
Power On/Off................................................................... |
16 |
Making Initial Settings.................................................... |
17 |
Google Account................................................................. |
18 |
Unlocking Screen............................................................... |
21 |

6 |
|
|
|
Package Contents |
|
Parts & Functions |
|
|
|
|
|
|
|
|
|
|
Package Contents |
|
Handset (Front) |
Handset (AQUOS R2 compact)Battery is built into handset.Handset back cover is not removable.
(Japanese)(Japanese)
Name
 Proximity/
Light Sensor
 Charging/
Notification
Lamp
 Display
 Earpiece
 Front
Front
Camera
 Fingerprint
Sensor
Description
Proximity Sensor prevents Touchscreen misoperation during calls. Light Sensor adjusts Display brightness according to ambient light.
Illuminates while charging or for missed calls and notifications.
Touchscreen-type display; operate with your fingers on Display.
Hear the other party's voice here.
Use to shoot photos or videos of yourself.
Use fingerprint authentication to unlock screen, or use as Home key.

Handset (Back and Sides)
Name
 Mic
Mic
(Recorder Mic)
 Back
Back
Camera
 Mobile
Light
 FeliCa mark
 Mic/
Mic/
Recorder Mic
 Speaker
 Earphones-
Microphone
Jack
 Card Tray
 External
Connection
Jack
Description
Use while recording videos or when talking through Speakerphone.
Make sure not to cover Recorder Mic.
Shoot photos or videos.
Use as a camera flash, flashlight, etc.
Hold up to reader/writer to use NFC/ Osaifu-Keitai®.
Talk to the other party here. Also use while recording videos or when talking to emopa.
Make sure not to cover Mic/Recorder Mic.
Listen to music, video sound, etc.
Connect stereo earphones with mic (commercially available) here.
Insert/remove SD Card and SIM Card.
Connect ROBOQUL, AC Adaptor, etc.
Handset Keys
7
Charging/Notification Lamp
Lights/flashes while charging or for missed calls, new SMS/ +Message, etc.
Lamp color and illumination
Red, lit
Green, lit
Red, flashing
White, flashing1
Indication
Charging (Battery level less than about 94%)
Charging (Battery level more than about 95%)
Charging not possible
Notifications (missed calls, new SMS/ +Message, etc.)
1 Flashes when Display turned off.
Started Getting
Name
 Volume Up
Key
 Volume
Down Key
 Power Key
Description
Increase volume.
Decrease volume.
Turn Display off/on. Long Press for power on/off, reboot, etc.
compact R2 AQUOS

8
SIM Card
SIM Card is an IC card containing phone number and other customer information.
Handling SIM Card
Check the following regarding SIM Card handling.

 IC (gold) chip
For SIM Card handling, see SoftBank Website. https://www.softbank.jp/mobile/support/protect/usim/ (Japanese)
Avoid applying labels. May damage SIM Card.SIM is replaceable (at cost) in case of loss/damage.Wipe clean with a dry, soft cloth.
Always keep the IC (gold) chip clean.
SIM Card Cautions
Observe the following when using SIM Card.Within Japan, SIM Card must be installed to make
emergency calls (110, 119, 118).
Always follow emergency procedures to suspend service if your SIM Card or handset (SIM Card inserted) is lost/ stolen. For details, contact Customer Service.
Customer is responsible for any damage caused by inserting SIM Card in an other-brand IC card reader, etc. SoftBank Corp. is not responsible in such case.
It is recommended that you back up information that is saved on SIM Card. SoftBank Corp. is not responsible for damages from saved information that is lost.
Always power off handset before inserting/removing SIM Card.
Note that SIM Card specifications and performance may change without notice.
Return SIM Card to SoftBank Corp. when canceling subscription.
SIM Card is the property of SoftBank Corp.Returned SIM Cards are recycled for environmental
purposes.
Inserting SIM Card
Always power off beforehand.
Set SIM Card in Card Tray beforehand. Do not insert SIM Card without setting it in Card Tray.
With Display upward, pull out Card Tray by hooking a finger on groove (○)
With Display upward, pull out Card Tray. Pulling out Card Tray with Display downward or handset held upright can allow SIM Card and SD Card to fall from Card Tray and become misplaced.
Do not pull Card Tray forcefully or at an angle; damage may result. Gently pull Card Tray out horizontally.
Set SIM Card in Card Tray
Place gently, noting orientation of SIM Card (notch/IC (gold) chip facing down).
Make sure SIM Card is in Card Tray. Inserting Card Tray with SIM Card on its edge may cause damage.
Insert Card Tray in SIM/SD Card Slot
 SIM Card is inserted.
Do not insert Card Tray upside down.
Insert gently all the way horizontally in direction shown.Push Card Tray firmly where circled (○) so that there is no
gap between handset and Card Tray.
To maintain water and dust resistance, use handset with Card Tray completely closed.
Removing SIM Card
Always power off beforehand.
With Display upward, pull out Card Tray by hooking a finger on groove (○)
With Display upward, pull out Card Tray. Pulling out Card Tray with Display downward or handset held upright can allow SIM Card and SD Card to fall from Card Tray and become misplaced.
Do not pull Card Tray forcefully or at an angle; damage may result. Gently pull Card Tray out horizontally.
Remove SIM Card
Insert Card Tray in SIM/SD Card Slot
 SIM Card is removed.
Do not insert Card Tray upside down.
Insert gently all the way horizontally in direction shown.Push Card Tray firmly where circled (○) so that there is no
gap between handset and Card Tray.
To maintain water and dust resistance, use handset with Card Tray completely closed.
SIM-Unlocking Handset
Handset can be SIM-unlocked. SIM-unlocking handset allows other-carrier SIM cards to be used with it.
Some services, functions, etc. may have restrictions when an other-carrier SIM card is used. SoftBank Corp. does not guarantee operation whatsoever.
For details on SIM unlocking, see SoftBank Website.
9
Internal Storage and SD Card
Handset supports SD Card up to 512 GB. Some SD Cards may |
|
||||||||
not operate properly. |
|
|
|
|
|
||||
Internal storage can be used for saving data including system |
Getting |
||||||||
data, applications, and video and photos taken with Camera. |
|||||||||
|
|||||||||
|
Internal Storage/SD Card Cautions |
Started |
|||||||
|
|
|
|
|
|
|
|
||
Data on Internal Storage/SD Card |
|
|
|||||||
|
|
|
|||||||
Data on internal storage/SD Card may be lost/altered |
|
||||||||
due to accidents, malfunctions, repairs, handset upgrade/ |
|
||||||||
replacement, mishandling, etc. Back up important data |
|
||||||||
regularly. SoftBank Corp. is not liable for any damages |
|
||||||||
resulting from loss/alteration of data. |
|
|
|
||||||
Do not insert or remove SD Card forcefully. |
|
||||||||
Do not touch terminals or expose them to metal objects. |
|
||||||||
Never power off while reading or writing data. |
|
||||||||
Make sure not to erase or overwrite data accidentally. |
|
||||||||
microSDXC Card |
|
|
|
|
|
||||
Handset supports microSDXC Cards (SDXC-compatible SD |
|
||||||||
Cards). microSDXC Cards are supported by SDXC-compatible |
|
||||||||
devices only. |
|
|
|
|
|
|
|||
Exchanging Data with Non-SDXC-Compatible |
|
||||||||
Devices |
|
|
|
|
|
|
|||
To exchange data between handset and non-SDXC- |
|
||||||||
compatible devices, use SD Cards (microSD/microSDHC |
|
||||||||
Cards) supported by handset and those devices. Inserting a |
|
||||||||
microSDXC Card used on handset in a non-SDXC-compatible |
|
||||||||
device may corrupt card data. In such cases, do not format |
|
||||||||
the microSDXC Card on that device even if prompted to do |
|
||||||||
so. |
|
|
|
|
|
|
|||
Formatting deletes all microSDXC Card data and changes |
|
||||||||
the file system. The original storage capacity may |
|
||||||||
be unavailable after formatting. To use a corrupted |
|
||||||||
microSDXC Card, format it on an SDXC-compatible device. |
|
||||||||
Save Location |
|
|
|
|
|
||||
By default, data, including photos and videos taken |
|
||||||||
with handset, is saved in internal storage. Even with |
|
||||||||
downloaded commercially-available applications described |
|
||||||||
as saving data on SD Card, data is saved in internal |
|
||||||||
storage. |
|
|
|
|
|
|
|||
To save photos and videos taken with handset on SD |
|
||||||||
Card, insert SD Card before using Camera, then change |
|
||||||||
save location as follows. |
|
|
|
||||||
In Home Screen, |
(Camera) |
|
|
|
|||||
COMMON |
|
||||||||
|
|
|
|
|
|
|
|
||
Save To |
SD card |
|
|
|
|||||
|
|
|
|
|
|
|
|||
|
SD Card Caution |
|
|
AQUOS |
|||||
|
|
|
|
|
|
|
|
||
Keep SD Card away from infants; may cause choking if |
|||||||||
R2 |
|||||||||
swallowed. |
|
|
|
|
|
||||
|
|
|
|
|
|
|
|
compact |
|
|
|
|
|
|
|
|
|
||
|
|
|
|
|
|
|
|
||
10
Inserting SD Card
Always power off beforehand.
Set SD Card in Card Tray beforehand. Do not insert SD Card without setting it in Card Tray.
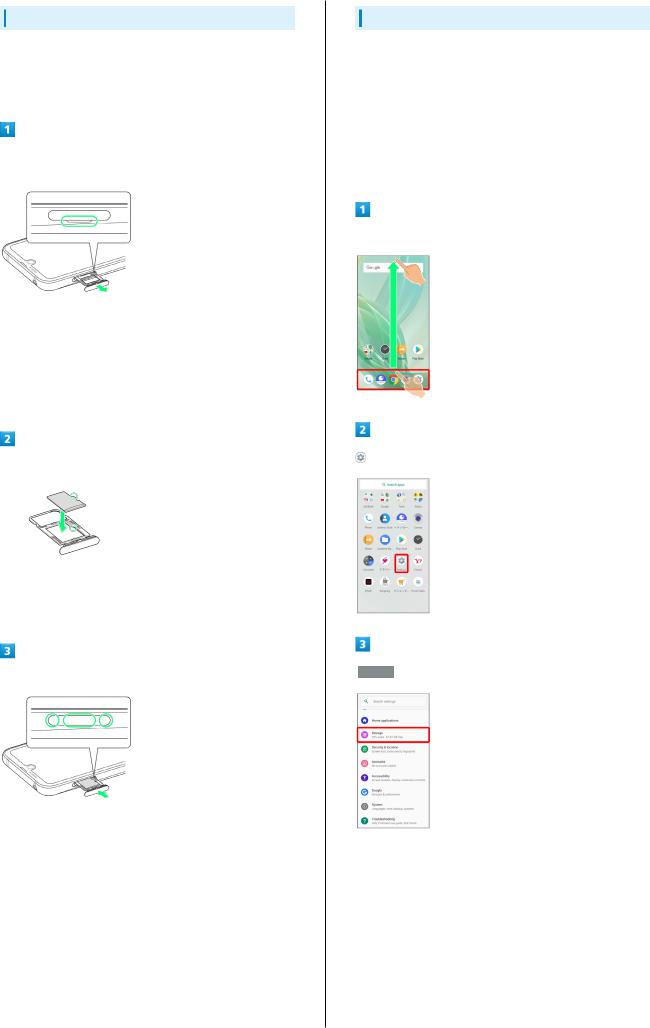
With Display upward, pull out Card Tray by hooking a finger on groove (○)
With Display upward, pull out Card Tray. Pulling out Card Tray with Display downward or handset held upright can allow SIM Card and SD Card to fall from Card Tray and become misplaced.
Do not pull Card Tray forcefully or at an angle; damage may result. Gently pull Card Tray out horizontally.
Set SD Card in Card Tray
Place gently, noting orientation of SD Card (notch/terminal side facing down).
Make sure SD Card is in Card Tray. Inserting Card Tray with SD Card on its edge may cause damage.
Insert Card Tray in SIM/SD Card Slot
 SD Card is inserted.
Do not insert Card Tray upside down.
Insert gently all the way horizontally in direction shown.Push Card Tray firmly where circled (○) so that there is no
gap between handset and Card Tray.
To maintain water and dust resistance, use handset with Card Tray completely closed.
Formatting SD Card
When using a new SD Card for the first time, always format it on handset.
Formatting erases all data on SD Card. Format SD Card with caution.
When formatting, keep handset charged or charge it adequately beforehand.
Insert SD Card beforehand. See "Inserting SD Card" for details.
In Home Screen, Drag Favorites Tray to top of Display
(Settings)
 Storage
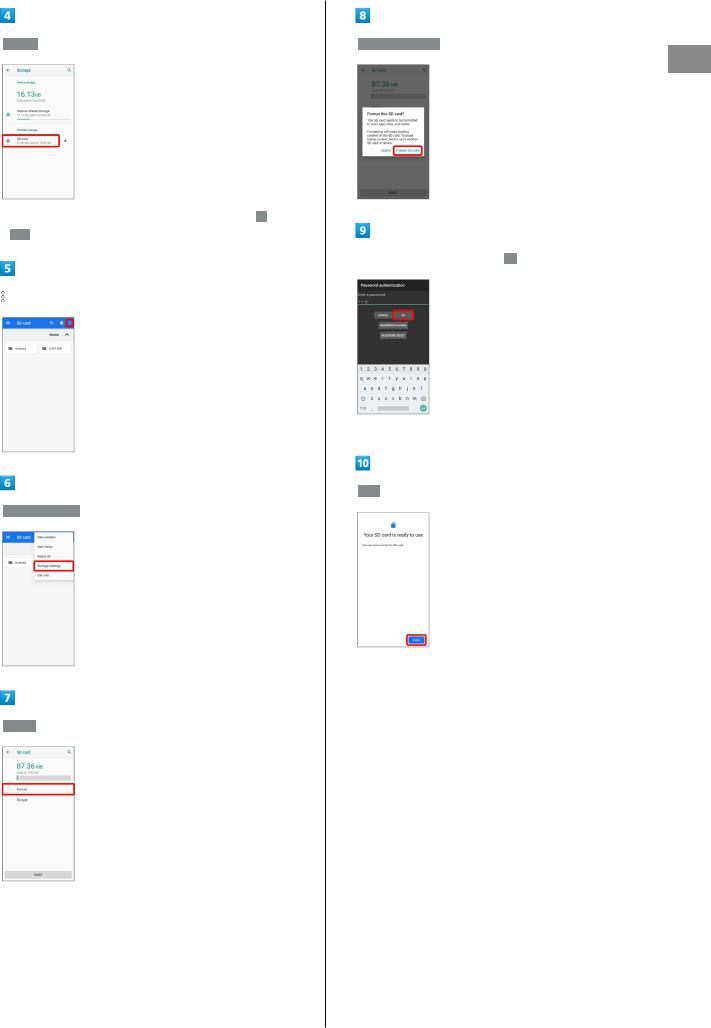
 SD card
When Contents Manager window appears next, Tap  SD card
 .
.
 Storage settings
11
 FORMAT SD CARD
Started Getting
Enter Operation Password 
 OK
OK
If Operation Password is unset, follow onscreen prompts.
 Done
Done
 All data on SD Card is erased.
 Format
compact R2 AQUOS
12
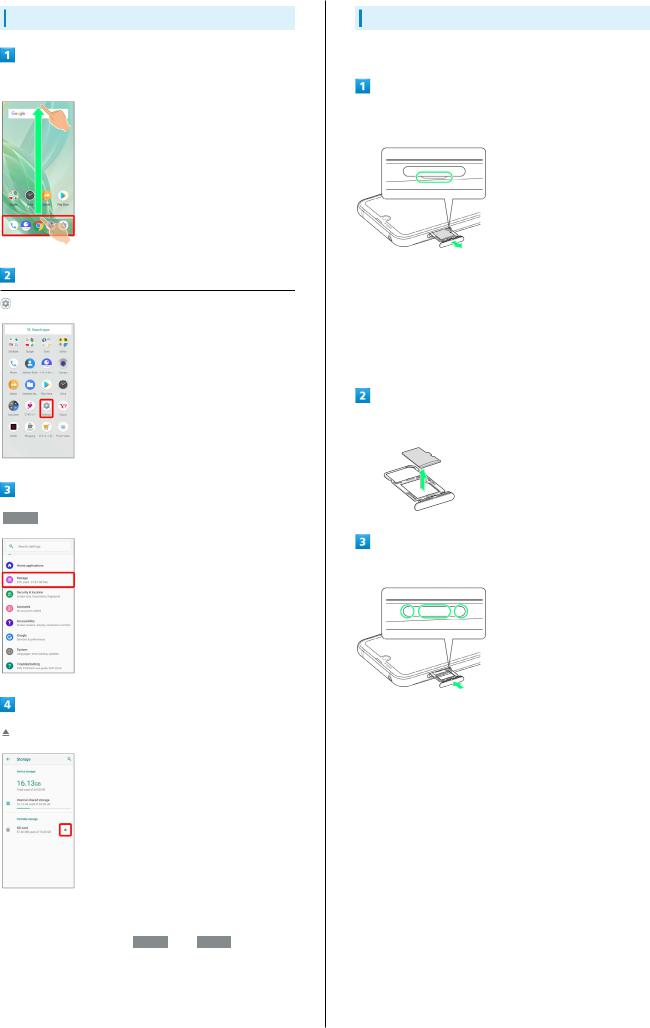
Unmounting SD Card
In Home Screen, Drag Favorites Tray to top of Display
(Settings)
 Storage
 SD Card is unmounted.
To mount SD Card again,  SD card

 MOUNT
MOUNT .
.
Removing SD Card
Always power off beforehand.
With Display upward, pull out Card Tray by hooking a finger on groove (○)
With Display upward, pull out Card Tray. Pulling out Card Tray with Display downward or handset held upright can allow SIM Card and SD Card to fall from Card Tray and become misplaced.
Do not pull Card Tray forcefully or at an angle; damage may result. Gently pull Card Tray out horizontally.
Remove SD Card
Insert Card Tray in SIM/SD Card Slot
 SD Card is removed.
Do not insert Card Tray upside down.
Insert gently all the way horizontally in direction shown.Push Card Tray firmly where circled (○) so that there is no
gap between handset and Card Tray.
To maintain water and dust resistance, use handset with Card Tray completely closed.

Charging Handset
Battery is built into handset.
Internal Battery
A lithium-ion battery is built into handset; it is not removable.
Recycling
This product requires a lithium-ion battery. Lithiumion batteries are recyclable. To recycle a used lithiumion battery, take it to any shop displaying the recycling symbol.
Battery Cautions
Storage
To help maintain performance and life of Internal Battery, do not store in the following conditions (battery level should be at approximately 40% for optimal storage).Full (immediately after charging is complete)Exhausted (too low to power on handset)
Bulges of Internal Battery
Depending on use, bulges may appear near end of battery life; this does not affect safety.
Internal Battery Replacement
Internal Battery is a consumable item; may need to be replaced if operating time shortens noticeably. Internal Battery is not user replaceable; its replacement incurs fees and requires handset submission to a SoftBank Shop or other appropriate servicer. For details, contact a SoftBank Shop or Customer Service.
13
About Charging
The following charging options are available.
Charging
Option
ROBOQUL (desktop holder)
AC Adaptor
Description
Place handset in ROBOQUL and charge using an AC Adaptor (optional accessories).
Connect handset and AC Adaptor (optional accessory) directly.
Started Getting
Indications while Charging
Charging/Notification Lamp
Charging/Notification Lamp illuminates red while charging; illuminates green when charge is almost full.
If Charging/Notification Lamp is blinking, charging is not working properly. Make sure that you are using Charger and products specified by SoftBank Corp. If you are using specified products only, contact a SoftBank Shop or Customer Service.
Lock Screen while Charging
Charging progress appears in lock screen."Charging": normal charging"Charging rapidly": rapid charging
"Charging slowly": low-speed charging; handset begins low-speed charging depending on the conditions, such as when nearly charged.
Charging Cautions
Water Resistance
ROBOQUL and AC Adaptor (optional accessories) are not waterproof. Never connect a charger plug/USB Type-C™ plug while handset or Charger is wet.
Handset is water resistant; however, if a charger plug/USB Type-C plug is inserted while it is wet, liquid (tap water, beverage, sea water, pet urine, etc.) or a foreign object adhered to handset or a charger plug/USB Type-C plug may cause overheating, burnout, fire, malfunction, burns, etc. due to electric shock, short-circuiting, etc.
Handling Cords
Do not pull, bend, or twist cord; may damage the cord.
About Charging Abroad
SoftBank Corp. is not liable for problems resulting from
charging handset abroad. AQUOS R2compact
14
ROBOQUL
ROBOQUL is designed for use in Japan. You assume all responsibility if used abroad. Use abroad may infringe on the country's/region's laws; check before using.
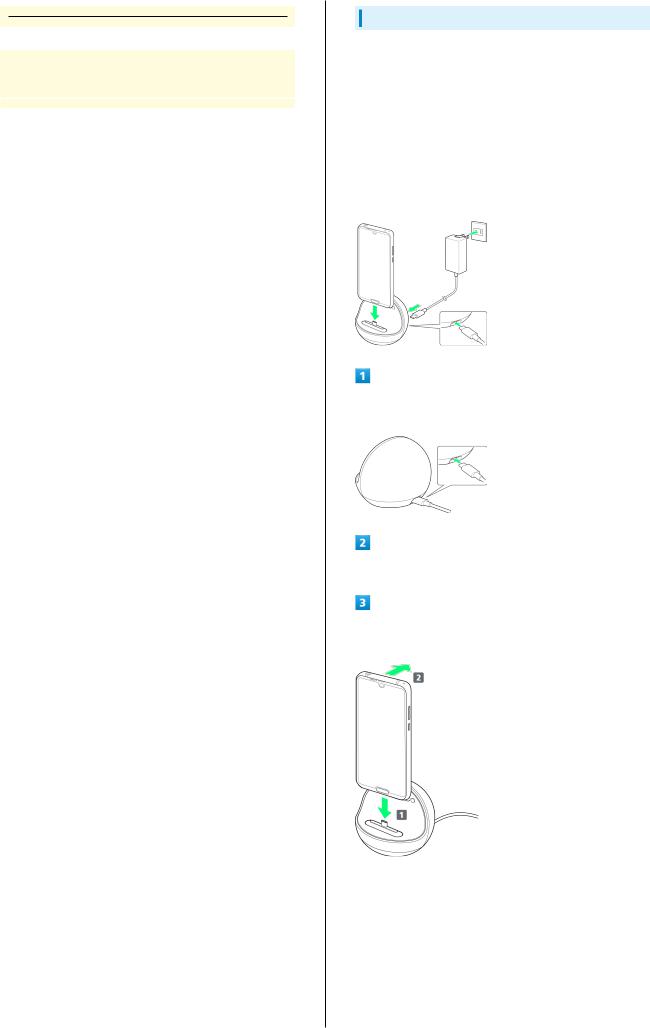
Charging with ROBOQUL
Charge using ROBOQUL [SHEGH1] and an AC Adaptor (USB Type-C™ quick charge AC Adaptor for USB PD [ZSDBAS] (SB- AC20-TCPD)) (optional accessories).
When charging using ROBOQUL and handset is powered on, ROBOQUL swivels when Display lights up, at start of charging, for incoming calls, alarms, etc. See "Using ROBOQUL" for details on setting ROBOQUL motion.
Use ROBOQUL on a flat and stable surface.
Handset does not quick-charge when using ROBOQUL. See "Handset" for charge times with an AC Adaptor/ROBOQUL.
Insert USB Type-C plug on AC Adaptor into ROBOQUL power connection terminal
Raise plug on AC Adaptor and plug into outlet
Insert ROBOQUL charging plug into External Connection Jack (  ), and lean handset backward (
  )
)
 Charging/Notification Lamp illuminates once charging starts.
Press handset firmly and straight all the way. If not attached adequately, handset may fall or ROBOQUL may tip over. Avoid scratching handset when attaching.
To continue using ROBOQUL after charging, skip  and
and
 .
.

After charging, remove handset from ROBOQUL and disconnect USB Type-C plug on AC Adaptor
Hold down ROBOQUL while pulling handset straight up.
Unplug AC Adaptor and lower plug
 Charging ends.
Using ROBOQUL Functions
You must set permissions for ROBOQUL to use functions beforehand. See "Before Using ROBOQUL" for details.
15
Charging with AC Adaptor
Use an AC Adaptor (USB Type-C™ quick charge AC Adaptor for USB PD [ZSDBAS] (SB-AC20-TCPD)) (optional accessory).
For information on other peripheral devices, see SoftBank
Website. Getting
Started
Insert USB Type-C plug of AC Adaptor into External
Connection Jack
Raise plug on AC Adaptor and plug into outlet
 Charging/Notification Lamp illuminates once charging starts.
After charging, unplug AC Adaptor from outlet and disconnect from handset
 Charging ends.
compact R2 AQUOS

16
Power On/Off
Powering On
Long Press Power Key until SHARP logo appears
 Handset powers on, and lock screen appears after a while.
If confirmation appears, follow onscreen prompts.
An initial settings wizard may appear the first time handset is powered on. For details on initial settings, see "Making Initial Settings."
Flick  /
/  up
up
 Home Screen appears.
After Flicking  up, enter pattern / lock no. (PIN) / password to unlock.
Powering Off
Power Key (Long Press)
 Power off
 Handset powers off.

Making Initial Settings
When powering on the first time, an initial settings wizard appears for optionally making Wi-Fi, Google™ account, and other settings. Follow onscreen instructions to set items. Insert SIM Card before powering on handset.
Making Initial Settings
Select language then  START
START
To place an emergency call, Tap  Emergency call
 .To set visual assistance, Tap
  Vision Settings
 . See
. See
"Accessibility" for details.
Set Wi-Fi items
Follow onscreen prompts.
To skip Wi-Fi settings, select  Use mobile network for setup
 /
/  SKIP
SKIP . Continue by following onscreen prompts.
 DON'T COPY
Tap  NEXT
NEXT to copy data from another mobile, etc. Follow onscreen prompts.
17
Set up a Google Account
Started Getting
See "Google Account" for details on a Google Account.To skip Google Account setup, Tap  Skip
Skip .
.
Set/check each item 
 ACCEPT
 SKIP
SKIP
Tap method 
 NEXT
NEXT to set selected method. See "Using Fingerprint Authentication Function," "Security & Location Settings," "Setting Screen to Unlock by Tracing Pattern,"
"Requiring Lock No. (PIN) Entry for Unlocking Screen," and "Setting Screen to Unlock with Password" for details.
 No Thanks
 /
/  Turn on
After Tapping |
|
, follow onscreen prompts to set |
R2 AQUOS |
|
Turn on |
compact |
|||
Google Assistant. |
||||
|
||||

18
 Skip
Skip
After Tapping  Add a card
 follow onscreen prompts to save card information.
Set each item 
 DONE FOR NOW
 Handset restarts, and initial settings are complete.
To make My SoftBank settings, after initial settings, Drag Status Bar down, then Tap  Information about My SoftBank
 .
.
Google Account
Use a Google Account and get more convenience with Google services. A Google Account is required to use some services or fully use some applications.
Google Account Cautions
Google Account Mail Address & Password
Be careful not to forget your Google account mail address and password.
Google Account Operations & User Interface
Operations and user interface are subject to change due to automatic application updates or other reasons.
Creating a Google Account
In Home Screen, Drag Favorites Tray to top of Display
(Settings)
 Accounts
19
Add account |
Enter first name |
Enter last name |
Next |
Started Getting
If confirmation appears, follow onscreen prompts.
 Google
Set/enter date of birth and gender 
 Next
Next
 Window for logging in to a Google account opens.
Enter username (mail address)  Next
Next
 Create account
Enter password  Re-enter password
  Next
Next
 For myself
To create a child's account, Tap  For my child
 , then follow onscreen prompts.
compact R2 AQUOS

20
 Yes, I'm in
To not add a phone number, or add a phone number for security only, Tap  More options
 . Continue by following onscreen prompts.
To not set a phone number, Tap  Skip
Skip .
.
Check the privacy policy and terms of use  I agree
 Next
Next
Select whether to enable data backup 
 ACCEPT
Signing in to a Google Account
In window for logging in to a Google account, enter mail address 
 Next
Next
Enter password 
 Next
Next
Follow onscreen prompts
 You are signed in to your Google Account.
 Account is created.

Unlocking Screen
Screen Lock
After a period of inactivity, Display turns off to save battery power (screen lock active). Screen lock prevents accidental Touchscreen operation.
To activate screen lock manually, Press Power Key when Display is turned on.
If Screen Lock Activates while Playing Music
Music continues to play. For operation, Press Power Key to open lock screen and use operation panel (operations may vary depending on application).
21
Unlocking Screen
When Display is turned off (screen lock active), Power Key 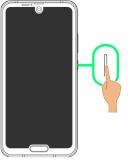 GettingStarted
 Lock screen appears.
In lock screen, Flick  /
/  up
up
 Screen is unlocked.
To change the unlock method for enhanced security, set handset to require pattern drawing or lock no. (PIN)/ password entry for unlocking screen or set screen to be unlocked with your fingerprint/face as needed. See "Using Fingerprint Authentication Function," "Security & Location Settings," "Setting Screen to Unlock by Tracing Pattern," "Requiring Lock No. (PIN) Entry for Unlocking Screen," and "Setting Screen to Unlock with Password" for details.
After Flicking  up, enter pattern / lock no. (PIN) / password to unlock.
Another Way to Turn On Display
Set Display to turn on when handset is picked up and held still (Turn screen on by holding). See "Auto Sleep Off Settings" for details.
compact R2 AQUOS
22

Basic Operations |
|
Basic Operations............................................................... |
24 |
Using Manner Mode.......................................................... |
24 |
Using Airplane Mode......................................................... |
26 |
Using Fingerprint Authentication Function.................... |
26 |
Updating the System........................................................ |
29 |
Using ROBOQUL................................................................ |
30 |

24
Basic Operations
Selecting Options and Navigating
Screens
Tap items, icons, onscreen keys, etc. to open assigned items.
To return to the previous screen, Tap  .
.
Menu Operations
Tap  at Display top or bottom for available settings and items.
Using Manner Mode
Mute ringtones and other handset sounds to avoid disturbing others around you.
Manner mode setting is also accessible from Quick Settings Window.
Manner Mode Options
Settable items are the following.Vibe
Ringtones and other handset sounds are muted; handset vibrates for incoming calls/messages, etc.
Mute
Ringtones and other handset sounds are muted; handset does not vibrate for incoming calls/messages, etc.
Manner Mode Cautions
Camera shutter sound, video recording tones, alarms, media sound, etc. still play even in Manner mode.Alternatively, to mute alarms and media sound, use "Do
not disturb." See "Sound Settings" for details.
Using Manner Mode (Vibe)
Press Volume Up/Down Key
Screens may also have settings and items that are available by Touching & Holding Display.
 Volume bar appears.
(Manner OFF)
 Icon changes to
  (Vibe), and handset enters Manner mode (vibe).

Canceling Manner Mode (Vibe)
Press Volume Up/Down Key for volume bar, |
(Vibe) |
||
(Mute) |
|
|
|
Icon changes to |
(Manner OFF), and handset exits |
||
Manner mode. |
|
|
|
|
|
|
|
|
|
|
|
|
|
|
|
25
Using Manner Mode (Mute)
Press Volume Up/Down Key
Operations Basic
 Volume bar appears.
(Manner OFF)
 Icon changes to
  (Vibe), and handset enters Manner mode (vibe).
(Vibe) while volume bar is displayed
 Icon changes to
  (Mute), and handset enters Manner mode (mute).
Canceling Manner Mode (Mute)
Press Volume Up/Down Key for volume bar, |
(Mute) |
|
|
Icon changes to |
(Manner OFF), and handset exits |
compactR2AQUOS |
|
Manner mode. |
|
|
|
|
|
|
|
|
|
|
|
|
|
|
|

26
Using Airplane Mode
Leaving power on, suspend signal-transmitting functions.
Activating Airplane Mode
Drag Status Bar down
 Notifications Window opens.
 Airplane mode activates.
Canceling Airplane Mode
From Notifications Window,
Airplane Mode Caution
Activating Airplane mode disables Wi-Fi and Bluetooth®, interrupting corresponding transmissions. Wi-Fi/Bluetooth® connections can be used even in Airplane mode by enabling Wi-Fi/Bluetooth® after activating Airplane mode; make sure that such connection/
transmission is allowed in your current location before use.
Using Fingerprint Authentication
Function
Fingerprint Authentication Function
Hold finger to sensor to authenticate and use handset. Use this function to unlock screen or access Notifications Window.
Fingerprint Authentication Function
Cautions
Observe the following when using the fingerprint authentication function.
Authentication is based on fingerprint characteristics. This function may be unusable if your fingerprint characteristics are not prominent.
Ability to authenticate (assuming finger is held to sensor correctly) depends on conditions of use. Saving your fingerprint may be difficult if finger is in any of the following conditions. Washing/wiping hands, using different finger, saving a wider area, etc. may improve capability.
-Wrinkled with moisture (e.g., after a bath)
-Wet with water, sweat, etc.
-Dry
-Covered with handcream, etc.
-Stained with mud or oil
-Rough or damaged (cut, sore, etc.)
-Fingerprint is faint (finger surface is worn)
-Fingerprint is deformed due to weight gain or loss
-Finger surface condition at the time of authentication is extremely different than when fingerprint was saved
Fingerprint authentication technology does not guarantee successful personal authentication/verification. SoftBank Corp. is not liable for any damages resulting from use
of handset by third party or lost opportunities to use handset.

Saving Fingerprints
In Home Screen, Drag Favorites Tray to top of Display 
 (Settings)
 Security & location
 Security & location menu opens.
 Fingerprint
 Fingerprint settings open.
 NEXT
NEXT
27 |
|
||||||
|
|
|
|
|
|
|
|
Follow onscreen prompts and set pattern / lock no. (PIN) / |
|
||||||
password for unlocking screen |
|
||||||
This is a backup method for unlocking the screen if unable |
Operations Basic |
||||||
|
|||||||
|
to authenticate with your fingerprint. |
|
|||||
If method for unlocking screen is setting other than |
|
||||||
|
|
|
|
or |
|
, first unlock screen. |
|
|
|
None |
Swipe |
|
|||
See "Setting Screen to Unlock by Tracing Pattern," |
|
||||||
|
"Requiring Lock No. (PIN) Entry for Unlocking Screen," and |
|
|||||
|
"Setting Screen to Unlock with Password" for details on |
|
|||||
|
setting a method for unlocking screen. |
|
|||||
|
|
|
|
||||
|
|
|
|
||||
|
NEXT |
|
|||||
Hold finger to sensor until handset vibrates
Move finger a little at a time and hold it to sensor.Repeat until screen appears indicating fingerprint is saved.If finger is already saved, use another finger.
compact R2 AQUOS

28
 DONE
DONE
 Fingerprint is saved.
To save other fingerprints, Tap  ADD ANOTHER
 .
.
Saving Fingerprints
Savable Number of Fingerprints
Save up to 5 fingerprints.
Backup Screen Unlock Methods
Make sure not to forget pattern / lock no. (PIN) / password set as backup for unlocking screen.
Fingerprint Saving Operations
Setting/Changing Names of Saved Fingerprints
In Fingerprint settings, Tap saved fingerprint  Enter name
 OK
OK
Deleting Fingerprints
In Fingerprint settings,  for saved fingerprint
 YES, REMOVE
Troubleshooting
Q.Failure to save fingerprint
A.Keep your finger pressed on the sensor slightly harder. Using a different finger may also improve authentication performance.
Fingerprint Sensor Cautions
Observe the following when using Fingerprint Sensor.Do not hit or subject handset to excessive shock. May cause malfunction or damage. Do not scratch sensor
surface or poke with a pen, pin, or other pointed object.Do not place stickers on sensor surface or mark with ink.Dust, smudges, or other soiling on sensor may affect
authentication. Clean the Fingerprint Sensor surface from time to time.
Holding finger to sensor for too short/long a time may affect authentication. Hold finger straight on sensor so that spiral of fingerprint is in center of sensor.
Fingerprint Sensor may not activate if you start saving your fingerprint or performing authentication with your finger on the sensor. Release it and retry.
Performing Fingerprint Authentication
In authentication window, hold finger to sensor
 Fingerprint is authenticated.
Troubleshooting
Q.Fingerprint is not authenticated
A.Remove finger then try authenticating again.
Or, Flick  /
/  up and unlock screen using backup unlock method set when saving fingerprint.
Loading...