


 Loading...
OPERATION MANUAL
(for printer)
DIGITAL LASER COPIER/PRINTER DIGITAL MULTIFUNCTIONAL SYSTEM
Be sure to become thoroughly familiar with this manual to gain the maximum benefit from the product.
Before installing this product, be sure to read the installation requirements and cautions sections of the "Operation manual (for general information and copier operation)".
Be sure to keep all operation manuals handy for reference including this manual, the "Operation manual (for general information and copier operation)" and operation manuals for any optional equipment which has been installed.

Warranty
While every effort has been made to make this document as accurate and helpful as possible, SHARP Corporation makes no warranty of any kind with regard to its content. All information included herein is subject to change without notice. SHARP is not responsible for any loss or damages, direct or indirect, arising from or related to the use of this operation manual.
© Copyright SHARP Corporation 2003. All rights reserved. Reproduction, adaptation or translation without prior written permission is prohibited, except as allowed under copyright laws.
Trademark Acknowledgments
Sharpdesk is a trademark of Sharp Corporation.
Microsoft®, Windows®, Windows® 95, Windows® 98, Windows® Me, Windows NT® 4.0, Windows® 2000, Windows® XP and Internet Explorer® are registered trademarks or trademarks of Microsoft Corporation in the U.S.A. and other countries.
Netscape Navigator is a trademark of Netscape Communications Corporation.
Macintosh, Power Macintosh, Mac OS, LaserWriter, and AppleTalk are registered trademarks of Apple Computer, Inc.
IBM, PC/AT, and PowerPC are trademarks of International Business Machines Corporation.
Pentium is a registered trademark of Intel Corporation.
PCL is a trademark of the Hewlett-Packard Company.
PostScript® is a registered trademark of Adobe Systems Incorporated.
Acrobat® Reader Copyright© 1987-2002 Adobe Systems Incorporated. All rights reserved.
Adobe, the Adobe logo, Acrobat, and the Acrobat logo are trademarks of Adobe Systems Incorporated.
NetWare is a registered trademark of Novell, Inc.
Agfa and the Agfa Rhombus, are registered trademarks of Agfa-Gevaert, A.G. All other product names are the property of the respective owners.
All other trademarks and copyrights are the property of their respective owners.
The display screens, messages, and key names shown in the manual may differ from those on the actual machine due to product improvements and modifications.

TABLE OF CONTENTS
CHAPTER 1
BASIC PRINTING PROCEDURES
SETTING THE PRINTER DRIVER............................. |
1-2 |
● Printer driver settings in Windows (selecting and |
|
setting print conditions) |
1-2 |
● Using the Help file to view explanations of the |
|
settings................................................................ |
1-3 |
● Printing................................................................ |
1-4 |
● Using options to print .......................................... |
1-6 |
CHAPTER 5
KEY OPERATOR PROGRAMS
KEY OPERATOR PROGRAMS .................................. |
5-2 |
● Key operator program list .................................... |
5-2 |
● Procedure for using key operator programs........ |
5-3 |
● Key operator program menu ............................... |
5-4 |
DESCRIPTION OF SETTING PROGRAMS ............... |
5-5 |
● Printer settings .................................................... |
5-5 |
● Network settings.................................................. |
5-7 |
CHAPTER 2 |
|
SETTING THE PRINTER |
DRIVER |
PROPERTIES |
|
SELECTING PRINTING FUNCTIONS ....................... |
2-2 |
● Settings in the [Main] tab .................................... |
2-2 |
● Settings in the [Paper] tab................................... |
2-6 |
● Settings in the [Advanced] tab ............................ |
2-9 |
● Settings in the [Job Handling] tab ....................... |
2-12 |
● Settings in the [Watermarks] tab......................... |
2-15 |
CHAPTER 3
WEB PAGES IN THE PRINTER
CHAPTER 6
TROUBLESHOOTING
TROUBLESHOOTING ................................................ |
6-2 |
● Checking the IP address ..................................... |
6-4 |
CHAPTER 7
APPENDIX
PRINTER SPECIFICATIONS...................................... |
7-2 |
NOTICE PAGE PRINTING.......................................... |
7-3 |
PRINT AREA............................................................... |
7-4 |
REMOTE OPERATION VIA A NETWORK................. |
3-2 |
● Environment Required to Access the Web Page .... |
3-2 |
● How to access the Web page and view Help...... |
3-2 |
● Items in the menu frame of the Web page.......... |
3-3 |
● E-mail Print ......................................................... |
3-7 |
● Directly printing a file on a computer................... |
3-8 |
● Directly printing a file on an FTP server.............. |
3-9 |
CHAPTER 4
PRINTER BASIC SETTINGS
MAKING CONFIGURATION SETTING ...................... |
4-2 |
●Operation procedure common to all printer configuration settings (items that can be set from
the operation panel) ............................................ |
4-2 |
● Printer Default settings........................................ |
4-4 |
● PCL settings........................................................ |
4-5 |
● PostScript settings .............................................. |
4-5 |
0-1

CHAPTER 1
BASIC PRINTING
PROCEDURES
This chapter explains how to configure printer driver settings at your computer, and provides basic information on printing.
Page
SETTING THE PRINTER DRIVER ................................................................ |
1-2 |
● Printer driver settings in Windows (selecting and setting print conditions) .. |
1-2 |
● Using the Help file to view explanations of the settings ......................... |
1-3 |
● Printing ................................................................................................... |
1-4 |
● Using options to print ............................................................................. |
1-6 |
1-1

SETTING THE PRINTER DRIVER
This section describes the method of changing the printer driver settings from your computer. If you have not yet installed the printer driver, read the accompanying "SOFTWARE SETUP GUIDE (for printer)" and install the printer driver from the CD-ROM.
Printer driver settings in Windows (selecting and setting print conditions)
Change the settings using the printer properties.
■ Windows 95/98/Me |
■ Windows NT4.0 / 2000 / XP |
The procedure for adjusting the settings in Windows Me is explained in the following.
The procedure for adjusting the settings in Windows XP is explained in the following.
1 On the [Start] menu, select [Settings] and then [Printers].
2 Right-click the installed printer driver and select [Properties] in the pop-up menu. Click the [Setup] tab in the printer driver properties.
The SHARP AR-M620N PCL6 properties is shown as an example.
3 Set each item.
For setting items, see the printer driver help. For information on viewing Help, see the following page 1-3. An example of always using the document filing function is explained on page 1-3.
4 Click the [OK] button.
1 Selectmenu. [Printers and Faxes] from the [Start]
2 Right-click the installed printer driver and select [Printing Preferences].
The screen shows the example of selecting SHARP AR-M620N PCL6.
3 Set each item.
For setting items, see the printer driver help. For information on viewing Help, see the following page 1-3. An example of always using the document filing function is explained on page 1-3.
4 Click the [OK] button.
NOTE
To configure settings for installed peripheral devices such as a saddle stitch finisher, finisher, and large capacity tray, right-click the printer driver, select [Properties], and select the [Configuration] tab. (In Windows 95/98/Me, select [Properties] and then the [Configuration] tab in the [Setup] tab.) If the machine is being used as a network printer, click the [Auto Configuration] button in the [Configuration] tab to automatically set the peripheral device configuration. To display the latest tray information (paper size, paper type, and paper remaining), click the [Tray Status] button in the [Paper] tab.
1-2

SETTING THE PRINTER DRIVER
■ Selecting document filing
The procedure for always using the document filing function is explained below as an example. This setting is selected in the [Job Handling] tab of the printer driver window.
1
2
3
Follow steps 1 and 2 on page 1-2. |
4 Enter a user name and a job name in the |
|
Click the [Job Handling] tab. |
"Job ID" field. |
|
5 Click the [Apply] button. |
||
|
Select the [Document Filing] checkbox.
6 Click the [OK] button.
The document filing function will now be used each time you print a job.
Using the Help file to view explanations of the settings
To view on-screen explanations of the settings in the printer driver, open the Help file.
■ Opening Help in Windows
This window is the SHARP AR-M620N PCL6 Properties in Windows Me.
Click [Help] to display the
Help screen.
You can search for information using various methods from the tabs.
1-3

SETTING THE PRINTER DRIVER
Printing
The procedure for printing in WordPad*1 is explained as an example in this section. If you do not have any documents created in WordPad, create a text document in WordPad that can be printed.
*1 This is a standard accessory program in Windows
1 Open a document created in WordPad.
2 Selectmenu. [Print] from the WordPad [File]
3 Select [SHARP AR-M620N PCL6] from the [Name] drop-down list.
(1)In Windows 95/98/Me/NT 4.0
Click the [Properties] button to open the printer driver properties window.
(2)In Windows 2000/XP
Select the [SHARP AR-M620N PCL6] printer icon in [Select Printer].In Windows 2000, the properties consist of five tabs: [Main], [Paper], [Advanced], [Job Handling], and [Watermarks].
In Windows XP, click the [Preferences] button to open the printer driver properties.
4 Click the desired tab and configure settings.
NOTES
●When the properties are opened from an application, the settings that you configure in the properties will remain in effect only while you use the application.
●For information on the settings in the properties, see "SETTING THE PRINTER DRIVER PROPERTIES" in chapter 2.
5 To adjust the print contrast, follow the procedure below. If you do not need to adjust the print contrast, go to step 6 on the next page.
To adjust the print contrast, click the [Image Adjustment] button in the [Advanced settings] tab. The window below will appear. Adjust the brightness and contrast in the [Image Adjustment] field.
When you are finished, go to step 6 on the next page.
1-4
SETTING THE PRINTER DRIVER
6 Click the [Paper] tab.
Check the paper size to make sure it is correct. Next, specify the paper feeding method in [Paper Selection]. Normally [Auto Select] is used. When finished, click the [OK] button to close the printer properties window.
7 Click the [OK] button in the Print window in Windows 95/98/Me/NT 4.0, or the [Print] button in Windows 2000/XP.
1-5

SETTING THE PRINTER DRIVER
Using options to print
The procedure for using a peripheral device (option) to print is explained below using WordPad*1 as an example. If you do not have any documents created in WordPad, create a text document in WordPad that can be printed.
*1 WordPad is a software application that is included in Windows as a standard accessory.
1 Open a document that was created in |
4 Click the desired tab and configure |
WordPad. |
settings. |
2 Select [Print] from the WordPad [File] |
|
menu. |
|
3 Select "SHARP AR-M620N PCL6" from the [Name] drop-down list.
(1) In Windows 95/98/Me/NT 4.0
NOTES
●When the properties are opened from an application, the settings that you configure in the properties will remain in effect only while you use the application.
●For information on the settings in the properties, see "SETTING THE PRINTER DRIVER PROPERTIES" in chapter 2.
Click the [Properties] button to open the printer driver properties window.
(2)In Windows 2000/XP
In [Select Printer], select the "SHARP AR-M620N PCL6" printer icon.
In Windows 2000, the properties consist of five tabs: [Main], [Paper], [Advanced], [Job Handling], and [Watermarks].
In Windows XP, click the [Preferences] button to open the printer driver properties.
(1)To use the optional saddle stitch finisher to print, configure the settings in the following window:
1To use the pamphlet style function, select [Pamphlet Style] in the [Document Style] field and set [Staple] to [2 Staples] in the [Finishing] field.
1-6

SETTING THE PRINTER DRIVER
5 Click the [Paper] tab.
Make sure that the selected paper size is correct in the [Paper Size] field.
Next, select the paper feeding method in [Paper Selection]. Normally [Auto Select] is used. If you wish to use the optional paper tray, select it in the following window.
1To select a paper tray, select [Paper Source] in [Paper Selection] and then select the desired tray from the list.
Example: Selecting the large capacity tray
2To select the paper type, select [Paper Type] in [Paper Selection] and then select the desired paper type from the list.
Example: Selecting recycled paper
NOTE
The size and type of paper and whether or not a tray can be used for printing are set in "Paper tray setting" in the machine's custom settings. (See "Custom settings" in the "Operation manual (for general information and copier operation)".)
If you select [Paper Source] or [Paper Type], be sure to configure the tray settings in the [Configration] tab of the printer driver properties.
6 Adjust the print contrast settings as needed (page 1-4). If you do not need to adjust the print contrast, go to step 7.
7 In Windows 95/98/Me/NT 4.0, click the [OK] button in the print window. In Windows 2000/XP, click the [Print] button.
1-7
CHAPTER 2
SETTING THE PRINTER DRIVER PROPERTIES
This chapter explains how to configure settings in the printer driver. The settings are changed in the software application.
|
Page |
SELECTING PRINTING FUNCTIONS........................................................... |
2-2 |
● Settings in the [Main] tab........................................................................ |
2-2 |
● Settings in the [Paper] tab...................................................................... |
2-6 |
● Settings in the [Advanced] tab ............................................................... |
2-9 |
● Settings in the [Job Handling] tab ........................................................ |
2-12 |
● Settings in the [Watermarks] tab .......................................................... |
2-15 |
2-1

SELECTING PRINTING FUNCTIONS
Almost all print functions are selected in the print driver properties window that appears when printing from an application. The print functions can also be selected in the printer driver properties window that appears when [Properties] is selected in the printer icon menu. The printer driver settings are grouped on tabs in the printer driver properties window.
The procedure for selecting settings after opening the printer driver properties from an application is explained in this section. (The windows that are shown are the PCL6 printer driver in Windows Me.)
The following optional peripheral devices are installed in the printer driver windows: Saddle stitch finisher + Inserter + Punch module + Large capacity tray
Settings in the [Main] tab
The following window appears when the [Main] tab is clicked. The settings and buttons are explained below.
 Click this button to return all settings to the factory default settings. This button appears on all tabs.
1Copies
Set the number of copies.
Any number from 1 to 999 can be set. Default setting: 1
2Collate
Select this checkbox to collate the copies.
When the staple function or punch function is turned on, a checkmark automatically appears in the checkbox.
Default setting: Selected
3Document Style
Select one-sided or two-sided printing. [1-Sided]...................Print on one side of the
paper.
[2-Sided (Book)] .......Print on both sides of the paper and bind at the side.
[2-Sided (Tablet)] .....Print on both sides of the paper and bind at the top.
[Pamphlet Style]*1 .....Print on both sides of the paper and bind down the middle.
Default setting: 1-Sided
*1 Four selections are available for the pamphlet format.
[Tiled Pamphlet]
Print on paper double the size of the document size selected in the application.
The page order will be rearranged as required for the middle binding format.
[2-Up Pamphlet]
The document size selected in the application will be reduced in the same way as in 2-Up printing, and printing will take place using the selected paper size.
[Multiple Tiled Pamphlet]
When using the pamphlet function, printing takes place on paper that is twice the size of the paper specified in the application. When this function is selected and the number of pages exceeds the stapling limit, the pages are divided into groups that can be stapled, and the pages in each group are arranged pamphlet style and stapled. The groups can then be put together to form a pamphlet with the correct page order.
[Multiple 2-Up Pamphlet]
When using the pamphlet function, the pages are reduced and printed 2-Up style on the size of the paper specified in the application. When this function is selected and the number of pages exceeds the stapling limit, the pages are divided into groups that can be stapled, and the pages in each group are arranged pamphlet style and stapled. The groups can then be put together to form a pamphlet with the correct page order.
2-2

SELECTING PRINTING FUNCTIONS Settings in the [Main] tab (continued)
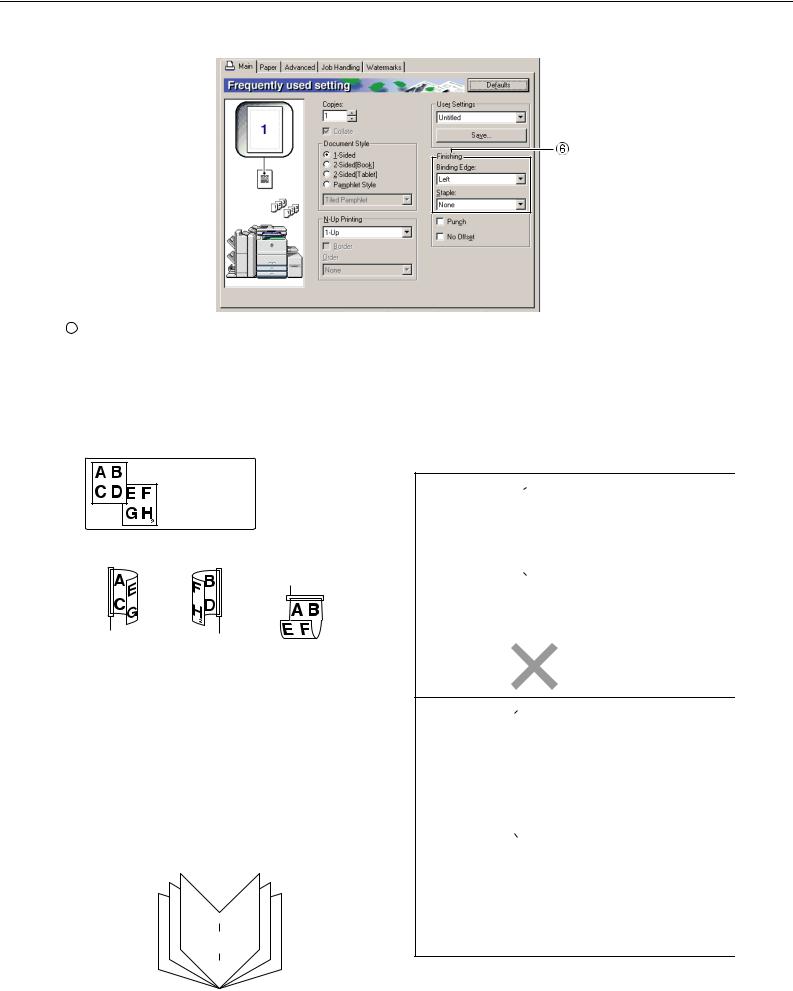
4N-Up Printing
Each page is reduced to allow multiple pages to be printed on each sheet. The pages are printed in "Z" order on each sheet.
The following five settings are available: [1-Up], [2-Up], [4-Up], [6-Up], [8-Up]. Default setting: 1-Up
Border |
[Border]
This setting is greyed out when [1-Up] is selected. Select whether or not to print a border around each page when a setting other than 1-Up is selected.
Default setting: Not selected
[Order]
This setting is greyed out when 1-Up is selected. When a setting other than 1-Up is selected, the layout of the pages on the sheet can be selected. Example: Changing the layout of 4-Up to [Left, and
Down].
5User Settings
The user can store up to 7 sets of settings, allowing the settings to be easily changed by simply selecting the desired set.
Default setting: Factory Defaults
[Save]
Save the settings under the name that appears in "User Settings".
Up to 20 characters can be entered for the name. If none of the settings have been changed (the settings are still the factory defaults), this button will be greyed out.
When [Delete] appears in the button, it can be clicked to delete a stored set of user settings.
2-3
SELECTING PRINTING FUNCTIONS Settings in the [Main] tab (continued)
6Finishing
Configure settings for staple or punch finishing.
[Binding Edge]
When automatic two-sided printing is performed, the [Binding Edge] setting is used to determine how the top and bottom edges of the front and back sides are positioned. The relation between the document and each of the settings is as follows:
|
Original image |
|
[Left] |
[Right] |
[Top] |
Left binding |
Rignt binding |
Top binding |
|
|
Binding edge |
Binding edge |
Binding edge |
|
Default setting: Left
[Staple]
[None] ............ Do not staple.
[1 Staple]........ Staple in one place. [2 Staples] ...... Staple in two places. Default setting: None
Pamphlet stapling function
The paper is stapled in two places at the centreline, folded in half as shown, and delivered to the output tray.
[Example]
6 |
7 |
4 |
9 |
2 |
11 |
Vertical paper feeding
Horizontal paper feeding
Staple sort function
Each set of pages printed using the sort function is stapled and delivered to the top tray, or stapled at the centre and delivered to the lower pamphlet tray. (Saddle stitch finisher only) The relations between stapling positions, paper feed orientations, allowed paper sizes, and stapling limits are indicated below.
Possible stapling positions
One |
staple |
|
|
|
|
|
|
|
|
|
|
Possible paper sizes: A4, B5, |
||
|
|
|
|
|
|
|
|
|
|
|||||
at |
top |
left |
|
|
|
|
|
|
|
|
|
|
8-1/2" x 11" |
|
corner |
|
|
|
|
|
|
|
|
|
|
|
Staple limit: 50 sheets |
||
|
|
|
|
|
|
|
|
|
|
|
|
|
||
|
|
|
|
|
|
|
|
|
|
|
|
|
|
|
One |
staple |
|
|
|
|
|
|
|
|
|
|
|
||
|
|
|
|
|
|
|
|
|
|
|
||||
at |
|
bottom |
|
|
|
|
|
|
|
|
|
|
Same as above |
|
left corner |
|
|
|
|
|
|
|
|
|
|
|
|||
|
|
|
|
|
|
|
|
|
|
|
|
|||
|
|
|
|
|
|
|
|
|
|
|
|
|
|
|
Two staples |
|
|
|
|
|
|
|
|
|
|
Same as above |
|||
|
|
|
|
|
|
|
|
|
|
|||||
|
|
|
|
|
|
|
|
|
|
|||||
|
|
|
|
|
|
|
|
|
|
|||||
at left edge |
|
|
|
|
|
|
|
|
|
|
||||
|
|
|
|
|
|
|
|
|
|
|
||||
|
|
|
|
|
|
|
|
|
|
|
||||
|
|
|
|
|
|
|
|
|
|
|
|
|
|
|
|
|
|
|
|
|
|
|
|
|
|
|
|
|
|
Two staples |
|
|
|
|
|
|
|
|
|
|
Pamphlet style is not possible |
|||
|
|
|
|
|
|
|
|
|
|
|||||
at centreline |
|
|
|
|
|
|
|
|
|
|
using vertically fed paper |
|||
|
|
|
|
|
|
|
|
|
|
|
|
|
|
Possible paper sizes: A3, B4, 11" x |
|
|
|
|
|
|
|
|
|
|
|
|
|
|
|
|
|
|
|
|
|
|
|
|
|
|
|
|
|
|
|
|
|
|
|
|
|
|
|
|
|
|
|
|
17" |
One |
staple |
|
|
|
|
|
|
|
|
|
|
Staple limit: 30 sheets |
||
at |
top |
left |
|
|
|
|
|
|
|
|
|
|
|
|
|
|
|
|
|
|
|
|
|
|
|
||||
corner |
|
|
|
|
|
|
|
|
|
|
|
Possible paper sizes: A4R, 8-1/2" |
||
|
|
|
|
|
|
|
|
|
|
|
||||
|
|
|
|
|
|
|
|
|
|
|
|
|
|
x 14", 8-1/2" x 13", 8-1/2" x 11"R |
|
|
|
|
|
|
|
|
|
|
|
|
|
|
Staple limit: 30 sheets |
|
|
|
|
|
|
|
|
|
|
|
|
|
|
|
|
|
|
|
|
|
|
|
|
|
|
|
|
|
|
One |
staple |
|
|
|
|
|
|
|
|
|
|
Possible paper sizes: A3, B4, A4R, |
||
|
|
|
|
|
|
|
|
|
|
11" x 17", 8-1/2" x 14", 8-1/2" x 13", |
||||
at |
|
bottom |
|
|
|
|
|
|
|
|
|
|
||
|
|
|
|
|
|
|
|
|
|
|
8-1/2" x 11"R |
|||
left corner |
|
|
|
|
|
|
|
|
|
|
||||
|
|
|
|
|
|
|
|
|
|
Staple limit: 30 sheets |
||||
|
|
|
|
|
|
|
|
|
|
|||||
|
|
|
|
|
|
|
|
|
|
|
|
|
|
|
|
|
|
|
|
|
|
|
|
|
|
|
|||
Two staples |
|
|
|
|
|
|
|
|
|
|
Same as above |
|||
|
|
|
|
|
|
|
|
|
|
|||||
|
|
|
|
|
|
|
|
|
|
|||||
at left edge |
|
|
|
|
|
|
|
|
|
|
||||
|
|
|
|
|
|
|
|
|
|
|
||||
|
|
|
|
|
|
|
|
|
|
|
|
|
|
|
|
|
|
|
|
|
|
|
|
|
|
|
|
|
|
Two staples |
|
|
|
|
|
|
|
|
|
|
Possible paper sizes: A3, B4, A4R, |
|||
|
|
|
|
|
|
|
|
|
|
11" x 17", 8-1/2" x 14", 8-1/2" x 13", |
||||
|
|
|
|
|
|
|
|
|
|
|||||
at centreline |
|
|
|
|
|
|
|
|
|
|
8-1/2" x 11"R |
|||
|
|
|
|
|
|
|
|
|
|
|
|
|
|
Staple limit: 15 sheets |
|
|
|
|
|
|
|
|
|
|
|
|
|
|
|
|
|
|
|
|
|
|
|
|
|
|
|
|
|
|
2-4

SELECTING PRINTING FUNCTIONS Settings in the [Main] tab (continued)
7[Punch]
Use this to select the punch function.
When the punch function is selected, [Collate] is automatically selected.
Default setting: Not selected
Punch function (only when a punch module is installed)
When a punch module is installed on the saddle stitch finisher, holes (two) can be punched in the printed pages before delivery to the tray. (The punch function cannot be used in combination with the pamphlet function.) When using the punch function, the automatic image rotation function does not operate.
Paper sizes that can be punched are indicated in the specifications on page 3-3 of the "Operation manual (for general information and copier operation)".
[Example] |
|
{Original 1} |
{Punch positions} |
8[No Offset]
Select this when you do not wish sets of collated or grouped pages to be offset from each other. Default setting: Not selected
Offset function
Each set of printed pages is offset from the previous set in the tray for easy separation. (The offset function operates in the finisher or saddle stitch finisher tray.) The offset function does not operate when the staple sort function is selected.
Offset mode |
Non-offset mode |
{Original 2} |
{Punch positions} |
||
|
|
|
|
|
|
|
|
2-5

SELECTING PRINTING FUNCTIONS
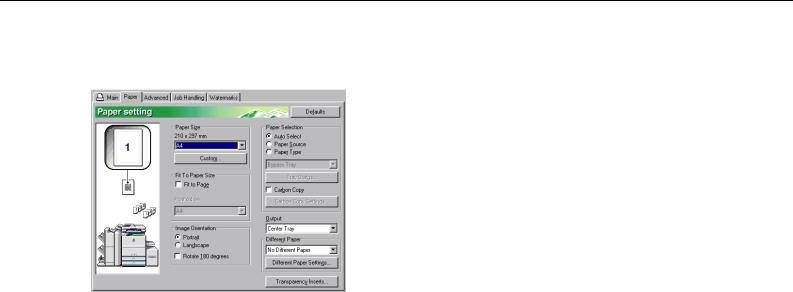
Settings in the [Paper] tab
The following screen appears when the [Paper] tab is selected. The settings and buttons in this screen are explained below.
1Paper Size
Select the size of paper to be printed on.
Click one of the paper sizes that appear in the box. Default setting: A4
[Custom]
A custom paper size can also be set.
Only one custom paper size can be stored.
Click this button to open the window for setting the custom paper size.
2Fit To Paper Size
3Image Orientation
Set the orientation of the document.
Click the radio button for [Portrait] or the radio button for [Landscape].
[Portrait].......... Select portrait orientation. [Landscape].... Select landscape orientation. Default setting: Portrait
[Rotate 180 degrees]
Rotate the image 180° before printing. Default setting: Not selected
This field is used for the Fit to Page function. This function automatically enlarges or reduces the printed image to match the paper being used. Enlargement or reduction takes place with the image centred on the page.
To use this function, select the [Fit to Page] checkbox and then select the size of paper to be used.
NOTE
Printing normally takes place using the paper size set in the application, regardless of the paper size selected in the printer driver. When the paper size is not specified in the application, the paper size setting in the printer driver is used.
[Fit To Page]
When this checkbox is selected, the print image corresponding to the paper size selected in [Paper Size] is automatically reduced or enlarged to fit the paper selected in [Fit To Paper Size].
Default setting: Not selected
2-6
SELECTING PRINTING FUNCTIONS Settings in the [Paper] tab (continued)
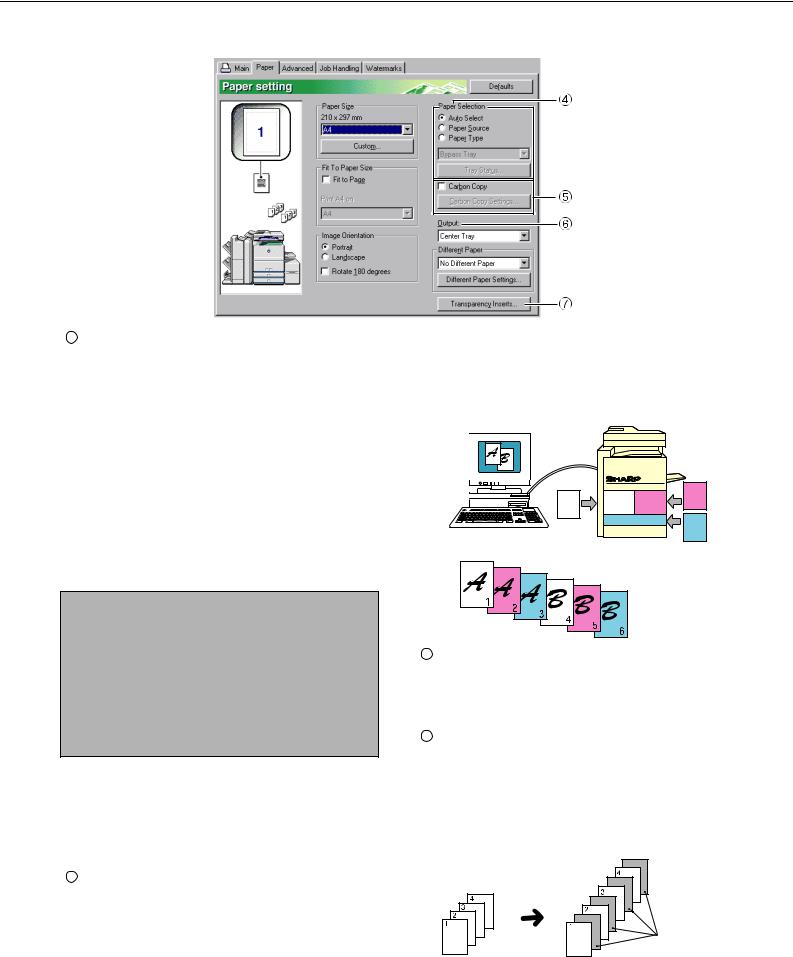
4Paper selection
Select the paper tray and paper type in this item. Default setting: Auto Select
[Auto Select]
When [Auto Select] is selected, the tray containing the paper specified in [Paper Size] is automatically used.
[Paper Source]
When this is selected, paper is drawn from the specified tray regardless of the paper size setting.
[Paper Type]
When this selected, paper is fed from the tray that has the specified type of paper.
There are also 7 user type settings, and a name can be assigned to each type (maximum of 14 characters).
NOTE
The size and type of paper and whether or not a tray can be used for printing are set in "Paper tray setting" in the machine's custom settings. (See "Custom Settings" in the Operation manual (for general information and copier operation.))
If you select [Paper Source] or [Paper Type], be sure to configure the tray settings in the [Configuration] tab of the printer driver properties.
[Tray Status]
Click this button to display the paper size, paper type, and paper remaining in the machine's paper trays.
This function operates when the machine is used on a network.
5Carbon copy
Select this function to print multiple copies of the same document on paper from different trays. Click the [Carbon Copy Settings] button to configure the carbon copy settings. For example, if regular paper is loaded in tray 1 and coloured paper is loaded in tray 2, you can print an original and a copy of an invoice. You can also load regular paper in tray 1 and recycled paper in tray 2 to print a copy for presentation and a copy for retention.
[Carbon Copy Settings]
Click this button to configure settings in the [Carbon Copy Settings] window.
Default setting: Not selected
Print job
Result (when [Collate] is selected)
6Output
Use this setting to select the output tray. When the stapling function is selected, the centre tray cannot be selected.
Default setting: Centre Tray
7Transparency Inserts
The printer can be instructed to separate the transparencies by inserting blank sheets of paper. Click this button to open the window for selection of transparency insert settings.
This cannot be selected when two-sided printing, the staple function, or the punch function is selected.
Original
Inserts
2-7
Loading...