Sharp Aquos XX3 User Guide
AQUOS Xx3
User Guide
AQUOS Xx3
User Guide Contents
|
1 |
Introduction |
|
About the User Guide........................................................ |
3 |
Accessing Instructions on Handset................................... |
3 |
Getting Started |
|
Package Contents............................................................... |
6 |
Parts & Functions.............................................................. |
6 |
USIM Card............................................................................ |
7 |
Handset Memory & SD Card............................................ |
10 |
Charging Handset.............................................................. |
13 |
Power On/Off................................................................... |
15 |
Using Touchscreen............................................................ |
16 |
Handset Initial Settings................................................... |
17 |
Importing Files from Other Mobiles............................... |
19 |
Basic Operations |
|
Basic Operations............................................................... |
26 |
Confirmation at First Activation of Applications......... |
33 |
Applications....................................................................... |
34 |
Using Recent Apps Window............................................. |
34 |
Handset Phone Number.................................................... |
35 |
Using Manner Mode.......................................................... |
35 |
Using Airplane Mode......................................................... |
37 |
Text Entry......................................................................... |
37 |
Google Account................................................................. |
39 |
Google Play....................................................................... |
41 |
Security Codes.................................................................. |
43 |
USIM PIN............................................................................ |
44 |
Turning Off Display (Screen Lock).................................. |
46 |
Using Fingerprint Authentication Function.................... |
46 |
Updating Software........................................................... |
49 |
Handset Interface |
|
Lock Screen Basics........................................................... |
52 |
Home Screen Basics.......................................................... |
54 |
Icons at Display Top (Status Bar)................................... |
55 |
Checking Handset Status & Notifications (Notifications |
|
Window/Quick Settings Window).................................... |
56 |
Customizing Home Screen................................................ |
58 |
Capturing Screenshots (Clip Now)................................... |
63 |
Scrolling Screen Automatically (ScrollAuto)................... |
66 |
Disabling Touch Operation Temporarily (Childlock)....... |
67 |
Copying Onscreen Text (Copy Anywhere)....................... |
67 |
Writing Notes on Display (KAKU Notepad)..................... |
68 |
Phone |
|
Placing/Answering Calls................................................... |
70 |
Optional Services.............................................................. |
73 |
Making Call Settings........................................................ |
78 |
Address Book.................................................................... |
79 |
Hiding Contacts (Secrecy Settings)................................ |
81 |
Messaging & Internet |
|
Messaging.......................................................................... |
84 |
Sending S! Mail/SMS......................................................... |
84 |
Opening & Replying to S! Mail/SMS................................ |
86 |
Xx3 AQUOS
2
Using Gmail....................................................................... |
88 |
Using Email........................................................................ |
90 |
Using the Internet (Chrome)............................................ |
93 |
Camera
Capturing Photos/Videos................................................. |
98 |
Music & Images
Listening to Music (Play Music).................................... |
102 |
Viewing & Managing Photos/Videos (Album)................ |
104 |
Connectivity
Connecting by Wi-Fi....................................................... |
110 |
Using Tethering.............................................................. |
113 |
Using Bluetooth® Function............................................ |
114 |
Global Services
Global Roaming............................................................... |
116 |
Calling from Outside Japan........................................... |
117 |
Handset Settings
About Settings............................................................... |
122 |
Sound & Notification Settings...................................... |
123 |
Illumination Settings...................................................... |
126 |
Wallpaper & Display Settings........................................ |
127 |
Useful Settings............................................................... |
130 |
Battery & Energy Saving Settings................................ |
133 |
Call Settings................................................................... |
134 |
Mail Settings................................................................... |
135 |
Home Applications Setting............................................ |
138 |
Apps Settings................................................................. |
139 |
Storage & USB Settings................................................. |
140 |
Memory Settings............................................................. |
141 |
Data Usage Settings...................................................... |
141 |
More Settings................................................................. |
143 |
Location Settings........................................................... |
145 |
Lock & Security Settings.............................................. |
146 |
Language & Input Settings............................................ |
149 |
Backup & Reset.............................................................. |
151 |
Accounts Settings.......................................................... |
154 |
Google Settings.............................................................. |
154 |
Date & Time Settings.................................................... |
155 |
Accessibility Settings.................................................... |
156 |
Printing Settings............................................................ |
157 |
About Phone.................................................................... |
158 |
For Assistance
File Storage..................................................................... |
160 |
Backup & Restore........................................................... |
160 |
Troubleshooting.............................................................. |
161 |
Specifications.................................................................. |
163 |
Warranty & After-Sales Service................................... |
165 |
Customer Service............................................................ |
165 |
Safety Precautions
Important Product Information..................................... |
176 |
Handset & Hardware Care............................................. |
177 |
General Notes................................................................. |
180 |
Radio Wave Exposure and Specific Absorption Rate (SAR) |
|
Information..................................................................... |
182 |
Water & Dust Resistance.............................................. |
183 |
Safety Precautions......................................................... |
168 |
About the User Guide
Thank-you for purchasing this product.
Before Using This Product
Read "Safety Precautions" thoroughly beforehand for proper usage.
Accessible services may be limited by subscription contract conditions.
Descriptions in the User Guide
In the User Guide, most operation descriptions are based on handset at time of purchase.
Unless noted otherwise, descriptions are for app sheet in Home Screen.
"Confirmation" refers to a window that appears after operation, such as authentication prompt window, selection window or caution window.
Some operation descriptions may be omitted.
Screenshots & Key Labels
Screenshots in the User Guide may differ in appearance with actual Display. Key labels in the User Guide are simplified for description purposes and differ with actual Display.
Other Notations
In the User Guide, the product is referred to as "handset." microSD™/microSDHC™/microSDXC™ Card is referred to as "SD Card."
"506SH" here refers to this mobile phone "AQUOS Xx3."
3 |
|
|
Accessing Instructions on Handset |
|
|
|
Introduction |
|
For those unfamiliar with handset operation, handset includes |
||
an application for learning touch operation and checking how |
||
|
||
to make settings. |
|
|
Access the FAQ mobile site as needed. |
|
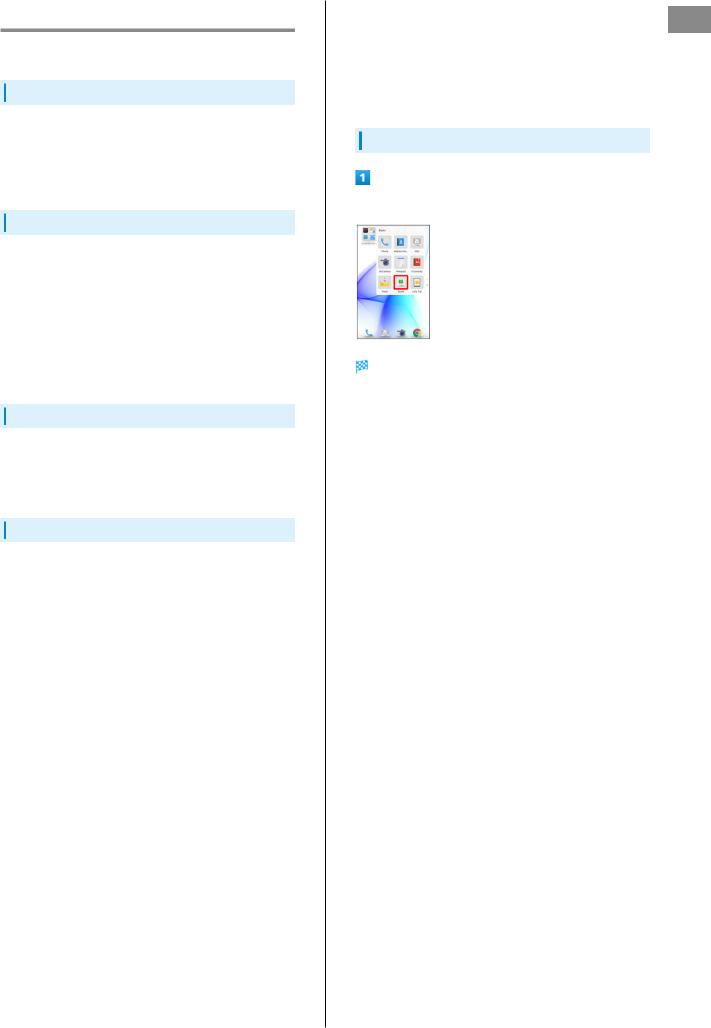
Launching Guide
In app sheet,  (Basic)
 (Guide)
Guide top screen opens.
Information on usage of  (Guide) appears at initial startup. Follow onscreen prompts.
Xx3 AQUOS
4
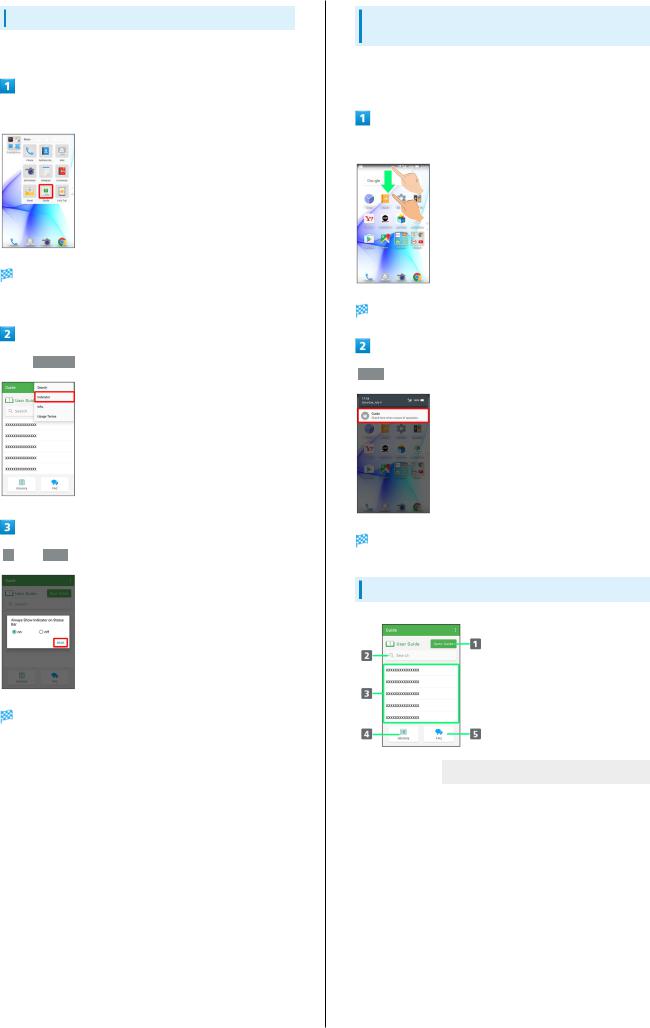
Showing Status Bar Indicator
Show indicator to launch Guide from Notifications Window.
In app sheet,  (Basic)
 (Guide)
Guide top screen opens.
If confirmation appears, follow onscreen prompts.


 Indicator
 on
on

 BACK
BACK
Indicator is shown.
Launching Guide from Notifications Window
Launch the Guide quickly for how to use functions, etc. when indicator is set to appear.
Drag Status Bar down
Notifications Window opens.
 Guide
Guide
Guide top screen opens.
Using Guide
Item
 Open Guide
 Enter information to search for
 Most viewed items
 Glossary
 FAQ
FAQ
Description
Check how to operate handset by category.
Search for items in Guide.
Most viewed items appear here randomly. Tap an item to open it in User Guide.
Look up unfamiliar terms.
Check frequently asked questions, and quickly access the FAQ mobile site.

Getting Started |
|
Package Contents............................................................... |
6 |
Parts & Functions.............................................................. |
6 |
USIM Card............................................................................ |
7 |
Handset Memory & SD Card............................................ |
10 |
Charging Handset.............................................................. |
13 |
Power On/Off................................................................... |
15 |
Using Touchscreen............................................................ |
16 |
Handset Initial Settings................................................... |
17 |
Importing Files from Other Mobiles............................... |
19 |

6 |
|
|
|
Package Contents |
|
Parts & Functions |
|
|
|
|
|
|
|
|
|
|
Package Contents |
|
Handset Parts |
Handset (AQUOS Xx3)Battery is built into handset.
Handset back cover is not removable.TV Antenna Cable (Complimentary sample)(Japanese)(Japanese)
Warranty
Name |
|
Description |
|
|
|
 Earphones-
Microphone
Jack
 Proximity/
Light Sensor
Connect TV Antenna Cable or Earphones with Mic (optional accessory) here.
Proximity Sensor prevents Touchscreen misoperation during calls. Light Sensor adjusts Display brightness according to ambient light.
 Front
Front
Camera
 Display
 External
Connection
Jack
 Speaker
 Mic
Mic
(Recorder Mic)
 Receiver
 Proximity Sensor for Grip Magic
 Mic/
Mic/
Recorder Mic
 Strap
Strap
Eyelet/
Pressure Vent
Use to shoot photos or videos of yourself.
Handset uses a touchscreen-type Display. Operate with your fingers on Display.
Connect AC Adaptor or Micro USB Cable here.
Listen to music, video sound, TV, etc.
Use while recording videos or when talking through Speakerphone.
Hear other party's voice through this.
Detects nearby objects to prevent unintended Grip Magic operation.
Talk to other party through this. Also use while recording videos or when talking to emopa.
Attach straps here. Pressure Vent releases excess air inside handset.
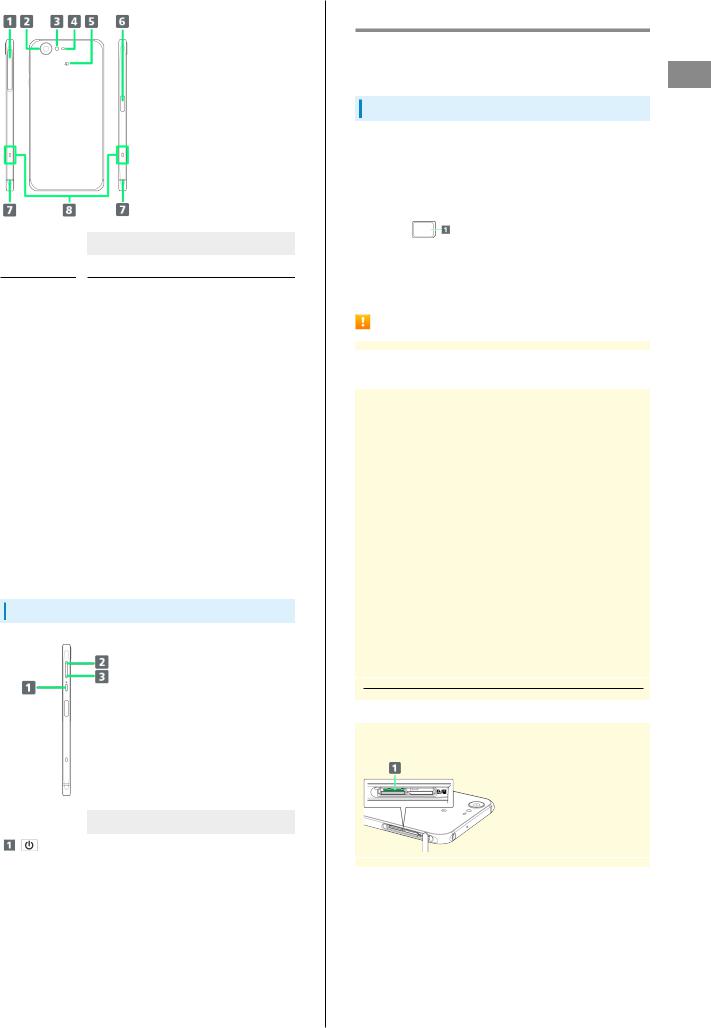
Name
 Card Slot
 Camera
 Mobile
Light
 Proximity
Sensor for
Grip Magic
 FeliCa
Mark
 Fingerprint
Sensor
 Charging/
Notification
Lamp
 Grip Sensor
Description
Insert/remove SD Card and USIM Card.
Shoot photos or videos.
Use as a camera flash, flashlight, etc.
Detects nearby objects to prevent unintended Grip Magic operation.
Hold up to reader/writer when using NFC/ Osaifu-Keitai®.
Unlock screen with fingerprint authentication.
Illuminates while charging or for incoming calls/messages and notifications.
Turns on Display, etc. when handset is held with both right and left sensors touched.
Handset Keys
Name
(Power Key)
 Volume Up
Key
 Volume
Down Key
Description
Turn Display off/on. Long Press for power on/off or reboot.
Increase volume.
Decrease volume. Long Press in lock screen to activate/cancel Manner mode.
7
USIM Card
USIM Card is an IC card containing phone number and other customer information.
Handling USIM Card
See instructions included with USIM Card for handling.Avoid applying labels. May damage USIM Card.
USIM is replaceable (at cost) in case of loss/damage.Wipe clean with a dry, soft cloth.
Always keep the IC chip (metal) clean.
 IC chip (metal)
USIM Card Usage Notes
About USIM Card
Observe the following when using USIM Card.
Always follow emergency procedures to suspend service if your USIM Card or handset (USIM Card inserted) is lost/ stolen. For details, contact Customer Service.
Customer is responsible for any damage caused by inserting USIM Card in an other-brand IC card reader, etc. SoftBank Corp. is not responsible in such case.
It is recommended that you back up information that is saved on USIM Card. SoftBank Corp. is not responsible for damages from saved information that is lost.
Always power off handset before inserting/removing USIM Card.
Note that USIM Card specifications and performance may change without notice.
Return USIM Card to SoftBank Corp. when canceling subscription.
USIM Card is the property of SoftBank Corp.Returned USIM Cards are recycled for environmental
purposes.
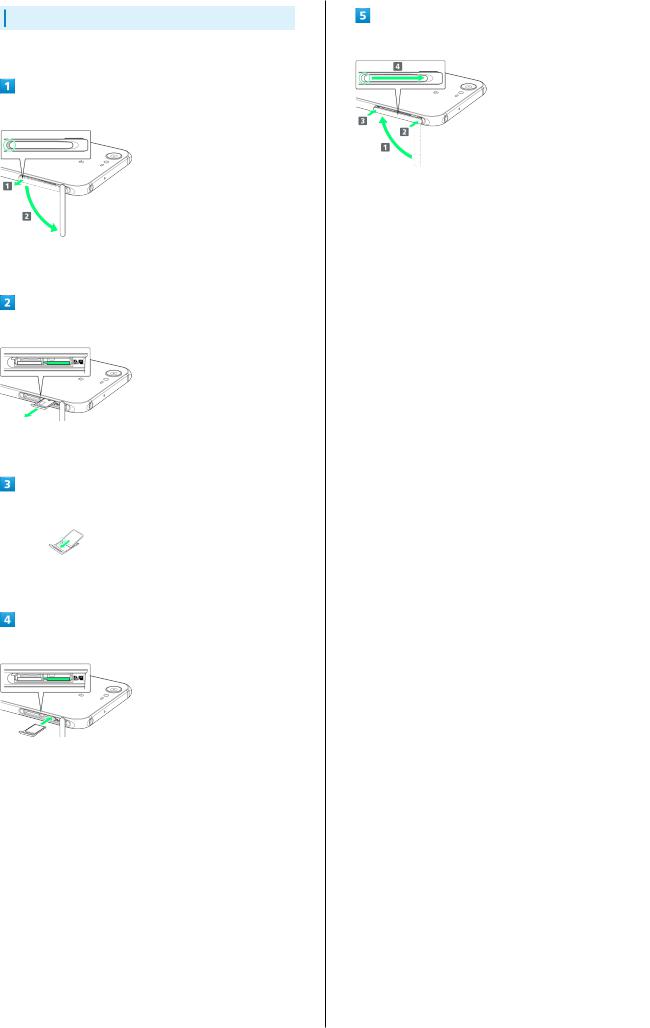
About IMEI Sheet
IMEI Sheet (  ) can be found when Card Slot Cover is open. Do not pull out IMEI Sheet.
Started Getting
Xx3 AQUOS
8
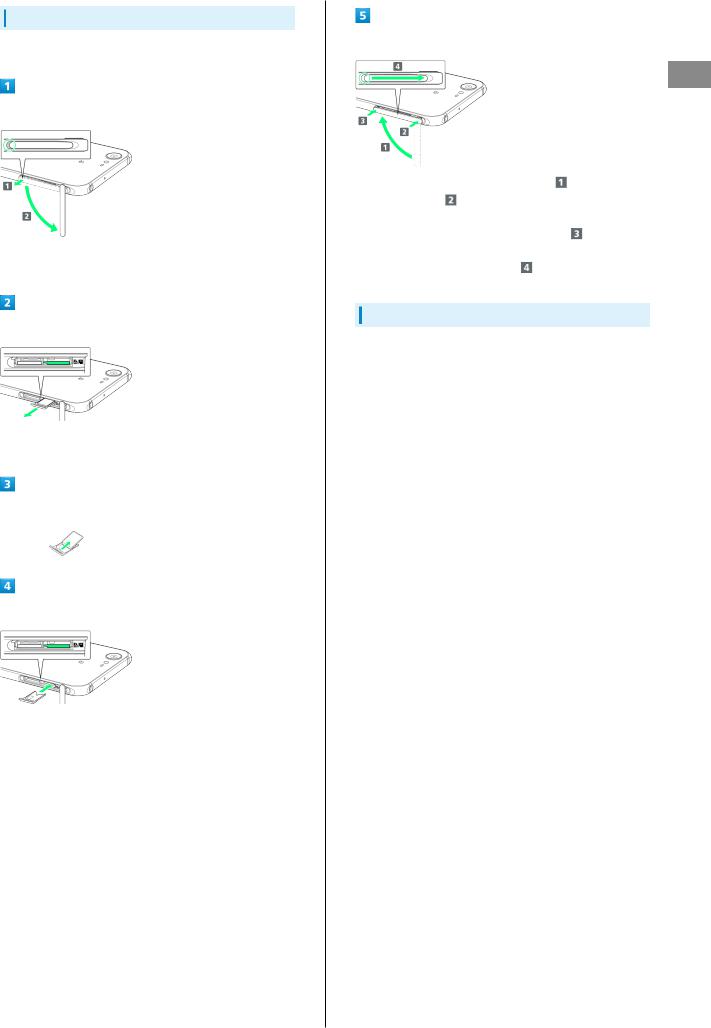
Inserting USIM Card
Always power off beforehand.
Open Card Slot Cover
Use notch (○) to pull Card Slot Cover toward you as shown (  ), then rotate it in the direction of the arrow (
  ).
).
Pull out USIM Tray
Do not pull USIM Tray forcefully or at an angle; damage may result. Gently pull it out horizontally from the edge.
Place USIM Card in USIM Tray
Check orientation of USIM Card (see notch), then gently place it with IC chip (metal) facing up.
Insert USIM Tray into USIM Card Slot (right opening)
Check orientation of USIM Tray, then gently insert it all the way horizontally.
Close Card Slot Cover
Lift Card Slot Cover in the direction of  and reinsert hinge as shown (
  ); place Card Slot Cover over the slot so that there is no gap between handset and Card Slot Cover, then push it in the direction of the arrow (
  ) to close.
When closing Card Slot Cover, push it firmly all the way from ○ area to hinge as shown (  ).
).
Removing USIM Card
Always power off beforehand.
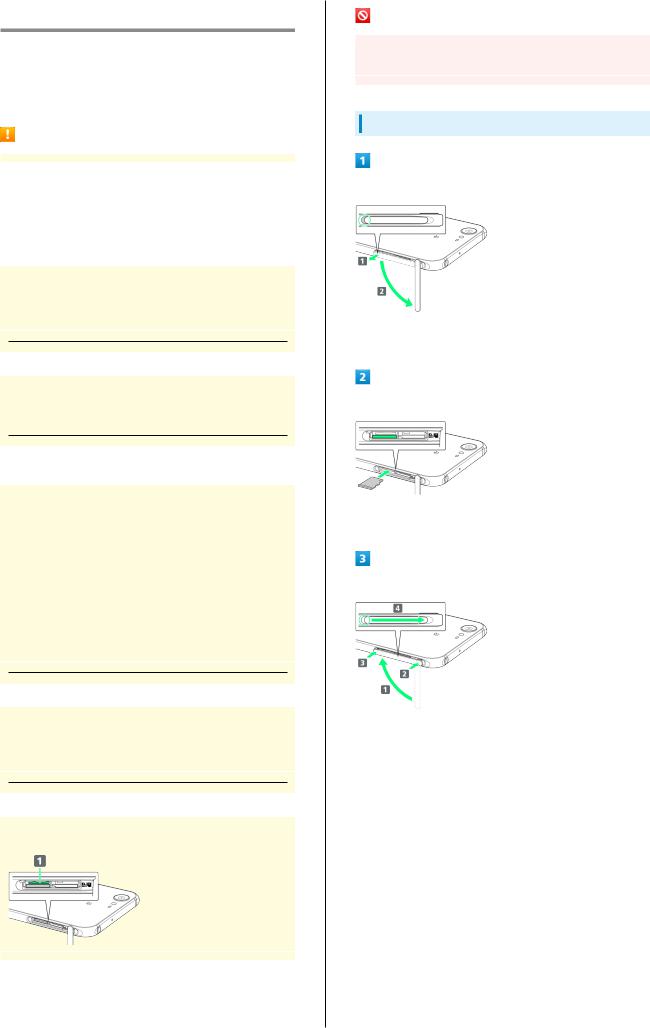
Open Card Slot Cover
Use notch (○) to pull Card Slot Cover toward you as shown (  ), then rotate it in the direction of the arrow (
  ).
).
Pull out USIM Tray
Do not pull USIM Tray forcefully or at an angle; damage may result. Gently pull it out horizontally from the edge.
Remove USIM Card
Insert USIM Tray into USIM Card Slot (right opening)
Do not insert USIM Tray at an angle; damage may result. Check orientation of USIM Tray, then gently insert it all the way horizontally.
|
|
|
9 |
|
|
|
|
|
|
Close Card Slot Cover |
|
|
|
|
|
|
|
|
Getting |
Lift Card Slot Cover in the direction of |
and reinsert |
Started |
||
|
||||
hinge as shown ( |
); place Card Slot Cover over the slot so |
|
||
that there is no gap between handset and Card Slot Cover, |
|
|||
then push it in the direction of the arrow ( |
) to close. |
|
||
When closing Card Slot Cover, push it firmly all the way |
|
|||
from ○ area to hinge as shown ( |
). |
|
|
|
SIM-Unlocking Handset
Handset can be SIM-unlocked. SIM-unlocking handset allows other-carrier SIM cards to be used with it.
Some services, functions, etc. may have restrictions when an other-carrier SIM card is used. SoftBank Corp. does not guarantee operation whatsoever.
For details on SIM unlocking, see SoftBank Website.
Xx3 AQUOS
10
Handset Memory & SD Card
Handset supports SD Card up to 200 GB. Some SD Cards may not operate properly.
Handset memory can be used for saving data including system data, applications, and video and photos taken with Camera.
Handset Memory/SD Card Usage Notes
Handset Memory/SD Card Files
Handset memory/SD Card files may be lost/altered due to accidents, malfunctions, repairs, handset upgrade/ replacement, mishandling, etc. Back up important files regularly. SoftBank Corp. is not liable for any damages resulting from loss/alteration of files.
Do not insert or remove SD Card forcefully.
Do not touch terminals or expose them to metal objects.Never power off while files are being accessed.
Make sure not to erase or overwrite files accidentally.
microSDXC Card
Handset supports microSDXC Cards (SDXC-compatible SD Cards). microSDXC Cards are supported by SDXC-compatible devices only.
Exchanging Files with Non-SDXC-Compatible Devices
To exchange files between handset and non-SDXC- compatible devices, use SD Cards (microSD/microSDHC Cards) supported by handset and those devices. Inserting a microSDXC Card used on handset in a non-SDXC-compatible device may corrupt card files. In such cases, do not format the microSDXC Card on that device even if prompted to do so.
Formatting deletes all microSDXC Card files and changes the file system. The original memory capacity may
be unavailable after formatting. To use a corrupted microSDXC Card, format it on an SDXC-compatible device.
Save Location
By default, files, including videos and photos taken with handset, are saved in handset memory. Even with
downloaded commercially-available apps described as saving data on SD Card, files are saved in handset memory.
About IMEI Sheet
IMEI Sheet (  ) can be found when Card Slot Cover is open. Do not pull out IMEI Sheet.
SD Card Caution
Keep SD Card away from infants; may cause choking if swallowed.
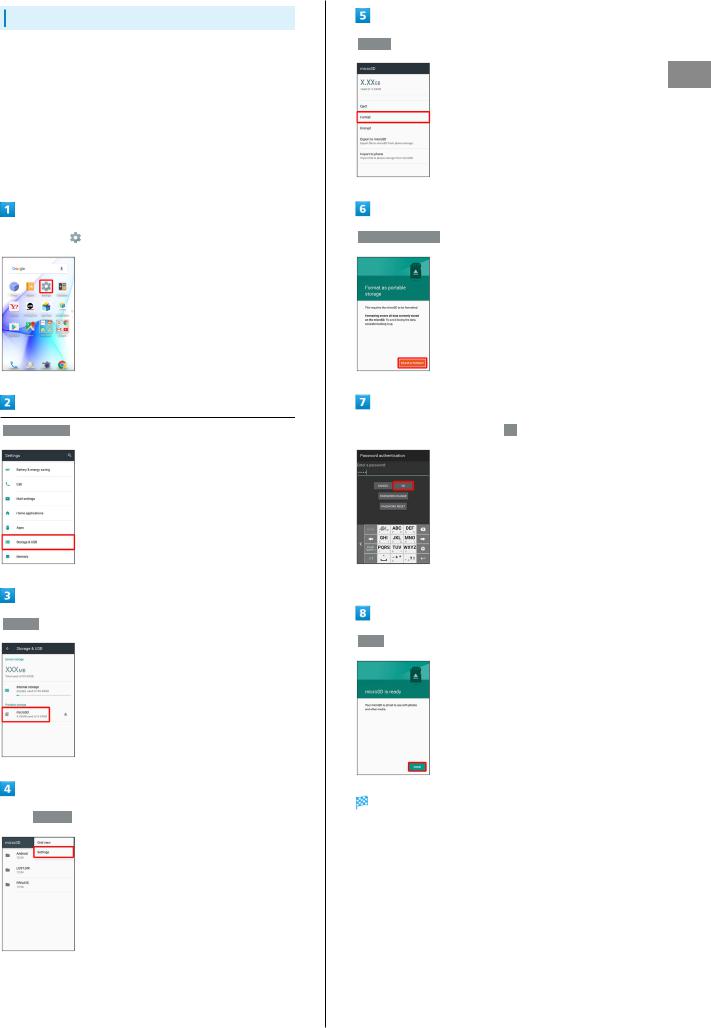
Inserting SD Card
Open Card Slot Cover
Use notch (○) to pull Card Slot Cover toward you as shown (  ), then rotate it in the direction of the arrow (
  ).
).
Insert SD Card into SD Card Slot (left opening)
Gently insert SD Card all the way horizontally with terminals facing down.
Close Card Slot Cover
Lift Card Slot Cover in the direction of  and reinsert hinge as shown (
  ); place Card Slot Cover over the slot so that there is no gap between handset and Card Slot Cover, then push it in the direction of the arrow (
  ) to close.
When closing Card Slot Cover, push it firmly all the way from ○ area to hinge as shown (  ).
).
Formatting SD Card
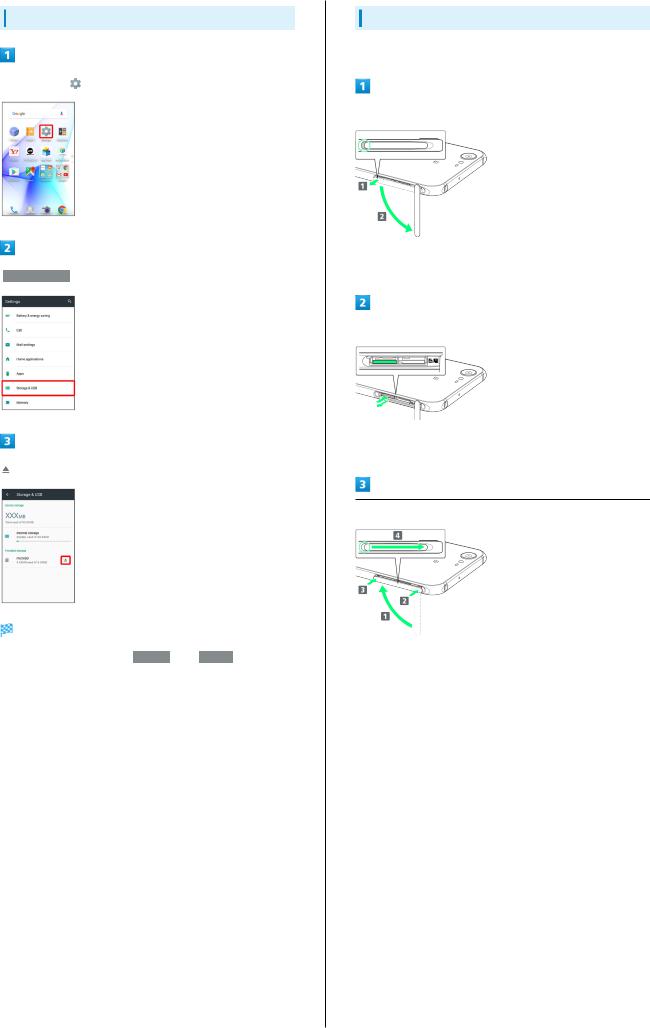
When using a new SD Card for the first time, always format it on handset.
Formatting erases all data on SD Card. Format SD Card with caution.
When formatting, keep handset charged or charge it adequately beforehand.
Insert SD Card beforehand. See "Inserting SD Card" for details.
In app sheet, |
(Settings) |
 Storage & USB
 microSD


 Settings
11
 Format
 ERASE & FORMAT
Enter Operation Password 
 OK
OK
If Operation Password is unset, follow onscreen prompts.
 DONE
DONE
All data on SD Card is erased.
Started Getting
Xx3 AQUOS
12
Unmounting SD Card
In app sheet, |
(Settings) |
 Storage & USB
SD Card is unmounted.
To mount SD Card again,  microSD

 MOUNT
MOUNT .
.
Removing SD Card
Always unmount SD Card beforehand.
Open Card Slot Cover
Use notch (○) to pull Card Slot Cover toward you as shown (  ), then rotate it in the direction of the arrow (
  ).
).
Remove SD Card
Lightly push SD Card in and release finger (SD Card pops out slightly); gently pull it out horizontally.
Close Card Slot Cover
Lift Card Slot Cover in the direction of  and reinsert hinge as shown (
  ); place Card Slot Cover over the slot so that there is no gap between handset and Card Slot Cover, then push it in the direction of the arrow (
  ) to close.
When closing Card Slot Cover, push it firmly all the way from ○ area to hinge as shown (  ).
).
Charging Handset
Battery is built into handset.
Internal Battery
A lithium-ion battery is built into handset; it is not removable.
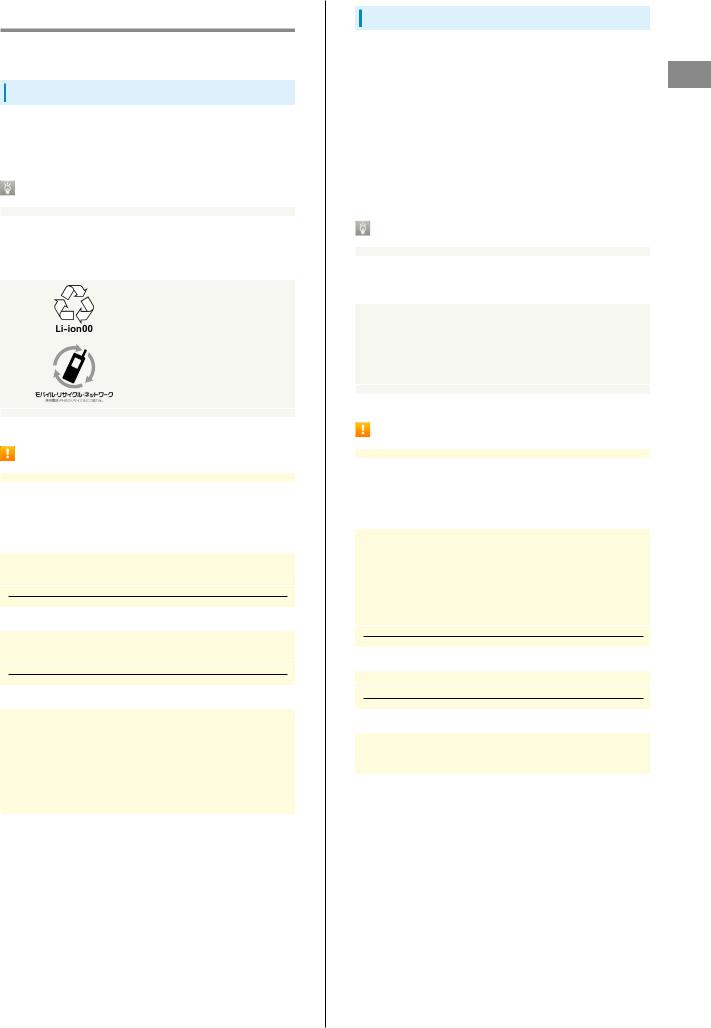
Recycling
This product requires a lithium-ion battery. Lithiumion batteries are recyclable. To recycle a used lithiumion battery, take it to any shop displaying the recycling symbol.
Battery Cautions
Storage
To help maintain performance and life of Internal Battery, do not store in the following conditions (battery level should be at approximately 40% for optimal storage).Full (immediately after charging is complete)Exhausted (too low to power on handset)
Bulges of Internal Battery
Depending on use, bulges may appear near end of battery life; this does not affect safety.
Internal Battery Replacement
Internal Battery is a consumable item; may need to be replaced if operating time shortens noticeably. Internal Battery is not user replaceable; its replacement incurs fees and requires handset submission to a SoftBank Shop or other appropriate servicer. For details, contact a SoftBank Shop or SoftBank Customer Support, General Information.
13
About Charging
The following charging options are available.
Charging |
|
Description |
|
Option |
|
||
|
|
||
|
|
|
|
AC Adaptor |
Connect handset and AC Adaptor (sold |
||
separately) directly. |
|||
|
|
||
USB charging |
Connect handset and a PC with Micro USB |
||
Cable (optional accessory). |
|||
|
|
||
Charging/Notification Lamp
Charging/Notification Lamp illuminates red while charging; illuminates green when charge is almost full. Charging/Notification Lamp goes out when charge is full.If Charging/Notification Lamp is blinking, charging is not
working properly. Make sure that you are using Charger and products specified by SoftBank Corp. If you are using specified products only, contact a SoftBank Shop or SoftBank Customer Support, General Information.
Charging Cautions
Water Resistance
AC Adaptor (optional accessory) and Micro USB Cable (optional accessory) are not waterproof. Never connect Micro USB plug while handset or Charger is wet. Handset is water resistant; however, if Micro USB plug is inserted while it is wet, liquid (tap water, beverage, sea water, pet urine, etc.) or a foreign object adhered to
handset or Micro USB plug may cause overheating, burnout, fire, malfunction, burns, etc. due to electric shock, shortcircuiting, etc.
Handling Cords
Do not pull, bend, or twist cord; may damage the cord.
About Charging Abroad
SoftBank Corp. is not liable for problems resulting from charging handset abroad.
Started Getting
Xx3 AQUOS
14
Charging with AC Adaptor
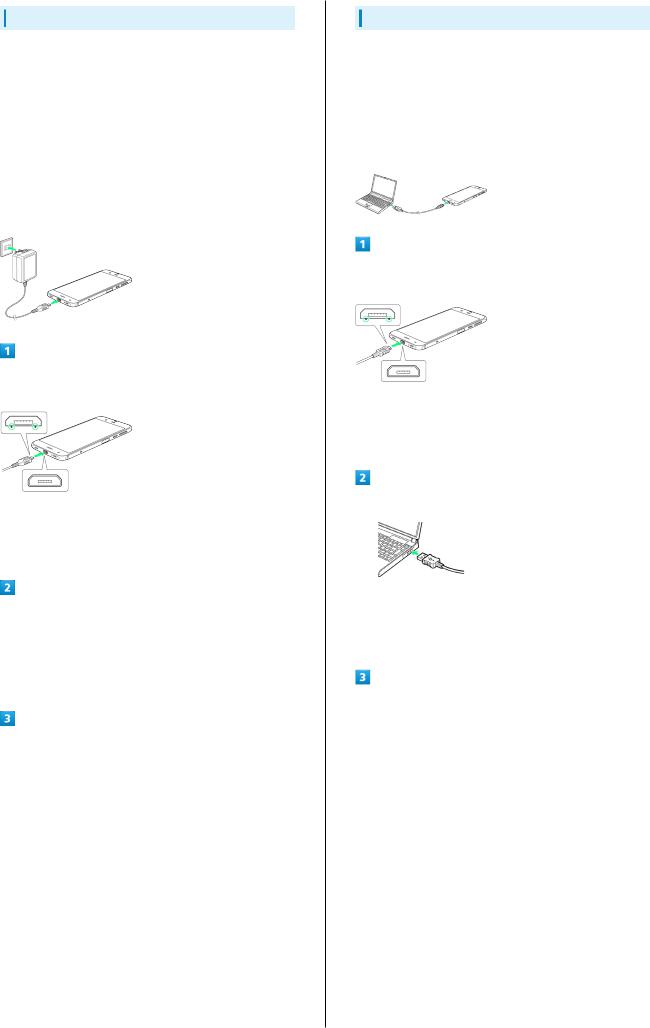
Purchase and use SB-AC12-HDQC (SoftBank SELECTION Qualcomm® Quick Charge™ 2.0 AC Adaptor for smartphones) or SB-AC13-HDMU (Micro USB 1.0 A AC Adaptor).
For information on other peripheral devices, see SoftBank Website.
The following explains how to charge handset using SB-AC12- HDQC (SoftBank SELECTION Qualcomm® Quick Charge™ 2.0 AC Adaptor for smartphones).
See User Guide for corresponding AC Adaptor.
Never connect Micro USB plug while handset or AC Adaptor is wet.
Insert Micro USB plug of AC Adaptor into External Connection Jack
Insert Micro USB plug in correct orientation; otherwise, External Connection Jack may be damaged. Check contours and orientation of Micro USB plug, then insert it with tabs
(○) facing down.
Extend blades and plug AC Adaptor into AC outlet
 Charging starts and Charging/Notification Lamp illuminates.
Charging/Notification Lamp goes out when charge is full.
After charging, remove Micro USB plug from External Connection Jack, then unplug AC Adaptor and retract blades
Charging by PC
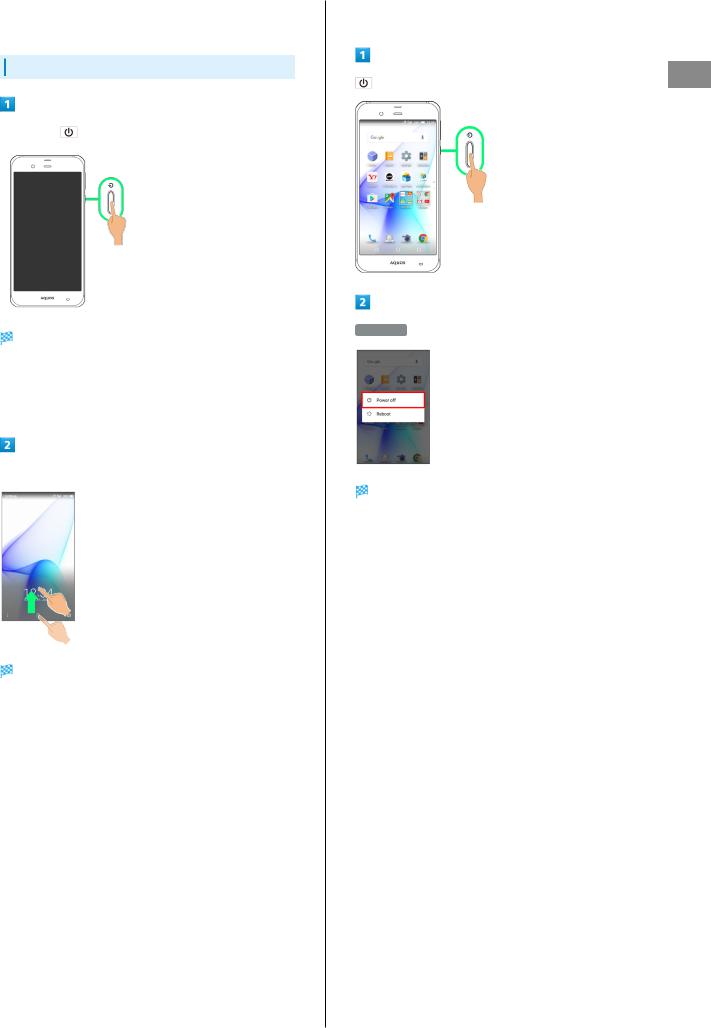
Connect handset to a PC with Micro USB Cable (SHDDL1; optional accessory).
Make sure that PC is turned on.
Charging may not be possible/take a long time depending on connection and PC conditions.
Never connect Micro USB plug while handset or Micro USB Cable is wet.
Insert Micro USB plug of Micro USB Cable into External Connection Jack
Insert Micro USB plug in correct orientation; otherwise, External Connection Jack may be damaged. Check contours and orientation of Micro USB plug, then insert it with tabs
(○) facing down.
Insert USB plug of Micro USB Cable into PC USB port
 Charging starts and Charging/Notification Lamp illuminates.
Charging/Notification Lamp goes out when charge is full.
After charging, remove Micro USB Cable from handset and PC
15
Power On/Off |
|
|
|
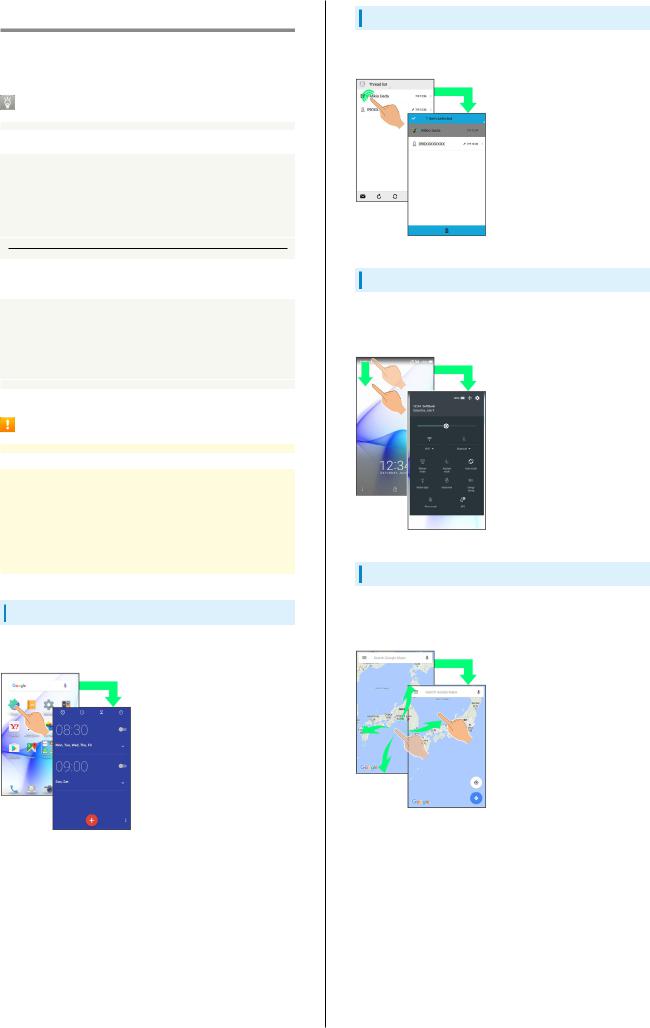
Power Off |
Power On
(Long Press)
Long Press |
until SHARP logo appears |
Power off
Handset powers on, and lock screen appears after a while.
If confirmation appears, follow onscreen prompts.
An initial settings screen may appear the first time handset is powered on. For details on initial settings, see "Handset Initial Settings."
Drag  or
or  up
up
Handset powers off.
Home Screen appears.
Started Getting
Xx3 AQUOS
16
Using Touchscreen
Handset uses a touchscreen-type Display. Operate with your fingers on Display.
About Touchscreen
In Case of Unintended Operation
If handset initiates operation without Touchscreen (Display) being operated or does not respond after Touchscreen being operated, Press  to turn off Display, Press
  again to turn on Display and then operate handset.
Touchscreen Usage Notes
Touchscreen may not respond in these situations:Use with gloves/long fingernails
When using handset with gloves on, enable Glove mode.Use of pens, pencils or sharp objects
Use with objects on/against DisplayUse while wet
Touchscreen Usage Cautions
To prevent malfunctions, do not:Touch Display with wet fingersUse if Display is wet
If Display is wet, wipe it with a soft cloth.Subject Display to force/pressure
Place a sticker or shield (commercially-available protective film, privacy protector shield, etc.) on Display
Tap
Contact Display lightly and briefly.
Touch & Hold
Contact Display lightly; release finger when screen changes.
Drag
Touch icon or other item lightly, move it where desired, and release finger.
Flick
Contact Display lightly, then brush screen up/down or left/ right.
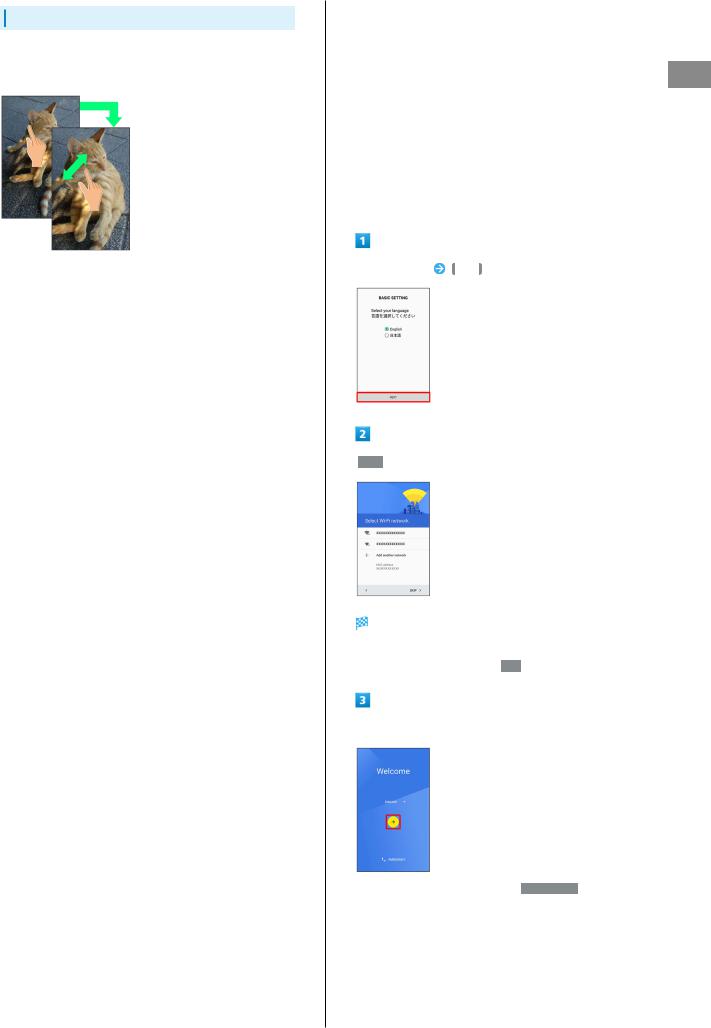
Pinch/Spread
Contact Display lightly, then move fingers toward each other (Pinch) or away from each other (Spread).
|
|
17 |
|
|
Handset Initial Settings |
|
|||
|
|
|
|
|
An initial settings screen appears the first time handset |
|
|||
is powered on. Here, make settings for Wi-Fi, a Google™ |
|
|||
Account, etc. Follow onscreen prompts to set items. |
|
|||
Insert USIM Card before powering on handset. |
Getting |
|||
|
|
|
||
|
Making Initial Settings |
|||
Depending on your environment, screen content, setting items |
Started |
|||
|
||||
and steps may differ. |
|
|||
Follow onscreen prompts on your handset. |
|
|||
|
|
|
|
|
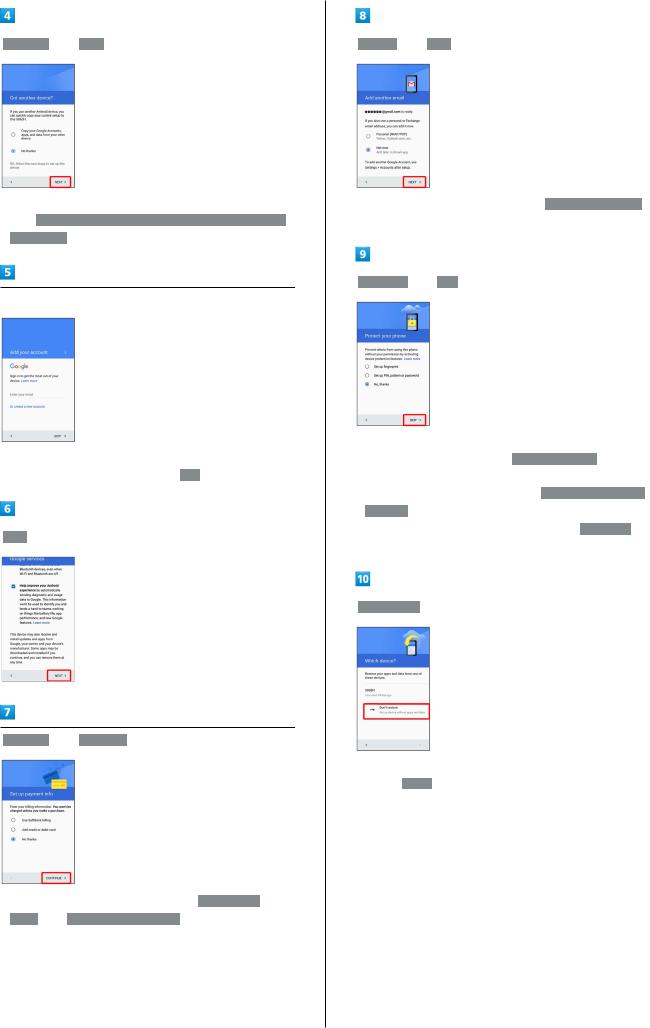
Select language |
|
|
|
|
NEXT |
|
|||
 NEXT
NEXT
 Set Wi-Fi items
Handset restarts.
Follow onscreen prompts.
To skip Wi-Fi settings, Tap  SKIP
SKIP .
.
Tap language 

To place an emergency call, Tap  EMERGENCY
 .
.
If Wi-Fi items are not set, Wi-Fi settings screen appears.
Xx3 AQUOS
18
 No thanks

 NEXT
NEXT
To copy settings from a Google Account on another mobile, Tap  Copy your Google Accounts, apps, and data from your other device
 . Follow onscreen prompts.
Set up a Google Account
See "Google Account" for details on a Google Account.To skip Google Account setup, Tap  SKIP
SKIP .
.
 NEXT
NEXT
 No thanks

 CONTINUE
To set up payment information, select  Use SoftBank billing
 or
or  Add credit or debit card
 . Follow onscreen prompts.
 Not now

 NEXT
NEXT
To add another email address, select  Personal (IMAP/POP)
. Follow onscreen prompts.
 No, thanks

 SKIP
SKIP
If confirmation appears, follow onscreen prompts.To set up fingerprints, select  Set up fingerprint
 . See
. See
"Saving Fingerprints" for details.
To set up Screen lock option, select  Set up PIN, pattern or password
 . See "Lock & Security Settings" for details.
To learn about protecting smartphones, Tap  Learn more
 .If Get Google Now screen appears, follow onscreen prompts.
 Don't restore
To restore data from another mobile or an application, select  506SH
506SH . Follow onscreen prompts.
If confirmation appears, follow onscreen prompts.
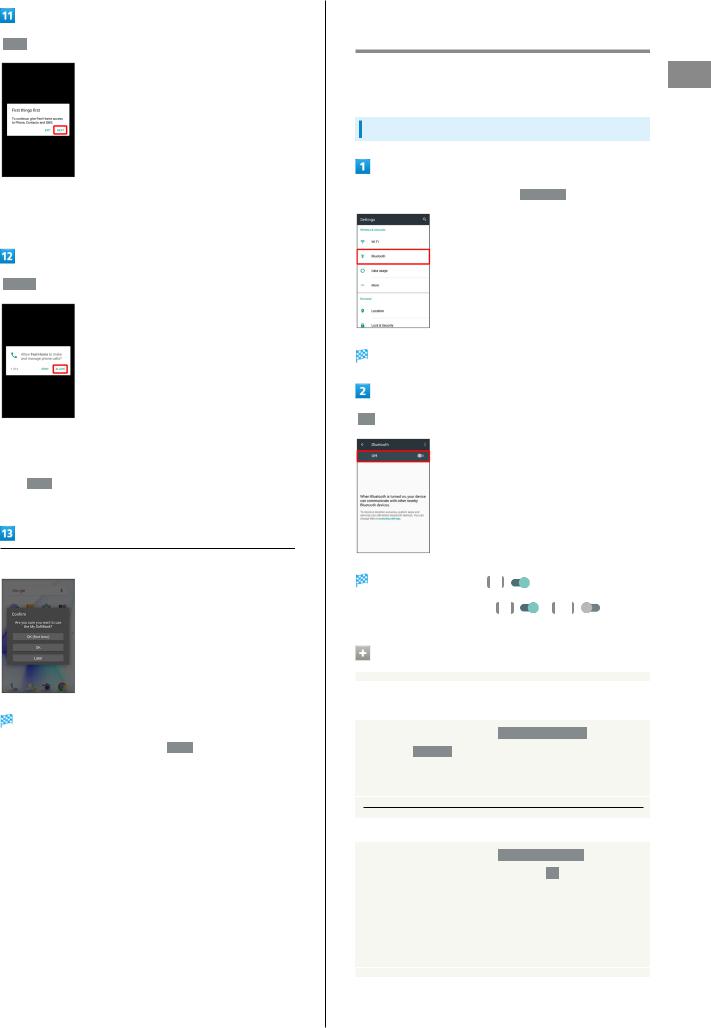
 NEXT
NEXT
 Confirmation for giving access permission to application appears.
 ALLOW
ALLOW
Access permission confirmation appears multiple times. For details on giving access permissions to applications, see "Confirmation at First Activation of Applications."
If  DENY
DENY is Tapped, confirmation for giving access permission to application returns.
Set up My SoftBank
Initial settings are complete.
To skip My SoftBank setup, Tap  Later
Later .
.
19
Importing Files from Other Mobiles
Import files from other mobiles, etc. using Bluetooth® or SD Card.
Enabling Bluetooth® Function
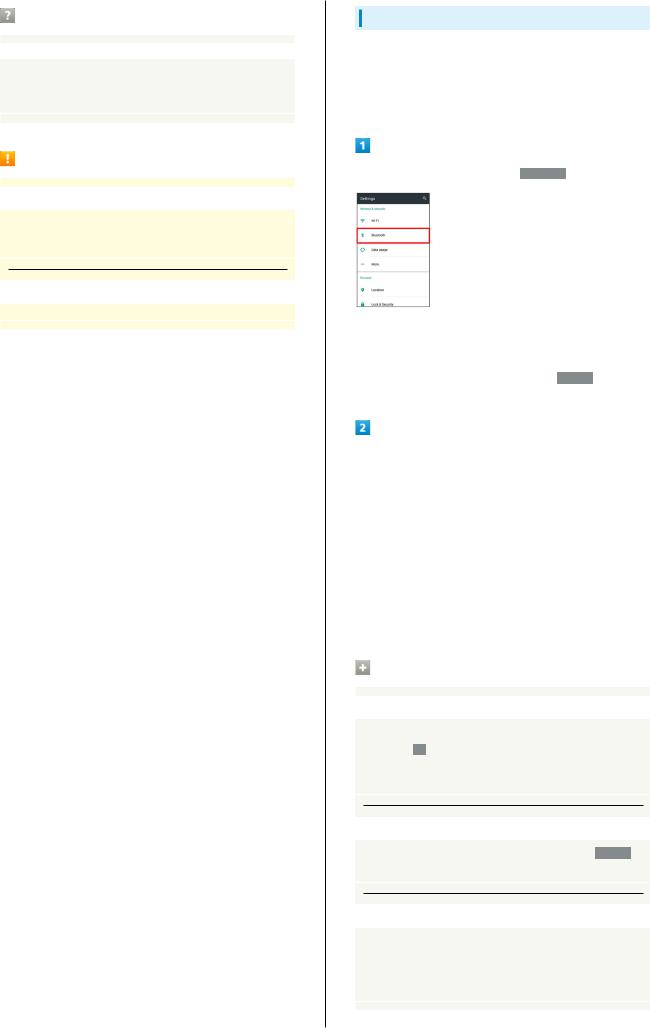
In app sheet,  (Settings)
 Bluetooth
Bluetooth® menu opens.
 Off
Off

Bluetooth® is enabled ( |
On |
|
). |
|
|
|
To disable Bluetooth®, Tap |
|
|
( |
|
). |
|
|
On |
Off |
||||
Bluetooth® Connection Operations
Renaming Handset Name that Appears on Other Devices
In Bluetooth® menu, 

 Rename this device
 Enter name
 RENAME
Available when Bluetooth® is enabled.Renaming may not be possible if emoji is used.
Setting Whether to Give Priority to aptX®
In Bluetooth® menu, 

 Qualcomm® aptX™

 /
/  at the right end of aptX line
 OK
OK
Available when Bluetooth® is enabled.
Tap  to toggle off (
  ),
),  to toggle on (
  ).Changes are applied to devices connected after setting changes are made. Disconnect and reconnect handset to
devices to apply changes.
Started Getting
Xx3 AQUOS
20
Troubleshooting
Q.Cannot use Bluetooth®
A.Airplane mode may be active. Activating Airplane mode disables Bluetooth®. (Bluetooth® can be enabled again while Airplane mode is active.)
Bluetooth® Usage Notes
Connection
Bluetooth® connection may not be possible with some Bluetooth® devices. In addition, noise may interfere with wireless or handsfree conversations.
File Transfer
Files may not appear correctly on recipient devices.
Pairing Bluetooth® Devices
Search for and pair nearby Bluetooth® devices. Paired Bluetooth® devices can be connected easily.
Enable Bluetooth® on handset and set target devices to be discoverable first.
In app sheet,  (Settings)
 Bluetooth
 Bluetooth® menu opens; found Bluetooth® devices appear in Available devices field.
If target device does not appear, 

 Refresh
 to try searching again.
Tap target device  Follow onscreen prompts for authentication
 Pairing completes; handset connects to some devices (e.g., handsfree devices) automatically.
Authentication procedure varies by device. Passkey entry may be required.
Passkey is a 1 to 16-digit number or a set of characters/ symbols required for authentication between handset and other devices.
Paired devices appear in Paired devices field.
Pairing Operations
Renaming Paired Devices
In Bluetooth® menu,  for target device
  Enter name
 OK
OK
Available when Bluetooth® is enabled.Renaming may not be possible if emoji is used.
Unpairing Devices
In Bluetooth® menu,  for target device
 FORGET
Available when Bluetooth® is enabled.
Connecting to Bluetooth® Devices by Service
In Bluetooth® menu,  for target device
  Tap item
Available when Bluetooth® is enabled.
Available when handset is paired with a device that supports corresponding service.
Connecting to Paired Bluetooth® Devices
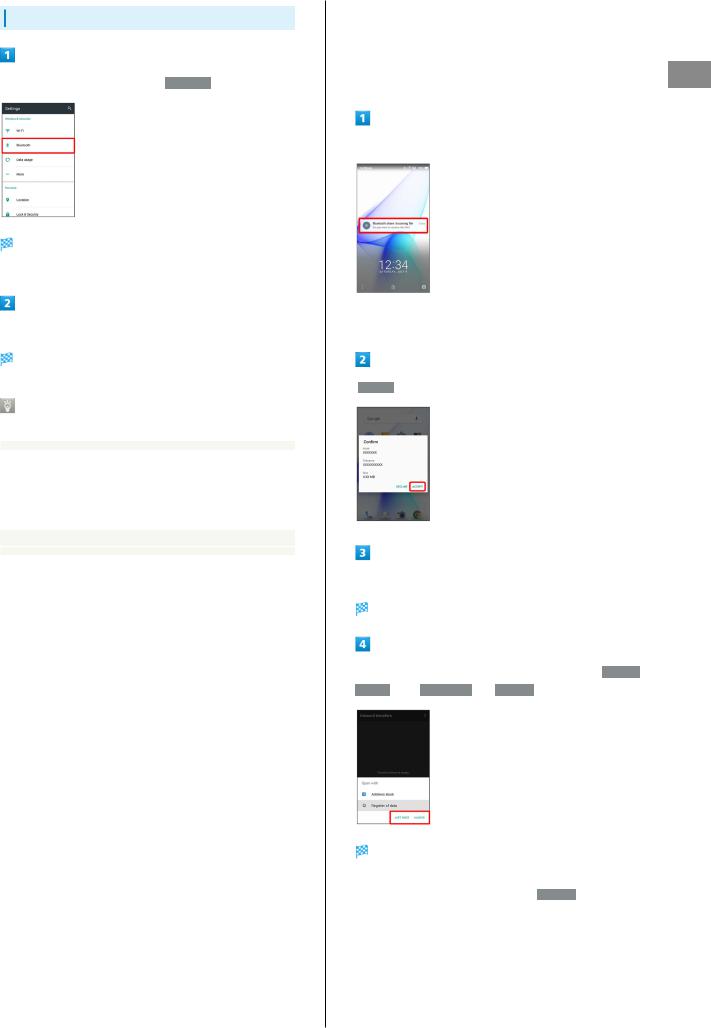
In app sheet,  (Settings)
 Bluetooth
Bluetooth® menu opens.
Paired Bluetooth® devices appear in Paired devices field.
Tap target device
Handset connects to the device.
Connection by Accepting Connection Requests
Handset automatically accepts connection requests from paired devices. For unpaired devices, set handset to be discoverable, then perform pairing operation on other devices. When connection request arrives, follow onscreen prompts.
If confirmation appears, follow onscreen prompts.
21 |
|
|
|
|
|
|
Receiving Files via Bluetooth® (e.g., |
|
|
Address Book) |
|
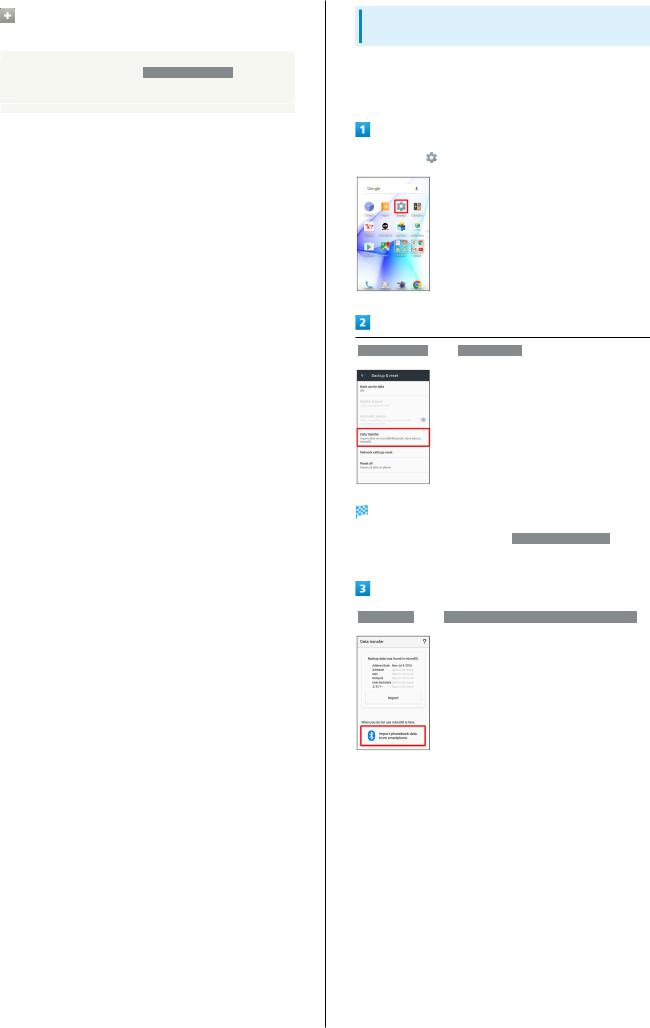
When file reception request arrives, notification appears in |
|
|
lock screen. To receive files: |
|
|
|
Getting |
|
Tap Bluetooth® share notification twice |
||
|
|
Started |
In Home Screen,  appears on Status Bar. Drag Status Bar down, then Tap Bluetooth® share notification.
 ACCEPT
After file reception, Drag Status Bar down
Notifications Window opens.
Tap Bluetooth® share notification  Tap file
 Register of data

 JUST ONCE
 /
/  ALWAYS
File content is saved.
If confirmation appears, follow onscreen prompts.To always use selected option, Tap  ALWAYS
 .
.
Xx3 AQUOS
22
Opening Files Received by Bluetooth® Transfer
In Bluetooth® menu, 

 Show received files
 Tap file
  Follow onscreen prompts
Importing Contacts via Bluetooth® (Data Transfer)
Import contacts from other mobiles using Bluetooth®.
Enable Bluetooth® beforehand.
In app sheet, |
(Settings) |
 Backup & reset

 Data transfer
Data transfer window opens.
In Data transfer window, Tap  Function information
 to view a video tutorial (Japanese) on Sharp Website.
 Data import

 Import phonebook data from smartphone.
If SD Card is not inserted or there is no backup file on inserted SD Card, Select device to import from window appears. Follow onscreen prompts.
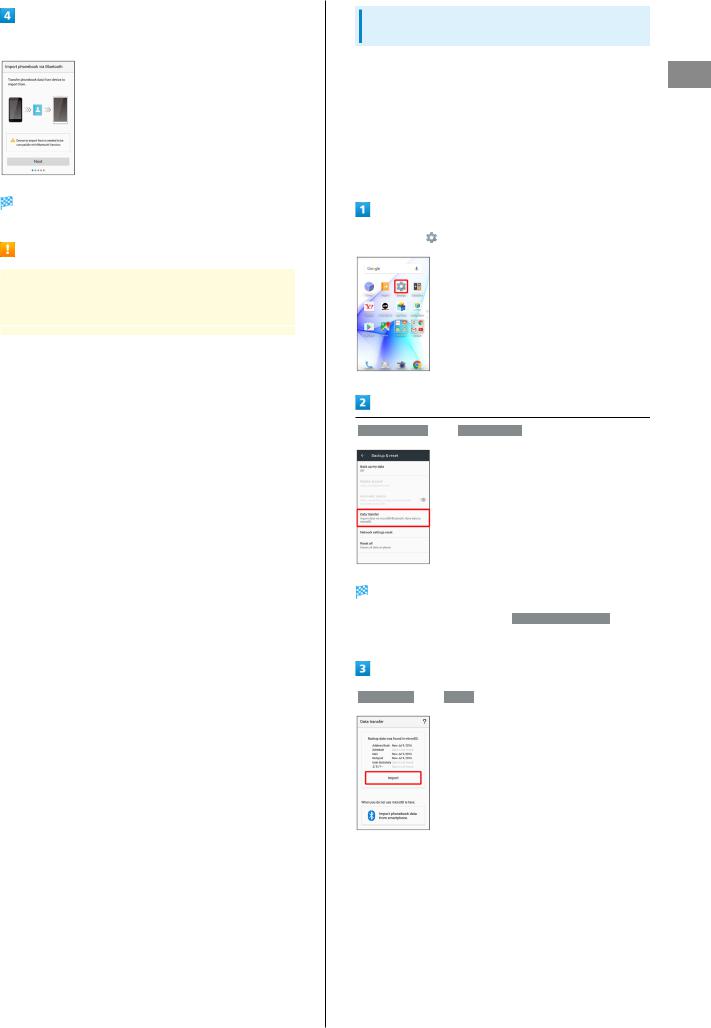
Follow onscreen prompts
Import of contacts is complete.
Caution for Importing Data
Import is not available if there is only a little free space in handset memory. Process stops if Battery runs low. Operate with adequate battery charge whenever possible.
23
Importing Files from SD Card (Data Transfer)
Import files (contacts, messages, Calendar, Notepad, User/ Learning dictionary, emopa) saved to SD Card on other mobiles or handset to handset.
Insert SD Card containing a backup file beforehand. See "Inserting SD Card" for details.
Contacts may not be imported correctly depending on the device used for saving them.
In app sheet, |
(Settings) |
 Backup & reset

 Data transfer
Data transfer window opens.
In Data transfer window, Tap  Function information
 to view a video tutorial (Japanese) on Sharp Website.
 Data import

 Import
If SD Card is not inserted or there is no backup file on inserted SD Card, Select device to import from window appears. Follow onscreen prompts.
Started Getting
Xx3 AQUOS

24
Tap item to import  Tap file to import
 Add registration
 /
/  Delete and register
When  Mail
Mail is selected, Mail application activates. Follow onscreen prompts.
 YES
YES
Import starts.
If confirmation appears, follow onscreen prompts.
 Complete
Import is complete.
Cautions for Importing Data
Import is not available if there is only a little free space in handset memory. Process stops if Battery runs low. Operate with adequate battery charge whenever possible. When importing User/Learning dictionary (S-Shoin), existing User/Learning dictionary (S-Shoin) files in handset memory are deleted.

Basic Operations |
|
Basic Operations............................................................... |
26 |
Confirmation at First Activation of Applications......... |
33 |
Applications....................................................................... |
34 |
Using Recent Apps Window............................................. |
34 |
Handset Phone Number.................................................... |
35 |
Using Manner Mode.......................................................... |
35 |
Using Airplane Mode......................................................... |
37 |
Text Entry......................................................................... |
37 |
Google Account................................................................. |
39 |
Google Play....................................................................... |
41 |
Security Codes.................................................................. |
43 |
USIM PIN............................................................................ |
44 |
Turning Off Display (Screen Lock).................................. |
46 |
Using Fingerprint Authentication Function.................... |
46 |
Updating Software........................................................... |
49 |
26
Basic Operations
Lock Screen
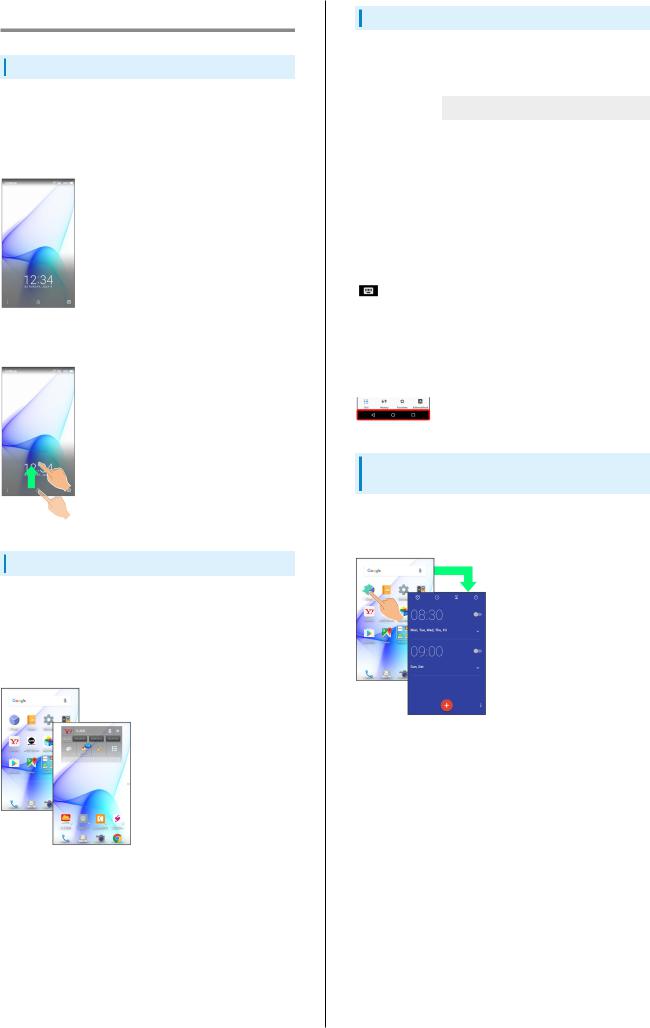
After a period of inactivity, Display turns off to save battery power (Screen lock active).
Press  to open lock screen; screen can be unlocked.
Lock screen also appears at power on.
To unlock screen and use handset, Drag  or
or  up. For details on lock screen, see "Lock Screen Basics."
Home Screen
Most operations start from Home Screen. Activate applications, change handset settings, etc. (To change Home Screen, switch to another home screen app.)
Activate most applications from app sheet in Home Screen. See "Home Screen Basics" for details.
Navigation Bar
Tap icons on Navigation Bar (Display bottom) for the following functions/operations.
Name
 (Back key)
 (Home key)
 (Recents key)
(Keyboard
key)
 (Menu key)
Description
Return to the previous screen. When keyboard is on Display,  appears instead; Tap to close the keyboard.
Return to Home Screen.
Open a list of recently used applications to activate or remove them from the list. Touch & Hold to open/close Quick Settings Window.
Change keyboard/input method. Appears when keyboard is open.
Open menu. Appears for some applications.
Selecting Options and Navigating
Screens
Tap item, icon, key, etc. to open menu/window or execute corresponding function/operation.
To return to the previous screen, Tap  .
.
To return to Home Screen, Tap  at Display bottom.
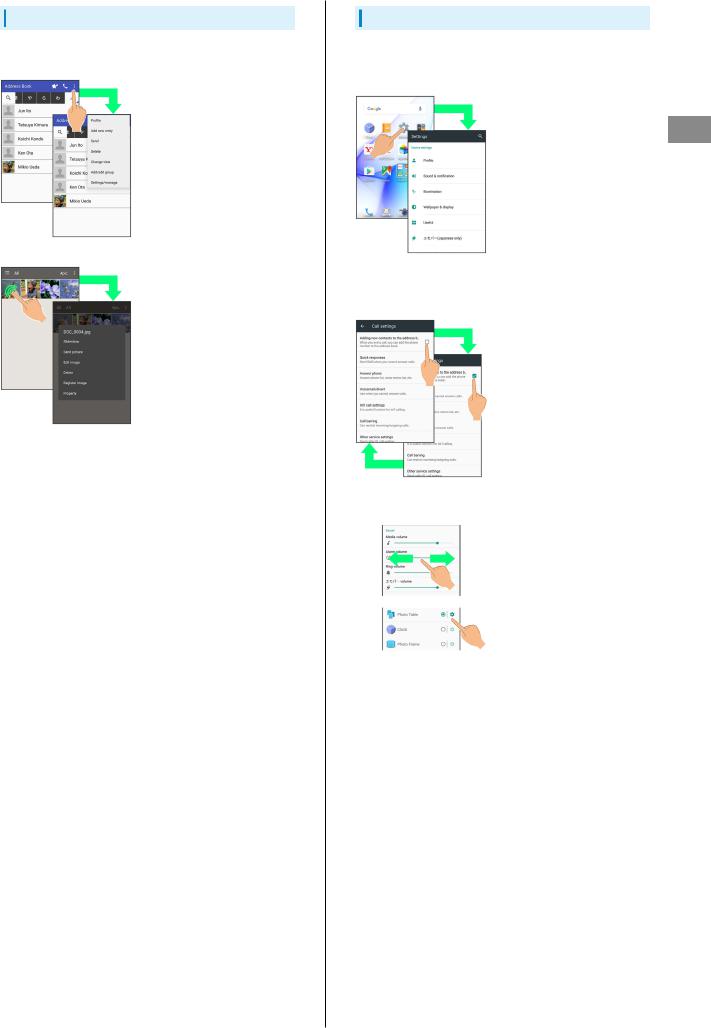
Menu Operations
Tap  at Display top or bottom to open menu or settings.
In some windows, Touch & Hold for menu or settings.
27
Handset Settings and Making Settings
In app sheet, Tap  (Settings) to customize the operation of handset functions.
Checkbox (  /
/  ) or switch (
  /
/  ) appears for some options. Tap to enable (
  /
/  ) or disable (
  /
/  ) option.
Drag/Flick slider, spinner, etc. to adjust some settings. If available, Tap  for additional settings.
Operations Basic
Xx3 AQUOS
28
Portrait Orientation & Landscape
Orientation
The screen changes to landscape orientation when handset is rotated sideways.
Depending on the current screen, the orientation may not change even by changing handset orientation.
Handset can be set so that the screen does not change from portrait to landscape orientation while handset is held. See "Operating by Gripping Handset (Grip Magic)" for details.
(Orientation does not change automatically by default.)
One-Hand Operation (ShrinkScreen)
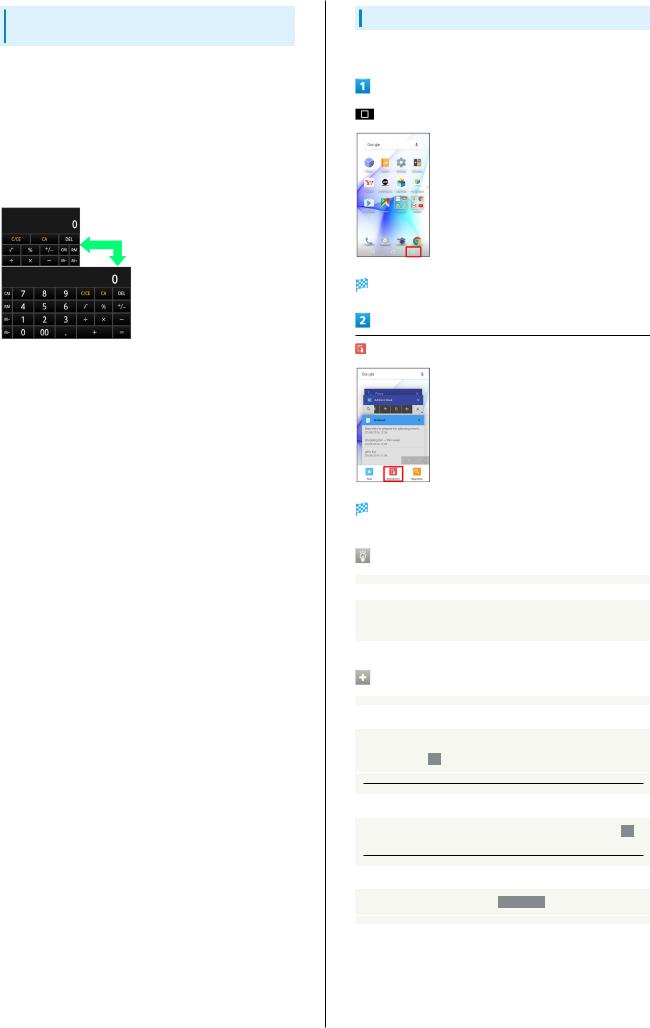
Shrink screen for easier one-hand operation.
Recent apps window opens.
(ShrinkScreen)
Screen shrinks.
About ShrinkScreen
Some screens may not be shrunk.
Full-screen view is restored when screen orientation is changed to landscape or when Display turns off.
Shrunk Screen Operations
Moving Shrunk Screen
In shrunk screen, 
 Drag screen to change its position
 OK
OK
Enlarging/Reducing Shrunk Screen Size
In shrunk screen, 
 Pinch or Spread screen
 OK
OK
Restoring Full-Screen View
In shrunk screen, 

 Fullscreen
 Loading...