


CLX-9252
Table of contents
 Loading...
CLX-9252 9352 Series
SCX-8230 8240 Series
Color Multi-Functional Printer
User’s Guide
imagine the possibilities
Thank you for purchasing a Samsung product.

copyright
© 2010 Samsung Electronics Co., Ltd. All rights reserved.
This user’s guide is provided for informational purposes only. All information included herein is subject to change without notice.
Samsung Electronics is not responsible for any direct or indirect damages, arising from or related to use of this user’s guide.
• Samsung and Samsung logo are trademarks of Samsung Electronics Co., Ltd.
• PCL and PCL 6 are trademarks of Hewlett-Packard Company.
• Microsoft, Windows, Windows Vista, Windows 7 and Windows 2008 Server R2 are either registered trademarks or trademarks of Microsoft Corporation.
• PostScript 3 is a trademark of Adobe System, Inc.
• This product includes software developed at the University of California, Irvine for use in the DAV Explorer project (http://www.ics.uci.edu/~webdav/).
• ABBYY® FineReader® Engine for Embedded OS © 2009 ABBYY. ABBYY FineReader - the keenest eye in OCR. ABBYY, FINEREADER and ABBYY
FineReader are registered trademarks of ABBYY Software Ltd.
• All other brand or product names are trademarks of their respective companies or organizations.
Refer to the ‘LICENSE.txt’ file in the provided CD-ROM for the open source license information.
IF YOU USE THIS MACHINE TO PRODUCE AND THEN USE COUNTERFEIT CURRENCY, YOU WILL BE PUNISHED TO THE FULLEST EXTENT OF THE LAW.
REV. 1.00
Copyright_ 2

contents
COPYRIGHT
2
CONTENTS
3
INTRODUCTION
15
11 About this user’s guide
13 Features of your new product
15 Machine overview
15 Front view 1
16 Front view 2
17 Rear view
18 Inner view (CLX-9252 9352 Series)
19 Inner view (SCX-8230 8240 Series)
20 View with Standard finisher (optional)
21 View with Booklet finisher 1 (optional)
22 View with Booklet finisher 2 (optional)
23 View with Cabinet stand and High capacity feeder (optional)
24 Control panel overview
25 Understanding the status LED
26 Turning the machine on
27 Turning the machine off
27 Connecting a printer cable
27 Using a network cable
28 Adjusting angle of the control panel
29 Introducing the display screen and useful buttons
29 Display screen
29 Counter button
30 Eco button
30 Job Status button
32 Help button
32 Interrupt button
32 Power Saver button
32 Understanding the pop-up keyboard
33 Using the manual stapler
34 Using the pen and paper clip holder
34 Viewing the animation for trouble shooting
MEDIA AND TRAY
35
Contents_ 3
35 Loading originals
35 On the scanner glass
36 In the duplex automatic document feeder (DADF)
37 Selecting print media
37 Guidelines to select the print media
37 Loading paper in the tray
37 Standard tray / optional dual cassette feeder
40 Optional high capacity feeder
42 Multi-purpose tray
44 Media sizes automatically detected
45 Printing on special media
45 Envelope
46 Transparency
46 Labels
47 Card stock/ Custom-sized paper

contents
47 Letterhead/Preprinted paper
47 Glossy
47 Tray setting
47 Setting the paper size
48 Setting the paper type
48 Auto tray switch
48 Auto continue
48 Paper substitution
49 Tray priority setting
49 Setting the tray confirmation message
COPYING
50
50 Understanding the copy screen
50 Basic tab
51 Advanced tab
51 Image tab
52 Basic copy
53 Copying different sized originals
54 Changing the settings for each copy
54 Selecting the paper supply tray
55 Reducing or enlarging copies
55 Copying multiple sides
56 Selecting the color mode (CLX-9252 9352 Series only)
56 Deciding the form of copy output
60 Changing the darkness
60 Proof copying
61 Using special copy features
61 Selecting the size of originals
61 Selecting the orientation of originals
62 ID card copying
63 N-up copying
66 Image Repeat
66 Image shift copying
68 Booklet copying
69 Book copying
70 Cover copying
70 Transparency copying
71 Watermark
71 Overlay
72 Stamp
73 Poster copying
73 Selecting duplex scan speed
74 Setting job completion notification
74 Build job
74 Selecting the type of originals
75 Erasing edges
75 Changing the sharpness
76 Changing the contrast
76 Copying in a mirror image
77 Adjusting background
77 Erasing backside Images
78 Copying in a negative image
79 Using a programs setting
79 Saving Programs
79 Using Programs
79 Managing Programs
80 Using previous settings
80 Saving documents
Contents_ 4

contents
81 Using the Quick Copy menu
SCANNING
82
82 Basic scanning method
82 Understanding the scan methods
83 Scanning originals and sending through email (scan to email)
83 Understanding the Scan to Email screen
85 Sending a scanned image to several destinations as an email attachment
85 Entering email addresses
86 Resending the latest email address
86 Printing an email confirmation report
87 Scanning originals and sending via SMB/WEBDAV/FTP (scan to
server)
87 Understanding the Scan to Server screen
89 Scanning and sending to SMB/WEBDAV/FTP server
89 Entering server addresses
91 Resending the latest server address
91 An example of security configuration for anonymous user on SMB server.
93 Scanning originals and sending to a USB memory device (scan to
USB)
93 Understanding the Scan to USB screen
94 Scanning to a USB memory device
95 Attaching stored documents
95 Sending a stored document
95 Previewing image to be scanned
95 Using the Preview button
96 Changing the scan feature settings
96 Scanning from both sides of originals
96 Changing the resolution
96 Selecting the size of originals
97 Selecting the orientation of originals
97 Delaying a scanned image transmission
98 Book scanning
98 Build job
98 Setting job completion notification
99 Selecting the type of originals
99 Selecting the color mode
100 Changing Darkness
100 Changing Sharpness
100 Changing Contrast
100 Adjusting background
101 Erasing backside Images
101 Scan to Edge
101 Quality
101 Scan Preset
102 File Format
102 File Name
102 File Policy
103 Folder Creation
103 Using a programs setting
103 Saving Programs
103 Using Programs
103 Managing Programs
103 Using previous settings
104 Saving documents
105 Scanning originals and sending to your computer (scan to PC)
105 For a network connected machine
105 Using Samsung Scan and Fax Manager 2
Contents_ 5

contents
106 Scan Assistant
107 Scanning with TWAIN-enabled software
107 Macintosh scanning
107 Scanning with network
107 Linux scanning
107 Scanning
108 Adding Job Type Settings
108 Using the Image Manager
FAXING (OPTIONAL)
110
110 Preparing to fax
110 Using a fax in your computer
110 Sending a fax (Windows)
111 Checking a sent fax list (Windows)
111 Sending a fax (Macintosh)
112 Understanding the fax screen
112 Basic tab
112 Advanced tab
113 Image tab
113 Sending a fax
113 Setting the fax header
113 Sending a fax
114 Sending a fax using speed dial numbers
114 Sending a fax manually using On Hook
114 Sending a fax manually using an extension telephone
114 Resending Automatically
115 Redialing the last number
115 Delaying a fax transmission
116 Sending a priority fax
116 Receiving a fax
116 Changing the receive modes
116 Receiving manually in Telephone mode
117 Receiving automatically in Answering Machine/Fax mode
117 Receiving faxes manually using an extension telephone
117 Receiving in secure receiving mode
118 Selecting a received fax output tray
118 Printing received faxes on both sides of the paper
118 Receiving faxes in memory
119 Adjusting the document settings
119 Selecting the size of originals
119 Faxing on both sides of originals
120 Selecting the orientation of originals
120 Changing the resolution
121 Selecting the type of originals
121 Selecting the color mode
121 Changing the darkness
121 Adjusting background
122 Erasing backside images
123 Forwarding a fax to another destination
123 Understanding the Fax Forward Settings options
123 Setting the fax forwarding
123 Setting the junk fax
124 Printing a fax report
125 Using a programs setting
125 Saving Programs
125 Using Programs
126 Managing Programs
126 Using previous settings
Contents_ 6

contents
127 Saving documents
SETTING UP AN ADDRESS BOOK
128
PRINTING
137
128 Setting up an address book using the control panel
128 Storing Individual address (Fax, E-Mail)
128 Storing Individual address (SMB, FTP, WebDAV)
129 Editing Individual address
129 Storing Group address
130 Editing Group address
130 Searching Address Book for an entry
131 Deleting an entry in an Address Book
131 Checking Address Book for an entry
132 Setting up an address book using SyncThru™ Web Service
132 Storing on your local machine
137 System requirements
137 Windows
137 Macintosh
137 Linux
138 UNIX
138 Introducing useful software programs
138 Samsung Anyweb Print
138 Printer driver features
138 PCL printer driver
138 XPS printer driver
139 PostScript printer driver
139 Basic printing
139 Canceling a print job
140 Opening printing preferences
140 Print Mode
141 Basic tab
142 Paper tab
143 Graphics tab
145 Finishing tab
146 Advanced tab
147 Eco tab
147 Samsung tab
148 Using a favorite setting
148 Using help
149 Setting Device Options
151 Using special print features
151 Printing multiple pages on one sheet of paper
151 Printing posters
151 Printing booklets
152 Printing on both sides of the paper
152 Change the size by percentage of your document
152 Fitting your document to a selected paper size
152 Using watermarks
153 Using overlay
154 Banner Printing
155 Using direct printing utility
155 What is Direct Printing Utility?
155 Printing
155 Using the right-click menu
155 Changing the default print settings
156 Setting your machine as a default machine
156 Printing to a file (PRN)
Contents_ 7

contents
157 Macintosh printing
157 Printing a document
157 Activating optional devices or accessories
157 Changing printer settings
160 Printing multiple pages on one sheet of paper
160 Printing on both sides of paper
161 Linux printing
161 Printing from applications
161 Printing files
161 Configuring Printer Properties
162 UNIX Printing
162 Proceeding the print job
162 Changing the printer settings
USING A USB MEMORY DEVICE
164
DOCUMENT BOX
167
164 Understanding the USB screen
164 About USB memory device
165 Printing from a USB memory device
166 Managing usb memory
166 Deleting an image file
166 Formatting a USB memory device
166 Viewing the USB memory capacity
167 Understanding the document box screen
168 Box setting
168 New Box
168 Edit Box
169 Delete Box
169 Saving documents
170 Understanding details of the document box screen
171 Using document box features
171 Selecting the job type
171 Previewing the stored data
172 Adding scanned data
173 Viewing detail information
173 Editing stored data
173 Deleting stored data
174 Sending stored data
177 Printing stored data
177 Printing information of stored data
178 Combining stored data
178 Using the box with SyncThru™ Web Service
178 Box Setting
MANAGEMENT TOOLS
182
Contents_ 8
182 Easy Capture Manager
182 Samsung AnyWeb Print
182 Easy Eco Driver
182 Using Samsung Easy Printer Manager
182 Understanding Samsung Easy Printer Manager
183 Advanced settings user interface overview
183 Using Samsung Printer Status
183 Samsung Printer Status overview
184 Using Samsung Easy Document Creator
184 Understanding Samsung Easy Document Creator
185 Using features
186 Plug-ins

contents
186 Using the Linux Unified Driver Configurator
186 Opening the Unified Driver Configurator
186 Printers configuration
187 Scanners configuration
187 Ports configuration
TROUBLESHOOTING
188
188 Redistributing toner
189 Replacing the toner cartridge
191 Cleaning paper dust stick and chargers of imaging units
195 Replacing the imaging unit
199 Replacing the waste toner container
201 Clearing original document jams
201 Original paper jam in front of scanner
202 Original paper jam inside of scanner
203 Original paper jam while reversing paper in scanner
204 Original paper jam in front of scanner duplex path
206 Original paper jam in exit area of scanner
207 Original paper jam in duplex exit area of scanner
210 Tips for avoiding paper jams
210 Clearing paper jams
210 Paper jam in tray 1
212 Paper jam in tray 2
213 Paper jam in tray 3
214 Paper jam in tray 4
215 Paper jam in optional high capacity feeder
216 Paper jam in the multi-purpose tray
216 Paper jam inside the machine (Jam feed 1)
217 Paper jam inside the machine (Jam feed 2)
217 Paper jam inside the machine (Jam feed 3)
218 Paper jam inside the machine (Jam feed 4)
218 Paper jam inside the machine (Jam Registration)
219 Paper jam inside of the machine (Jam at Fuser out)
219 Paper jam at the top of duplex path (Jam Duplex Return)
220 Paper jam at the top of duplex path (Jam Duplex 1)
220 Paper jam at the inside of duplex path (Jam Duplex 2)
221 Paper jam bottom of duplex path (Jam Duplex Regi.)
221 Paper jam in exit area (Jam Exit Face down)
222 Paper jam in exit area (Jam Exit Face Up)
223 Paper jam inside of finisher during ejecting to top bin
223 Paper jam at finisher’s exit during ejection to the top bin
224 Paper jam inside of finisher during ejecting to main bin
224 Paper jam at finisher’s exit during ejecting to main bin
226 Paper jam inside of finisher bridge
226 Paper jam at entrance of finisher
228 Paper jam around puncher of finisher
228 Paper jam at entrance of booklet maker (3,250-sheet booklet finisher
only)
229 Paper jam inside of booklet maker (3,250-sheet booklet finisher only)
231 Paper jam before booklet folding (3,250-sheet booklet finisher only)
233 Paper jam after booklet folding (3,250-sheet booklet finisher only)
234 Understanding display messages
240 Solving other problems
240 Power and cable connecting problems
240 Display screen problem
241 Paper feeding problems
241 Printing problems
243 Printing quality problems
Contents_ 9

contents
245 Copying problems
246 Scanning problems
246 Scan and Fax Manager 2 Problem
246 Fax problems (optional)
247 Common PostScript problems
247 Common Windows problems
248 Common Linux problems
249 Common Macintosh problems
250 Specifications
251 Electrical specifications
CONTACT SAMSUNG WORLDWIDE
255
GLOSSARY
258
Contents_ 10

about this user’s guide
This user’s guide provides information to provide a basic understanding of the machine as well as detailed explanations on
each step during actual usage. Valuable for both novice and professional users, all users can refer to this guide for
installing and using the machine.
• Read the safety information before using the machine.
• If you have a problem using the machine, refer to the troubleshooting chapter (see "Troubleshooting" on page 188).
• Terms used in this user’s guide are explained in the glossary chapter (see "Glossary" on page 258).
• Use the Index to find information.
• All illustrations in this user’s guide may differ from your machine depending on its options or models.
• The display screen image in this user’s guide may differ from your machine depending on its options or models.
• The procedures in this user’s guide are mainly based on the operating system of Windows XP.
Conventions
Some terms in this guide are used interchangeably:
• Document is synonymous with original.
• Paper is synonymous with media, or print media.
• Machine refers to printer or MFP.
The following table offers the conventions of this guide:
Convention Description Example
Bold Used for texts on the display or button names on the machine. Start
Note Provides additional information or detailed specification of the machine function
and feature.
Caution Gives users information to protect the machine from possible mechanical
damage.
Footnote Provides additional information on certain words or a phrase. a. pages per minute
(“Cross-reference”) Guides users to a reference page for additional detailed information. (see "Finding more information" on page 12).
The date format may differ from country
to country.
Do not touch the green underside of the
toner cartridge.
About this user’s guide_ 11
Finding more information
You can find information for setting up and using your machine from the following resources, either as a print-out or on screen.
Material name Description
Installation Guide This guide provides information on setting up your machine and requires that you follow the instructions in the guide to prepare the
Quick Reference
Guide
Online User’s Guide
Machine Driver Help
Samsung website If you have Internet access, you can get help, support, machine drivers, manuals, and order information from the Samsung website.
Downloadable
softwares
machine.
This guide provides operating procedures and descriptions of the most frequently used functions, allowing the machine to immediately
be used.
This guide provides you with step-by-step instructions for using your machine’s full features and contains information for maintaining
your machine, troubleshooting, and installing accessories.
This help guide provides you with help information on the printer driver and instructions for setting up the printing options (see the
User’s Guide).
(www.samsung.com/printer)
You can download useful softwares from the Samsung website.
• SyncThru
software is for network models only. (http://solution.samsungprinter.com)
• Samsung AnyWeb Print: helps personal users to screen-capture the website screen in Windows Internet Explorer easily.
(http://solution.samsungprinter.com/personal/anywebprint)
• XPS printer driver: used to print XPS file format. The XPS printer driver can be installed only on Windows Vista OS or higher.
(www.samsung.com/printer)
TM
Web Admin Service: convenient for network administrators who need to manage many machines simultaneously. This
About this user’s guide_ 12
features of your new product
Your new machine is equipped with a number of special features that improve the quality of your printed documents.
Special Features
Print with excellent quality and speed
• You can print with a resolution of up to 9,600 x 600 dpi
effective output (600 x 600 x 4 dpi).
• CLX-9352 Series prints A4-sized or letter-sized paper at up
to 35 ppm. CLX-9252 Series prints A4-sized or letter-sized
paper at up to 25 ppm.
• CLX-9352 Series prints A3-sized paper at up to 17 ppm.
CLX-9252 Series prints A3-sized paper at up to 12 ppm.
• SCX-8240 Series prints A4-sized or letter-sized paper at up
to 40 ppm. SCX-8230 Series prints A4-sized or letter-sized
paper at up to 30 ppm.
• SCX-8240 Series prints A3-sized paper at up to 20 ppm.
SCX-8230 Series prints A3-sized paper at up to 15 ppm.
Handle many different types of printable material
• The multi-purpose tray supports various printable materials
(see"Print media specifications" on page 252).
• The multi-purpose tray holds up to 100 sheets of plain paper.
• The 1,040-sheet standard tray and 1,040-sheet optional dual
cassette feeder support plain paper in various sizes.
• The 2,000-sheet optional high capacity feeder supports
various paper types in A4 and letter (see"Print media
specifications" on page 252).
Create professional documents
• Print Posters. The texts and pictures of each page of your
document are magnified and printed across the sheet of
paper and can then be taped together to form a poster (see
"Printing posters" on page 151).
• Print Watermarks. You can customize your documents with
words, such as “Confidential” (see "Using watermarks" on
page 152).
• You can use preprinted forms and letterhead with plain
paper (see"Using overlay" on page 153).
* Zoran IPS Emulation compatible with PostScript 3:
©Copyright 1995-2005, Zoran Corporation. All rights reserved.
Zoran, the Zoran logo, IPS/PS3, and OneImage are trademarks
of Zoran Corporation.
136 PS3 fonts: Contains UFST and MicroType from
Monotype Imaging Inc.
Print in various environments
• You can print on various operating systems such as
Windows, Linux, and Macintosh systems.
• Your machine is equipped with a network interface.
Copy originals in several formats
• Your machine can copy multiple image copies from the
original documents on a single page (see "N-up copying" on
page 63).
• There are special functions to erase catalog and newspaper
background images (see "Adjusting background" on
page 77).
• The print quality and image size can be adjusted and
enhanced at the same time.
Scan the originals and send it right away
• Scan in color and use precise compressions of JPEG, TIFF,
and PDF formats.
• Quickly scan and send files to multiple destinations using
Networks scanning (see "Scanning" on page 82).
Save time and money
• To save paper, you can print multiple pages on one single
sheet of paper (see "Printing multiple pages on one sheet of
paper" on page 151).
• This machine automatically conserves electricity by
substantially reducing power consumption when not in use.
• To save paper, you can print on both sides of the paper
(double-sided printing) (see "Printing on both sides of the
paper" on page 152).
Expand your machine’s capacity
• Your machine has an extra memory slot to expand its
memory (see Supplies and Accessories).
• Zoran IPS Emulation* compatible with PostScript 3 (PS)
enables PS printing.
Features of your new product_ 13
Set a specific time to transmit a fax (optional)
• You can specify a certain time to transmit a fax and also
send the fax to several stored addresses.
• After transmission, the machine may print out the fax reports
according to the setting.
Use USB flash memory devices
If you have a USB memory device, you can use it various ways
for your machine.
• You can scan documents and save them to the device.
• You can directly print data stored in the device (see
"Printing from a USB memory device" on page 165).

Features by models
The machine is designed to support all of your document needs from printing and copying to more advanced networking solutions for your business. Some features
and optional goods may not be available depending on models or countries.
Features by models include:
FEATURES SCX-8230 Series SCX-8240 Series CLX-9252 Series CLX-9352 Series
USB Memory Interface ●●●●
Duplex Automatic Document Feeder ●●●●
Hard Disk ●●●●
Network Interface Ethernet 10/100 Base TX wired LAN ●●●●
Duplex (2-sided) printing ●●●●
Right Output Tray ooo●
1,250-sheet Standard Finisher oooo
3,250-sheet Booklet Finisher oooo
Bridge Kit oooo
2/3 Hole Punch Kit oooo
2/4 Hole Punch Kit oooo
Cabinet Stand oooo
Dual Cassette Feeder oooo
High Capacity Feeder oooo
Working Table oooo
Fax Kit oooo
Fax Multiline Kit oooo
FDI Kit oooo
Expansion Memory Module 1G oooo
SmarThru Workflow x oooo
CounThru 2 oooo
Advanced Scan Kit oooo
Scanner Dehumidifying Heater Kit oooo
Cassette Dehumidifying Heater Kit oooo
( ●: Included, o: Optional)
Features of your new product_ 14
1.introduction
These are the main components of your machine:
This chapter includes:
• Machine overview
• Control panel overview
• Understanding the status LED
• Turning the machine on
• Connecting a printer cable
• Adjusting angle of the control panel
• Introducing the display screen and useful buttons
• Understanding the pop-up keyboard
• Using the manual stapler
• Using the pen and paper clip holder
• Viewing the animation for trouble shooting
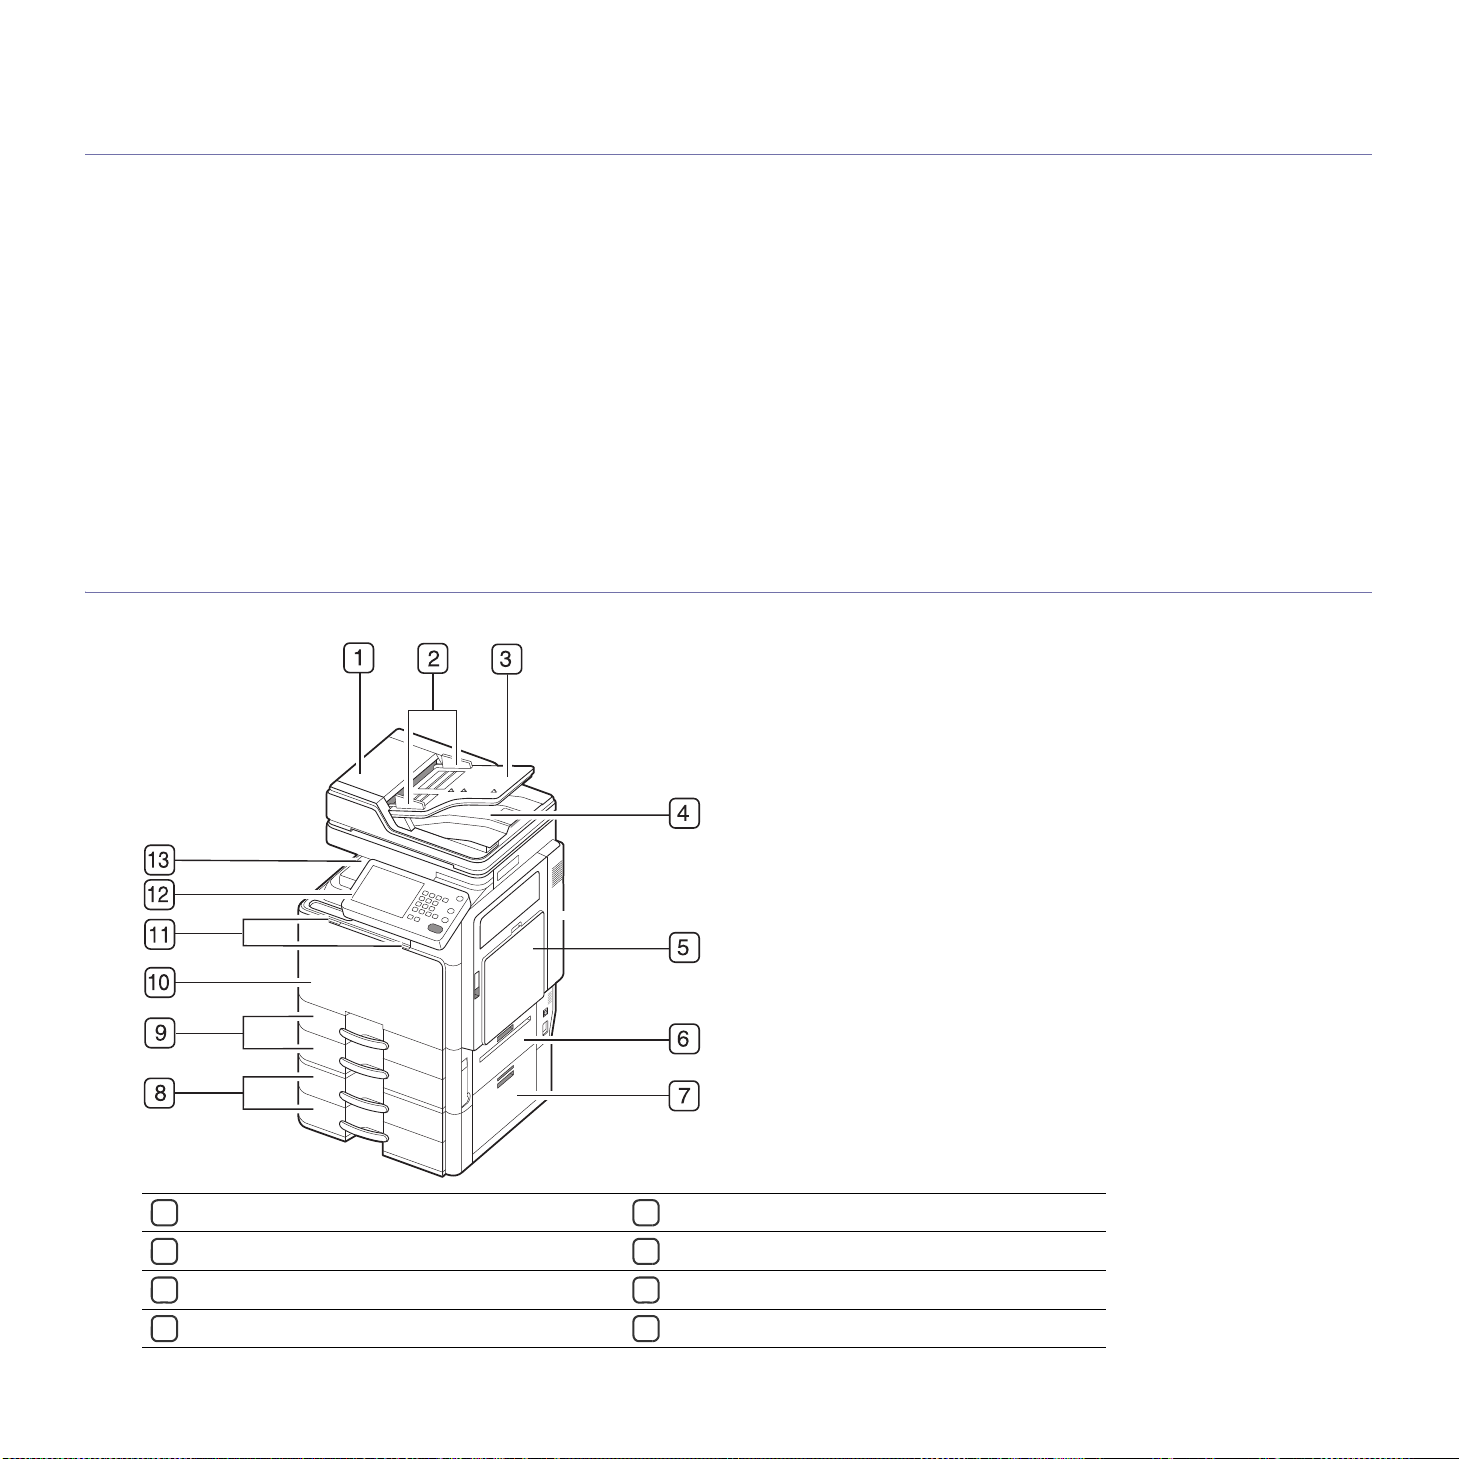
Machine overview
Front view 1
Duplex automatic document feeder cover
1
Duplex automatic document feeder width guides
2
Duplex automatic document feeder input tray
3
Duplex automatic document feeder output tray
4
8
Optional dual cassette feeder (tray 3, tray 4)
Standard tray (tray 1, tray 2)
9
Front door
10
Front door handle
11
Introduction_ 15
a
Multi-purpose tray
5
Standard tray right bottom door
6
Optional dual cassette feeder right bottom door
7
a.Optional device.
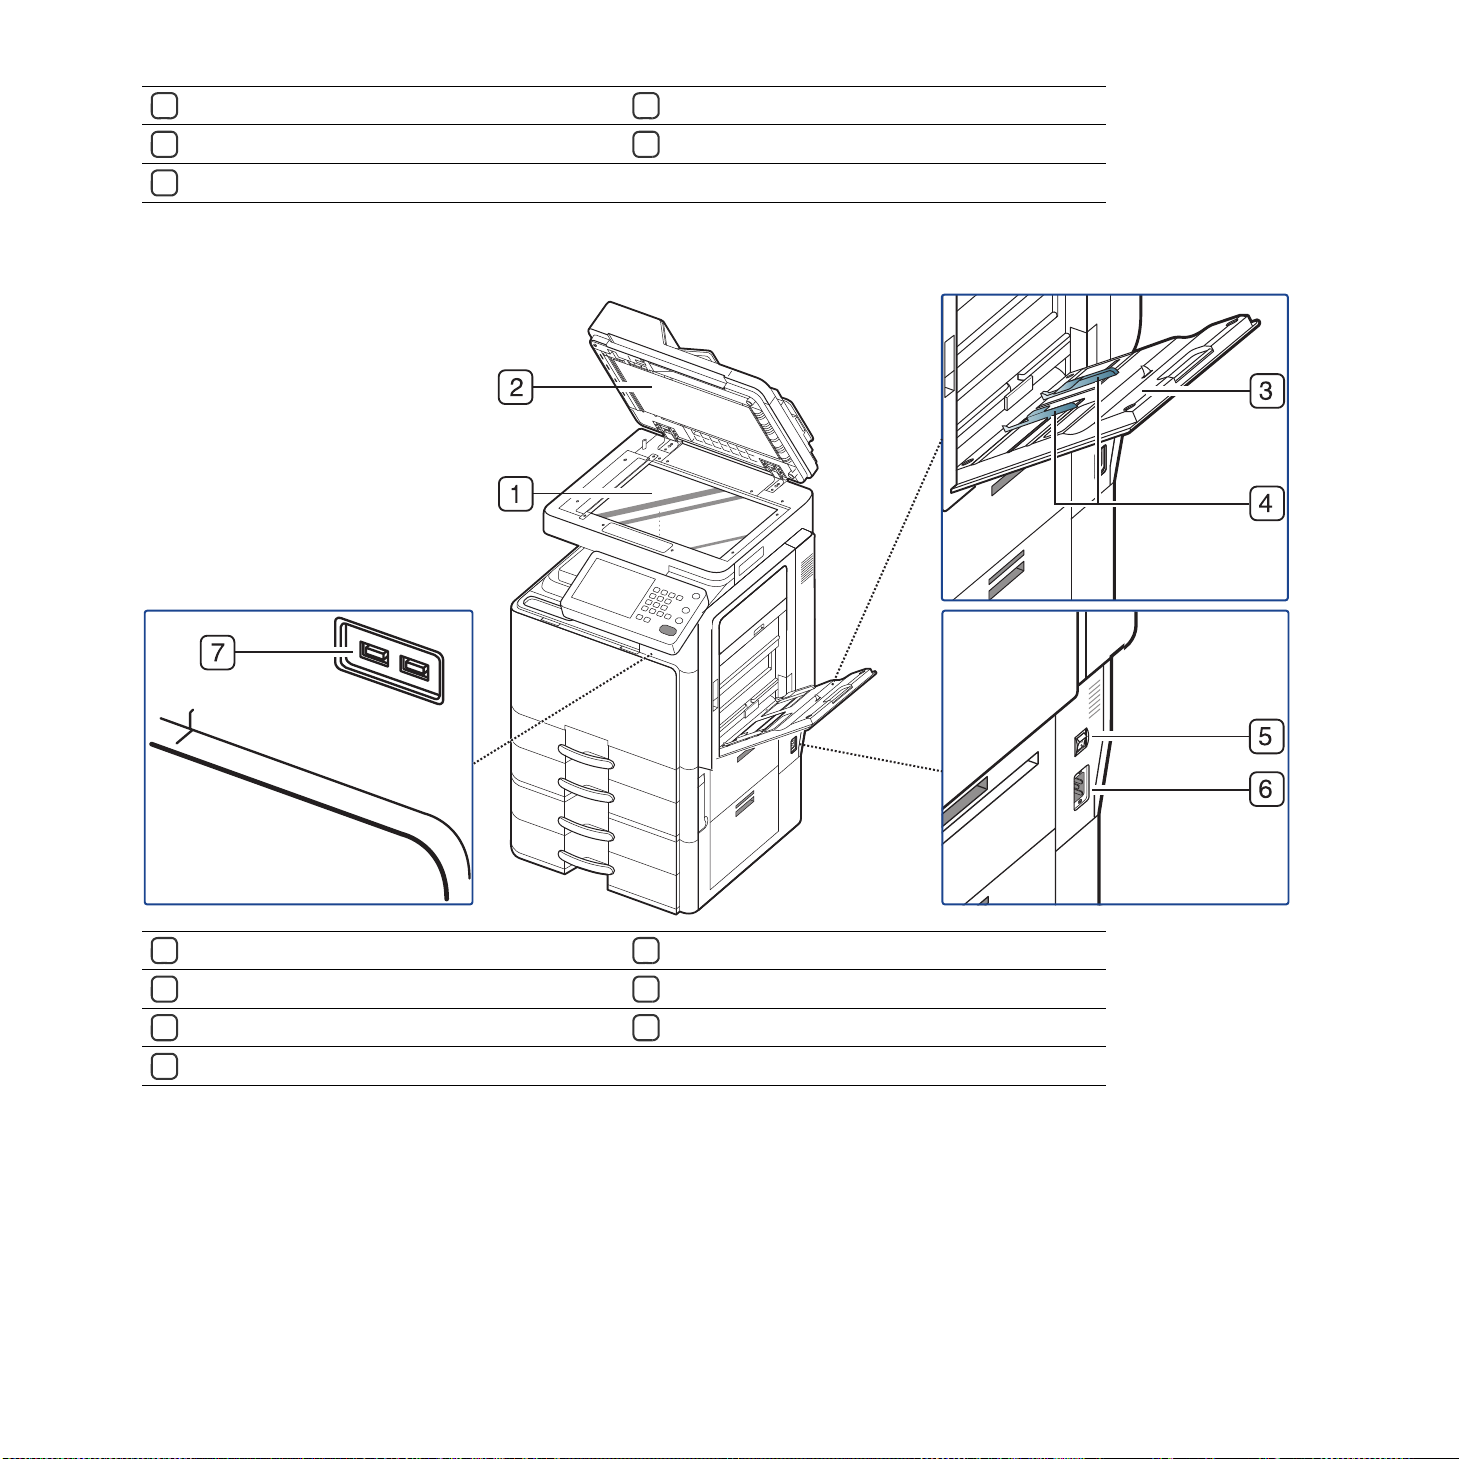
Front view 2
Control panel
12
Center tray
13
Scanner glass
1
White sheet
2
Multi-purpose tray
3
Multi-purpose tray paper width guide
4
Power-switch
5
Power receptacle
6
USB port (2 EA)
7
Introduction_ 16
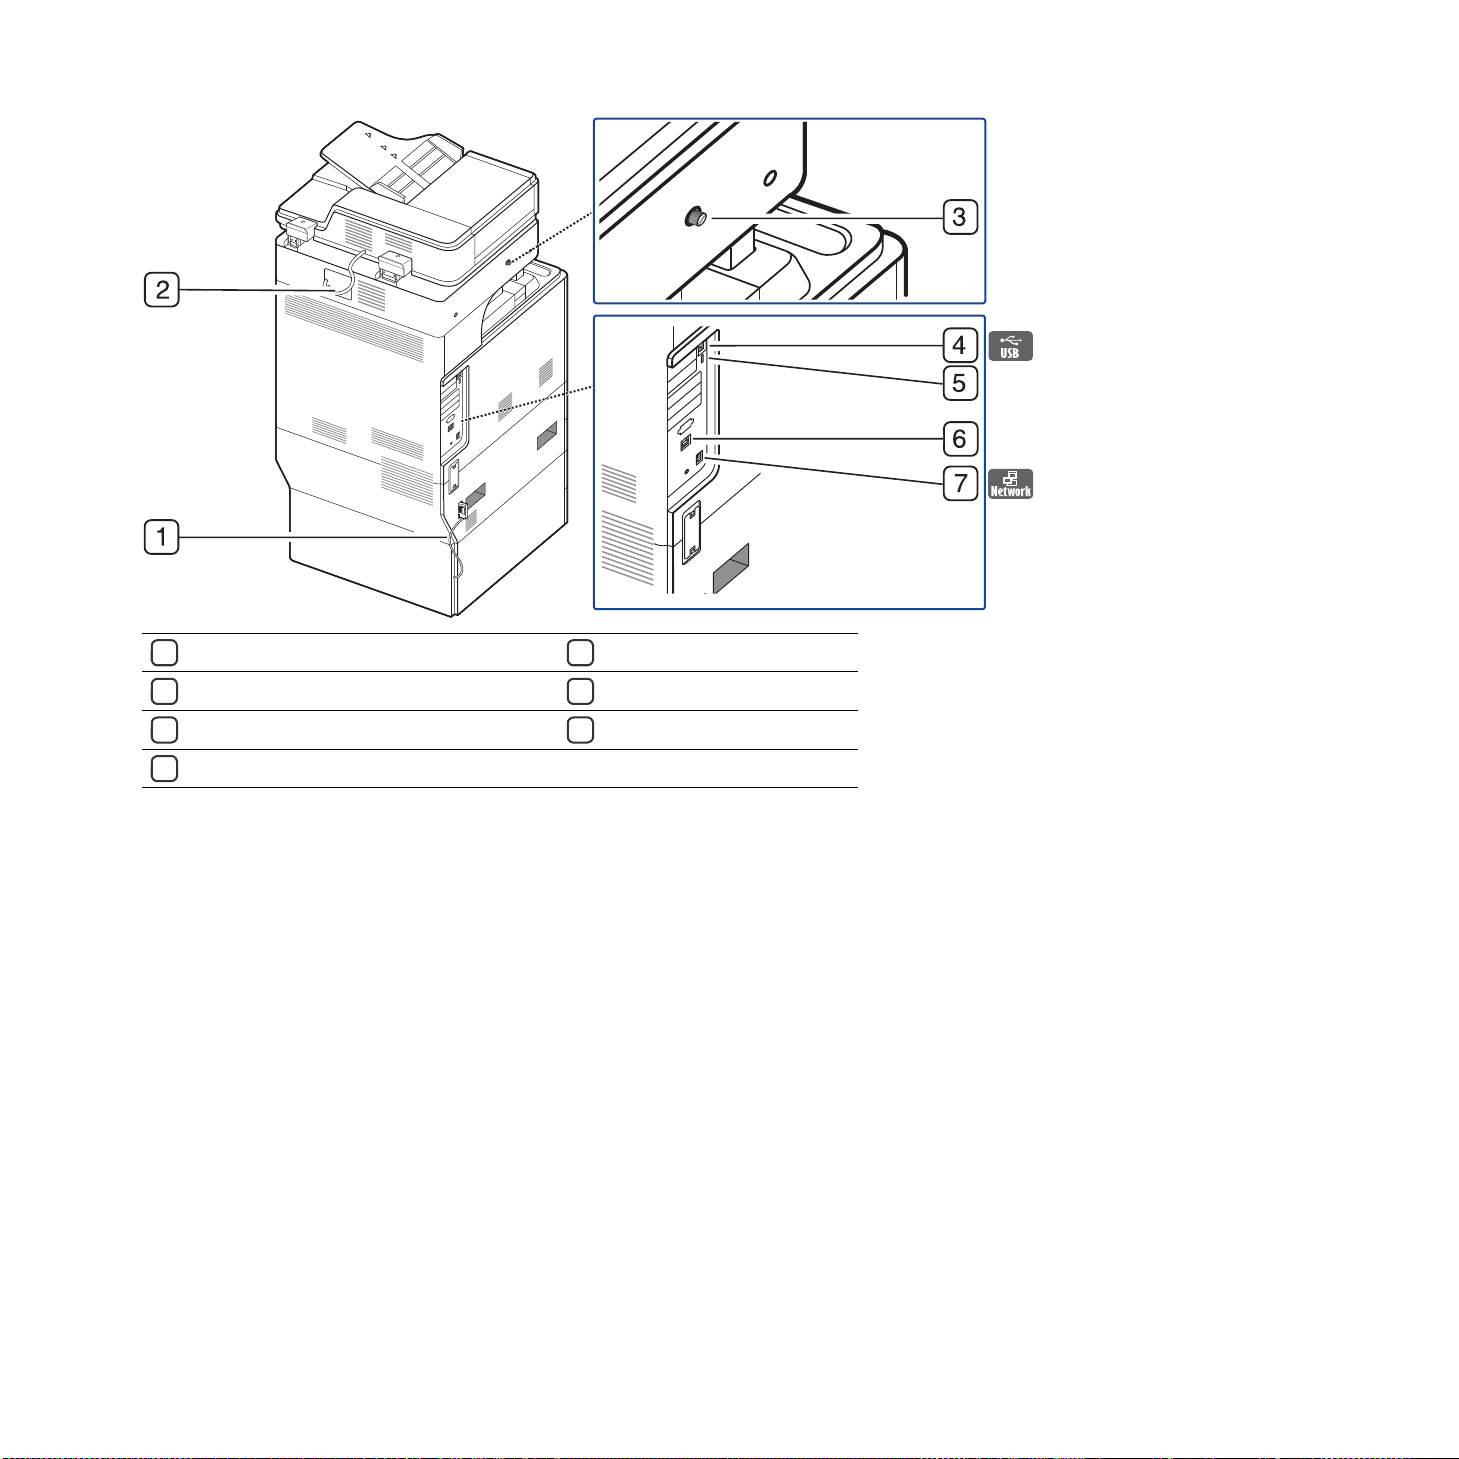
Rear view
Optional dual cassette feeder cable
1
Duplexing automatic document feeder cable
2
Scanner locking screw
3
USB port
4
USB host port
5
Finisher connector
6
Network port
7
Introduction_ 17

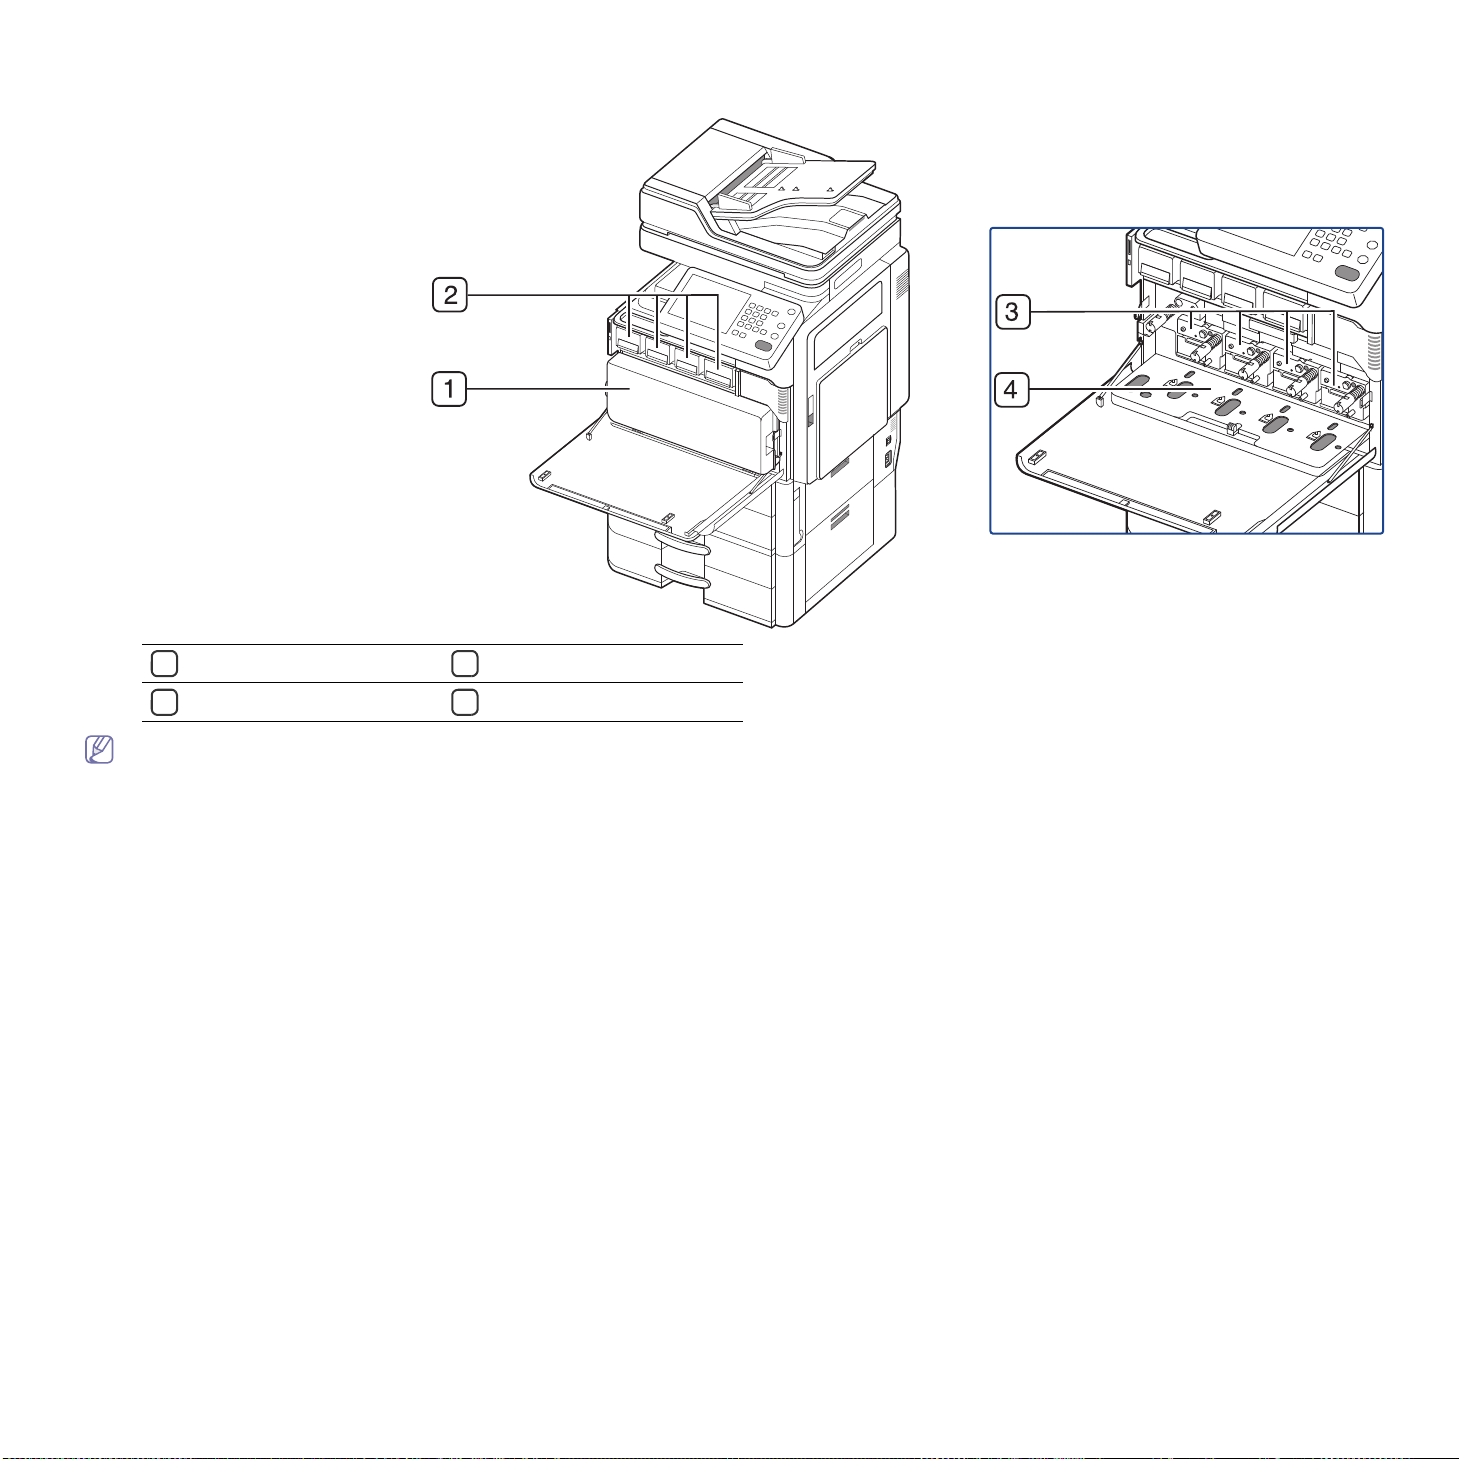
Inner view (CLX-9252 9352 Series)
Waste toner container
1
Toner cartridges
2
Imaging units
3
Inner cover
4
If you want to see the imaging unit, you need to remove the waste toner container. Hold the left/right locking levers and push outward. Then remove the waste
toner container.
Introduction_ 18
Inner view (SCX-8230 8240 Series)
Waste toner container
1
Toner cartridge
2
Imaging unit
3
Locking lever
4
If you want to see the imaging unit, you need to remove the waste toner container. Lift the locking lever upward. Then remove the waste toner container.
Introduction_ 19
View with Standard finisher (optional)
Standard finisher front door
1
Manual stapler
2
Manual stapler button
3
Finishing tray
4
Top tray
5
Top door
6
Standard finisher Front door handle
7
Bridge unit
8
Staple
9
Introduction_ 20
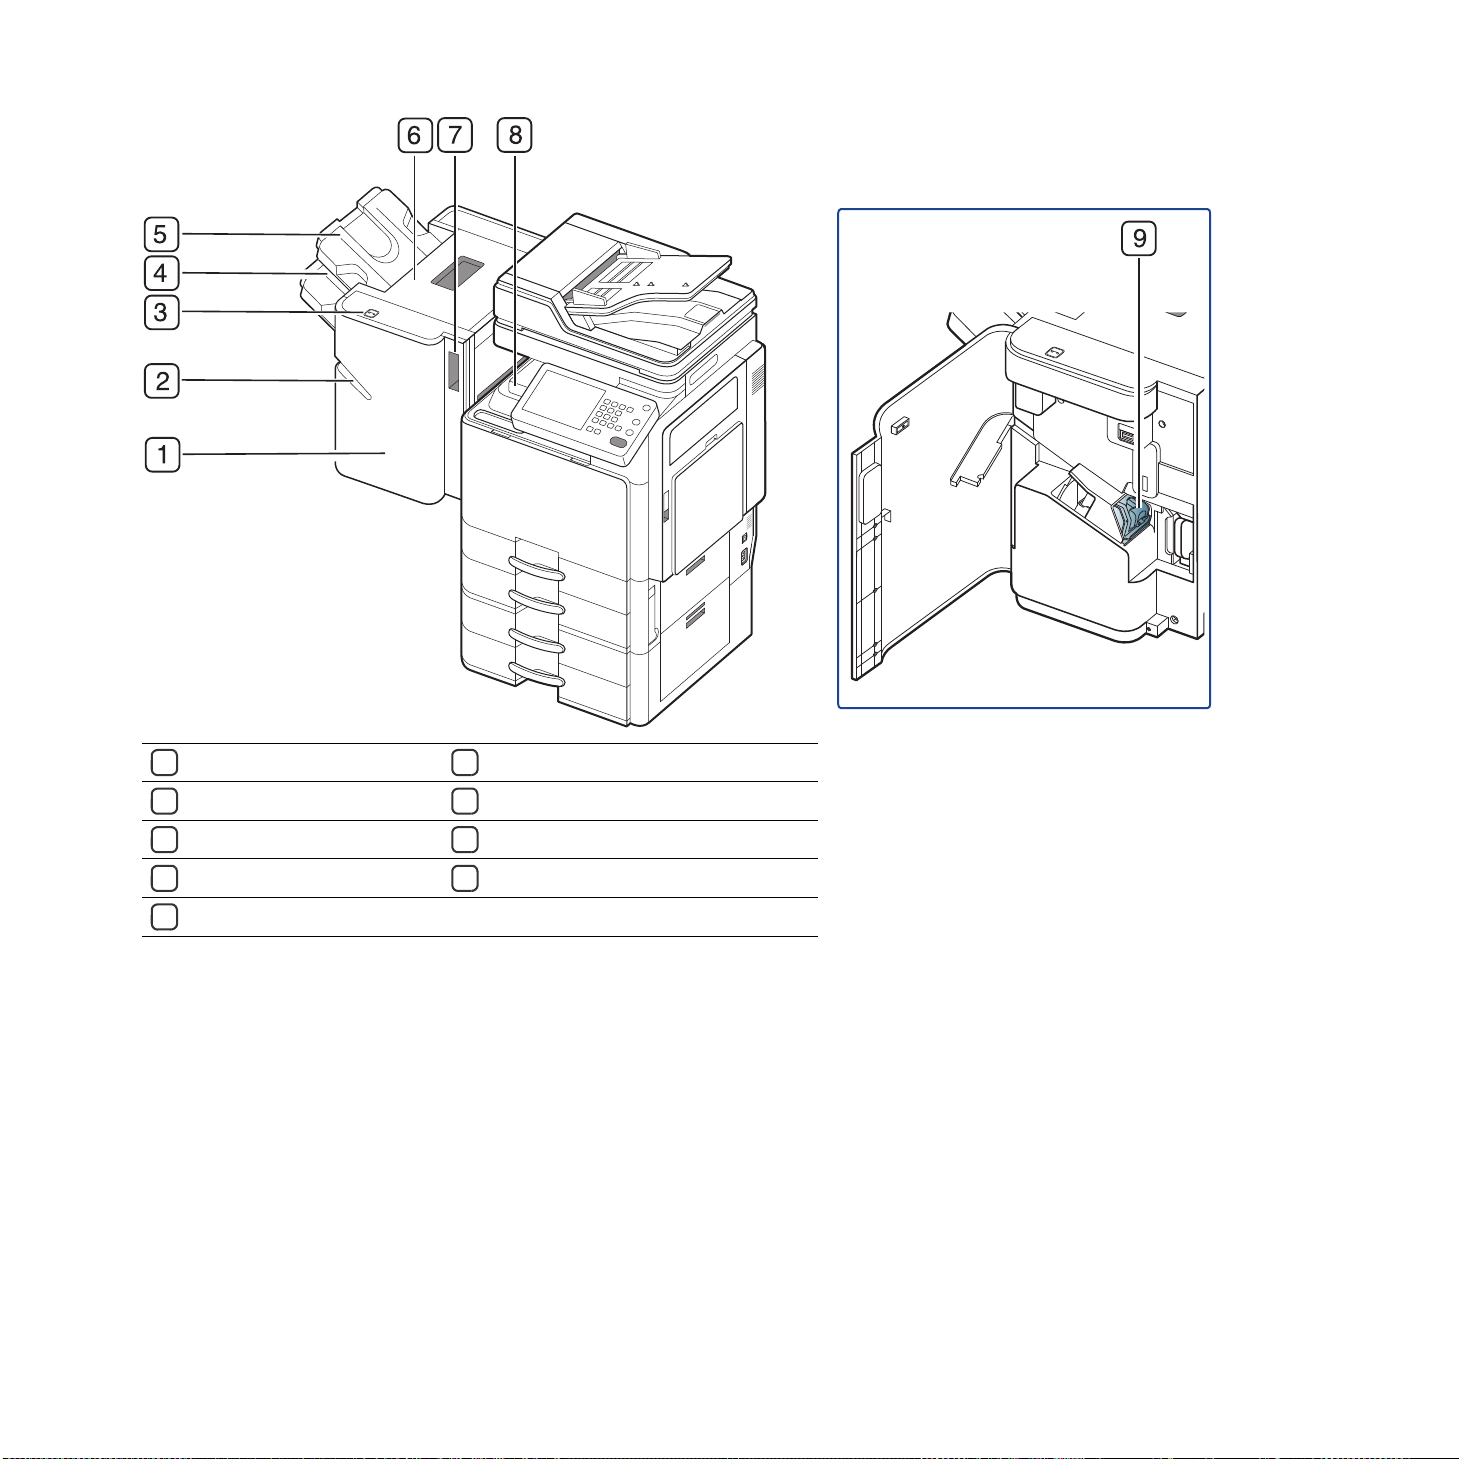
View with Booklet finisher 1 (optional)
Booklet tray
1
Finishing tray
2
Booklet finisher front door
3
Manual stapler
4
Manual stapler button
5
Top tray
6
Top door
7
Booklet finisher front door handle
8
Bridge unit
9
Introduction_ 21
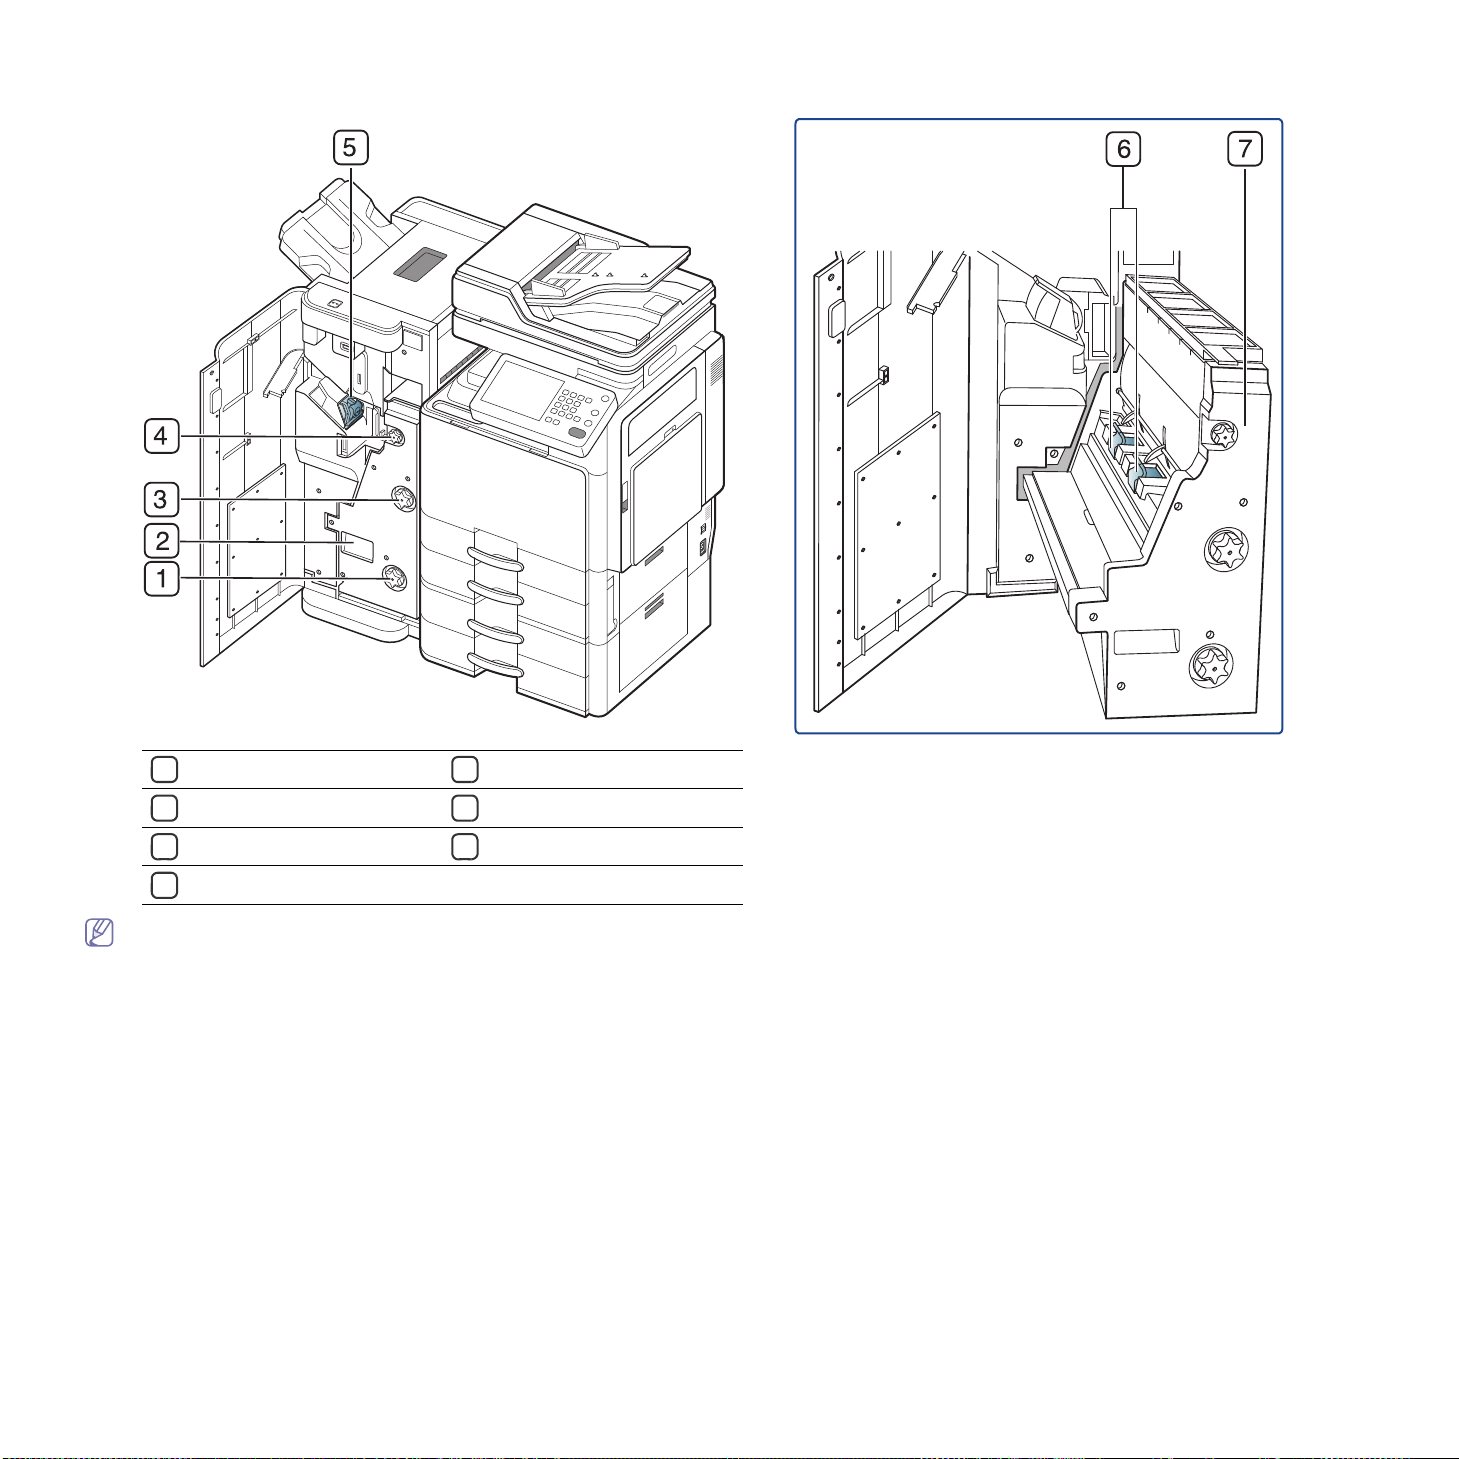
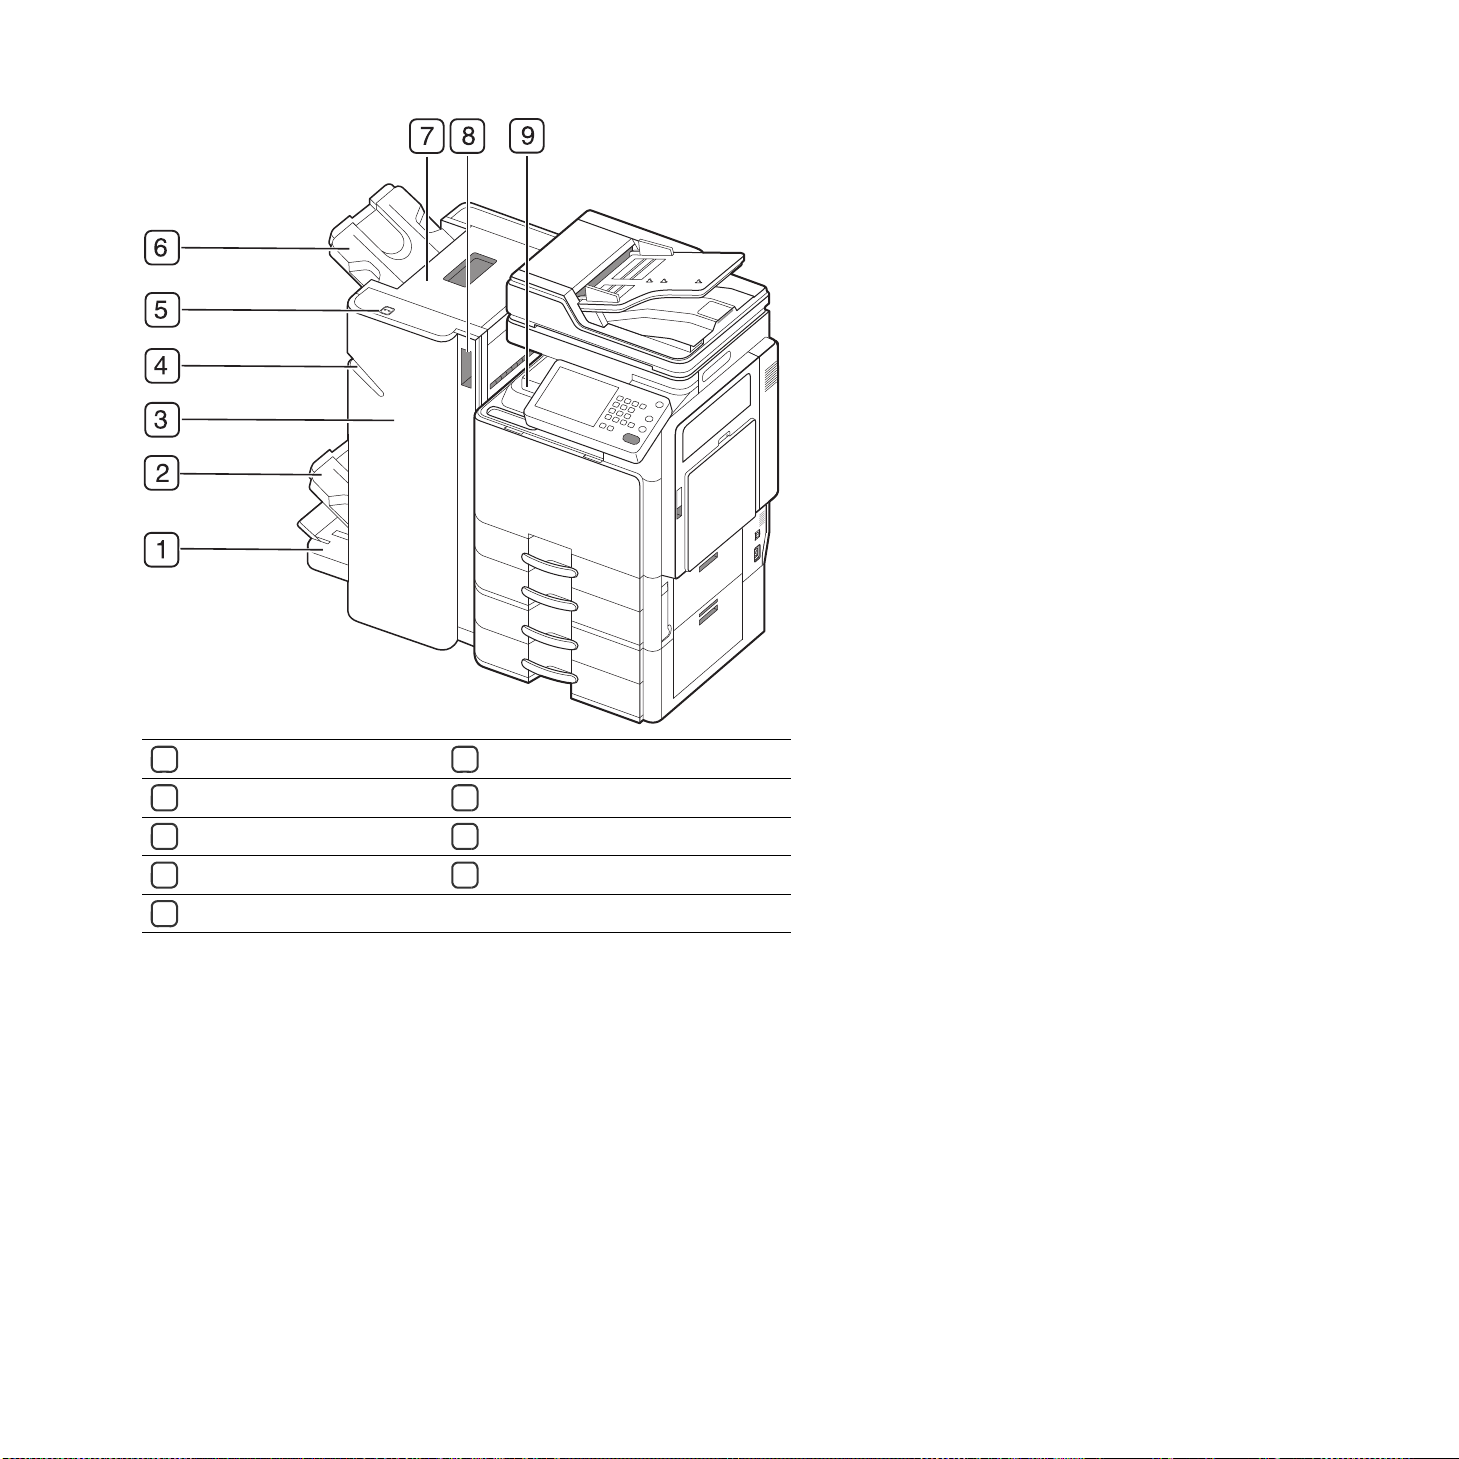
View with Booklet finisher 2 (optional)
Knife wheel
1
Booklet maker handle
2
Fold wheel
3
Booklet jam removal wheel
4
Staple
5
Booklet Staple (2 EA)
6
Booklet maker
7
If you want to open the booklet maker, hold the booklet maker handle and pull it out.
Introduction_ 22
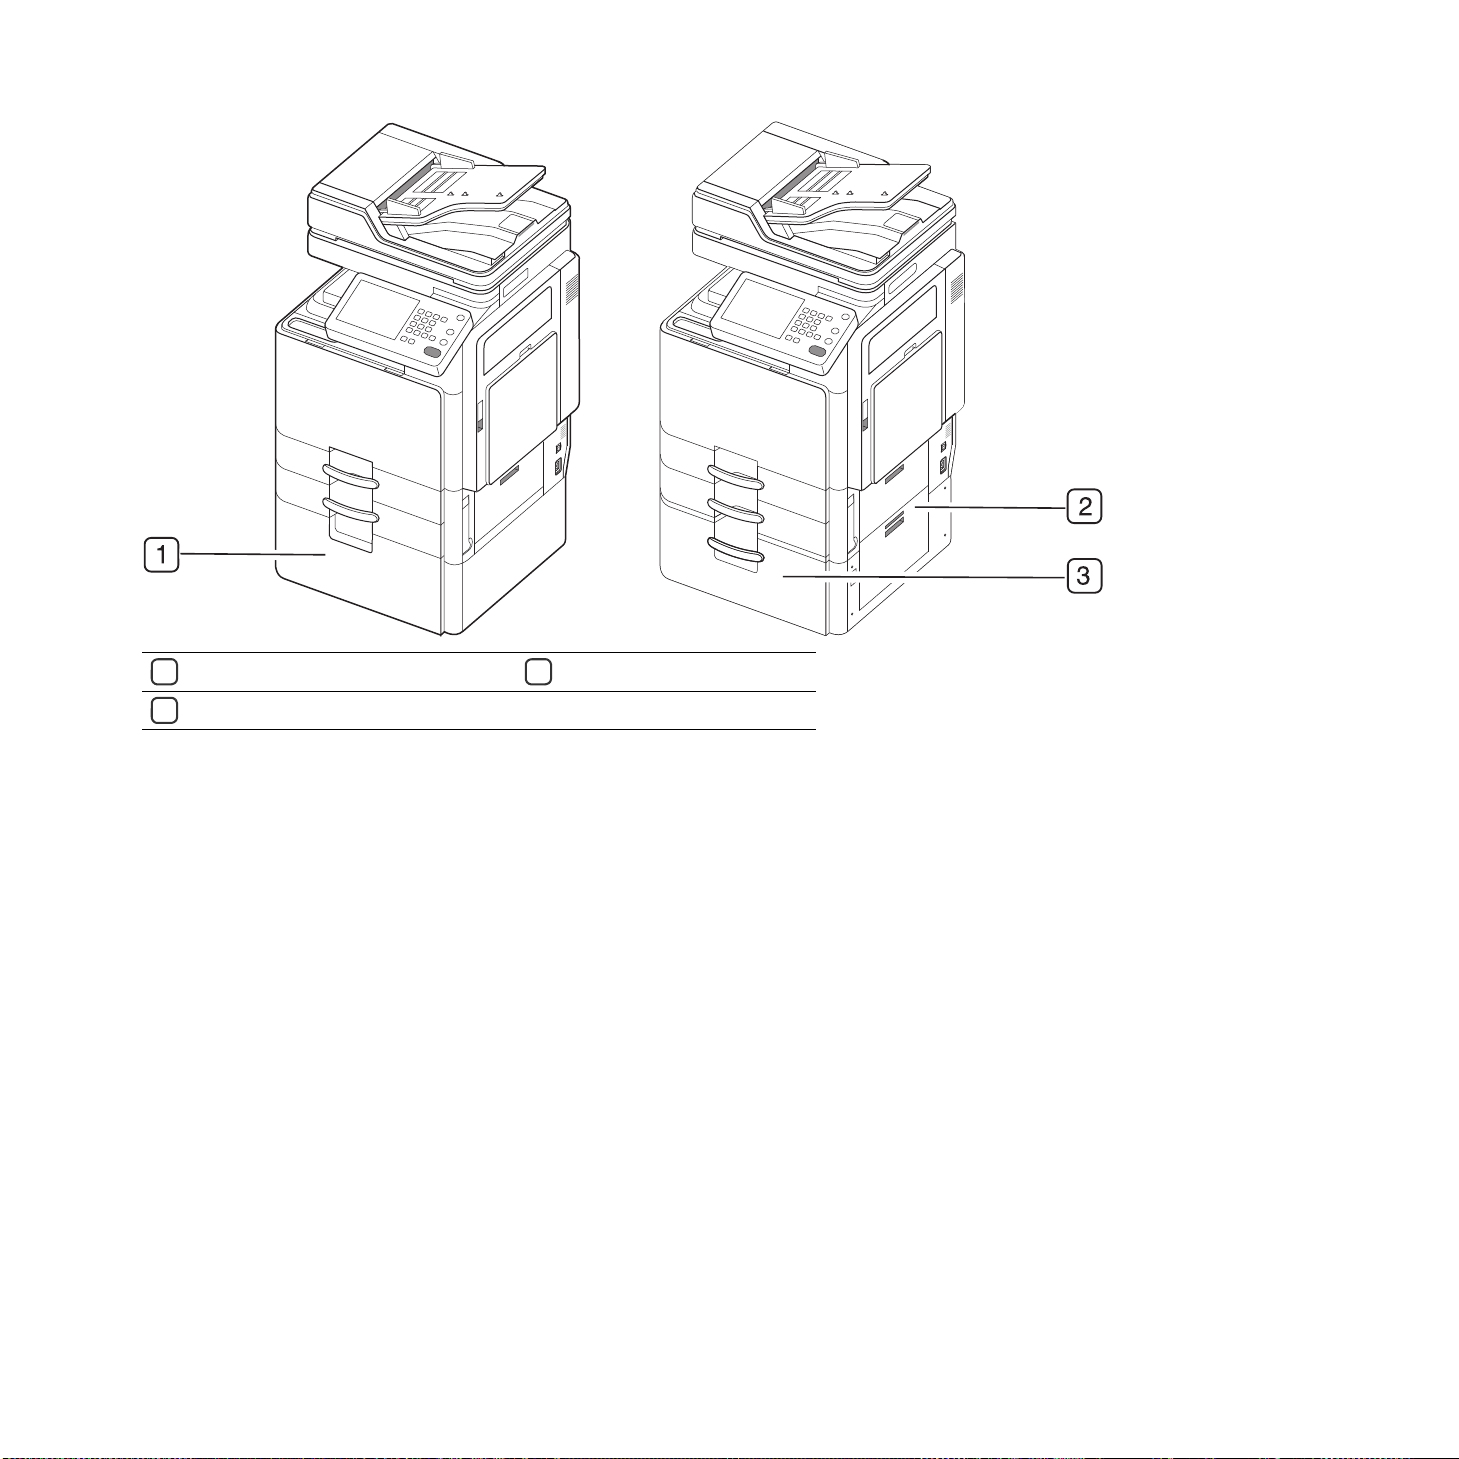
View with Cabinet stand and High capacity feeder (optional)
Cabinet Stand
1
High capacity feeder right bottom door
2
High capacity feeder
3
Introduction_ 23
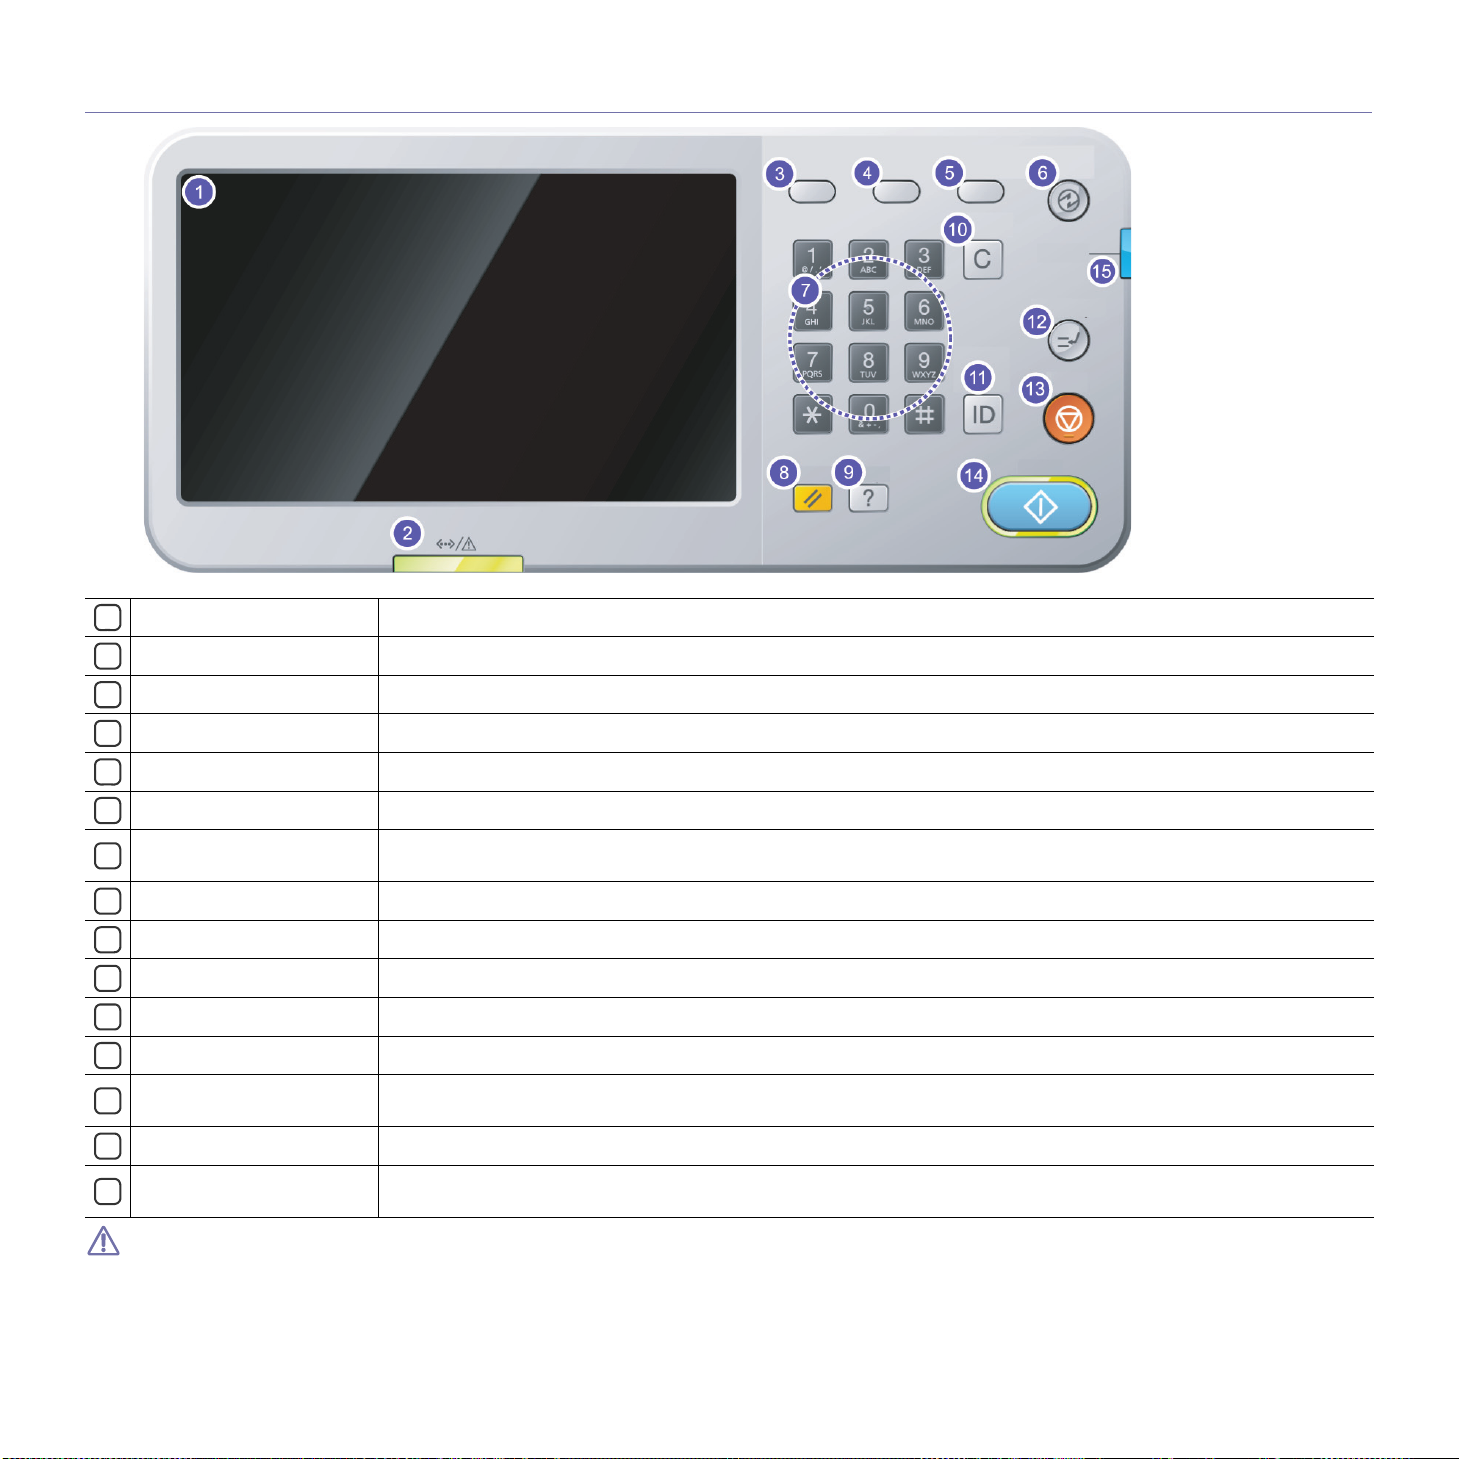
Control panel overview
Display screen
1
Status LED
2
Job Status
3
Counter
4
Eco
5
Power Saver
6
Numeric keypad
7
Reset
8
Help
9
Clear
10
Log out
11
Interrupt
12
Stop
13
Start
14
Power
15
Shows the current machine status and prompts during an operation. You can set menus easily using the display screen.
Shows the status of your machine (See "Understanding the status LED" on page 25).
Shows the jobs currently running, queued jobs, completed jobs, current error code or secured jobs.
Shows the amount of paper used (See "Counter button" on page 29).
Turn into Eco mode (See "Eco button" on page 30).
Turn into power saver mode (See "Power Saver button" on page 32).
Dials numbers and enters alphanumeric characters. You can also enter the number value for document copies or other
options.
Resets the current machine’s setup.
Gives detailed information about this machine’s menus or status.
Deletes characters in the edit area.
Allows user to log out.
Stops a job in operation for urgent copying.
Stops an operation at any time. The pop-up window appears on the screen showing the current job that the user can stop or
resume.
Starts a job.
Turn the power on or off. When the blue LED is on, the machine is powered on and you can use it. If you turn the machine
off, press this button for more than three seconds. Press Yes when the confirmation window appears.
When you use the display screen, use your finger only. The screen may be damaged with a sharpen pen or anything else.
Introduction_ 24

Understanding the status LED
The color of the status LED indicates the machine's current status.
Status
Description
Off • The machine is off-line.
• The machine is in power saver mode. When data is received, or any button is pressed, it switches to on-line automatically.
Green On The machine is on-line and can be used.
Blinking Fax The machine is sending or receiving faxes.
Copy The machine is copying documents.
Scan The machine is scanning documents.
Print • When the status LEDslowly blinks, the machine is receiving data from the computer.
• When the status LED blinks rapidly, the machine is printing data.
Red On • The imaging unit is at the end of its lifespan. Remove the old imaging unit and install a new one.
• The toner cartridge is totally empty. Remove the old toner cartridge and install a new one.
• A paper jam has occurred (see "Clearing paper jams" on page 210).
• The door is open. Close the door.
• There is no paper in the tray. Load paper in the tray (see "Loading paper in the tray" on page 37).
• The machine has stopped due to a major error. Check the display message (see "Understanding display messages" on
page 234).
• The waste toner container is not installed in the machine, or full waste toner container (see "Replacing the waste toner container"
on page 199).
Blinking • A minor error has occurred and the machine is waiting for the error to be cleared. Check the display message
(see "Understanding display messages" on page 234). When the problem is cleared, the machine resumes its original task.
• The toner cartridge, imaging unit, or waste toner container is near the end of its life. Order a new toner cartridge, imaging unit, or
waste toner container. You can temporarily improve print quality by redistributing the toner.
Check the message on the display screen. Follow the instructions in the message or refer to the troubleshooting chater (see "Understanding display
messages" on page 234). If the problem persists, call for service.
Introduction_ 25
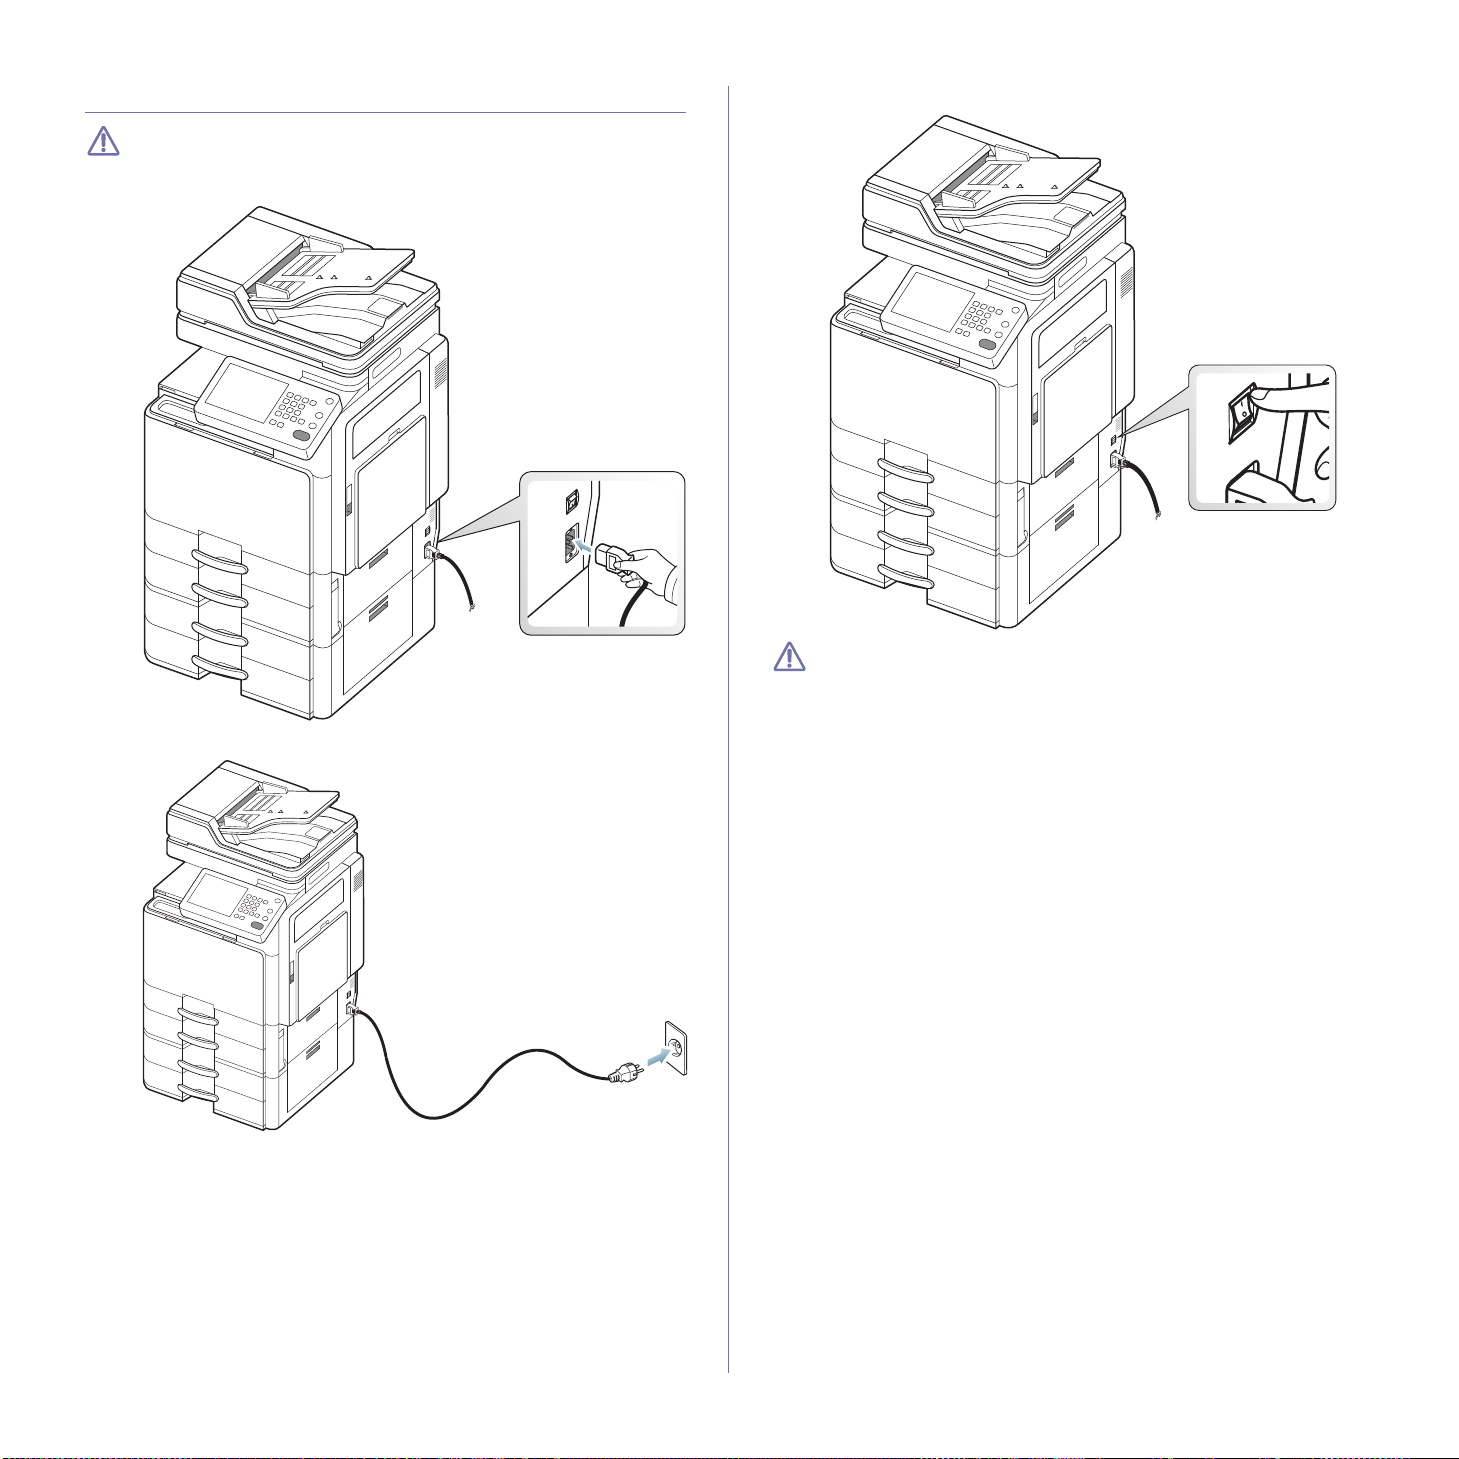
Turning the machine on
Keep in mind that you should use the power cord supplied with the
machine. Otherwise, it can cause damage or fire to the machine.
1. Plug the power cord into the power receptacle.
2. Plug the other end into a properly grounded AC outlet.
3. Turn on the main power switch.
• Some parts inside of the machine may be hot when power is on, or
after printing. Be careful not to burn yourself when working inside
the machine.
• Do not disassemble the machine when it is turned on or plugged
in. Doing so may give you an electric shock.
Introduction_ 26
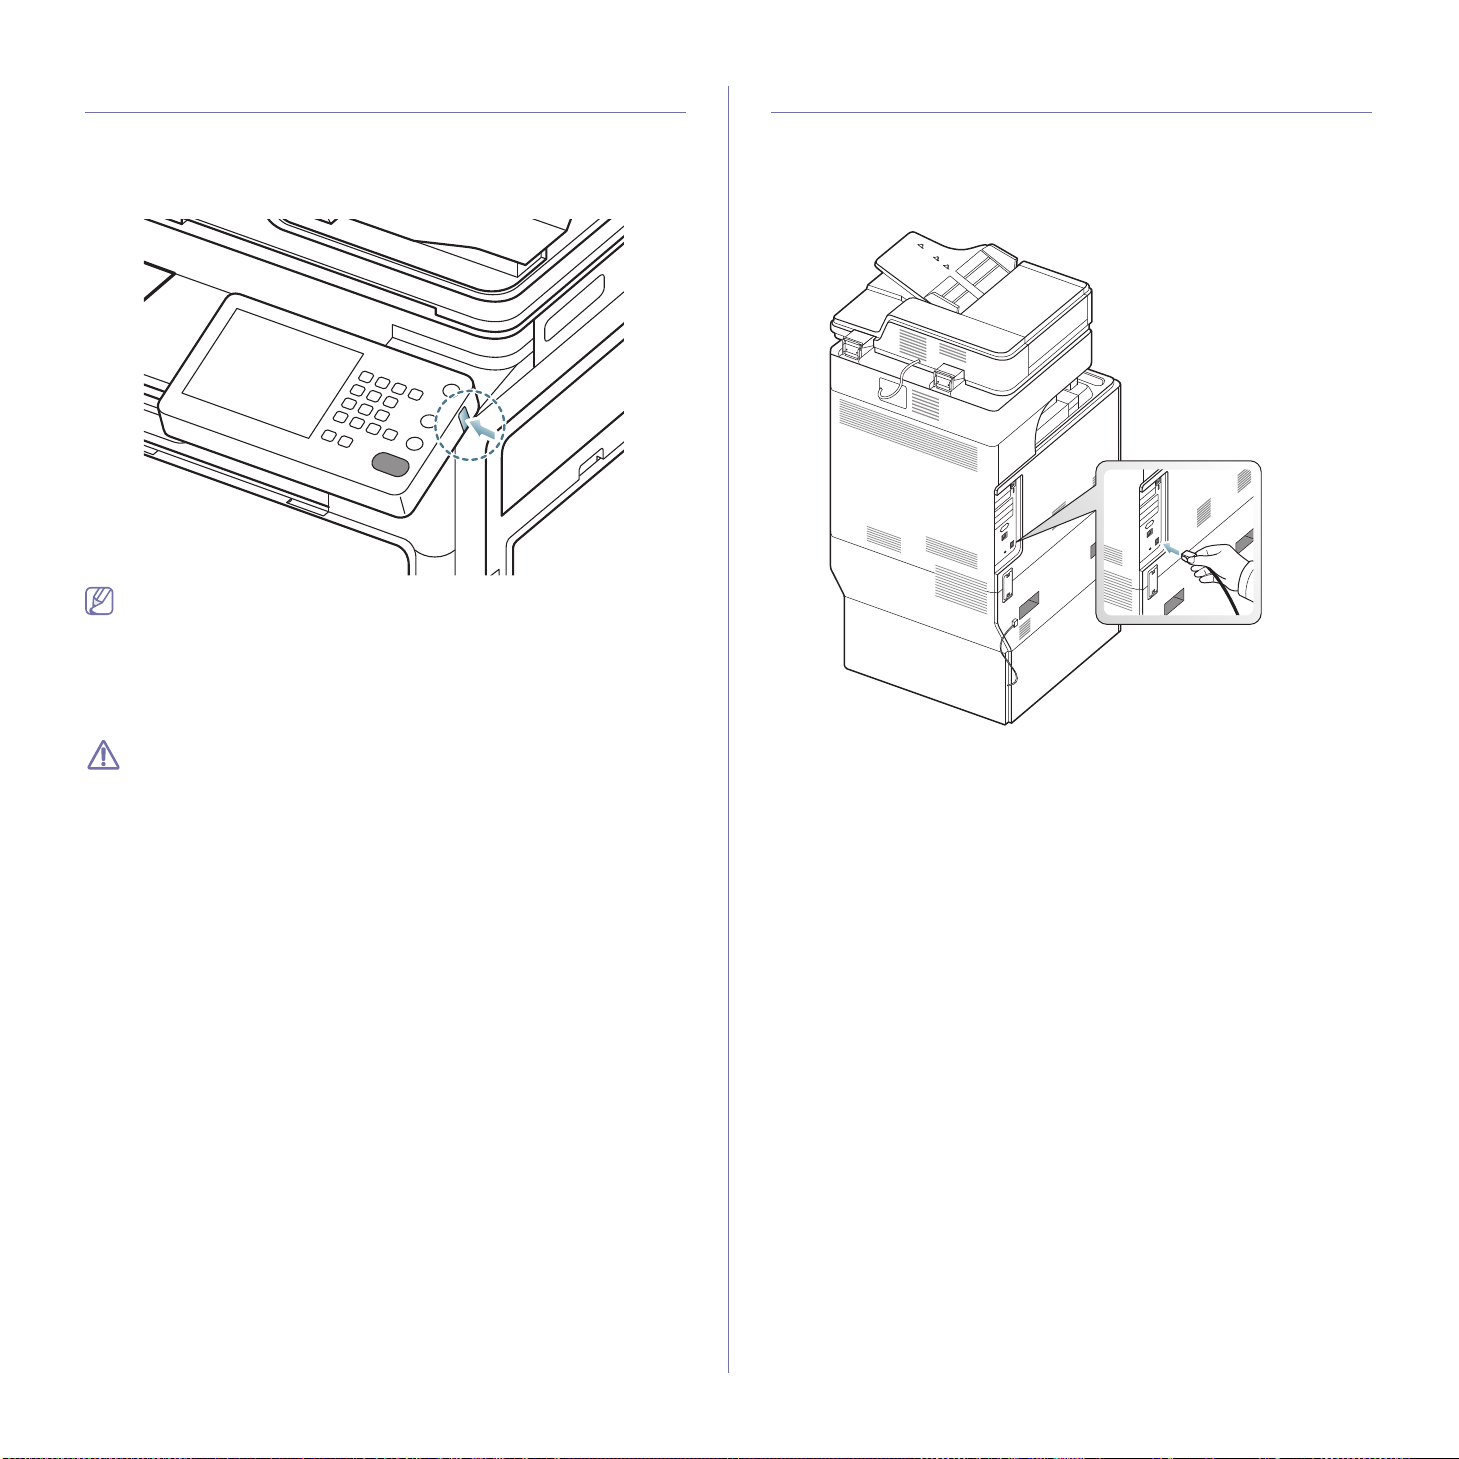
Turning the machine off
Connecting a printer cable
If you need to turn the machine off, press the Power button for more than
three seconds on the right side of the control panel. When the confirmation
window appears, press Yes from the display screen, then wait until power is
turned off automatically.
• The machine has three types of power off mode. Press the
Machine Setup > General Settings > Power Button Operation.
The Power Button Operation option can only be configured by an
authorized user who has registered an ID and a password on the
machine. For detailed information about the power off using the
Power button, refer to the Administrator’s Guide.
• You can also turn the machine on pressing the Power button.
If you turn the machine off directly using the main power switch above
the power receptacle, it could cause the hard disk problem in the
machine.
Using a network cable
This machine has a bulit-in network interface card. You can connect your
machine to a network using a network cable.
Connect your machine to the network with a network cable:
Introduction_ 27
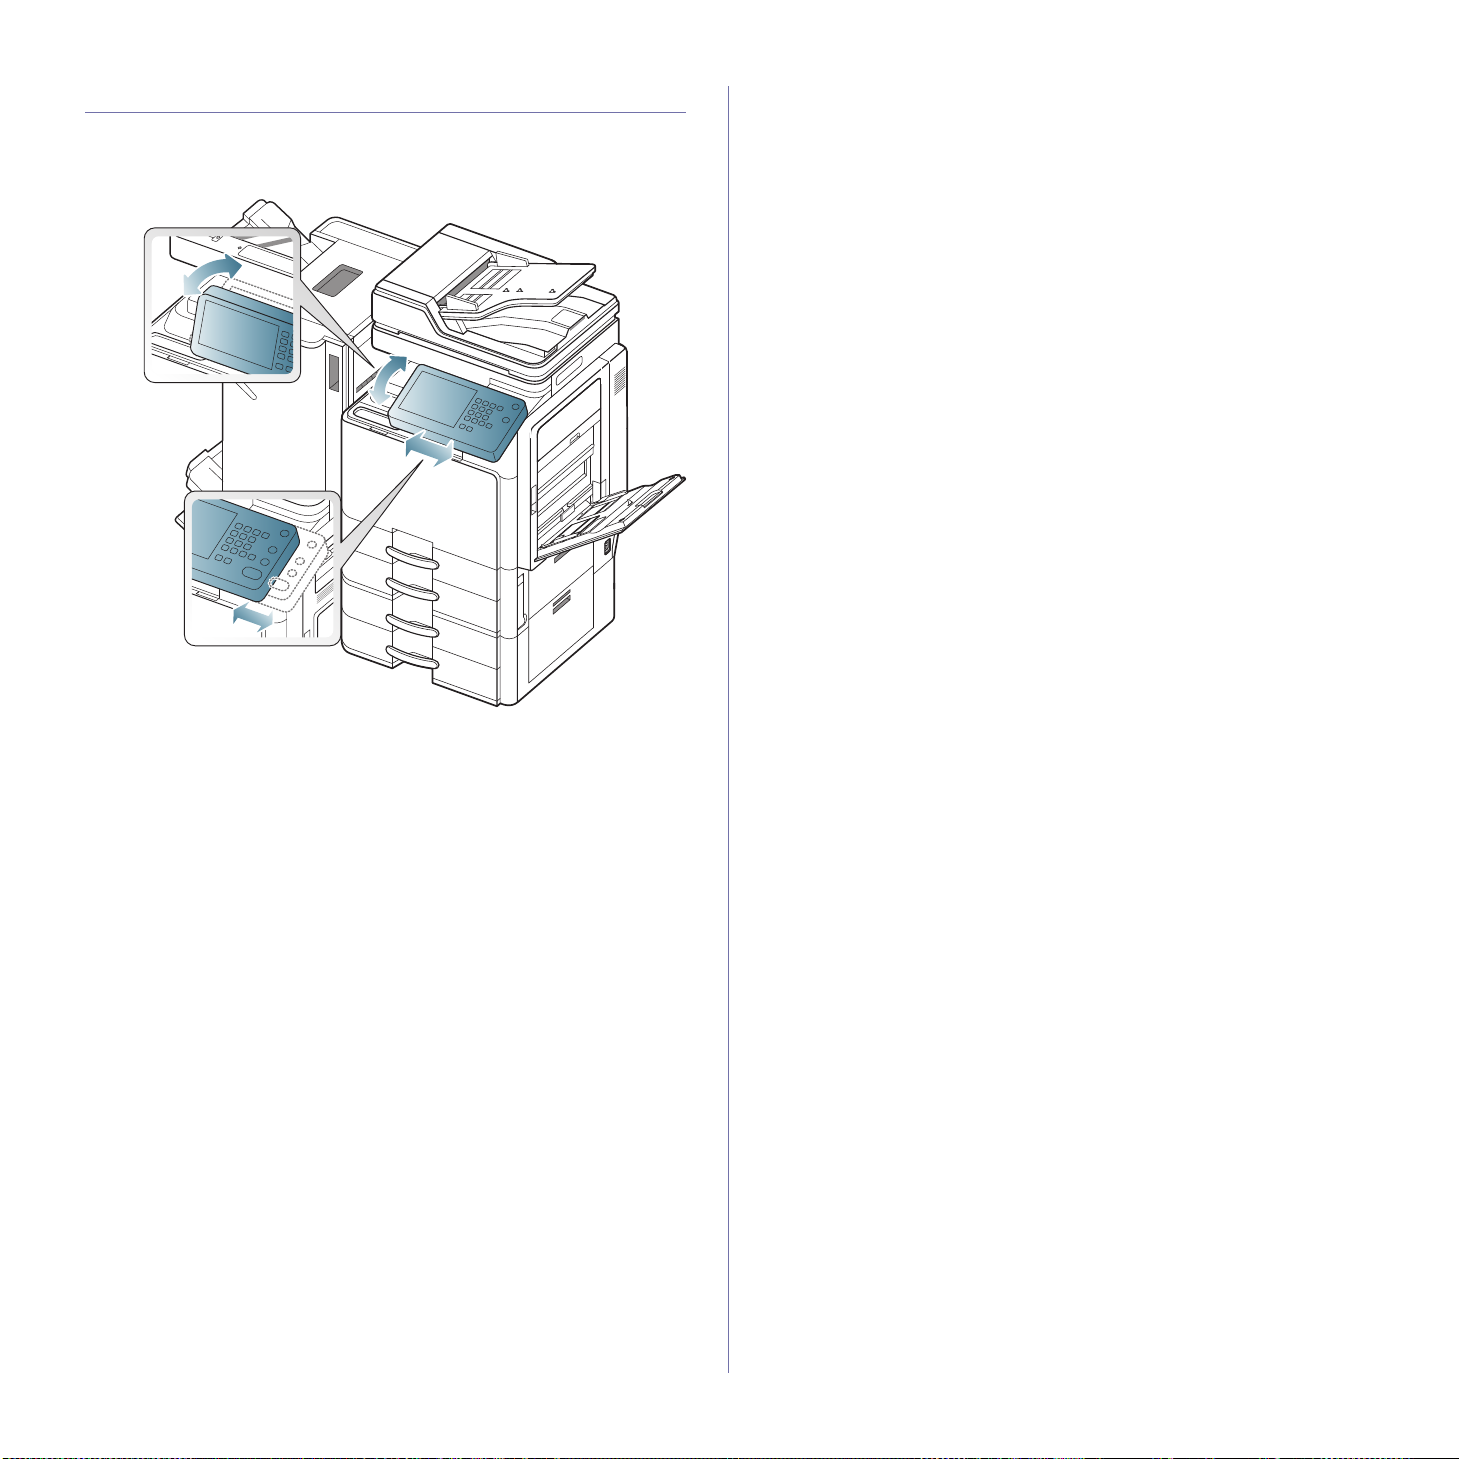
Adjusting angle of the control panel
The display screen could not be seen depending on the angle of the control
panel and light. You can adjust the angle of the control panel to the direction
which you want.
Introduction_ 28
Introducing the display screen and useful buttons
Display screen
The display screen on the control panel allows user-friendly operation of the
machine. Once you press the home icon ( ) on the screen, it shows the
display screen. The display screen image in this user’s guide may differ
from your machine depending on its options or models.
• Icons shown on the display screen such as Fax may be grayed
out, depending on the optional kit or program installed in your
machine.
• To switch to the next display screen, press the right arrow on the
display screen.
• Depending on the authentication setting, the machine’s users have
to enter an ID and a password. In this case, the machine can only
be used by an authorized user who has registered an ID and a
password on the machine. Contact the machine’s administrator.
• : When a USB memory device is inserted into the USB
memory port on your machine, this is activated on the display screen.
When you want to remove USB memory from the machine, press this
button and Stop.
• Quick Copy: Enters the Quick Copy menu (see "Using the Quick Copy
menu" on page 81).
• Scan to PC: Enters the Scan to PC menu (see "Scanning originals and
sending to your computer (scan to PC)" on page 105).
• SmarThru WorkFlow: In order to use this menu, SmarThru WorkFlow
should be installed. For more information, contact your local Samsung
dealer or the retailer where you purchased your machine.
Counter button
When you press the Counter button on the control panel, You can see the
number of impressions.
• USB: Enters the USB menu. When USB memory is inserted into the
USB memory port on your machine, USB is activated on the display
screen (see "Using a USB memory device" on page 164).
• Copy: Enters the Copy menu (see "Copying" on page 50).
• Fax: Enters the Fax menu. Fax is activated on the display screen by
installing optional fax kit (see
• Document Box: Enters the Document Box menu (see "Document
box" on page 167).
• Scan to Email: Enters the Scan to Email menu (see "Scanning
originals and sending through email (scan to email)" on page 83).
• Scan to Server: Enters the Scan to Server menu (see "Scanning
originals and sending via SMB/WEBDAV/FTP (scan to server)" on
page 87).
• Scan to USB: Enters the Scan to USB menu. When USB memory is
inserted into the USB memory port on your machine, Scan to USB is
activated on the display screen (see
a USB memory device (scan to USB)" on page 93).
• Machine Setup: You can browse current machine settings or change
machine values.
Some menus are only configured by an administrator or an
authorized user who has registered ID and password on the
machine by administrator. When the machine requests, enter the
ID and password.
• Toner Info: Shows the amount of toner used.
• LCD Brightness: Adjusts brightness of the display screen.
• : Changes the display language on the display screen.
"Faxing (optional)" on page 110).
"Scanning originals and sending to
When you select Device, you can see the number of impressions by device.
Impression here means one side printing.
• Total Usage:
• Large Page: Displays the total number of impressions with large size
paper.
• Print: Displays the number of impressions by printing.
• Copy: Displays the number of impressions by copying.
• Fax Print: Displays the number of impressions by received faxes.
• Report: Displays the number of report impressions.
• Send Usage: Displays the number of images sent via email, server,
etc.
• Fax Send Usage(PSTN): Displays the number of sent faxes.
• Print: Prints the usage counter report.
When you select User, you can see the number of usage, limit, and
remaining usage by each user. For detailed information about Counter,
refer to the Administrator’s Guide.
Displays the total number of impressions.
Introduction_ 29
Eco button
The eco feature allows you to save print resources and leads you to
eco-friendly printing. When you press the Eco button, the machine turns the
eco mode on or off. If the eco mode is on, you can see the eco image
( )on some features. Some options in the features are not available to
use in the eco mode. For detailed information about eco feature, refer to the
Administrator’s Guide.
• Only administrators have permission for Eco Setting in Machine
Setup.
• If the machine requests a password for eco mode, you need to
enter the password. Contact your administrator.
• The Eco button is activated only for Copy, Quick Copy and
Document Box menus.
Status Description
Off The machine is not in the Eco mode.
Green On The machine is in the Eco mode.
Job Status button
When you press the Job Status button, the screen lists the currently
running, queued, and completed jobs.
• User: Displays the name of the job owner.
• Detail: Displays detailed information of selected job from the list.
• Delete: Removes a selected job from the list.
• Delete All: Removes printing jobs or all jobs from the list. When you
press Print Job Only, all printing jobs are deleted which Job Type is
Host Print.
• Promote: Promotes a selected job from the list when the many jobs
are queued. The selected job cannot be promoted in front of the
progressing job.
You cannot use the Promote button depending on the state of
the job. If the Promote button is inactivated when you select a
job, the job you selected is considerably progressed.
• Job Hold: Holds a selected job from the list.
You cannot use the Job Hold button depending on the state of
the job. If the Job Hold button is inactivated when you select a
job, the job you selected is considerably progressed.
• Release: Releases the held job from the list.
• Close: Closes the job status window.
Completed Job
Displays the list of completed jobs.
Current Job
Displays the list of jobs in progress and pending.
• No: Gives the order of jobs.
• Job Type: Displays type of the job, such as print, copy, fax, etc.
• Status: Displays the current status of each job (see "Meaning of
status" on page 31).
• Job Name: Displays the name of the job.
• No: Gives the order of jobs.
• Job Type: Displays type of the job, such as print, copy, fax, etc.
• Status: Displays the status of each completed job (see "Meaning of
status" on page 31).
• Job Name: Displays the name of the job.
• User: Displays the name of the job owner.
• Detail: Displays detailed information of selected job.
• Close: Closes the job status window.
Introduction_ 30
Loading...