


CLP620ND
Troubleshooting_ 66
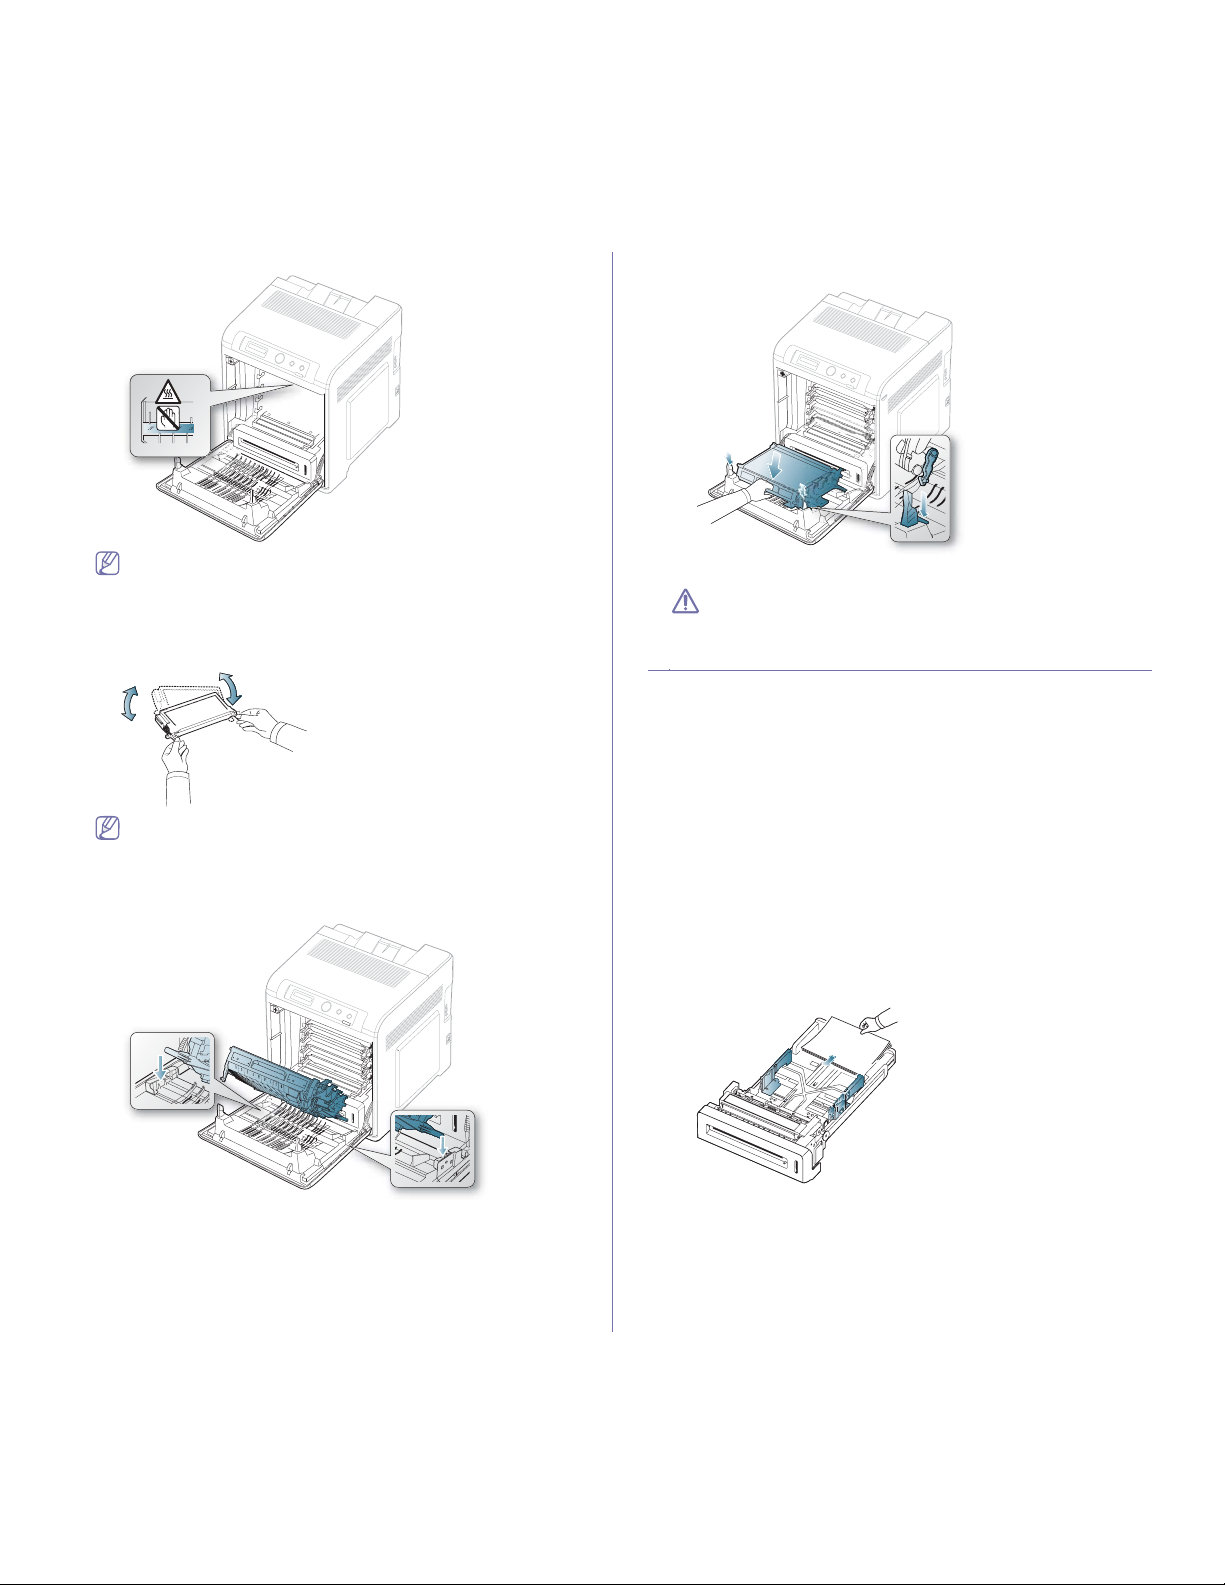
of the fuser unit might be high and could damage your skin.
When you open the front cover and work inside the machine, it is
highly recommend that you remove the paper transfer belt first.
Because the work you do could contaminate the paper transfer
belt.
4. Hold
ing both handles on the toner cartridge, thoroughly rock it from side
to side to redistribute the toner.
If toner gets on your clothing, wipe it off with a dry cloth and wash
clothing in cold water. Hot water sets toner into fabric.
5. Slide the toner cartridge back into the machine.
6. Hold
ing the handle on the paper transfer belt, align it with the slots on
the inside of the front cover.
7. Lower the paper transfer belt until it is parallel with the front cover and
firmly seated.
8. Close the front cover. Ensure that the cover is securely closed.
If the front cover is not completely closed, the machine will not
operate.
TIPS FOR AVOIDING PAPER JAMS
By selecting the correct media types, most paper jams can be avoided.
When a paper jam occurs, refer to the below guidelines.
• Ensure that the adjustable guides are positioned correctly (See "Loading
paper in the tray" on page 37).
• Do
not overload the tray. Ensure that the paper level is below the paper
capacity mark on the inside of the tray.
• D
o not remove paper from the tray while your machine is printing.
• F
lex, fan, and straighten paper before loading.
• D
o not use creased, damp, or highly curled paper.
• D
o not mix paper types in a tray.
• U
se only recommended print media (See "Setting the paper Type and
Size" on page 41).
• Ensure that the recommended side of the print media is facing up in the
tray, or facing down in the multi-purpose tray.
• If
paper jams occur frequently when you print on A5/B5-sized paper:
Load the paper into the tray with the long edge facing the front of the
tray.
If load the paper this way, printing both sides of the paper (duplex) is not
supported.
In the Printing
Preferences window, set the page orientation to be
rotated 180 degrees (See "Opening printing preferences" on page 44).
Troubleshooting_ 67
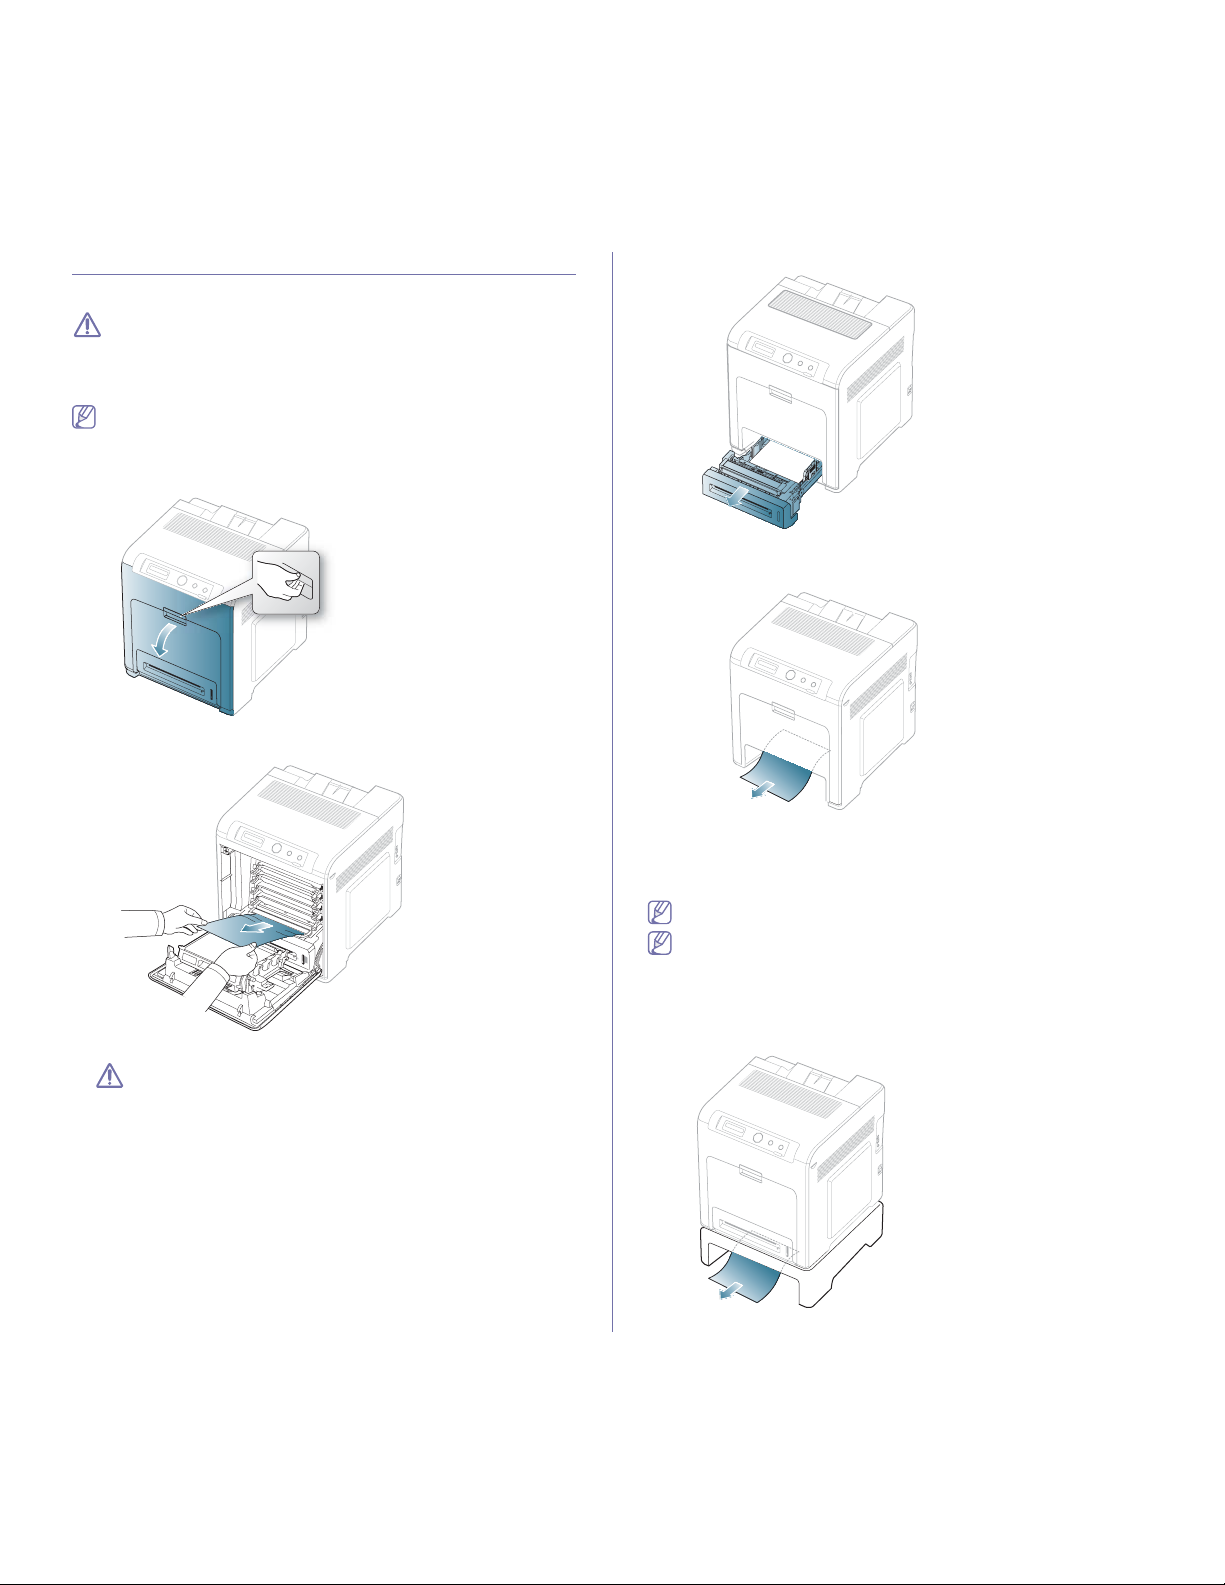
CLEARING PAPER JAMS
When a paper jam occurs, a warning message appears on the display.
To avoid tearing the paper, pull the jammed paper out slowly and
gently. Follow the instructions in the following sections to clear the
jam.
In tray 1
Click this link to open an animation about clearing a jam.
If paper is jammed in the paper feed area
, follow the steps below to release
the jammed paper.
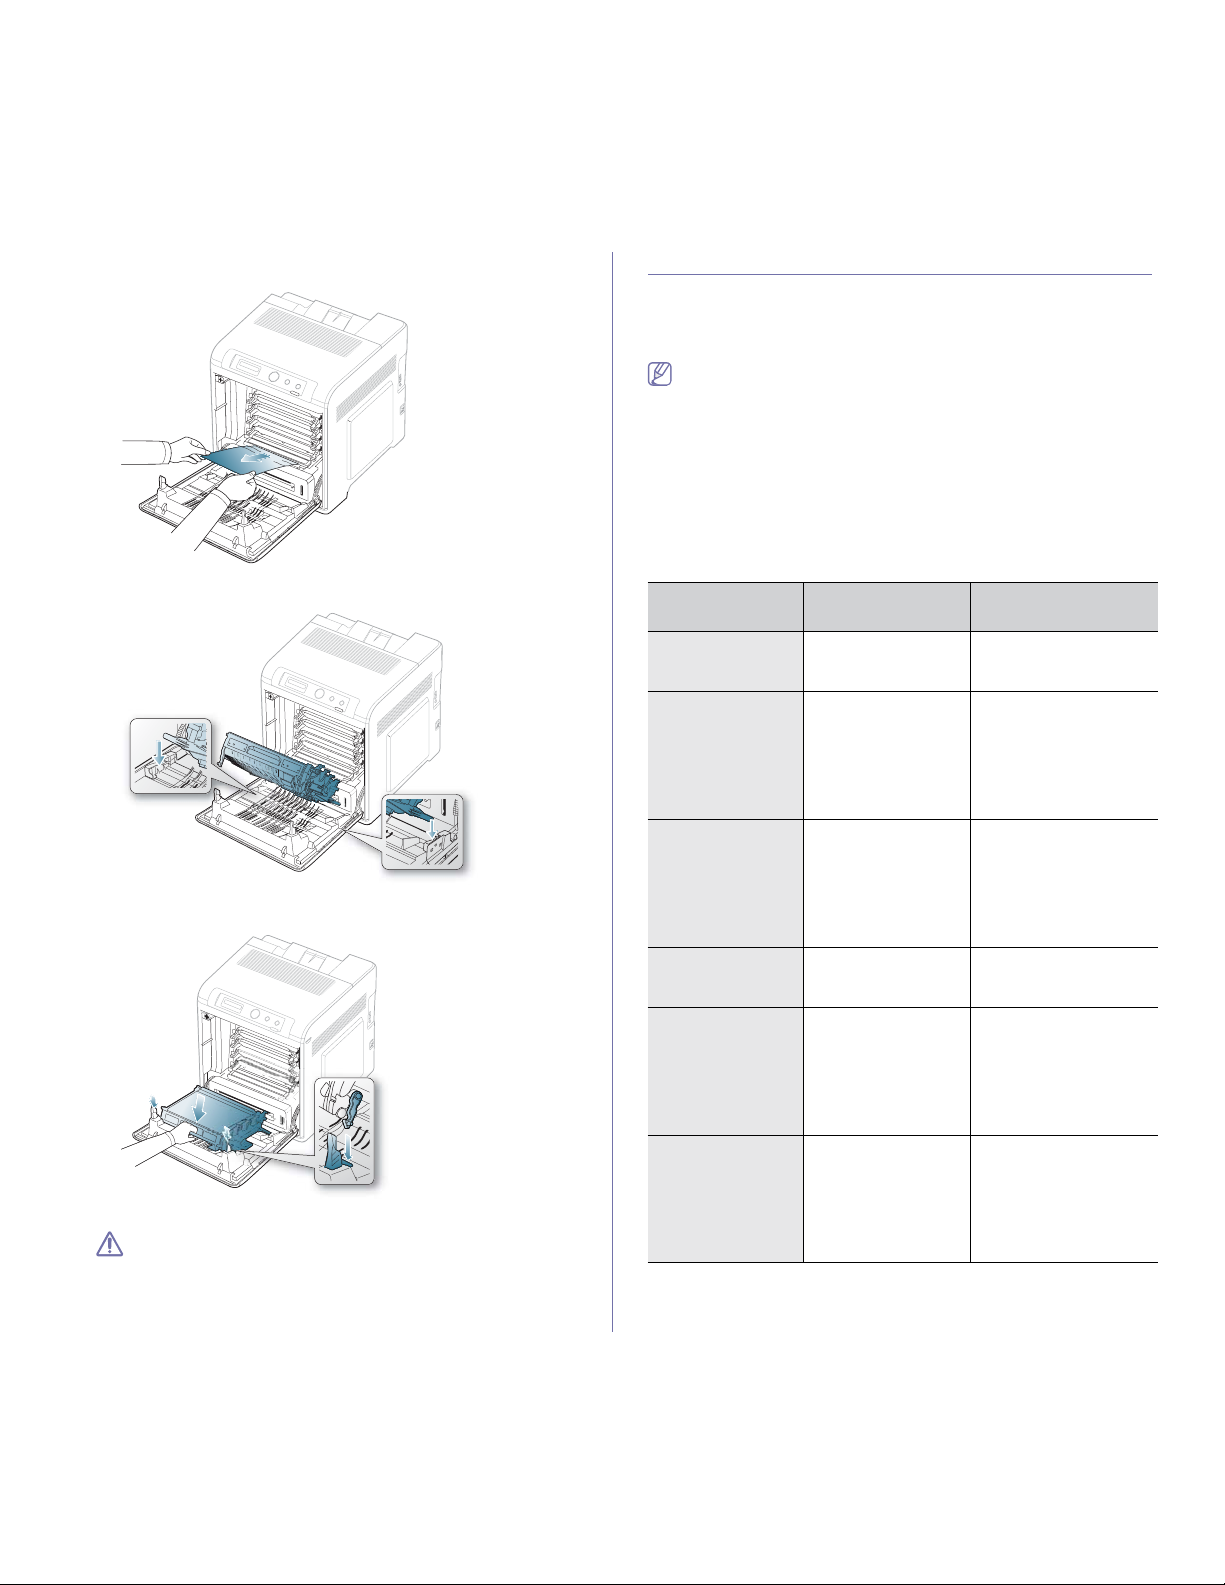
1. Using
the handle, completely open the front cover.
2. Remove the jammed paper by pulling in the direction shown. To avoid
tearing the paper, pull it out gently and slowly.
3. Close the front cover.
If the front cover is not completely closed, the machine will not
operate.
4. Pu
ll out tray 1.
5. Remove the jammed paper by pulling in the direction shown. To avoid
tearing the paper, pull it out gently and slowly.
6. Insert tray 1 back into the machine until it snaps into place. Printing
automatically resumes.
In optional tray
Click this link to open an animation about clearing a jam.
This section explains the method of removing jammed paper in the
optional tray 2. Please refer to the below method for other optional
tray, since the method is same for all optional trays.
1. Pu
ll out optional tray 2 open.
2. R
emove the jammed paper by pulling in the direction shown. To avoid
tearing the paper, pull it out gently and slowly.
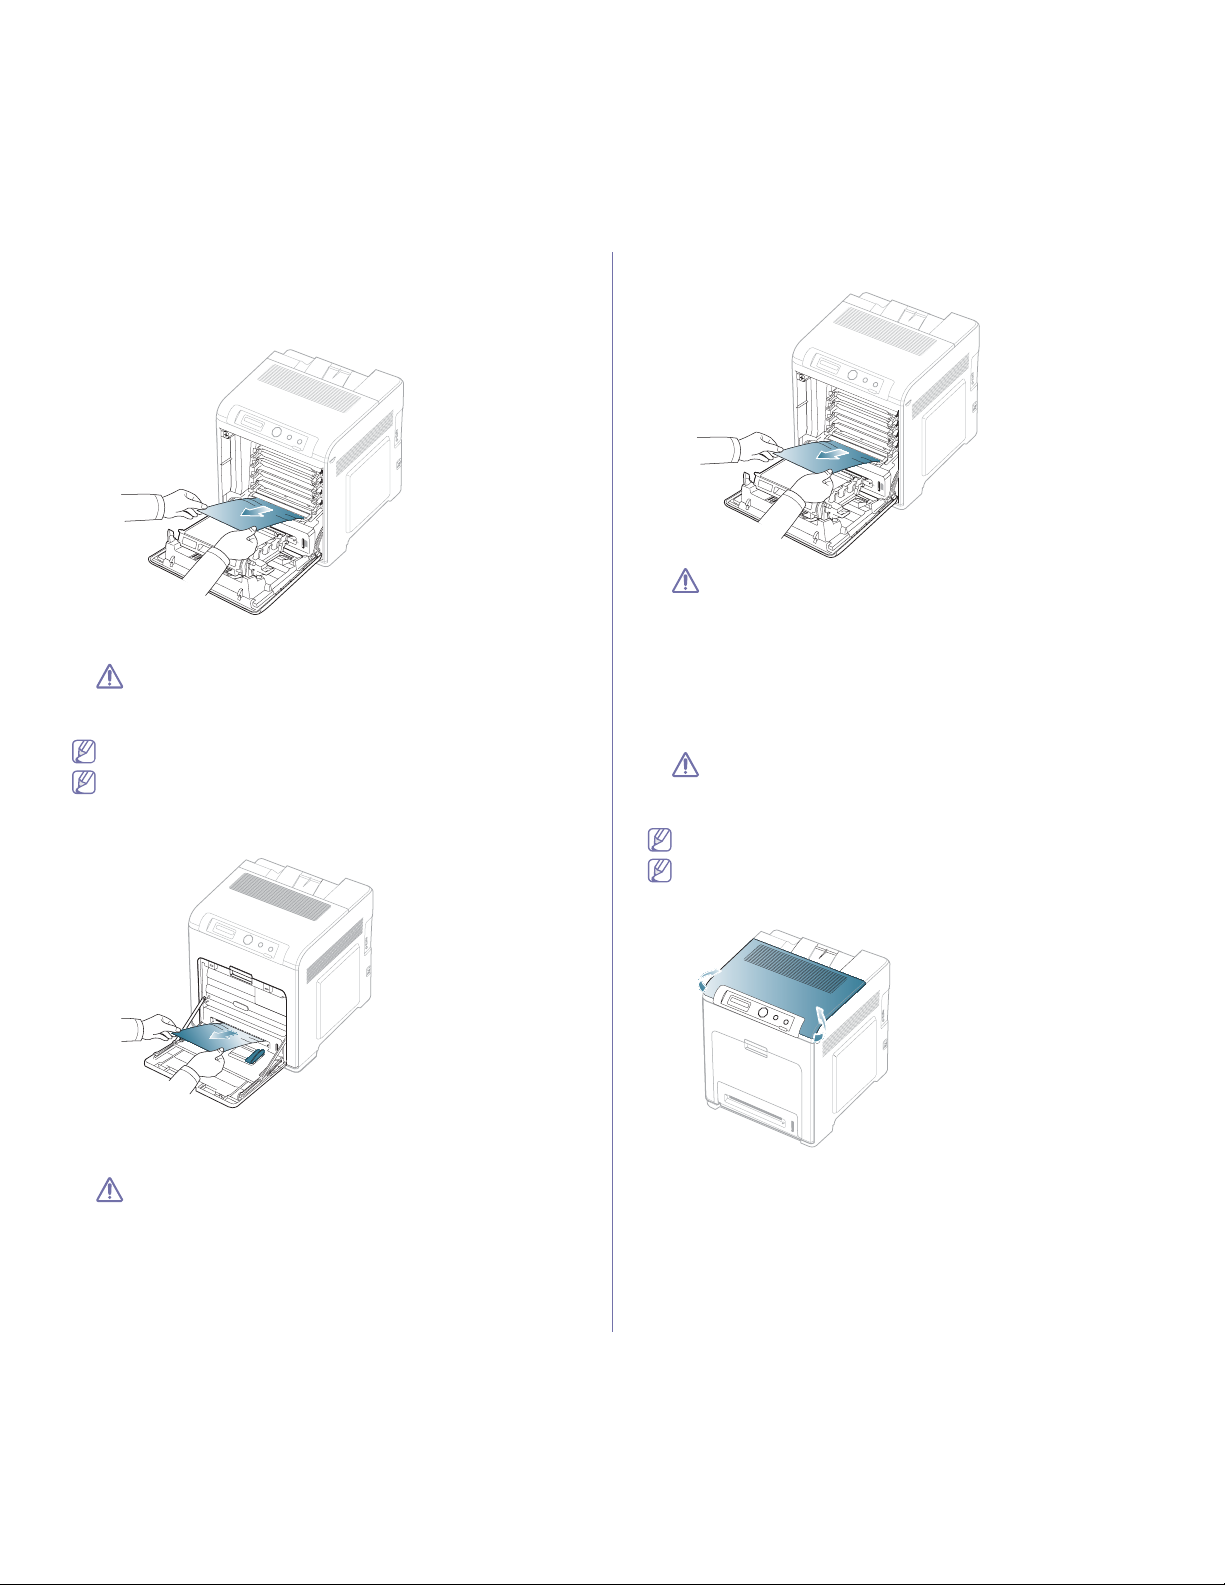
Troubleshooting_ 68
If the paper does not move when you pull or if you do not see the paper
in this area, stop and go to the next step.
3. Using the handle, completely open the front cover.
4. Remove the jammed
paper by pulling in the direction shown. To avoid
tearing the paper, pull it out gently and slowly.
5. Close the front cover and insert the trays back into the machine. Printing
automatically resumes.
If the front cover is not completely closed, the machine will not
operate.
In the multi-purpose tray
Click this link to open an animation about clearing a jam.
When you print using the multi-purpose tray and the machine detects
that there is either no paper or that the paper has been improperly
loaded, follow the next steps to release the jammed paper.
1. If th
e paper is not feeding properly, pull the paper out of the machine.
If you do not see the jammed paper or if there is any resistance when
you pull, stop and go to step 3.
2. Open and close the front cover to resume printing.
If the front cover is not completely closed, the machine will not
operate.
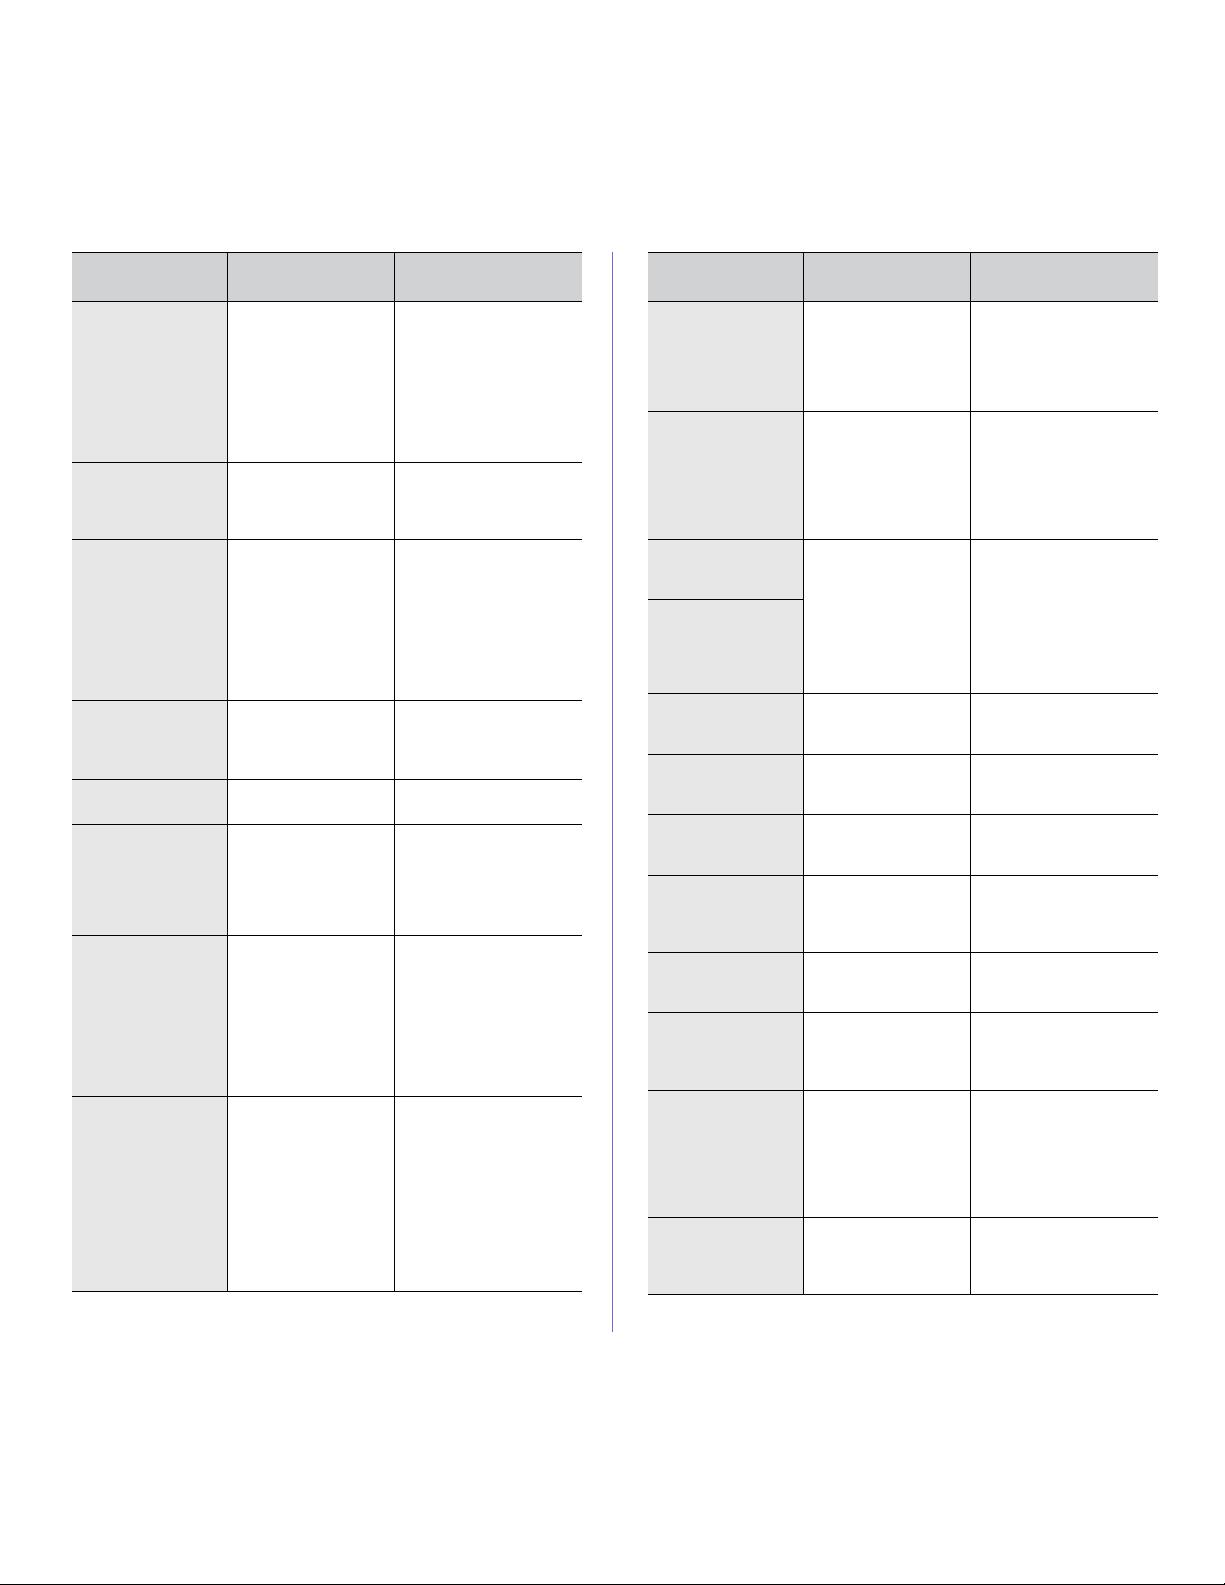
3. Using the handle, completely open the front cover.
4. R
emove the jammed paper by pulling in the direction shown. To avoid
tearing the paper, pull it out gently and slowly.
• Do not touch the green surface, the OPC drum or the front of
the toner cartridge, with your hands or any other material. Use
the handle on each cartridge in order to avoid touching this
area.
• Be careful not to scratch the surface
of the paper transfer belt.
• If you leave the front cover open for more than a few minutes,
th
e OPC drum can be exposed to light. This will cause damage
to the OPC drum. Close the front cover when the installation
needs to be halted for any reason.
5. C
lose the front cover to resume printing.
If the front cover is not completely closed, the machine will not
operate.
In the fuser unit area
Click this link to open an animation about clearing a jam.
The fuser area is hot. Take care when removing paper from the
machine.
1. Open the top cover.
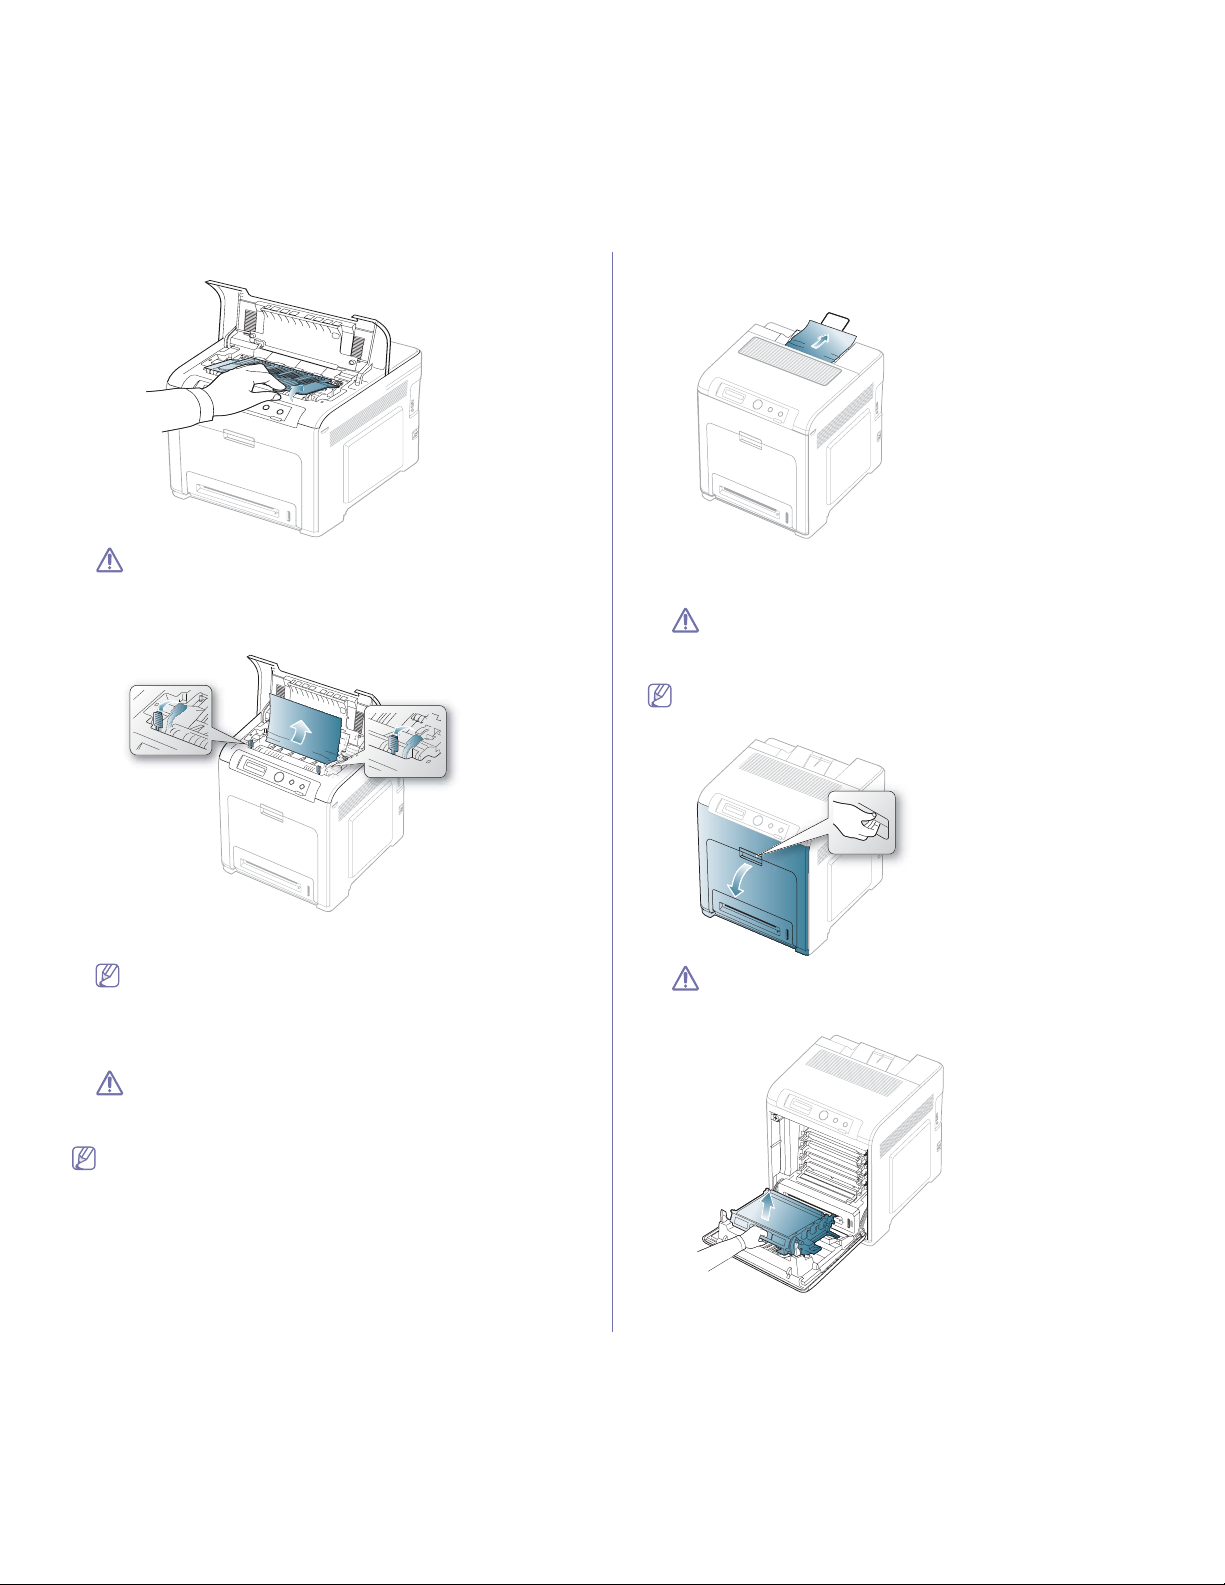
Troubleshooting_ 69
2. Open the inner cover using the handle on it.
Do not touch the fuser inside the inner cover. It is hot and could
cause burns! The fuser's operating temperature is 180°C (356°F).
Take care when removing paper from the machine.
3. Pull up
the paper jam lever to loose the fusing part of the fuser unit and
carefully take the jammed paper out of the machine.
4. Press down the paper jam lever to fasten the fusing part.
5. Close
the inner cover.
Before closing the inner cover, the jam lever must be fastened first
(step4). Otherwise, paper jam can occur.
6. After removing the jammed paper, check for paper which may be
jammed in other parts of the machine.
7. Close the top cover. Ensure that the cover is securely closed.
If the top cover is not completely closed, the machine will not
operate.
In exit area
Click this link to open an animation about clearing a jam.
1. Ope
n and close the front cover. The jammed paper is automatically
ejected from the machine.
2. Gently pull the paper out of the output tray.
If you do not see the jammed paper or if there is any resistance when
you pull, stop and see "In the fuser unit area" on page 68.
3. Ope
n and close the front cover to resume printing.
If the front cover is not completely closed, the machine will not
operate.
In the duplex unit area
Click this link to open an animation about clearing a jam.
1. U
sing the handle, completely open the front cover.
Be careful not to scratch the surface of the paper transfer belt.
2. Pre
ss the green release handle to release the paper transfer belt.
Holding the handle on the paper transfer belt, lift it out of the machine.
Troubleshooting_ 70
3. Remove the jammed paper by pulling in the direction shown. To avoid
tearing the paper, pull it out gently and slowly.
4. Holding the handle on the paper transfer belt, align it with the slots on
the inside of the front cover.
5. Lower the paper transfer belt until it is parallel with the front cover and
firmly seated.
6. Close the front cover to resume printing.
If the front cover is not completely closed, the machine will not
operate.
UNDERSTANDING DISPLAY MESSAGES
Messages appear on the Smart Panel program window or on the control
panel display to indicate machine status or errors. Refer to the tables below
to understand the messages meaning to correct the problem, if necessary.
Messages and their explanations are listed in alphabetical order.
• If a message is not in the table, reboot the power and try the
printing job again. If the problem persists, call for service.
• When you call for service, provide th
e service representative with
the contents of display message.
• Some messages may not appear in the display depending on the
options or models.
• [error number] indicates the error
number.
• [tray type] indicates the tray number.
• [media type] indicates the media type.
• [media size] indicates the media size.
• [color] indicates the color of toner or imaging unit.
MESSAGE MEANING
SUGGESTED
SOLUTIONS
Adjusting Color
Registration
The machine is
adjusting the color
registration.
Wait a few minutes.
BOOTP problem
Auto IP Run
The IP address
assignment is failed.
This happens, when
Auto IP for BOOTP is
set in SyncThru™
Web Service.
Change the IP address
assignment method to
DHCP or Static. If you do
not change this option,
the BOOTP server
continually asks to assign
the IP Address.
BOOTP problem
Reconfigure DHCP
The IP address
assignment is failed.
This happens, when
Auto IP for BOOTP is
not set in SyncThru™
Web Service.
Change the IP address
assignment method to
DHCP or Static. If you do
not change this option,
the BOOTP server
continually asks to assign
the IP Address.
Calibrating
image density…
The machine is
calibrating the image
density.
Wait a few minutes.
DHCP problem:
Auto IP Run
The IP address
assignment is failed.
This happens, when
Auto IP for DHCP is
set in SyncThru
Web™ Service.
Change the IP address
assignment method to
BOOTP or Static. If you
do not change this option,
the DHCP server
continually asks to assign
the IP Address.
DHCP problem
Reconfigure
BOOTP
The IP address
assignment is failed.
This happens, when
Auto IP for DHCP is
not set in SyncThru™
Web Service.
Change the IP address
assignment method to
BOOTP or Static. If you
do not change this option,
the DHCP server
continually asks to assign
the IP Address.
Troubleshooting_ 71
Error [error number]
[color] toner
The indicated toner
cartridge is installed
improperly, or the
connector is polluted.
Reinstall the
Samsung-genuine toner
cartridge two or three
times to confirm it is
seated properly. Or clean
the connector. If the
problem persists, contact
the service
representatives.
Error [error number]
Turn off then on
A systematic error has
occurred
Reboot the power and try
the printing job again. If
the problem persists, call
for service.
Install Toner
ź
The indicated toner
cartridge is installed
improperly, or not
installed.
Reinstall the toner
cartridge two or three
times to confirm it is
seated properly. If the
problem persists, the
toner cartridge is not
being detected. Contact
the service
representatives.
Load [tray number]
with
[media size][media
type]
There is no
corresponding paper
in the corresponding
tray.
Load corresponding
paper in the
corresponding tray.
(Page 4.4)
Network Problem:
IP Conflict
The IP address is
used elsewhere.
Check the IP address or
obtain a new IP address.
Not Compatible
[color] toner
The indicated toner
cartridge is not
suitable for your
machine.
Install the corresponding
toner cartridge with a
Samsung-genuine
cartridge (See "Replacing
the toner cartridge" on
page 82).
Not Compatible
Transfer belt
The transfer belt is not
suitable for your
machine.
Install the
Samsung-genuine
transfer belt. If the
problem persists, contact
the service
representatives (See
"Replacing the paper
transfer belt" on
page 83).
Not Installed
Transfer belt
The transfer belt is not
installed.
Reinstall the Samsung
-genuine transfer belt two
or three times to confirm
it is seated properly. If the
problem persists, the
transfer belt is not being
detected. Contact the
service representatives
(See "Replacing the
paper transfer belt" on
page 83).
MESSAGE MEANING
SUGGESTED
SOLUTIONS
Not proper room
temp. Move set
The machine is in a
room with improper
room temperature.
Move the machine to a
room with proper room
temperature (See
"Environmental
specifications" on
page 87).
Output bin Full
Remove paper
The output tray is full.
Or the sensor is not
facing down.
Remove papers from the
output tray, the machine
resumes printing. Or
make sure the sensor is
facing down. If the
problem persists, call for
service.
Paper Empty
in [tray number]
There is no paper in
the indicated tray.
Load paper in the tray.
(See "Loading paper in
the tray" on page 37).
Paper Jam
bottom of duplex
Paper has jammed
during duplex printing.
This is applicable only
to machines with this
feature.
Clear the jam (See "In the
duplex unit area" on
page 69).
Paper Jam
in exit area
Special print media
has jammed in the
paper exit area.
Clear the jam (See "In
exit area" on page 69).
Paper Jam
inside machine
Paper has jammed
inside the machine.
Clear the jam (See "In the
fuser unit area" on
page 68).
Paper Jam
in MP Tray
Paper has jammed in
the multi-purpose tray.
Clear the jam (See "In the
multi-purpose tray" on
page 68).
Paper Jam
in Tray1
Paper has jammed in
the paper feed area
and inside the
machine.
Clear the jam (See "In
tray 1" on page 67).
Paper Jam
in Tray2
Paper has jammed in
the optional tray.
Clear the jam (See "In
optional tray" on
page 67).
Prepare new
Transfer belt
The life of the transfer
belt will be expired
soon.
Replace the transfer belt
with a new one. Contact
the service
representatives.
Prepare Toner
ź
Small amount of toner
is left in the indicated
cartridge. The
estimated cartridge
life of toner is close.
Prepare a new cartridge
for a replacement. You
may temporarily increase
the printing quality by
redistributing the toner
(See
"Redistributing
toner" on page 65).
Pulled Out
[tray number]
Cassette
The indicated tray
cassette is not
inserted, or not
properly closed.
To close the tray, lower
the rear edge, align it with
the slot, and slide it into
the printer.
MESSAGE MEANING
SUGGESTED
SOLUTIONS
Troubleshooting_ 72
Replace new
Fuser unit
The life of the fuser
unit has expired.
Replace the fuser unit
with a new one. Contact
the service
representatives.
MESSAGE MEANING
SUGGESTED
SOLUTIONS
Replace Toner
ź
The indicated toner
cartridge has almost
reached its estimated
cartridge life. The
machine might stop
printing.
Estimated
cartridge life
means the
expected or
estimated toner
cartridge life,
which indicates
the average
capacity of
print-outs and is
designed
pursuant to
ISO/IEC
19798.
The number of
pages may be
affected by
operating
environment,
printing interval,
media type and
media size.
Some amount of
toner may
remain in the
cartridge even
when red LED is
turned on
appears and the
printer stops
printing.
• If Stop, Continue or
Mono Only appears in
the LCD display,
choose one of them. If
you select Stop, the
printer stops printing
and you cannot print
any more without
changing the cartridge.
If you select Continue,
the printer keeps
printing but the printing
quality cannot be
guaranteed. If you
select Mono Only, the
machine prints the
data in black only.
Replace the toner
cartridge for the best
print quality when this
message appears.
Using a cartridge
beyond this stage can
result in printing quality
issues (See
"Replacing the toner
cartridge" on page 82).
Samsung does
not recommend
using
non-genuine
Samsung toner
cartridge such as
refilled or
remanufactured.
Samsung cannot
guarantee
non-genuine
Samsung toner
cartridge's
quality. Service
or repair required
as a result of
using
non-genuine
Samsung toner
cartridges will not
be covered
under the
machine
warranty.
• If the machine stops
printing, replace the
toner cartridge (See
"Replacing the toner
cartridge" on page 82).
MESSAGE MEANING
SUGGESTED
SOLUTIONS
Troubleshooting_ 73
SOLVING OTHER PROBLEMS
The following chart lists some conditions that may occur and the
recommended solutions. Follow the suggested solutions until the problem is
corrected. If the problem persists, call for service.
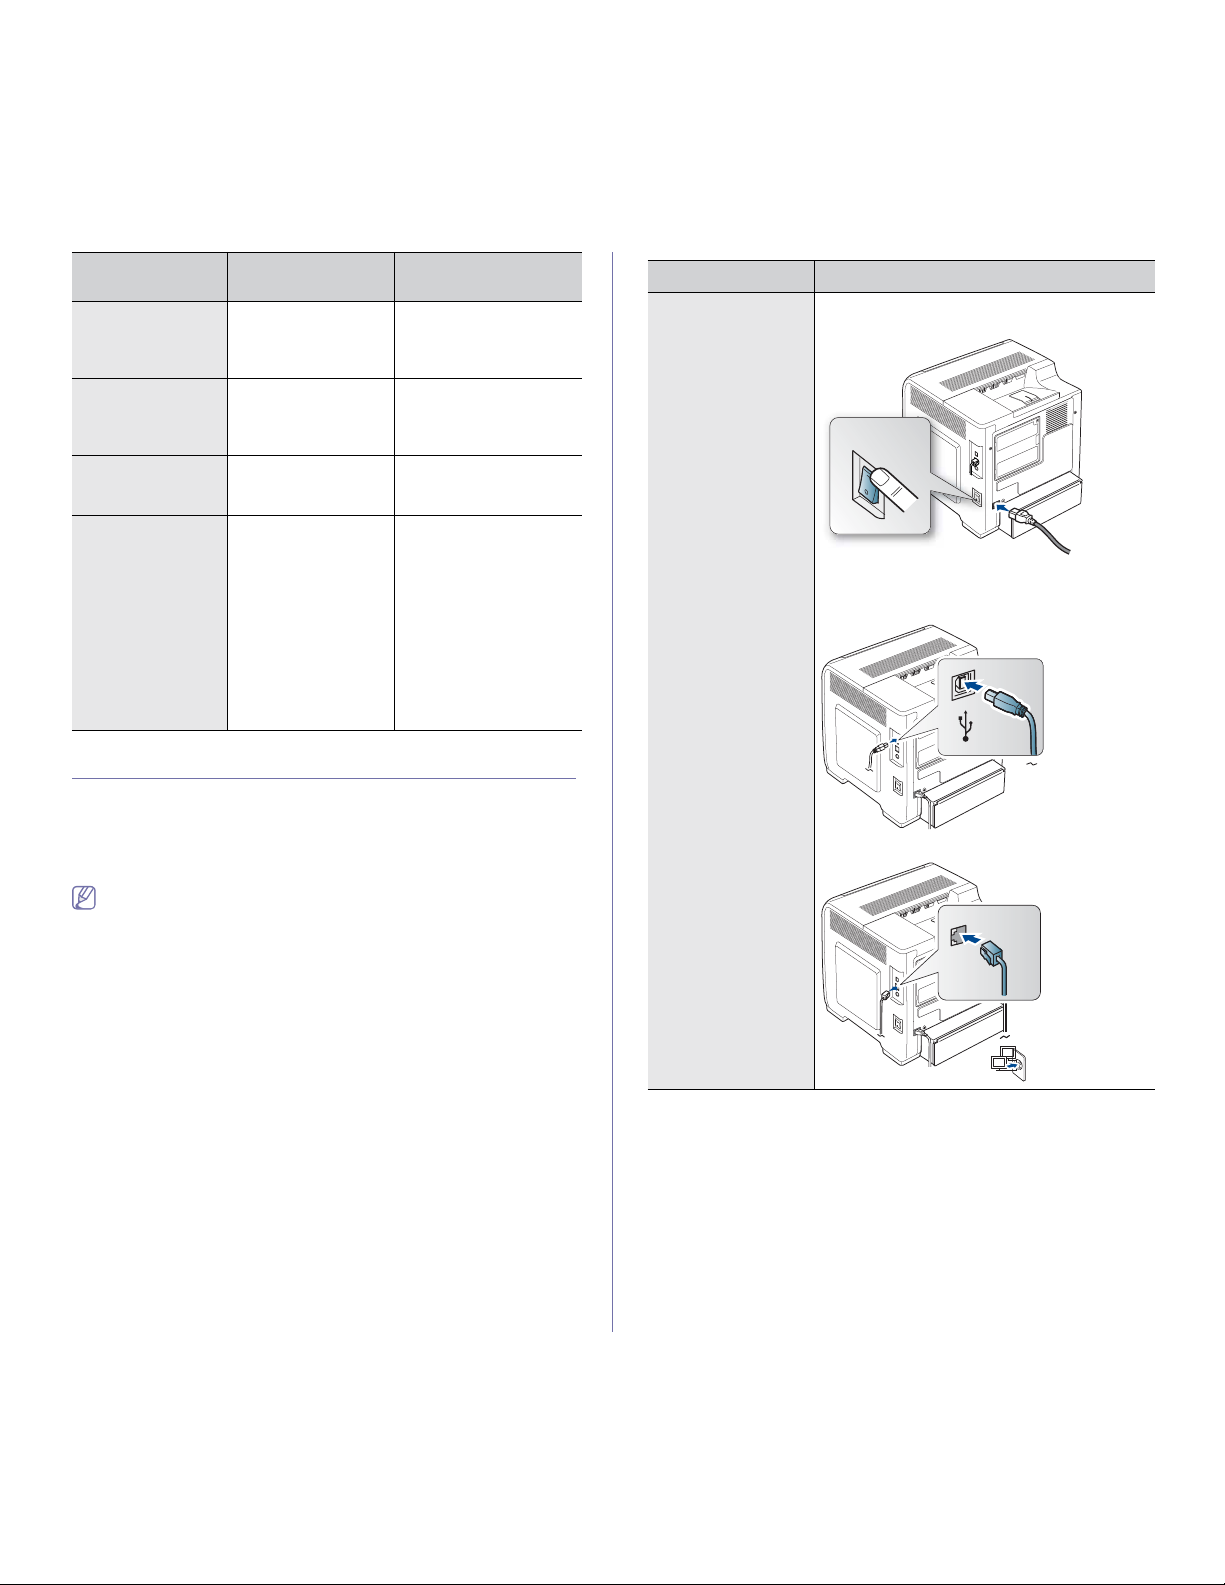
Power problems
Click this link to open an animation about clearing a jam.
CONDITION SUGGESTED SOLUTIONS
The machine is not
receiving power,
or the connection
cab
le between the
computer and the
machine is not
connected properly.
• Plu
g in the power cord and switch on the
power-switch.
• Disconnect the machine cable and reconnect
it.
- Fo
r Local Printing
- For Network Printing
Self Diagnostics
Please wait
The engine in your
machine is checking
some problems
detected.
Please wait a few
minutes.
Self Diagnostics
mode
The engine in your
machine is checking
some problems
detected.
Please wait a few
minutes.
Sleeping... The machine is in the
power save mode.
When data is received, it
switches to on-line
automatically.
Updating Data
Please Wait...
• The machine is
updating data.
• This message
can
also appear when
priniting on a paper
smaller than A4,
such as envelope
or B5. In this case,
the machine is
adjusting the
setting for best print
result.
Wait a few minutes.
MESSAGE MEANING
SUGGESTED
SOLUTIONS
Troubleshooting_ 74
Paper feeding problems
CONDITION SUGGESTED SOLUTIONS
Paper jams during
printing.
Clear the paper jam (See "Clearing paper jams"
on page 67
).
Paper sticks
together.
• Check the maximum paper capacity of the
tray (See "Print media specifications" on
page 89).
• Ma
ke sure that you are using the correct type
of paper (See "Print media specifications" on
page 89).
• Remove pap
er from the tray and flex or fan
the paper.
• Humid conditions may cause some paper to
stick together.
Multiple sheets of
paper do not feed.
Different types of paper may be stacked in the
tray. Load paper of only one type, size, and
weight.
Paper does not feed
into the machine.
• Remove any obstructions from inside the
machine.
• Pa
per has not been loaded correctly. Remove
paper from the tray and reload it correctly.
• The
re is too much paper in the tray. Remove
excess paper from the tray.
• The paper is too thick. Use only paper that
meets the specifications required by the
machine (See "Print media specifications" on
page 89
).
The paper keeps
jamming.
• There is too much paper in the tray. Remove
excess paper from the tray. If you are printing
on special materials, use the multi-purpose
tray.
• An
incorrect type of paper is being used. Use
only paper that meets the specifications
required by the machine (See "Print media
specifications" on page 89).
• There may be debris inside the machine.
Open the front cover and remove any debris.
Transparencies stick
together in the paper
exit.
Use only transparencies specifically designed
for laser printers. Remove each transparency as
it exits from the machine.
Envelopes skew or
fail to feed correctly.
Ensure that the paper guides are against both
sides of the envelopes.
Printing problems
CONDITION
POSSIBLE
CAUSE
SUGGESTED
SOLUTIONS
The machine
does not print.
The machine is not
receiving power.
Check the power cord
connections. Check the
power switch and the power
source.
The machine is not
se
lected as the
default machine.
Select your machine as your
default machine in your
Windows.
Check the machine for the following:
• T
he front cover is not closed. Close the front
cover.
• Paper is jammed. Clear the paper jam (See
"Clearing paper jams" on page 67).
• No
paper is loaded. Load paper (See "Loading
paper in the tray" on page 37).
• The
toner cartridge is not installed. Install the
toner cartridge.
• Remove the protection sheet on the paper
transfer belt. Refer to Quick Install Guide.
• Remove the seal
ing tape from the toner
cartridge. Refer to Quick Install Guide.
If a system error occurs, contact your service
re
presentative.
The connection
ca
ble between the
computer and the
machine is not
connected properly.
Disconnect the machine
ca
ble and reconnect it.
The connection
ca
ble between the
computer and the
machine is
defective.
If possible, attach the cable
to an
other computer that is
working properly and print a
job. You can also try using a
different machine cable.
The port setting is
incorrect.
Check the Windows printer
setting to make sure
that the
print job is sent to the correct
port. If the computer has
more than one port, make
sure that the machine is
attached to the correct one.
The machine may
be
configured
incorrectly.
Check the Printing
Preferences to ensure that
all of the print settings are
correct (See "Opening
printing preferences" on
page 44).
The printer driver
may be
incorrectly
installed.
Repair the machine software
(See "Installing USB
connected machine’s driver"
on page 23).

Troubleshooting_ 75
(Continued) The
machine does not
print.
The machine is
malfunctioning.
Check the display message
on the control panel to see if
the machine is indicating a
system error. Contact a
service representative.
The document size
is so big that the
hard disk space of
the computer is
insufficient to
access the print job.
Get more hard disk space
and print the document
again.
The machine
selects print
materials from
the wrong paper
source.
The paper option
that was selected in
the Printing
Preferences may
be incorrect.
For many software
applications, the paper
source selection is found
under the Paper tab within
the Printing Preferences.
Select the correct paper
source. See the printer
driver help screen (See
"Opening printing
preferences" on page 44).
A print job is
extremely slow.
The job may be
very complex.
Reduce the complexity of
the page or try adjusting the
print quality settings.
Half the page is
blank.
The page
orientation setting
may be incorrect.
Change the page orientation
in your application. See the
printer driver help screen.
The paper size and
the paper size
settings do not
match.
Ensure that the paper size in
the printer driver settings
matches the paper in the
tray.
Or, ensure that the paper
size in the printer driver
settings matches the paper
selection in the software
application settings you use.
CONDITION
POSSIBLE
CAUSE
SUGGESTED
SOLUTIONS
The machine
prints, but the
text is wrong,
garbled, or
incomplete.
The machine cable
is loose or
defective.
Disconnect the machine
cable and reconnect. Try a
print job that you have
already printed successfully.
If possible, attach the cable
and the machine to another
computer that you know
works and try a print job.
Finally, try a new machine
cable.
The wrong printer
driver was selected.
Check the application’s
printer selection menu to
ensure that your machine is
selected.
The software
application is
malfunctioning.
Try printing a job from
another application.
The operating
system is
malfunctioning.
Exit Windows and reboot the
computer. Turn the machine
off and back on again.
If you are in a DOS
environment, the
font setting for your
machine may be
set incorrectly.
Change the language
setting (See "Changing font
setting" on page 35).
Pages print, but
they are blank.
The toner cartridge
is defective or out of
toner.
Redistribute the toner, if
necessary.
If necessary, replace the
toner cartridge.
The file may have
blank pages.
Check the file to ensure that
it does not contain blank
pages.
Some parts, such
as the controller or
the board, may be
defective.
Contact a service
representative.
The machine
does not print
PDF file correctly.
Some parts of
graphics, text, or
illustrations are
missing.
Incompatibility
between the PDF
file and the Acrobat
products.
Printing the PDF file as an
image may enable the file to
print. Turn on Print As
Image from the Acrobat
printing options.
It will take longer to
print when you print a
PDF file as an image.
CONDITION
POSSIBLE
CAUSE
SUGGESTED
SOLUTIONS
Troubleshooting_ 76
Printing quality problems
If the inside of the machine is dirty or paper has been loaded improperly,
there might be a reduction in print quality. See the table below to clear the
problem.
The print quality
of photos is not
good. Images are
not clear.
The resolution of
the photo is very
low.
Reduce the photo size. If
you increase the photo size
in the software application,
the resolution will be
reduced.
Before printing,
the machine
emits vapor near
the output tray.
Using damp paper
can cause vapor
during printing.
This is not a problem. Just
keep printing.
The machine
does not print
special- sized
paper, such as
billing paper.
Paper size and
paper size setting
do not match.
Set the correct size in the
Paper tab > Size > Edit... in
the Printing Preferences
(See "Opening printing
preferences" on page 44).
CONDITION SUGGESTED SOLUTIONS
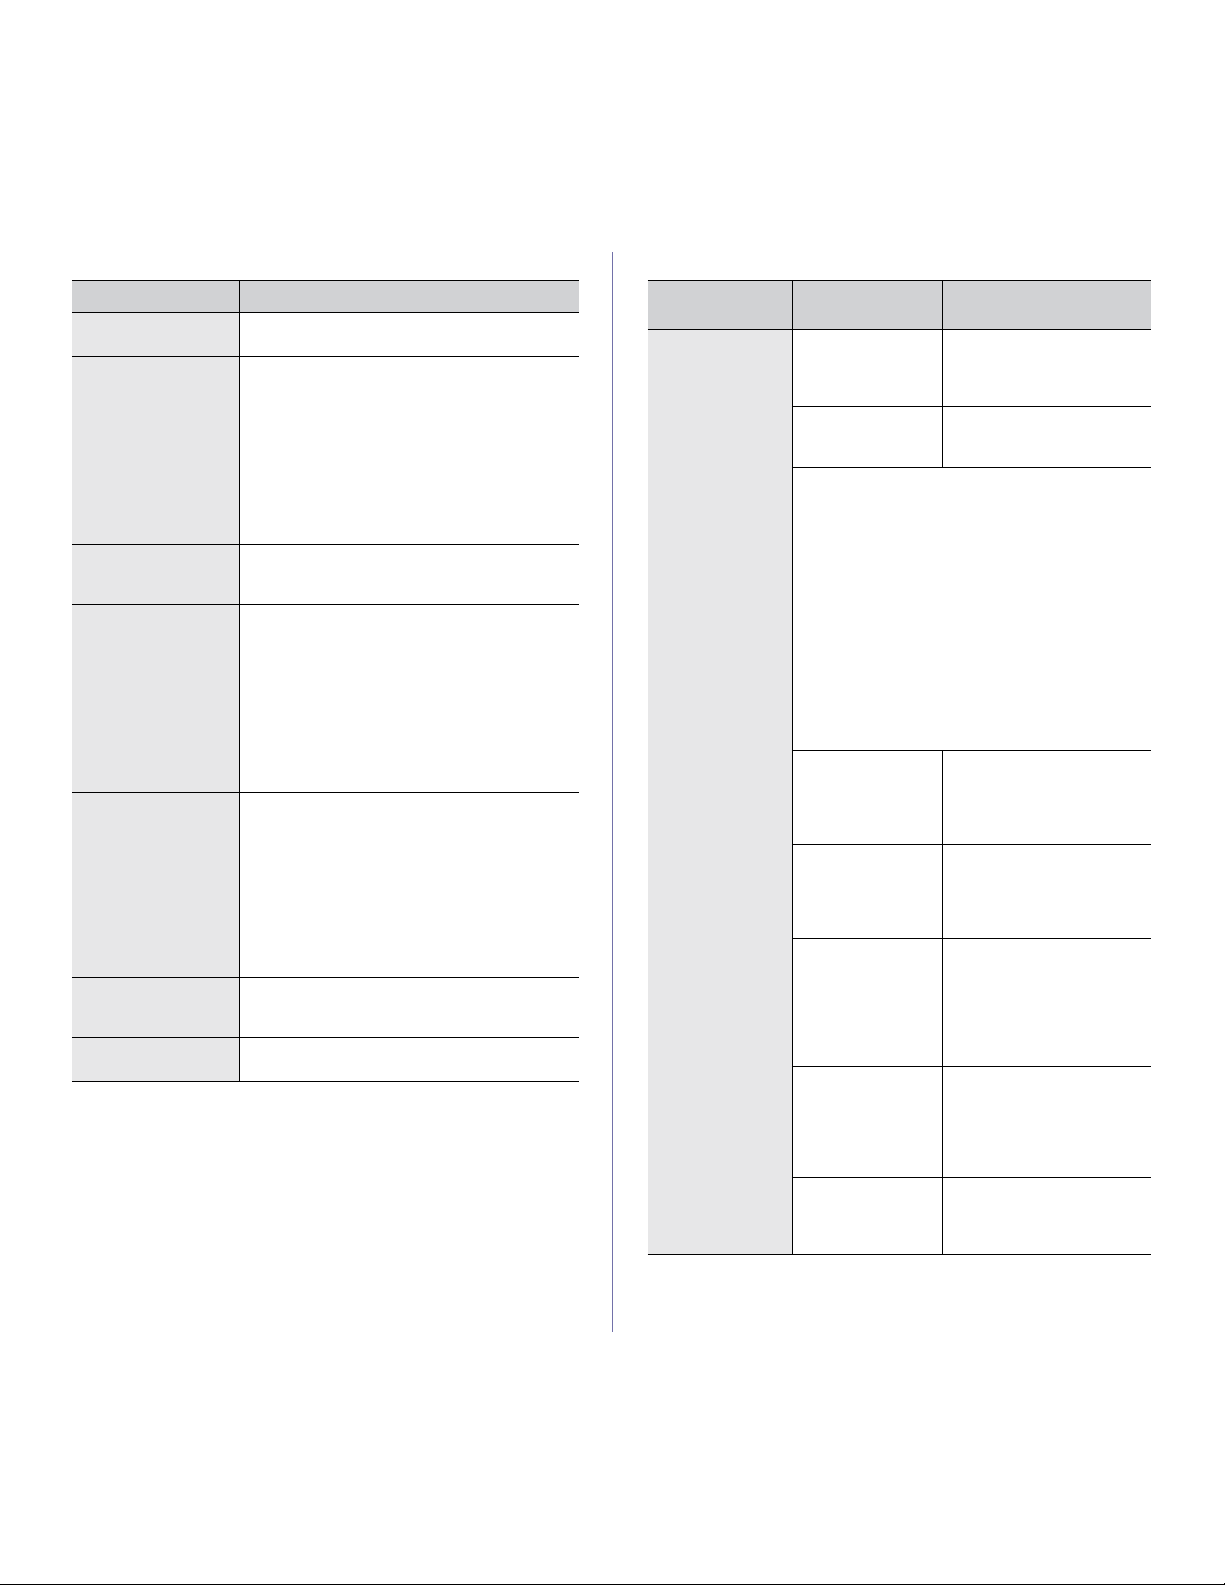
Light or faded print
• If a vertical white streak or faded area
appears on the page, the toner supply is low.
You may be able to temporarily extend the
toner cartridge life (See "Redistributing toner"
on page 65). If this does not improve the print
quality, install a new toner cartridge.
• T
he paper may not meet paper specifications;
for example, the paper may be too moist or
rough (See "Print media specifications" on
page 89).
• If the entire pa
ge is light, the print resolution
setting is too low or the toner save mode is
on. Adjust the print resolution and turn the
toner save mode off. See the help screen of
the printer driver.
• A combina
tion of faded or smeared defects
may indicate that the toner cartridge needs
cleaning (See "Cleaning the inside" on
page 62).
• T
he surface of the LSU part inside the
machine may be dirty (See "Cleaning the
inside" on page 62).
Toner specks
AaBbCc
AaBbCc
AaBbCc
AaBbCc
AaBbCc
• The paper may not meet specifications; for
example, the paper may be too moist or rough
(See "Print media specifications" on page 89).
• T
he transfer roller may be dirty. Clean the
inside of your machine. Contact a service
representative.
• T
he paper path may need cleaning. Contact a
service representative.
CONDITION
POSSIBLE
CAUSE
SUGGESTED
SOLUTIONS
Dropouts
AaBb
C
AaBb
C
AaBb
C
AaBb
C
AaBb
C
If faded areas, generally rounded, occur
randomly on the page:
• A singl
e sheet of paper may be defective.
Try reprinting the job.
• The moisture content of the paper is uneven
or the paper has moist spots on its surface.
Try a different brand of paper (See "Print
media specifications" on page 89).
• T
he paper lot is bad. The manufacturing
processes can cause some areas to reject
toner. Try a different kind or brand of paper.
• Ch
ange the printer option and try again. Go
to Printing Preferences, click Paper tab,
and set type to Thick Paper (See "Opening
printing preferences" on page 44).
• If these steps do no
t correct the problem,
contact a service representative.
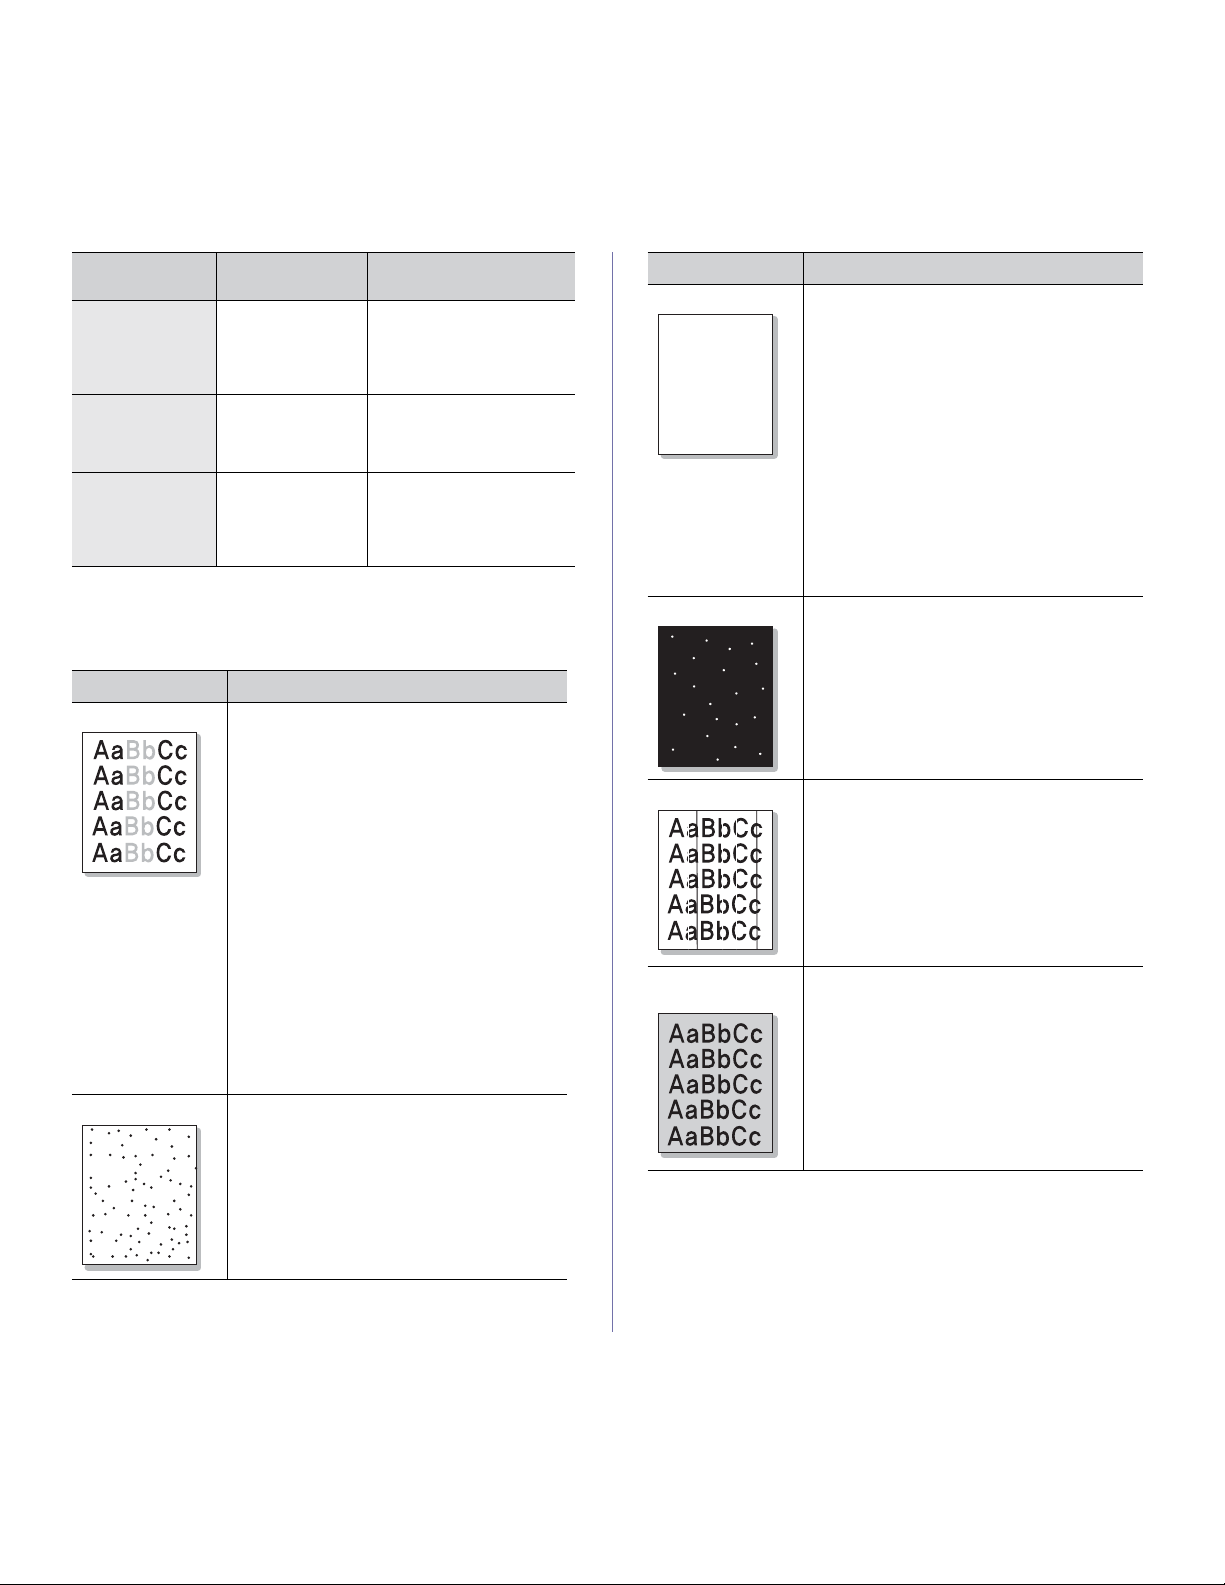
White Spots
If white spots appear on the page:
• T
he paper is too rough and a lot of dirt from a
paper falls to the inner devices within the
machine, so the transfer roller may be dirty.
Clean the inside of your machine (See
"Cleaning the inside" on page 62).
• T
he paper path may need cleaning (See
"Cleaning the inside" on page 62).
Vertical lines
If black vertical streaks appear on the page:
• The surface (drum
part) of the toner
cartridge inside the machine has probably
been scratched. Remove the toner cartridge
and install a new one (See "Replacing the
toner cartridge" on page 82).
If white vertical streaks appear on the page:
• T
he surface of the LSU part inside the
machine may be dirty (See "Cleaning the
inside" on page 62).
Color or Black
background
If the amount of background shading becomes
unacceptable:
• Ch
ange to a lighter weight paper (See "Print
media specifications" on page 89).
• Check the environmental conditions: very
dry conditions (low humidity) or a high level
of humidity (higher than 80% RH) can
increase the amount of background shading.
• Re
move the old toner cartridge and, install a
new one (See "Replacing the toner
cartridge" on page 82
).
CONDITION SUGGESTED SOLUTIONS

Troubleshooting_ 77
Toner smear If toner smears on the page:
• C
lean the inside of the machine (See
"Cleaning the inside" on page 62).
• C
heck the paper type and quality (See "Print
media specifications" on page 89).
• Remove the toner cartridge and then, install
a new one (See "Replacing the toner
cartridge" on page 82).
Vertical repetitive
de
fects
If marks repeatedly appear on the printed side of
the page at even intervals:
• T
he toner cartridge may be damaged. If you
still have the same problem, remove the
toner cartridge and, install a new one (See
"Replacing the toner cartridge" on page 82).
• Pa
rts of the machine may have toner on
them. If the defects occur on the back of the
page, the problem will likely correct itself
after a few more pages.
• T
he fusing assembly may be damaged.
Contact a service representative.
Background
sca
tter
A
Background scatter results from bits of toner
randomly distributed on the printed page.
• T
he paper may be too damp. Try printing
with a different batch of paper. Do not open
packages of paper until necessary so that
the paper does not absorb too much
moisture.
• If ba
ckground scatter occurs on an envelope,
change the printing layout to avoid printing
over areas that have overlapping seams on
the reverse side. Printing on seams can
cause problems.
• If b
ackground scatter covers the entire
surface area of a printed page, adjust the
print resolution through your software
application or in Printing Preferences (See
"Opening printing preferences" on page 44).
Misformed
ch
aracters
If characters are improperly formed and
producing hollow images, the paper stock may
be too slick. Try different paper (See "Print
media specifications" on page 89
).
CONDITION SUGGESTED SOLUTIONS
Page skew
A
aBb
C
AaBb
C
AaBb
C
AaBb
Cc
A
aBbC
c
• Ensure that the paper is loaded properly.
• Che
ck the paper type and quality (See "Print
media specifications" on page 89).
• Ensure
that the guides are not too tight or too
loose against the paper stack.
Curl or wave
• Ensure that the paper is loaded properly.
• Che
ck the paper type and quality. Both high
temperature and humidity can cause paper
curl (See "Print media specifications" on
page 89).
• Tu
rn the stack of paper over in the tray. Also
try rotating the paper 180° in the tray.
Wrinkles or
crea
ses
• Ensure that the paper is loaded properly.
• Che
ck the paper type and quality (See "Print
media specifications" on page 89).
• Turn the stack of paper over in the tray. Also
try rotating the paper 180° in the tray.
Back of printouts
are d
irty
• Check for leaking toner. Clean the inside of
the machine (See "Cleaning the inside" on
page 62).
• Cle
an the fuser belt (See "Cleaning a fuser
belt" on page 62).
• The toner cartridge has reached its estimated
cartridge life.
Solid Color or
Bla
ck pages
A
• The toner cartridge may not be installed
properly. Remove the cartridge and reinsert it.
• The toner cartridge may be defective.
Remove the toner cartridge and install a new
one (See "Replacing the toner cartridge" on
page 82).
• The machine may require repair. Contact a
service representative.
CONDITION SUGGESTED SOLUTIONS
 Loading...