


RI9347/01
Saeco RI9347/01, 721440832, 721440332, 721440032, 721423332 Operating Instructions Manual
...
ISTRUZIONI PER L'USO
OPERATING INSTRUCTIONS
MODE D’EMPLOI
BEDIENUNGSANLEITUNG
INSTRUCCIONES DE USO
INSTRUÇÕES PARA USO
GEBRUIKSAANWIJZING
PER LA VOSTRA SICUREZZA LEGGERE ATTENTAMENTE LE ISTRUZIONI PER L'USO.
FOR YOUR SAFETY CAREFULLY READ THE OPERATING INSTRUCTIONS.
POUR VOTRE SÉCURITÉ, LISEZ SOIGNEUSEMENT LES INSTRUCTIONS D’EMPLOI.
FÜR IHRE SICHERHEIT LESEN SIE BITTE SORGFÄLTIG DIE BEDIENUNGSANLEITUNG,
BEVOR SIE DAS GERÄT IN BETRIEB SETZEN.
PARA SU SEGURIDAD LÉA ATENTAMENTE LAS INSTRUCCIONES DE EMPLEO
PARA A SUA SEGURANÇA DEVE LER ATENTAMENTE ESTAS INSTRUÇÕES.
LEES DEZE GEBRUIKSAANWIJZING ZORGVULDIG VOORDAT U DE MACHINE GEBRUIKT.
TYPE COM 004 ATYPE COM 004 A
TYPE COM 004 ATYPE COM 004 A
TYPE COM 004 A
FOR HOUSEHOLD USE ONLFOR HOUSEHOLD USE ONL
FOR HOUSEHOLD USE ONLFOR HOUSEHOLD USE ONL
FOR HOUSEHOLD USE ONL
YY
YY
Y
Com004a 165925900 Rev01.pmd 13/07/2003, 18.301

2
Congratulazioni,
Ci congratuliamo con voi per l'acquisto di questa macchina per caffè espresso, di qualità
superiore, e vi ringraziamo per la fiducia accordataci. Prima di mettere in funzione la macchina, vi consigliamo di leggere attentamente le istruzioni per l'uso che vi spiegano come utilizzarla, pulirla e mantenerla in perfetta efficienza. Se avete altre domande, rivolgetevi al rivenditore
o direttamente alla nostra casa. Saremo lieti di darVi tutti i chiarimenti desiderati.
Congratulations,
Congratulations on choosing this top-quality espresso machine and many thanks for your
confidence in our products. Before operating the machine, we recommend you read the following
instructions thoroughly which explain how to use, clean and maintain the machine. For any
other information, please contact the leader or our company directly. We will be glad to provide
you with any explanations you may need.
Félicitations,
Nous vous felicitons de l'achat de cette machine pour café express de qualité superieure et Vous
remercions pour Votre préférence. Avant de mettre la machine en marche, nous Vous
recommandons de lire attentivement ces instructions d'emploi qui expliquent comment employer,
nettoyer et conserver la machine en parfait état de functionnement. Si Vous avez des questions
à poser, nous Vous prions de contacter le détaillant ou directement notre maison. Nous Vous
donnerons avec plaisir toutes les informations nécessaires.
Wir gratulieren Ihnen Kauf dieser Espressomaschine höchster Qualität und danken Ihnen für Ihr
Vertrauen. Vor der Inbetriebnahme der Maschine empfehlen wir, diese Bedienungsanleitung
sorgfaltig durchzulesen, die Anweisungen über den Gebrauch, die Reinigung und die Pflege
der Maschine gibt. Wenn Sie weitere Fragen haben, werden Sie sich bitte an den Händler oder
direkt an uns. Wir werden Ihnen gerne alle notwendigen Erklärungen geben.
Felicidades!
Congratulándonos con Ud por haber comprado esta máquina para café expreso, de calidad
superior, Le agradecemos la confianza depositada en nuestros productos. Antes de poner en
marcha el aparado Le aconsejamos lea atentamente las instrucciones de empleo que explican
como utilizarla, limpiarla y mantenerla correctamente. En caso tenga más cuestiones, acuda al
revendedor o directamente a nuestra casa. Será un placer darle las informaciones deseadas.
Parabens!
Està do parabéns pela aquisiçao desta màquina de café espresso, de qualidade superior e
agradecemos a confiança demonstrada. Antes de utilizar a màquina é aconselhàvel ler
atentamente o manual de instruçoes na qual lhe explicamos como utilizà-la, limpiàla e mantela perfeitas condiçoes. No caso de ter quaquer outras questoes é aconselhàvel contactar o
revendedor ou directamente o fabricante. Estaremos ao v/disporpara todos os esclarecimentos
desejados.
Gefeliciteerd!
Wij feliciteren u met het feit dat u dit espresso-apparaat van topkwaliteit gekocht heeft en wij
danken u voor het in ons gestelde vertrouwen.Voordat u het apparaat in gebruik neemt adviseren
wij u deze gebruiksaanwijzing aandachtig te lezen. In deze gebruiksaanwijzing wordt namelijk
uitgelegd hoe u het apparaat het beste kunt gebruiken, schoonmaken en onderhouden zodat
het apparaat lang meegaat.
Com004a 165925900 Rev01.pmd 13/07/2003, 18.302
33
Com004a 165925900 Rev01.pmd 13/07/2003, 18.303

4
D E S C A L E R
Com004a 165925900 Rev01.pmd 13/07/2003, 18.304
5
5
V I N E G A R
A C I D
Com004a 165925900 Rev01.pmd 13/07/2003, 18.305

6
1 GENERALITÁ
La macchina per caffè è indicata per la preparazione di 1 o 2 tazze di caffè espresso ed
è dotata di un tubo orientabile per l’erogazione del vapore e dell’acqua calda.
I comandi sulla parte frontale dell’apparecchio sono contrassegnati con i simboli di
facile interpretazione.
Il corpo della macchina dall’elegante design è stato progettato per uso domestico e non
è indicato per un funzionamento continuo di tipo professionale.
Attenzione. Non si assumono responsabilità per eventuali danni in caso di:
• Impiego errato e non conforme agli scopi previsti;
• Riparazioni non eseguite presso centri d’assistenza autorizzati;
• Manomissione del cavo di alimentazione;
• Manomissione di qualsiasi componente della macchina;
• Impiego di pezzi di ricambio e accessori non originali.
In questi casi viene a decadere la garanzia.
1.1 Per facilitare la lettura
Il triangolo d’avvertimento indica tutte le istruzioni importanti per la sicurezza dell’utente. Attenersi scrupolosamente a tali indicazioni per evitare ferimenti gravi!
Questo simbolo evidenzia le informazioni da tenere in maggiore considerazione, per un
migliore utilizzo della macchina.
Il riferimento ad illustrazioni, parti dell’apparecchio o elementi di comando, ecc. è indicato da numeri o lettere; in questo caso si rimanda all’illustrazione.
GENERALITÁ
Indice
1 GENERALITÁ .................................... 6
2 DATI TECNICI ................................... 7
3 NORME DI SICUREZZA .....................9
4 INSTALLAZIONE .............................11
5 MACINACAFFÈ ............................... 12
6 EROGAZIONE DEL CAFFÈ............... 13
7 SCELTA DEL TIPO DI CAFFÈ -
CONSIGLI ......................................14
8 EROGAZIONE DELL’ACQUA CALDA 14
9 EROGAZIONE DEL VAPORE/
PREPARAZIONE DEL CAPPUCCINO.. 15
10 PULIZIA .......................................... 15
11 DECALCIFICAZIONE ....................... 16
12 SERVIZIO AD INTERVALLI REGOLARI ... 16
13 INFORMAZIONI DI CARATTERE
GIURIDICO .................................... 16
14 SMALTIMENTO ...............................17
15 INCONVENIENTI, CAUSE E RIMEDI . 18
Com004a 165925900 Rev01.pmd 13/07/2003, 18.306
7
Le illustrazioni corrispondenti al testo si trovano nel risvolto di copertina.
Tenere questa pagina aperta durante la lettura delle istruzioni per l’uso.
1.2 Impiego di queste istruzioni per l’uso
Conservare queste istruzioni per l’uso in un luogo sicuro e allegarle alla macchina
per caffè qualora un’altra persona dovesse utilizzarla.
Per ulteriori informazioni o nel caso di problemi, non trattati del tutto o soltanto insufficientemente nelle presenti istruzioni, rivolgetevi agli specialisti competenti.
2 DATI TECNICI
Tensione nominale Vedi targhetta posta sull’apparecchio
Potenza nominale Vedi targhetta posta sull’apparecchio
Materiale corpo Termoplastico
Dimensioni (l x a x p) 350 x 335 x 242
Peso 4,8 kg
Lunghezza cavo 1,2 m
Pannello di comando Frontale
Portafiltro Crema
(variabili in funzione dei modelli) Ottone
Pannarello Speciale per cappuccini (opzionale) e
cappuccinatore (opzionale)
Serbatoio Estraibile
Alimentazione Vedi targhetta
Serbatoio acqua 1,4 l
Pressione pompa 13-15 bar
Caldaia Com004AX Inox
Com004AL Alluminio
Dispositivi di sicurezza Valvola di sicurezza pressione caldaia
Termostato di sicurezza
Con riserva di modifiche di costruzione ed esecuzione dovute al progresso tecnologico.
Macchina conforme alla Direttiva Europea 89/336/CEE (Decreto legislativo 476 del
04/12/92), relativa all’eliminazione dei disturbi radiotelevisivi.
DATI TECNICI
Com004a 165925900 Rev01.pmd 13/07/2003, 18.307
8
NORME DI SICUREZZA
Misure in millimetri
NORME DI SICUREZZA
2
0
0
4
0
0
2 0
0
2
0
0
Com004a 165925900 Rev01.pmd 13/07/2003, 18.308
9
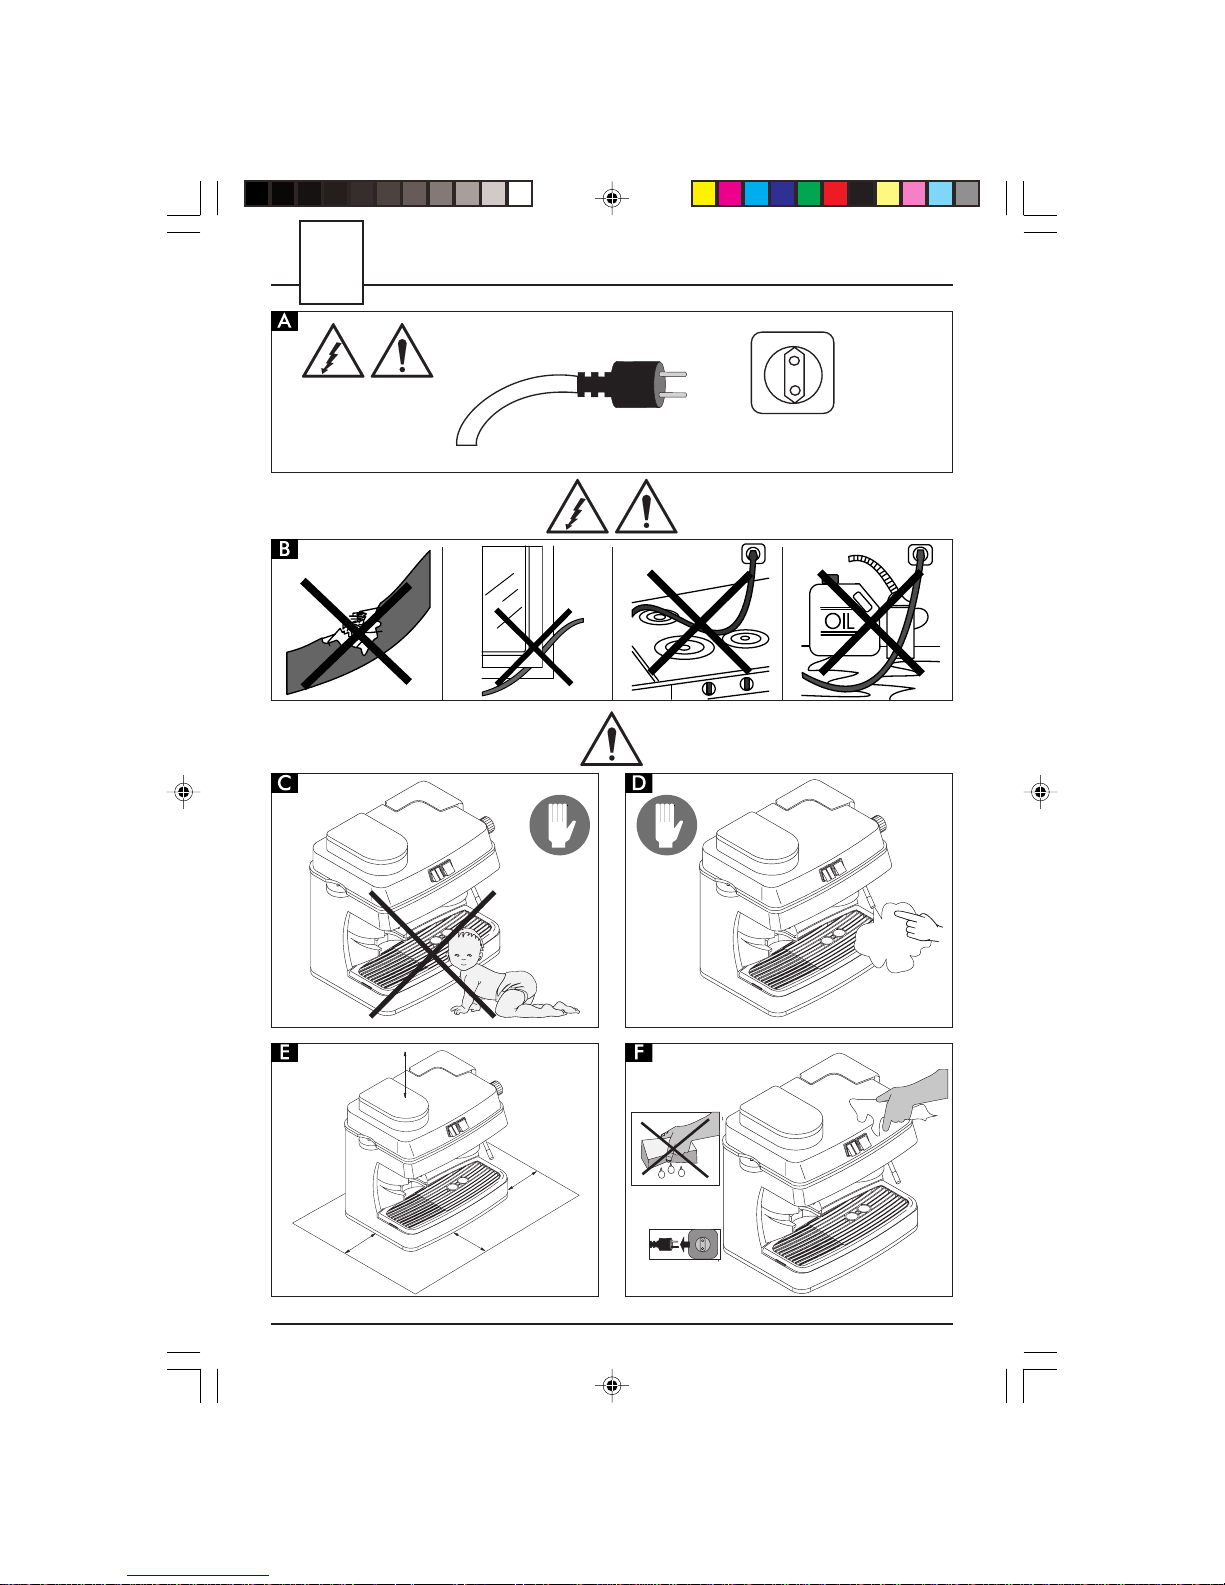
3 NORME DI SICUREZZA
Mai mettere a contatto dell’acqua le parti
sotto corrente: pericolo di cortocircuito!
Il vapore surriscaldato e l’acqua calda
possono provocare scottature! Mai dirigere il getto di vapore o dell’acqua calda verso parti del corpo, toccare con precauzione il beccuccio vapore / acqua calda: pericolo di scottature!
Destinazione d’uso
La macchina per caffè è prevista esclusivamente per l’impiego domestico.
È vietato apportare modifiche tecniche e
ogni impiego illecito, a causa dei rischi che
essi comportano!
La macchina per caffè deve essere utilizzata solo da adulti.
Alimentazione di corrente
Allacciare la macchina per caffè soltanto
ad una presa di corrente adeguata.
La tensione deve corrispondere a quella
indicata sulla targhetta dell’apparecchio.
Cavo d’alimentazione
Mai usare la macchina per caffè se il cavo
d’alimentazione è difettoso.
Far sostituire subito da specialisti competenti i cavi e le spine difettosi.
Non far passare il cavo d’alimentazione per
angoli e su spigoli vivi, sopra oggetti molto caldi e proteggerlo dall’olio.
Non portare o tirare la macchina per caffè
tenendola per il cavo.
Non estrarre la spina tirandola per il cavo
oppure toccarla con le mani bagnate.
Evitare che il cavo d’alimentazione cada
liberamente da tavoli o scaffali.
Protezione d’altre persone
Assicurarsi che nessun bambino abbia la
possibilità di giocare con la macchina per
caffè.
I bambini non si rendono conto del pericolo connesso agli elettrodomestici.
Non lasciare alla portata dei bambini i materiali utilizzati per imballare la macchina.
Pericolo d’ustioni
Evitare di dirigere contro se stessi e/o altri
il getto di vapore surriscaldato e/o d’acqua calda.
Usare sempre le apposite maniglie o manopole.
Toccare i beccucci soltanto nella zona provvista di protezioni anti-scottature.
Non disinserire (togliere) mai il portafiltro
durante l’erogazione del caffè.
Durante la fase di riscaldamento dal gruppo erogazione caffè possono uscire gocce
d’acqua calda.
Ubicazione
Sistemare la macchina per caffè in un posto sicuro, dove nessuno può rovesciarla o
venirne ferito.
Acqua calda o vapore surriscaldato potrebbero fuoriuscire: pericolo di scottature!
Non usare la macchina per caffè all’aperto.
Non posare la macchina su superfici molto calde e nelle vicinanze di fiamme aperte
per evitare che la carcassa fonda o comunque si danneggi.
Pulizia
Prima di pulire la macchina, è indispensabile disinserire tutti i tasti e poi staccare la
spina dalla presa di corrente.
Inoltre, aspettare che la macchina si raffreddi.
Mai immergere la macchina nell’acqua!
È severamente vietato cercare d’intervenire all’interno della macchina.
NORME DI SICUREZZA
Com004a 165925900 Rev01.pmd 13/07/2003, 18.309

10
Spazio per l’uso e la manuten-
zione
Per il corretto e buon funzionamento della
macchina per caffè si consiglia quanto segue:
• Scegliere un piano d’appoggio ben li-
vellato;
• Scegliere un ambiente sufficientemente
illuminato, igienico e con presa di corrente facilmente accessibile;
• Prevedere una distanza minima dalle
pareti della macchina come indicato in
figura.
Custodia della macchina
Quando la macchina rimane inutilizzata per
un periodo prolungato, disinserire la macchina e staccare la spina dalla presa.
Custodirla in luogo asciutto e non accessibile ai bambini.
Proteggerla dalla polvere e dallo sporco.
Riparazioni / Manutenzione
Nel caso di guasti, difetti o sospetto di difetto dopo una caduta, staccare subito la
spina dalla presa.
Mai mettere in funzione una macchina difettosa.
Soltanto gli specialisti competenti possono
effettuare interventi e riparazioni.
Le riparazioni vanno eseguite unicamente
da un centro di assistenza autorizzato.
Nel caso di interventi non eseguiti a regola
d’arte, si declina ogni responsabilità per
eventuali danni.
Antincendio
In caso di incendio utilizzare estintori ad
anidride carbonica (CO2). Non utilizzare
acqua o estintori a polvere.
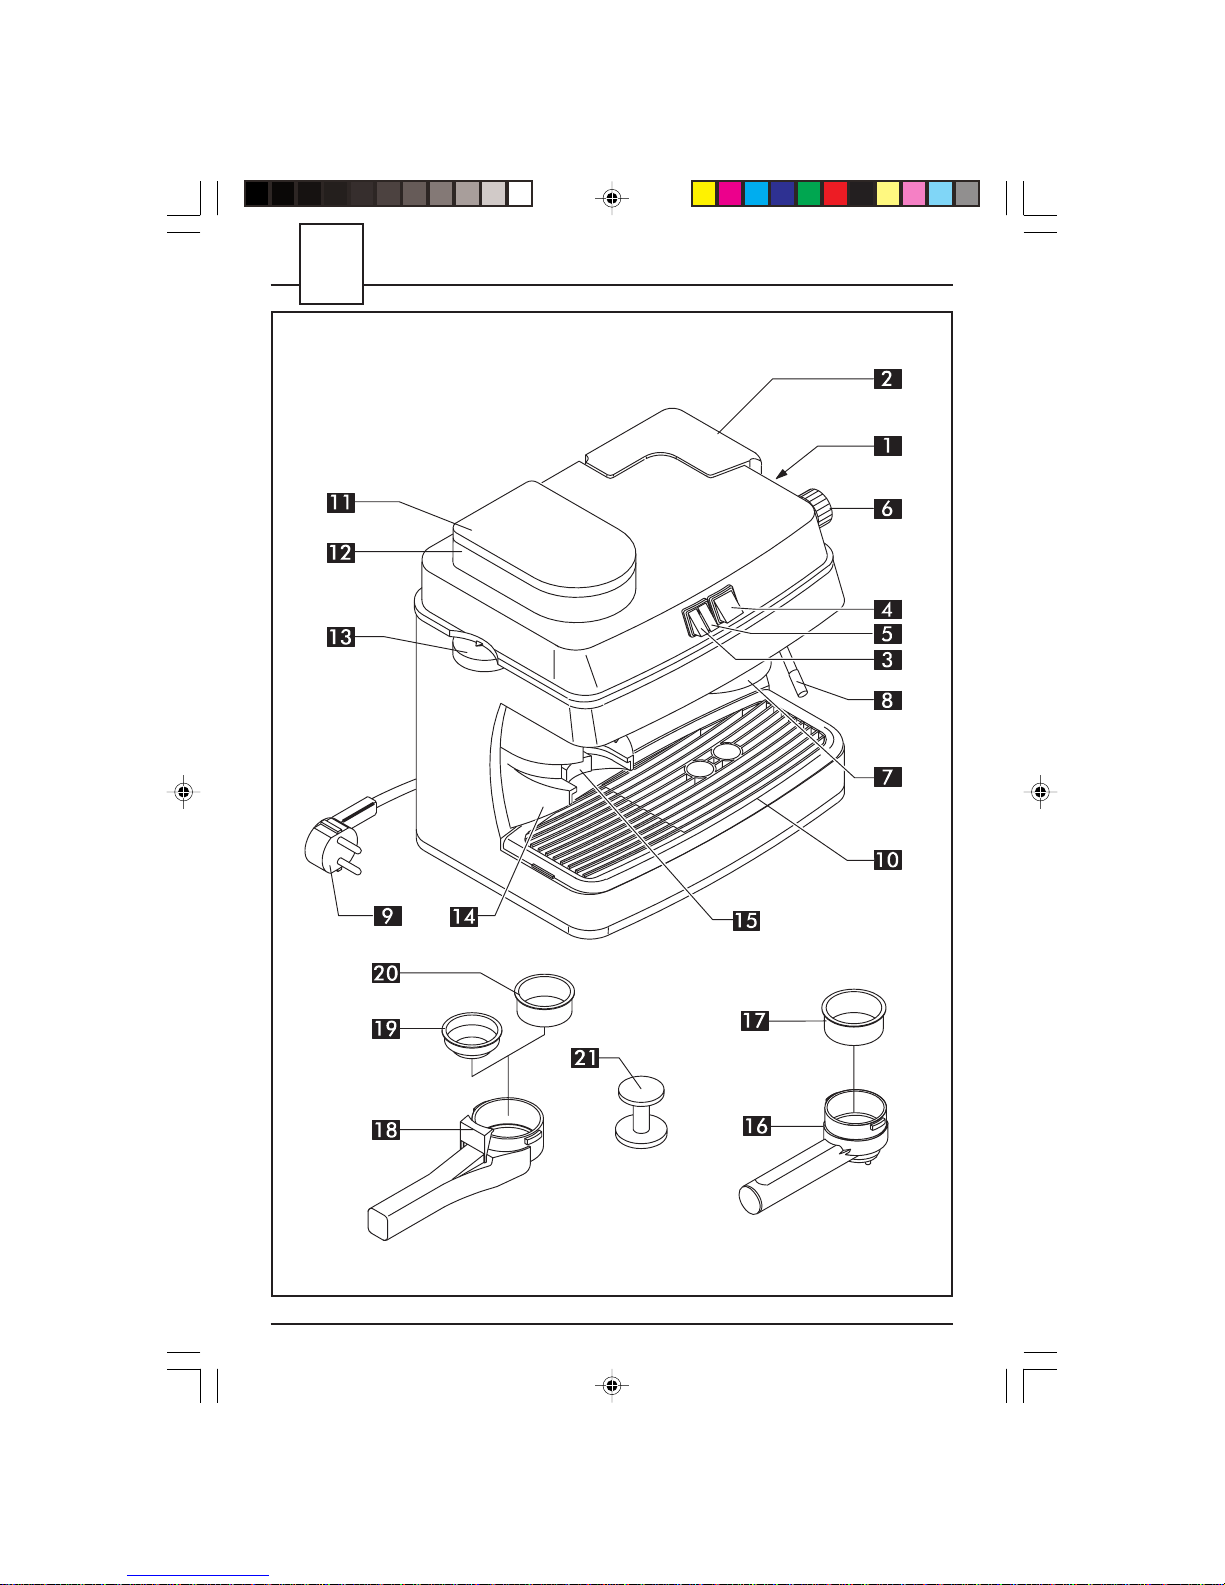
Legenda componenti macchina
Serbatoio acqua
Coperchio serbatoio acqua
Interruttore generale
Interruttore caffè con spia pronto macchina incorporata
Interruttore vapore
Pomello rubinetto acqua calda/vapore
Gruppo erogatore caffè
Tubo vapore
Cavo alimentazione
Vasca recupero acqua + griglia
Coperchio contenitore caffè
Contenitore caffè in grani
Manopola regolazione macinatura
Convogliatore uscita caffè
Pulsante azionamento macinacaffè
Accessori (variabili in funzione del modello)
Portafiltro “Crema”
Filtro per portafiltro “Crema”
(Unico per l’erogazione di 1o 2 caffè)
Portafiltro in ottone
Filtro 1 caffè per portafiltro in ottone
Filtro 2 caffè per portafiltro in ottone
Pressino
NORME DI SICUREZZA
Com004a 165925900 Rev01.pmd 13/07/2003, 18.3010
11
4 INSTALLAZIONE
Per la propria sicurezza e quella di terzi
attenersi scrupolosamente alle “Norme
di sicurezza” riportate alle pagine 9-10.
4.1 Imballaggio
L’imballaggio originale è stato progettato
e realizzato per proteggere la macchina durante la spedizione.
Si consiglia di conservarlo per un eventuale trasporto futuro.
4.2 Avvertenze di Installazione
Prima di installare la macchina, attenersi
alle seguenti prescrizioni di sicurezza:
• sistemare la macchina in un luogo sicu-
ro;
• accertarsi che i bambini non abbiano la
possibilità di giocare con la macchina;
• evitare che la macchina venga collocata
su superfici molto calde o vicino a fiam-
me aperte.
La macchina per caffè è ora pronta per
essere collegata alla rete elettrica.
4.3 Collegamento alla rete elettrica
La corrente elettrica può essere
pericolosa! Di conseguenza, attenersi sempre scrupolosamente alle
norme di sicurezza.
Non usare mai cavi difettosi!
I cavi e le spine difettosi devono
essere sostituiti immediatamente da
specialisti autorizzati.
La macchina per caffè deve essere collegata ad una presa di corrente adeguata.
La tensione dell’apparecchio è stata impostata in fabbrica.
Verificare che la tensione della rete cor-
risponda alle indicazioni riportate sulla
targhetta d’identificazione posta sul fondo dell’apparecchio.
• Srotolare dal fondo dell’apparecchio la
quantità di cavo necessario per il collegamento alla rete elettrica.
• Verificare che l’interruttore generale sia
posto su “0” prima di collegare la macchina alla rete elettrica.
• Inserire la spina in una presa di corrente
di tensione adeguata.
4.4 Riempimento del serbatoio ac-
qua
• Togliere il coperchio del serbatoio (2)
• Estrarre il serbatoio dell’acqua (1) sollevandolo, facendo attenzione a non danneggiare i tubi che si trovano inseriti nel
serbatoio.
• Sciacquarlo e riempirlo con acqua
fresca, evitando di immetterne una quantità eccessiva.
• Reinserire il serbatoio nella sua sede
e reinserire i tubi sfilati in precedenza.
Nota bene!
Alcuni modelli sono provvisti di
serbatoio con valvola di aspirazione acqua. Questa valvola si chiude automaticamente quando il serbatoio viene
estratto per impedire la fuoriuscita dell’acqua. Una volta inserito il serbatoio
effettuare una leggera pressione.
• Rimettere il coperchio sul serbatoio.
Immettere nel serbatoio sempre
e soltanto acqua fresca non gassata. Acqua calda nonché altri liquidi
possono danneggiare il serbatoio.
Non mettere in funzione la mac-
china senza acqua: accertarsi che
MESSA IN FUNZIONE
Com004a 165925900 Rev01.pmd 13/07/2003, 18.3011
12
ve ne sia a sufficienza all’interno del
serbatoio.
4.5 Caricamento del circuito
Prima di ogni messa in funzione, dopo
che la macchina non è stata usata per molto
tempo, dopo aver esaurito l’acqua e dopo
il prelievo del vapore, il circuito della macchina deve essere ricaricato.
• Premere l’interruttore generale (3), la spia
posta al suo interno si illuminerà.
• Dirigere il tubo vapore (pannarello) sopra la vasca raccogligocce.
• Aprire il pomello (6) “acqua calda/vapore” ruotandolo in senso antiorario e
premere l’interruttore caffè (4).
• Attendere che dal tubo vapore
(pannarello) fuoriesca un getto regolare
di acqua.
• Premere di nuovo l’interruttore caffè (4)
e chiudere il pomello (6) “acqua calda/
vapore” ruotandolo in senso orario.
La macchina ora è pronta per l’erogazione
del caffè.
5 MACINACAFFÈ
Attenzione! La manopola di
regolazione della macinatura deve
essere ruotata solo quando il macinacaffè è in funzione. Non inserire caffè
macinato nel contenitore caffè in grani.
Vietato introdurre qualsiasi ma-
teriale che non sia caffè in grani. Il macinacaffè contiene organi in
movimento che possono essere pericolosi; vietato introdurre le dita e/o altri
oggetti. Prima di intervenire, per qualsiasi motivo, all’interno del contenitore caffè disinserire l’interruttore generale e staccare la spina dalla presa di
corrente. Non immettere caffè in gra-
ni nel contenitore caffè quando la macina è in funzione.
• Togliere il coperchio (11) del contenitore
caffè in grani (12).
• Verificare che il contenitore sia pulito, versare il caffè fresco in grani e richiudere
il contenitore con il coperchio (11).
La qualità ed il gusto del caffè dipendono,
oltre che dalla miscela utilizzata, anche dal
grado di macinatura.
La macchina è dotata di una manopola (13)
per la regolazione del grado di macinatura.
Per variare il grado di macinatura ruotare
la manopola graduata quando la macina
è in funzione (le cifre ne indicano il grado);
ogni apparecchio è regolato in fabbrica su
un grado di macinatura medio.
Ruotando la manopola verso numeri più
bassi si aumenta il grado di macinatura;
verso numeri più alti si diminuisce il grado
di macinatura.
É sconsigliato miscelare caffè con diversi
gradi di macinatura.
5.1 Azionamento macinacaffè /
dosatura
• Accendere la macchina, se questa non è
attiva, premendo l’interruttore generale (3).
• Per azionare il macinacaffè avvicinare il portafiltro verso il convogliatore
uscita caffè (14) inserendolo nell’apposita forcella. Premere con il portafiltro
fino ad azionare l’interruttore macinatura
caffè (15).
• Il macinacaffè entra in funzione dosando caffè macinato all’interno del
portafiltro.
• Interrompere la macinatura del caffè in
polvere quando si è raggiunta la quantità desiderata estraendo il portafiltro dalla forcella;
MACINACAFFÈ
Com004a 165925900 Rev01.pmd 13/07/2003, 18.3012

13
Nota. La dosatura avviene al-
l’istante ed è affidata alla sensibilità dell’utilizzatore, evitare una
dosatura eccessiva o scarsa; la quantità di caffè in polvere per ogni tazzina
di caffè dovrebbe variare da 5 a 7 gr.
Attenzione! è vietato azionare il
macinacaffè con altri dispositivi e/
o strumenti diversi dal portafiltro.
6 EROGAZIONE DEL CAFFÈ
Attenzione!
Durante l’erogazione del caffè è
vietato disinserire il portafiltro ruotandolo
manualmente in senso orario.
Pericolo di ustioni.
• Durante questa operazione la spia di pron-
to macchina situata all’interno dell’interruttore caffè (4) può accendersi e spegnersi; tale funzionamento deve essere considerato normale e non un’anomalia.
• Assicurarsi, prima dell’uso, che il po-
mello (6) acqua calda/vapore sia chiuso e che il serbatoio acqua della macchina contenga una quantità di acqua
sufficiente.
• Accendere la macchina, se questa non è
attiva, con l’interruttore generale (3), la
spia posta al suo interno si illuminerà.
• Attendere che la spia di pronto macchi-
na situata all’interno dell’interruttore caffè
(4) si accenda, ora la macchina è pronta
per l’erogazione del caffè.
6.1 Con portafiltro Crema
• Inserire il filtro (17) nel portafiltro “Crema” (16).
• Inserire dal basso il portafiltro “Crema” nel gruppo erogazione (7),
ruotandolo da sinistra verso destra fino
al suo bloccaggio.
• Lasciare la presa dal manico del
portafiltro.
Un sistema automatico riporta ora leggermente il manico verso sinistra. Questo movimento garantisce il perfetto funzionamento del portafiltro.
• Posizionare una tazza sotto al
portafiltro.
Preriscaldare il portafiltro e la tazza premendo l’interruttore caffè (4); l’acqua comincerà ad uscire dal portafiltro (questa
operazione si rende necessaria solo per
il primo caffè).
• Quando la tazza sarà sufficientemente
piena premere nuovamente l’interruttore caffè (4).
• Togliere il portafiltro dalla macchina
ruotandolo da destra verso sinistra e vuotare l’acqua residua.
• Con lo speciale portafiltro Crema (16)
di cui è dotata la macchina, non occorre
cambiare filtro per ottenere uno o due
caffè.
• Prelevare, con il portafiltro, una quantità di caffè macinato adeguata (par. 5.1)
per ottenere uno o due caffè.
• Pulire il bordo del portafiltro da eventuali residui di caffè.
• Inserire dal basso il portafiltro “Crema” (16) nel gruppo erogazione (7),
ruotandolo da sinistra verso destra, fino
al suo bloccaggio completo come visto
in precedenza.
• Prelevare 1 o 2 tazzine preriscaldate
e posizionarle sotto al portafiltro; verificare che siano correttamente sistemate
sotto ai fori di uscita caffè.
• Premere il tasto caffè. Attendere che le
tazzine siano sufficientemente piene.
• Premere nuovamente il tasto caffè per fermare l’erogazione del caffè.
• Al termine dell’erogazione attendere
EROGAZIONE DEL CAFFÈ
Com004a 165925900 Rev01.pmd 13/07/2003, 18.3013

14
qualche secondo, estrarre il portafiltro e
vuotarlo dai fondi residui.
Nota di pulizia: mantenere puli-
to il filtro del portafiltro “Crema”
estraendolo dalla propria sede e lavandolo con acqua potabile.
6.2 Con portafiltro in ottone
• Inserire il filtro (19 o 20, da 1 o 2 tazze
secondo il numero di caffè da realizzare)
nel portafiltro in ottone (18).
• Inserire dal basso il portafiltro in ot-
tone nel gruppo erogazione (7),
ruotandolo da sinistra verso destra fino
al suo bloccaggio.
• Posizionare una tazza sotto al
portafiltro.
• Preriscaldare il portafiltro e la tazza pre-
mendo l’interruttore caffè (4); l’acqua comincerà ad uscire dal portafiltro (questa
operazione si rende necessaria solo per
il primo caffè).
• Quando la tazza sarà sufficientemente
piena premere nuovamente l’interruttore caffè (4).
• Togliere il portafiltro dalla macchina
ruotandolo da destra verso sinistra.
• Prelevare, con il portafiltro, una o due
dosi di caffè macinato (pa.5.1), in funzione del filtro montato in precedenza.
• Premere il caffè utilizzando l’apposito
pressino (21) e pulire il bordo del
portafiltro da eventuali residui di caffè.
• Inserire dal basso il portafiltro in ot-
tone (18) nel gruppo erogatore (7),
ruotandolo da sinistra verso destra, fino
al suo bloccaggio completo.
• Prelevare 1 o 2 tazzine preriscaldate
e posizionarle sotto al portafiltro; verificare che siano correttamente sistemate
sotto ai fori di uscita caffè.
• Premere il tasto caffè. Attendere che le
tazzine siano sufficientemente piene.
• Premere nuovamente il tasto caffè per fermare l’erogazione del caffè.
• Al termine dell’erogazione estrarre il
portafiltro e vuotarlo dai fondi residui.
Nota di pulizia: mantenere pulito il
filtro del portafiltro estraendolo dal-
la propria sede e lavandolo con acqua.
7 SCELTA DEL TIPO DI CAFFÈ
- CONSIGLI
In linea di massima si possono utilizzare
tutti i tipi di caffè esistenti in commercio.
Tuttavia, il caffè è un prodotto naturale ed
il suo gusto cambia in funzione dell’origine e della miscela; è preferibile quindi provarne vari tipi, al fine di trovare quello che
meglio si addice ai gusti personali.
Per migliori risultati si consiglia comunque
di utilizzare miscele espressamente preparate per macchine espresso.
Il caffè dovrebbe sempre fuoriuscire regolarmente dal portafiltro senza gocciolare.
La velocità di fuoriuscita del caffè può essere modificata cambiando leggermente la
dose, il grado di macinatura e/o di
pressatura del caffè nel filtro.
PRIMA DI ESEGUIRE QUALSIASI
OPERAZIONE RELATIVA ALL’EROGAZIONE DEL VAPORE O DELL’ACQUA CALDA VERIFICARE CHE IL TUBO
VAPORE (PANNARELLO) SIA ORIENTATO
SOPRA LA VASCA RECUPERO ACQUA.
8 EROGAZIONE DELL’ACQUA
CALDA
• Accendere la macchina, se questa non è
attiva, con l’interruttore generale (3), la
spia posta al suo interno si illuminerà.
EROGAZIONE DELL’ACQUA CALDA
Com004a 165925900 Rev01.pmd 13/07/2003, 18.3014

15
• Attendere che la spia situata all’interno
dell’interruttore caffè (4) si accenda.
• Sistemare una tazza o un bicchiere
da tè sotto al tubo vapore (pannarello).
• Aprire il pomello (6) “Acqua calda/vapore” ruotandolo in senso antiorario e
premere l’interruttore caffè (4) per la fuoriuscita dell’acqua fino alla quantità desiderata.
• Premere nuovamente l’interruttore caffè
(4) e chiudere il pomello (6) ruotandolo
in senso orario per interrompere
l’erogazione di acqua calda.
Pericolo di scottature!
All’inizio dell’erogazione possono
verificarsi brevi spruzzi di acqua calda.
Il tubo di erogazione può raggiungere
temperature elevate: evitare di toccarlo
direttamente con le mani.
9 EROGAZIONE DEL VAPORE/
PREPARAZIONE DEL CAPPUCCINO
• Accendere la macchina, se questa non è
attiva, con l’interruttore generale (3), la
spia posta al suo interno si illuminerà.
• Premere l’interruttore (5) vapore, la
spia posta al suo interno si illuminerà.
Si spegne la spia di pronto macchina
situata all’interno dell’interruttore caffè (4).
• Attendere che la spia di pronto mac-
china situata all’interno dell’interruttore
(4) si riaccenda, a questo punto la
macchina è pronta per l’erogazione del
vapore.
• Dirigere il tubo vapore (pannarello)
sopra la vasca raccogligocce, aprire il
pomello (6) “Acqua calda/vapore” per
qualche istante, in modo da far uscire
l’acqua residua dal tubo vapore
(pannarello); in breve tempo comincerà ad uscire solo vapore.
• Chiudere il pomello (6).
• Immergere il tubo vapore (pannarello) nel liquido da riscaldare e
aprire il pomello (6); far ruotare il recipiente con lenti movimenti dal basso
verso l’alto per rendere uniforme il riscaldamento.
• Dopo aver utilizzato il vapore per il
tempo desiderato chiudere il pomello
(6) e riportare in posizione iniziale l’interruttore (5) “Vapore”.
Utilizzando questo sistema con il
latte si procede alla preparazio-
ne del cappuccino.
• Procedere con il caricamento del circuito descritto nel par. 4.5 per rendere operativa la macchina.
• Pulire, dopo questa operazione il tubo vapore (pannarello) con un panno umido.
10 PULIZIA
La manutenzione e la pulizia possono essere effettuate soltanto quando la macchina è fredda e scollegata dalla rete
elettrica.
• Non immergere la macchina nell’acqua
e non inserire i componenti nella lavastoviglie.
• Non utilizzare oggetti acuminati o prodotti chimici aggressivi (solventi) per la
pulizia.
• Si consiglia di pulire quotidianamente
il serbatoio dell’acqua e di riempirlo con
acqua fresca.
• Dopo aver riscaldato il latte, prelevare
una piccola quantità di acqua calda per
la pulizia del tubo e pulirlo esternamente con un panno umido.
• Per la pulizia dell’apparecchio uti-
EROGAZIONE DEL VAPORE - PULIZIA
Com004a 165925900 Rev01.pmd 13/07/2003, 18.3015
16
lizzare un panno morbido inumidito di
acqua.
• Per la pulizia del portafiltro procedere come segue:
• Estrarre il filtro, immergerlo in acqua
calda e lavarlo con cura.
• Lavare l’interno del portafiltro.
• Non asciugare la macchina e/o i suoi
componenti utilizzando un forno a
microonde e/o un forno convenzionale.
• Pulire, quando è presente, il pannarello
situato sopra il tubo vapore.
Per fare questo occorre svitare la ghiera
ed estrarre il pannarello dal tubo vapore, smontare il corpo esterno del
pannarello.
Lavare con acqua corrente e rimontare il
pannarello.
Si consiglia di serrare la ghiera
in modo adeguato; il pannarello
potrebbe sfilarsi durante il suo utilizzo.
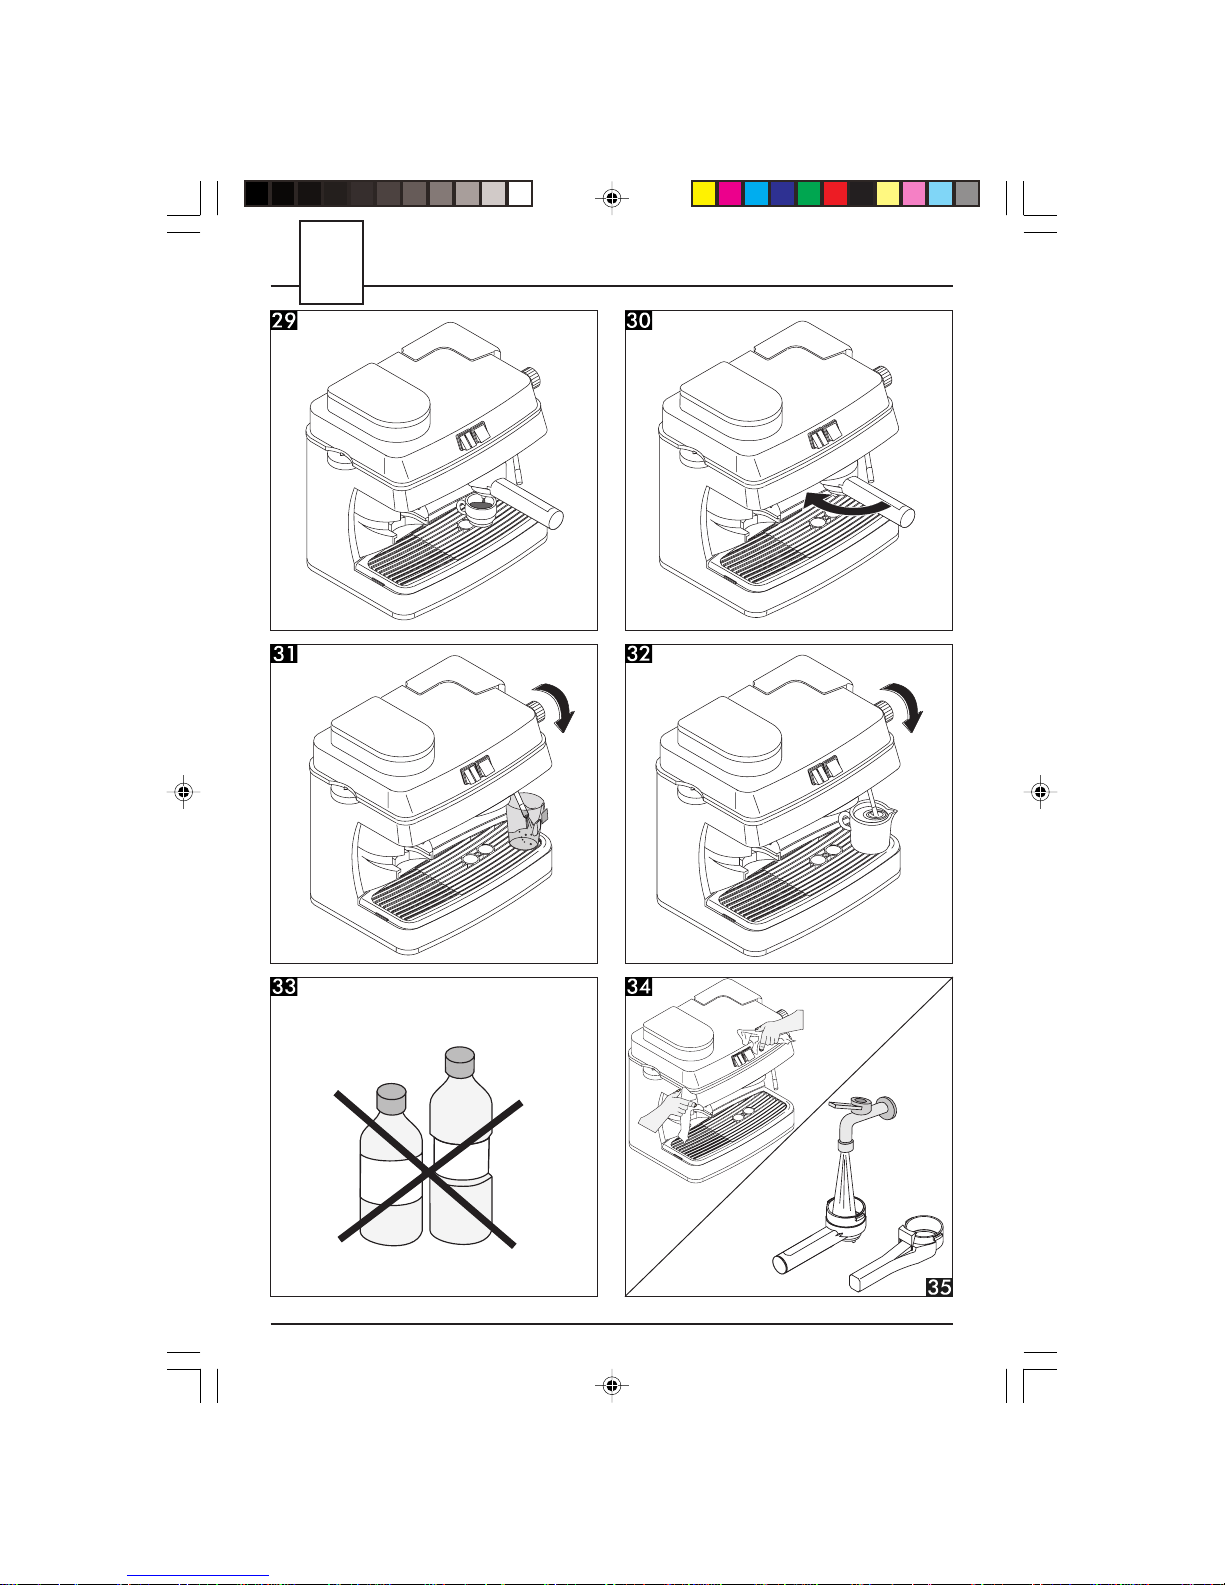
11 DECALCIFICAZIONE
La formazione di calcare avviene con
l’uso dell’apparecchio; la decalcificazione
è necessaria quando si osserva una riduzione della portata dell’acqua.
Qualora si voglia eseguirla per-
sonalmente, si può utilizzare un
prodotto decalcificante per macchine
da caffè di tipo non tossico e/o nocivo,
comunemente reperibile in commercio.
Attenzione! Non utilizzare in nes-
sun caso l’aceto come decalcificante.
• Togliere il serbatoio dell’acqua e vuotar-
lo dall’acqua residua.
• Miscelare il decalcificante con acqua
come specificato sulla confezione del
DECALCIFICAZIONE
prodotto decalcificante e riempire il serbatoio dell’acqua; inserire il serbatoio
nella macchina.
• Accendere la macchina premendo l’interruttore generale.
• Dirigere il tubo vapore sulla vasca
raccogligocce.
• Prelevare ad intervalli (una tazza per
volta) l’intero contenuto del serbatoio dell’acqua ruotando il pomello vapore (6)
in senso antiorario e premendo l’interruttore caffè (4); per fermare l’erogazione
premere nuovamente l’interruttore caffè
(4) e ruotare il pomello vapore (6) in senso orario.
• Durante i singoli intervalli si deve lasciare
agire il decalcificante per circa 10-15 minuti, scollegando la macchina per mezzo
dell’interruttore generale (3).
• Terminata la soluzione decalcificante, estrarre il serbatoio dell’acqua,
sciacquarlo e riempirlo con acqua fresca potabile.
• Reinserire il serbatoio nella
machina; vuotare 2/3 del contento del
serbatoio dell’acqua ruotando il pomello vapore (6) in senso antiorario e premendo l’interruttore caffè (4); per fermare
l’erogazione premere nuovamente l’interruttore caffè (4) e ruotare il pomello
vapore (6) in senso orario.
• Lasciare riscaldare la macchina e vuotare il rimanente contenuto del serbatoio
dell’acqua ruotando il pomello vapore
(6) in senso antiorario e premendo l’interruttore caffè (4); per fermare
l’erogazione premere nuovamente l’interruttore caffè (4) e ruotare il pomello
vapore (6) in senso orario.
Qualora si utilizzi un prodotto
diverso da quello consigliato si
raccomanda di rispettare comunque
Com004a 165925900 Rev01.pmd 13/07/2003, 18.3016
17
le istruzioni della casa produttrice riportate sulla confezione del prodotto decalcificante.
12 SERVIZIO AD INTERVALLI
REGOLARI
Il servizio ad intervalli regolari da parte
di un Centro di Assistenza Autorizzato
prolunga la durata e l’affidabilità della
macchina.
Conservare l’imballo originale che potrà servire da protezione durante il trasporto.
13 INFORMAZIONI DI CARAT-
TERE GIURIDICO
• Le presenti istruzioni per l’uso contengono le informazioni necessarie per l’impiego corretto, per le funzioni operative
e la manutenzione accurata dell’apparecchio.
• Queste conoscenze e l’osservanza delle
presenti istruzioni rappresentano la premessa per un uso senza pericolo nel pieno rispetto della sicurezza in caso di funzionamento e manutenzione dell’apparecchio.
• Se si desiderano ulteriori informazioni, o
se dovessero subentrare particolari problemi che si ritiene nelle presenti istruzioni d’uso non siano stati spiegati con
sufficiente chiarezza, preghiamo di rivolgersi al rivenditore locale o direttamente
alla ditta costruttrice.
• Inoltre facciamo notare che il contenuto di queste istruzioni d’uso non è
parte di una convenzione precedente
o già esistente, di un accordo o di un
contratto legale e che non ne cambiano la sostanza.
• Tutti gli obblighi del costruttore si basa-
INFORMAZIONI DI CARATTERE GIURIDICO - SMALTIMENTO
no sul relativo contratto di compravendita che contiene anche il regolamento
completo ed esclusivo riguardo alle prestazioni di garanzia.
• Le norme di garanzia contrattuali non
vengono né limitate né estese in base alle
presenti spiegazioni.
• Le istruzioni per l’uso contengono informazioni protette dal diritto d’autore.
• Non è permesso fotocopiarle o tradurle
in un’altra lingua senza previo accordo
scritto da parte del Costruttore.
14 SMALTIMENTO
• Rendere inutilizzabile gli apparecchi non
più in uso.
• Staccare la spina dalla presa e tagliare il
cavo elettrico.
• Consegnare gli apparecchi fuori uso a
un centro di raccolta idoneo.
Com004a 165925900 Rev01.pmd 13/07/2003, 18.3017
18
Guasto
La macchina non si accende
La pompa è molto rumorosa
Il caffè é troppo freddo
Non si forma la schiuma del latte
Il caffè sgorga troppo
velocemente, non si forma la crema
Il caffè non sgorga o
sgorga solo a gocce
Il caffè sgorga dai bordi
Cause possibili
Macchina non collegata alla rete elettrica.
Manca acqua nel serbatoio (par.4.4).
La spia dell’interruttore caffè (4) era
spenta quando è stato premuto l’interruttore (4).
Portafiltro non inserito per il
preriscaldamento (par. 6.1-6.2)
Latte non adatto.
Troppo poco caffè nel portafiltro.
Macinatura troppo grossa.
Caffè vecchio o non adatto.
Mancanza di acqua.
Macinatura troppo fine.
Caffè premuto nel portafiltro.
Troppo caffè nel portafiltro.
Pomello (6) “Acqua calda/vapore”
aperto.
Macchina calcificata.
Doccia otturata.
Filtro nel portafiltro otturato.
Portafiltro inserito male nel gruppo
erogazione caffè.
Bordo superiore del portafiltro spor-
co.
Guarnizione della caldaia sporca o
usurata.
Troppo caffè nel portafiltro.
Rimedio
Collegare la macchina alla rete
elettrica.
Rabboccare con acqua.
Attendere che la spia si illumini.
Preriscaldare il portafiltro.
Controllare il tenore del grasso.
Aggiungere il caffè (par. 6.1-6.2).
Modificare il grado di
macinatura. (cap.5).
Usare una miscela diversa (cap.7).
Rabboccare con acqua (par.4.4)
Modificare il grado di
macinatura. (cap.5).
Smuovere il caffè macinato.
Ridurre la quantità di caffè utiliz-
zando il misurino.
Chiudere il pomello.
Decalcificare la macchina
(cap.11).
Pulire l’elemento filtrante.
Pulire il filtro (cap.10).
Inserire correttamente il portafiltro
(par.6.1-6.2).
Pulire il bordo del portafiltro.
Pulire o sostituire la guarnizione.
Ridurre la quantità di caffè utilizzando il misurino
INCONVENIENTI, CAUSE E RIMEDI
15 INCONVENIENTI, CAUSE E RIMEDI
Per i guasti non contemplati dalla suddetta tabella o in caso che i rimedi suggeriti
non li risolvano, rivolgersi ad un centro assistenza.
Com004a 165925900 Rev01.pmd 13/07/2003, 18.3018
19
NOTE
__________________________________________________
__________________________________________________
__________________________________________________
__________________________________________________
__________________________________________________
__________________________________________________
__________________________________________________
__________________________________________________
__________________________________________________
__________________________________________________
__________________________________________________
__________________________________________________
__________________________________________________
__________________________________________________
__________________________________________________
__________________________________________________
__________________________________________________
__________________________________________________
__________________________________________________
__________________________________________________
__________________________________________________
__________________________________________________
__________________________________________________
__________________________________________________
__________________________________________________
__________________________________________________
__________________________________________________
__________________________________________________
__________________________________________________
__________________________________________________
__________________________________________________
Com004a 165925900 Rev01.pmd 13/07/2003, 18.3019

20
Contents
1 GENERAL ....................................... 20
2 TECHNICAL SPECIFICATIONS ......... 21
3 SAFETY REGULATIONS ...................23
4 INSTALLMENT................................. 25
5 COFFEE GRINDER ..........................26
6 COFFEE FLOW ............................... 27
7 ADVICE ON CHOICE OF COFFEE... 28
8 HOT WATER JET .............................. 28
9 HOW TO PREPARE A CAPPUCCINO
COFFEE USING THE STEAM TUBE ... 29
10 CLEANING INSTRUCTIONS ............ 29
11 DESCALING ................................... 30
12 SERVICING ..................................... 30
13 LEGAL INFORMATION ....................30
14 DISPOSAL OF THE APPLIANCE ....... 31
15 TROUBLESHOOTING ...................... 32
1 GENERAL
This coffee machine is designed to make 1 or 2 cups of espresso coffee, and includes an
adjustable hot water/steam tube.
The switches on the front of the machine are clearly labelled with easy to understand
symbols.
The machine is elegantly designed for a domestic kitchen and is not suitable for heavy
duty, professional use.
Warning: The manufacturers accept no responsibility for eventual faults caused
by any of the following:
• Misuse or use contrary to the manufacturer’s recommendations;
• Repairs attempted by persons not belonging to an authorised service centre;
• Mishandling of the mains cable;
• Mishandling of any part of the machine;
• Use of unauthorised spare parts or accessories.
In any of the above cases the guarantee will prove null and void.
1.1 Guide to the instructions
The warning triangle indicates all the personal safety instructions. Follow these
instructions carefully to avoid injury.
This symbol indicates the most important information for ensuring an optimal use of the
machine.
References to diagrams, parts of the appliance or control switches etc. are indicated by a
number or letter. Keep the illustrations to hand.
GENERAL
Com004a 165925900 Rev01.pmd 13/07/2003, 18.3020

21
The diagrams referred to in the leaflet are placed in the inside cover flap.
Keep these pages open while reading the instructions.
1.2 How to use these instructions
Keep the instructions in a safe place or attach them to the machine for easy
consultation by others.
If you desire any further information or have a problem not sufficiently covered by this
leaflet please contact our qualified experts.
2 TECHNICAL SPECIFICATIONS
Rated voltage See rating plate on appliance
Rated output See rating plate on appliance
Body material Thermoplastic
Dimensions (l x h x w) 350 x 335 x 242
Weight 4.8 kg
Cable length 1.2 m
Control panel Frontal
Filter holder “Crema”
(depending on model) Brass
“Pannarello” Cappuccino optional extra and “cappuccino”
maker (optional)
Tank Removable
Power supply See rating plate
Water tank 1.4 l
Pump pressure 13-15 bar
Boiler Com004AX Stainless steel
Com004AL Aluminium
Safety requirements Pressure safety valve in boiler
Safety thermostat
The manufacturer reserves the right to change the make up of the machine in the
light of any technological breakthrough.
The machine complies to the European Standard 89/336/EEC (legislative decree 476
04.12.92), referring to the elimination of broadcasting disturbance.
TECHNICAL SPECIFICATIONS
Com004a 165925900 Rev01.pmd 13/07/2003, 18.3021

22
Sizes in millimetres
SAFETY REGULATIONS
2
0
0
4
0
0
2 0
0
2
0
0
Com004a 165925900 Rev01.pmd 13/07/2003, 18.3022
23
SAFETY REGULATIONS
3 SAFETY REGULATIONS
All electrical parts must be kept dry, as
the machine may short circuit on contact
with water.
Steam and boiling water can cause
burning.
Always point the steam or hot water jet
away from any part of the body and be
careful when touching the steam/hot
water nozzle as it may be hot: danger of
burning.
Use of machine
The coffee machine is designed exclusively
for domestic use.
Technical alterations or misuse are strictly
forbidden owing to the risks that they
involve.
The coffee maker must be used by adults
only.
Electrical requirements
The coffee machine must be connected to
a suitable wall socket.
The voltage used must be that indicated
on the rating plate.
Mains cable
The coffee maker must not be used if the
mains cable flex is defective.
If a plug or cable is defective it must be
changed immediately by a qualified
specialist.
Do not locate the mains cable over hot
surfaces or round sharp corners and keep
it away from oil.
Do not carry or pull the machine by the
mains cable.
Do not unplug the machine by pulling the
mains cable or with wet hands.
Do not allow the flex to dangle from a shelf
or table.
Safeguarding others
Ensure that the machine is out of the reach
of children.
Children are not aware of the risks involved
in electrical appliances.
Packing materials must not be left within
children’s reach as they represent a
potential source of danger.
Burning precautions
Always point the steam/hot water jet away
from you.
Always use the correct handles or knobs.
Only touch the nozzle in the part where it
has been insulated for your protection.
Do not remove the filter holder while the
machine is in use.
While the machine is warming up, hot water
may drip from the coffee outlet.
Location
The machine must be positioned in a safe
place where it cannot be knocked over or
cause injury.
Hot water or steam may leak, causing
possible burning.
Do not use the coffee machine outdoors.
Do not place the machine near hot surfaces
or naked flames as this may damage or
melt the cover.
Cleaning Instructions
Before cleaning the machine, all switches
must be in the “off” position, and the
machine must be unplugged from the
wall socket.
You must wait for the machine to cool down.
Never immerse the machine in water.
It is strictly forbidden to tamper with the
inside of the machine.
Com004a 165925900 Rev01.pmd 13/07/2003, 18.3023
24
SAFETY REGULATIONS
Recommended space for use
and maintenance
To get the best results from the coffee
machine, the following is recommended:
• Place the machine on a flat, even surface;
• Choose a position that is well-lit, hygienic
and where a wall socket is easily
accessible;
• Check that the minimum distances
around the machine are as indicated in
the diagram.
Storage of the machine
If the machine is to be left unused for a
long period, turn it off and unplug it from
the wall socket. Keep in a dry place, out of
the reach of children. Cover against dirt
and dust.
Repairs/Maintenance
If the machine stops working, is in any way
defective or has been knocked over unplug
it immediately from the wall socket.
Never use a faulty machine.
Repairs or alterations must only be carried
out by qualified experts.
Repairs or alterations must only be carried
out by an authorised service centre.
The company will accept no responsibility
for damage caused by repairs attempted
by unauthorised persons.
Fire risks
If the machine should catch fire use a
carbon dioxide extinguisher.
Do not use water or a powder extinguisher.
Legend of machine components
Water tank
Water tank lid
Main switch
Coffee switch with machine ready light
incorporated
Steam switch
Steam/hot water knob
Coffee outlet
Steam tube
Mains cable
Drip tray + grill
Coffee container lid
Container for coffee beans
Grind regulation knob
Coffee outflow conveyor
Coffee grinder start button
Accessories (the accessories vary
depending on the model)
“Crema” filter holder
Filter for “Crema” filter holder r
(A single unit for making 1 or 2 cups
of coffee)
Brass filter holder
Single cup filter for brass filter holder
Twin cup filter for brass filter holder
Coffee tamper
Com004a 165925900 Rev01.pmd 13/07/2003, 18.3024
25
START-UP
4 INSTALLMENT
For personal safety follow the “Safety
regulations” found on pages 23-24.
4.1 Packaging
The original packaging has been designed
to protect the appliance during transportation.
You are recommended to keep it for later
use.
4.2 Installment requirements
Before installing the machine read the
following safety instructions carefully:
• Locate the machine in a safe place;
• Make sure that it is out of the reach of
children;
• Do not place the machine on a hot
surface or near a naked flame.
The machine is now ready to be connected
to the house electricity supply.
4.3 Connecting the appliance to the
power supply
Electricity can be dangerous, so
always follow the safety
regulations carefully.
Never use a faulty cable.
Faulty plugs and cables must be
changed immediately by authorised
personnel.
The coffee maker must be connected to a
suitable wall socket. The voltage of the
appliance has been factory-set. The voltage
on the rating plate (positioned on the
bottom of the appliance) must correspond
to that of your house electricity supply.
• Uncoil a length of cable from the cable
wind found underneath the appliance,
sufficient for the plug to reach the wall
socket.
• Check that the main switch is in the “0”
position before inserting the plug in the
wall socket.
• Plug the appliance into a wall socket
carrying the correct voltage.
4.4 Filling the water tank
• Remove the water tank lid (2).
• Lift out the water tank (1), making sure
you do not damage any of the tubes
inside it.
• Rinse and fill the tank with fresh water
without overfilling.
• Put the water tank back in its right
place, making sure that the tubes
removed previously are all immersed in
water.
Warning! The tanks of some
models are equipped with a
water inflow valve.
This valve closes automatically when the
tank is removed to prevent water
leakage.
When putting the tank back, press
lightly on it to open the valve.
• Put the lid back on the tank.
Always fill the tank with fresh, not
carbonised water: hot water or
other liquids may damage the tank.
Do not use the coffee maker
without water, always check that
there is enough water in the tank.
Com004a 165925900 Rev01.pmd 13/07/2003, 18.3025

26
COFFEE GRINDER
4.5 Priming
Before using the machine for the first
time, after the appliance has been left
unused for a long period or when the water
and steam have run out, it is necessary to
prime the machine.
• Turn on the main switch (3), the light on
the inside will be on.
• Point the steam tube (“Pannarello”) over
the drip tray.
• Open the “hot water/steam” knob (6),
turning it in an anti-clockwise direction
and press the coffee switch (4).
• Wait until a steady stream of water flows
from the tube (“Pannarello”).
• Press the coffee switch (4) again and close
the “hot water/steam” knob (6), turning
it in a clockwise direction.
The machine is now ready to make a perfect
cup of coffee.
5 COFFEE GRINDER
Warning! Turn grinding adjusting
handle only when the coffee
grinder is working.
Do not introduce ground coffee in the
coffee bean box.
Do not introduce any kind of
material, except for coffee beans.
The coffee grinder contains moving parts
which can be dangerous.
Do not introduce fingers and/or other
objects. Before any intervention inside the
coffee box, for any reason, turn off the
main switch and remove the switch plug.
Do not introduce coffee beans in the
coffee box when the machine is working.
• Remove the cover (11) of the coffee bean
box (12).
• Make sure that the box is clean, pour
milled coffee beans and close the box
with the cover (11).
The coffee quality and taste depend on the
blend, but also on the grinding level.
The machine is fitted with a handle (13)
designed to adjust the grinding level.
In order to adjust the grinding level, turn
the graduated handle when the machine is
working (the level is indicated by digits).
When manufactured, the machine is set to
a medium grinding level.
By setting the handle to smaller numbers,
the grinding level is increased, whereas it
lowers if the handle is set to bigger numbers.
Coffee with different grinding levels should
not be blended.
5.1 Coffee grinder operation/
dosage
• If the machine is off, turn it on by pressing
the main switch (3).
• To start the coffee grinder, bring
coffee filter-holder close to coffee output
conveyor (14), by introducing it into a
special fork.
Press by means of the coffee filter until
the coffee grinding switch (15) is
turned on.
• The coffee grinder starts working by
dosing ground coffee inside the coffee
filter-holder.
• Stop grinding ground coffee when the
desired quantity has been reached, by
pulling the filter-holder out of the fork.
Note. Dosage takes place
immediately and depends on the
Com004a 165925900 Rev01.pmd 13/07/2003, 18.3026
27
COFFEE FLOW
user; avoid strong or small doses. The
quantity of ground coffee per cup
should be 5 to 7 grams.
Warning! The coffee grinder shall
not be operated by devices and/
or tools other than the coffee filterholder.
6 COFFEE FLOW
Warning! Do not remove the filter
holder by turning it manually in a
clockwise direction while the machine is
producing coffee. Danger of burning.
• During this operation the „machine on“
light inside the coffee switch (4) will go
on and off. This is perfectly normal.
• Before using the machine, make sure that
the “hot water/steam” knob (6) is closed
and that there is sufficient water in the
tank.
• Turn on the machine. If the coffee maker
is not working the light on the inside of
the main switch (3) will light up.
• Wait for the coffee switch, „machine
ready“ light (4) to come on. Now the
coffee maker is ready.
6.1 Using the “Crema” filter holder
•Place the filter (17) inside the “Crema”
filter holder (16).
• Insert the “Crema” filter holder (18)
in the dispenser unit (7) from below,
turning it from left to right until it locks
into place.
• Let go of the filter holder handle.
Automatically the handle will move
slightly to the left. This movement
guarantees the perfect functioning of
the filter holder.
• Place a cup under the filter holder.
To warm up the filter holder and the cup,
press the coffee switch (4); water will begin
to drip from the filter holder (this operation
is only necessary for the first cup of coffee).
• When the cup is sufficiently full, press the
coffee switch (4) again.
• Remove the filter holder from the
machine by turning it to the left and pour
out any water that is left inside.
• With the special “Crema” filter holder (16)
supplied with the machine, it is not
necessary to change the filter to obtain
one or two cups of coffee.
• Take a suitable quantity of ground
coffee (par. 5.1) by means of coffee filterholder to have one or two cups of coffee.
• Clean the edges of the filter holder from
any excess of coffee grounds.
• Insert the “Crema” filter holder (16)
in the dispenser unit (7) from below,
turning it from left to right until it locks
into place as directed above.
• Position two warmed cups under the
filter holder, making sure that they are
directly under the coffee spouts.
• Press the coffee switch. Wait until the cups
are sufficiently filled.
• Press the coffee switch again to stop the
coffee flow.
• When the coffee flow has ceased,
remove the filter holder and empty out
the excess coffee grounds.
Cleaning note: always keep the
“Crema” filter holder clean by
removing it and washing it with
drinking water.
Com004a 165925900 Rev01.pmd 13/07/2003, 18.3027
28
HOT WATER JET
6.2 Using the brass filter holder
• Place the filter (19 or 20, single or twin
cup, depending on the number of
coffees you wish to make) in the brass
filter holder (18).
• Fit the filter holder into the coffee outlet
socket (7), pushing it upwards and turning
it to the right until it locks into place.
• Place a cup under the filter holder.
• To warm up the filter holder and the cup,
press the coffee switch (4); water will
begin to drip from the filter holder (this
operation is only necessary for the first
cup of coffee).
• When the cup is sufficiently full, press the
coffee switch (4) again.
• Remove the filter holder from the
machine by turning it to the left.
• By means of coffee filter-holder, take
one or two doses of ground coffee (par.
5.1), depending on the filter which has
previously been mounted.
• Tamp the ground coffee in the filter holder
using the built-in tamper (21). Clean
excess coffee grounds from the rim of the
filter holder.
• Fit the brass filter holder (18) into the
coffee outlet socket (7), as explained
above, pushing it upwards and turning it
to the right until it locks into place.
• Position two warmed cups under the
filter holder, making sure that they are
directly under the coffee spouts.
• Press the coffee switch. Wait until the cups
are sufficiently filled.
• Press the coffee switch again to stop the
coffee flow.
• When the coffee flow has ceased,
remove the filter holder and empty out
the excess coffee grounds.
Cleaning hint: when cleaning the
filter take it right out of the filter
holder and rinse thoroughly.
7 ADVICE ON CHOICE OF
COFFEE
Practically any type of ground coffee on the
market can be used with this machine.
Coffee is a natural product and its taste
varies, depending on its origin and blend.
It is therefore advisable to try a number of
different types to discover your own personal preference. For best results use blends
specifically ground for espresso machines.
The coffee flow should be constant and
should not drip. The speed of the coffee
flow can be regulated by changing the
dosage, the fineness of the grinding and/
or by how heavily you tamp down the coffee
in the filter.
BEFORE USING THE HOT WATER/
STEAM JET, MAKE SURE THAT THE
STEAM TUBE (“PANNARELLO”) IS
POSITIONED OVER THE DRIP TRAY.
8 HOT WATER JET
• If the machine is not already on, turn it on
at the main switch (3) which will light up.
• Wait for the coffee switch, „machine
ready“ light (4) to come on.
• Place a cup or a glass tea cup under
the steam tube (“Pannarello”).
• Open the “Hot water/steam knob (6),
turning it in anti-clockwise direction
and press the coffee switch (4) to start
the water flow.
•To stop the water flow, press the coffee
Com004a 165925900 Rev01.pmd 13/07/2003, 18.3028

29
HOW TO PREPARE A CAPPUCCINO / CLEANING INSTRUCTIONS
switch (4) again, and close the steam
knob (6) by turning it in a clockwise
direction.
Danger of burning! When water
begins to flow out, it may be very
hot. The steam tube does get very hot,
so avoid touching it in any way.
9 HOW TO PREPARE A CAP-
PUCCINO COFFEE USING
THE STEAM TUBE
• If the machine is not already on, turn it on
at the main switch (3) which will light up.
• Press the steam switch (5) which will light
up. The coffee switch „machine on“ light
(4) will turn off.
• When the coffee switch „machine on“
light (4) comes back on , the steam tube
is ready to use.
• Point the steam tube (“Pannarello”)
over the drip tray and open the “hot
water/steam” knob (6) for a few seconds
to clear the tube of any excess water.
Wait for a few more seconds for steam to
flow out.
• Close the knob (6).
• Immerse the tube in the liquid to be
heated and open the knob (6).
Move the container gently up and down
to ensure that the liquid is heated right
through.
• When the liquid has reached the required
temperature close the knob (6) and turn
off the “steam” switch (5).
To make a cappuccino heat milk
using the method explained
above.
• Proceed following the priming instructions
found in par. 4.5.
• When you have finished using the steam
tube clean with a damp cloth.
10 CLEANING INSTRUCTIONS
Before cleaning the machine, let it cool
down and unplug it.
• Do not immerse the coffee maker in water
and do not put any of the components in
a dishwasher.
• Do not use sharp objects or abrasive
chemical products (solvents) to clean the
machine.
• Clean the water tank and fill it with
fresh water daily.
• After heating milk, release a small quantity
of hot water to clean out the steam tube
and wipe the outside of it with a damp cloth.
• Use a damp cloth to wipe down the
appliance.
• Clean the filter holder as follows:
• Remove the filter, place it in hot water
and wash it carefully.
• Clean the inside of the filter holder.
• Do not dry the machine and/or any of its
parts using a microwave and/or
conventional oven.
• Clean the “Pannarello” located over the
steam tube, if it is fitted on your machine.
To do this, unscrew the ring nut, remove
the “Pannarello” from the steam tube and
take off the external casing.
Rinse the “Pannarello” under running
water and then put it back together again.
The ring nut must be closed
properly as otherwise the
“Pannarello” may come loose during use.
Com004a 165925900 Rev01.pmd 13/07/2003, 18.3029
30
DESCALING / LEGAL INFORMATION
11 DESCALING
The formation of lime on the inside of
the appliance is inevitable.
If you notice a reduction in the water
capacity of the appliance it is necessary to
descale the machine.
If you wish to descale the
appliance yourself, use a descaler
especially made for coffee machines.
Use a product normally available on the
market, that is neither toxic nor harmful.
Warning! Never use vinegar as a
descaler.
• Remove the water container and empty
out any remaining water.
• Mix the descaling agent with water
as directed on the package and pour the
solution into the water container; place
the water container inside the machine.
• Turn on the machine by pressing the main
switch.
• Position the steam tube over the drip tray.
• Empty the entire contents from the
water container at intervals (one cup at a
time) by turning the steam knob (6)
counterclockwise and pressing the coffee
switch (4); to cut off flow press the coffee
switch (4) again and turn the steam knob
(6) clockwise.
• Every time a cup of descaler is released
the machine should be turned off at the
main switch (3) and left for 10-15 minutes
to give the descaling solution time to act.
• When all the descaling agent has
been used up, take out the water
container, rinse it out and fill it with fresh
drinking water.
• Place the container back inside
the machine; empty out 2/3 of the water
in the container by turning the steam knob
(6) counterclockwise and pressing the
coffee switch (4); to cut off flow press the
coffee switch (4) again and turn the steam
knob (6) clockwise.
• Let the machine heat up and empty out
the water remaining in the water container
by turning the steam knob (6)
counterclockwise and pressing the coffee
switch (4); to cut off flow press the coffee
switch (4) again and turn the steam knob
(6) clockwise.
If a descaling product that has not
been recommended is used, we
do advise the client to follow the
manufacturer’s instructions found on
the packet.
12 SERVICING
Regular servicing carried out by an
authorised service centre will prolong the
life and efficiency of the machine.
Keep the original packaging as it may prove useful in protecting the machine at a
later date.
13 LEGAL INFORMATION
• These instructions include information on
how to use the machine correctly, its
functions and its maintenance.
• If these instructions are followed closely
no risks should be run in using the
appliance and all necessary safety
requirements regarding function and
maintenance should be upheld.
• If more information is required or if a
particular problem not dealt with or
Com004a 165925900 Rev01.pmd 13/07/2003, 18.3030
 Loading...