


 Loading...
MANUALE DI INSTALLAZIONE ED USO
INSTALLATION AND OPERATION MANUAL
INSTALLATIONS-UNDBEDIENUNGSANLEITUNG
MANUEL D'INSTALLATION ET D’UTILISATION
MANUAL DE INSTALACIÓN Y DE USO
MANUAL DE INSTALAÇÃO E USO
INSTALLATIEEN GEBRUIKSAANWIJZINGEN
MOD. |
TYPES |
MIRAGE |
P DEU 001 |
MIRAGE PLUS |
|
MIRAGE COMBI |
P DEU 001H |
MIRAGE S |
P DEU 001S |
DEUMIDIFICATORE D'AMBIENTE TRASFERIBILE
PORTABLE ROOM DEHUMIDIFIER
MOBILER ENTFEUCHTER
DÉSHUMIDIFICATEUR AMOVIBLE
DESHUMIDIFICADOR DE AMBIENTE TRANSFERIBLE
DESUMIDIFICADOR MÓVEL
VERPLAATSBAAR ONTVOCHTIGINGSAPPARAAT
NEDERLANDS PORTUGUES ESPAÑOL FRANÇAIS DEUTSCH ENGLISH ITALIANO

2 |
CONGRATULAZIONI - CONGRATULATIONS - GLÜCKWÜNSCHE FELICITATIONS - FELICITADES - PARABÉNS - FELICITATIES
Congratulazioni !
Ci congratuliamo con Voi per l'acquisto di questo deumidificatore di qualità superiore, e Vi ringraziamo per la fiducia accordataci.
Prima di mettere in funzione l'apparecchio Vi consigliamo di leggere attentamente il manuale in dotazione che Vi spiega come installarlo, utilizzarlo e mantenerlo in perfetta efficienza.
Se avete altre domande, rivolgeteVi al rivenditore o direttamente alla nostra Sede. Saremo lieti di darVi tutti i chiarimenti desiderati.
Congratulations!
We would like to congratulate you for having purchased this superior quality dehumidifier and thank you for having placed your trust in our company.
We recommend that you read the manual provided before using your equipment, as it will explain how to install, use and maintain it in a perfectly efficient state.
If you have any further questions, contact the place of purchase or our company directly. We will be pleased to provide you with any clarification you may require.
Herzlichen Glückwunsch!
Wir gratulieren Ihnen zum Kauf dieses Entfeuchters erstklassiger Qualität und danken Ihnen für das in uns gesetzte Vertrauen.
Lesen Sie die mitgelieferte Bedienungsanleitung vor Inbetriebnahme des Entfeuchters sorgfältig durch. Sie erfahren hier, wie die Anlage installiert, betrieben und einwandfrei instandgehalten wird.
Sollten Sie weitere Fragen haben, wenden Sie sich an Ihren Fachhändler oder direkt an uns. Wir stehen Ihnen gerne zur Verfügung, um Ihnen jegliche Erläuterungen zu geben.
Félicitations!
Nous vous félicitons d’avoir choisi notre produit, un déshumidificateur de qualité supérieure et nous vous remercions de la confiance que vous nous avez accordée.
Avant la mise en marche de l’appareil, nous vous conseillons de lire attentivement cette notice qui vous explique comment l’installer, l’utiliser et le conserver en parfait état.
Si vous avez des questions, adressez-vous à notre revendeur ou directement à notre maison mère. Nous serons heureux de vous donner tous les éclaircissements souhaités.
¡Felicidades!
Les felicitamos por haber adquirido este deshumidificador de calidad superior y les agradecemos la confianza que nos han demostrado.
Antes de poner en funcionamiento el aparato les aconsejamos que lean atentamente el manual que les adjuntamos en el cual se explica cómo instalarlo, utilizarlo y mantenerlo en perfectas condiciones. Si desean información más detallada, pueden dirigirse al vendedor o directamente a nuestra sede:
Estaremos encantados de atenderles y de ofrecerles toda la información que deseen.
Parabéns
Parabéns! Os nossos parabéns por ter adquirido este desumidificador de alta qualidade e agradecemos pe la confiança demonstrada. Antes de colocar o aparelho em funcionamento, aconselhamos a leitura atenta do manual de instruções que explica como instalá-lo, utilizá-lo e mantê-lo em perfeitas condições. No caso de dúvidas, dirija-se ao revendedor ou diretamente à nossa Sede. Teremos o maior prazer em fornecer todos os esclarecimentos necessários.
Gefeliciteerd!
Wij feliciteren u met de aankoop van dit ontvochtigingsapparaat van superieure kwaliteit, en wij danken u voor het vertrouwen dat u in ons stelt.
Alvorens het apparaat in werking te stellen adviseren wij u de bijgeleverde gebruiksaanwijzingen aandachtig door te lezen, waarin wordt uitgelegd hoe het apparaat geïnstalleerd, gebruikt en in perfecte staat dient te worden gehouden.
Heeft u andere vragen, dan kunt u zich wenden tot de dealer of rechtstreeks tot onze vestiging. Wij zullen u graag de gewenste informatie verstrekken.

3 |
A |
|
|
|
|
B |
|
|
2 |
|
|
|
|
1 |
|
|
|
|
|
|
|
|
|
|
5 |
|
|
|
|
|
|
|
7 |
|
|
|
|
C |
|
|
3 |
|
|
|
|
|
|
|
|
|
|
|
|
|
|
|
|
|
|
|
|
8 |
|
|
|
|
|
|
|
D |
|
|
|
|
|
|
|
4 |
|
|
|
|
|
|
|
9 |
|
|
6 |
|
|
|
|
|
|
|
E |
|
|
|
|
|
|
|
. |
|
. |
|
|
|
|
|
|
|
. |
|
|
|
||
. |
|
|
. |
|
|
||
|
|
|
|
|
|
|
|
|
|
|
|
|
LO GI |
|
|
. |
|
|
|
. |
. |
|
|
|
|
|
|
|
|
||
|
|
. |
|
|
|
||
|
|
. |
|
|
|
|
|
F |
|
|
|
|
|
|
|
. |
. |
|
|
|
|
|
|
. |
|
|
|
|
|
||
. |
. |
|
E |
|
L |
||
|
|
|
|
|
C |
A |
|
|
|
|
|
|
|
O LO GIC |
|
. |
|
. |
. |
|
|
|
|
|
|
|
|
|
|
||
. |
|
|
|
|
|
||
|
. |
|
|
|
|
|
|
G |
|
|
|
|
|
|
|
H |
|
|
|
|
|
|
|
4 |
INDICE - CARATTERISTICHE TECNICHE - LIMITI DI FUNZIONAMENTO
Il triangolo di avvertimento indica tutte le prescrizioni importanti per la sicurezza dell’utente.
Nella pagina 3 di copertina sono riportate le illustrazioni relative al funzionamento. Tenere questa pagina aperta durante la consultazione del presente manuale. I riferimenti ad illustrazioni, parti dell’apparecchio o elementi di comando, ecc. sono indicati da numeri o lettere.
Per ulteriori informazioni o nel caso di problemi, rivolgersi al Vostro rivenditore o al Centro Assistenza Autorizzato.
Conservare questo manuale per l’uso in un luogo sicuro e allegarlo al deumidificatore per eventuali successive consultazioni.
INDICE
CARATTERISTICHE TECNICHE .................................... |
4 |
LIMITI DI FUNZIONAMENTO .......................................... |
4 |
USO PREVISTO DEL DEUMIDIFICATORE .................... |
5 |
NORME DI SICUREZZA .................................................. |
5 |
INSTALLAZIONE E TRASPORTO .................................. |
6 |
MESSA FUORI SERVIZIO ............................................... |
6 |
DESCRIZIONE COMPONENTI ....................................... |
7 |
CARATTERISTICHE ESCLUSIVE DEL |
|
DEUMIDIFICATORE ........................................................ |
7 |
ALTRE CARATTERISTICHE DEL DEUMIDIFICATORE . 7 |
|
USO DEL DEUMIDIFICATORE ....................................... |
8 |
FUNZIONAMENTO ........................................................ |
10 |
PULIZIA E MANUTENZIONE ........................................ |
11 |
TABELLA DIFETTI, CAUSE E RIMEDI ......................... |
12 |
INSTALLAZIONE CON SCARICO DIRETTO. ............... |
13 |
RIPRISTINO FUNZIONAMENTO CON TANICA |
|
RACCOLTA CONDENSA .............................................. |
13 |
CARATTERISTICHE TECNICHE
|
Caratteristiche tecniche |
|
|
Mirage |
|
Mirage |
|
Mirage S |
Mirage |
|
||||
|
|
|
|
Combi |
|
Plus |
|
|||||||
|
Caratteristiche elettriche |
|
|
|
|
|
vedi targhetta dati |
|
|
|||||
|
Consumo di energia in modo deumidificazione kWh/24h |
|
8,5 |
|
8,5 |
|
8,3 |
8,3 |
|
|||||
|
Consumo di energia in modo riscaldamento kWh/1h |
|
- |
|
1,3 |
|
- |
- |
opzionale |
|||||
|
|
|
|
|
|
|
|
|
|
|
|
|
|
|
|
Consumo di energia in modo combinato kWh/1h |
|
- |
|
1,6 |
|
- |
- |
||||||
|
|
|
|
|
||||||||||
|
|
|
|
|
|
|
|
|
|
|
|
|
|
|
|
Umidità asportata (32°C 80% U.R.) (L/24h) deumidificazione |
|
18 |
|
18 |
|
14,5 |
14,5 |
|
|||||
|
|
|
|
|
|
|
|
|
|
|
|
|
|
|
|
Umidità asportata (32°C 80% U.R.) (L/24h) combi |
|
- |
|
20 ca. |
|
- |
- |
(°°) = |
|||||
|
|
|
|
|
|
|
|
|
|
|
|
|
||
|
Umidità asportata (27°C 60% U.R.) (L/24h) deumidificazione |
|
10 |
|
10 |
|
9 |
9 |
||||||
|
Umidità asportata (27°C 60% U.R.) (L/24h) combi |
|
- |
|
11 ca. |
|
- |
- |
serie |
|||||
|
|
|
|
|
|
|
|
|
|
|
|
|
|
|
|
Fluido refrigerante R134a (Ecologico) (gr) |
|
|
|
|
|
vedi targhetta dati |
|
||||||
|
|
|
|
|
|
|
= di |
|||||||
|
Aria trattata (m³/h) |
min./max |
|
|
200/270 |
|
200/270 |
|
270 |
200/270 |
||||
|
|
|
|
|
|
|
|
|
|
|
|
|
|
(°) |
|
Dispositivo di sbrinamento elettronico |
|
|
° |
|
° |
|
° |
° |
|||||
|
|
|
|
|
disponibile |
|||||||||
|
|
|
|
|
|
|
|
|
|
|
|
|
||
|
Controllo tanica elettronico |
|
|
° |
|
° |
|
° |
° |
|||||
|
Umidostato |
|
|
|
|
° |
|
° |
|
° |
° |
|
||
|
Protettore resistenza |
|
|
- |
|
° |
|
- |
- |
|
||||
|
|
|
|
|
|
|
|
|
|
|
|
|
|
) = non |
|
Filtro a rete |
|
|
|
|
° |
|
° |
|
° |
° |
|||
|
|
|
|
|
|
|
|
|
|
|
|
|||
|
Dimensioni (Larg. x Alt. x Profond.) (mm) |
|
|
|
|
|
415 x 670 x 330 |
|
||||||
|
|
|
|
|
|
|
|
|
|
|
|
|
|
(- |
|
Capacità tanica (L) |
|
|
|
|
|
|
4,5 |
|
|
|
|||
|
|
|
|
|
|
|
|
|
|
|
||||
|
Termostato elettronico |
|
|
- |
|
° |
|
- |
- |
legenda: |
||||
|
|
|
|
|
|
|
|
|
|
|
|
|
|
|
|
N° Velocità ventilatore |
|
|
2 |
|
2 |
|
1 |
2 |
|||||
|
|
|
|
|
|
|||||||||
|
|
|
|
|
|
|
|
|
|
|
|
|
|
|
|
Protettore compressore |
|
|
° |
|
° |
|
° |
° |
|
||||
|
|
|
|
|
|
|
|
|
|
|
|
|
|
|
|
Dispositivo antigoccia |
|
|
° |
|
° |
|
° |
° |
|
||||
|
|
|
|
|
|
|
|
|
|
|
|
|
|
|
|
Filtro ad alta efficenza con carboni attivi |
|
|
°° |
|
° |
|
°° |
°° |
|
||||
|
|
|
|
|
|
|
|
|
|
|
|
|
|
|
|
Peso (Kg) |
|
|
|
|
20 |
|
21 |
|
20 |
20 |
|
||
|
|
|
|
|
|
|
|
|
|
|
|
|
|
|
|
|
|
|
|
|
|
|
|
|
|
|
|
||
|
|
|
LIMITI DI FUNZIONAMENTO |
|
|
|
|
|
|
|
||||
|
|
|
|
|
|
|
|
|
|
|
|
|||
|
|
|
Mirage, Mirage S, Mirage Plus |
|
|
|
Mirage Combi |
|
|
|||||
|
|
|
|
|
|
|
|
|
||||||
|
|
|
Riscaldamento |
Deumidificazione |
Riscaldamento |
|
Deumidificazione |
|
||||||
|
|
|
|
|
|
|
|
|
|
|||||
|
Temperatura |
|
- |
+5° / +32°C |
|
Max 27° C |
|
+5° / +32°C |
|
|||||
|
Umidità relativa |
|
- |
25 / 95% |
|
|
|
Max 95% |
|
25 / 95% |
|
|||
|
|
|
|
|
|
|
|
|
|
|
|
|
|
|

USO PREVISTO DEL DEUMIDIFICATORE - NORME DI SICUREZZA |
5 |
USO PREVISTO DEL DEUMIDIFICATORE
I |
L |
M |
N |
•Il deumidificatore può essere utilizzato;
-per asciugare più velocemente il bucato all'interno della casa (non utilizzare in locali adibiti a lavanderia);
-per evitare la formazione della condensa nei locali;
-per eliminare l’umidità dai muri e dai mobili della propria abitazione;
-per proteggere oggetti deteriorabili dall'umidità.
-per ottenere una maggiore qualità dell'aria nella propria abitazione.
NORME DI SICUREZZA
•Il collegamento alla rete elettrica deve essere eseguito in conformità alle norme di sicurezza riguardanti l’installazione degli elettrodomestici vigenti nel paese di utilizzazione.
•La presa, nella quale viene collegato il deumidificatore, deve essere:
-conforme al tipo di spina installata nel medesimo;
-dimensionata per sopportare la corrente massima assorbita.
-collegata ad un efficiente impianto di messa a terra.
•Il cavo di alimentazione (Fig.N), non deve:
-entrare in contatto con qualsiasi tipo di liquido: pericolo di scosse elettriche e/o incendio;
-essere schiacciato e/o entrare in contatto con superfici taglienti;
-essere utilizzato per spostare il deumidificatore;
-essere utilizzato se risulta danneggiato;
-essere manipolato con le mani umide o bagnate;
-essere avvolto in una matassa quando il deumidificatore è in funzione.
•È vietato:
-Inserire oggetti all’interno delle griglie di uscita o di ingresso dell’aria;
-Utilizzare il deumidificatore all’interno di armadi, mobili e/o in spazi ristretti tra questi (Fig.L);
-Riparare, smontare e /o modificare personalmente il deumidificatore;
-Ostruire le griglie di uscita e/o di ingresso dell’aria con gli oggetti da deumidificare (Fig.M);
-Installare il deumidificatore con modalità differenti da quelle descritte nel paragrafo “Installazione e trasporto”;
-Utilizzare il deumidificatore in prossimità di sostanze infiammabili, esplosive e/o sensibili alla quantità di umidità presente nell’ambiente.
-Far funzionare il deumidificatore con la griglia inferiore aperta.
-Far funzionare il deumidificatore senza i filtri.
•L’acqua ottenuta con la deumidificazione non deve essere usata per scopi alimentari.
•Non lasciare giocare i bambini nelle vicinanze del deumidificatore
•Prima di pulire il deumidificatore accertarsi che la spina sia scollegata dalla presa di corrente; non lavare il deumidificatore con acqua (Fig.I), benzina, solventi di qualsiasi natura.
•È assolutamente vietato apportare qualsiasi modifica tecnica al deumidificatore.
•Il cavo di alimentazione può essere sostituito solo da un Centro Assistenza Autorizzato.
•Non collocare il deumidificatore vicino ad impianti di riscaldamento (come stufe o caloriferi).
•Evitare di usare lo scarico diretto se il tubo di scarico è esposto a temperature sotto lo zero.
•Evitare di usare il deumidificatore per applicazioni specialistiche come la conservazione di alimenti, opere d’arte, dati scientifici, ecc..
•In caso di incendio utilizzare estintori ad anidride carbonica (CO2). Non utilizzare acqua od estintori a polvere.
ITALIANO

6 |
INSTALLAZIONE E TRASPORTO - MESSA FUORI SERVIZIO
INSTALLAZIONE E TRASPORTO
• |
Conservare l’imballo per un trasporto futuro; un eventuale smaltimento dell’im- |
O |
|
|
|||
|
ballo deve essere effettuato nel rispetto delle norme vigenti nel paese di utilizzo |
|
|
||||
|
|
|
|
||||
|
del deumidificatore. |
|
|
|
|
|
|
• |
Durante la movimentazione ed il trasporto, il deumidificatore deve essere man- |
|
|
|
|||
|
tenuto in posizione verticale (Fig.O); assicurarsi che la vasca di raccolta dell’ac- |
|
|
|
|||
|
qua sia vuota. |
|
|
|
|
|
|
• |
Non utilizzare la maniglia posta sul retro per sollevare il deumidificatore (Fig.P); |
|
|
|
|||
|
la maniglia è stata studiata per facilitare lo spostamento del deumidificatore a |
|
|
|
|||
|
contatto con il pavimento. |
|
|
|
|
|
ALTO |
• Per l’installazione rispettare le distanze riportate nella (Fig.Q); evitare che tende |
|
|
|||||
|
|
|
|||||
|
e/o ostacoli vari impediscano i corretti flussi dell’aria. |
|
|
|
|
|
|
• |
Il deumidificatore deve essere installato su una superficie piana non inclinata |
P |
|
|
|||
|
|
|
|||||
|
avente caratteristiche adeguate a sopportarne il peso. (Fig.R) |
|
|
|
|
||
|
Se l'apparecchio è inclinato e/o coricato l'acqua accumulata dal processo |
|
|
|
|||
|
di deumidificazione può fuoriuscire, causando guasti. |
|
|
|
|
||
• |
Il deumidificatore ha la possibilità di essere installato a parete in posizione non |
|
|
|
|||
|
inclinata (Fig.S); per questo tipo di installazione assicurarsi che la parete abbia |
|
|
|
|||
|
le caratteristiche adeguate per sostenerne il peso. (Vedi dati tecnici). |
|
|
|
|
||
|
Utilizzare 2 tasselli di forma, dimensioni e tipo appropriati (Vedi esempio in Fig.T). |
|
|
|
|||
|
Il costruttore non si assume alcuna responsabilità implicita ed esplicita |
Q |
|
Misure in mm |
|||
|
riguardo a danni a cose e/o persone che si dovessero verificare a causa di |
|
|
|
|||
|
un’errata installazione del deumidificatore. |
|
|
|
|
|
|
|
MESSA FUORI SERVIZIO |
|
|
|
|
|
|
Rendere subito inutilizzabile il deumidificatore non più in uso. Staccare la spina di |
|
|
|
||||
alimentazione dalla presa di corrente e tagliare il cavo di alimentazione. Il |
|
|
|
||||
deumidificatore fuori uso deve essere consegnato ad un centro di raccolta autorizza- |
|
|
|
||||
to per lo smaltimento dello stesso in base alle normative vigenti nel paese di utilizza- |
|
|
|
||||
zione. |
|
|
|
|
|
|
|
|
|
|
|
|
R |
|
|
V |
U |
T |
(non in dotazione) |
S |
|
|
|
|
|
|
Ø |
5 |
m a x |
|
|
|
|
|
|
2 5 |
m a x |
|
|
|
X |
X |
|
|
|
|
|
|
|
|
|
|
|
|
|
|
|
|
6 |
m in |
÷ |
1 5 |
m a x |
|
X= 235 mm |
|
Misure in mm |
|
|
|
|

DESCRIZIONE GENERALE DEI COMPONENTI - CARATTERISTICHE DEL DEUMIDIFICATORE
7 |
|
|
DESCRIZIONE COMPONENTI |
ITALIANO |
|
|
LEGENDA COMPONENTI MACCHINA FIG. A - Z |
|||
|
|
|||
1 |
Pannello comandi |
6 |
Filtro lavabile |
|
2 |
Griglia uscita aria deumidificata |
7 Filtro ad alta efficenza con carboni attivi (quando previsto) |
|
|
3 |
Griglia portafiltri ingresso aria |
8 |
Tappo foro scarico diretto |
4 |
Tanica raccolta condensa |
9 |
Tubo scarico diretto (quando previsto) |
5 |
Sistema ''Aria in fiore®'' |
10 |
Coperchio contenitore fragranza sistema “Aria in fiore®” |
CARATTERISTICHE ESCLUSIVE DEL DEUMIDIFICATORE
SISTEMA “ARIA IN FIORE ® ” (FIG.Z)
Questo apparecchio è dotato di un esclusivo sistema “Aria in fiore®”; potete scegliere fra diverse fragranze per ottenere una gradevole profumazione della Vostra casa semplicemente operando come segue:
•estrarre la tavoletta della fragranza desiderata dalla confezione;
•ruotare in senso antiorario il coperchio (10) (Fig.Z);
•inserire orizzontalmente la tavoletta profumata nelle apposite guide;
•richiudere il coperchio (10) (Fig.Z) ruotandolo in senso orario.
La fragranza avrà una durata di circa 24 ore, dopodiché occorrerà sostituire la tavoletta seguendo le istruzioni sopra riportate.
Z |
10 |
Utilizzare esclusivamente i prodotti originali Saeco® reperibili nei punti vendita autorizzati.
FILTRO AD ALTA EFFICENZA CON CARBONI ATTIVI (7)
Il deumidificatore Saeco® è in grado, con questo accessorio, di filtrare l’aria trattata eliminando polvere, pollini ecc..
Il filtro ad alta efficenza con carboni attivi viene montato di serie sui modelli “Mirage Combi” e può essere installato anche sulle macchine nelle quali non è presente acquistandolo presso un rivenditore Autorizzato.
Questo filtro deve essere sostituito almeno ogni 3 mesi di funzionamento del deumidificatore.
ALTRE CARATTERISTICHE DEL DEUMIDIFICATORE
DISPOSITIVO ANTIGOCCIA
Il deumidificatore Saeco® è provvisto di un dispositivo che impedisce il gocciolamento dell’acqua quando si estrae la tanica di raccolta condensa, evitando di bagnare l'interno dell'apparecchio o il Vostro pavimento.
SBRINAMENTO ELETTRONICO
Il deumidificatore Saeco® è provvisto di un dispositivo che provvede a controllare elettronicamente il processo di sbrinamento.
SCARICO DIRETTO
Il deumidificatore Saeco® permette il drenaggio continuo della condensa in uno scarico appropriato. Per attivare questa opzione è necessario consultare il paragrafo "Installazione con scarico diretto".

8 |
USO DEL DEUMIDIFICATORE
USO DEL DEUMIDIFICATORE
LEGENDA COMANDI E SEGNALAZIONI MIRAGE/MIRAGE COMBI (FIG. E - F)
COMANDO |
MIRAGE DEU001 |
MIRAGE COMBI DEU001H |
|
|
|
. |
|
|
|
. . |
. |
P P |
||
. |
|
|
||
|
. |
|
||
|
|
. |
|
|
. . |
|
|
||
|
. |
|
|
|
 P
P

 P
P


 P
P

 P
P


 P
P

 P
P


 P
P


 P
P


DENOMINAZIONE
Manopola regolazione deumidificazione
Pulsante/Spia
accensione – spegnimento
Pulsante/Spia selettore velocità aria
Spia tanica raccolta condensa piena
Pulsante/Spie
modalità di funzionamento
Deumidificazione
Combi
Riscaldamento
Pulsante/Spie termostato elettronico
Minimo
DESCRIZIONE
Regola la quantità di umidità che si desidera nell’ambiente
 = minima deumidificazione


 =massima deumidificazione
Questo pulsante serve per accendere e spegnere il deumidificatore. Il deumidificatore quando viene spento con questo pulsante si riavvia nella modalità nella quale era stato spento.
Premendo questo pulsante si seleziona la velocità di uscita del- l’aria dal deumidificatore. La pressione del pulsante alterna le due velocità del ventilatore. La spia si accende quando viene selezionata la modalità di velocità massima.
Questa spia segnala il raggiungimento del livello massimo nella tanica di raccolta condensa. Il deumidificatore si arresta automaticamente.
Con questo pulsante è possibile selezionare la modalità di funzionamento del deumidificatore.
Il deumidificatore all’accensione si pone in modalità Deumidificazione; si accende la relativa spia.
Premendo una volta il pulsante viene selezionata la modalità Combi; entrambe le spie sono accese. In questa modalità la macchina deumidifica e riscalda l’aria in uscita.
Una seconda pressione del pulsante pone il deumidificatore nella sola modalità di Riscaldamento; rimane accesa la relativa spia. Una successiva pressione del tasto riporta il deumidificatore nella condizione di partenza.
Nella modalità Riscaldamento e Combi il ventilatore funziona sempre alla massima velocità.
Con questo pulsante, è possibile selezionare tre diversi valori di temperatura ambiente (preimpostati), che sono controllati dal termostato elettronico.
Questa funzione è attiva solo quando vengono selezionate le modalità di funzionamento Combi e Riscaldamento.
Alla prima selezione delle modalità Combi e Riscaldamento viene impostato il termostato elettronico alla temperatura Minima. Premendo il pulsante, si selezionano la temperatura Media e Massima; la macchina funzionerà in riscaldamento fino al raggiungimento della temperatura ambiente desiderata.
Medio
Massimo

USO DEL DEUMIDIFICATORE
9 |
|
LEGENDA COMANDI E SEGNALAZIONI MIRAGE S (FIG. G) |
ITALIANO |
||
COMANDO |
DENOMINAZIONE |
DESCRIZIONE |
||
|
||||
|
Manopola accensione/spegnimento |
e Permette l'accensione e lo spegnimento della macchina e rego- |
|
|
|
regolazione deumidificazione. |
la la quantità di umidità che si desidera nell'ambiente. |
|
|
|
|
OFF=macchina spenta |
|
|
|
|
= minima deumidificazione |
|
|
|
|
=massima deumidificazione |
|
|
|
Spia segnalazione accensione |
Segnala all'utilizzatore che l'umidità presente nell'aria è maggio- |
|
|
|
|
re di quella attualmente impostata. |
|
|
|
|
(Vedi modalità Funzionamento) |
|
|
Spia tanica raccolta condensa piena |
Questa spia segnala il raggiungimento del livello massimo nella |
|
tanica di raccolta condensa. Il deumidificatore si arresta auto- |
|
maticamente. |
LEGENDA COMANDI E SEGNALAZIONI MIRAGE PLUS (FIG. H)
COMANDO DENOMINAZIONE |
DESCRIZIONE |
Manopola regolazione deumidificazione Regola la quantità di umidità che si desidera nell'ambiente
 = minima deumidificazione


 =massima deumidificazione
|
|
|
Pulsante/Spia |
Questo pulsante serve per accendere e spegnere il |
|
|
|
accensione spegnimento |
deumidificatore. |
|
|
|
|
|
|
|
|
Pulsante/Spia |
Premendo questo pulsante si seleziona la velocità di uscita del- |
|
|
|
selettore velocità aria |
l’aria dal deumidificatore. La pressione del pulsante alterna le |
|
|
|
|
due velocità del ventilatore. La spia si accende quando viene |
|
|
|
|
selezionata la modalità di velocità massima. |
|
|
|
|
|
|
|
|
Spia tanica raccolta condensa piena |
Questa spia segnala il raggiungimento del livello massimo nella |
|
|
|
|
tanica di raccolta condensa. Il deumidificatore si arresta automa- |
|
|
|
|
ticamente. |
|
|
|
|
|
|
|
|
Display indicazione umidità |
Visualizza l'umidità ambientale. (Tolleranza del 5% a 25°C) |
|
|
|
|
(Vedi modalità di funzionamento) |
|
|
|
|
|
|
|
|
|
|
|
|
|
|
|

10 |
FUNZIONAMENTO
FUNZIONAMENTO
Modalità Deumidificazione
antiorario fino all’arresto del compressore; cosi facendo avrete regolato l’apparecchio sui valori di deumidificazione desiderati che esso manterrà automaticamente.
•Collegare l’apparecchio, mediante la spina, ad una presa di corrente.
•Controllare che la spia “tanica raccolta condensa piena” sia spenta.
Mirage - Mirage combi - Mirage plus
•Ruotare la manopola “regolazione umidità” sulla posizione (


 /
/


 ) di massima deumidificazione.
•Premere il pulsante “accensione-spegnimento”; si avvia il deumidificatore.
•Il ventilatore si avvia alla velocità minima; se si desidera aumentare la velocità del ventilatore premere una volta il pulsante “selettore velocità aria”.
Nota: una maggiore velocità del ventilatore aumenta la capacità di deumidificazione dell’aria.
Quando l’umidità dell’ambiente è quella desiderata, ruotare lentamente la manopola “regolazione deumidificazione” in senso antiorario fino all’arresto del compressore; cosi facendo avrete regolato l’apparecchio sui valori di deumidificazione desiderati che esso manterrà automaticamente.
Mirage S
•Ruotare la manopola "regolazione umidità" sulla posizione
(


 ) di massima deumidificazione, in questo modo viene contemporaneamente abilitato il funzionamento.
Nota: il ventilatore ed il compressore si avviano trascorso un tempo tecnico prestabilito dal costruttore; la spia di "segnalazione accensione" si accende.
Quando la temperatura dell’ambiente ha raggiunto il valore impostato, il termostato elettronico provvederà a gestire automaticamente l'accensione e lo spegnimento della resistenza per mantenere costante la temperatura dell'aria nell'ambiente.
Se si cambia la modalità di funzionamento, da Deumidificazione a Combi o viceversa, può essere necessario trovare, per la “manopola di regolazione dell’umidità”, una nuova posizione per avere lo stesso grado di deumidificazione.
Modalità Riscaldamento
(solo Mirage Combi)
•Collegare l'apparecchio, mediante la spina, ad una presa di corrente.
•Controllare che la spia “tanica raccolta condensa piena” sia spenta.
•Premere il pulsante “accensione-spegnimento”; si avvia il deumidificatore.
•Premere il pulsante “modalità di funzionamento” fino a quando non rimarrà accesa la sola spia “Riscaldamento”; in questa modalità di funzionamento il ventilatore si porta alla massima velocità.
•Premere il pulsante “termostato elettronico” e selezionare la temperatura desiderata
Quando la temperatura dell’ambiente ha raggiunto il valore impostato, il termostato elettronico provvederà a gestire automaticamente l'accensione e lo spegnimento della resistenza per mantenere costante la temperatura dell'aria nell'ambiente.
Tanica di raccolta condensa
Quando l'umidità dell'ambiente è quella desiderata, ruotare lentamente la manopola "regolazione deumidificazione" in senso antiorario fino all'arresto del compressore/ventilatore e relativo spegnimento del led; così facendo avrete regolato l'apparecchio sui valori di deumidificazione desiderati che esso manterrà automaticamente.
Modalità Combi
(solo Mirage Combi)
•Collegare l’apparecchio, mediante la spina, ad una presa di corrente.
•Controllare che la spia “tanica raccolta condensa piena” sia spenta.
•Ruotare la manopola “regolazione umidità” sulla posizione (


 ) di massima deumidificazione.
•Premere il pulsante “accensione-spegnimento”; si avvia il deumidificatore.
•Premere il pulsante “modalità di funzionamento” fino a quando non rimarranno accese le spie che identificano la modalità “Combi”; in questa modalità di funzionamento il ventilatore si porta alla massima velocità.
•Premere il pulsante “termostato elettronico” e selezionare la temperatura desiderata
Quando l’umidità dell’ambiente è quella desiderata, ruotare lentamente la manopola “regolazione deumidificazione” in senso
In tutte le modalità di funzionamento il riempimento della tanica di raccolta condensa arresta il funzionamento del deumidificatore; in questo caso la spia posta sul pannello comandi si illuminerà.
Per ripristinare il funzionamento del deumidificatore, occorre vuotare la tanica di raccolta condensa come descritto nei punti seguenti:
•Aprire la griglia portafiltri agendo sul lato destro della stessa tirandola verso l’esterno.
•Sollevare ed estrarre la tanica, mediante l’impugnatura di estrazione (Fig.B) posta nella parte inferiore, fino a quando la maniglia di trasporto (Fig.C) non è facilmente accessibile.
L’apparecchio è dotato di un dispositivo antigoccia che si attiva ed impedisce che la base del deumidificatore si possa bagnare quando viene estratta la tanica di raccolta condensa.
•Vuotare la tanica di raccolta condensa.
•Controllare che sia fuoriuscita l'acqua anche dalla sede del galleggiante (Fig.D).
•Riposizionare la tanica di raccolta condensa nell’alloggiamento dalla quale è stata rimossa premendola verso l’interno.
Se il grado di umidità dell'aria è maggiore del grado di umidi-
PULIZIA E MANUTENZIONE
11 |
tà selezionato (con la manopola regolazione umidità), il deumidificatore riparte automaticamente nella modalità selezionata precedentemente trascorso il tempo di ritardo.
Nota. Non forzare lo sportello durante le operazioni di rimozione della tanica di raccolta condensa; l’apparecchio non può funzionare senza tanica.
Segnalazione Umidità Ambientale
(solo Mirage Plus)
Collegando l'apparecchio, mediante la spina, ad una presa di corrente, il display "humidity control" si accende e visualizza l'umidità ambientale (anche quando la macchina è spenta).
L'escursione visualizzata va da 30% a 80%.
Oltre tali limiti il display potrebbe indicare la dicitura lampeggiante "LLL" (vedi tabella difetti, cause, rimedi).
Note di funzionamento generali
Il deumidificatore durante il funzionamento può aumentare, di qualche grado, la temperatura ambiente.
Se durante il funzionamento del deumidificatore (Mod. Mirage - Mirage Combi - Mirage Plus), si verifica una caduta della tensione di rete, il deumidificatore si spegne e rimane in questa condizione fino a quando non verrà premuto il pulsante di avvio; le impostazioni attivate precedentemente verranno perdute, per riattivarle occorre procedere manualmente in funzione della modalità che si intende attivare.
Nel deumidificatore modello Mirage S al verificarsi di una caduta di tensione della rete non verranno perdute le regolazioni effettuate dall'utente; il deumidificatore ripartirà automaticamente con i parametri impostati, al ripristino della tensione di rete.
stato del filtro ad alta efficenza con carboni attivi, secondo le |
|
||
modalità di seguito descritto: |
|
||
• |
spegnere il deumidificatore; |
ITALIANO |
|
• |
aprire la griglia portafiltri ingresso aria (3); |
||
|
|||
• |
estrarre i filtri dalla griglia (6)(7)(Fig.A); |
|
|
• rimuovere il filtro ad alta efficenza con carboni attivi, (quan- |
|
||
|
do presente) dal filtro a rete; |
|
|
• |
ispezionare il filtro ad alta efficenza con carboni attivi; nel |
|
|
|
caso risultasse sporco occorre sostituirlo; |
|
|
• |
lavare il filtro a rete con acqua tiepida ed asciugarlo; |
|
|
• |
inserire il filtro ad alta efficenza con carboni attivi nel filtro |
|
|
|
a rete; |
|
|
• |
inserire i filtri nella griglia portafiltri ingresso aria e chiude- |
|
|
|
re. |
|
|
Se non si usa il deumidificatore
Se il deumidificatore non viene utilizzato per un lungo periodo si consiglia quanto segue:
•spegnere il deumidificatore;
•scollegare il cavo di alimentazione dalla presa di corrente;
•avvolgere il cavo di alimentazione in una matassa;
•togliere la tanica di raccolta condensa e gettare via l’acqua;
•pulire, ed eventualmente sostituire, i filtri dell’aria presenti;
•conservare il deumidificatore in posizione verticale, coperto con un panno, in un luogo che risulti sicuro fuori dalla portata dei bambini.
PULIZIA E MANUTENZIONE
•La pulizia va eseguita con il deumidificatore spento e la spina disinserita.
•Le zone di circolazione dell’aria del deumidificatore debbono essere mantenute pulite e libere da ostruzioni.
Nota: anche la polvere, dopo un lungo periodo di funzionamento può creare un’ostruzione.
•Non immergere l’apparecchio in acqua e/o in altri liquidi.
•Asciugare a mano l’apparecchio.
•Non versare liquidi all’interno dell’apparecchio (Es.: griglia di uscita, Aria in fiore® ”).
Parti esterne in plastica
Pulire il deumidificatore con un panno umido ed asciugare.
Nota: utilizzare solo acqua per inumidire il panno.
Pulizia e sostituzione filtri dell’aria
Ogni due settimane occorre lavare il filtro a rete e verificare lo

12 |
TABELLA DIFETTI, CAUSE E RIMEDI
TABELLA DIFETTI, CAUSE E RIMEDI
DIFETTI |
CAUSE |
RIMEDI |
|
|
|
|
|
Il deumidificatore non fun- |
La spina del cavo di alimen- |
Collegare la spina del cavo di alimentazione |
|
ziona |
tazione non è collegata |
|
|
|
|
|
|
|
|
Tanica acqua piena |
Vuotare la tanica di raccolta condensa e reinserirla |
|
|
|
|
|
|
La tanica di raccolta con- |
Inserire correttamente la tanica di raccolta condensa |
|
|
densa non è inserita corret- |
|
|
|
tamente |
|
|
|
|
|
|
|
Il grado di deumidificazio- |
Aumentare, con l’apposita manopola, il grado di deumidificazione de- |
|
|
ne impostato è stato rag- |
siderato |
|
|
giunto |
|
|
|
|
|
|
|
Non è stato premuto il tasto |
Premere il tasto ON/OFF |
|
|
ON/OFF (Mirage, Mirage |
|
|
|
Combi, Mirage Plus) |
|
|
|
|
|
|
|
La sede del galleggiante |
Svuotare nuovamente la tanica capovolgendola completamente |
|
|
non è stata svuotata com- |
|
|
|
pletamente |
|
|
|
|
|
Scarsa condensazione |
È già stato raggiunto il va- |
Aumentare, con l’apposita manopola, il grado di deumidificazione de- |
|
di acqua |
lore di deumidificazione im- |
siderato |
|
|
|
postato |
|
|
|
|
|
|
|
I filtri dell’aria sono ostruiti |
Procedere alla pulizia e/o alla sostituzione dei filtri |
|
|
|
|
|
|
Velocità dell’aria bassa |
Aumentare la velocità dell’aria |
|
|
(Mirage, Mirage Combi, |
|
|
|
Mirage Plus) |
|
|
|
|
|
Non c’è flusso di aria |
I filtri dell’aria sono ostruiti |
Procedere alla pulizia e/o alla sostituzione dei filtri |
|
|
|
|
|
|
|
Il ventilatore non funziona* |
Aumentare, con l'apposita manopola, il grado di deumidificazione desi- |
|
|
(Mirage S) |
derato sino all'accenzione del led ed attendere il tempo tecnico di avvio. |
|
|
|
|
L’apparecchio funziona |
I filtri dell’aria sono ostruiti |
Procedere alla pulizia e/o alla sostituzione dei filtri |
|
ma non riduce l’umidità |
|
|
|
|
|
|
|
|
|
La temperatura e/o l’umidi- |
È normale che in certe condizioni ambientali l’apparecchio non |
|
|
tà del locale sono troppo |
deumidifichi (vedere la tabella “limiti di funzionamento”) |
|
|
basse |
|
|
|
|
|
|
|
Il locale è troppo grande* |
|
|
|
|
|
È stato selezionato il fun- |
È intervenuto il protettore |
Per ripristinare il funzionamento è necessario togliere la spina dalla |
|
zionamento Combi o Ri- |
di sicurezza della resisten- |
presa di corrente per 2 minuti, eliminare la cause che hanno provoca- |
|
scaldamento ma l'appa- |
za |
to il surriscaldamento, quindi reinserire la spina nella presa |
|
recchio non riscalda |
|
|
|
(Mirage Combi) |
|
|
|
|
È stata raggiunta la tempe- |
Se si desidera e non è stata selezionata la temperatura massima, è |
|
|
|
||
|
|
ratura selezionata |
possibile riavviare la modalità Riscaldamento selezionando una tem- |
|
|
|
peratura più elevata |
|
|
|
|
|
|
Il locale è troppo grande* |
|
|
|
|
|
Il display indica LLL% |
L'umidità ambiente è inferio- |
|
|
(Mirage Plus) |
re a 30% o superiore al 80%* |
|
|
|
|
|
|
(*) Tali cause non sono indice di guasti.
Per la risoluzione dei malfunzionamenti che non sono stati riportati nella tabella e/o se i rimedi consigliati non risolvono il difetto, è necessario rivolgersi ad un Centro Assistenza Autorizzato.

INSTALLAZIONE CON SCARICO DIRETTO - RIPRISTINO FUNZIONAMENTO CON TANICA RACCOLTA CONDENSA |
13 |
INSTALLAZIONE CON SCARICO DIRETTO.
Mediante il tubo in dotazione (quando previsto) è possibile drenare la condensa direttamente in uno scarico appropriato. Per attivare questa opzione procedere come segue:
•togliere il tappo in gomma (8) (Fig.Z1) sito sul lato della macchina e conservarlo con cura;
•aprire la griglia portafiltri (3) (Fig.Z1) e sfilare la tanica di raccolta condensa (4);
•estrarre l’inserto (11) (Fig.Z2) che disattiva il dispositivo antigoccia dalla tanica di raccolta condensa e conservarlo con cura;
•inserire il tubo (9) (Fig.Z3) nel gomito dopo averlo fatto passare attraverso il foro, avendo cura di spostare manualmente il dispositivo antigoccia (12);
•reinserire la tanica di raccolta condensa (4) (Fig.Z4) e chiudere la griglia portafiltri (3).
Attenzione:
 Il tubo di scarico deve essere inclinato verso il basso (Fig.Z6) e comunque, nel suo percorso, non deve mai superare l’altezza dello scarico al quale è stato collegato (Fig.Z5); è necessario controllare periodicamente che il tubo non sia ostruito e che sia inserito correttamente per evitare la fuoriuscita della condensa.
Z1 |
|
8 |
Z2 |
11 |
3 |
|
|
|
|
4 |
|
|
|
|
Z3 |
12 |
9 |
Z4 |
|
|
|
|
|
4 |
Z5 |
|
|
Z6 |
|
RIPRISTINO FUNZIONAMENTO CON TANICA |
|
|
RACCOLTA CONDENSA |
ITALIANO |
|
Per ripristinare il funzionamento con la tanica di raccolta con- |
||
|
||
densa procedere come segue: |
|
|
• aprire la griglia portafiltri (3) (Fig.Z7) ed estrarre la tanica di |
|
|
raccolta condensa (4); |
|
|
• sfilare con cautela il tubo (9) (Fig.Z8) dal gomito, avendo cura |
|
|
spostare manualmente il dispositivo antigoccia (12) (Fig.Z8); |
|
|
• posizionare l’inserto (11) (Fig.Z9) nella tanica di raccolta con- |
|
|
densa (4); |
|
|
• riposizionare il tappo in gomma (8) (Fig.Z10) nella struttura |
|
|
del deumidificatore; |
|
|
• reinserire la tanica di raccolta condensa (4) (Fig.Z10) e chiu- |
|
|
dere la griglia portafiltri (3). |
|
Attenzione:
 Ricordarsi di inserire l’inserto per la disattivazione del dispositivo antigoccia. Se questo non viene eseguito si avranno delle fuoriuscite di acqua.
Z7 |
|
Z8 |
12 |
9 |
|
|
|
||
|
3 |
|
|
|
|
4 |
|
|
|
Z9 |
11 |
Z10 |
4 |
8 |
|
||||
|
|
|
|
|
|
|
3 |
|
|

14 |
INDEX - TECHNICAL SPECIFICATIONS - OPERATING LIMITS
The warning triangle indicates all the important rules for user safety.
Illustrations referring to operation are provided on the front cover page number 3. Keep this page open while reading this manual. Numbers or letters are used to refer to illustrations, parts of the equipment or controls, etc.
For further information or if any problems are encountered, contact the place of purchase or an authorised service center.
Keep these instructions in a safe place, near the climate control system, for future consultation.
INDEX
TECHNICAL SPECIFICATIONS .................................... |
14 |
OPERATING LIMITS ...................................................... |
14 |
SUGGESTED USES FOR YOUR DEHUMIDIFIER ....... |
15 |
SAFETY GUIDELINES .................................................. |
15 |
INSTALLATION AND HANDLING ................................. |
16 |
DISPOSAL ..................................................................... |
16 |
DESCRIPTION OF COMPONENTS .............................. |
17 |
EXCLUSIVE FEATURES ............................................... |
17 |
OTHER FEATURES ....................................................... |
17 |
DESCRIPTION OF CONTROLS .................................... |
18 |
MODES OF OPERATION .............................................. |
20 |
CLEANING AND MAINTENANCE ................................ |
21 |
TROUBLESHOOTING ................................................... |
22 |
INSTALLATION WITH DIRECT DRAINAGE ................. |
23 |
RESTORING DRAINAGE INTO THE CONDENSATION |
|
COLLECTION TANK ..................................................... |
23 |
TECHNICAL SPECIFICATIONS
|
Technical specifications |
|
|
|
|
Mirage |
|
Mirage |
|
Mirage S |
Mirage |
|
|||
|
|
|
|
|
|
Combi |
|
Plus |
|
||||||
|
Electrical specifications |
|
|
|
|
|
|
|
See data plate |
|
|
||||
|
Energy consumption in dehumidifying mode kWh/24h |
|
8.5 |
|
8.5 |
|
8.3 |
8.3 |
optional |
||||||
|
Energy consumption in heating mode kWh/1h |
|
|
- |
|
1.3 |
|
- |
- |
||||||
|
|
|
|
|
|
||||||||||
|
|
|
|
|
|
|
|
|
|
|
|
|
|
||
|
Energy consumption in combined mode kWh/1h |
|
- |
|
1.6 |
|
- |
- |
(°°) = |
||||||
|
Humidity removed (32°C 80% RH) (L/24h) - dehumidification |
|
18 |
|
18 |
|
14.5 |
14.5 |
|||||||
|
Humidity removed (32°C 80% RH) (L/24h) - Combi |
|
- |
|
20 about |
|
- |
- |
|
||||||
|
|
|
|
|
|
|
|
|
|
|
|
|
|
||
|
Humidity removed (27°C 60% RH) (L/24h) - dehumidification |
|
10 |
|
10 |
|
9 |
9 |
standard= |
||||||
|
Air conditioned (m3/h) min./max. |
|
|
200/270 |
|
200/270 |
|
270 |
200/270 |
||||||
|
Humidity removed (27°C 60% RH) (L/24h) - Combi |
|
- |
|
11 about |
|
- |
- |
|
||||||
|
Refrigeration fluid R134a (Ecological) (gr.) |
|
|
|
|
|
See data plate |
|
|
||||||
|
|
|
|
|
|
|
|
|
|
|
|
|
|
|
(°) |
|
Electronic defrosting device |
|
|
|
|
° |
|
° |
|
° |
° |
||||
|
|
|
|
|
|
|
|
||||||||
|
|
|
|
|
|
|
|
|
|
|
|
|
|
|
|
|
Humidistat |
|
|
|
|
° |
|
° |
|
° |
° |
available |
|||
|
|
|
|
|
|
|
|
|
|
|
|
|
|
|
|
|
Heating element protection |
|
|
|
|
- |
|
° |
|
- |
- |
||||
|
|
|
|
|
|
|
|
||||||||
|
|
|
|
|
|
|
|
|
|
|
|
|
|
|
|
|
Electronic tank control |
|
|
|
|
° |
|
° |
|
° |
° |
|
|||
|
|
|
|
|
|
|
|
|
|
|
|
|
|
|
) = not |
|
Net filter |
|
|
|
|
° |
|
° |
|
° |
° |
||||
|
|
|
|
|
|
|
|
|
|
|
|
|
|||
|
Dimensions (Width x Height x Depth) (mm) |
|
|
|
|
|
415 x 670 x 330 |
|
|||||||
|
|
|
|
|
|
|
|
|
|
|
|
|
|
|
(- |
|
Tank capacity (L) |
|
|
|
|
|
|
|
|
4.5 |
|
|
|||
|
|
|
|
|
|
|
|
|
|
|
|
||||
|
Electronic thermostat |
|
|
|
|
- |
|
° |
|
- |
- |
legend: |
|||
|
|
|
|
|
|
|
|
|
|
|
|
|
|
|
|
|
Fan speed no. |
|
|
|
|
2 |
|
2 |
|
1 |
2 |
||||
|
|
|
|
|
|
|
|
||||||||
|
|
|
|
|
|
|
|
|
|
|
|
|
|
|
|
|
Compressor protection |
|
|
|
|
° |
|
° |
|
° |
° |
|
|||
|
|
|
|
|
|
|
|
|
|
|
|
|
|
|
|
|
Non-drip device |
|
|
|
|
° |
|
° |
|
° |
° |
|
|||
|
|
|
|
|
|
|
|
|
|
|
|
|
|
|
|
|
Highly efficient filter with activated charcoals |
|
|
°° |
|
° |
|
°° |
°° |
|
|||||
|
|
|
|
|
|
|
|
|
|
|
|
|
|
|
|
|
Weight (Kg) |
|
|
|
|
20 |
|
21 |
|
20 |
20 |
|
|||
|
|
|
|
|
|
|
|
|
|
|
|
|
|
||
|
|
|
|
|
|
|
|
|
|
|
|
|
|||
|
|
|
OPERATING LIMITS |
|
|
|
|
|
|
|
|||||
|
|
|
|
|
|
|
|
|
|
|
|
||||
|
|
|
Mirage, Mirage S, Mirage Plus |
|
|
|
Mirage Combi |
|
|
||||||
|
|
|
Heating |
|
Dehumidification |
|
|
Heating |
|
|
Dehumidification |
|
|||
|
|
|
|
|
|
|
|
|
|
|
|
|
|||
|
Temperature |
|
- |
|
+5° / +32°C |
|
|
Max 27° C |
|
|
+5° / +32°C |
|
|||
|
Relative Humidity |
|
- |
|
25 / 95% |
|
|
|
Max 95% |
|
25 / 95% |
|
|||
|
|
|
|
|
|
|
|
|
|
|
|
|
|
|
|

SUGGESTED USES FOR YOUR DEHUMIDIFIER - SAFETY GUIDELINES
SUGGESTED USES FOR YOUR DEHUMIDIFIER
15 |
I |
L |
M |
N |
• |
The dehumidifier may be used: |
|
|
- To rapidly dry laundry hung indoors (do not employ in premises used as |
|
|
laundry); |
|
|
- To avoid the formation of condensation in rooms; |
|
|
- To eliminate humidity from walls and furniture in your home; |
|
|
- To protect objects that may deteriorate due to humidity; |
ENGLISH |
|
- To improve the quality of the air in your home. |
|
|
|
|
|
SAFETY GUIDELINES |
|
• The dehumidifier must be connected to your household power supply in |
|
|
|
compliance with current safety standards concerning the installation of |
|
|
household appliances. |
|
• |
The outlet which the dehumidifier is plugged into must: |
|
|
- comply with the type of plug installed on the unit; |
|
|
- be rated to handle the maximum current requirements of the unit; |
|
|
- be properly grounded. |
|
• |
The power cord (fig. N) must: |
|
|
- not touch any type of liquid: hazard of electrocution and/or fire; |
|
|
- not be squashed and/or touch sharp edges; |
|
|
- not be used to pull or move the dehumidifier; |
|
|
- not be used if it is damaged; |
|
|
- not be handled with damp or wet hands; |
|
|
- not be rolled up while the dehumidifier is turned on or plugged in. |
|
• |
It is prohibited: |
|
|
- to insert objects inside the air inlet or outlet grids; |
|
|
- to use the dehumidifier inside closets, cabinets, cupboards and/or in |
|
|
other restricted spaces (fig.L); |
|
|
- to repair, dismantle and/or modify the dehumidifier yourself; |
|
|
- to obstruct the air inlet and/or outlet grids with the items to be |
|
|
dehumidified (Fig.M); |
|
|
- to install the dehumidifier in a different manner then is described in the |
|
|
“Installation and transport” section; |
|
|
- to use the dehumidifier near flammable or explosive substances and/or |
|
|
substances that may be adversely affected by the amount of humidity |
|
|
in the room; |
|
|
- to run the dehumidifier while the bottom grid is open; |
|
|
- to run the dehumidifier without the filters; |
|
• |
The water obtained through dehumidification must not be used for food |
|
|
purposes. |
|
• |
Never let children play near the dehumidifier. |
|
• |
Before cleaning the dehumidifier make sure to turn off and unplug it; |
|
|
only wash the dehumidifier with water (fig.I); do not use harsh detergents, |
|
|
benzene, or solvents of any kind. |
|
• |
It is absolutely prohibited to make any modifications to the dehumidifier |
|
|
whatsoever. |
|
• |
The power cord may only be replaced by an authorised service center. |
|
• |
Do not place the dehumidifier near heating devices (such as heaters or |
|
|
stoves). |
|
• |
Avoid using the direct drainage option if the drainage pipe is exposed to |
|
|
temperatures below freezing. |
|
• Avoid using the dehumidifier for highly sensitive or specialised |
|
|
|
applications such as the preservation of food, works of art, scientific |
|
|
information etc. |
|
• |
In the case of fire, use a carbon dioxide (CO2) type extinguisher. Never |
|
|
use water or powder type extinguishers to put out the fire. |
|

16 |
INSTALLATION AND HANDLING - DISPOSAL
INSTALLATION AND HANDLING
• |
Keep the packing for possible future use; in any event if the packing is disposed |
O |
|
|
|||
|
of, it must be done so observing the standards in force in the country in which |
|
|
||||
|
|
|
|
||||
|
the dehumidifier is installed. |
|
|
|
|
|
|
• |
When handling and transporting the unit, it must be kept in an upright position |
|
|
|
|||
|
(fig.O); make sure that the water collection tray is empty. |
|
|
|
|
|
|
• |
Do not use the handle situated at the back to lift the dehumidifier (Fig.P); this |
|
|
|
|||
|
handle has been designed to facilitate moving the dehumidifier while it rests on |
|
|
|
|||
|
the floor. |
|
|
|
|
|
UP |
• Maintain the proper space around the unit as indicated in (Fig.Q) for installation; |
|
|
|||||
|
move curtains and/or other obstacles that may interfere with smooth airflow. |
|
|
|
|||
• |
The dehumidifier must be installed on a flat and level surface that is capable of |
P |
|
|
|||
|
|
|
|||||
|
bearing its full weight (Fig.R). |
|
|
|
|
|
|
|
If the equipment is tilted and/or laid down, the water accumulated by the |
|
|
|
|||
|
dehumidification process may overflow, causing damage. |
|
|
|
|
||
|
• The dehumidifier may be wall-mounted in an upright position (fig.S); for this |
|
|
|
|||
|
type of installation make sure that the wall is suitable to take the full weight (see |
|
|
|
|||
|
technical data). Use 2 appropriately shaped and sized dowels for this purpose |
|
|
|
|||
|
(see example in fig.T). |
|
|
|
|
|
|
|
The manufacturer declines all implicit and explicit liabilities with regard to |
|
|
|
|||
|
damage to objects and/or injury to persons that may occur due to an |
Q |
|
Measurements |
|||
|
incorrect installation or use of the dehumidifier. |
|
|
|
|||
|
|
|
|
|
|
|
in mm |
|
|
DISPOSAL |
|
|
|
|
|
A dehumidifier that will no longer be used must be immediately rendered inoperable. |
|
|
|
||||
Unplug the unit and cut the power cord. The unit should then be handed over to an |
|
|
|
||||
authorised collection center for its disposal in compliance with the rules in force in the |
|
|
|
||||
country of installation. |
|
|
|
|
|
|
|
|
|
|
|
|
R |
|
|
V |
U |
T |
(not supplied) |
S |
|
|
|
|
|
|
Ø |
5 |
m a x |
|
|
|
|
|
|
2 5 |
m a x |
|
|
|
X |
|
|
|
|
|
|
|
X |
|
|
|
|
|
|
|
|
|
6 |
m in |
÷ |
1 5 |
m a x |
|
|
|
Measurements |
|
|
|
|
|
X= 235 mm |
|
in mm |
|
|
|
|

DESCRIPTION OF COMPONENTS - FEATURES
DESCRIPTION OF COMPONENTS
LIST OF COMPONENTS - FIG. A - Z
17 |
1 Control panel
2 Dehumidified air outlet grid
3Air inlet filter holder grid
4Condensation collection tank
5“Air in bloom®” system
6 |
Washable filter |
|
|
7 |
Highly efficient filter with activated charcoals (when provided) |
ENGLISH |
|
8 |
Direct drainage hole cap |
||
|
|||
9 |
Direct drainage pipe (when provided) |
|
10 Fragrance container on top of “Air in bloom®” system
EXCLUSIVE FEATURES
“AIR IN BLOOM ® ” SYSTEM (FIG.Z)
This equipment is provided with an exclusive “Air in bloom®” system; you may choose among a variety of fragrances to pleasantly scent your home by simply proceeding as follows:
•remove the desired fragrance tablet from the packet;
•turn the cover counter clockwise (10) (Fig.Z);
•place the scented tablet horizontally in the appropriate guides;
•close the cover (10) (Fig.Z) again by turning it clockwise.
The fragrance tablets last for approximately 24 hours, after which time they are to be replaced, following the procedure described above.
Use only original Saeco® products that may be purchased through authorised retailers.
Z |
10 |
HIGHLY EFFICIENT FILTER WITH ACTIVATED CHARCOALS (7)
Thanks to this accessory the Saeco® dehumidifier is capable of filtering the conditioned air in order to eliminate dust, pollen etc. The highly efficient filter with activated charcoals is fitted standard on the “Mirage combi” models and may be installed also on machines in which the filter is not provided, by purchasing it from an authorised dealer.
This filter must be replaced after a maximum of 3 months use.
OTHER FEATURES
ANTI-DRIP DEVICE
The Saeco® dehumidifier is provided with a device that prevents water from dripping when the condensation collection tank is removed, to protect the inside the equipment and your floor from wetness.
ELECTRONIC DEFROSTING
The Saeco® dehumidifier is provided with a device that electronically controls the defrosting process.
DIRECT DRAINAGE
The Saeco® dehumidifier enables the continuous drainage of the condensation into an appropriate drainage point. To enable this option, refer to the “installation with direct drainage” section.

18 |
DESCRIPTION OF CONTROLS
DESCRIPTION OF CONTROLS
LIST OF THE CONTROLS AND INDICATORS (MIRAGE/MIRAGE COMBI) (FIG. E - F)
CONTROL |
MIRAGE DEU001 |
MIRAGE COMBI DEU001H |
|
|
|
. |
|
|
|
. . |
. |
P P |
||
. |
|
|
||
|
. |
|
||
|
|
. |
|
|
. . |
|
|
||
|
. |
|
|
|
 P
P

 P
P


 P
P

 P
P


 P
P

 P
P


 P
P


 P
P


NAME |
DESCRIPTION |
|
Dehumidification adjustment |
Adjusts the humidity level of the room |
|
knob |
= minimum dehumidification |
|
|
= Max. dehumidification |
|
ON/OFF push button / LED |
This push button is used to turn the dehumidifier on and off. The |
|
|
dehumidifier starts in the running mode in which it was set when |
|
|
turned off. |
|
Air speed selection push |
This push button is used to select the air flow speed through the |
|
button /LED |
dehumidifier. The two fan speeds are alternately elected by |
|
|
pressing this push button. The LED lights up when the maximum |
|
|
speed is selected. |
|
Condensation collection |
This LED points out that the maximum level in the condensation |
|
tank full LED |
collection tank has been reached. The dehumidifier will stop |
|
|
automatically when this occurs. |
|
Running mode |
The running mode of the dehumidifier may be selected using this |
|
Push button/LEDs |
push button. |
|
|
Upon starting, the dehumidifier enters the Dehumidification |
|
|
mode; the corresponding LED lights up. |
|
|
Press the push button once to select the Combi running mode; |
|
|
both LEDs will light up. The unit dehumidifies and heats the air |
|
Dehumidification |
in this running mode. |
|
Press the push button twice to set the dehumidifier in the Heating |
||
|
||
|
mode. The corresponding LED remains lit. If pressed again, the |
|
|
dehumidifier returns to the starting status. |
|
|
The fan always runs at full speed in the Heating and Combi mode. |
|
Combi |
|
|
Heating |
|
|
Electronic thermostat push |
This push button is used to select between three different pre-set |
|
button /LEDs |
room temperatures that are controlled by the electronic thermostat. |
|
|
This function is enabled only when the Combi and Heating modes |
|
|
are selected. |
|
|
The first time that the Combi and Heating modes are selected |
|
Minimum |
the electronic thermostat is set at the Minimum temperature. |
|
Press the push button to select the Medium and Maximum tem- |
||
|
||
|
perature; the machine will heat the room until the desired tempe- |
|
|
rature is reached. |
Medium
Maximum

DESCRIPTION OF CONTROLS
LIST OF THE CONTROLS AND INDICATORS (MIRAGE S) (FIG. G)
19 |
CONTROL |
NAME |
DESCRIPTION |
|
|
ON/OFF and dehumidification adjustment |
This knob is used to turn the dehumidifier on and off, and to also |
|
|
knob |
adjust the humidity level of the room. |
|
|
|
OFF=machine turned off |
|
|
ON indication LED |
= minimum dehumidification |
ENGLISH |
|
This LED points out that the humidity in the air is higher than the |
||
|
|
=maximum dehumidification |
|
|
|
humidity currently set. |
|
|
|
(see Modes of Operation) |
|
|
Condensation collection tank full LED |
This LED points out that the maximum level in the condensation |
|
|
|
collection tank has been reached. The dehumidifier will stop |
|
|
|
automatically when this occurs. |
|
LIST OF THE CONTROLS AND INDICATORS (MIRAGE PLUS) (FIG. H)
CONTROL NAME |
DESCRIPTION |
Dehumidification adjustment knob |
Adjusts the humidity level of the room |
|
= minimum dehumidification |
|
= max. dehumidification |
ON/OFF push button / LED |
This push button is used to turn the dehumidifier on and off. |
Air speed selection push button /LED This push button is used to select the air flow speed through the dehumidifier. The two fan speeds are alternately elected by pressing this push button. The LED lights up when the maximum speed is selected.
Condensation collection tank full LED This LED points out that the maximum level in the condensation collection tank has been reached. The dehumidifier will stop automatically when this occurs.
|
|
Display for humidity indication |
It displays the humidity in the room (5% tolerance at 25°C) |
|
|
|
(see Modes of Operation). |
|
|
|
|
|
|
|
|
|
|
|
|

20 |
MODES OF OPERATION
MODES OF OPERATION
Dehumidification mode
or vice versa, it may be necessary to reposition the “humidity adjustment knob” in order to achieve the same degree of dehumidification.
•Plug the equipment into an appropriate outlet;
•Make sure that the “condensation collection tank full” LED is off.
Mirage - Mirage combi - Mirage plus
•Turn the “humidity adjustment” knob to the maximum dehumidification position (


 /
/


 );
);
•Press the “ON-OFF” push button and the dehumidifier will start;
•The fan starts at the minimum speed; if the fan speed is to be increased, press the “air speed selection” push button once.
Note: the greater the speed of the fan, the greater the capacity of dehumidifying the air
When the room humidity has been lowered to the desired level, slowly turn the “dehumidification adjustment” knob counter clockwise until the compressor stops; in this way you will have adjusted the unit to automatically maintain the desired level of humidity.
Mirage S
•Turn the “humidity adjustment” knob to the maximum
dehumidification position (


 ); by this way, the operation is simultaneously enabled.
Note: the fan and the compressor will start after a technical time set by the manufacturer; the “ON indication” LED will be on.
When the desired room humidity is reached, slowly turn the “dehumidification adjustment” knob counter clockwise until the compressor/fan stops and the led is off; in this way you will have adjusted the unit to automatically maintain the desired level of humidity.
Combi mode
(Mirage Combi only)
•Plug the equipment into an appropriate outlet;
•Make sure that the “condensation collection tank full” LED is off;
•Turn the “humidity adjustment” knob to the maximum dehumidification position (


 );
);
•Press the “ON-OFF” push button and the dehumidifier will start;
•Press the “running mode” push button until the two LEDs that correspond to the “Combi” running mode are lit. The fan will run at maximum speed in this running mode;
•Press the “electronic thermostat” push button and select the desired temperature.
When the room humidity has been lowered to the desired level, slowly turn the “dehumidification adjustment” knob counter clockwise until the compressor stops; in this way you will have adjusted the unit to automatically maintain the desired level of humidity.
When the desired room temperature is reached, the electronic thermostat will automatically control the operation of the heating element to maintain the right temperature in the room.
If the running mode is changed from Dehumidification to Combi
Heating mode
(Mirage Combi only)
•Plug the equipment into an appropriate outlet;
•Make sure that the “condensation collection tank full” LED is off;
•Press the “ON-OFF” push button and the dehumidifier will start;
•Press the “running mode” push button until only the “heating” LED remains lit; in this running mode the fan runs at maximum speed;
•Press the “electronic thermostat” push button and select the desired temperature.
When the desired room temperature is reached, the electronic thermostat will automatically control the operation of the heating element to maintain the right temperature in the room.
Condensation collection tank
The dehumidifier is automatically stopped when the condensation collection tank is full, regardless of the running mode in use; the corresponding LED on the control panel will light up when this occurs.
For the dehumidifier to begin running again you will need to empty the condensation collection tank as described below:
•open the filter holder grid by pulling the right-hand side of the grid outwards;
•lift and remove the tank, using the extraction handle (Fig.B) situated at the bottom until the handle used for carrying the tank (Fig.C) can be easily reached.
The equipment is provided with an anti-drip device that is activated to prevent the bottom of the dehumidifier from getting wet when the condensation collection tank is removed.
•Empty the condensation collection tank;
•Check that the water has been drained also from the floater base (Fig.D);
•Put the condensation collection tank back into place, pushing it inwards.
If the degree of humidity of the air is greater than the degree of humidity selected (with the humidity adjustment knob), the dehumidifier will start automatically in the running mode previously selected.
Note: Do not force the door while attempting to remove the condensation collection tank; the equipment will not run without the tank in place.
Room Humidity Indication
(Mirage Plus only)
By plugging the unit into an outlet, the “humidity control” display will turn on and show the room humidity (also when the machine is off). The range displayed is between 30% and 80% .
Beyond these limits, the display could show a flashing message “LLL” (see the troubleshooting table).
CLEANING AND MAINTENANCE
21 |
General notes concerning operation
•clean the installed air filters and replace if necessary;
•store the unit in an upright position, covered by a cloth, in a safe place out of the reach of children.
While running, the dehumidifier may increase the room temperature by a few degrees.
If, while using the dehumidifier, there should be a power |
|
|
disruption, the dehumidifier will switch off and remain so |
|
|
until the Start push button is pressed; the settings activated |
ENGLISH |
|
previously will be lost. |
||
|
||
To reactivate them, you will need to proceed manually |
|
|
according to the modes you want to activate. |
|
|
Should a power disruption occur with a Mirage S |
|
|
dehumidifier, the settings previously activated by the user |
|
|
will not be lost; when power is reset, the dehumidifier will |
|
|
start again automatically maintaining its parameters. |
|
CLEANING AND MAINTENANCE
•The dehumidifier should only be cleaned when it is turned off and unplugged.
•The air circulation areas of the dehumidifier must be kept clean and free from obstructions at all times
Note: even dust may cause an obstruction after extended use.
•Do not dip the equipment in water and/or other liquids
•Dry the unit by hand
•Do not pour liquids into the equipment (i.e.: air outlet grid, “Air in Bloom system ® ”).
External plastic parts
Clean the dehumidifier with a damp cloth and dry afterwards.
Note: use water only to wet the cloth.
Cleaning and replacing the air filters
Every two weeks, the net filter must be washed and the state of the highly efficient filter with activated charcoals must be checked in the following manner:
•Turn the dehumidifier off;
•open the air inlet filter holder grid (3)
•remove the filters from the grid (6) (7)(Fig.A)
•remove the highly efficient filter with activated charcoals (when installed) from the net filter;
•inspect the highly efficient filter with activated charcoals and replace it if dirty;
•wash the net filter with warm water and dry it afterwards;
•insert the highly efficient filter with activated charcoals in the net filter;
•insert the filters in the air inlet filter holder grid and close it;
When the dehumidifier is not in use
If the dehumidifier is not used for long periods it is advisable to:
•turn the dehumidifier off;
•unplug the power cord from the outlet;
•wind the power cord into a tidy roll;
•remove the condensation collection tank and dump any water;

22 |
TROUBLESHOOTING
TROUBLESHOOTING
PROBLEM |
POSSIBLE CAUSE |
SOLUTION |
|
||||
The dehumidifier fails to |
It is not properly plugged in. |
Make sure the plug is securely in the outlet. |
|
||||
run |
|
|
|
|
|
|
|
|
|
|
|
|
|||
|
The water tank is full |
|
Empty the condensation collection tank and put it back in the unit. |
|
|||
|
|
|
|
|
|
||
|
The |
|
condensation |
Insert the condensation collection tank correctly. |
|
||
|
collection tank is incorrectly |
|
|
||||
|
inserted. |
|
|
|
|
|
|
|
|
|
|
|
|
|
|
|
The |
set |
degree |
of |
Increase the desired degree of dehumidification using the appropriate |
|
|
|
dehumidification has been |
knob |
|
||||
|
reached |
|
|
|
|
|
|
|
|
|
|
||||
|
The ON/OFF button has |
Press the ON/OFF button. |
|
||||
|
not been pressed (Mirage, |
|
|
||||
|
Mirage Combi, Mirage |
|
|
||||
|
Plus) |
|
|
|
|
|
|
|
|
|
|
||||
|
The seat of the floater has |
Empty again the can by overturning it completely. |
|
||||
|
not |
been |
emptied |
|
|
||
|
completely. |
|
|
|
|
||
|
|
|
|
||||
I n a d e q u a t e |
The set dehumidification |
Increase the degree of dehumidification desired using the appropriate |
|
||||
Dehumidification |
degree has been reached |
knob |
|
||||
|
|
|
|
||||
|
The air filters are obstructed |
Clean and/or replace the filters |
|
||||
|
|
|
|
||||
|
Low air speed (Mirage, |
Increase the air speed |
|
||||
|
Mirage Combi, |
Mirage |
|
|
|||
|
Plus) |
|
|
|
|
|
|
|
|
|
|
|
|
|
|
There is no air flow |
The |
air |
filters |
are |
Clean and/or replace the filters |
|
|
|
obstructed |
|
|
|
|
|
|
|
|
|
|
||||
|
The fan does not work * |
Increase the degree of dehumidification desired using the appropriate |
|
||||
|
(Mirage S). |
|
|
|
knob until the led is on; then await the technical starting time. |
|
|
|
|
|
|
|
|
|
|
The equipment is running |
The |
air |
filters |
are |
Clean and/or replace the filters |
|
|
without dehumidifying |
obstructed |
|
|
|
|
|
|
|
|
|
|
||||
|
The temperature and/or |
It is sometimes normal that the equipment fails to dehumidify in certain |
|
||||
|
humidity in the room is too |
surrounding conditions (see “running limits” table) |
|
||||
|
low |
|
|
|
|
|
|
|
|
|
|
|
|||
|
The room is too large* |
|
|
|
|||
|
|
|
|
||||
The Combi or Heating |
The safety protection relay |
To restore normal running conditions unplug unit for 2 minutes, locate |
|
||||
mode has been selected |
for the heating element has |
and eliminate the cause of the overheating then plug the unit back in. |
|
||||
but the equipment fails to |
tripped |
|
|
|
|
|
|
heat the room (Mirage |
|
|
|
|
|
|
|
|
|
|
|
|
|
|
|
Combi). |
The temperature selected |
If the maximum temperature is desired but has not been selected, the |
|
||||
|
|
||||||
|
has been reached |
|
Heating mode may be restarted by selecting a higher temperature. |
|
|||
|
|
|
|
|
|||
|
The room is too large* |
|
|
|
|||
|
|
|
|
||||
The display shows LLL% |
The room humidity is lower |
|
|
||||
(Mirage Plus). |
than |
30% or higher than |
|
|
|||
|
80% |
|
|
|
|
|
|
|
|
|
|
|
|
|
|
(*) These causes do not mean that there is a fault with the unit.
To correct problems that have not been described in the table and/or if the solutions advised fail to resolve the problem, contact an authorised service center.
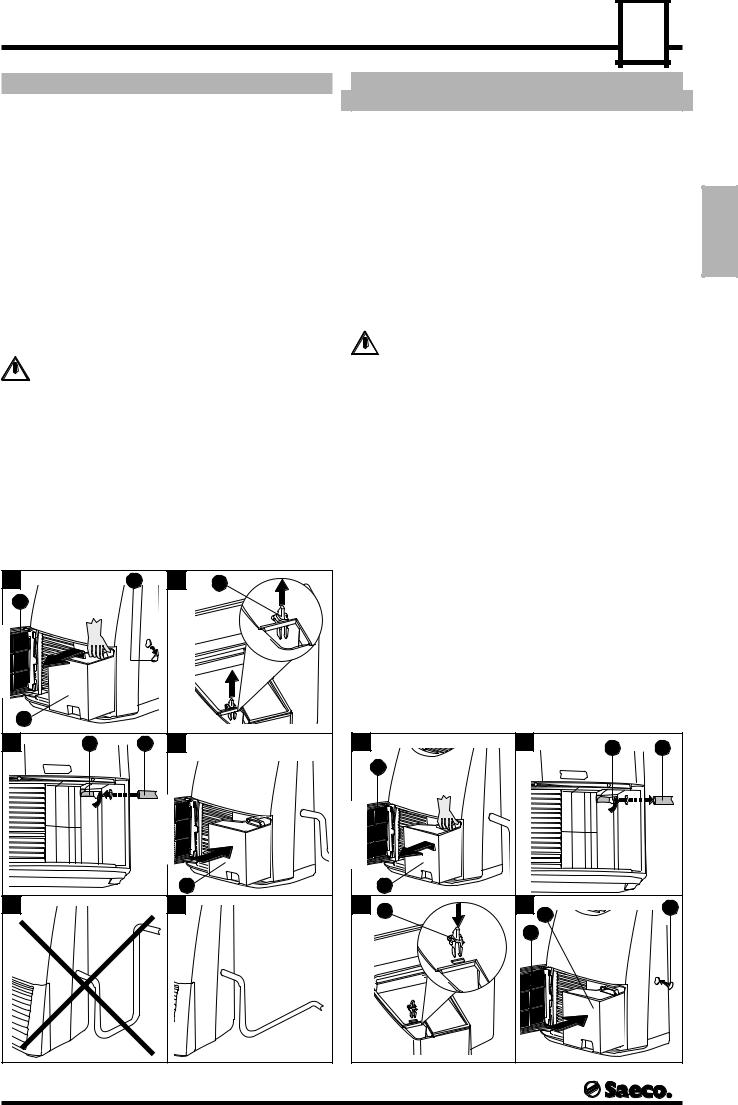
INSTALLATION WITH DIRECT DRAINAGE - RESTORING DRAINAGE INTO THE CONDENSATION COLLECTION TANK
23 |
INSTALLATION WITH DIRECT DRAINAGE
The condensation may be drained directly into an appropriate drainage point by means of a pipe that is supplied with the unit. To activate this option proceed as follows:
RESTORING DRAINAGE INTO THE CONDENSATION COLLECTION TANK
To restore drainage into the condensation collection tank, proceed as follows:
•remove the rubber cap (8) (Fig.Z1) situated at the side of the unit and keep it in a safe place;
•open the filter holder grid (3) (Fig.Z1) and slide the condensation collection tank out (4);
•remove the insert (11) (Fig.Z2) that deactivates the anti-drip device from the condensation collection tank and keep it in a safe place;
•insert the pipe (Fig.9) (Fig.Z3) in the joint after having passed it through the hole, being careful to manually move the anti-drip device (12)
•re-insert the condensation collection tank (4) (Fig.Z4) and close the filter holder grid (3)
Warning!
 The drainage pipe must slope downwards (Fig.Z6) and no part of the pipe should exceed the height of the drainage point on the unit to which it is connected (Fig.Z5); make sure, on a periodic basis, that the tube is not obstructed and that it is firmly attached to prevent the condensation from overflowing.
Z1 |
|
8 |
Z2 |
11 |
3 |
|
|
|
|
4 |
|
|
|
|
Z3 |
12 |
9 |
Z4 |
|
|
|
|
|
4 |
Z5 |
|
|
Z6 |
|
• open the filter holder grid (3) (Fig.Z7) and remove the |
|
|
condensation collection tank (4); |
|
|
• carefully slide the tube (9) (Fig. Z8) out of the joint, being careful |
ENGLISH |
|
to manually move the anti-drip device (12) (Fig.Z8); |
||
• position the insert (11) (Fig.Z9) in the condensation collection |
||
tank (4); |
||
• replace the rubber cap (8) (Fig.Z10) in the casing of the |
||
|
||
dehumidifier |
|
|
• re-insert the condensation collection tank (4) (Fig.Z10) and |
|
|
close the filter holder grid (3). |
|
Warning!
 Remember to reinstall the insert for the de-activation of the anti-drip device. Water will overflow if this is not reinserted.
Z7 |
|
Z8 |
12 |
9 |
|
|
|
||
|
3 |
|
|
|
|
4 |
|
|
|
Z9 |
11 |
Z10 |
4 |
8 |
|
||||
|
|
|
|
|
|
|
3 |
|
|
Loading...