


Printer/Scanner Unit
Type 2000
Operating Instructions
Scanner Reference
1Sending Scan Files by E-mail
2Sending Scan Files by Scan to Folder
3Delivering Scan Files
4Using the Network TWAIN Scanner Function
5Various Scan Settings
6Appendix
Read this manual carefully before you use this machine and keep it handy for future reference. For safe and correct use, be sure to read the Safety Information in "About This Machine" before using the machine.
Introduction
This manual contains detailed instructions and notes on the operation and use of this machine. For your safety and benefit, read this manual carefully before using the machine. Keep this manual in a handy place for quick reference.
Important
Contents of this manual are subject to change without prior notice. In no event will the company be liable for direct, indirect, special, incidental, or consequential damages as a result of handling or operating the machine.
Notes:
Some illustrations in this manual might be slightly different from the machine.
Certain options might not be available in some countries. For details, please contact your local dealer.
Caution:
Use of controls or adjustments or performance of procedures other than those specified in this manual might result in hazardous radiation exposure.
Two kinds of size notation are employed in this manual. With this machine refer to the metric version.
Manuals for This Machine
Refer to the manuals that are relevant to what you want to do with the machine.
 Important
Media differ according to manual.
The printed and electronic versions of a manual have the same contents.
Adobe Acrobat Reader/Adobe Reader must be installed in order to view the manuals as PDF files.
Depending on which country you are in, there may also be html manuals. To view these manuals, a Web browser must be installed.
About This Machine
Be sure to read the Safety Information in this manual before using the machine.
This manual provides an introduction to the functions of the machine. It also explains the control panel, preparation procedures for using the machine, how to enter text, and how to install the CD-ROMs provided.
General Settings Guide
Explains User Tools settings, and Address Book procedures such as registering fax numbers, e-mail addresses, and user codes. Also refer to this manual for explanations on how to connect the machine.
Troubleshooting
Provides a guide to solving common problems, and explains how to replace paper, toner, and other consumables.
Security Reference
This manual is for administrators of the machine. It explains security functions that the administrators can use to protect data from being tampered with, or prevent the machine from unauthorized use.
Also refer to this manual for the procedures for registering administrators, as well as setting user and administrator authentication.
Copy Reference
Explains Copier functions and operations. Also refer to this manual for explanations on how to place originals.
Facsimile Reference
Explains Facsimile functions and operations.
Printer Reference
Explains Printer functions and operations.
Scanner Reference
Explains Scanner functions and operations.
i
Network Guide
Explains how to configure and operate the machine in a network environment, and use the software provided.
This manual covers all models, and includes descriptions of functions and settings that might not be available on this machine. Images, illustrations, and information about operating systems that are supported might also differ slightly from those of this machine.
Other manuals
•Manuals for This Machine
•Safety Information
•Quick Reference Copy Guide
•Quick Reference Fax Guide
•Quick Reference Printer Guide
•Quick Reference Scanner Guide
•PostScript3 Supplement
•UNIX Supplement
•Manuals for DeskTopBinder Lite
•DeskTopBinder Lite Setup Guide
•DeskTopBinder Introduction Guide
•Auto Document Link Guide

 Note
Note
Manuals provided are specific to machine types.
For "UNIX Supplement", please visit our Web site or consult an authorized dealer.
"PostScript3 Supplement" and "UNIX Supplement" include descriptions of functions and settings that might not be available on this machine.
The following software products are referred to using general names:
Product name |
General name |
|
|
DeskTopBinder Lite and DeskTopBinder Pro- |
DeskTopBinder |
fessional * |
|
ScanRouter EX Professional * and ScanRouter |
the ScanRouter delivery software |
EX Enterprise * |
|
|
|
*Optional
ii

TABLE OF CONTENTS |
|
Manuals for This Machine ...................................................................................... |
i |
How to Read This Manual ..................................................................................... |
1 |
Symbols ..................................................................................................................... |
1 |
Names of Major Options ............................................................................................ |
1 |
About the Scanner Functions............................................................................... |
2 |
Display .................................................................................................................... |
3 |
Reading the Display and Using Keys......................................................................... |
3 |
Confirmation Displays ................................................................................................ |
4 |
Scanner Features................................................................................................... |
6 |
1. Sending Scan Files by E-mail |
|
Before Sending Scan Files by E-mail................................................................... |
9 |
Outline of Sending Scan Files by E-mail.................................................................... |
9 |
Preparation for Sending by E-mail ........................................................................... |
10 |
Registering E-mail Addresses in the Address Book................................................. |
10 |
E-mail Screen........................................................................................................... |
11 |
Basic Procedure for Sending E-mail.................................................................. |
13 |
Specifying E-mail Destinations .......................................................................... |
15 |
Selecting a Destination Registered to a Quick Dial Key .......................................... |
15 |
Selecting a Destination Registered in the Machine's Address Book........................ |
16 |
Manual Entry of an E-mail Address.......................................................................... |
22 |
Searching for a Destination in the LDAP Server ...................................................... |
23 |
Registering a Manually-Entered E-mail Address in the Address Book .................... |
26 |
Specifying the Sender ......................................................................................... |
28 |
Selecting a Sender Registered to a Quick Dial Key................................................. |
29 |
Selecting a Sender from the List .............................................................................. |
30 |
Using a Registration Number to Specify a Sender Name ........................................ |
32 |
Searching for a Sender by Name............................................................................. |
34 |
Searching for a Sender by E-mail Address .............................................................. |
36 |
Setting the Return Receipt Function.................................................................. |
38 |
Specifying the Subject ........................................................................................ |
39 |
2. Sending Scan Files by Scan to Folder |
|
Before Sending Scan Files by Scan to Folder .................................................. |
41 |
Outline of Sending Scan Files by Scan to Folder..................................................... |
41 |
Preparation for Sending by Scan to Folder .............................................................. |
44 |
Registering Destination Folders in the Address Book.............................................. |
45 |
Scan to Folder Screen ............................................................................................. |
46 |
Basic Procedure for Sending by Scan to Folder .............................................. |
48 |
Specifying Scan to Folder Destinations ............................................................ |
50 |
Selecting a Destination Registered to a Quick Dial Key .......................................... |
50 |
Selecting a Destination Registered in the Machine's Address Book........................ |
51 |
Sending Scan Files to a Shared Folder on the Network .......................................... |
57 |
Sending Scan Files to an FTP Server...................................................................... |
63 |
Sending Scan Files to NetWare Server ................................................................... |
65 |
Registering the Path to the Selected Destination in the Address Book ................... |
71 |
iii

3. Delivering Scan Files |
|
Before Delivering Scan Files .............................................................................. |
73 |
Delivering Scan Files ............................................................................................... |
73 |
Preparation for Delivering ........................................................................................ |
74 |
Installing DeskTopBinder Lite from Provided CD-ROM ........................................... |
75 |
Network Delivery Scanner Screen ........................................................................... |
76 |
Basic Delivery Procedure.................................................................................... |
78 |
Specifying Delivery Destinations ....................................................................... |
81 |
Selecting a Destination Using a Quick Dial Key....................................................... |
81 |
Selecting a Destination Registered in the Destination List of the Delivery Server ... |
82 |
4. Using the Network TWAIN Scanner Function |
|
When Using as a TWAIN Scanner ...................................................................... |
87 |
Outline of the TWAIN Scanner Function .................................................................. |
88 |
Preparation for Using the Network TWAIN Scanner ................................................ |
89 |
Installing TWAIN Driver from Provided CD-ROM..................................................... |
90 |
Basic Procedure for Scanning Files Using TWAIN Scanner ........................... |
91 |
5. Various Scan Settings |
|
Specifying Send Options .................................................................................... |
93 |
Resolution ................................................................................................................ |
93 |
Original Orientation .................................................................................................. |
94 |
Original Setting......................................................................................................... |
96 |
Scan Size ................................................................................................................. |
97 |
Mixed Sizes............................................................................................................ |
101 |
Stamp..................................................................................................................... |
102 |
File Type ................................................................................................................ |
104 |
PDF Security Encryption ........................................................................................ |
105 |
PDF Security Permissions ..................................................................................... |
107 |
Selecting Original Type ..................................................................................... |
110 |
Adjusting Image Density ................................................................................... |
111 |
Scan Settings When Using Twain Scanner ..................................................... |
112 |
Setting Original Orientation on the TWAIN Scanner .............................................. |
112 |
When Scanning Originals of Mixed Sizes Using TWAIN Scanner ......................... |
113 |
6. Appendix |
|
Relationship between Resolution and Scan Size ........................................... |
115 |
Software Supplied on CD-ROM ........................................................................ |
117 |
Auto-Run Program ................................................................................................. |
117 |
TWAIN Driver ......................................................................................................... |
117 |
DeskTopBinder Lite................................................................................................ |
118 |
Values of Various Set Items for Transmission/Delivery Function ................ |
120 |
Transmission.......................................................................................................... |
120 |
The Network Delivery Function .............................................................................. |
122 |
Specifications..................................................................................................... |
123 |
INDEX....................................................................................................... |
124 |
iv
How to Read This Manual
This section describes how to read this manual through symbols used.
Symbols
This manual uses the following symbols:
Indicates important safety notes.
Ignoring these notes could result in serious injury or death. Be sure to read these notes. They can be found in the "Safety Information" section of About This Machine.
Indicates important safety notes.
Ignoring these notes could result in moderate or minor injury, or damage to the machine or to property. Be sure to read these notes. They can be found in the "Safety Information" section of About This Machine.
Indicates points to pay attention to when using the machine, and explanations of likely causes of paper misfeeds, damage to originals, or loss of data. Be sure to read these explanations.
Indicates supplementary explanations of the machine’s functions, and instructions on resolving user errors.
This symbol is located at the end of sections. It indicates where you can find further relevant information.
[ ]
Indicates the names of keys that appear on the machine’s display panel.
{}
Indicates the names of keys on the machine’s control panel.
Names of Major Options
Major options of this machine are referred to as follows in this manual:
•Auto Document Feeder→ADF
•Auto Document Feeder capable of scanning both sides of a sheet→ARDF
1

About the Scanner Functions
This section describes functions you can use in the scanner mode.
For details about each function, see respective chapters.
Sending scan files
There are several methods you can use to send captured data as files to computers.
The following functions are available only when Function Upgrade Option is installed:
•Sending scan files by e-mail
For details, see chapter 1 "Sending Scan Files by E-mail"
•Sending scan files to a shared folder
For details, see chapter 2 "Sending Scan Files by Scan to Folder".
•Sending scan files to an FTP server
For details, see chapter 2 "Sending Scan Files by Scan to Folder".
•Sending scan files to a NetWare server
For details, see chapter 2 "Sending Scan Files by Scan to Folder".
•Delivering scan files using the delivery server For details, see chapter 3 "Delivering Scan Files".
Scanning originals using the TWAIN Driver
Use the TWAIN driver to specify the machine where originals will be scanned from a client computer. For details, see chapter 4 "Using the Network TWAIN Scanner Function".

 Reference
p.9 “Sending Scan Files by E-mail”
p.41 “Sending Scan Files by Scan to Folder”
p.73 “Delivering Scan Files”
p.87 “Using the Network TWAIN Scanner Function”
2
Display
This section explains the display, keys, and the two confirmation displays - Check Destination and File Status.
You can find explanations about the E-mail screen, Scan to Folder screen, or Network Delivery Scanner screen in this manual. For details, see "E-mail Screen", "Scan to Folder Screen", and "Network Delivery Scanner Screen".

 Reference
p.11 “E-mail Screen”
p.46 “Scan to Folder Screen”
p.76 “Network Delivery Scanner Screen”
Reading the Display and Using Keys
This section explains how to read the display and use the selection keys.
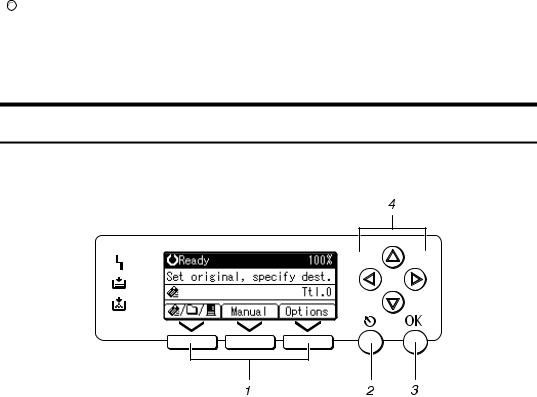
1. Selection keys
Press to select an item displayed at the bottom of the screen.
Example: the standby screen
•When the instruction "press [ ] to switch to the E-mail screen" is given in this manual, press the left selection key.
•When the instruction "press [Manual] " is given in this manual, press the center selection key.
•When the instruction "press [Options] " is given in this manual, press the right selection key.
ARO001S
2. {Escape} key
Press to cancel operation or return to the preceding display.
3. {OK} key
Press to specify a function on the display or determine a selected function.
4. Scroll key
Press to move the cursor in each direction, step by step. When the {U}, {T}, {V}, or {W} key appears in this manual, press the scroll key of the same direction.
3
Confirmation Displays
This section explains the two confirmation displays - Check Dest. and File Status.
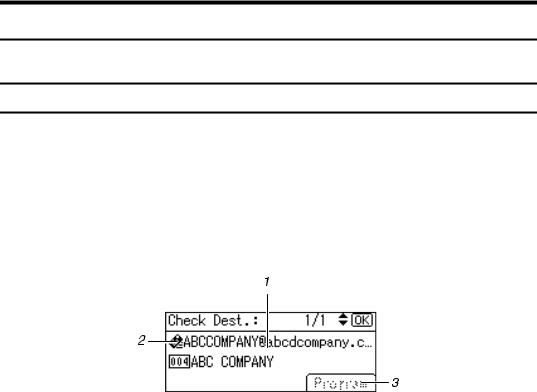
Check Destination
This section explains about displayed items and how to display the Check Dest. screen.
Use the Check Dest. screen to check the details of e-mail, Scan to folder, or delivery destinations.
Pressing the {Check Destination} key switches the screen from the initial scanner screen to the Check Dest. screen.
Check Dest.
ARO002S
1. Destination |
3. [Program] |
Displays the transmission or delivery destinations.
When multiple destinations are specified, you can change the display by pressing the {U} or {T} key.
2. Transmission function icon
Displays the icon of the transmission function (e-mail, Scan to Folder, or delivery function) in use.
For e-mail or Scan to Folder, if you press [Program], the destination that is entered directory or specified by browsing the server can be registered in the machine's address book.
4
File Status
This section explains the items that appear on the screen and how to display File Status.
Use the File Status screen to check e-mail, Scan to Folder, and delivery results. Press the {Job Information} key to display File Status.
File Status
ARO003S
1. Date / Time
Displays the date and time the machine sent a transmission request, or the date and time "VDone", "VError", or "VCanceled" was confirmed.
2. Destination
The destination is displayed with the icon of the transmission function (e-mail, Scan to Folder, or delivery function).
When multiple destinations were selected, the first selected destination is displayed. Other destinations appear as “+ 2” (When two other destinations exist.).

 Note
Note
3.Number of scanned pages
Displays the number of scanned pages.
4.Status
One of the following transmission status is displayed: "VDone", "VSending", "VWaiting", "VError" or "VCanceled".
5. [Print]
Press to print transmission results.
Depending on the security settings, some transmission results might not appear in File Status.
5
Scanner Features
This section explains Scanner Features settings.
To display the Scanner Features screen, press the {User Tools/Counter} key. For details about setting methods, see General Settings Guide.
Scan Settings
Items |
Description |
|
|
Default Scan Settings |
Allows you to specify the default resolution and scan |
|
size. |
|
|
Original Setting |
Allows you to specify the default whether originals |
|
are one-sided or two-sided. |
|
This setting is available only when you have installed |
|
the optional ARDF. |
|
|
Mixed Orig. Sizes Priority |
Allows you to set the machine to automatically detect |
|
the size of mixed-size originals placed in the ADF. |
|
|
Orig. Orientation Priority |
Allows you to select the default original orientation |
|
(helpful if you usually place originals in the same ori- |
|
entation). |
|
|
Original Type Setting |
Allows you to select a suitable original type setting. |
|
|
Destination List Settings
Items |
Description |
|
|
Dest. List Priority 1 |
Allows you to specify whether the address book that |
|
is managed by this machine or the "Destination List" |
|
that is managed by the delivery server is displayed as |
|
the default. |
|
This setting is available only when the Network Deliv- |
|
ery Scanner function is enabled by the ScanRouter de- |
|
livery software. |
|
|
Update Server Dest. List |
Allows you to update the delivery server's destination |
|
list by pressing [Update Server Dest. List]. To use this |
|
function, under [System Settings], set [Delivery Option] to |
|
[On]. |
|
This setting is available only when the Network Deliv- |
|
ery Scanner function is enabled by the ScanRouter de- |
|
livery software. |
|
|
Dest. List Priority 2 |
Allows you to select whether to prioritize the e-mail |
|
destination list or the folder destination list. |
|
|
6
Send Settings
Items |
Description |
|
|
TWAIN Standby Time |
Allows you to select the machine's response if a client |
|
computer tries to use the TWAIN scanner while scan- |
|
ning is in progress. |
|
|
File Type Priority |
Allows you to specify the default file format of scan |
|
files. |
|
|
Compression |
Allows you to specify a compression of scanned image |
|
data. |
|
|
Print&Del. Scanner Journal |
Allows you to specify the machine's response if the |
|
maximum number of scanner journals is exceeded. |
|
|
Print Scanner Journal |
Allows you to print the scanner journal. The scanner |
|
journal is then deleted. |
|
|
Delete Scanner Journal |
Allows you to delete the scanner journal without |
|
printing it. |
|
|
Max. E-mail Size |
Allows you to select whether or not to limit the size of |
|
e-mail that has attachments. |
|
|
Divide & Send E-mail |
Allows you to select whether or not to divide files that |
|
exceed the size specified in [Max. E-mail Size] and send |
|
them as multiple e-mails. |
|
|
E-mail Informatn. Language |
Allows you to select the language in which document |
|
information such as the title, date, and administrator's |
|
name is sent. |
|
|
Administrator Tools
Items |
Description |
|
|
Menu Protect |
Allows you to set the default access level for functions |
|
whose settings can be changed by users other than the |
|
administrator. |
|
|
7
8
1. Sending Scan Files by E-mail
You can attach scan files to e-mails and send them via connections such as LAN and the Internet.
Before Sending Scan Files by E-mail
This section explains the necessary preparations and the procedure for sending scan files by e-mail.
Outline of Sending Scan Files by E-mail
This section outlines the function for sending scan files by e-mail.
ZZZ508S
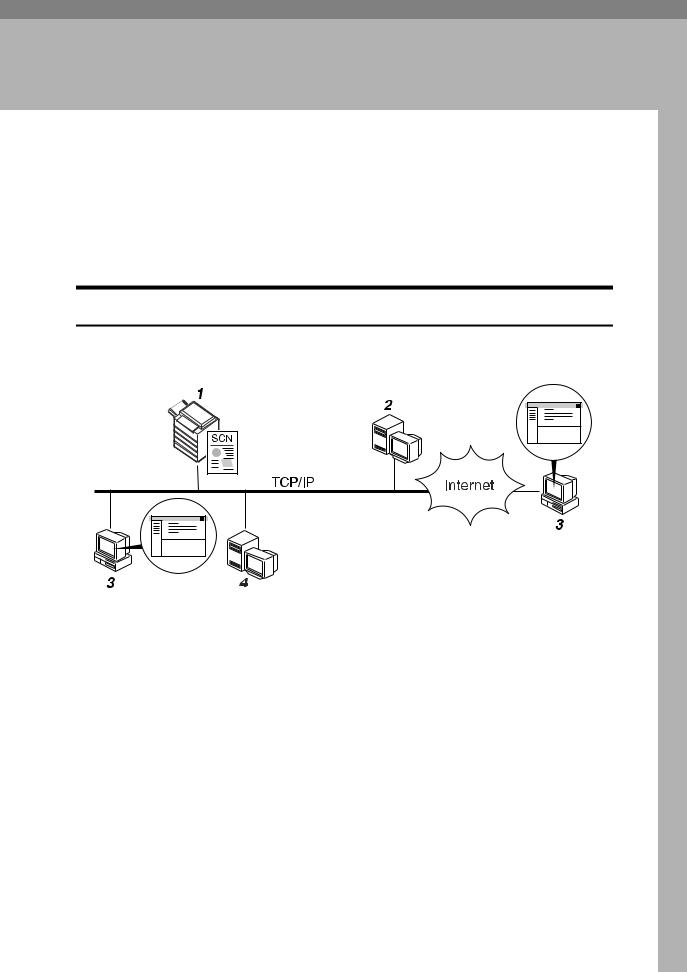
1. This machine
A scan file can be attached to an e-mail and sent to a mail server.
2. SMTP server
You need to have an access to an e-mail server that supports SMTP (Simple Mail Transfer Protocol), to send scan files by e- mail. However, it is not essential to have an e-mail server inside the LAN where this machine belongs. It transfers a received e-mail to a specified destination through a LAN or the Internet.
3. Client computer
Use e-mail client software to receive e- mail messages and scan file attachments that are generated by this machine.
4. LDAP server
Use this server for administering e-mail accounts, searching the network, and authenticating the computers that access the machine. Using the LDAP server, you can search for destinations from the machine.
9

Sending Scan Files by E-mail
Preparation for Sending by E-mail
This section explains the preparation and settings for sending scan files by e-mail.
1 A Connect the machine to the network.
Connect the machine to the network using an Ethernet cable or wireless LAN (IEEE 802.11b).
B Make the necessary network settings in [System Settings]
If you have connected the machine to the network using an Ethernet cable, make the following settings. For details, see General Settings Guide.
•Specify the machine’s IPv4 address and subnet mask.
•Specify the IPv4 gateway address.
•In [Effective Protocol], enable [IPv4].
•Specify the SMTP server.
C If necessary, change settings in [Send Settings] under [Scanner Features].

 Note
Note
To connect the machine to the network using a wireless LAN (IEEE 802.11b), an extended wireless LAN board is required respectively. For details, see Network Guide.
Items to set up in [System Settings] vary depending on the network environment. For more information about network settings, see General Settings Guide.
For more information about [Scanner Features], see General Settings Guide.
Registering E-mail Addresses in the Address Book
You can register frequently used e-mail addresses to the address book.
You can register frequently used e-mail addresses in the address book. Register e-mail addresses in [Address Book Management] under [Administrator Tools] from
[System Settings]. Addresses can also be registered as groups.

 Note
Note
For details about registering e-mail addresses in the address book, see General Settings Guide.
You can also register e-mail addresses in the address book using Web Image Monitor or SmartDeviceMonitor for Admin. For details about how to install these applications, see Network Guide. For details about registering addresses in the address book, see Help of respective applications.
Depending on the machine type, you may not be able to use the machine when it is updating the address book using CSV files (retrieved using SmartDeviceMonitor for Admin) that contain user codes.
10
Before Sending Scan Files by E-mail
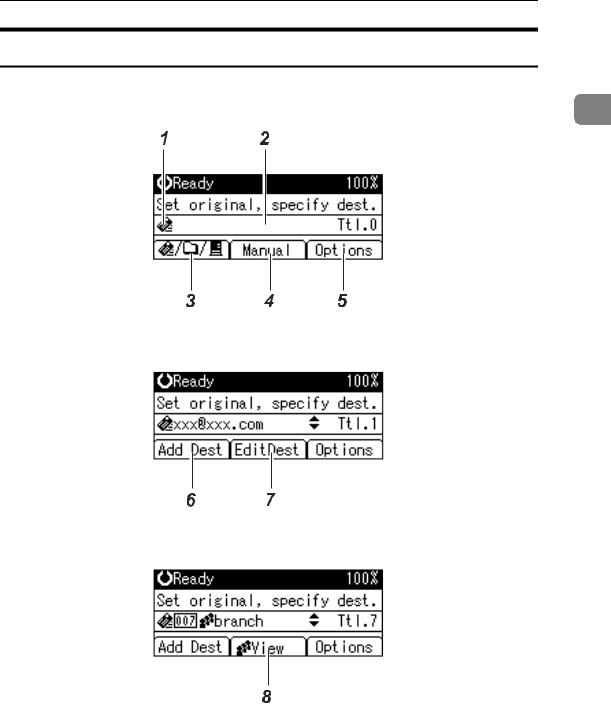
E-mail Screen
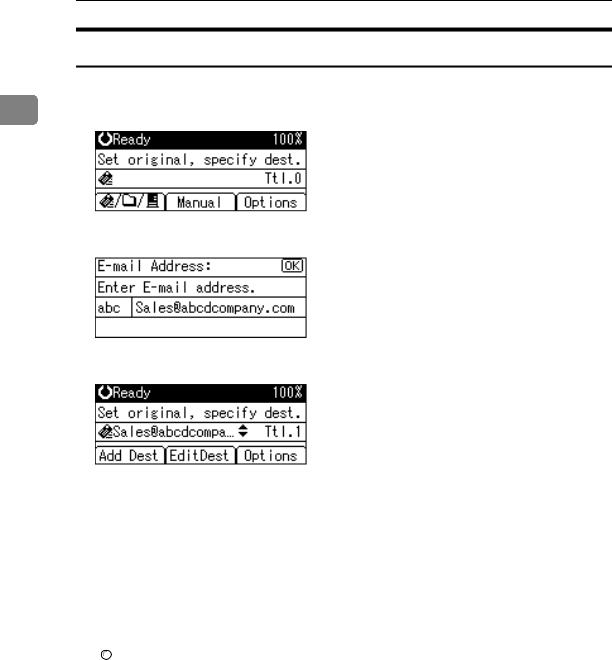
This section explains the screen layout when sending scan files by e-mail.
|
|
Main screen |
1 |
ZZZ601S
When a destination is entered manually
ZZZ602S
When a group is selected for destination
ZZZ603S
11

Sending Scan Files by E-mail
1. E-mail icon |
5. [Options] |
Indicates that the E-mail screen is displayed.
2.Destination field
1Displays a selected destination. If multiple destinations are selected, press the {U} or {T} key to display the destinations in the order they were selected. To check the selected destination, press the
{Check Destination} key.
3.E-mail  / Scan to Folder
 / Network Delivery Scanner
Press to switch between screens. You can also use this key to switch between the E- mail and Scan to Folder functions when sending the same file to both e-mail and Scan to Folder destinations at the same time.
4. [Manual]
When specifying a destination that is not registered, press [Manual], and then enter the e-mail address of the destination using the Quick Dial keys.
Press to make the scan settings and specify formats of files you want to send.
6. [Add Dest]
When selecting multiple destinations after a manual entry of an e-mail address, press [Add Dest], and then enter the e-mail address of the destination.
7. [EditDest]
When changing an e-mail address that has been entered, press [EditDest], and then enter the new e-mail address.
8. [View]
Press to check the addresses registered in a group.
12
Basic Procedure for Sending E-mail
Basic Procedure for Sending E-mail
This section describes the basic operation for sending scan files by e-mail.
|
|
A Make sure that no previous settings remain. |
1 |
If a previous setting remains, press the {Clear Modes} key.
B If the Network Delivery Scanner or Scan to Folder screen is displayed, press [ ] to switch to the E-mail screen.
C Place originals.
D If necessary, select the original type.
For details, see "Selecting Original Type".
E If necessary, specify the scanning density.
For details, see "Adjusting Image Density".
F Select the destination.
You can specify multiple destinations.
For details, see "Specifying E-mail Destinations".
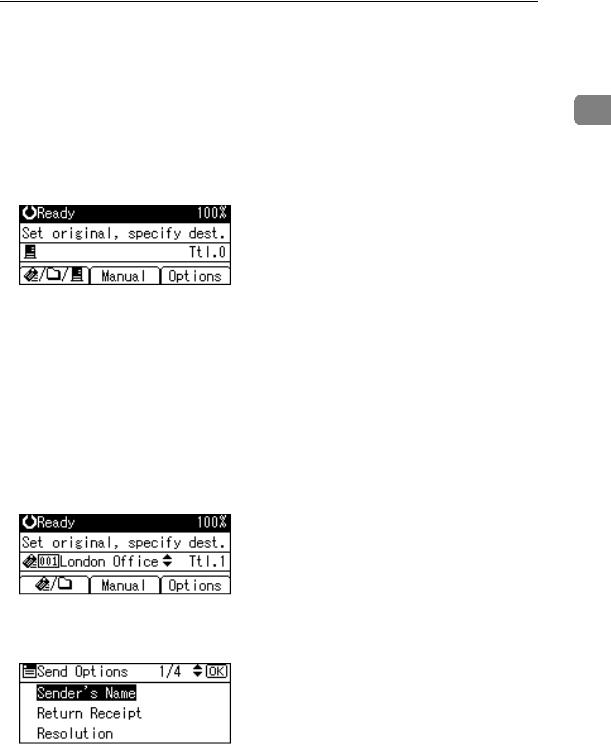
G Press [Options], select [Sender's Name], and then specify the e-mail sender.
For details, see "Specifying the Sender".
H If necessary, select [Return Receipt] under [Options] to make settings for the Return Receipt function.
For details, see "Setting the Return Receipt Function".
13

Sending Scan Files by E-mail
I If necessary, select [Attach Subject] under [Options] to specify the e-mail subject.
For details, see "Specifying the Subject".
J If necessary, specify the resolution and orientation of the original under
1 [Options].
For details, see "Specifying Send Options".
K Press the {Start} key.
Scanning starts.
You must press the {q} key to send scan files that are scanned from the exposure glass.
Scan files that are scanned from the ADF/ARDF are sent immediately.
L If you still have originals to send, place them on the machine, and then press the {Start} key.
Repeat this step until all originals are scanned.
M After all originals are scanned, press the {q} key.
Transmission starts.

 Note
Note
If you have selected two or more destinations, the destinations can be made to appear one by one by pressing the {U} or {T} key.
To cancel a selected destination, display the destination in the destination field, and then press the {Clear/ Stop} key.
In [System Settings], you can specify the administrator's e-mail address as the default sender name. This lets you send e-mail without entering anything for [Sender's Name]. For details, see General Settings Guide.
Depending on the security setting, the logged-on user may be specified as
[Sender's Name].
If you press the {Check Destination} key, the initial scanner screen switches to the Check Dest. screen. You can use the Check Dest. screen to check the details of the selected destinations. For details, see "Check Destination".
To cancel scanning, press the {Clear/ Stop} key.

 Reference
p.110 “Selecting Original Type”
p.111 “Adjusting Image Density”
p.15 “Specifying E-mail Destinations”
p.28 “Specifying the Sender”
p.38 “Setting the Return Receipt Function”
p.39 “Specifying the Subject”
p.93 “Specifying Send Options”
p.4 “Check Destination”
14
Specifying E-mail Destinations
Specifying E-mail Destinations
This section explains how to specify e-mail destinations. |
1 |
You can specify e-mail destinations by any of the following methods: |
•Select a destination registered to a Quick Dial key
•Select a destination from the machine’s address book
•Enter an e-mail address manually
•Search the LDAP server for a destination and select it
Selecting a Destination Registered to a Quick Dial Key
This section explains how to select a destination registered to a Quick Dial key.
For details about how to register an e-mail destination to a Quick Dial key, see General Settings Guide.
A Press the Quick Dial key to which the destination is registered.
Repeat this step to add more destinations.
ZZZ609S |
The illustration is an example. The actual appearance may be different.
15
Sending Scan Files by E-mail
Selecting a Destination Registered in the Machine's Address Book
This section explains how to select a destination from the machine’s address book.
1 Important
To use this function, you must register destinations in [System Settings] in advance. For details, see General Settings Guide.
There are four methods of selecting a destination that is registered in the machine's address book:
•Select a destination from the list
•Enter the destination's registration number
•Search for a destination by name
•Search for a destination by e-mail address
Selecting a destination from a list
Use the following procedure to select a destination from the list.
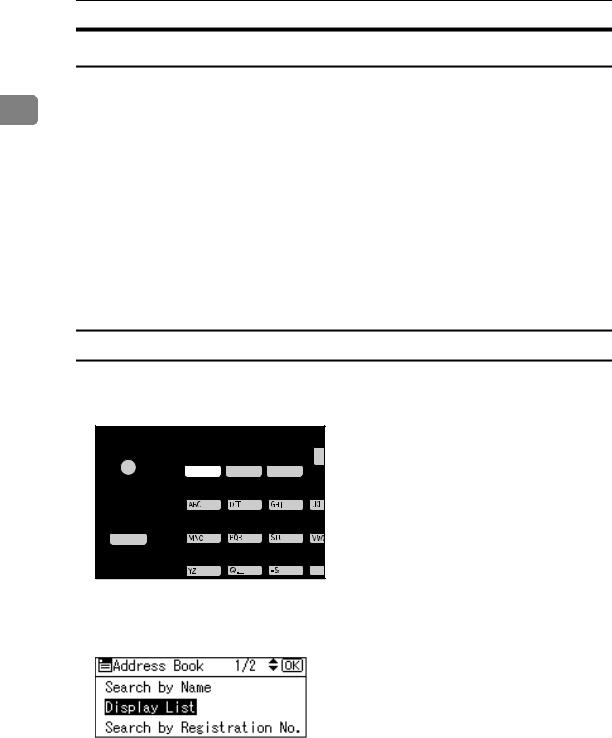
A Press the {Search Destination} key.
ZZZ610S |
The illustration is an example. The actual appearance may be different.
B Press the {U}or {T}key to select [Display List], and then press the {OK}key.
16
Specifying E-mail Destinations
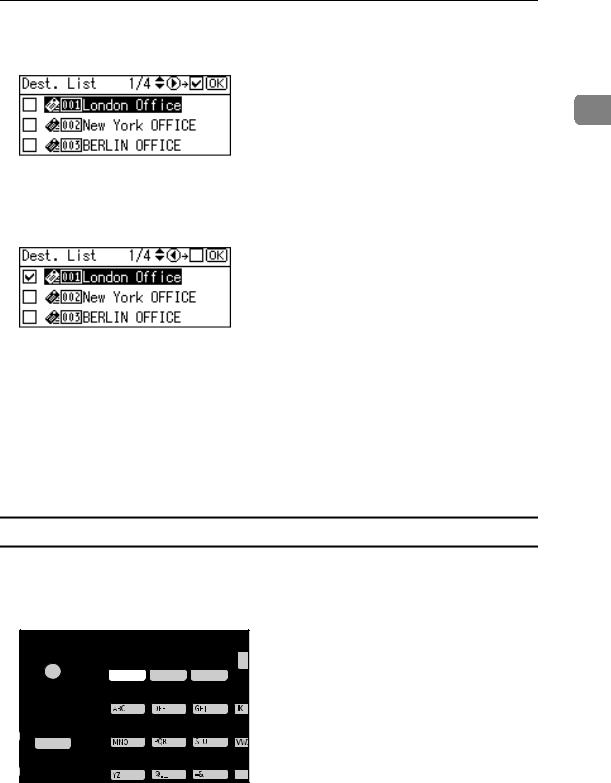
C Press the {U} or {T} key to select the destination from the list, and then press the {V} key.
1
The check box on the left side of the selected destination is selected.
Repeat this step to add more destinations.
D Press the {OK} key.

 Note
Note
If under [System Settings], [LDAP Search] is set to [On], a screen to select a search object appears when you press the {Search Destination} key. On the screen, select [Search Address Book], and then press the {OK} key.
To cancel a selected destination, press the {U} or {T} key to select the target destination, and then press the {W} key.
Depending on the security settings, some destinations may not appear in the destination list.
Using a registration number to select a destination
Select the destination from the machine’s address book using its registration number.
A Press the {Search Destination} key.
ZZZ610S |
The illustration is an example. The actual appearance may be different.
17
Sending Scan Files by E-mail
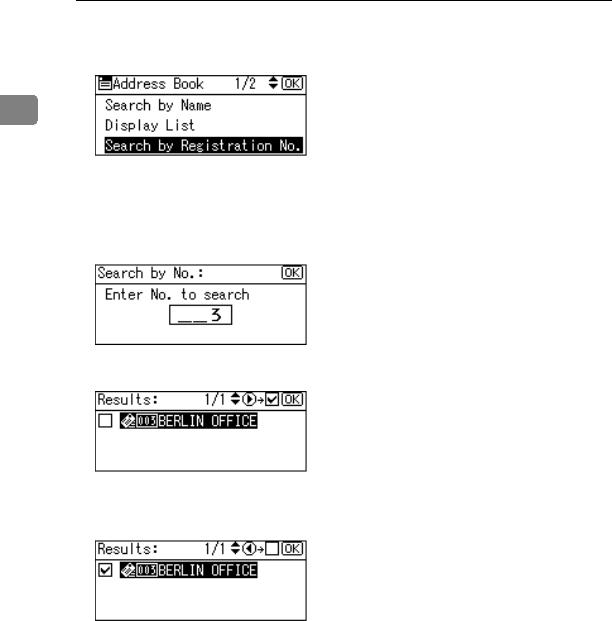
B Press the {U} or {T} key to select [Search by Registration No.], and then press the {OK} key.
1
C Use the number keys to enter the three-digit number assigned to the destination, and then press the {OK} key.
D
E
Example: To enter 003
Press the {3} key, and then press the {OK} key.
Press the {V} key.
The check box on the left side of the selected destination is selected.
Press the {OK} key.

 Note
Note
If under [System Settings], [LDAP Search] is set to [On], a screen to select a search object appears when you press the {Search Destination} key. On the screen, select [Search Address Book], and then press the {OK} key.
18
Specifying E-mail Destinations
Searching for a destination by name
Use the following procedure to search by name for a destination in the machine's address book.
A Press the {Search Destination} key. 1
ZZZ610S |
The illustration is an example. The actual appearance may be different.
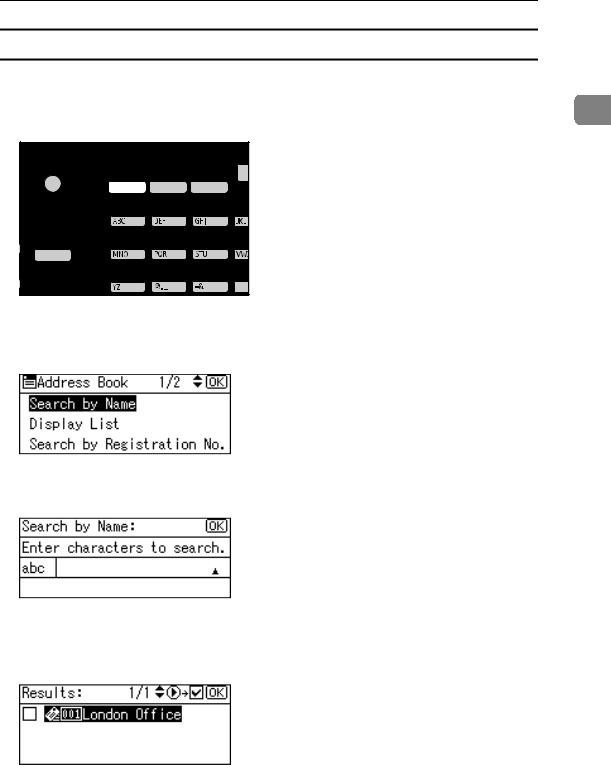
B Select [Search by Name], and then press the {OK} key.
C Enter the beginning of the destination name, and then press the {OK} key twice.
Destinations that match the search conditions are displayed.
D Press the {U} or {T} key to select the destination, and then press the {V} key.
The check box on the left side of the selected destination is selected.
19
Sending Scan Files by E-mail
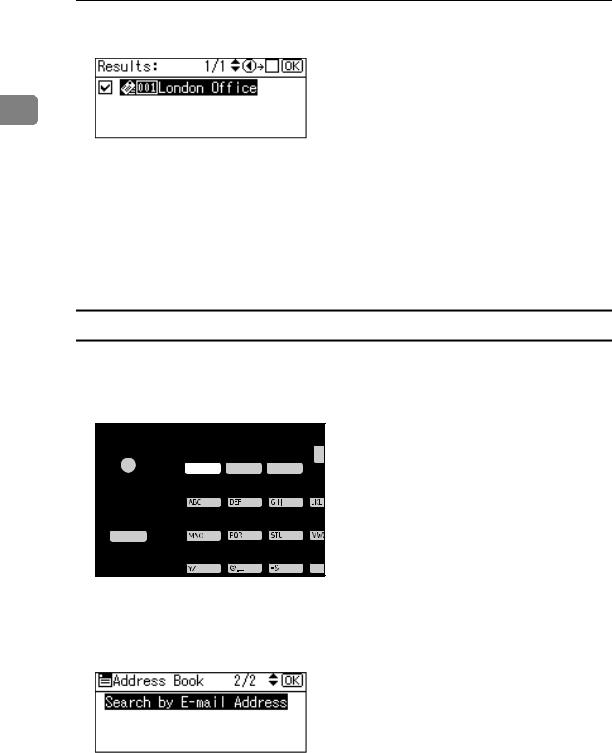
E Press the {OK} key.
1

 Note
Note
Up to 100 destinations can be displayed as search results.
If under [System Settings], [LDAP Search] is set to [On], a screen to select a search object appears when you press the {Search Destination} key. On the screen, select [Search Address Book], and then press the {OK} key.
To cancel a selected destination, press the {U} or {T} key to select the target destination, and then press the {W} key.
Searching for a destination by e-mail address
Use the following procedure to search by e-mail address for a destination in the machine's address book.
A Press the {Search Destination} key.
ZZZ610S |
The illustration is an example. The actual appearance may be different.
B Press the {U} or {T} key to select [Search by E-mail Address], and then press
the {OK} key.
20
Specifying E-mail Destinations
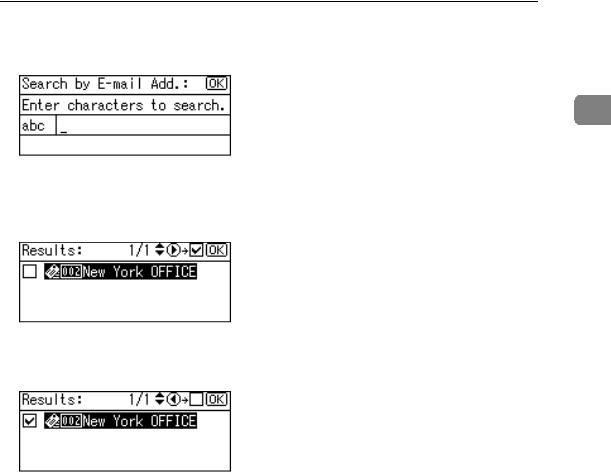
C Enter the beginning of the e-mail address, and then press the {OK} key twice.
1
Destinations that match the search conditions are displayed.
D Press the {U} or {T} key to select the destination, and then press the {V} key.
The check box on the left side of the selected destination is selected.
E Press the {OK} key.

 Note
Note
If under [System Settings], [LDAP Search] is set to [On], a screen to select a search object appears when you press the {Search Destination} key. On the screen, select [Search Address Book], and then press the {OK} key.
Up to 100 destinations can be displayed as search results.
To cancel a selected destination, press the {U} or {T} key to select the target destination, and then press the {W} key.
21
Sending Scan Files by E-mail
Manual Entry of an E-mail Address
This section explains how to enter an e-mail address manually.
1A
B
C
Press [Manual].
Enter the e-mail address.
Press the {OK} key.

 Note
Note
Depending on the security settings, [Manual] may not be displayed. For details, consult the administrator.
To modify or change an entered e-mail address, press [EditDest].
To add another destination, press [Add Dest], and then enter an e-mail address.
You can register manually-entered e-mail addresses in the machine's address book. For details, see "Registering Manually Entered E-mail Address to Address Book".

 Reference
p.26 “Registering a Manually-Entered E-mail Address in the Address
Book”
22
Specifying E-mail Destinations
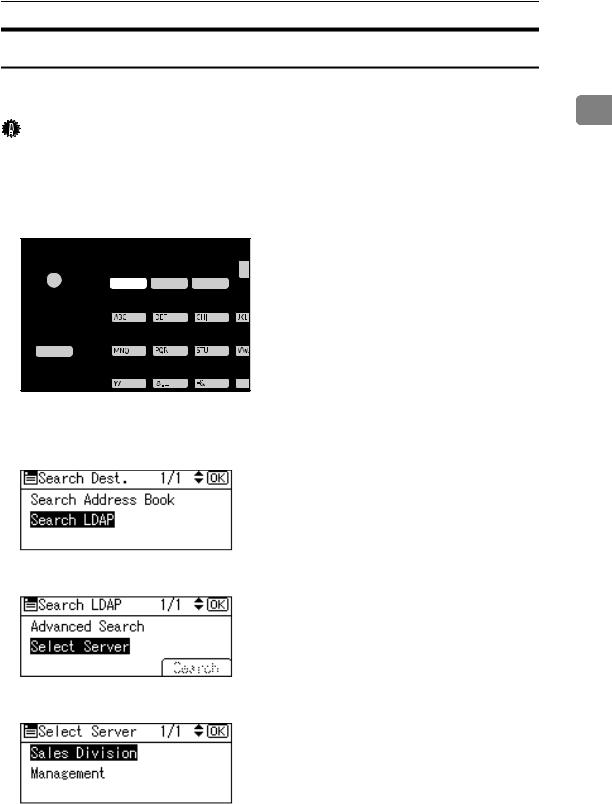
Searching for a Destination in the LDAP Server |
|
|
You can search the LDAP server for an address and then specify that address as |
|
|
an e-mail destination. |
1 |
|
Important |
||
|
To use this function, you must connect an LDAP server to the network.
It is necessary to register the LDAP server under [System Settings]. Also, set [LDAP Search] to [On] under [System Settings]. For details, see “General Settings Guide”.
A Press the {Search Destination} key.
ZZZ610S |
The illustration is an example. The actual appearance may be different.
B Select [Search LDAP], and then press the {OK} key.
C Select [Select Server], and then press the {OK} key.
D Select the server, and then press the {OK} key.
If authentication is required to access the server, the authentication screen appears. Enter the user name and password correctly.
The Search LDAP screen reappears.
23

Sending Scan Files by E-mail
E Select [Advanced Search], and then press the {OK} key.
1
F Specify the search conditions.
The following example uses fuzzy search by destination name. Select [Name], and then press the {OK} key.
G Enter a part of the destination name.
H I
J
Search can be by surname or first name, depending on the LDAP server's settings. Consult your administrator.
Press the {OK} key.
Press the {U}or {T}key to select [Fuzzy Search], and then press the {OK}key.
 appears on the left side of the specified condition.
You can also refine the search by setting multiple search conditions.
Press the {Escape} key.
24
 Loading...