


Operating Instructions
Printer Reference
1Preparing the Machine
2Setting Up the Printer Driver
3Other Print Operations
4The Functions and Settings of the Machine
5Appendix
Read this manual carefully before you use this machine and keep it handy for future reference. For safe and correct use, be sure to read the Safety Information in "About This Machine" before using the machine.
Introduction
This manual contains detailed instructions and notes on the operation and use of this machine. For your safety and benefit, read this manual carefully before using the machine. Keep this manual in a handy place for quick reference.
Important
Contents of this manual are subject to change without prior notice. In no event will the company be liable for direct, indirect, special, incidental, or consequential damages as a result of handling or operating the machine.
Do not copy or print any item for which reproduction is prohibited by law.
Copying or printing the following items is generally prohibited by local law:
bank notes, revenue stamps, bonds, stock certificates, bank drafts, checks, passports, driver's licenses.
The preceding list is meant as a guide only and is not inclusive. We assume no responsibility for its completeness or accuracy. If you have any questions concerning the legality of copying or printing certain items, consult with your legal advisor.
Notes:
Some illustrations in this manual might be slightly different from the machine.
Certain options might not be available in some countries. For details, please contact your local dealer.
Two kinds of size notation are employed in this manual. With this machine refer to the inch version.
Caution:
Use of controls or adjustments or performance of procedures other than those specified in this manual might result in hazardous radiation exposure.
Manuals for This Machine
Refer to the manuals that are relevant to what you want to do with the machine.
 Important
Media differ according to manual.
The printed and electronic versions of a manual have the same contents.
Adobe Acrobat Reader/Adobe Reader must be installed in order to view the manuals as PDF files.
Depending on which country you are in, there m ay also be html manuals. To view these manuals, a Web browser must be installed.
About This Machine
Be sure to read the Safety Information in this manual before using the machine.
This manual provides an introduction to the functions of the machine. It also explains the control panel, preparation procedures for using the machine, how to enter text, and how to install the CD-ROMs provided.
General Settings Guide
Explains User Tools settings, and Address Book procedures such as registering fax numbers, e-mail addresses, and user codes. Also refer to this manual for explanations on how to connect the machine.
Trouble Shooting
Provides a guide to solving common problems, and explains how to replace paper, toner, and other consumables.
Security Reference
This manual is for administrators of the machine. It explains security functions that the administrators can use to protect data from being tampered with, or prevent the machine from unauthorized use.
Also refer to this manual for the procedures for registering administrators, as well as setting user and administrator authentication.
Copy Reference
Explains Copier functions and operations. Also refer to this manual for explanations on how to place originals.
Facsimile Reference
Explains Facsimile functions and operations.
Printer Reference
Explains Printer functions and operations.
Scanner Reference
Explains Scanner functions and operations.
i
Network Guide
Explains how to configure and operate the machine in a network environment, and use the software provided.
This manual covers all models, and includes descriptions of functions and settings that might not be available on this machine. Images, illustrations, and information about operating systems that are supported might also differ slightly from those of this machine.
Other manuals
•PostScript 3 Supplement
•UNIX Supplement
•Manuals for DeskTopBinder Lite
•DeskTopBinder Lite Setup Guide
•DeskTopBinder Introduction Guide
•Auto Document Link Guide

 Note
Note
Manuals provided are specific to machine types.
For “UNIX Supplement”, please visit our Web site or consult an authorized dealer.
“PostScript3 Supplement” and “UNIX Supplement” include descriptions of functions and settings that might not be available on this machine.
ii

TABLE OF CONTENTS |
|
Manuals for This Machine ...................................................................................... |
i |
Notice ...................................................................................................................... |
1 |
How to Read This Manual ..................................................................................... |
3 |
Symbols ..................................................................................................................... |
3 |
Display Panel.......................................................................................................... |
4 |
Reading the Display and Using Keys......................................................................... |
5 |
Printer Features Menu ........................................................................................... |
6 |
Setting Paper on the Bypass Tray...................................................................... |
10 |
Setting the Paper Size Using the Control Panel ...................................................... |
12 |
Setting the Custom Size Paper Using the Control Panel ......................................... |
14 |
Setting Thick Paper or OHP Transparencies Using the Control Panel .................... |
16 |
Setting envelope Using the Control Panel ............................................................... |
17 |
1. Preparing the Machine |
|
Confirming the Connection Method................................................................... |
19 |
Network Connection................................................................................................. |
19 |
Local Connection ..................................................................................................... |
22 |
Installing the Printer Driver................................................................................. |
23 |
Quick Install.............................................................................................................. |
23 |
Installing the Printer Driver for the Selected Port ..................................................... |
24 |
Using as a Windows Network Printer ................................................................ |
34 |
Using as a NetWare Print Server / Remote Printer ........................................... |
36 |
Form Feed................................................................................................................ |
38 |
Banner Page ............................................................................................................ |
38 |
Printing after Resetting the Printer ........................................................................... |
38 |
Installing the Printer Driver Using USB ............................................................. |
39 |
Windows Me - USB .................................................................................................. |
39 |
Windows 2000 - USB ............................................................................................... |
41 |
Windows XP, Windows Server 2003 - USB ............................................................. |
42 |
Printing with Parallel Connection....................................................................... |
44 |
Printing with Bluetooth Connection................................................................... |
46 |
Supported Profiles.................................................................................................... |
46 |
Printing with Bluetooth Connection .......................................................................... |
46 |
Configuring Security Mode Settings......................................................................... |
48 |
Printing in the Security Mode ................................................................................... |
48 |
Making Option Settings for the Printer .............................................................. |
49 |
Conditions for Bidirectional Communication ............................................................ |
49 |
If Bidirectional Communication Is Disabled.............................................................. |
51 |
Installing Font Manager 2000.............................................................................. |
52 |
Using Adobe PageMaker Version 6.0, 6.5, or 7.0 .............................................. |
53 |
iii

2. Setting Up the Printer Driver |
|
PCL - Accessing the Printer Properties............................................................. |
55 |
Windows 95 / 98 / Me - Accessing the Printer Properties ........................................ |
55 |
Windows 2000 - Accessing the Printer Properties ................................................... |
56 |
Windows XP, Windows Server 2003 - Accessing the Printer Properties ................. |
58 |
Windows NT 4.0 - Accessing the Printer Properties ................................................ |
59 |
RPCS - Accessing the Printer Properties .......................................................... |
62 |
Windows 95 / 98 / Me - Accessing the Printer Properties ........................................ |
62 |
Windows 2000 - Accessing the Printer Properties ................................................... |
64 |
Windows XP, Windows Server 2003 - Accessing the Printer Properties ................. |
66 |
Windows NT 4.0 - Accessing the Printer Properties ................................................ |
68 |
3. Other Print Operations |
|
Printing a PDF File Directly................................................................................. |
71 |
Printing Method ........................................................................................................ |
71 |
Using DeskTopBinder Lite ....................................................................................... |
71 |
Using commands ..................................................................................................... |
74 |
Unauthorized Copy Control ................................................................................ |
75 |
Using [Data security for copying] ................................................................................. |
76 |
Using [Mask type:] ..................................................................................................... |
78 |
Important Notice....................................................................................................... |
79 |
Form Feed............................................................................................................. |
80 |
Printing from a Selected Tray................................................................................... |
80 |
Canceling a Print Job ............................................................................................... |
81 |
Canceling a Print Job .......................................................................................... |
83 |
Canceling a Print Job Using the Control Panel ........................................................ |
83 |
Windows - Canceling a Print Job from the computer ............................................... |
83 |
Checking the Error Log ....................................................................................... |
85 |
Collate ................................................................................................................... |
86 |
4. The Functions and Settings of the Machine |
|
Mainframe............................................................................................................. |
89 |
Functions.................................................................................................................. |
89 |
Interface ................................................................................................................... |
89 |
List of the Setting Items ...................................................................................... |
90 |
Web Image Monitor.................................................................................................. |
90 |
telnet ........................................................................................................................ |
93 |
Settings that can be used with PostScript 3............................................................. |
94 |
5. Appendix |
|
Specifications....................................................................................................... |
95 |
Options..................................................................................................................... |
96 |
INDEX......................................................................................................... |
98 |
iv
Notice
Note to users in the United States of America
Note:
This equipment has been tested and found to comply with the limits for a Class B digital device, pursuant to Part 15 of the FCC Rules. These limits are designed to provide reasonable protection against harmful interference in a residential installation. This equipment generates, uses and can radiate radio frequency energy and, if not installed and used in accordance with the instructions, may cause harmful interference to radio communications. However, there is no guarantee that interference will not occur in a particular installation. If this equipment does cause harmful interference to radio or television reception, which can be determined by turning the equipment off and on, the user is encouraged to try to correct the interference by one more of the following measures:
•Reorient or relocate the receiving antenna.
•Increase the separation between the equipment and receiver.
•Connect the equipment into an outlet on a circuit different from that to which the receiver is connected.
•Consult the dealer or an experienced radio /TV technician for help.
Caution:
Changes or modifications not expressly approved by the party responsible for compliance could void the user's authority to operate the equipment.
Declaration of Conformity
Product Name: Printer/Scanner Unit
Model Number: 9016/Dsm716/LD316/Aficio MP 1600 9021d/Dsm721d/LD320d/Aficio MP 2000
Responsible party: Ricoh Corporation
Address: 5 Dedrick Place, West Caldwell, NJ 07006
Telephone number: 973-882-2000
This device complies with Part 15 of the FCC Rules.
Operation is subject to the following two conditions:
1.This device may not cause harmful interference, and
2.this device must accept any interference received, including interference that may cause undesired operation.
AProperly shielded and grounded cables and connectors must be used for connections to a host computer (and/or peripheral) in order to meet FCC emission limits.
BAn AC adapter with a ferrite core must be used for RF interference suppression.
1
Note to users in Canada
Note:
This Class B digital apparatus complies with Canadian ICES-003.
Remarque concernant les utilisateurs au Canada
Avertissement:
Cet appareil numérique de la classe B est conforme à la norme NMB-003 du Canada.
2
How to Read This Manual
Symbols
This manual uses the following symbols:
Indicates important safety notes.
Ignoring these notes could result in serious injury or death. Be sure to read these notes. They can be found in the “Safety Information” section of About This Machine.
Indicates important safety notes.
Ignoring these notes could result in moderate or minor injury, or damage to the machine or to property. Be sure to read these notes. They can be found in the “Safety Information” section of About This Machine.
Indicates points to pay attention to when using the machine, and explanations of likely causes of paper misfeeds, damage to originals, or loss of data. Be sure to read these explanations.
Indicates supplementary explanations of the machine’s functions, and instructions on resolving user errors.
This symbol is located at the end of sections. It indicates where you can find further relevant information.
[ ]
Indicates the names of keys that appear on the machine’s display panel.
{}
Indicates the names of keys on the machine’s control panel.
3
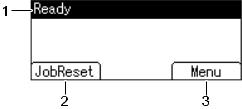
Display Panel
This section describes configuration using the display panel when the printer function is selected.
ASC009S
1. Operational status or messages
Displays current machine status, such as “Ready”, “Offline”, and “Printing...”.
2. [JobReset]
Press to cancel the current print job. If you press it when the machine is offline and Hex Dump is selected, Hex Dump is canceled.

 Note
Note
3. [Menu]
Press to display the menu to select the following options:
•[Show Error Log]
Displays the error logs of print jobs that are sent from a computer.
When the power is turned on, the copier display is shown. This is a factory default. This initial setting can be changed. See “System Settings”, General Settings Guide.
4
Reading the Display and Using Keys
This section explains how to read the display and using the selection key for the initial display.
ASC010S
1. Scroll keys |
3. {Escape} key |
Press to move the cursor in each direction, step by step.
When the {U}, {T}, {V}, or {W} key appears in this manual, press the scroll key of the same direction.
2. {OK} key
Press to set a selected item or entered numeric value.

 Note
Note
Press to cancel an operation or return to the previous display.
4. Selection keys
Correspond to the function items at the bottom line on the display. Example: Basic screen When the instruction “press [JobReset]” appears in this manual, press the left selection key.
The Printer display is set as the default screen when the machine is turned on. You can change the settings in [System Settings]. See General Settings Guide.
5
Printer Features Menu
The following explains settings and meanings of functions on Printer Feature. Printer Feature screen appears when you press the {User Tools/Counter} key. For details, see “Printer Features”, General Settings Guide.
List/Test Print
Menu |
Description |
|
|
Multiple Lists |
You can print the configuration page and er- |
|
ror log. |
|
|
Config. Page |
You can print the machine's current configu- |
|
ration values. |
|
|
Error Log |
You can print error logs listing all errors that |
|
occurred during printing. |
|
|
Menu List |
You can print a Menu List showing the ma- |
|
chine's function menus. |
|
|
PCL Config./Font Page |
You can print the current configuration and |
|
installed PCL font list. |
|
|
PS Config./Font Page |
You can print the current configuration and |
|
installed PostScript font list. |
|
|
PDF Config./Font Page |
You can print the current configuration and |
|
installed PDF font list. |
|
This menu can be selected only when the op- |
|
tional PostScript 3 unit is installed. |
|
|
Hex Dump |
You can print in the Hex Dump mode. |
|
|
Maintenance
Menu |
Description |
|
|
Menu Protect |
This function lets you protect menu settings |
|
from accidental change. It makes it impossi- |
|
ble to change menu settings with normal |
|
procedures unless you perform the required |
|
key operations. |
|
In a network environment, only administra- |
|
tors can make changes to menu settings. |
|
|
List/Test Print Lock |
You can lock the [List/Test Print] menu. |
|
|
6

System
Menu |
|
Description |
|
|
|
Print Error Report |
You can print an error report when a printer |
|
|
or memory error occurs. |
|
|
|
|
Auto Continue |
You can select this to enable Auto Continue. |
|
|
When it is On, printing continues after a sys- |
|
|
tem error occurs. |
|
|
|
|
Memory Overflow |
Select this to have a memory overflow error |
|
|
report printed. |
|
|
|
|
Memory Usage |
You can select the amount of memory used |
|
|
in Font Priority or Frame Priority, according |
|
|
to paper size or resolution. |
|
|
|
|
Duplex |
You can select to have print on both sides of |
|
|
each page. |
|
|
|
|
Copies |
You can specify the number of print sets. |
|
|
This setting is disabled if the number of pag- |
|
|
es to print has been specified with the printer |
|
|
driver or another command. |
|
|
|
|
Blank Page Print |
You can select whether or not to print blank |
|
|
pages. |
|
|
|
|
Edge Smoothing |
Set this to enable Edge Smoothing. |
|
|
• |
On (Default) |
|
• |
Off |
|
|
Note |
|
If Toner Saving is set to On, Edge |
|
|
|
Smoothing is ignored even if it is set to |
|
|
On. |
|
|
|
Toner Saving |
Set this to enable Toner Saving. |
|
|
• |
On (Default) |
|
• |
Off |
|
|
|
Printer Language |
You can specify the printer language. |
|
|
|
|
Sub Paper Size |
You can enable the Auto Substitute Paper |
|
|
Size (A4↔LT) feature. |
|
|
|
|
Page Size |
You can select the default paper size. |
|
|
|
|
Letterhead Setting |
You can rotate original images when print- |
|
|
ing. |
|
|
When printing, original images are always |
|
|
rotated by 180 degrees. Therefore, output |
|
|
might not be as expected when printing onto |
|
|
letterhead or preprinted paper requiring ori- |
|
|
entation. Using this function, you can specify |
|
|
image rotation. |
|
|
|
|
Bypass Tray Priority |
You can specify which of the two options, |
|
|
(Printer) Driver / Command or Machine Set- |
|
|
tings, has priority for determining the paper |
|
|
size for the bypass tray. |
|
7
Menu |
Description |
|
|
Edge to Edge Print |
You can select whether or not to print on the |
|
entire sheet. |
|
|
Default Printer Lang. |
You can set the default printer language if |
|
the machine cannot find the printer language |
|
automatically. |
|
|
Tray Switching |
You can set to switch the paper tray. |
|
|
RAM Disk |
You can change the settings of the RAM disk. |
|
|
Host Interface
Menu |
Description |
|
|
I/O Buffer |
You can set the size of the I/O Buffer. Nor- |
|
mally it is not necessary to change this set- |
|
ting. |
|
|
I/O Timeout |
You can set how many seconds the machine |
|
should wait before ending a print job. If data |
|
from another port usually arrives in the mid- |
|
dle of a print job, you should increase this |
|
timeout period. |
|
|
PCL Menu
Menu |
Description |
|
|
Orientation |
You can set the page orientation. |
|
|
Form Lines |
You can set the number of lines per page. |
|
|
Font Source |
You can set the storage location of the de- |
|
fault font. |
|
|
Font Number |
You can set the ID of the default font you |
|
want to use. |
|
|
Point Size |
You can set the point size you want to use for |
|
the selected font. |
|
|
Font Pitch |
You can set the number of characters per |
|
inch for the selected font. |
|
|
Symbol Set |
You can specify the set of print characters for |
|
the selected font. The available options are as |
|
follows: |
|
|
Courier Font |
You can select a courier font type. |
|
|
Ext. A4 Width |
You can extend the printing area width |
|
when printing on A4 sheet with PCL. |
|
|
Append CR to LF |
When set to On, a carriage return will follow |
|
each line feed: CR=CR, LF=CR−LF, FF=CR− |
|
FF. |
|
|
Resolution |
You can set the print resolution in dots per |
|
inch. |
|
|
8

PS Menu (optional)
Menu |
Description |
|
|
Data Format |
You can select a data format. |
|
|
Resolution |
You can set the print resolution in dots per |
|
inch. |
|
|
PDF Menu (optional)
Menu |
Description |
|
|
Change PDF Password |
You can set the password for the PDF file ex- |
|
ecuting PDF Direct Print. |
|
|
PDF Group Password |
You can set the group password already |
|
specified with DeskTopBinder Lite. |
|
|
Resolution |
You can set the print resolution in dots per |
|
inch. |
|
|

 Note
Note
Depending on which optional units you have installed or the printer language you have selected, some options are not displayed.
Depending on the security settings, you might not be able to set certain options.

 Reference
For details, see “Printer Features”, General Settings Guide.
For more information about copier features and system settings, see Copy Reference and General Settings Guide.
9
Setting Paper on the Bypass Tray
This section gives instructions for setting paper on the bypass tray.
For details about paper size and paper type, see “Recommended Paper Sizes and Types”, About This Machine.
 Important
The following functions are disabled when printing from the bypass tray:
•Duplex printing
•Auto Tray Select
•Auto Tray Switching
•Rotating Collate
When printing using the printer function, original images are always rotated by 180 degrees (the orientation of images to be printed is opposite to that of the copier function). When printing onto paper with specific orientation requirements, such as envelopes and letterheads, be sure to rotate the paper feed orientation to 180 degrees.
Be sure to set the paper size using the printer driver when printing data from the computer. The paper size set using the printer driver has priority over the one set using the control panel.
Paper that is thicker than 162 g/m2 (max.) cannot be printed from the bypass tray.
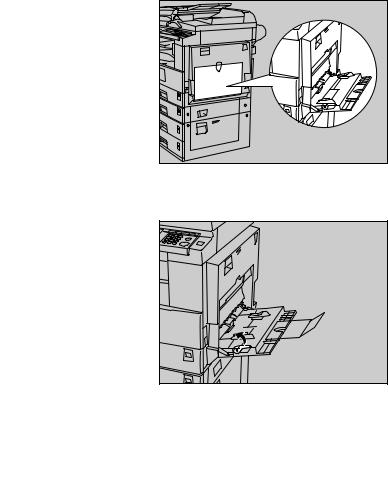
A Open the bypass tray.
AAW019S1 |
B Lift up the paper guide release lever.
ASC001S
10
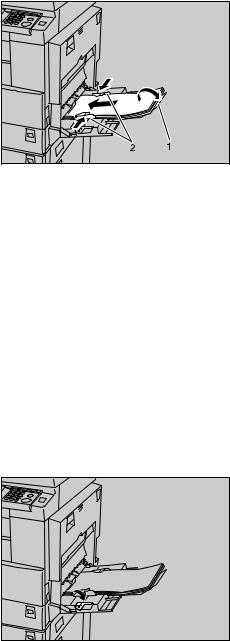
C Adjust the paper guides to the paper size, and then gently insert paper face down into the bypass tray.
AAW020S1
1.Extender
2.Paper guides
•Open out the extender to support paper sizes larger than A4 L, 81/2 ×11
L.
•If the paper guides are not flush against the paper, skewing and misfeeds might occur.
•Gently insert paper until it stops.
•Do not stack paper over the limit mark, otherwise a skewed image or misfeeds might occur.
•Fan the paper to get air between the sheets to avoid a multi-sheet feed.
•When setting an OHP transparency, make sure that its front and back sides are properly positioned.
D Push down the paper guide release lever.
ASC002S
E Set the paper size using the printer driver or the control panel.
11


 Note
Note
Paper within the following dimensions can be set in the bypass tray:
•Vertical: 90 - 297 mm (3.55 - 11.69 in.)
•Horizontal: 148 - 600 mm (5.83 - 23.62 in.)
Be sure to set the paper with the side you want to print facing down in the bypass tray.
The number of sheets that can be loaded in the bypass tray depends on the paper type.
When loading OHP transparencies or thick paper in the bypass tray, make the paper setting using the control panel or printer driver.

 Reference
For details about setting the paper size, see p.12 “Setting the Paper Size Using the Control Panel”.
For details about setting paper in the regular paper tray, see General Settings Guide.
When loading custom size paper, see p.14 “Setting the Custom Size Paper Using the Control Panel”.
Select paper type when printing onto OHP transparencies or thick paper (over 90.2 g/m2). For details, see p.16 “Setting Thick Paper or OHP Transparencies Using the Control Panel”.
Select paper type when printing onto envelopes. For details, see p.17 “Setting envelope Using the Control Panel”.
When loading letterhead paper, pay attention to its orientation. See General Settings Guide.
Setting the Paper Size Using the Control Panel
This procedure describes how to set paper size of the bypass tray using the control panel. If you select the printer driver to set paper size, this procedure is not necessary.
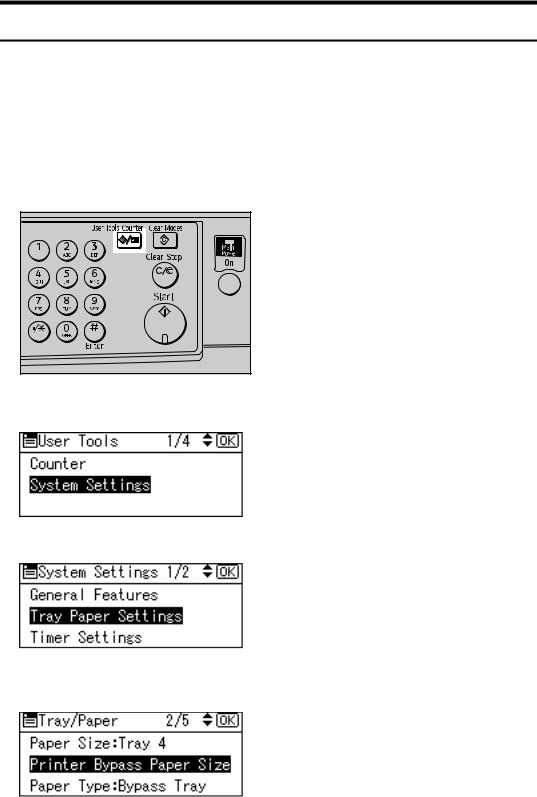
A Press the {User Tools/Counter} key.
ASC011S |
12
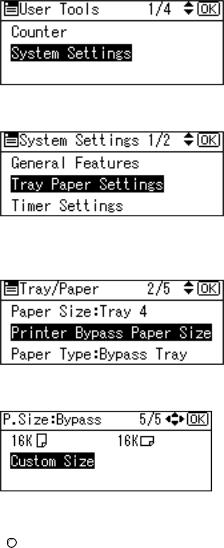
B Select [System Settings] using {T} or {U}, and then press the {OK} key.
C Select [Tray Paper Settings] using {T} or {U}, and then press the {OK} key.
D Select [Printer Bypass Paper Size] using {T} or {U}, and then press the {OK} key.
E Select the paper size using the scroll keys, and then press the {OK} key.
F Press the {User Tools/Counter} key to return to the default screen.

 Reference
See the printer driver Help about the settings from the printer drivers.
Select paper type when printing onto OHP transparencies or thick paper. For details, see p.16 “Setting Thick Paper or OHP Transparencies Using the Control Panel”.
Select paper type when printing onto envelopes. For details, see p.17 “Setting envelope Using the Control Panel”.
13
Setting the Custom Size Paper Using the Control Panel
The following procedures are not required if you select the printer driver for the settings. In that case, set the paper size using the printer driver.
 Important
Custom size settings set using the printer driver have priority over those set using the machine's control panel.
When the printer driver is not used, make settings using the control panel.
A Press the {User Tools/Counter} key.
ASC011S |
B Select [System Settings] using {T} or {U}, and then press the {OK} key.
C Select [Tray Paper Settings] using {T} or {U}, and then press the {OK} key.
D Select [Printer Bypass Paper Size] using {T} or {U}, and then press the {OK} key.
14
E Select [Custom Size] using the scroll keys, and then press the {OK} key.
F Enter the horizontal size of the paper using the number keys, and press
{q}.
Available size: 148 - 600 mm (5.83 - 23.62 in.)
G Enter the vertical size of the paper using the number keys, and press {q}.
Available size: 90 - 297 mm (3.55 - 11.69 in.)
H Press the {User Tools/Counter} key to return to the default screen.

 Note
Note
If the printer driver is not used, select [Machine Settings] from [Bypass Tray Priority] in [System] of [Printer Features] (see “Printer Features”, General Settings Guide). Set paper size using the control panel.

 Reference
For printer driver settings, see the printer driver Help.
15

Setting Thick Paper or OHP Transparencies Using the Control Panel
The following procedures are not required if you select the printer driver for the settings. In that case, set the paper size using the printer driver.
 Important
Paper size settings set using the printer driver have priority over those set using the machine's control panel.
When the printer driver is not used, make settings using the control panel.
A Press the {User Tools/Counter} key.
ASC011S |
B Select [System Settings] using {T} or {U}, and then press the {OK} key.
C Select [Tray Paper Settings] using {T} or {U}, and then press the {OK} key.
D Select [Paper Type: Bypass Tray] using {T} or {U}, and then press the {OK} key.
16
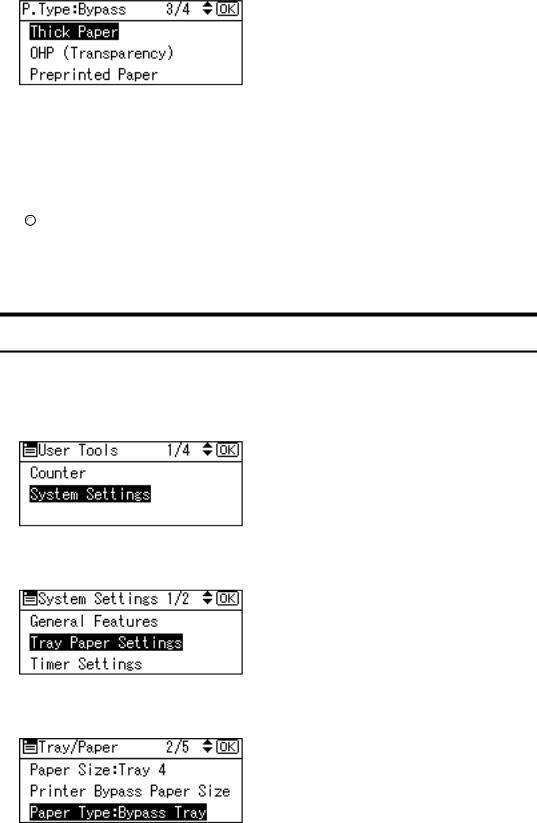
E Select paper type from the menu using {T}or {U}, and then press the {OK} key.
F Press the {User Tools/Counter} key to return to the default screen.

 Note
Note
The settings made will remain valid until they are reset again. After printing on thick paper or OHP Transparencies, be sure to clear settings for the next user.

 Reference
For the printer driver settings, see the printer driver Help.
For details about printing onto envelopes, see p.17 “Setting envelope Using the Control Panel”.
Setting envelope Using the Control Panel
A B
Press the {User Tools/Counter} key.
Select [System Settings] using the {U} or {T} key, and then press the {OK} key.
C Select [Tray Paper Settings] using the {U}or {T}key, and then press the {OK} key.
D Select [Paper Type:Bypass Tray] using the {U} or {T} key, and then press the {OK} key.
17
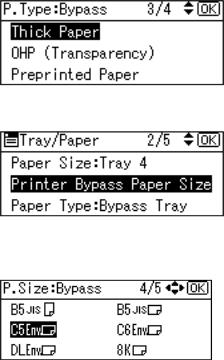
E Select [Thick Paper] using the {U} or {T} key, and then press the {OK} key.
F Select [Printer Bypass Paper Size], and then press the {OK} key.
G Select the paper envelope size from [C6envL], [C5envL], or [DlenvL], and then press the {OK} key.
H Press the {User Tools/Counter} key to return to the default screen.
18
1. Preparing the Machine
Confirming the Connection Method
This machine supports network and local connection.
Before installing the printer driver, check how the machine is connected. Follow the driver installation procedure that is appropriate to the connection method.
Network Connection
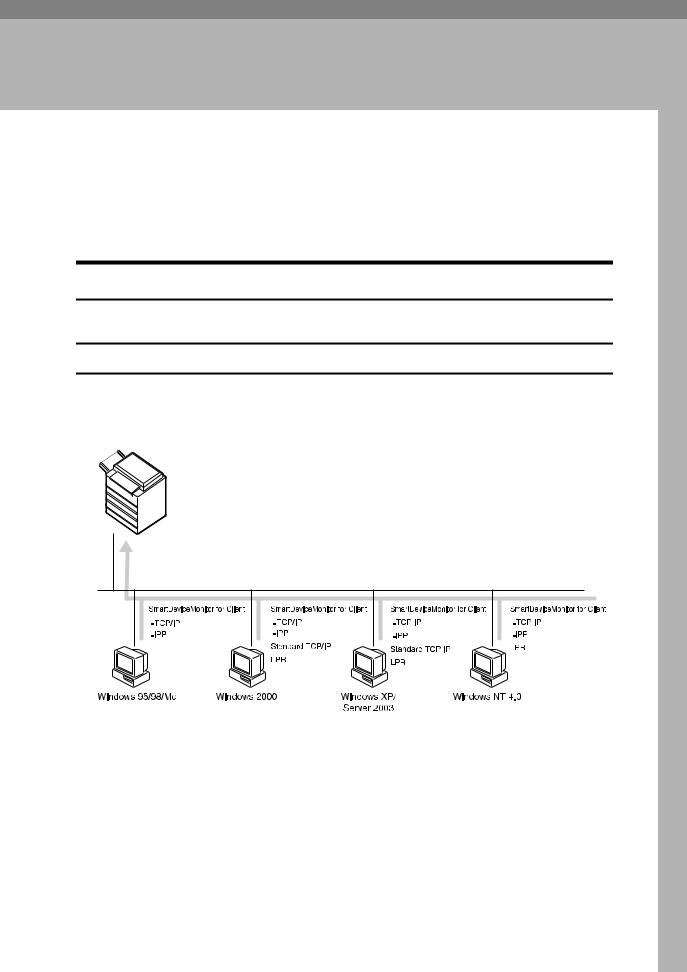
This machine can be used as a Windows printing port or network printer.
Using This Machine as the Windows Printing port
Network connections can be established through Ethernet and IEEE 802.11b.
Available ports are determined based on the combination of Windows operating system version and connection method used.
ZZZ035S
Windows 95 / 98
Connection Method |
Available Ports |
|
|
Ethernet / IEEE 802.11b |
SmartDeviceMonitor for Client port |
|
|
Windows Me
Connection Method |
Available Ports |
|
|
Ethernet / IEEE 802.11b |
SmartDeviceMonitor for Client port |
|
|
19

Preparing the Machine
Windows 2000
|
|
Connection Method |
Available Ports |
|
|
|
|
|
|
Ethernet / IEEE 802.11b |
SmartDeviceMonitor for Client port |
|
|
|
Standard TCP/IP |
1 |
|
|
|
|
|
LPR port |
|
|
|
|
|
|
|
|
|
|
Windows XP |
|
|
|
|
|
|
|
|
Connection Method |
Available Ports |
|
|
|
|
|
|
Ethernet / IEEE 802.11b |
SmartDeviceMonitor for Client port |
|
|
|
Standard TCP/IP |
|
|
|
LPR port |
|
|
|
|
|
Windows Server 2003 |
|
|
|
|
|
|
|
|
Connection Method |
Available Ports |
|
|
|
|
|
|
Ethernet / IEEE 802.11b |
SmartDeviceMonitor for Client port |
|
|
|
Standard TCP/IP |
|
|
|
LPR port |
|
|
|
|
|
Windows NT 4.0 |
|
|
|
|
|
|
|
|
Connection Method |
Available Ports |
|
|
|
|
|
|
Ethernet / IEEE 802.11b |
SmartDeviceMonitor for Client port |
|
|
|
LPR port |
|
|
|
|

 Reference
See the explanation about how to install the printer driver for each type of port. For the SmartDeviceMonitor for Client port, see p.24 “Using the SmartDeviceMonitor for Client Port”.
For the Standard TCP/IP port, see p.30 “Using the Standard TCP/IP Port”.
For the LPR port, see p.32 “Using the LPR Port”.
20
Confirming the Connection Method
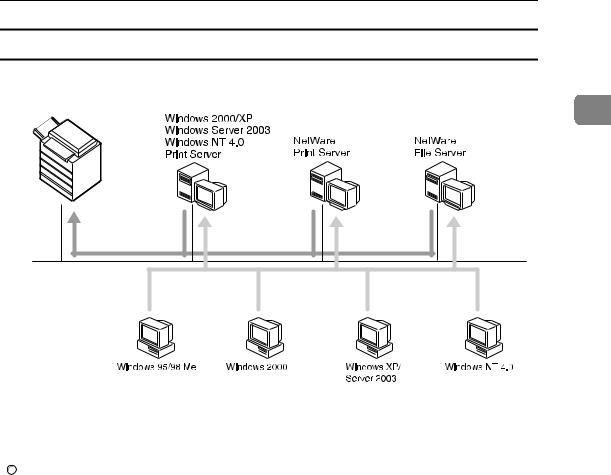
Using as a network printer
This machine can be used as the Windows network printer, the NetWare print
server, or the NetWare remote printer.
1
ZZZ036S

 Note
Note
In an IPv6 environment, Netware servers cannot be used.

 Reference
See the explanation about how to install the printer driver for each type of network printer.
For the Windows network printer, see p.34 “Using as a Windows Network Printer”.
For the NetWare print server and remote printer, see p.36 “Using as a NetWare Print Server / Remote Printer”.
21

Preparing the Machine
Local Connection
Local connections can be established via parallel, USB, and Bluetooth connec- 1 tions.
Windows operating system version determines the available connection methods.
•Windows 95: Parallel connections
•Windows 98: Parallel connections
•Windows 98 SE / Me:
USB and Parallel connections
•Windows 2000:
USB, Parallel, and Bluetooth connections
•Windows XP:
USB, Parallel, and Bluetooth connections
•Windows Server 2003:
USB, Parallel, and Bluetooth connections
•Windows NT 4.0: Parallel connections

 Reference
See the explanation about how to install the printer driver for each method of connection.
For the USB connection, see p.39 “Installing the Printer Driver Using USB”.
For the parallel connection, see p.44 “Printing with Parallel Connection”.
For the Bluetooth connection, see p.46 “Printing with Bluetooth Connection”.
22

Installing the Printer Driver
Installing the Printer Driver
This section explains how to install the printer driver. There are two ways to in-
stall the printer driver: using Quick Install, which installs the settings at once, or 1 installing the appropriate driver according to the port you want to use.
 Important
If your operating system is Windows NT4.0, download printer driver for Windows NT4.0 from the supplier's Web site.
Quick Install
Windows 95 / 98 / Me / 2000 / XP and Windows Server 2003 users can easily install this software using the supplied CD-ROM.
Using Quick Install, the PCL printer driver and/or RPCS printer driver, DeskTopBinder Lite and SmartDeviceMonitor for Client are installed under network environment, and the TCP/IP port will be set.
 Important
To install printer driver under Windows 2000 / XP Professional, Windows Server 2003, and Windows NT 4.0, you must have an account that has Manage Printers permission. Log on as an Administrator.
If you connect using USB, refer to p.39 “Installing the Printer Driver Using USB” and install the printer driver.
A B
Quit all applications currently running.
Insert the CD-ROM into the CD-ROM drive.
The installer starts.
Auto Run may not work with certain operating system settings. If this happens, launch “Setup.exe” on the CD-ROM root directory.
C Select an interface language, and then click [OK].
The default interface language is English.
D Click [Quick Install].
The software license agreement appears in the [License Agreement] dialog box.
E After reading the agreement, click [I accept the agreement.], and then click
[Next >].
F Select the machine model you want to use in the [Select Printer] dialog box.
For network connection via TCP/IP, select the machine whose IP address is displayed in [Connect To].
For parallel connection, select the machine whose printer port is displayed in
[Connect To].
23

Preparing the Machine
G Click [Install].
The printer driver installation starts.
1 |
H Click [Finish]. |
A message about restarting the computer appears. Restart the computer to |
complete installation.
I Click [Exit] in the first dialog box of the installer, and then take out the CDROM.

 Note
Note
To stop installation of the selected software, click [Cancel] before installation is complete.
Auto Run may not work with certain operating system settings. If this happens, launch “Setup.exe” on the CD-ROM root directory.
Select a machine to whose IP address is displayed in [Connect To] to install SmartDeviceMonitor for Client when using TCP/IP.

 Reference
Quick Install is not available unless bidirectional communication between the machine and computer is enabled via parallel connection. See p.51 “If Bidirectional Communication Is Disabled” for details about bidirectional communication between the machine and computer.
Installing the Printer Driver for the Selected Port
Using the SmartDeviceMonitor for Client Port
 Important
To install SmartDeviceMonitor for Client under Windows 2000 / XP Professional, Windows Server 2003, and Windows NT 4.0, you must have an account that has Manage Printers permission. Log on as an Administrator.
Install SmartDeviceMonitor for Client before installing the printer driver when using the SmartDeviceMonitor for Client port.
Installing SmartDeviceMonitor for Client
A B
Quit all applications currently running. Insert the CD-ROM into the CD-ROM drive.
The installer starts.
C Select an interface language, and then click [OK].
The default interface language is English.
24
 Loading...