


X-EM11
X-EM21
CD Receiver System
Micro chaîne CD
X-EM11
Register your product at:
CD Receiver System
http://www.pioneerelectronics.com (US)
http://www.pioneerelectronics.ca (Canada)
• Protect your new investment
The details of your purchase will be on file for reference in the event of an insurance claim such as loss or theft.
• Receive free tips, updates and service bulletins on your new product
• Improve product development
Your input helps us continue to design products that meet your needs.
• Receive a free Pioneer newsletter
Registered customers can opt in to receive a monthly newsletter.
http://www.pioneerelectronics.com (États-Unis)
http://www.pioneerelectronics.ca (Canada)
Discover the benefits of registering your product online at
http://www.pioneer.co.uk
Découvrez les nombreux avantages offerts en enregistrant votre produit en ligne
maintenant sur
Registre su producto en
http://www.pioneer.fr
http://www.pioneer.eu
(or
http://www.pioneer.eu
(ou
http://www.pioneer.eu
http://www.pioneer.es
) Descubra los beneficios de registrarse on-line:
(o en
).
).
Operating Instructions
Mode d’emploi
Manual de instrucciones
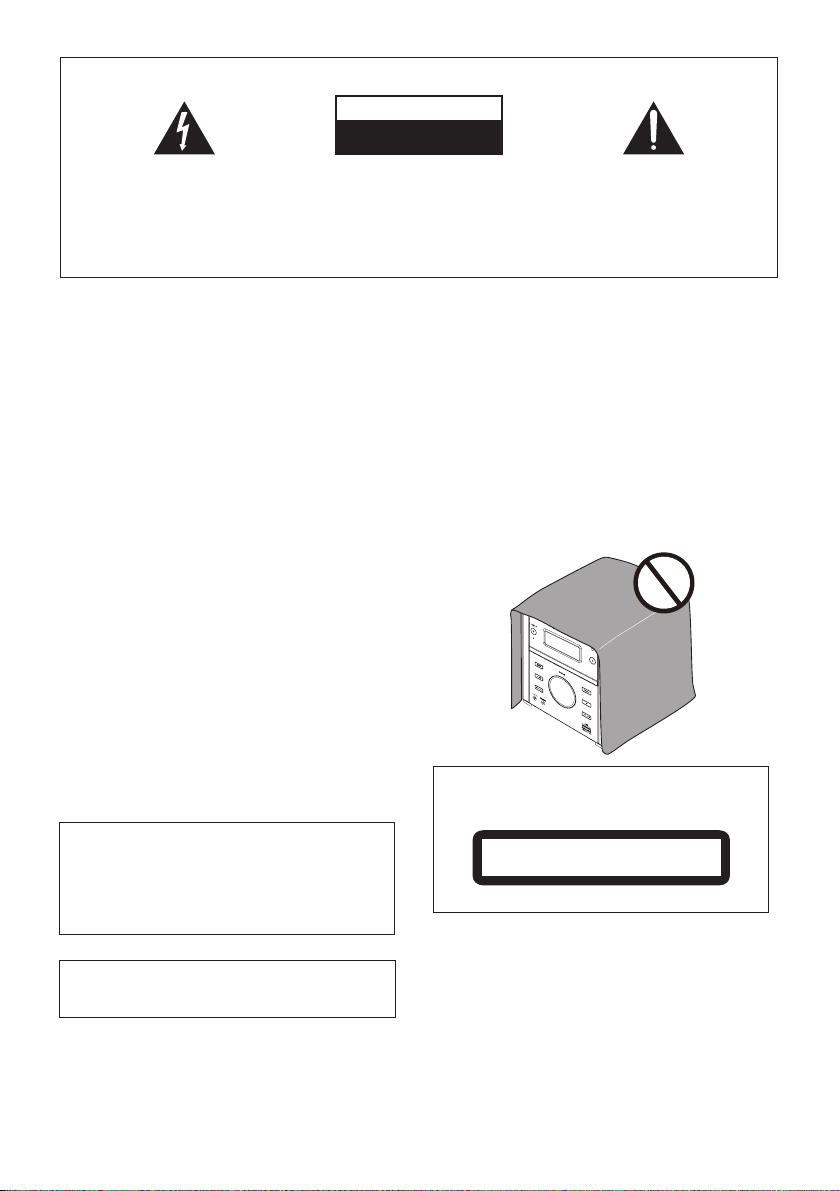
IMPORTANT
The lightning flash with arrowhead symbol,
within an equilateral triangle, is intended to
alert the user to the presence of uninsulated
“dangerous voltage” within the product’s
enclosure that may be of sufficient
magnitude to constitute a risk of electric
shock to persons.
CAUTION
RISK OF ELECTRIC SHOCK
DO NOT OPEN
CAUTION:
TO PREVENT THE RISK OF ELECTRIC
SHOCK, DO NOT REMOVE COVER (OR
BACK). NO USER-SERVICEABLE PARTS
INSIDE. REFER SERVICING TO QUALIFIED
SERVICE PERSONNEL.
The exclamation point within an equilateral
triangle is intended to alert the user to the
presence of important operating and
maintenance (servicing) instructions in the
literature accompanying the appliance.
D3-4-2-1-1_A1_En
WARNING
This equipment is not waterproof. To prevent a fire or
shock hazard, do not place any container filled with
liquid near this equipment (such as a vase or flower
pot) or expose it to dripping, splashing, rain or
moisture.
D3-4-2-1-3_A1_En
WARNING
Before plugging in for the first time, read the following
section carefully.
The voltage of the available power supply differs
according to country or region. Be sure that the
power supply voltage of the area where this unit
will be used meets the required voltage (e.g., 230 V
or 120 V) written on the rear panel.
D3-4-2-1-4*_A1_En
WARNING
To prevent a fire hazard, do not place any naked flame
sources (such as a lighted candle) on the equipment.
D3-4-2-1-7a_A1_En
Operating Environment
Operating environment temperature and humidity:
+5 °C to +35 °C (+41 °F to +95 °F); less than 85 %RH
(cooling vents not blocked)
Do not install this unit in a poorly ventilated area, or in
locations exposed to high humidity or direct sunlight (or
strong artificial light)
This product is for general household purposes. Any
failure due to use for other than household purposes
(such as long-term use for business purposes in a
restaurant or use in a car or ship) and which requires
repair will be charged for even during the warranty
period.
When using this product, confirm the safety
information shown on the bottom of the unit.
D3-4-2-1-7c*_A1_En
K041_A1_En
D3-4-2-2-4_B1_En
VENTILATION CAUTION
When installing this unit, make sure to leave space
around the unit for ventilation to improve heat radiation
(at least 10 cm at top, 10 cm at rear, and 10 cm at each
side).
WARNING
Slots and openings in the cabinet are provided for
ventilation to ensure reliable operation of the product,
and to protect it from overheating. To prevent fire
hazard, the openings should never be blocked or
covered with items (such as newspapers, table-cloths,
curtains) or by operating the equipment on thick carpet
or a bed.
D3-4-2-1-7b*_A1_En
CAUTION
This product is a class 1 laser product classified
under the Safety of laser products, IEC 60825-1:2007.
CLASS 1 LASER PRODUCT
D58-5-2-2a_A1_En
WARNING
Store small parts out of the reach of children and
infants. If accidentally swallowed, contact a doctor
immediately.
If the AC plug of this unit does not match the AC
outlet you want to use, the plug must be removed
and appropriate one fitted. Replacement and
mounting of an AC plug on the power supply cord of
this unit should be performed only by qualified
service personnel. If connected to an AC outlet, the
cut-off plug can cause severe electrical shock. Make
sure it is properly disposed of after removal.
The equipment should be disconnected by removing
the mains plug from the wall socket when left unused
for a long period of time (for example, when on
vacation).
D3-4-2-2-1a_A1_En
CAUTION
STANDBY/ON switch on this unit will not
The
completely shut off all power from the AC outlet.
Since the power cord serves as the main disconnect
device for the unit, you will need to unplug it from the
AC outlet to shut down all power. Therefore, make
sure the unit has been installed so that the power
cord can be easily unplugged from the AC outlet in
case of an accident. To avoid fire hazard, the power
cord should also be unplugged from the AC outlet
when left unused for a long period of time (for
example, when on vacation).
D3-4-2-2-2a*_A1_En
POWER-CORD CAUTION
Handle the power cord by the plug. Do not pull out the
plug by tugging the cord and never touch the power
cord when your hands are wet as this could cause a
short circuit or electric shock. Do not place the unit, a
piece of furniture, etc., on the power cord, or pinch the
cord. Never make a knot in the cord or tie it with other
cords. The power cords should be routed such that they
are not likely to be stepped on. A damaged power cord
can cause a fire or give you an electrical shock. Check
the power cord once in a while. When you find it
damaged, ask your nearest PIONEER authorized
service center or your dealer for a replacement.
S002*_A1_En
Condensation
If the unit is moved suddenly from a cold place into a
warm room (in winter, for example) or if the temperature
in the room in which the player is installed rises
suddenly due to a heater, etc., water droplets
(condensation) may form inside (on operating parts and
the lens). When condensation is present, the player will
not operate properly and playback is not possible. Let
the player stand at room temperature for 1 or 2 hours
with the power turned on (the time depends on the
extent of condensation). The water droplets will
dissipate and playback will become possible.
Condensation can also occur in the summer if the
player is exposed to the direct wind from an
air-conditioner. If this happens, move the player to a
different place.
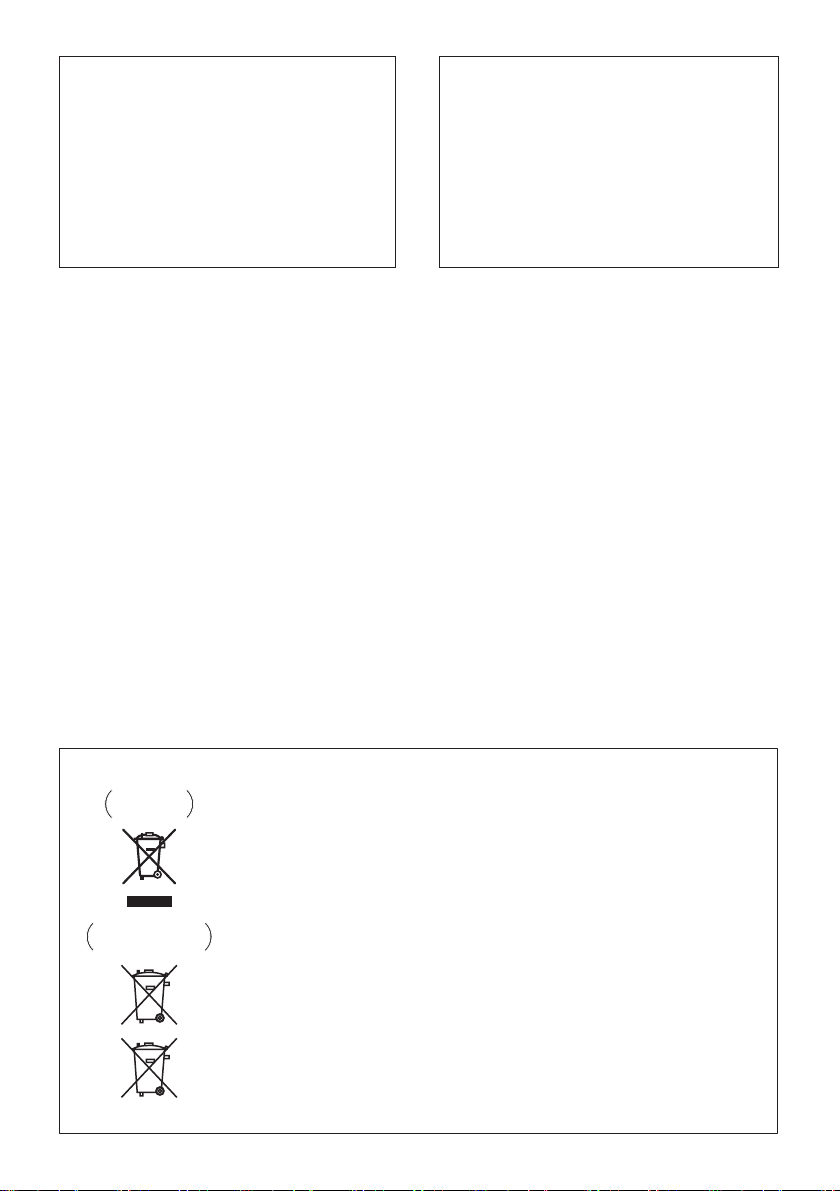
[European model only]
Information for users on collection and disposal of old equipment and used batteries
Symbol for
equipment
Symbol examples
for batteries
Pb
These symbols on the products, packaging, and/or accompanying documents mean
that used electrical and electronic products and batteries should not be mixed with
general household waste.
For proper treatment, recovery and recycling of old products and used batteries,
please take them to applicable collection points in accordance with your national
legislation.
By disposing of these products and batteries correctly, you will help to save valuable
resources and prevent any potential negative effects on human health and the
environment which could otherwise arise from inappropriate waste handling.
For more information about collection and recycling of old products and batteries,
please contact your local municipality, your waste disposal service or the point of sale
where you purchased the items.
These symbols are only valid in the European Union.
For countries outside the European Union:
If you wish to discard these items, please contact your local authorities or dealer and
ask for the correct method of disposal.
K058a_A1_En
S005_A1_En

[U.S. and Canadian model only]
This Class B digital apparatus complies with
Canadian ICES-003.
The Safety of Your Ears is in Your Hands
Get the most out of your equipment by playing it at a
safe level – a level that lets the sound come through
clearly without annoying blaring or distortion and, most
importantly, without affecting your sensitive hearing.
Sound can be deceiving. Over time, your hearing
“comfort level” adapts to higher volumes of sound, so
what sounds “normal” can actually be loud and
harmful to your hearing. Guard against this by setting
your equipment at a safe level BEFORE your hearing
adapts.
ESTABLISH A SAFE LEVEL:
• Set your volume control at a low setting.
• Slowly increase the sound until you can hear it
comfortably and clearly, without distortion.
• Once you have established a comfortable sound
level, set the dial and leave it there.
BE SURE TO OBSERVE THE FOLLOWING
GUIDELINES:
• Do not turn up the volume so high that you can’t
hear what’s around you.
• Use caution or temporarily discontinue use in
potentially hazardous situations.
• Do not use headphones while operating a motorized
vehicle; the use of headphones may create a traffic
hazard and is illegal in many areas.
D8-10-1-3_A1_En
S001a_A1_En
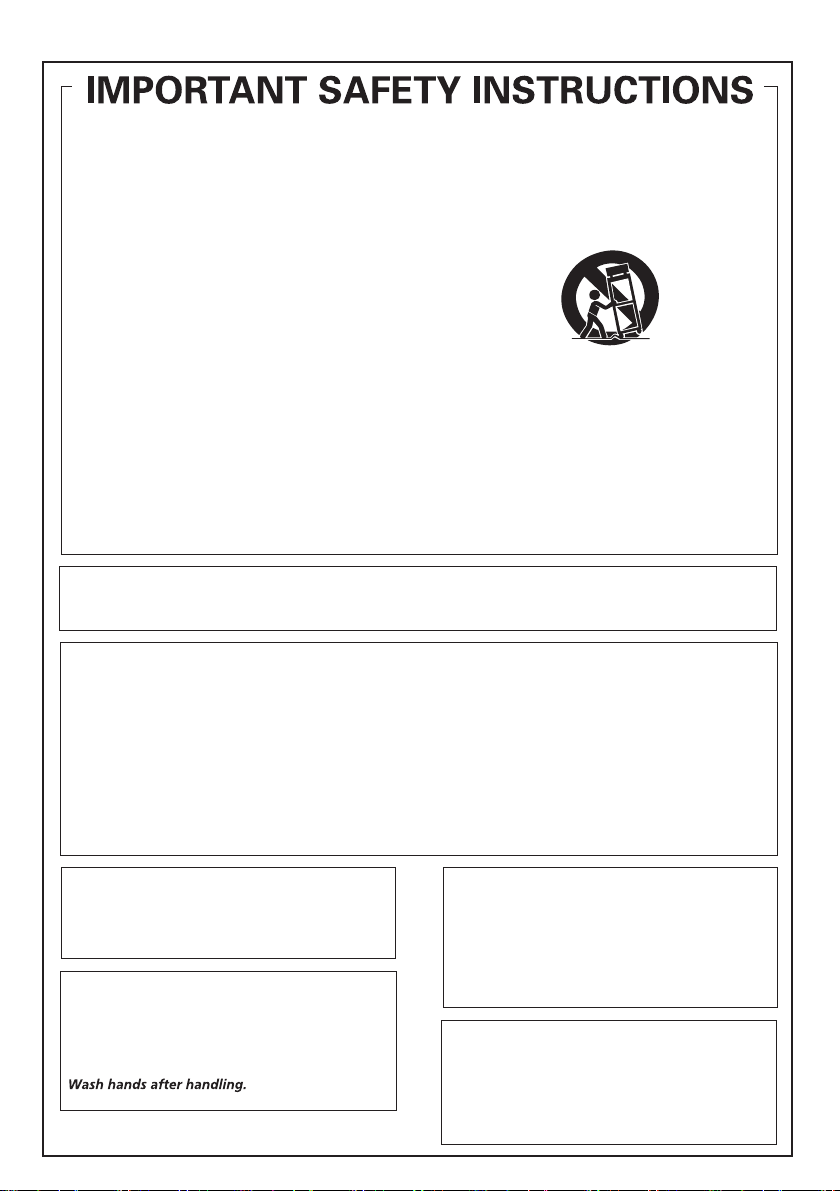
[U.S. model only]
11)
Read these instructions.
1)
Keep these instructions.
2)
Heed all warnings.
3)
Follow all instructions.
4)
Do not use this apparatus near water.
5)
Clean only with dry cloth.
6)
Do not block any ventilation openings. Install in
7)
accordance with the manufacturer’s
instructions.
Do not install near any heat sources such as
8)
radiators, heat registers, stoves, or other
apparatus (including amplifiers) that produce
heat.
Do not defeat the safety purpose of the polarized
9)
or grounding-type plug. A polarized plug has two
blades with one wider than the other. A
grounding type plug has two blades and a third
grounding prong. The wide blade or the third
prong are provided for your safety. If the provided
plug does not fit into your outlet, consult an
electrician for replacement of the obsolete outlet.
Protect the power cord from being walked on or
10)
pinched particularly at plugs, convenience
receptacles, and the point where they exit from
the apparatus.
This device complies with part 15 of the FCC Rules. Operation is subject to the following two conditions: (1) This
device may not cause harmful interference, and (2) this device must accept any interference received, including
interference that may cause undesired operation.
Only use attachments/accessories specified by
the manufacturer.
12)
Use only with the cart, stand, tripod, bracket, or
table specified by the manufacturer, or sold with
the apparatus. When a cart is used, use caution
when moving the cart/apparatus combination to
avoid injury from tip-over.
13)
Unplug this apparatus during lightning storms
or when unused for long periods of time.
14)
Refer all servicing to qualified service personnel.
Servicing is required when the apparatus has
been damaged in any way, such as power-supply
cord or plug is damaged, liquid has been spilled
or objects have fallen into the apparatus, the
apparatus has been exposed to rain or moisture,
does not operate normally, or has been dropped.
D3-7-13-69_En
NOTE:
This equipment has been tested and found to comply with the limits for a Class B digital device, pursuant to Part 15
of the FCC Rules. These limits are designed to provide reasonable protection against harmful interference in a
residential installation. This equipment generates, uses, and can radiate radio frequency energy and, if not installed
and used in accordance with the instructions, may cause harmful interference to radio communications. However,
there is no guarantee that interference will not occur in a particular installation. If this equipment does cause
harmful interference to radio or television reception, which can be determined by turning the equipment off and on,
the user is encouraged to try to correct the interference by one or more of the following measures:
— Reorient or relocate the receiving antenna.
— Increase the separation between the equipment and receiver.
— Connect the equipment into an outlet on a circuit different from that to which the receiver is connected.
— Consult the dealer or an experienced radio/TV technician for help.
Information to User
Alterations or modifications carried out without
appropriate authorization may invalidate the user’s
right to operate the equipment.
D8-10-2_A1_En
CAUTION
This product satisfies FCC regulations when shielded
cables and connectors are used to connect the unit
to other equipment. To prevent electromagnetic
interference with electric appliances such as radios
D8-10-1-2_A1_En
and televisions, use shielded cables and connectors
WARNING: Handling the cord on this product or
cords associated with accessories sold with the
product may expose you to chemicals listed on
proposition 65 known to the State of California and
other governmental entities to cause cancer and
birth defect or other reproductive harm.
D36-P5_B1_En
for connections.
D8-10-3a_A1_En
IMPORTANT NOTICE
THE MODEL NUMBER AND SERIAL NUMBER OF
THIS EQUIPMENT ARE ON THE REAR OR BOTTOM.
RECORD THESE NUMBERS ON YOUR ENCLOSED
WARRANTY CARD AND KEEP IN A SAFE PLACE
FOR FUTURE REFERENCE.
D36-AP9-1_A1_En

Thank you for buying this Pioneer product.
Please read through these operating instructions so that you will know how to operate your model properly. After you
have finished reading the instructions, put them in a safe place for future reference.
Contents
01 Before you start
Introduction . . . . . . . . . . . . . . . . . . . . . . . . . . . . . . . . . . . 7
What's in the box . . . . . . . . . . . . . . . . . . . . . . . . . . . . . . . 7
Battery installation of the remote control . . . . . . . . . . . 7
02 Part names and functions
Overview of the main unit . . . . . . . . . . . . . . . . . . . . . . . . 9
Overview of the remote control . . . . . . . . . . . . . . . . . . . 10
03 Connections
Connect speakers. . . . . . . . . . . . . . . . . . . . . . . . . . . . . . 12
FM antenna installation. . . . . . . . . . . . . . . . . . . . . . . . . 12
Connect power . . . . . . . . . . . . . . . . . . . . . . . . . . . . . . . . 12
04 Getting started
Turning on. . . . . . . . . . . . . . . . . . . . . . . . . . . . . . . . . . . . 13
APS mode. . . . . . . . . . . . . . . . . . . . . . . . . . . . . . . . . . . . . .13
Setting the clock. . . . . . . . . . . . . . . . . . . . . . . . . . . . . . . 13
Selecting a source . . . . . . . . . . . . . . . . . . . . . . . . . . . . . 13
05 Playing
Playing a disc . . . . . . . . . . . . . . . . . . . . . . . . . . . . . . . . . 14
Playing from a USB storage device . . . . . . . . . . . . . . . 14
Controlling playback . . . . . . . . . . . . . . . . . . . . . . . . . . . 14
Programming tracks . . . . . . . . . . . . . . . . . . . . . . . . . . . 15
For a CD . . . . . . . . . . . . . . . . . . . . . . . . . . . . . . . . . . . . . . .15
For WMA/MP3 files . . . . . . . . . . . . . . . . . . . . . . . . . . . . . .15
Erasing the program . . . . . . . . . . . . . . . . . . . . . . . . . . . . .15
06 Using the dock (X-EM21 only)
Compatible iPod/iPhone models . . . . . . . . . . . . . . . . . 16
Enjoying audio through the dock . . . . . . . . . . . . . . . . . 16
Charging your iPod/iPhone . . . . . . . . . . . . . . . . . . . . . . 17
Unloading your iPod/iPhone . . . . . . . . . . . . . . . . . . . . . 17
07 Listening to the FM radio
Tuning to an FM radio station . . . . . . . . . . . . . . . . . . . . 18
Programming radio stations . . . . . . . . . . . . . . . . . . . . . 18
Tuning to a preset radio station . . . . . . . . . . . . . . . . . . 18
Display RDS information
(European model only). . . . . . . . . . . . . . . . . . . . . . . . . . 18
Searching for RDS programs
(European model only). . . . . . . . . . . . . . . . . . . . . . . . . . 18
ASPM (Auto Station Program Memory)
(European model only). . . . . . . . . . . . . . . . . . . . . . . . . . 18
08 Adjusting sound
Adjusting the volume level . . . . . . . . . . . . . . . . . . . . . . 19
P.BASS control. . . . . . . . . . . . . . . . . . . . . . . . . . . . . . . . 19
Muting sound . . . . . . . . . . . . . . . . . . . . . . . . . . . . . . . . . 19
09 Other features
Turn on/off automatically. . . . . . . . . . . . . . . . . . . . . . . . 20
Setting the sleep timer. . . . . . . . . . . . . . . . . . . . . . . . . . 20
Routing audio from other devices. . . . . . . . . . . . . . . . . 20
Through the AUX IN socket . . . . . . . . . . . . . . . . . . . . . . .20
Listening through the headphones. . . . . . . . . . . . . . . . 21
10 Additional information
USB playability information. . . . . . . . . . . . . . . . . . . . . . 22
Supported MP3 disc formats . . . . . . . . . . . . . . . . . . . . 22
RDS program types . . . . . . . . . . . . . . . . . . . . . . . . . . . . 22
Troubleshooting . . . . . . . . . . . . . . . . . . . . . . . . . . . . . . . 23
iPod and iPhone (X-EM21 only) . . . . . . . . . . . . . . . . . . . .24
Cautions on use . . . . . . . . . . . . . . . . . . . . . . . . . . . . . . . 24
When moving this unit . . . . . . . . . . . . . . . . . . . . . . . . . . . 24
Place of installation. . . . . . . . . . . . . . . . . . . . . . . . . . . . . . 24
Do not place objects on this unit . . . . . . . . . . . . . . . . . . . 24
Cleaning the product. . . . . . . . . . . . . . . . . . . . . . . . . . . . . 25
Cleaning the lens. . . . . . . . . . . . . . . . . . . . . . . . . . . . . . . . 25
Handling discs . . . . . . . . . . . . . . . . . . . . . . . . . . . . . . . . 25
Storing . . . . . . . . . . . . . . . . . . . . . . . . . . . . . . . . . . . . . . . . 25
Cleaning discs . . . . . . . . . . . . . . . . . . . . . . . . . . . . . . . . . . 25
About specially shaped discs. . . . . . . . . . . . . . . . . . . . . .25
About iPod/iPhone. . . . . . . . . . . . . . . . . . . . . . . . . . . . . 25
Specifications. . . . . . . . . . . . . . . . . . . . . . . . . . . . . . . . . 26
6
En
Before you start 01
Chapter 1:
Before you start
Introduction
With this system, you can:
• enjoy audio from discs, USB storage devices, iPod/
iPhone (X-EM21 only), and other external devices
• listen to FM radio stations
Playable media:
• Discs: CD-DA, CD-R, CD-RW, MP3-CD, WMA-CD
• Files: .mp3, .wma
•USB storage device
– Compatibility: USB 1.1/2.0 (Full Speed)
– Class support: MSC (Mass Storage Class)
– File system: FAT12, FAT16, FAT32
– Maximum number of albums/folders: 99
– Maximum number of tracks/files: 999
– Maximum level of directory: 8
• iPhone and iPod models (X-EM21 only)
– iPhone 4S
–iPhone 4
– iPhone 3GS
– iPhone 3G
– iPod touch (1st, 2nd, 3rd, and 4th generation)
– iPod nano (3rd, 4th, 5th, and 6th generation)
– iPod classic
What's in the box
Check and identify the contents of the package:
• Micro music system
•AC power cord
• Remote control
• Warranty card
• Operating Instructions (this document)
Battery installation of the remote
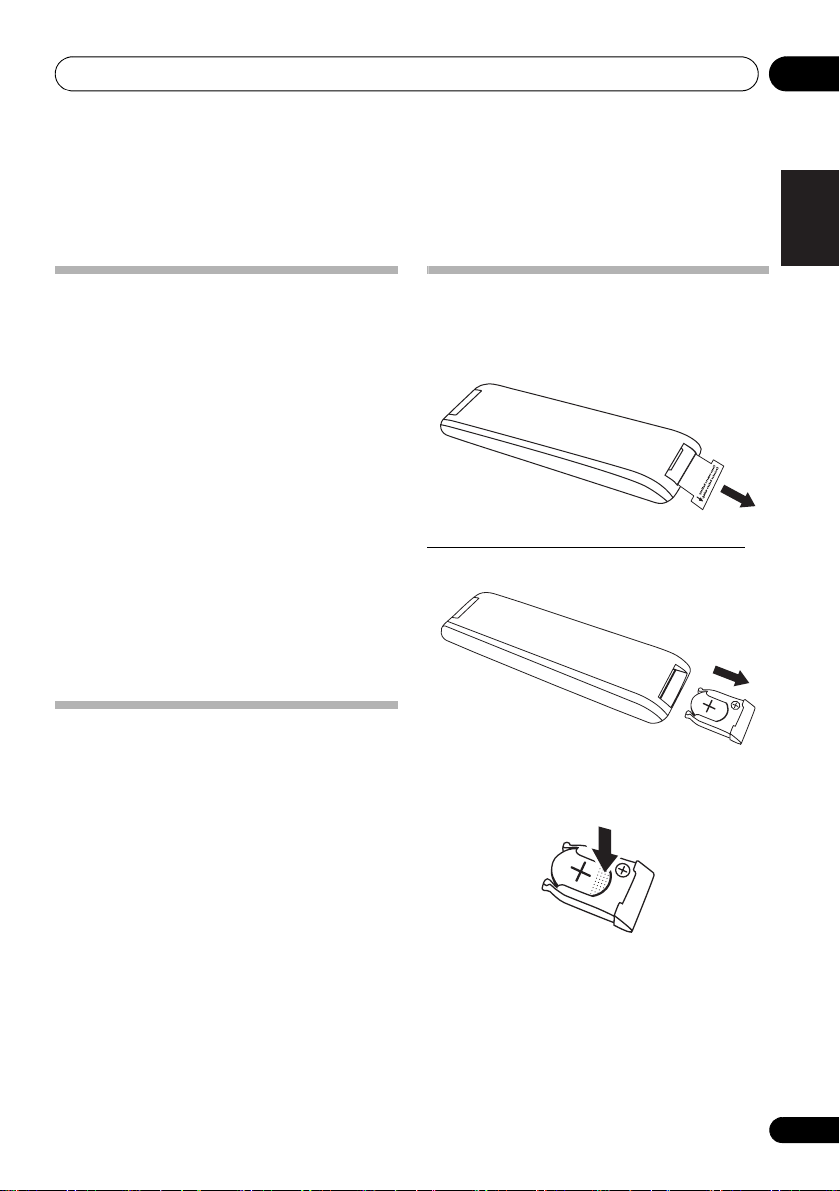
control
• Remove the insulation insert before the first
time use.
Replacing the battery (CR2025, 3 V).
1 Open the battery drawer indirection.
Open
2 Gently press the edge of the battery (the
dotted section on the diagram below) and
remove the battery.
English
Français Español
En
7
Before you start01
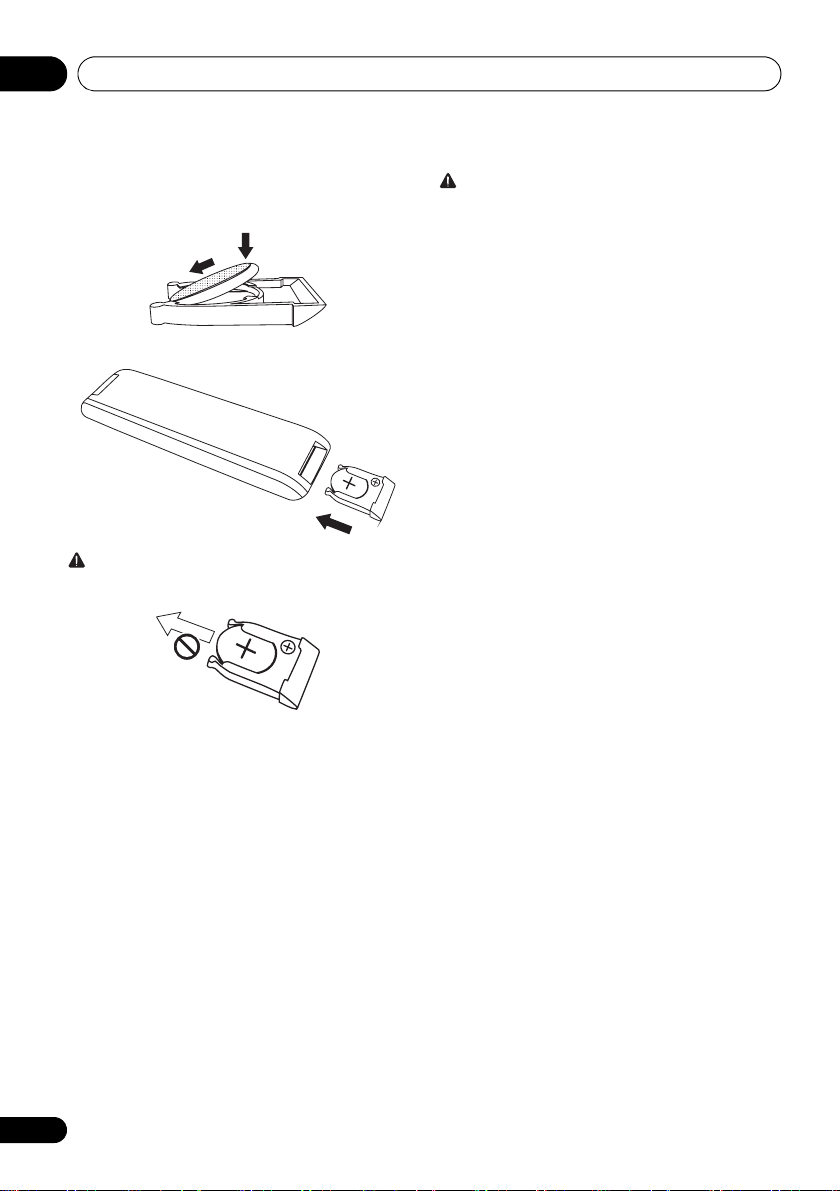
3 Turn the battery case upside-down, set the
new battery with the
side facing down, insert
it diagonally then gently press it down.
4 Close the battery drawer indirection.
Close
WARNING
• Do not pull the battery in the direction shown on the
diagram below. Doing so may damage the battery case.
• Do not use or store batteries in direct sunlight or other
excessively hot place, such as inside a car or near a
heater. This can cause batteries to leak, overheat,
explode or catch fire. It can also reduce the life or
performance of batteries.
CAUTION
• Do not use any batteries other than the ones specified.
• When loading the batteries into the remote control, set
them in the proper direction, as indicated by the polarity
marks ( and ).
• Do not heat batteries, disassemble them, or throw them
into flames or water.
• Batteries may have different voltages, even if they look
similar.
• To prevent leakage of battery fluid, remove the batteries
if you do not plan to use the remote control for a long
period of time (1 month or more). If the fluid should leak,
wipe it carefully off the inside of the case, then insert new
batteries. If a battery should leak and the fluid should get
on your skin, flush it off with large quantities of water.
• When disposing of used batteries, please comply with
governmental regulations or environmental public
institution’s rules that apply in your country/area.
•Danger of explosion if battery is incorrectly replaced.
Replace only with the same or equivalent type
recommended by the manufacturer.
• Dispose of used battery cells immediately after
replacement. Keep away from children.
• If swallowed, please contact a doctor immediately.
• Lithium batteries may present a fire or chemical burn
hazard if misused. Do not disassemble, heat above
100 °C, or incinerate.
8
En

Part names and functions 02
English
Français Español
11
17
12
13
14
15
16
1
2
9
3
4
5
6
7
8
10
Chapter 2:
Part names and functions
Overview of the main unit
1 Dock for iPhone/iPod (X-EM21 only)
• Connect to the iPhone/iPod.
2
STANDBY/ON
• Switch between standby and on.
3
4
5
STANDBY
• Red lights up during standby.
INPUT
• Press repeatedly to select the input source.
• Use to play, pause, or resume playback.
• In the standby mode, press and hold to switch between
APS on and off.
indicator
6
• Skip to the previous track.
• Press and hold to play reverse quickly within a track.
• Tune to the previous radio station.
• Press and hold to search the previous radio station
automatically.
7
AUX IN
• Connect to the audio output socket (usually the
headphones socket) of an external device.
8
PHONES
• Connect to headphones with a 3.5 mm connector.
9
En
Part names and functions02
European model
U.S. and Canadian model
9 Remote control sensor
• Point the remote control to this, and then operate it
within approximately 7 m. The product may have trouble
capturing remote control signals if there is a fluorescent
light nearby. If this happens, move the product away
from the fluorescent light.
10
• Open or close the disc tray.
11 Main display
12 Disc tray
• Place the disc with the label side up.
13
P.BASS
• Switch P.BASS between on and off.
14
•Use to stop playback.
• In standby mode, press and hold to enable or disable the
feature demonstration.
15
• Skip to the next track.
• Press and hold to play forward quickly within a track.
• Tune to the next radio station.
• Press and hold to search the next radio station
automatically.
16
• Connect to a USB storage device.
17
VOLUME
• Rotate to increase or decrease the volume level.
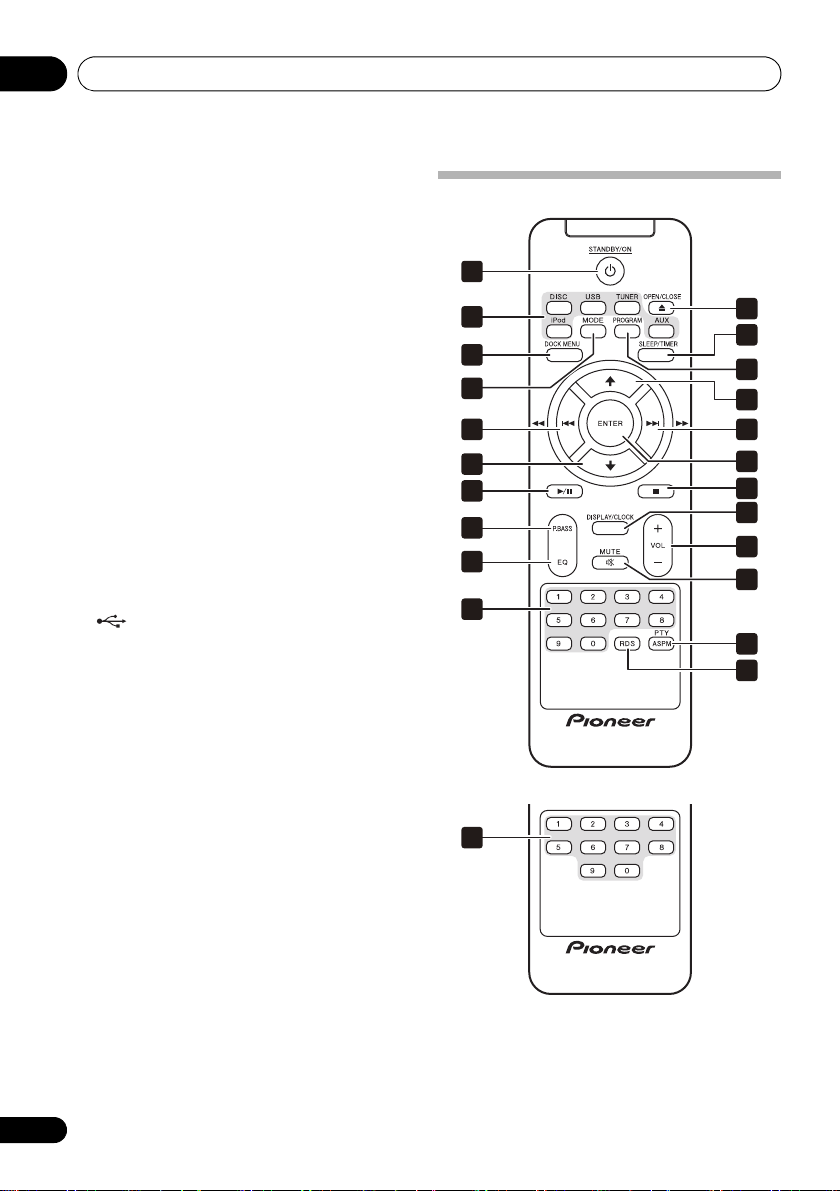
Overview of the remote control
1
2
3
4
5
6
7
8
9
10
11
12
13
6
5
14
15
16
17
18
19
20
10
En
10

Part names and functions 02
1
STANDBY/ON
• Switch between standby and on.
2 Input function buttons
• Use to select the input source.
3
DOCK MENU
• Use to access iPod/iPhone menu.
4
MODE
• Use to select the play mode of each input source.
•[DISC]
Repeat 1 Repeat all Random
(Back to beginning)
•[USB]
Repeat 1 Repeat album Repeat all
Random (Back to beginning)
•[iPod] (X-EM21 only)
Repeat 1 Repeat all Random (Back to
beginning)
5
• Skip to the track.
• Press and hold to play quickly within a track.
• Tune to the station.
• Press and hold to search the radio station automatically.
6
/
• Skip to the previous or next album.
• Select a preset radio station.
• Use to navigate through iPod/iPhone playlist. (X-EM21
only)
7
• Use to play, pause, or resume playback.
• In the standby mode, press and hold to switch APS
between on and off.
8
P.BASS
• Switch P.BASS between on and off.
9
EQ
• Use to select EQ.
[ROCK] [JAZZ] [POP] [CLASSIC] Flat (off)
(Back to beginning)
10 Numeric buttons (0 to 9)
• Use to enter numbers.
• Enter the track number to select a track directly.
• Enter the sequence number to select a preset radio
station.
11
OPEN/CLOSE
• Open or close the disc tray.
12
SLEEP/TIMER
• Set the sleep timer in the working mode.
• Set alarm timer in the standby mode.
(X-EM21 only)
13
PROGRAM
•Use to program audio tracks.
• Use to program radio stations.
14
ENTER
•Use to confirm actions.
15
•Use to stop playback.
• In the standby mode, press and hold to enable or disable
the feature demonstration.
16
DISPLAY/CLOCK
• Display the current status or media information.
• Display the available ID3 information of MP3 tracks.
• In the working mode, press to display the clock for a
while.
• In the standby mode, press and hold to set the clock.
17
VOL +/–
• Use to set the listening volume.
18
MUTE
• Use to mute or restore volume.
19
PTY/ASPM
• Search for RDS program types.
• Press and hold to search for the RDS auto station
program memory.
20
RDS
• Display the available information of an RDS radio
station.
(European model only)
(European model only)
English
Français Español
11
En
Connections03
Chapter 3:
Connections
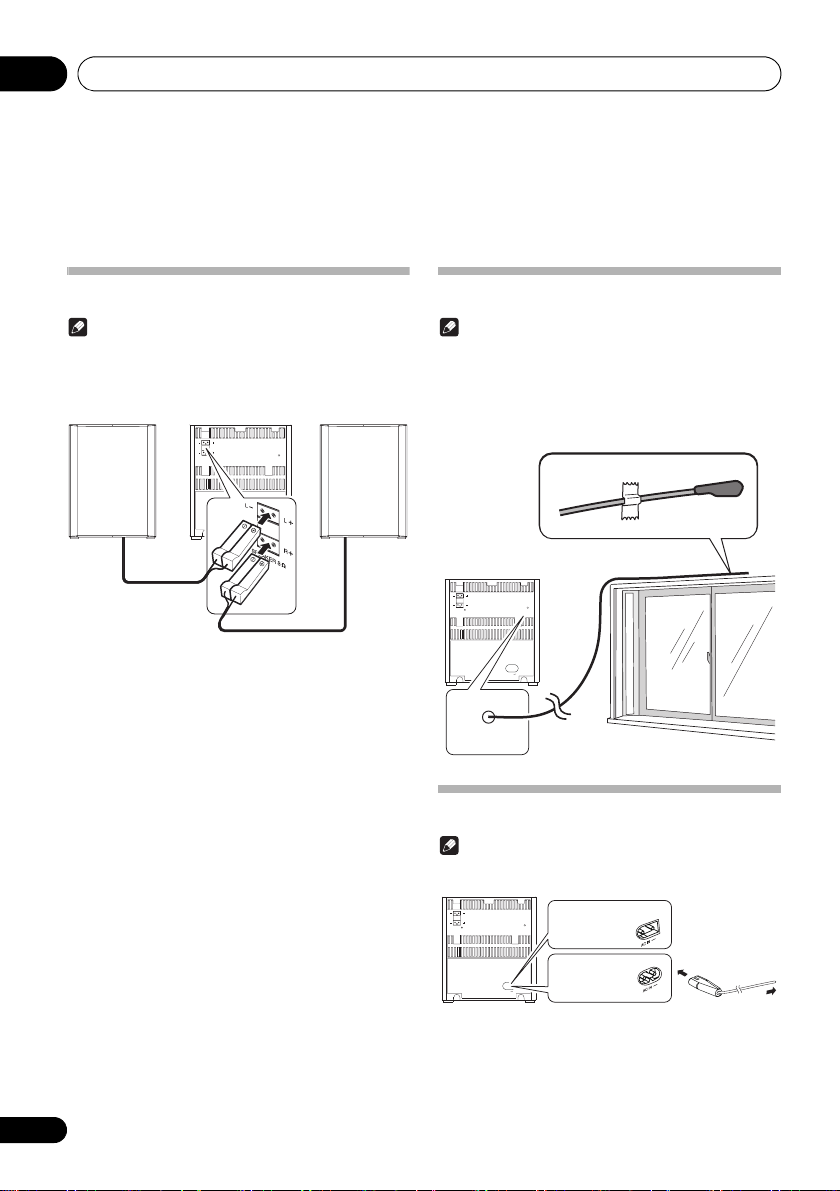
Connect speakers
Note
• For the best sound quality, use the supplied speakers only.
• Connect speakers with the same or higher impedance only.
Refer to Additional information > Specifications for details.
• To avoid magnetic interference or unwanted noise, never
place this product too close to any radiation devices.
LRL
R
SPEAKER 8
Connect the speaker cable plugs to the SPEAKER OUT
sockets.
• the left one to the L+/L– socket
• the right one to the R+/R– socket
FM ANT.
AC IN
FM antenna installation
Note
• The antenna on the back panel is used to improve reception
of FM. Extend this antenna and fix it to a position with the
best reception.
• Never tug strongly on the antenna line since damage of an
antenna may be caused.
• This product does not support MW (medium wave) radio
reception.
LRL
R
SPEAKER 8
FM ANT.
AC IN
FM ANT.
Connect power
Note
• Before you connect the AC power cord, make sure that you
have completed all other connections.
L
RLR
SPEAKER 8
Connect the AC power cord to
•the AC IN~ socket on the back panel,
and
• the wall outlet.
FM ANT.
AC IN
U.S. and Canadian
model
European
model
To the wall
outlet
12
En

Getting started 04
Chapter 4:
Getting started
CAUTION
• Use of controls or adjustments or performance of
procedures other than herein expressly specified may
result in hazardous radiation exposure or other unsafe
operation.
Always follow the instructions in this chapter in sequence.
Turning on
Press
This product switches to the last selected source.
APS mode
How to turn off the APS mode:
• When an iPod/iPhone is connected, the light of the main
STANDBY/ON
• After this product is kept inactive for 15 minutes, it
automatically switches to the standby mode.
– The clock is displayed.
– If the clock is not set, [--:--] blinks.
• Press and hold to turn off the APS mode in the
standby mode and [APS OFF] is displayed.
• If the APS mode is turned on again, Press and hold
in the standby mode and [APS ON] is displayed.
Note
display stays on even if it automatically switches to the
standby mode.
Selecting a source
Press INPUT repeatedly to select a source.
•[DISC]: the disc in the disc tray
•[USB]: .wma/.mp3 files stored on the connected USB
storage device
•[iPod]: the playlist on the connected iPhone/iPod
(X-EM21 only)
•[FM ST]/[FM MONO]: the FM radio
•[AUX IN]: the audio input through the AUX IN socket
English
Français Español
Setting the clock
Note
• During setting, if no action is made within 90 seconds, the
system exits clock setting without saving earlier
operations.
1 In the standby mode, press and hold
DISPLAY/CLOCK
The hour digits blink.
2 Press
DISPLAY/CLOCK
press
The minute digits blink.
3 Press
DISPLAY/CLOCK
press
to activate clock setting.
/
to set the hour, and then
to confirm.
/
to set the minute, and then
to confirm.
13
En

Playing05
Chapter 5:
Playing
Playing a disc
1 Press
repeatedly on the main unit to switch the source
to [
2 Press
3 Load a disc with the printed side facing up.
4 Press
Playback starts automatically after a few seconds.
DISC
on the remote control or
DISC
].
to eject the disc tray.
again to close the disc tray.
• If playback does not start automatically, press to
start playback.
INPUT
Playing from a USB storage device
This system can play .mp3 and .wma files that are copied onto
a supported USB storage device:
• Flash drive
• Memory card reader
• HDD: hard disk drive (This product can detect only a
portable HDD with USB power peak current no more
than 500 mA.)
Note
• Pioneer does not guarantee compatibility with all USB
storage devices.
• NTFS (New Technology File System) file system is not
supported.
1 Connect the USB storage device to the
socket.
USB
2Press
on the remote control or
repeatedly on the main unit to switch the source
USB
].
to [
Playback starts automatically.
If playback does not start automatically,
1Press
2Press
3Press
/
to select an album.
/
to select a track.
to start playback.
Controlling playback
During playback, follow the instructions below to control
playback.
Buttons Functions
Pause or resume playback.
Stop playback.
/ Skip to the previous or next track.
Press and hold to rewind a track or
search forward fast within a track.
/ Skip to the previous or next album when
Numeric buttons
(0 to 9)
MODE Select an available play mode.
no less than one album exists.
Enter the number of a track to play it.
• Repeat 1 : repeat the current
track
• Repeat all : repeat all tracks
• Repeat album : repeat
the current album (only USB
function)
• Random : play tracks randomly
• Play tracks in sequence
Random is unavailable for
programmed tracks.
USB
INPUT
14
En

Playing 05
Programming tracks
Note
• You can program up to 20 tracks.
• During programming, if no operation is made within 20
seconds, the system returns to the stop mode without
saving earlier operations.
For a CD
1 Press to stop playback.
[T0], the total number of tracks, and the duration time are
displayed.
2 Press
programming.
[PROG.] and [P01] (the sequence number) are displayed with
[00] blinking.
3 Press
The track number blinks.
4 Press
selected track.
5 Repeat steps 3 and 4 to program more
tracks.
6 Press
For WMA/MP3 files
1 Press to stop playback.
[A XXX] (XXX indicates the total number of albums) and
[T XXX] (XXX indicates the total number of tracks) are
displayed.
2 Press
programming.
[PROG.] and [P01] are displayed with [A00] blinking.
3 Press
[AXX] (XX indicates the album number) blinks.
4 Press
selected album.
[T00] blinks.
5 Press
[TXX] (XX indicates the track number) blinks.
6 Press
selected track.
7 Repeat steps 3 to 6 to program more tracks.
8 Press
PROGRAM
/
PROGRAM
PROGRAM
/
PROGRAM
/
PROGRAM
to activate the
to select a track.
again to program the
to start playback.
to activate the
repeatedly to select an album.
again to confirm the
repeatedly to select a track.
again to confirm the
to start playback.
Erasing the program
To erase the program,
• Switch to another source.
English
Français Español
15
En

Using the dock (X-EM21 only)06
Chapter 6:
Using the dock
You can enjoy audio from iPod/iPhone through this system.
Note
• No audio output from the PHONES socket in this situation.
• When operating directly on iPod/iPhone, do hold the iPod/
iPhone with the other hand to prevent loose connection.
• iPod/iPhone will not play automatically when docked if the
source is not selected as [iPod].
(X-EM21 only)
Compatible iPod/iPhone models
This system supports the following iPod and iPhone models.
• iPhone 4S
• iPhone 4
• iPhone 3GS
• iPhone 3G
• iPod touch (1st, 2nd, 3rd, and 4th generations)
• iPod nano (3rd, 4th, 5th, and 6th generations)
• iPod classic
Some of the functions may be restricted for some models.
• This system has been developed and tested for the
software version of iPod/iPhone indicated on the website
of Pioneer.
(http://pioneer.jp/homeav/support/ios/na/)
(http://pioneer.jp/homeav/support/ios/eu/)
• Installing software versions other than the ones
indicated on the website of Pioneer to your iPod/iPhone
may result in incompatibility with this system.
Enjoying audio through the dock
Note
• The peak current through the dock connector is limited as
1 000 mA for iPod/iPhone. To avoid damage to your iPod/
iPhone and this system, securely load your iPod/iPhone as
indicated.
1Press
repeatedly on the main unit to switch the source
to [
2 Remove the terminal cover from the dock.
3 Connect your
4 Play a track on your
Buttons Functions
Start, pause, or resume playback.
DOCK MENU Access the playlist of iPod/iPhone.
/ Navigate through the playlist of iPod/
/ Skip to the previous/next track.
iPod
iPod
on the remote control or
].
iPod/iPhone
iPod/iPhone
iPhone.
Press and hold to rewind or search
forward fast.
INPUT
to the dock.
.
16
En

Using the dock (X-EM21 only) 06
Charging your iPod/iPhone
Once the iPod/iPhone is docked and recognized, charging
starts.
Unloading your iPod/iPhone
Note
• Risk of damage to the dock or your iPod/iPhone: Do not
twist or shake your iPod/iPhone during unloading.
1 Pull the
2 Attach the terminal cover to the dock.
iPod/iPhone
out of the dock.
English
Français Español
17
En

Listening to the FM radio07
Chapter 7:
Listening to the FM radio
Tuning to an FM radio station
Note
• Make sure that you have connected and fully extended the
FM antenna.
1 Press
TUNER
on the remote control or
INPUT
repeatedly on the main unit to switch the source
to tuner.
2 Press and hold
/
until the frequency
starts to change.
• To tune to a station at a specific frequency, press
/ repeatedly until the desired frequency is
displayed.
Tip
• In the FM mode, you can press TUNER repeatedly to switch
the sound setting between [FM ST] (stereo) and
[FM MONO] (monophonic).
Programming radio stations
Note
• You can program up to 20 preset radio stations.
• To overwrite a programmed radio station, store another one
with its sequence number.
1 Tune to a radio station.
2 Press
[PRESET XX] (XX indicates the sequence number) blinks.
3 Press
PROGRAM
/
to activate programming.
to allocate a sequence number
from 1 to 20 to this radio station, and then press
PROGRAM
The preset sequence number and the frequency of this radio
station are displayed.
to confirm.
4 Repeat steps 1-3 to program more stations.
Tuning to a preset radio station
• Press / to select the sequence number of that preset
radio station.
• Enter its sequence number with numeric keypad.
Display RDS information
(European model only)
RDS (Radio Data System) is a service that allows FM stations
to show additional information. If you tune to an RDS radio
station, [RDS] and the station name are displayed.
1 Tune to an RDS radio station.
RDS
2Press
available information:
•Station name
• Program type such as [NEWS] (news), [SPORT] (sport),
[POP M] (pop music)...
• Text messages
•Frequency
repeatedly to scroll through the
Searching for RDS programs
(European model only)
You can search for a program type.
1Press
[SEARCH] appears in the display.
2Press
PTY/ASPM
/
.
to select the program type
you want to hear.
3Press
PTY/ASPM
to search for the program
type.
The system starts searching in the station presets.
If [NO FOUND] is displayed, it means the tuner couldn’t find
that program type at the time of the search.
ASPM (Auto Station Program
Memory) (European model only)
You can program up to 20 preset RDS stations.
Press and hold
All the available RDS stations are programmed. (up to 20
stations)
PTY/ASPM
.
18
En

Adjusting sound 08
Chapter 8:
Adjusting sound
The following operations are applicable to all supported
media.
Adjusting the volume level
• On the remote control, press VOL +/– repeatedly.
• On the main unit, rotate VOLUME clockwise or
counterclockwise.
• When the power is turned off (to the standby mode) with
the volume set high, the volume is set to a moderate level
when the power is turned back on.
P.BASS control
When the power is first turned on, the unit will enter the
P.BASS mode which emphasizes the bass frequencies. To
cancel the P.BASS mode, press P.BASS on the main unit or
remote control.
Muting sound
•Press MUTE to mute or restore the sound.
English
Français Español
19
En

Other features09
Chapter 9:
Other features
Turn on/off automatically
You can set a time for automatic power on and off.
Note
• Make sure that you have set the clock before this setup.
1 In standby mode, press and hold
.
TIMER
[TIMER ON] (time for auto power on) blinks.
2 Press
The hour digits blink.
3 Press
4 Press
The minute digits blink.
5 Press
SLEEP/TIMER
.
/
SLEEP/TIMER
again.
/
to set the hour.
to set the minute.
6 Press SLEEP/TIMER to confirm the time for
auto power on.
[TIMER ON] blinks.
• If you want to set the power-off time, press /
t o se lec t [ TIMER OFF] (time for auto power off),
and then repeat steps 2-6.
7 Press
8 Press
9 Select the input ([
FM
[
/
SLEEP/TIMER
]) by pressing
to select [
.
DISC
INPUT
], [
on the main unit or one
of the input function buttons on the remote
control.
• For the tuner source, you still need to press /
to select a programmed radio station.
•[iPod] can only be selected on the X-EM21.
10 Press
The clock time is displayed.
SLEEP/TIMER
• To deactivate the timer, press SLEEP/TIMER again.
• The power cannot be turned on while the timer is being
set. Finish setting the time, then turn on the power.
.
USB
], [
SLEEP/
SOURCE
iPod
] or
Setting the sleep timer
In the working mode, press SLEEP/TIMER repeatedly to select
a preset period (15, 30, 45, 60, or 90 minutes).
When the sleep timer is activated, [SLEEP] is displayed on the
upper-right corner of the main display.
• To deactivate the sleep timer, press SLEEP/TIMER
repeatedly until [SLEEPOFF] is displayed.
Routing audio from other devices
Through the AUX IN socket
].
1 Connect a stereo mini-plug cable
(commercially available) to
•the AUX IN socket on the front panel of the main unit,
and
• the headphones socket on the external device (for
example, an MP3 player).
2Press
repeatedly on the main unit to switch the source
to [
3 Play the external device.
AUX IN
AUX
on the remote control or
].
INPUT
20
En

Other features 09
Listening through the headphones
Plug your headphones into the PHONES socket on the front
panel of the main unit.
Note
• No audio output from the headphones socket when you
listen to the docked iPod/iPhone. Listen through the
speakers instead.
English
Français Español
21
En

Additional information10
Chapter 10:
Additional information
USB playability information
Compatible USB devices:
• USB flash memory (USB1.1/2.0 (Full Speed))
• USB flash players (USB1.1/2.0 (Full Speed))
• Memory cards (an additional card reader is required)
Supported formats:
• USB or memory file format FAT12, FAT16, FAT32 (sector
size: 512 bytes)
• MP3 bitrates (data rates): 32 kbps to 320 kbps and
variable bitrates
• WMA v9 or earlier
• Directory nesting up to 8 levels
• Number of albums/folders: maximum 99
• Number of tracks/files: maximum 999 (depending on file
name length)
• ID3 tag v2.0 or later (Only English letters and numbers
are supported.)
• File name in Unicode UTF8 (maximum length: 16 bytes)
Audio files cannot be played depending on the encoding
software settings, USB device type, recording, other
conditions.
Unsupported formats:
• Empty albums: an album that does not contain MP3/
WMA files
• Unsupported file formats are skipped. For example,
Word documents (.doc) or MP3 files with extension.dlf
are ignored and not played.
• AAC, WAV, PCM audio files
• DRM protected WMA files (.wav, .m4a, .m4p, .mp4, .aac)
• WMA files in Lossless format
Supported MP3 disc formats
• ISO9660, Joliet
• Maximum track/file number: 999
(depending on file name length)
• Maximum album number: 99
• Supported sampling frequencies: 32 kHz, 44.1 kHz,
48 kHz
• Supported bitrates: 32 kbps to 320 kbps, variable bitrates
Audio files cannot be played depending on the encoding
software settings, USB device type, recording, other
conditions.
RDS program types
NO TYPE No RDS programme type
NEWS News services
AFFAIRS Politics and current affairs
INFO Special information programs
SPORT Sports
EDUCATE Education and advanced training
DRAMA Radio plays and literature
CULTURE Culture, religion and society
SCIENCE Science
VARIED Entertainment programs
POP M Pop music
ROCK M Rock music
EASY M Light music
LIGHT M Light classical music
CLASSICS Classical music
OTHER M Special music programs
WEATHER Weather
FINANCE Finance
CHILDREN Children’s programs
SOCIAL Social Affairs
RELIGION Religion
PHONE IN Phone In
TRAVEL Travel
LEISURE Leisure
JAZZ Jazz Music
COUNTRY Country Music
NATION M National Music
OLDIES Oldies Music
FOLK M Folk Music
DOCUMENT Documentary
TES Alarm Test
ALARM Alarm
22
En

Additional information 10
Troubleshooting
WARNING
• Never remove the casing of this apparatus.
Incorrect operation is often mistaken for trouble or malfunction. If you think that there is something wrong with this component,
check the points below. Sometimes the trouble may lie in another component. Inspect the other components and electrical
appliances being used. If the trouble cannot be rectified even after checking the points below, ask your nearest Pioneer
authorized service center or your dealer to carry out repair work.
• If the unit does not operate normally due to external effects such as static electricity, disconnect the power plug from the
outlet and insert it again to return to normal operating conditions.
Problem Solution
No power. Make sure that the AC power cord is connected properly.
Make sure that there is power at the AC outlet.
With a power-saving feature, the system switches off automatically 15 minutes after the
system stays inactive.
No sound or poor sound. Adjust the volume.
Disconnect the headphones.
Make sure that the speakers are connected correctly.
No response from the system. Reconnect the AC power plug, and then turn on the system again.
With a power-saving feature, the system switches off automatically 15 minutes after the
system stays inactive.
Remote control does not work. Before you press any function button, select the correct source with the remote control instead
No disc is detected. Insert a disc.
USB storage device is not supported. Make sure that the USB storage device is compatible with the system.
Cannot play some files on the
USB storage device.
Radio reception is poor. Increase the distance between the system and other electrical appliances.
Timer does not work. Set the clock correctly.
of the main unit.
Reduce the distance between the remote control and the main unit.
Insert battery with its polarity (+/– signs) aligned as indicated.
Replace the batteries.
Aim the remote control directly at the sensor on the front panel of the main unit.
Make sure that you place the disc with its label facing upwards.
Wait until the moisture condensation at the lens has cleared.
Replace or clean the disc.
Make sure that the recordable disc is finalized and the format is supported.
Try another one.
Make sure that the file format is supported.
Make sure that the file quantity does not exceed the maximum.
Fully extend the antenna.
Switch on the timer.
English
Français Español
23
En
 Loading...