


VSX-S300-K
AUDIO/VIDEO MULTI-CHANNEL RECEIVER |
Quick Start Guide |
RECEPTEUR AUDIOVISUEL MULTICANAL |
Guide rapide |
SINTOAMPLIFICATORE AUDIO/VIDEO MULTICANALE |
Guida di avvio rapido |
AUDIO/VIDEO MULTIKANAALS RECEIVER |
Snelstartgids |
RECEPTOR AUDIO-VIDEO MULTICANAL |
Guía de inicio rápido |
AUDIO-/VIDEO- MEHRKANAL-RECEIVER |
Kurzanleitung |
|
|
Thank you for buying this Pioneer product. This Quick Start Guide includes instructions for basic connections and operations to allow simple use of the receiver. For detailed descriptions of the receiver, see the “Operating Instructions” provided on the included CD-ROM ( ).
).
Merci pour l’achat de ce produit Pioneer. Ce guide rapide contient les instructions relatives aux raccordements et opérations de base permettant une utilisation simple de ce récepteur. Pour des descriptions plus détaillées du récepteur, référez-vous au “Mode d’emploi” sur le CD-ROM ( ) fourni.
Благодарим вас за приобретение данного изделия Pioneer. В данном Кратком руководстве пользователя содержатся инструкции по основным подключениям и операциям для упрощенного использования ресивера. Подробное описание ресивера см. в «Инструкции по эксплуатации»,
содержащихся на поставляемом CD-ROM ( ).
).
Vi ringraziamo per avere acquistato questo prodotto Pioneer. Questa Guida di avvio rapido comprende istruzioni per i collegamenti fondamentali e per le operazioni essenziali di questo ricevitore. Per una descrizione dettagliata del ricevitore, vedere le “Istruzioni per l’uso” contenute nel CD-ROM ( ) accluso.
Hartelijk dank voor de aanschaf van dit Pioneer product. In deze snelstartgids vindt u de instructies voor de basisaansluitingen en de basisbediening voor een eenvoudig gebruik van de receiver. Voor meer gedetailleerde informatie wordt u verwezen naar de “Handleiding” die op de bijgeleverde CD-ROM ( ) staat.
Muchas gracias por haber adquirido este producto de Pioneer. Esta Guía de inicio rápido incluye instrucciones para hacer las conexiones y operaciones básicas que le permitirán hacer un uso sencillo del receptor. Para conocer una descripción detallada del receptor, consulte el “Manual de instrucciones” suministrado con el CD-ROM ( ) incluido.
Vielen Dank, dass Sie sich für dieses Pioneer-Produkt entschieden haben. Die Kurzanleitung enthält Anweisungen für grundlegende Verbindungen und Bedienvorgänge, um eine einfache Bedienung des Receivers zu ermöglichen. Detaillierte Beschreibungen des Receivers finden Sie in der „Bedienungsanleitung“ auf der mitgelieferten CD-ROM ( ).
).
STANDBY/ON
|
|
|
ECO |
D AUX |
A AUX |
|
S.RTRV |
iPod USB NETWORK ADAPTER |
AUTO/ |
||
DIRECT |
|||
TUNER |
BD |
|
ALC/ |
DVD STANDARD |
|||
CD |
STB |
GAME |
ADV |
SURR |
|||
RECEIVER |
TV |
PORTABLE |
SOUND |
WING |
|||
SLEEP |
SP-AB |
AUDIO |
DISP |
DIMMER |
STATUS |
||
TOP |
|
MENU |
VOL |
MENU |
|
TOOLS |
|
|
ENTER |
|
|
iPod |
|
|
|
CTRL |
|
|
|
HOME MENU |
|
RETURN |
|
|
PTY |
BAND |
MUTE |
PRESET TUNE
RECEIVER
What’s in the box |
Inhoud van de doos |
Contenu du carton d’emballage |
Contenido de la caja |
Комплект поставки |
Lieferumfang |
Contenuto della confezione |
|
Remote Control |
|
|
|
VSX-S300-K |
|
|
|
|
|
||
Télécommande |
|
|
|
|
|
Пульт дистанционного управления |
|
|
|
|
|
Telecomando |
|
|
CD-ROM (Operating instructions) |
||
Afstandsbediening |
|
|
|||
|
|
|
CD-ROM (Mode d’emploi) |
||
Mando a distancia |
Setup microphone |
|
|
||
CD-ROM (Инструкции по эксплуатации) |
|||||
Fernbedienung |
Microphone de configuration |
||||
|
CD-ROM (Istruzioni per l’uso) |
||||
|
Установочный микрофон |
|
|||
|
|
|
CD-ROM (Handleiding) |
||
|
Impostazione microfono |
|
|
||
|
|
CD-ROM (Manual de instrucciones) |
|||
|
Microfoon voor instellen |
|
|||
|
|
CD-ROM (Bedienungsanleitung) |
|||
|
Micrófono de configuración |
|
|||
|
|
|
|
||
|
Mikrofon für die Einstellung |
|
|
|
|
AAA size IEC R03 dry cell batteries x2 |
|
|
|
|
|
Piles à anode sèche AAA IEC R03 x 2 |
|
|
|
|
|
Сухие батарейки размера AAA IEC R03, 2 шт. |
|
|
|
|
|
Pile a secco AAA IEC R03 x2 |
|
|
|
|
|
AAA/IEC/R03 drogecelbatterijen x2 |
|
|
|
|
|
Pilas secas AAA, IEC R03 x 2 |
These quick start guide |
|
Safety Brochure |
||
AAA/IEC/R03 Trockenbatterien x2 |
|
||||
|
Le présent Guide de démarrage |
Instructions de sécurité |
|||
|
Это краткое руководство пользователя |
Брошюра по технике безопасности |
|||
|
Guida per l’avvio rapido |
|
Istruzioni per la sicurezza |
||
|
Deze Quick Start-gids |
|
|
Folder veiligheid |
|
|
Esta guía de inicio rápido |
|
Folleto de seguridad |
||
|
Diese Kurzanleitung |
|
|
Sicherheitsbroschüre |
|
AM loop antenna |
FM wire antenna |
Power cord |
Warranty card |
Antenne cadre AM |
Antenne filaire FM |
Cordon d’alimentation |
Carte de garantie |
Рамочная антенна АМ |
Проволочная антенна FM |
Кабель питания |
Гарантийный сертификат |
Antenna AM a telaio |
Antenna FM a filo |
Cavo di alimentazione |
Documento di garanzia |
AM-raamantenne |
FM-draadantenne |
Netsnoer |
Garantiebewijs |
Antena de cuadro de AM |
Antena de hilos de FM |
Cable de alimentación |
Tarjeta de garantía |
MW-Rahmenantenne |
UKW-Drahtantenne |
Netzkabel |
Garantiekarte |

English
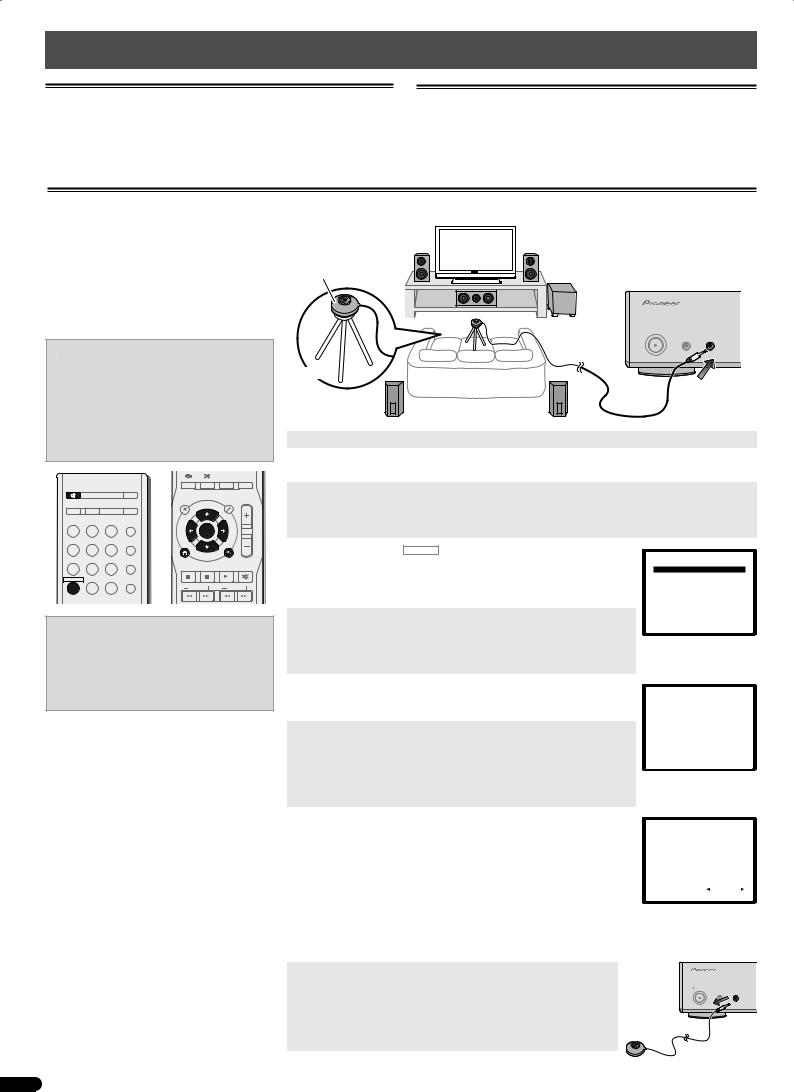
Flow of settings on the receiver
TV
L
Front left
This receiver
The unit is a full-fledged AV receiver equipped with an abundance of functions and terminals. It can be used easily after following the procedure below to make the connections and settings.
Blu-ray Disc player |
R |
|
Front right |
|
SW |
|
Subwoofer |
C |
|
Center |
SR |
|
Surround right |
SL
Surround left
 Connecting the speakers
 Connecting a TV and playback component
 Plugging the receiver
  Basic setup
VENTILATION CAUTION
When installing this unit, make sure to leave space around the unit for ventilation to improve heat radiation (at least 10 cm at top, 5 cm at rear, and 5 cm at each side).
WARNING
Slots and openings in the cabinet are provided for ventilation to ensure reliable operation of the product, and to protect it from overheating. To prevent fire hazard, the openings should never be blocked or covered with items (such as newspapers, table-cloths, curtains) or by operating the equipment on thick carpet or a bed.
D3-4-2-1-7b*_A1_En
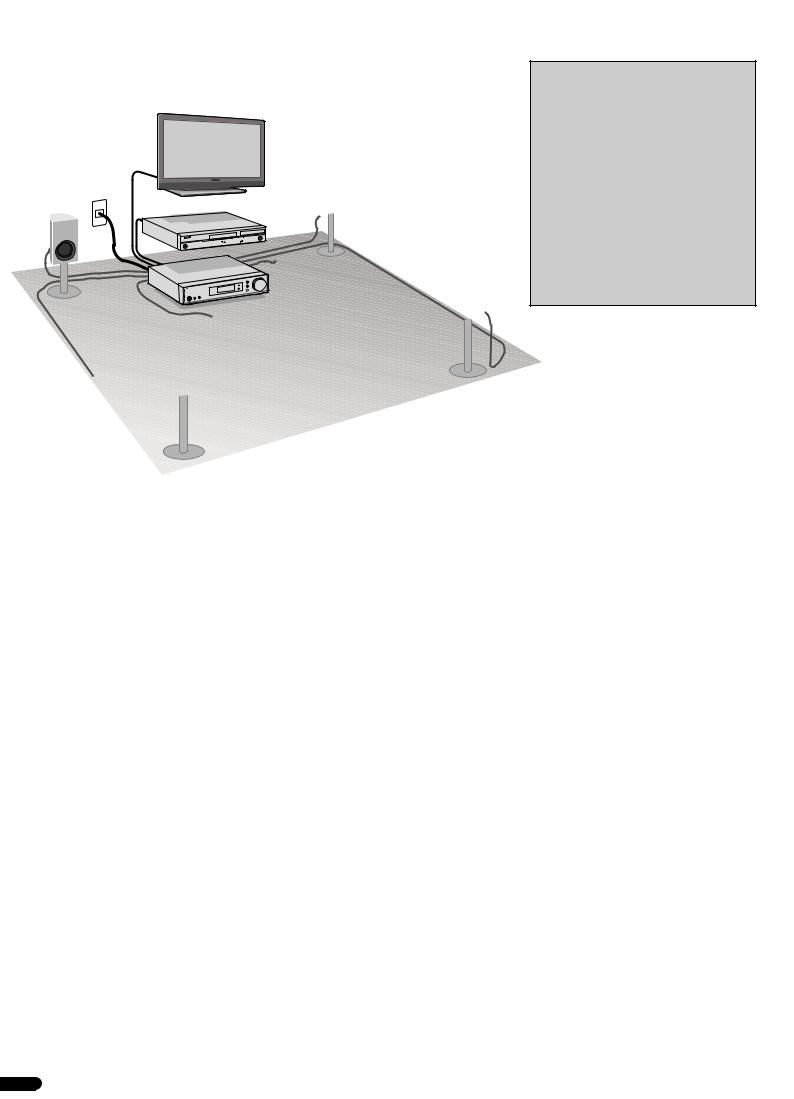
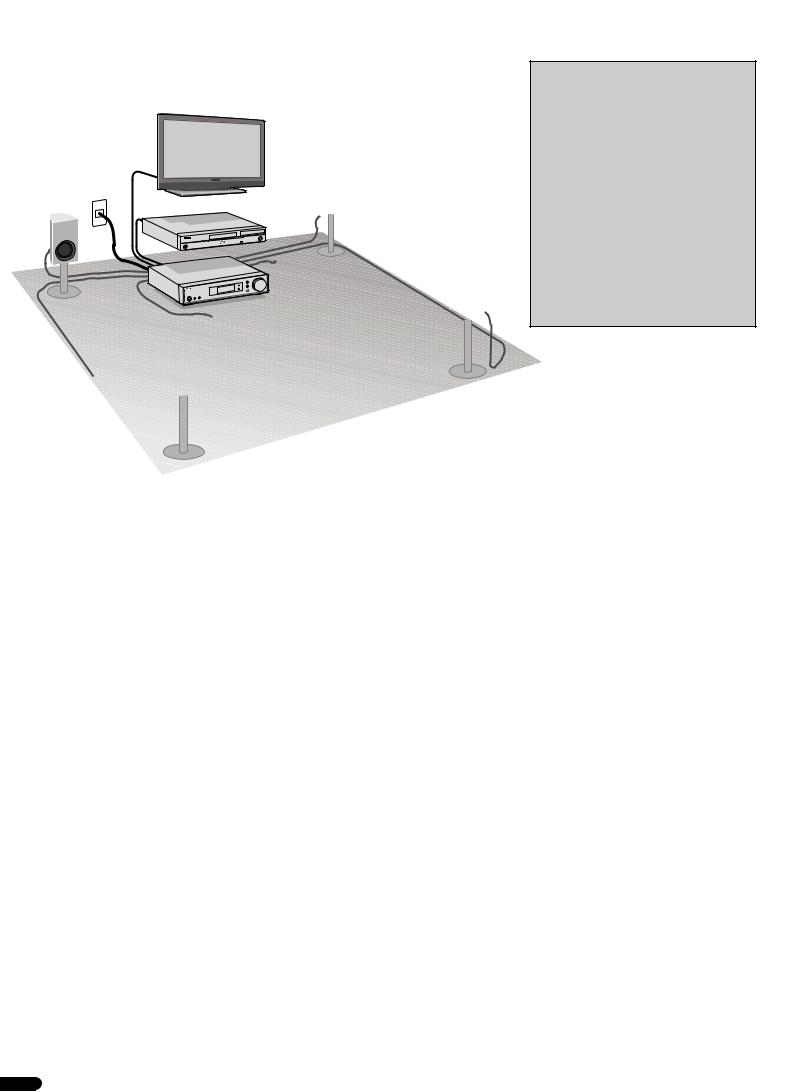
Placing the speakers
The receiver will work with just two stereo speakers (the front speakers in the diagram) but using at least three speakers is recommended, and a complete setup is best for surround sound.
To achieve the best possible surround sound, install your speakers as shown below.
2.1 channel surorund system: |
5.1 channel surorund system: |
R |
R |
L |
L |
SW |
SW |
|
C |
|
SR |
|
SL |
•In addition, surround back speakers, front height speakers or Speaker B can also be connected.
 "Connect the surround back or front height speakers"
 Connecting the speakers
Make sure you connect the speaker on the right to the right (R) terminal and the speaker on the left to the left (L) terminal. Also make sure the positive and negative (+/–) terminals on the receiver match those on the speakers.
You can use speakers with a normal impedance between 4 Ω and 16 Ω.
Bare wire connections
Front speaker terminals: |
1 |
2 |
3 |
|
1 |
Twist exposed wire strands together. |
|
|
|
2 |
Loosen terminal and insert exposed wire. |
|
10 mm |
|
3 |
Tighten terminal. |
|
|
|
Other speaker terminals: |
1 |
2 |
3 |
|
1 |
Twist exposed wire strands together. |
|
|
|
2 |
Push open the tabs and insert exposed wire. |
|
10 mm |
|
|
|
|
||
3 |
Release the tabs. |
|
|
|
Front Right |
Center |
Front Left |
|
|
|
Powerd |
|
Subwoofer |
|
S-SLW500 |
|
Subwoofer |
|
|
|
|
|
LINE LEVEL |
|
|
INPUT |
|
|
COAXIAL |
|
|
A |
FRONT |
SPEAKERS |
|
|
|
OPTICAL |
R |
L |
SUB |
|
|
|
CENTER WOOFER SURROUND / B |
||||
|
|
|
|
|
R |
L |
CD IN |
TV IN |
DIGITAL AUX IN |
|
|
|
|
SURR BACK/ |
AUDIO |
|
|
|
|
|
FRONT HEIGHT |
|
|
|
|
|
|
L |
|
|
|
|
|
|
(Single) |
|
|
|
|
|
|
R SUBWOOFER |
PRE OUT
Be sure to complete all connections before connecting this unit to the AC power source.
2 |
Surround |
Surround |
Right |
Left |
En
 CAUTION
•These speaker terminals carry HAZARDOUS LIVE voltage. To prevent the risk of electric shock when connecting or disconnecting the speaker cables, disconnect the power cord before touching any uninsulated parts.
•Make sure that all the bare speaker wire is twisted together and inserted fully into the speaker terminal. If any of the bare speaker wire touches the back panel it may cause the power to cut off as a safety measure.
•Do not allow the speaker cable core to come into contact with the receiver body.
–If the speaker cable core comes into contact with any metal portion of the receiver’s body, it may damage the speakers and cause smoke and fire.
Insert speaker cables securely into the terminals and check that the cable does not come out of easily.
 Important
•SPEAKERS SUBWOOFER terminals are Pioneer’s passive subwoofer S-SLW500 connection terminals. If using another model of subwoofer, be sure to use a model with built-in amp and connect to the PREOUT SUBWOOFER terminal.
•Please connect either passive or powered subwoofers, as connecting both makes it impossible to achieve the correct sound effect.

 Connecting a TV and playback component
If you have an HDMI or DVI (with HDCP) equipped component (Blu-ray Disc player, etc.), you can connect it to this receiver using a commercially available HDMI cable.
If the TV and playback components support the Control with HDMI feature, the convenient Control with HDMI functions can be used.  "Control with HDMI function"
•The following connection/setting is required to listen to the sound of the TV over this receiver.
–If the TV does not support the HDMI Audio Return Channel function, connect the receiver and TV with audio cables (as shown).
–If the TV supports the HDMI Audio Return Channel function, the sound of the TV is input to the receiver via the HDMI terminal, so there is no need to connect an audio cable. In this case, set ARC at HDMI Setup to ON.
 "HDMI Setup"
HDMI/DVI-compatible components |
|
|
|
|
(Blu-ray Disc player, etc.) |
|
|
|
|
|
|
|
HDMI/DVI-compatible TV |
|
|
|
|
|
This connection is |
HDMI OUT |
HDMI IN |
DIGITAL AUDIO OUT |
|
necessary in order to |
VIDEO IN |
see the OSD of the unit |
|||
|
|
OPTICAL |
|
on the TV. |
About video outputs connection
This receiver is not loaded with a video converter. When you use HDMI cables for connecting to the input device, the same cables should be used for connecting to the TV.
The signals input from the analog (composite) video input of this unit will not be output from the HDMI OUT.
 Important
•If the receiver is connected to a TV using an HDMI cable, the on-screen display (OSD) will not be displayed. Be sure to use a standard RCA analog video cable to connect. In this case, switch the TV input to analog to see the OSD screen (for setup, etc.) on the TV.
•When the Control with HDMI function is ON and the receiver is connected to a compatible TV with an HDMI cable, and you switch the input of the TV to composite, the input of the receiver may automatically switch to TV. If this happens, switch the receiver’s input back to the original input, or
turn OFF the Control with HDMI function. 
"HDMI Setup"
If the TV does not support the |
Connecting antennas |
|
Connect FM wire antenna and the the AM loop antenna |
||
HDMI Audio Return Channel |
||
as shown below. |
||
function, this connection is |
||
required to listen to the TV |
|
|
sound over the receiver. |
|
STB IN |
DVD/DVR IN |
BD/BDR IN |
GAME IN |
OUT |
COAXIAL |
|
|
A |
FRONT |
SPEAKERS |
|
|
|
|
|
|
|
|
|
OPTICAL |
R |
L |
SUB |
|
|
|
|
|
|
|
|
CENTER WOOFER SURROU |
|||
|
HDMI |
|
|
|
|
|
|
|
|
R |
|
|
|
|
|
CD IN |
TV IN |
DIGITAL AUX IN |
|
|
|
||
|
|
VIDEO |
(ANALOG |
ANALOG SURR BACK/ |
AUDIO |
|
|
|
|
||
|
|
|
|
AUX) |
AUX |
FRONT HEIGHT |
|
|
|
|
|
|
|
ASSIGNABLE |
|
L |
|
|
|
|
|
||
|
|
|
IN |
|
|
|
|
|
|
|
|
|
|
|
|
|
(Single) |
|
|
|
|
||
|
(OUTPUT 5 V |
|
|
|
|
|
|
|
|
|
|
|
0.1 A MAX) |
|
|
MONITOR |
|
R SUBWOOFER |
|
|
|
|
|
|
ADAPTER PORT |
|
IN |
|
|
If the device you wish to |
|||||
|
|
OUT |
|
PRE OUT |
|
|
|
connect does not have an |
|||
|
|
|
|
|
|
|
|
|
|
||
|
|
|
|
|
|
|
|
|
|
HDMI output terminal, it |
|
|
|
|
|
|
|
|
|
|
|
can be connected via these |
|
|
|
|
|
|
|
|
|
|
|
terminals. "Connecting |
|
|
|
|
|
|
|
|
|
|
|
your component with no HDMI |
|
terminal"
FM  UNBAL 75
AM LOOP 
ANTENNA
Bluetooth® ADAPTER |
|
AS-BT100 or AS-BT200 |
The Bluetooth® word mark and logos are registered |
(sold separately) |
|
|
trademarks owned by Bluetooth SIG, Inc. and any use |
Refer to the Operating Instructions in CD-ROM for |
of such marks by PIONEER CORPORATION is under |
instructions on how to connect and setup the Bluetooth |
license. Other trademarks and trade names are those of |
ADAPTER and how to play music. |
their respective owners. |
Français English
Deutsch Español Nederlands Italiano
 Plugging the receiver
Only plug in after you have connected all your components to this receiver, including the speakers.
1 Plug the supplied power cord into the AC IN socket on the back of the receiver. 2 Plug the other end into a power outlet.
AC IN
To power outlet
 CAUTION
• Handle the power cord by the plug part. Do not pull out the plug by tugging the cord, and never touch the power cord when your hands are wet, as this could cause a short circuit or electric shock. Do not place the unit, a piece of furniture, or other object on the power cord or pinch the cord in any other way. Never make a knot in the cord or tie it with other cables. The power cords should be routed so that they are not likely to be stepped on. A damaged power cord can cause a fire or give you an electric shock. Check the power cord once in a while. If you find it damaged, ask your nearest Pioneer authorized independent service company for a replacement.
• Do not use any power cord other than the one supplied with this unit.
• Do not use the supplied power cord for any purpose other than that described below.
• The receiver should be disconnected by removing the mains plug from the wall socket when not in regular
use, e.g., when on vacation.
3
En

 Basic setup
Canceling the Auto Power Down
When this receiver is not used over a period of several hours, it will power down automatically. The automatic power-off timer is set to six hours under factory settings, and the timing can be changed or the power-off function switched off altogether. 
"The Auto Power Down menu"
Canceling the demo display
The display on the front panel shows various information (demo displays) when the receiver is not operating.
You can turn off the demo display.  "The FL Demo Mode menu"
•The demo mode is canceled automatically when the Auto MCACC setup is performed (see below).
Automatically setting up for surround sound (MCACC)
The Auto Multi-Channel Acoustic Calibration (MCACC) setup measures the acoustic characteristics of your listening area, taking into account ambient noise, speaker size and distance, and tests for both channel delay and channel level. After you have set up the microphone provided with your system, the receiver uses the information from a series of test tones to optimize the speaker settings and equalization for your particular room.
CAUTION
•The test tones used in the Auto MCACC setup are output at high volume.
 Important
•The OSD will not appear if you have connected using the HDMI output to your TV. Use composite connections for Auto MCACC setup.
|
|
|
|
|
SLEEP SP-AB |
AUDIO |
DISP |
|
|
|
|
|
DIMMER |
STATUS |
|
STANDBY/ON |
|
|
|
|
|
|
|
|
|
|
|
ECO |
TOP |
MENU |
|
D AUX |
A AUX |
|
|
S.RTRV |
MENU |
TOOLS |
VOL |
|
|
|
|
|
|||
iPod USB NETWORK ADAPTER |
|
AUTO/ |
|
|
|
||
|
|
|
|
DIRECT |
|
|
|
|
|
|
|
|
ENTER |
|
|
TUNER |
BD |
DVD |
|
ALC/ |
|
|
|
|
|
|
STANDARD |
|
|
|
|
|
|
|
|
|
iPod |
|
|
|
|
|
|
|
CTRL |
|
|
CD |
STB |
GAME |
|
ADV |
HOME MENU |
RETURN |
|
|
|
|
|
SURR |
|
|
|
|
|
|
|
|
PTY |
BAND |
MUTE |
RECEIVER |
TV |
PORTABLE |
SOUND |
|
|
|
|
WING |
|
|
|
||||
|
|
|
|
|
PRESET |
TUNE |
|
 Note
Note
•The subwoofer distance setting may be farther than the actual distance from the listening position. This setting should be accurate (taking delay and room characteristics into account) and generally does not need to be changed.
Microphone
 STANDBY/ON
PORTABLE /
PHONES MCACC SETUP MIC
Tripod
1 Switch on the receiver and your TV.
2 Switch the TV input to the input that connects this receiver to the TV through the corresponding composite cable.
3 Connect the microphone to the MCACC SETUP MIC jack on the front panel.
Make sure there are no obstacles between the speakers and the microphone.
If you have a tripod, use it to place the microphone so that it’s about ear level at your normal listening position. Otherwise, place the microphone at ear level using a table or a chair.
4 Press RECEIVER on the remote control, then press the HOME MENU button.
The Home Menu appears on your TV. Use and ENTER on the remote control to navigate through the screens and select menu items. Press RETURN to exit the current menu.
5 Select ’Auto MCACC’ from the Home Menu, then press ENTER.
• Mic In! blinks when the microphone is not connected to MCACC SETUP MIC jack.
Try to be as quiet as possible after pressing ENTER. The system outputs a series of test tones to establish the ambient noise level.
6 Follow the instructions on-screen.
•When using a powered subwoofer, make sure the subwoofer is on and the volume is turned up.
7 Wait for the test tones to finish.
A progress report is displayed on-screen while the receiver outputs test tones to determine the speakers present in your setup. Try to be as quiet as possible while it’s doing this.
• For correct speaker settings, do not adjust the volume during the test tones.
8 Confirm the speaker configuration.
The configuration shown on-screen should reflect the actual speakers you have.
•With error messages (such as Too much ambient noise) select RETRY after checking for ambient noise.
If the speaker configuration displayed isn’t correct, use to select the speaker andto change the setting. When you’re finished, go to the next step.
If you see an error message (ERR) in the right side column, there may be a problem with the speaker connection. If selecting RETRY doesn’t fix the problem, turn off the power and check the speaker connections.
9 The Auto MCACC setup has finished! You return to the Home Menu.
Make sure the setup microphone is disconnected.
The settings made in the Auto MCACC setup should give you excellent surround sound from your system, but it is also possible to adjust these settings manually using the Manual speaker setup.  "Manual speaker setup"
Home Menu
1.Auto MCACC 2.Manual SP Setup 3.Input Assign 4.Pre Out Setting 5.HDMI Setup 6.Auto Power Down 7.FL Demo Mode
1.Auto MCACC
Now Analyzing
Environment Check
Ambient Noise
Speaker YES/NO
Return
1.Auto MCACC
Check!
Front |
[ |
YES ] |
Center |
[ |
YES ] |
Surr |
[ |
YES ] |
Surr. Back |
[YESx2] |
|
Subwoofer |
[ |
YES ] |
10:Next |
|
OK |
|
Return |
|
|
STANDBY/ON |
|
|
|
PORTABLE / |
|
|
PHONES MCACC SETUP MIC |
4
En

Basic playback
Here are the basic instructions for playing a source (such as a Blu-ray Disc) with your home theater system.
•The following buttons are not used with this receiver:
– iPod USB, NETWORK, ,
, , iPod CTRL
STANDBY/ON
1 |
|
|
|
|
|
|
|
|
|
|
|
ECO |
|
|
6 |
|||||||
|
|
|
|
|
|
|
|
|
|
|
|
|
|
|||||||||
|
|
|
|
|
|
|
|
|
|
|
|
|||||||||||
|
|
|
D AUX |
A AUX |
|
|
S.RTRV |
|
|
|||||||||||||
|
|
|
iPod USB NETWORK ADAPTER |
AUTO/ |
|
|
|
|
||||||||||||||
|
|
|
|
|
|
|
|
|
|
|
|
DIRECT |
|
|
|
|
||||||
|
|
|
TUNER |
BD |
DVD |
ALC/ |
|
|
|
|
||||||||||||
|
|
|
|
|
|
|
|
|
|
|
|
STANDARD |
|
|
|
|
||||||
|
|
|
|
|
|
|
|
|
|
|
|
|
|
|
|
|
|
|
|
|||
3 |
|
|
|
|
CD |
STB |
GAME |
ADV |
|
|
4 |
|||||||||||
|
|
|
|
SURR |
||||||||||||||||||
|
|
|
RECEIVER |
TV |
PORTABLE |
SOUND |
|
|
|
|
||||||||||||
7 |
|
|
|
|
|
|
|
|
|
|
|
WING |
|
|
|
|
||||||
|
|
|
|
|
|
|
|
|
AUDIO |
DISP |
|
|
|
|
||||||||
|
|
SLEEP |
SP-AB |
|
|
|
|
|||||||||||||||
|
|
|
|
|
|
|
||||||||||||||||
|
|
|
DIMMER |
STATUS |
|
|
|
|
||||||||||||||
|
|
|
TOP |
|
|
|
MENU |
VOL |
|
|
|
|
||||||||||
|
|
|
MENU |
|
|
|
TOOLS |
|
|
|
|
|||||||||||
A |
|
|
|
|
|
|
ENTER |
|
|
|
|
|
|
|
|
|
|
5 |
||||
|
iPod |
|
|
|
|
|
|
|
|
|
|
|||||||||||
|
|
|
|
|
|
|
|
|
|
|||||||||||||
|
|
|
|
|
|
|
|
|
|
|
|
|||||||||||
|
|
|
|
|
|
|
|
|
|
|
|
|
|
|
||||||||
|
|
|
|
|
|
|
|
|
|
|
|
|
|
|
|
|
|
|||||
|
|
|
|
|
|
|
|
|
|
|
|
|
|
|
|
|
|
|||||
|
|
CTRL |
|
|
|
|
|
|
|
|
|
|
|
|
|
|
|
|
||||
|
|
HOME MENU |
|
|
|
RETURN |
|
|
|
|
||||||||||||
|
|
|
|
|
|
|
PTY |
BAND |
MUTE |
|
|
|
|
|||||||||
B |
|
|
|
|
|
|
|
|
|
|
|
|
|
|||||||||
|
|
|
|
|
|
|
|
|
|
|
|
|
|
|
||||||||
|
|
|
|
PRESET |
TUNE |
|
|
|
|
|||||||||||||
|
|
|
|
|
|
|
|
|||||||||||||||
|
|
|
|
|
|
|
|
|
|
|
|
|
|
|
|
|
|
|
|
|
|
|
|
|
|
|
|
|
|
|
|
|
|
|
|
|
|
|
|
|
|
|
|
|
|
|
|
|
|
|
|
|
|
|
|
|
|
|
|
|
|
|
|
|
|
|
|
|
RECEIVER
1 Switch on your system components and receiver.
Start by switching on the playback component (for example a Blu-ray Disc player), your TV and subwoofer (if you have one), then the receiver (press STANDBY/ON).
2 Switch the TV input to the input that connects this receiver.
For example, if you connected this receiver to the VIDEO jacks on your TV, make sure that the VIDEO input is now selected.
3 Press input function buttons to select the input function you want to play.
•The input of the receiver will switch over, and you will be able to operate other components using the remote control.
•The input source can also be selected by using the front panel INPUT SELECTOR button. In this case, the remote control won’t switch operational modes.
4 Press AUTO/DIRECT to select ’AUTO SURR’ and start playback of the source.
If you’re playing a Dolby Digital or DTS surround sound Blu-ray/DVD disc, with a digital audio connection, you should hear surround sound. If you’re playing a stereo source or if the connection is an analog audio connection, you will only hear sound from the front left/right speakers in the default listening mode.
Listening in Standard surround sound
This receiver provide basic surround sound for stereo and multichannel sources.
While listening to a source, press ALC/STANDARD repeatedly to select a listening mode.
Listening in Advanced surround sound
The Advanced surround effects can be used for a variety of additional surround sound effects.
While listening to a source, press ADV SURR repeatedly to select a listening mode.
Listening in Sound Wing mode
HVT speakers make it possible to enjoy a broader-ranging sound.
While listening to a source, press SOUND WING to select the SOUND WING mode.
5 Use VOL +/– to adjust the volume level.
• Sound can be switched off by pressing MUTE button.
6 Enjoy a variety of sounds.
Press ECO to select the Ecology mode.
•Select the Ecology mode for Stereo (max. 2.1 ch) playback to enable the reduction of power consumption to a maximum of half normal levels.
Press S.RTRV to switch the Sound Retriever feature ON or OFF.
•When audio data is removed during the compression process, sound quality often suffers from an uneven sound image. The Sound Retriever feature employs new DSP technology that helps bring CD quality sound back to compressed 2-channel audio by restoring sound pressure and smoothing jagged artifacts left over after compression.
Other remote control functions
•Switch to one of the underlined devices to use the remote control to operate that device. To operate the receiver, first press RECEIVER ( 7 ), then press the appropriate button to operate.
Use the "A" buttons to adjust the settings of this receiver and operate other devices.
Use the "B" buttons to operate other devices. Operations are still possible even after pressing the
RECEIVER button.
Listening to the radio
1 Press TUNER to select the tuner.
If necessary, press BAND to change the band (FM or AM),
2 Press TUNE+/– (or ) to tune to a station.
• Press and hold TUNE+/– (or ) for about a second. The receiver will start searching for the next station.
If you’re listening to an FM station but the reception is weak, press BAND to select FM MONO and set the receiver to the mono reception mode.
Saving station presets
If you often listen to a particular radio station, it’s convenient to have the receiver store the frequency for easy recall whenever you want to listen to that station.
1 Press TOOLS while receiving a signal from the station you want to store.
The preset number is blinking.
2 Press PRESET+/– (or ) to select the station preset you want, then press ENTER.
The preset number stop blinking and the receiver stores the station.
Listening to station presets
You will need to have some presets stored to do this.
Press PRESET+/– (or ) to select the station preset you want.
© 2011 PIONEER CORPORATION. All rights reserved.
Français English
Deutsch Español Nederlands Italiano
5
En
Français
Organigramme des réglages sur le récepteur
Téléviseur
L
Avant gauche
Ce récepteur
Cet appareil est un récepteur AV à part entière présentant un grand nombre de fonctions et de prises. Il peut être utilisé facilement lorsque les raccordements et les réglages mentionnés ci-dessous ont été effectués.
Lecteur de Blu-ray Disc |
R |
|
Avant droite |
|
SW |
|
Caisson de basses |
c |
|
Centrale |
SR |
|
Surround droite |
SL
Surround gauche
 Raccordement des enceintes
 Raccordement d’un téléviseur et de périphériques de lecture
 Branchement du récepteur
  Configuration de base
PRÉCAUTION DE VENTILATION
Lors de l’installation de l’appareil, veillez à laisser un espace suffisant autour de ses parois de manière à améliorer la dissipation de chaleur (au moins 10 cm sur le dessus, 5 cm à l’arrière et 5 cm de chaque côté).
AVERTISSEMENT
Les fentes et ouvertures du coffret sont prévues pour la ventilation, pour assurer un fonctionnement stable de l’appareil et pour éviter sa surchauffe. Pour éviter les risques d’incendie, ne bouchez jamais les ouvertures et ne les recouvrez pas d’objets, tels que journaux, nappes ou rideaux, et n’utilisez pas l’appareil posé sur un tapis épais ou un lit.
D3-4-2-1-7b*_A1_Fr
Installation des enceintes
Le récepteur fonctionnera avec seulement deux enceintes stéréo (les enceintes avant sur le schéma), mais il est recommandé d’en utiliser au moins trois ; une configuration complète de huit enceintes est cependant idéale pour la production du son surround.
Pour obtenir le meilleur son surround possible, installez vos enceintes conformément à l’illustration ci-dessous.
Système surround à 2.1 canaux : Système surround à 5.1 canaux :
R |
R |
L |
L |
SW |
SW |
|
C |
|
SR |
|
SL |
••De plus, il est possible de connecter des enceinte surround arrière, des enceintes surround avanthaut, ou des enceintes B.•
l “Connectez les enceintes surround arrière ou surround avant-haut”
 Raccordement des enceintes
Vérifiez que l’enceinte droite est raccordée à la borne droite (R) et que l’enceinte gauche est raccordée à la borne gauche (L). Assurez-vous également que les bornes positive et négative (+/–) du récepteur sont reliées aux bornes positive et négative des enceintes.
Vous pouvez utiliser des enceintes ayant une impédance normale comprise entre 4 W et 16 W.
Branchement des fils nus
Bornes des enceintes avant : |
1 |
2 |
3 |
|
11Torsadez ensemble les brins de fil dénudés. |
|
|
|
|
22Libérez la borne de l’enceinte et insérez-y le fil. |
10 mm |
|
||
33Refermez la borne. |
|
|
|
|
Autres bornes d’enceinte : |
1 |
2 |
3 |
|
11Torsadez ensemble les brins de fil dénudés. |
||||
|
|
|
||
22Poussez sur les languettes pour les ouvrir et |
|
10 mm |
|
|
insérez le fil dénudé. |
|
|
||
|
|
|
||
33Relâchez les languettes. |
|
|
|
|
Avant droite |
Centrale |
|
Avant gauche |
|
|
|
Caisson de |
||
|
|
|
||
Subwoofer |
|
|
basses |
|
|
|
S-SLW500 |
||
amplifié |
|
|
||
|
|
|
||
LINE LEVEL
INPUT
COAXIAL |
|
|
A |
FRONT |
SPEAKERS |
|
|
|
|
|
OPTICAL |
R |
L |
SUB |
|
|
B |
|
|
CENTER WOOFER |
SURROUND / |
|||||
|
|
|
|
|
|
R |
L |
|
CD IN |
TV IN |
DIGITALAUXIN |
|
|
|
|
|
|
SURR BACK/ |
AUDIO |
|
|
|
|
|
|
|
FRONT HEIGHT |
|
|
|
|
|
|
|
|
L |
|
|
|
|
|
|
|
|
(Single) |
|
|
|
|
|
|
|
|
SUBWOOFER |
|
|
|
|
|
|
|
|
PRE OUT |
|
|
|
|
|
|
|
|
|
Assurez-vous que |
|
|
|
|
tous les branchements |
|
|
|
|
ont été effectués |
|
|
|
|
correctement avant de |
|
|
|
|
raccorder cet appareil |
Surround |
Surround |
|
2 |
au secteur. |
|||
droite |
gauche |
Fr
 ATTENTION
••Les bornes des haut-parleurs sont sous une tension DANGEREUSE. Pour éviter tout risque de décharge électrique lors du branchement et du débranchement des câbles de hautparleur, débranchez le cordon d’alimentation avant de toucher des parties non isolées.
••Assurez-vous que tous les brins de fil dénudés du câble d’enceinte sont torsadés ensemble et insérés complètement dans la borne de l’enceinte. Si une partie du fil d’enceinte exposé entre en contact avec le panneau arrière, l’alimentation peut être coupée par mesure de sécurité.
••Ne laissez pas l’âme des câbles d’enceintes venir en contact avec le boîtier du récepteur.
––Si l’âme des câbles d’enceintes entraient en contact avec une partie métallique du boîtier du récepteur, cela créerait un court-circuit qui pourrait endommager les enceintes et provoquer un départ de feu.•
Insérez correctement les câbles d’enceintes dans les bornes et vérifiez que les câbles ne peuvent pas se détacher facilement.
 Important
••Les bornes SPEAKERS SUBWOOFER sont des bornes de connexion pour caisson de basse passif Pioneer S-SLW500. Si vous utilisez un autre modèle de caisson de basse, veillez à utiliser un modèle avec amplificateur intégré et connectez-le à la borne PREOUT SUBWOOFER.
••Connectez soit un caisson de basse passif soit un caisson de basse actif, car le fait de connecter les deux types simultanément empêche d’obtenir un effet sonore correct.

 Raccordement d’un téléviseur et de périphériques de lecture
Si vous avez un composant équipé d’une prise HDMI ou DVI (avec HDCP) (Lecteur Blu-ray Disc, etc.), vous pouvez le raccorder à ce récepteur à l’aide d’un câble HDMI disponible dans le commerce.
Si le téléviseur et les équipements de lecture connectés prennent en charge la fonction d’Control HDMI, cette fonction pratique peut être utilisée. l “Fonction Control HDMI”
••La connexion et/ou le réglage suivant est nécessaire pour écouter le son du téléviseur par l’intermédiaire du récepteur.
––Si le téléviseur ne prend pas en charge la fonction HDMI Audio Return Channel, connectez le récepteur et le téléviseur à l’aide de câbles audio (comme indiqué).
––Si le téléviseur prend en charge la fonction HDMI Audio Return Channel, le son du téléviseur est envoyé vers le récepteur via la prise HDMI et il n’est alors pas nécessaire de connecter un câble audio. Dans ce cas, réglez l’option ARC sur ON dans le menu de configuration HDMI Setup. l “Menu HDMI Setup”
Équipements compatibles HDMI/DVI (Lecteur de Blu-ray Disc, etc.)
HDMI OUT |
HDMI IN |
DIGITAL AUDIO OUT |
|
|
OPTICAL |
Téléviseur compatible
HDMI/DVI
Cette connexion est nécessaire afin de faire
VIDEO IN apparaître l’affichage  OSD de l’appareil sur le téléviseur.
Si le téléviseur ne prend pas en charge la fonction HDMI Audio Return Channel, cette connexion est nécessaire pour écouter le son du téléviseur par l’intermédiaire du récepteur.
À propos du raccordement des sorties vidéo
Ce récepteur ne comporte pas de convertisseur vidéo. Si vous utilisez des câbles HDMI pour raccorder un équipement en entrée, le même type de câble doit être utilisé pour le raccordement du téléviseur.
Les signaux des entrées vidéo analogiques (composites) de cet appareil ne seront pas envoyés vers la sortie HDMI OUT.
 Important
••Si cet appareil est connecté à un téléviseur via un câble HDMI, l’affichage des informations à l’écran (OSD) n’apparaît pas. Veillez à utiliser un câble vidéo analogique RCA pour réaliser le branchement. Dans ce cas, si vous souhaitez que l’affichage OSD apparaisse (pour effectuer la configuration, etc.), basculez l’entrée TV sur le mode analogique.
••Lorsque la fonction Control HDMI est activée (ON) et que le récepteur est connecté via un câble HDMI à un téléviseur compatible, lorsque vous commutez l’entrée du téléviseur sur vidéo composite, il se peut que l’entrée du récepteur commute automatiquement sur TV. Si cela se produit, commutez l’entrée du récepteur sur
le réglage d’origine, ou désactivez la fonction Control HDMI. l “Menu HDMI Setup”
Raccordement des antennes
Raccordez l’antenne filaire FM et l’antenne cadre AM comme indiqué ci-dessous.
A |
FRONT |
|
SPEAKERS |
|
R |
L |
SUB |
|
CENTER WOOFER SURROU |
||
|
|
|
|
|
|
|
R |
|
FM |
|
UNBAL |
|
75 |
(OUTPUT 5V |
AMLOOP |
0.1 A MAX) |
ANTENNA |
ADAPTER PORT |
Si l’ équipement que vous |
|
souhaitez connecter ne possède |
||
|
||
|
pas de prise de sortie HDMI, |
|
|
il peut être connecté via ces |
|
|
bornes. l “Raccordement |
|
|
d’un équipement dépourvu de |
|
|
borne HDMI” |
ADAPTATEUR Bluetooth® |
La marque de mot et les logos Bluetooth® sont des |
AS-BT100 ou AS-BT200 |
|
(vendu séparément) |
marques déposées appartenant à Bluetooth SIG, Inc. |
Pour plus d’informations sur la connexion et la |
et toute utilisation de ces marques par PIONEER |
configuration de la clé Bluetooth ADAPTER et sur la lecture |
CORPORATION est faite sous licence. Les autres |
audio à l’aide de cette clé, veuillez consulter le Mode |
marques commerciales et noms commerciaux |
d’emploi sur le CD-ROM. |
appartiennent à leurs propriétaires respectifs. |
 Branchement du récepteur
Ne raccordez le récepteur au secteur qu’après y avoir connecté tous les composants, y compris les haut-parleurs.
11Enfichez le cordon d’alimentation fourni dans la prise AC IN à l’arrière du récepteur. 22Enfichez l’autre extrémité dans une prise électrique.
AC IN
Vers la prise secteur
 ATTENTION
••Tenez le cordon d’alimentation par sa prise lorsque vous le manipulez. Ne débranchez pas l’appareil en tirant sur le cordon et ne touchez jamais le cordon d’alimentation avec les mains mouillées ; vous pourriez provoquer
un court-circuit ou prendre un choc électrique. Ne placez pas l’appareil, un meuble ou tout autre objet sur le cordon d’alimentation, et évitez de le pincer de toute autre manière. Ne faites jamais de nœud dans le cordon et ne le liez jamais avec d’autres câbles. Les
cordons d’alimentation doivent être acheminés de façon
àce qu’on ne puisse pas marcher dessus. Un cordon d’alimentation endommagé peut provoquer un incendie ou un choc électrique. Vérifiez l’état du cordon de temps
àautre. Si le cordon est endommagé, demandez-en
le remplacement auprès du service après-vente agréé Pioneer le plus proche.
••N’utilisez aucun autre cordon d’alimentation que celui fourni avec cet appareil.
••N’utilisez pas le cordon d’alimentation fourni à d’autres fins que celles décrites ci-après.
••Lorsque le récepteur n’est pas utilisé durant une longue période (par ex. pendant les vacances), il est
recommandé de le débrancher, en retirant le connecteur d’alimentation de la prise murale.
Français English
Deutsch Español Nederlands Italiano
3
Fr
 Configuration de base
Annulation de la fonction d’arrêt automatique Auto Power Down
Lorsque ce récepteur n’est pas utilisé pendant une période de plusieurs heures, il se met automatiquement hors tension. La minuterie d’arrêt automatique est réglée en usine sur une durée six heures. Cette durée peut être modifiée et la fonction d’arrêt automatique peut aussi être désactivée. l “Le menu Auto Power Down”
Désactivation du mode d’affichage de démonstration
Diverses informations (de démonstration) s’affichent sur le panneau avant lorsque le récepteur ne fonctionne pas.
Il est possible de désactiver ce mode d’affichage. l “Le menu FL Demo Mode”
••Le mode démo est annulé automatiquement lorsque la configuration Auto MCACC est effectué (voir ci-dessous).
Configuration automatique du son surround (MCACC)
Le système de calibrage acoustique multicanaux (MultiChannel Acoustic Calibration, MCACC) mesure les caractéristiques acoustiques de votre position d’écoute en tenant compte du bruit ambiant, de la taille et de
la distance des enceintes et des tests sur le retard et le niveau de canal. Une fois que vous avez installé le microphone fourni avec votre système, le récepteur utilise les informations provenant d’une série de
tonalités de test afin d’optimiser les réglages d’enceinte et l’égalisation pour une pièce spécifique.
 ATTENTION
••Les tonalités de test utilisées dans la configuration MCACC automatique sont générées à un volume élevé.
 Important
••L’affichage à l’écran n’apparaît pas si vous avez effectué la connexion au téléviseur via la sortie HDMI. Utilisez les connexions composites pour la configuration Auto MCACC.
|
|
|
|
|
SLEEP SP-AB |
AUDIO |
DISP |
|
|
|
|
|
DIMMER |
STATUS |
|
STANDBY/ON |
|
|
|
|
|
|
|
|
|
|
|
ECO |
TOP |
MENU |
|
D AUX |
A AUX |
|
|
S.RTRV |
MENU |
TOOLS |
VOL |
|
|
|
|
|
|||
iPod USB NETWORK ADAPTER |
|
AUTO/ |
|
|
|
||
|
|
|
|
DIRECT |
|
|
|
|
|
|
|
|
ENTER |
|
|
TUNER |
BD |
DVD |
|
ALC/ |
|
|
|
|
|
|
STANDARD |
|
|
|
|
|
|
|
|
|
iPod |
|
|
|
|
|
|
|
CTRL |
|
|
CD |
STB |
GAME |
|
ADV |
HOMEMENU |
RETURN |
|
|
|
|
|
SURR |
|
|
|
|
|
|
|
|
PTY |
BAND |
MUTE |
RECEIVER |
TV |
PORTABLE |
SOUND |
|
|
|
|
WING |
|
|
|
||||
|
|
|
|
|
PRESET |
TUNE |
|
 Remarque
••Le réglage de la distance du subwoofer peut être supérieur à la distance réelle de la position d’écoute. Ce réglage doit être précis (en tenant compte des caractéristiques de retard et de la pièce) et il n’a généralement pas besoin d’être changé.
Microphone
 STANDBY/ON
PORTABLE /
PHONES MCACC SETUP MIC
Trépied
11Allumez le récepteur et votre téléviseur.
22Commutez l’entrée du téléviseur sur l’entrée qui connecte ce récepteur au téléviseur via le câble correspondant vidéo composite.
33Connectez le microphone à la prise MCACC SETUP MIC sur le panneau avant.
Assurez-vous qu’il n’y a pas d’obstacles entre les enceintes et le microphone.
Si vous avez un trépied, utilisez-le pour y placer le microphone afin qu’il soit au niveau des oreilles à votre position d’écoute normale. Sinon, placez le microphone au niveau des oreilles en utilisant une table ou une chaise.
44Appuyez sur la touche RECEIVER de la télécommande, puis sur la touche HOME MENU.
L’affichage revient à l’écran d’accueil Home Menu. Utilisez les touches et ENTER de la télécommande pour naviguer dans les écrans et sélectionner des options de menu. Appuyez sur la touche RETURN pour sortir du menu actuel.
55Sélectionnez ‘Auto MCACC’ dans le Home Menu, puis appuyez sur ENTER.
••Mic In! clignote lorsque le microphone n’est pas raccordé à la prise MCACC SETUP MIC.
Veillez à faire le moins de bruit possible après avoir appuyé sur ENTER. Le système émet une série de tonalités de test pour établir le niveau de bruit ambiant.
66Suivez les instructions à l’écran.
••En cas d’utilisation d’un caisson de basse actif, vérifiez que le caisson de basse est sous tension et que vous avez monté le volume.
77Attendez que les tonalités de test ne retentissent plus.
Un rapport de progression est affiché à l’écran pendant que le récepteur émet des tonalités de test afin de déterminer la présence des enceintes dans votre configuration. Essayez de rester aussi silencieux que possible pendant cette opération.
••Pour régler correctement vos enceintes, ne réglez pas le volume pendant que les tonalités de test sont générées.
88Confirmez la configuration des enceintes.
La configuration affichée à l’écran doit indiquer les enceintes que vous avez réellement installées.
••Si un message d’erreur (tel que Too much ambient noise) s’affiche, sélectionnez RETRY après avoir vérifié le bruit ambiant.
Si la configuration des enceintes affichée n’est pas correcte, utilisez pour sélectionner l’enceinte et modifier la configuration. Lorsque vous avez terminé, passez à l’étape suivante.
Si un message d’erreur (ERR) s’affiche dans la colonne de droite, il est possible que vous ayez mal raccordé vos enceintes. Si le fait de sélectionner la touche RETRY ne corrige pas le problème, arrêtez le récepteur et vérifiez les raccordements des enceintes.
99La configuration Auto MCACC est terminée ! L’affichage revient à l’écran d’accueil Home Menu.
Assurez-vous de débrancher le microphone de configuration.
Les réglages effectués en utilisant la configuration Auto MCACC doivent permettre à votre système de restituer une excellente qualité de son surround. Il est également possible d’ajuster ces réglages manuellement via le menu Manual Speaker Setup. l “Réglage manuel des enceintes”
Home Menu
1.Auto MCACC 2.Manual SP Setup 3.Input Assign 4.Pre Out Setting 5.HDMI Setup 6.Auto Power Down 7.FL Demo Mode
1.Auto MCACC
Now Analyzing
Environment Check
Ambient Noise
Speaker YES/NO
Return
1.Auto MCACC
Check!
Front |
[ |
YES ] |
||
Center |
[ |
YES ] |
||
Surr |
[ |
YES ] |
||
Surr. Back |
[YESx2] |
|||
Subwoofer |
[ |
YES ] |
||
|
|
|
|
|
10:Next |
|
|
OK |
|
|
|
Return |
||
STANDBY/ON
PORTABLE /
PHONES MCACC SETUP MIC
4
Fr

0Lecture de base
Voici les instructions de base pour lire une source (telle qu’un Blu-ray Disc) avec votre système home cinéma.
••Les touches suivantes ne sont pas utilisées avec ce |
11Allumez les composants de votre système et votre récepteur. |
|
récepteur : |
Allumez en premier lieu l’équipement de lecture (par exemple, un lecteur Blu-ray Disc), votre téléviseur et le |
|
––iPod USB, NETWORK, , , iPod CTRL |
||
caisson de graves (si vous en avez un), puis le récepteur (appuyez sur u STANDBY/ON). |
||
|
22Commutez l’entrée TV sur l’entrée qui est connectée à ce récepteur.
1 |
|
|
|
|
Par exemple, si vous connectez ce récepteur aux prise VIDEO de votre téléviseur, veillez à ce que l’entrée |
|
|
|
6 |
sélectionnée soit VIDEO. |
|
|
|
|
|
33Utilisez les touches de fonctions d’entrée pour sélectionner la fonction d’entrée souhaitée. |
|
|
|
|
••L’entrée du récepteur commute et vous pourrez alors utiliser d’autres composants via la télécommande.
••La source d’entrée peut aussi être sélectionnée à l’aide du bouton INPUT SELECTOR. Dans ce cas, la télécommande ne permutera pas les modes de fonctionnement.
44Appuyez sur AUTO/DIRECT pour sélectionner “AUTO SURR”, puis lancez la lecture de la source.
Si vous lisez un disque Blu-ray/DVD enregistré en Dolby Digital ou DTS surround, l’utilisation d’une connexion
3 
 4 audionumérique doit vous permettre de profiter du son surround. Si vous lisez à partir d’une source stéréo ou si la connexion audio est une connexion analogique, le son ne sera émis que par les enceintes avant gauche et droite en mode d’écoute par défaut.
7 |
|
Écoute en mode surround standard |
|
Ce récepteur permet d’obtenir, sans réglage particulier, un son surround de base pour les sources stéréo |
|
|
|
|
|
|
et multicanaux. |
Lorsque vous écoutez une source, appuyez de manière répétée sur la touche ALC/STANDARD pour sélectionner un mode d’écoute.
Écoute en mode surround avancé
A |
|
|
|
|
|
Les effets Advanced surround peuvent être utilisés pour une large gamme d’effets sonores surround |
||
|
|
|
|
|
|
|
5 |
supplémentaires. |
|
|
|
|
|
|
|
||
|
|
|
|
|
Lorsque vous écoutez une source, appuyez de manière répétée sur la touche ADV SURR |
|||
|
|
|
|
|
|
|
|
|
|
|
|
|
|
|
|
|
pour sélectionner un mode d’écoute. |
|
|
|
|
|
|
|
|
|
Écoute en mode Sound Wing
Les enceintes HVT permettent de profiter d’un son de plus large envergure.
B |
Pendant la lecture d’une source, appuyez sur la touche SOUND WING pour sélectionner le |
mode correspondant (SOUND WING). |
55Utilisez le bouton rotatif VOL +/– pour régler le volume sonore.
••Pour couper le son, appuyez sur la touche MUTE.
66Profitez de toute une variété de sons.
Appuyez sur la touche ECO pour sélectionner le mode correspondant.
••Lorsque vous sélectionnez le mode Ecology, le son est restitué en stéréo (2.1 canaux maximum) afin de réduire la consommation du système jusqu’à la moitié de la consommation normale.
Appuyez sur la touche S.RTRV pour activer ou désactiver la fonction Sound Retriever.
••Lorsque des données audio sont supprimées lors de la compression, la qualité du son est souvent amoindrie du fait de l’inégalité de l’image sonore. La fonction Sound Retriever a recours à une nouvelle technologie DSP pour restaurer un son de qualité CD vers des sources audio compressées à 2 canaux en rétablissant la pression sonore et en lissant les artéfacts dentelés restants après la compression.
RECEIVER |
Autres fonctions de la télécommande |
••Sélectionnez l’un des équipements soulignés pour commander cet équipement à l’aide de la télécommande. Pour faire commander ce récepteur, appuyez d’abord sur la touche RECEIVER ( 7 ) de la télécommande, puis appuyez sur la touche souhaitée.
Utilisez les touches “A” pour ajuster les réglages de ce récepteur et pour commander d’autres équipements.
Utilisez les touches “B” pour commander d’autres équipements. Les commandes restent utilisables même après avoir appuyé sur la touche RECEIVER .
Ecoute de la radio
11Appuyez sur TUNER pour sélectionner le syntoniseur.
Appuyez sur la touche BAND pour changer de bande de fréquences (FM ou AM), si nécessaire.
22Pour rechercher une station de radio, utilisez les touches TUNE+/– (ou ).
© 2011 PIONEER CORPORATION.
Tous droits de reproduction et de traduction réservés.
••Appuyez sur une des touches TUNE+/– (ou ) sans la relâcher pendant environ une seconde. Le récepteur lance la recherche de la station suivante dans la direction correspondant à la touche.
Si la réception du signal radio FM est faible, appuyez sur la touche BAND pour sélectionner FM MONO, et réglez le récepteur en mode de réception mono.
Mémorisation de stations préréglées
Si vous écoutez souvent une station de radio, il peut être pratique d’enregistrer sa fréquence dans le récepteur afin de pouvoir y accéder facilement lorsque vous le souhaitez.
11Pour mémoriser une station de radio que vous êtes en train d’écouter, appuyez d’abord sur la touche TOOLS.
Le numéro de préréglage clignote.
22Utilisez les touches PRESET+/– (ou ) pour sélectionner le numéro de préréglage que vous souhaitez attribuer à cette station, puis appuyez sur ENTER.
Le numéro préréglé cesse de clignoter et le récepteur mémorise la station.
Écoute des stations préréglées
Vous devez mémoriser des stations préréglées pour avoir accès à cette fonction.
Appuyez sur la touche PRESET+/– (ou ) pour sélectionner la station préréglée que vous désirez.
Français English
Deutsch Español Nederlands Italiano
5
Fr
Русский
Порядок выполнения настроек на ресивере
Телевизор
L
Передний
левый
Данный ресивер
Аппарат является полноценным аудио-видео ресивером, оборудованным множеством функций и терминалов. Он может без проблем использоваться после выполнения процедуры подключений и настроек, описанных ниже.
Проигрыватель |
R |
Blu-ray Disc |
|
Передний |
|
|
правый |
SW |
|
Низкочастотный |
|
громкоговоритель |
|
C |
|
Центральный |
SR |
Правый объемного звучания
SL
Левый объемного звучания
 Подключение громкоговорителей
 Подключение телевизора и компонентов воспроизведения
 Подключение ресивера к электророзетке
  Основная настройка
ОБЯЗАТЕЛЬНАЯ ВЕНТИЛЯЦИЯ
П а а а
а а
а а (
10 , 5 а 5 а
а а).
ПРЕДУПРЕЖДЕНИЕ
В а • |
|
, а• |
а • |
а а а• - -а.
В а а а €
а а а а
- а (-а а , а
а ) а а а а а
.
D3-4-2-1-7b*_A1_Ru
Размещение громкоговорителей
Ресивер может работать с двумя стерео громкоговорителями (передние громкоговорители на рисунке), тем не менее, рекомендуется использовать по крайней мере три, а полный комплект обеспечивает наилучшее объемное звучание.
Для получения наилучшего качества объемного звучания установите громкоговорители, как показано ниже.
Акустическаясистема2.1: |
Акустическаясистема5.1: |
R |
R |
L |
L |
SW |
SW |
|
C |
|
SR |
|
SL |
••Вдополнение,можнотакжеподключитьгромкоговорители объемногозвучания,передниеверхниегромкоговорителиили
громкоговорителиB.l «Подключениезаднихгромкоговорителей объемногозвучанияилипереднихверхнихгромкоговорителей»
 Подключение громкоговорителей
Убедитесь, что правый громкоговоритель подключен к правому (R) разъему, а левый громкоговоритель
– к левому (L) разъему. Также убедитесь, что положительный и отрицательный (+/–) разъемы ресивера совпадают с соответствующими разъемами громкоговорителей.
Можно использовать громкоговорители с нормальным импедансом мощностью от 4 W до 16 W.
Подключение проводов
Зажимы передних громкоговорителей: |
1 |
2 |
3 |
11Скрутите оголенные жилы провода. |
|
|
|
22Ослабьте зажим контакта и вставьте |
10 |
мм |
|
оголенный провод. |
|
||
33Зажмите контакт. |
|
|
|
Другие терминалы громкоговорителей: |
1 |
2 |
3 |
11Скрутите оголенные жилы провода. |
|
|
|
22Откройте защитные выступы и вставьте |
|
10 мм |
|
оголенный провод. |
|
|
|
33Отпустите защитные выступы. |
|
|
|
Передний правый |
Центральный |
Передний левый |
|
|
Активный
сабвуфер
LINE LEVEL
INPUT
COAXIAL |
|
|
A |
FRONT |
SPEAKERS |
|
|
|
|
|
OPTICAL |
R |
L |
SUB |
|
|
B |
|
|
CENTER WOOFER |
SURROUND / |
|||||
|
|
|
|
|
|
R |
L |
|
CD IN |
TV IN |
DIGITALAUXIN |
|
|
|
|
|
|
SURR BACK/ |
AUDIO |
|
|
|
|
|
|
|
FRONT HEIGHT |
|
|
|
|
|
|
|
|
L |
|
|
|
|
|
|
|
|
(Single) |
|
|
|
|
|
|
|
|
SUBWOOFER |
|
|
|
|
|
|
|
|
PRE OUT |
|
|
|
|
|
|
|
|
Низкочастотный
громкоговоритель
S-SLW500
Подключайте |
|
|
|
устройство к сети |
|
|
|
переменного тока только |
Правый |
Левый |
|
после завершения всех |
|||
объемного |
объемного |
||
2 соединений. |
|||
звучания |
звучания |
Ru
 ОСТОРОЖНО
••На контактах громкоговорителей имеется ОПАСНОЕ
••ДЛЯ ЖИЗНИ напряжение. Во избежание опасности поражения электрическим током при подключении или отключении кабелей громкоговорителей отсоединяйте кабель питания, прежде чем прикасаться к любым неизолированным деталям.
••Оголенные концы провода громкоговорителя должны быть обязательно скручены и вставлены в контакт громкоговорителя до конца. Если любой из неизолированных проводов громкоговорителя коснется задней панели, это может вызвать отключение питания в целях безопасности.
••Не допускайте контакта сердечника кабеля громкоговорителя с корпусом ресивера.
––Если произойдет контакт оголенного кабеля громкоговорителя с любой металлической частью корпуса ресивера, это может повредить громкоговоритель и стать причиной задымления и возгорания.• Надежно вставьте кабели громкоговорителей в зажимы и
убедитесь, что кабель не выпадает из зажима.
 Внимание
••Терминалы SPEAKERS SUBWOOFER - это терминалы для подключения пассивного сабвуфера S-SLW500 Pioneer. При использовании другой модели сабвуфера убедитесь, что используется модель со встроенным усилителем и подключается к терминалу PREOUT SUBWOOFER.
••Подключить или пассивные или активные сабвуферы, так как подключение сразу обоих делает невозможным достижение нужного звукового эффекта.
 Loading...