


Register your product and get support at
www.philips.com/welcome
HTS3371D
HTS3372D
Thank you for choosing Philips.
|
P |
O |
|
ST |
|
Need help fast?
Read your Quick Start Guide and/or User Manual first for quick tips
that make using your Philips product more enjoyable.
Register your product and get support at www.philips.com/welcome
or call
1 866 771 4018 while with your product
(and Model / Serial number)
|
T |
Philips vous remercie de |
|
votre confiance. |
|
|
|
|
RRÊ |
|
|
A |
|
|
Besoin d'une aide rapide?
Le Guide rapide de début et Manuel de l'utilisateur regorgent d'astuces destinées à simplifier l'utilisation de votre produit Philips.
Enregistrez votre produit et accédez à l'assistance sur www.philips.com/welcome
ou formez le
1 800 661 6162 (Francophone)
1 866 771 4018 (English speaking) Veillez à avoir votre produit à portée de main
(et model / serial nombre)
Gracias por escoger Philips
|
O |
T |
|
AL |
|
Necesita ayuda inmediata?
Lea primero la Guía rápida del comienzo o el Manual del usuario, en donde encontrará consejos que le ayudarán a disfrutar plenamente
de su producto Philips.
Visite www.philips.com/welcome para registrar su producto y obtener información de contacto y asistencia.
o llame al teléfono
1 866 771 4018
y tenga a mano el producto (y número de model / serial)
EN |
User manual |
FR_CA |
Manual del usuario |
|
|
ES_LA |
Manuel d’utilisation |
|
|

Contents
1 |
Important |
4 |
|
Important safety instruction |
4 |
|
Trademark notice |
6 |
|
|
|
2 |
Your HomeTheater System |
7 |
|
Feature highlights |
7 |
|
Product overview |
8 |
|
|
|
3 |
Connect |
11 |
|
Place the HomeTheater System |
11 |
|
Connect video cables |
11 |
|
Connect speakers and subwoofer |
14 |
|
Connect radio antenna |
14 |
|
Connect audio cables/other devices |
15 |
|
Connect power cord |
17 |
|
|
|
4 |
Get started |
18 |
|
Insert the remote control batteries |
18 |
|
Find the correct viewing channel |
19 |
|
Select menu display language |
19 |
|
Turn on Progressive Scan |
20 |
|
Change speaker settings |
21 |
|
Use Philips EasyLink |
22 |
|
Select a play source |
24 |
|
|
|
5 |
Play |
25 |
|
Play a disc |
25 |
|
Play video |
25 |
|
Play music |
28 |
|
Play photo |
29 |
|
Play from USB device |
31 |
|
Play from portable media player |
31 |
|
Play from iPod |
32 |
|
Play from radio |
33 |
|
|
|
6 |
Advanced features |
35 |
|
Create MP3 audio les |
35 |
7 |
Adjust sound |
36 |
|
Control the volume |
36 |
|
Select surround sound |
36 |
|
Select a preset sound |
36 |
|
|
|
8 |
Adjust settings |
37 |
|
General setup |
37 |
|
Audio setup |
39 |
|
Video setup |
41 |
|
Preferences |
43 |
|
|
|
9 |
Additional Information |
45 |
|
Update software |
45 |
|
Care |
45 |
|
|
|
10 Speci cations |
46 |
|
|
|
|
11 Troubleshooting |
48 |
|
|
|
|
12 Glossary |
50 |
|
English
Contents
EN 3

1 Important
Important safety instruction
•Read these instructions.
•Keep these instructions.
•Heed all warnings.
•Follow all instructions.
•Do not use this apparatus near water.
•Clean only with dry cloth.
•Do not block any ventilation openings. Install in accordance with the manufacturer’s instructions.
•Do not install near any heat sources such as radiators, heat registers, stoves, or other apparatus (including ampli ers) that produce heat.
•Do not defeat the safety purpose of the polarized or grounding-type plug. A polarized plug has two blades with one wider than the other. A grounding type plug has two blades and a third grounding prong. The wide blade or the third prong are provided for your safety. If the provided plug does not t into your outlet, consult an electrician for replacement of the obsolete outlet.
•Protect the power cord from being walked on or pinched, particularly at plugs, convenience receptacles, and the point where they exit from the apparatus.
•Only use attachments/accessories speci ed by the manufacturer.
•Use only with the cart, stand, tripod, bracket or table speci ed by the manufacturer or sold with the apparatus.
When a cart is used, use caution when moving the cart/apparatus combination to avoid injury from tip-over.
•Unplug this apparatus during lightning storm or when unused for long periods of time.
•Refer all servicing to quali ed service personnel. Servicing is required when the apparatus has been damaged in any way, such as power-supply cord or plug is damaged, liquid has been spilled or objects have fallen into the apparatus, the apparatus has been exposed to rain or moisture, does not operate normally, or has been dropped.
•Battery usage CAUTION - To prevent battery leakage which may result in bodily injury, property damage or damage to the unit:
•Install all batteries correctly, + and - as marked on the unit.
•Do not mix batteries (old and new or carbon and alkaline, etc.).
•Remove batteries when the unit is not used for a long time.
•Apparatus shall not be exposed to dripping or splashing.
•Do not place any sources of danger on the apparatus (e.g. liquid lled objects, lighted candles).
•This product may contain lead and mercury. Disposal of these materials may be regulated due to environmental considerations. For disposal or recycling information, please contact your local authorities or the Electronic Industries Alliance: www.eiae.org.com
•Use of controls or adjustments or performance of procedures other than herein may result in hazardous radiation exposure or other unsafe operation.
4EN

 Warning
•Modi cations not authorized by the manufacturer may void user authority to operate this device.
•Where the mains plug or an appliance coupler is used as the disconnect device, the disconnect device shall remain readily operable.
•Risk of overheating! Never install the Home Theater System in a con ned space. Always leave a space of at least 4 inches around the Home Theater System for ventilation. Ensure curtains or other objects never cover the ventilation slots on the Home Theater System.
Recycle notice
This electronic equipment contains a large number of materials that can be recycled or reused if disassembled by a specialized company. If you are disposing of an old machine, please take it to a recycling center.
Please observe the local regulations regarding disposal of packaging materials, exhausted batteries and old equipment.
Notice for USA
This equipment has been tested and found to comply with the limits for a Class B digital device, pursuant to part 15 of the FCC Rules. These limits are designed to provide reasonable protection against harmful interference in a residential installation. This equipment generates, uses and can radiate radio frequency energy and, if not installed and used in accordance with the instruction manual, may cause harmful interference to radio communications.
However, there is no guarantee that interference will not occur in a particular installation. Of this equipment does cause harmful interference to radio or television reception, which can be determined by turning the equipment off and on, the user is encouraged to try to correct the interference by one or more of the following measures:
•Relocate the receiving antenna.
•Increase the separation between equipment and receiver.
•Connect the equipment into an outlet on a circuit different from that to which the receiver is connected.
•Consult the dealer or an experienced radio/TV technician for help.
Notice for Canada
Class B Clause
This digital apparatus does not exceed the Class B limits for radio noise emissions from digital apparatus as set out in the Radio Interference Regulations of the Canadian Department of Communications.
This Class B digital apparatus complies with Canadian ICES-003.
Copyright notice
This product incorporates copyright protection technology that is protected by method claims of certain U.S. patents and other intellectual property rights owned by Macrovision Corporation and other rights owners. Use of this copyright protection technology must be authorised
by Macrovision Corporation, and is intended for home and other limited viewing uses only unless otherwise authorised by Macrovision Corporation. Reverse engineering or disassembly is prohibited.
English
Important
EN 5

About Progressive Scan
Consumers should note that not all high de nition television sets are fully compatible with this product and may cause artifacts to be displayed in the picture. In case of 525 or 625 progressive scan picture problems, it is recommended that the user switch the
connection to the ‘standard de nition’ output. If there are questions regarding our TV set compatibility with this model 525p and 625p DVD player, please contact our customer service center.
Trademark notice
Manufactured under license from Dolby Laboratories. Dolby, Pro Logic and the double-D symbol are trademarks of Dolby Laboratories.
DivX, DivX Ultra Certi ed, and associated logos are trademarks of DivX, Inc. and are used under license.
Of cial DivX® Ultra Certi ed product. Plays all versions of DivX ® video (including DivX ® 6) with enhanced playback of DivX® media les and the DivX® Media Format. Plays DivX® video with menus, subtitles and audio tracks.
Windows Media and the Windows logo are trademarks, or registered trademarks of Microsoft Corporation in the United States and/or other countries.
6EN
HDMI, and HDMI logo and High-De nition Multimedia Interface are trademarks or registered trademarks of HDMI licensing LLC.
The USB-IF Logos are trademarks of Universal Serial Bus Implementers Forum, inc.
Made for
iPod
iPod is a trademark of Apple Inc., registered in the U.S. and other countries.
“Made for iPod” means that an electronic accessory has been designed to connect speci cally to iPod and has been certi ed by the developer to meet Apple performance standards.
Apple is not responsible for the operation of this device or its compliance with safety and regulatory standards.
ENERGY STAR and the ENERGY STAR mark are registered U.S. marks.
Philips and Philips Shield are used under license of Koninklijke Electronics NV.
CLASS 1
LASER PRODUCT

2Your Home Theater System
Congratulations on your purchase, and welcome to Philips!To fully bene t from the support that Philips offers, register your product at www.philips.com/welcome.
Feature highlights
Video upscaling to 1080p
Enjoy watching discs in the highest picture quality available for your HDTV. This Home Theater System offers full high-de nition video playback up to 1080p resolution that provides a highly detailed picture and increased sharpness that delivers a more true-to-life picture for an amazing viewing experience.
Philips EasyLink
Your Home Theater System supports Philips EasyLink, which uses the HDMI CEC (Consumer Electronics Control) protocol.
EasyLink-compliant devices that are connected through HDMI connectors can be controlled by a single remote control.
 Note
Note
•Philips does not guarantee 100% interoperability with all HDMI CEC devices.
Listen to rich uncompressed multi-channel surround sound
This Home Theater System supports 5.1 channels of uncompressed audio that delivers a real-to-life sound experience as if you are listening to it live.
Hi speed USB 2.0 Link and MP3 link
Simply plug your USB device into the USB jack to play your MP3/WMA/JPEG/DivX les; or plug your portable media player to the MP3 LINK jack to enjoy the music play in superb sound quality.
Sync the audio output with the video play
Synchronize audio and video by delaying the audio output if the video signal sent to the TV is slower than the audio streams.
Create MP3 les
Convert your favorite audio tracks from an audio CD into MP3 format. The created MP3les are saved in your USB device.
Screen Fit
View the movie in full screen display on any TV.
Region codes
You can play discs with the following region codes.
DVD region code |
Countries |
|
U.S.A. and Canada |
English
Your HomeTheater System
EN 7

Product overview
Main unit
a b cdefghijk
a (Standby-On)
•Turns on the Home Theater System or switches to standby mode.
b Disc compartment
c (Open/Close)
•Opens or closes the disc compartment.
d (Play/Pause)
•Starts, pauses or resumes disc play.
•In radio mode, automatically tunes radio stations during rst-time setup.
e (Stop)
•Stops disc play.
•In radio mode, erases the current preset radio station.
fSOURCE
•Selects a media to play or listen to audio from the connected device.
gDisplay panel
•Displays the current status or disc information.
hIR sensor
•Detects signals from the remote control. Point the remote control at the IR sensor.
iVOL
• Increases or decreases volume.
jMP3 LINK
• Connects a portable audio player
k (USB)
(USB)
• Connects a USB supported device.
8EN
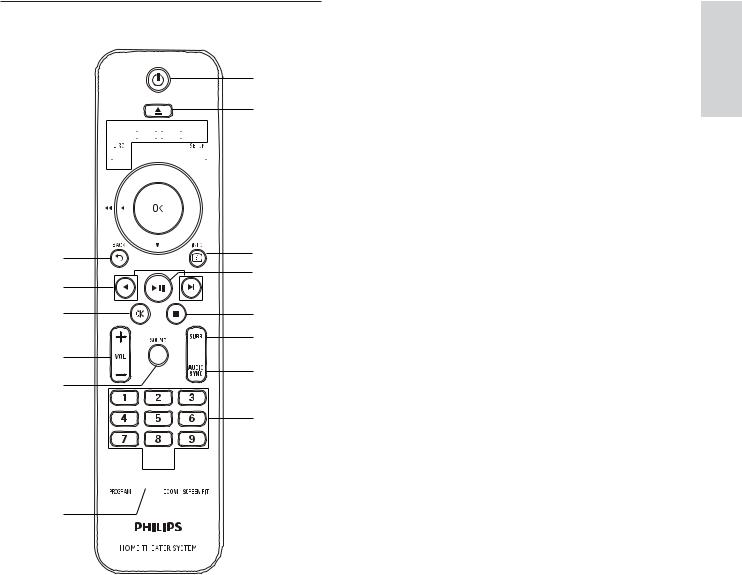
Remote control
a
b


 c
c

 d o
d o 


 e
e
p |
f |
|
g |
||
q |
||
|
||
r |
h |
|
s |
i |
|
j |
||
t |
||
|
||
|
k |
u 


 l v
l v 


 m
m
w n
n
a (Standby-On)
•Turns on the Home Theater System or switches to standby mode.
•Press and hold to turn off the Home Theater System and all HDMI CEC compliant devices.
b (Open/Close)
•Opens or closes the disc compartment.
cSource buttons
•AUDIO SOURCE: Selects an audio input source.
•RADIO: Switches to FM band.
•USB: Switches to the USB source.
•DOCK: Switches to the iPod in the dock.
•DISC: Switches to the disc source.
d SETUP
SETUP
•Accesses or exits the setup menu.
e


 (Navigation buttons)
•Navigates through the menus.
•Press left and right for fast backward or forward search.
•In radio mode, press up and down to tune the radio frequency.
•In radio mode, press left or right to start auto search.
f INFO
INFO
•For discs, displays information about the current status or the disc.
•For slideshows, displays a thumbnail view of photo les.
g
 (Play/Pause)
•Starts, pauses or resumes disc play.
•In radio mode, automatically tunes radio stations during rst-time setup.
h (Stop)
•Stops disc play.
•In radio mode, erases the current preset radio station.
iSURR (Surround Sound)
•Switches to supported surround sound or stereo sound.
jAUDIO SYNC
•Selects an audio language or channel.
•Press and hold to access the setting for audio sync, then press VOL +/- to set the audio delay time.
kNumeric buttons
• Selects an item to play.
English
Your HomeTheater System
EN 9
lSUBTITLE
•Select DVD or DivX subtitle languages.
m SCREEN FIT
•Fits the picture format to the TV screen.
nCREATE MP3/ZOOM
•Accesses the menu to create MP3.
•Zooms in or out of the picture.
oOK
• Con rms an entry or selection.
p BACK
BACK
•Returns to a previous screen.
•For DVD, goes to the title menu.
•For VCD version 2.0 or SVCD with PBC turned on, returns to the menu during playback.
q /
/  (Previous/Next)
•Skips to the previous or next title, chapter, or track.
r
 (Mute)
• Mutes or restores audio output.
sVOL +/-
• Increases or decreases volume.
tSOUND
• Selects a prede ned sound effect.
uSLEEP
•Sets a delay after which the Home Theater System switches to standby.
vREPEAT/PROGRAM
•Selects or turns off repeat or shuf e mode.
•In radio mode, resets the list of preset stations: press to manually reset; press and hold to automatically reset.
wREPEAT A-B
•Marks the section for repeat play, or turns off repeat mode.
10 EN
3 Connect
Make the following connections to use your HomeTheater System.
Basic connections:
•Video
•Speakers and subwoofer
•Power
Optional connections:
•Radio antenna
•Audio
•Audio from TV
•Audio from cable box/recorder/ game console
•Other devices
•Portable media player
•USB device
•iPod docking station
 Note
Note
•Refer to the type plate at the back or bottom of the product for identi cation and supply ratings.
•Before you make or change any connections, ensure that all the devices are disconnected from the power outlet.
 Tip
Tip
•Different types of connectors may be used to connect this product to your TV, depending on availability and your needs. A comprehensive interactive guide to help you connect your product is available at www.connectivityguide.philips.com.
Place the HomeTheater
System
•Place the Home Theater System where it cannot be pushed, pulled over or knocked down. Do not place it in an enclosed cabinet.
•Be sure that you have full access to the power cord for easy disconnection of the Home Theater System from the power supply.
REAR LEFT
FRONT  LEFT
LEFT 


 CENTER
English
FRONT


 RIGHT
RIGHT
REAR |
|
Connect |
|
RIGHT |
SUBWOOFER |
||
|
|||
|
|
1Place this Home Theater System near the TV.
2Place the speakers system at normal listening ear-level and directly parallel to the listening area.
3Place the subwoofer at the corner of the room or at least 3 feet away from the TV.
Tip |
• To avoid magnetic interference or unwanted noise, |
never place this Home Theater System too close to |
any radiation devices. |
Connect video cables
Connect this HomeTheater System toTV to view disc play. Select the best video connection that theTV can support.
•Option 1: Connect to the HDMI jack (for a HDMI, DVI or HDCP-compliant TV).
•Option 2: Connect to the component video jacks (for a standard TV or Progressive Scan TV).
•Option 3: Connect to the video (CVBS) jack (for a standard TV).
•Option 4: Connect to the RF modulator (for TV with only a single antenna input jack).
 Note
Note
•You must connect this Home Theater System directly to a TV.
EN 11

Option 1: Connect to the HDMI jack |
Option 2: Connect to the component |
|||||||||||||||||||||||||||||||||||||||||||||||||||||||||||||||||||||||||||||
|
|
|
|
|
|
|
|
|
|
|
|
|
|
|
|
|
|
|
|
|
|
|
|
|
|
|
|
|
|
|
|
|
|
|
|
|
|
|
|
|
|
|
|
|
video jack |
|||||||||||||||||||||||||||||||||
|
|
|
|
|
|
|
|
|
|
|
|
|
|
|
|
|
|
|
|
|
|
|
|
|
|
|
|
|
|
|
|
|
|
|
|
|
|
|
|
|
|
|
|
|
|
|
|
|
|
|
|
|
|
|
|
|
|
|
|
|
|
|
|
|
|
|
|
|
|
|
|
|
|
|
|
|
|
|
|
|
|
|
|
|
|
|
|
|
|
|
|
|
|
|
|
|
|
|
|
|
|
|
|
|
|
|
|
|
|
|
|
|
|
|
|
|
|
|
|
|
|
|
|
|
|
|
|
|
|
|
|
|
|
|
|
|
|
|
|
|
|
|
|
|
|
|
|
|
|
|
|
|
|
|
|
|
|
|
|
|
|
|
|
|
|
|
|
|
|
|
|
|
|
|
|
|
|
|
|
|
|
|
|
|
|
|
|
|
|
|
|
|
|
|
|
|
|
|
|
|
|
|
|
|
|
|
|
|
|
|
|
|
|
|
|
|
|
|
|
|
|
|
|
|
|
|
|
|
|
|
|
|
|
|
|
|
|
|
|
|
|
|
|
|
|
|
|
|
|
|
|
|
|
|
|
|
|
|
|
|
|
|
|
|
|
|
|
|
|
|
|
|
|
|
|
|
|
|
|
|
|
|
|
|
|
|
|
|
|
|
|
|
|
|
|
|
|
|
|
|
|
|
|
|
|
|
|
|
|
|
|
|
|
|
|
|
|
|
|
|
|
|
|
|
|
|
|
|
|
|
|
|
|
|
|
|
|
|
|
|
|
|
|
|
|
|
|
|
|
|
|
|
|
|
|
|
|
|
|
|
|
|
|
|
|
|
|
|
|
|
|
|
|
|
|
|
|
|
|
|
|
|
|
|
|
|
|
|
|
|
|
|
|
|
|
|
|
|
|
|
|
|
|
|
|
|
|
|
|
|
|
|
|
|
|
|
|
|
|
|
|
|
|
|
|
|
|
|
|
|
|
|
|
|
|
|
|
|
|
|
|
|
|
|
|
|
|
|
|
|
|
|
|
|
|
|
|
|
|
|
|
|
|
|
|
|
|
|
|
|
|
|
|
|
|
|
|
|
|
|
|
|
|
|
|
|
|
|
|
|
|
|
|
|
|
|
|
|
|
|
|
|
|
|
|
|
|
|
|
|
|
|
|
|
|
|
|
|
|
|
|
|
|
|
|
|
|
|
|
|
|
|
|
|
|
|
|
|
|
|
|
|
|
|
|
|
|
|
|
|
|
|
|
|
|
|
|
|
|
|
|
|
|
|
|
|
|
|
|
|
|
|
|
|
|
|
|
|
|
|
|
|
|
|
|
|
|
|
|
|
|
|
|
|
|
|
|
|
|
|
|
|
|
|
|
|
|
|
|
|
|
|
|
|
|
|
|
|
|
|
|
|
|
|
|
|
|
|
|
|
|
|
|
|
|
|
|
|
|
|
|
|
|
|
|
|
|
|
|
|
|
|
|
|
|
|
|
|
|
|
|
|
|
|
|
|
|
|
|
|
|
|
|
|
|
|
|
|
|
|
|
|
|
|
|
|
|
|
|
|
|
|
|
|
|
|
|
|
|
|
|
|
|
|
|
|
|
|
|
|
|
|
|
|
|
|
|
|
|
|
|
|
|
|
|
|
|
|
|
|
|
|
|
|
|
|
|
|
|
|
|
|
|
|
|
|
|
|
|
|
|
|
|
|
|
|
|
|
|
|
|
|
|
|
|
|
|
|
|
|
|
|
|
|
|
|
|
|
|
|
|
|
|
|
|
|
|
|
|
|
|
|
|
|
|
|
|
|
|
|
|
|
|
|
|
|
|
|
|
|
|
|
|
|
|
|
|
|
|
|
|
|
|
|
|
|
|
|
|
|
|
|
|
|
|
|
|
|
|
|
|
|
|
|
|
|
|
|
|
|
|
|
|
|
|
|
|
|
|
|
|
|
|
|
|
|
|
|
HDMI OUT
HDMI IN
1Connect an HDMI cable (not supplied) to the HDMI OUT jack on this Home Theater System and the HDMI input jack on the TV.
 Note
Note
•If your device supports HDMI CEC, you can control compliant devices with a single remote control. (see ‘Get started’ > ‘Use Philips EasyLink’).
 Tip
Tip
•If the TV has a DVI connection only, connect via a HDMI/DVI adaptor. Connect an audio cable for sound output.
•You can optimize the video output. (see ‘Adjust settings’ > ‘Video setup’ > [HDMI Setup]).
•This type of connection provides the best picture quality.
Pr Pb Y
VIDEO OUT
Pr Pb Y
1Connect the component video cable (not supplied) to the Y Pb Pr jacks on this Home Theater System and the COMPONENT VIDEO input jacks on the TV.
•If a progressive scan TV is used, you may turn on the progressive scan mode. (see ‘Get started’ > ‘Turn on Progressive Scan’).
 Note
Note
•The component video input jack on the TV might be labeled as Y Pb/Cb Pr/Cr or YUV.
•This type of connection provides good picture quality.
12 EN

Option 3: Connect to theVideo (CVBS) jack
VIDEO
VIDEO OUT
VIDEO IN
1Connect a composite video cable to the VIDEO jack on this Home Theater System and the VIDEO input jack on the TV.
 Note
Note
•The video input jack on the TV might be labeled as A/V IN, VIDEO IN, COMPOSITE or BASEBAND.
•This type of connection provides standard picture quality.
Option 4: Connect to the RF modulator
VIDEO
If your TV only has a single Antenna Input jack (labeled as 75 ohm or RF In), use a RF modulator to view the disc play on the TV.
1Connect a composite video cable (yellow) from the VIDEO jack on this Home Theater System to the video input jack on RF modulator.
2Connect a RF coaxial cable (not supplied) from the ANTENNA OUT or
TO TV jack on the RF modulator to the ANTENNA IN jack on your TV.
3If the off-air antenna or Cable TV service signal is connected to your TV, disconnect it from your TV and connect it to the ANTENNA IN or RF IN jack on the RF modulator.
Tip |
• See your electronics retailer or contact Philips |
for details about RF modulator availability and |
operations. |
English
Connect
EN 13

Connect speakers and |
|
|
|
|
Connect radio antenna |
|
|
|
|
|
|
||||||||||||||||||||||||||||||||||||||||||||||
subwoofer |
|
|
|
|
|
|
|
|
|
|
|
|
|
|
|
|
|
|
|
|
|
|
|
|
|
|
|
|
|
|
|
|
|
|
|
||||||||||||||||||||||
|
|
|
|
|
|
|
|
|
|
|
|
|
|
|
|
|
|
|
|
|
|
|
|
|
|
|
|
|
|
|
|
|
|
|
|
|
|
|
|
|
|
|
|
|
|
|
|
|
|
|
|
|
|
|
|
|
|
|
|
|
|
|
|
|
|
|
|
|
|
|
|
|
|
|
|
|
|
|
|
|
|
|
|
|
|
|
|
|
|
|
|
|
|
|
|
|
|
|
|
|
|
|
|
|
|
|
|
|
|
|
|
|
|
|
|
|
|
|
|
|
|
|
|
|
|
|
|
|
|
|
|
|
|
|
|
|
|
|
|
|
|
|
|
|
|
|
|
|
|
|
|
|
|
|
|
|
|
|
|
|
|
|
|
|
|
|
|
|
|
|
|
|
|
|
|
|
|
|
|
|
|
|
|
|
|
|
|
|
|
|
|
|
|
|
|
|
|
|
|
|
|
|
|
|
|
|
|
|
|
|
|
|
|
|
|
|
|
|
|
|
|
|
|
|
|
|
|
|
|
|
|
|
|
|
|
|
|
|
|
|
|
|
|
|
|
|
|
|
|
|
|
|
|
|
|
|
|
|
|
|
|
|
|
|
|
|
|
|
|
|
|
|
|
|
|
|
|
|
|
|
|
|
|
|
|
|
|
|
|
|
|
|
|
|
|
|
|
|
|
|
|
|
|
|
|
|
|
|
|
|
|
|
|
|
|
|
|
|
|
|
|
|
|
|
|
|
|
|
|
|
|
|
|
|
|
|
|
|
|
|
|
|
|
|
|
|
|
|
|
|
|
|
|
|
|
|
|
|
|
|
|
|
|
|
|
|
|
|
|
|
|
|
|
|
|
|
|
|
|
|
|
|
|
|
|
|
|
|
|
|
|
|
|
|
|
|
|
|
|
|
|
|
|
|
|
|
|
|
|
|
|
|
|
|
|
|
|
|
|
|
|
|
|
|
|
|
|
|
|
|
|
|
|
|
|
|
|
|
|
|
|
|
|
|
|
|
|
|
|
|
|
|
|
|
|
|
|
|
|
|
|
|
|
FM (75 Ω)
ANTENNA
1 Connect the FM antenna to the FM75 jack on this Home Theater System (for some models, this cable is already connected).
2 Extend the FM antenna and x its ends to the wall.
Tip |
• For better FM stereo reception, connect to an |
external FM antenna. |
1Connect the speakers and subwoofer to the matching jacks on the Home Theater System.
 Note
Note
•Ensure that the colors of the plugs and jacks are matched.
14 EN

Connect audio cables/other devices
Route the audio from other devices to this HomeTheater System to enjoy audio play with multi-channel surround capabilities.
Connect audio fromTV
(also used for EasyLink control)
AUX 1
AUDIO IN
AUDIO OUT
1Connect the audio cables (not supplied) to the AUDIO IN-AUX1 jacks on the Home Theater System and the AUDIO output jacks on the TV.
 Note
Note
•To listen to the audio output from this connection, press AUDIO SOURCE repeatedly until ‘AUX1’ is displayed on the display panel.
Connect audio from cable box/ |
|
|
||||||||||||||||||||||||||||||||
recorder/game console |
English |
|||||||||||||||||||||||||||||||||
You can choose to connect to analog or digital |
||||||||||||||||||||||||||||||||||
jack depending on the device capabilities. |
|
|||||||||||||||||||||||||||||||||
|
|
|
|
|
|
|
|
|
|
|
|
|
|
|
|
|
|
|
|
|
|
|
|
|
|
|
|
|
|
|
|
|
|
|
Connect to analog jacks |
Connect |
|||||||||||||||||||||||||||||||||
|
||||||||||||||||||||||||||||||||||
|
|
|
|
|
|
|
|
|
|
|
|
|
|
|
|
|
|
|
|
|
|
|
|
|
|
|
|
|
|
|
|
|
|
|
|
|
|
|
|
|
|
|
|
|
|
|
|
|
|
|
|
|
|
|
|
|
|
|
|
|
|
|
|
|
|
|
|
|
|
|
|
|
|
|
|
|
|
|
|
|
|
|
|
|
|
|
|
|
|
|
|
|
|
|
|
|
|
|
|
|
|
|
|
|
|
|
|
|
|
|
|
|
|
|
|
|
|
|
|
|
|
|
|
|
|
|
|
|
|
|
|
|
|
|
|
|
|
|
|
|
|
|
|
|
|
|
|
|
|
|
|
|
|
|
|
|
|
|
|
|
|
|
|
|
|
|
|
|
|
|
|
|
|
|
|
|
|
|
|
|
|
|
|
|
|
|
|
|
|
|
|
|
|
|
|
|
|
|
|
|
|
|
|
|
|
|
|
|
|
AUX 2
AUX 2
 AUDIO IN
AUDIO OUT
1Connect the audio cables (not supplied) to the AUDIO IN-AUX2 jacks on the Home Theater System and the AUDIO output jacks on the device.
 Note
Note
•To listen to the audio output from this connection, press AUDIO SOURCE repeatedly until ‘AUX2’ is displayed on the display panel.
EN 15

Connect to coaxial jack
COAXIAL
DIGITAL IN
COAXIAL
DIGITAL OUT
1Connect a coaxial cable (not supplied) to the COAXIAL DIGITAL-IN jack on the Home Theater System and the COAXIAL/DIGITAL output jack on the device.
 Note
Note
•To listen to the audio output from this connection, press AUDIO SOURCE repeatedly until ‘COAX IN’ is displayed on the display panel.
Connect to optical jack
OPTICAL
DIGITAL IN
OPTICAL
DIGITAL OUT
1Connect an optical cable (not supplied) to the OPTICAL DIGITAL-IN jack
on the Home Theater System and the OPTICAL/SPDIF output jack on the device.
 Note
Note
•To listen to the audio output from this connection, press AUDIO SOURCE repeatedly until ‘OPTI IN’ is displayed on the display panel.
Connect portable media player
MP3 |
1Connect a 3.5mm stereo audio cable (not supplied) to the MP3 LINK jack on this Home Theater System and the phone jack on the portable media player (such as MP3 player).
 Note
Note
•To listen to the audio output from this connection, press AUDIO SOURCE repeatedly until ‘MP3 LINK’ is displayed on the display panel.
16 EN

Connect USB device
1Connect the USB device to  USB jack on this Home Theater System.
 Note
Note
•This Home Theater System can only play/view MP3, WMA, DivX (Ultra) or JPEG les that are stored on such devices.
•Press USB to access the content and play the les.
Connect iPod docking station
Connect power cord
 Warning
•Risk of product damage! Ensure that the power supply voltage corresponds to the voltage printed on the back or the underside of the Home Theater System.
1 Connect the power cord to the power outlet when all the required connections are done.
»The HomeTheater System is ready to be set up for use.
English
Connect
DOCK
1Connect the iPod docking station to DOCK jack on this Home Theater System.
 Note
Note
•To listen to the audio output from this connection, press DOCK.
EN 17
 Loading...