


Philips HTS3277, HTS3377W-12, HTS3377, HTS3376W-12, HTS3377W User Manual
...Register your product and get support at
www.philips.com/welcome
HTS3269
HTS3270
HTS3277
HTS3376
HTS3377
HTS3376W
HTS3377W
EN User manual
DE Benutzerhandbuch
ES Manual del usuario
FR Mode d’emploi
NL Gebruiksaanwijzing

2
Philips Consumer Lifestyle
SGP 09-CE-HTS3377W/12
(report No.)
EC DECLARATION OF CONFORMITY
We,
Philips Consumer Electronics
(manufacturer’s name)
Philips, Glaslaan 2, 5616 JB Eindhoven, The Netherlands
(manufacturer’s address)
declare under our responsibility that the electrical product:
Philips |
HTS3377W/12 |
(name) |
(type or model) |
Home Theatre System with wireless
(product description)
to which this declaration relates is in conformity with the following standards:
EN 60065 : 2002 + A1 : 2006
EN 55013 : 2001 + A1 : 2003 + A2 : 2006 EN 55020 : 2007
EN 61000-3-2 : 2006-04
EN 61000-3-3 : 1995-01 + A1 : 2001-06 + A2:2005-11 EN 300 328 V1.7.1 + EN 301 489-1 V1.6.1, 489-17 V1.2.1 EN 62311 : 2008
(title and/or number and date of issue of the standards)
following the provisions of 2006/95/EC, 2004/108/EC & RTTE 1999/5/EC directives and is produced by a manufacturing organisation on ISO 9000 level.
Eindhoven, 11th March 2009 |
Frank Dethier |
(place, date) |
Innovation Lab Manager |
|
Philips Leuven |
|
(signature, name and function) |
Philips Consumer Lifestyle
SGP 09-CE-HTS3376W/12
(report No.)
EC DECLARATION OF CONFORMITY
We,
Philips Consumer Electronics
(manufacturer’s name)
Philips, Glaslaan 2, 5616 JB Eindhoven, The Netherlands
(manufacturer’s address)
declare under our responsibility that the electrical product:
Philips |
HTS3376W/12 |
(name) |
(type or model) |
Home Theatre System with wireless
(product description)
to which this declaration relates is in conformity with the following standards:
EN 60065 : 2002 + A1 : 2006
EN 55013 : 2001 + A1 : 2003 + A2 : 2006 EN 55020 : 2007
EN 61000-3-2 : 2006-04
EN 61000-3-3 : 1995-01 + A1 : 2001-06 + A2:2005-11 EN 300 328 V1.7.1 + EN 301 489-1 V1.6.1, 489-17 V1.2.1 EN 62311 : 2008
(title and/or number and date of issue of the standards)
following the provisions of 2006/95/EC, 2004/108/EC, 2005/32/EC & RTTE 1999/5/EC directives and is produced by a manufacturing organisation on ISO 9000 level.
Eindhoven, 2nd June 2009 |
Frank Dethier |
(place, date) |
Innovation Lab Manager |
|
Philips Leuven |
|
(signature, name and function) |

Contents
1 |
Important |
4 |
|
Safety and important notice |
4 |
|
Trademark notice |
5 |
|
|
|
2 |
Your product |
7 |
|
Feature highlights |
7 |
|
Product overview |
8 |
|
|
|
3 |
Connect |
10 |
|
Place the product |
10 |
|
Connect video cables |
11 |
|
Connect speaker cables to speakers |
12 |
|
Connect speaker to speaker stand |
12 |
|
Connect speakers and subwoofer |
13 |
|
Connect rear speakers to wireless |
|
|
receiver |
14 |
|
Connect radio antenna |
14 |
|
Connect audio cables/other devices |
14 |
|
Connect power cord |
16 |
|
|
|
4 |
Get started |
17 |
|
Insert the remote control batteries |
17 |
|
Find the correct viewing channel |
17 |
|
Select menu display language |
18 |
|
Change speaker settings |
18 |
|
Use Philips EasyLink |
19 |
|
Select a play source |
21 |
|
|
|
5 |
Play |
22 |
|
Play a disc |
22 |
|
Play video |
22 |
|
Play music |
25 |
|
Play photo |
26 |
|
Play from USB device |
27 |
|
Play from portable media player |
28 |
|
Play from radio |
28 |
|
|
|
6 |
Advanced features |
30 |
|
Create MP3 audio files |
30 |
7 |
Adjust sound |
31 |
|
Control the volume |
31 |
|
Select surround sound |
31 |
|
Select a preset sound |
31 |
|
|
|
8 |
Adjust settings |
32 |
|
General setup |
32 |
|
Audio setup |
34 |
|
Video setup |
35 |
|
Preferences |
36 |
|
|
|
9 |
Additional Information |
39 |
|
Update software |
39 |
|
Care |
39 |
|
|
|
10 Specifications |
40 |
|
|
|
|
11 Troubleshooting |
42 |
|
|
|
|
12 Glossary |
44 |
|
English
EN 3
1 Important
Safety and important notice
 Warning
•Risk of overheating! Never install the product in a confined space. Always leave a space
of at least 4 inches around the product for ventilation. Ensure curtains or other objects never cover the ventilation slots on the product.
•Never place the product, remote control or batteries near naked flames or other heat sources, including direct sunlight.
•Only use this product indoors. Keep this product away from water, moisture and liquidfilled objects.
•Never place this product on other electrical equipment.
•Keep away from this product during lightning storms.
•Where the mains plug or an appliance coupler is used as the disconnect device, the disconnect device shall remain readily operable.
•Visible and invisible laser radiation when open. Avoid exposure to beam.
This product is in compliance with the essential requirements and other relevant provisions of Directives 2006/95/EC (Low Voltage), 2004/108/EC (EMC).
Hereby, Philips Consumer Lifestyle, declares that this Home Theatre System HTS3377W, HTS3376W (CE 0560) is in compliance with the essential requirements and other relevant provisions of Directive 1999/5/EC.
Copyright
This product incorporates copyright protection technology that is protected by method claims of certain U.S. patents and other intellectual property rights owned by Macrovision Corporation and other rights owners. Use of this copyright protection technology must be authorized
by Macrovision Corporation, and is intended for home and other limited viewing uses only unless otherwise authorized by Macrovision Corporation. Reverse engineering or disassembly is prohibited.
Copyright in the U.K.
Recording and playback of material may require consent. See Copyright Act 1956 and The Performers’ Protection Acts 1958 to 1972.
Mains fuse (UK only)
This product is fitted with an approved moulded plug. Should it become necessary to replace the mains fuse, this must be replaced with a fuse of the same value as indicated on the plug (example 10A).
1 Remove fuse cover and fuse.
2 The replacement fuse must comply with BS 1362 and have the ASTA approval mark. If the fuse is lost, contact your dealer in order to verify the correct type.
3 Refit the fuse cover.
Note
•To conform to the EMC directive (2004/108/ EC), the mains plug on this product must not be detached from the mains cord.
4 EN

Disposal of your old product and batteries
Your product is designed and manufactured with high quality materials and components, which can be recycled and reused.
When this crossed-out wheeled bin symbol is attached to a product it means that the product is covered by the European Directive 2002/96/EC. Please inform yourself about the local separate collection system for electrical and electronic products.
Please act according to your local rules and do not dispose of your old products with your normal household waste.
Correct disposal of your old product helps to prevent potential negative consequences for the environment and human health.
Your product contains batteries covered by the European Directive 2006/66/EC, which cannot be disposed with normal household waste.
Please inform yourself about the local rules on separate collection of batteries because correct disposal helps to prevent negative consequences for the environmental and human health.
Trademark notice
English
Manufactured under license from Dolby Laboratories. Dolby, Pro Logic and the double-D symbol are trademarks of Dolby Laboratories.
DivX, DivX Ultra Certified, and associated logos are trademarks of DivX, Inc. and are used under license.
Official DivX® Ultra Certified product. Plays all versions of DivX ® video (including DivX ® 6) with enhanced playback of DivX® media files and the DivX® Media Format. Plays DivX® video with menus, subtitles and audio tracks.
Manufactured under licence under U.S. Patent #s: 5,451,942; 5,956,674; 5,974,380; 5,978,762; 6,487,535 & other U.S. and worldwide patents issued & pending. DTS and DTS Digital Surround are registered trademarks and the DTS logos and Symbol are trademarks of DTS, Inc. © 1996-2008 DTS, Inc. All Rights Reserved.
ENERGY STAR and the ENERGY STAR mark are registered U.S. trademarks.
EN 5

Windows Media and the Windows logo are trademarks, or registered trademarks of Microsoft Corporation in the United States and/or other countries.
HDMI, and HDMI logo and High-Definition Multimedia Interface are trademarks or registered trademarks of HDMI licensing LLC.
The USB-IF Logos are trademarks of Universal Serial Bus Implementers Forum, inc.
 Note
Note
•This equipment has been tested and found to comply with the limits for a Class B digital device, pursuant to Part 15 of the FCC Rules. These limits are designed to provide reasonable protection against harmful interference in a residential installation. This equipment generates, uses and can radiate radio frequency energy and, if not installed and used in accordance with the instructions, may cause harmful interference to radio communications. However, there is no guarantee that interference will not occur in a particular installation.
If this equipment does cause harmful interference to radio or television reception, which can be determined by turning the equipment off and on, the user is encouraged to try to correct the interference by one or more of the following measures:
•Reorient or relocate the receiving antenna.
•Increase the separation between the equipment and receiver.
•Connect the equipment into an outlet on a circuit different from that to which the receiver is connected.
•Consult the dealer or an experienced radio/TV technician for help.
6 EN
LASER RADIATION
DO NOTVIEW DIRECTLY WITH OPTICAL INSTRUMENTS CLASS 1M LASER PRODUCT
2 Your product
Congratulations on your purchase, and welcome to Philips! To fully benefit from the support that Philips offers; register your product at www.philips.com/welcome.
Feature highlights
Video upscaling to 1080p
Enjoy watching discs in the highest picture quality available for your HDTV. This product offers full high-definition video playback up to 1080p resolution that provides a highly detailed picture and increased sharpness that delivers a more true-to-life picture for an amazing viewing experience.
Philips EasyLink
Your product supports Philips EasyLink, which uses the HDMI CEC (Consumer Electronics Control) protocol. EasyLink-compliant devices that are connected through HDMI connectors can be controlled by a single remote control.
 Note
Note
•Philips does not guarantee 100% interoperability with all HDMI CEC devices.
Listen to rich uncompressed multi-channel surround sound
This Home Theatre System supports 5.1 channels of uncompressed audio that delivers a real-to-life sound experience as if you are listening to it live.
High speed USB 2.0 Link and MP3 link |
|
|
|
Simply plug your USB device into the USB jack |
lish |
to play your MP3/WMA/JPEG/DivX files; or |
|
plug your portable media player to the MP3 |
Eng |
LINK jack to enjoy the music play in superb |
|
sound quality. |
|
|
|
Sync the audio output with the video play |
|
Synchronise audio and video by delaying the |
|
audio output if the video signal sent to the TV |
|
is slower than the audio streams. |
|
Create MP3 files |
|
Convert your favourite audio tracks from an |
|
audio CD into MP3 format. The created MP3 |
|
files are saved in your USB device. |
|
Screen Fit |
|
View the movie in full screen display on any |
|
TV. |
|
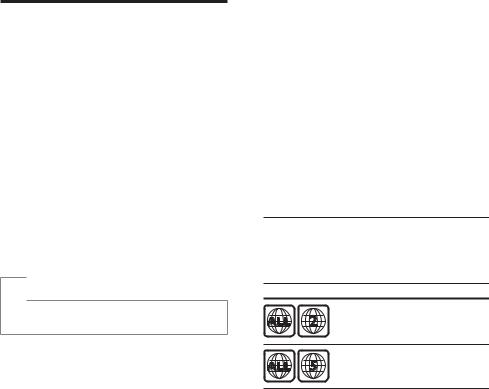
Region codes
You can play discs with the following region codes.
DVD region code |
Countries |
|
Europe |
|
Russia |
EN 7

Product overview
Main unit
a b cdefghijk
a (Standby-On)
•Turns on the Home Theatre System or switches to standby mode.
bDisc compartment
c (Open/Close)
•Opens or closes the disc compartment.
d (Play/Pause)
•Starts, pauses or resumes play.
•In radio mode, automatically tune radio stations during first-time setup.
e (Stop)
•Stops play.
•In radio mode, erases the current preset radio station.
fSOURCE
•Selects a media to play or listen to audio from the connected device.
gDisplay panel
•Displays the current status or the disc information.
hIR sensor
•Detects signals from the remote control. Point the remote control at the IR sensor.
iVOL
•Increases or decreases volume.
8 EN
jMP3 LINK
•Connects a portable audio player
k (USB)
(USB)
•Connects a USB supported device.
Remote control
a b
o 


 c
c
 d
d
p
|
e |
|
q |
f |
|
g |
||
r |
||
|
||
s |
h |
|
t |
i |
|
j |
||
u |
||
|


 k
k
v 


 l w
l w 


 m x
m x
 n
n
a (Standby-On)
•Turns on the Home Theatre System or switches to standby mode.
•When EasyLink is enabled, press and hold for at least three seconds to turn all connected HDMI CECcompliant devices to standby.
b (Open/Close)
•Opens or closes the disc compartment.

cSLEEP
•Sets a delay after which the Home Theatre System switches to standby.
d SETUP
SETUP
•Accesses or exits the setup menu.
e


 (Navigation buttons)
•Navigates through the menus.
•Press left and right for fast backward or forward search.
•In radio mode, press up and down to tune the radio frequency.
•In radio mode, press left or right to start auto search.
f INFO
INFO
•For discs, displays information about the current status or the disc.
•For slideshows, displays a thumbnail view of photo files.
g
 (Play/Pause)
•Starts, pauses or resumes play.
•In radio mode, automatically tune radio stations during first-time setup.
h (Stop)
•Stops play.
•In radio mode, erases the current preset radio station.
iSURR (Surround Sound)
•Switches to supported surround sound or stereo sound.
jAUDIO SYNC
•Selects an audio language or channel.
•Press and hold to access the setting for audio sync, then press VOL +/- to set the audio delay time.
kNumeric buttons
•Selects an item to play.
lSUBTITLE
•Selects a subtitle language for video.
m SCREEN FIT
•Fits the picture format to the TV screen.
nCREATE MP3/ZOOM
•Accesses the menu to create MP3.
•Zooms in or out of the picture.
oSource buttons
•AUDIO SOURCE: Selects an audio input source.
•RADIO: Switches to FM radio.
•USB: Switches to the USB source.
•DISC: Switches to the disc source.
pOK
•Confirms an entry or selection.
q BACK
BACK
•Returns to a previous screen.
•For DVD, goes to the title menu.
•For VCD version 2.0 or SVCD with PBC turned on, returns to the menu during playback.
r /
/ (Previous/Next)
•Skips to the previous or next title, chapter or track.
s
 (Mute)
•Mutes or restores audio output.
tVOL +/-
•Increases or decreases volume.
uSOUND
•Selects a predefined sound effect.
vANGLE
•Displays video from different camera angles.
wREPEAT/PROGRAM
•Selects or turns off repeat or shuffle mode.
•In radio mode, resets the list of preset stations: press to manually reset; press and hold to automatically reset.
xREPEAT A-B
•Marks the section for repeat play or turns off repeat mode.
English
EN 9
3 Connect
Make the following connections to use your Home Theatre System.
Basic connections:
•Video
•Speakers and subwoofer
•Wireless receiver (For HTS3377W, HTS3376W only)
•Power
Optional connections:
•Radio antenna
•Audio
•Audio from TV
•Audio from cable box/recorder/ game console
•Other devices
•Portable media player
•USB device
 Note
Note
•Refer to the type plate at the back or bottom of the product for identification and supply ratings.
•Before you make or change any connections, ensure that all devices are disconnected from the socket.
 Tip
Tip
•Different types of connectors can be used to connect this product, depending on availability and your needs. A comprehensive interactive guide to help you connect your product is available at www.connectivityguide.philips. com.
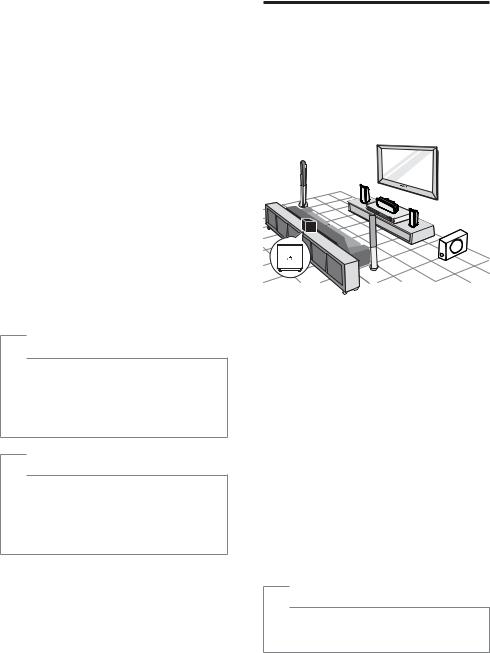
Place the product
•Place the product where it cannot be pushed, pulled over or knocked down. Do not place it in an enclosed cabinet.
•Make sure that you have full access to the power cord for easy disconnection of the product from the power supply.
REAR |
FRONT |
|
LEFT |
|
|
LEFT |
CENTER |
|
|
FRONT |
|
|
|
|
|
|
RIGHT |
|
REAR |
SUBWOOFER |
|
RIGHT |
|
|
|
Wireless receiver is for HTS3377W, HTS3376W only.
1 Place this Home Theatre System near to the TV.
2 Place the speakers system at normal listening ear-level and directly parallel to the listening area.
3 Place the subwoofer at the corner of the room or at least three feet away from the TV.
4 Place the wireless receiver (for HTS3377W, HTS3376W only) near to the AC socket and in between the rear speakers. Position the wireless receiver (with Philips logo) directly parallel to the Home Theatre System.
 Tip
Tip
•To avoid magnetic interference or unwanted noise, never place this Home Theatre System
too close to any radiation devices.
10 EN
Connect video cables
Connect this Home Theatre System to a TV to view disc play. Select the best video connection that the TV can support.
•Option 1: Connect to the SCART jack
•Option 2: Connect to the HDMI jack (for a HDMI, DVI or HDCP-compliant TV).
•Option 3: Connect to the video (CVBS) jack (for a standard TV).
 Note
Note
•You must connect this Home Theatre System directly to a TV.
Option 1: Connect to the SCART jack
SCART TO TV
SCART
1 Connect a scart cable to the SCART TO TV jack on this Home Theatre System and the SCART input jack on the TV.
 Note
Note
•Scart connection allows TV’s audio output through the speakers. Press AUDIO SOURCE repeatedly until ‘SCART IN’ is displayed on the display panel.
•This type of connection provides good picture quality.
Option 2: Connect to the HDMI jack
English
HDMI OUT
HDMI IN
1 Connect a HDMI cable (not supplied) to the HDMI OUT jack on this Home Theatre System and the HDMI input jack on the TV.
 Note
Note
•If your device supports HDMI CEC, you can control compliant devices with a single remote control. (see ‘Get started’ > ‘Use Philips EasyLink’).
 Tip
Tip
•If the TV has a DVI connection only, connect via a HDMI/DVI adaptor. Connect an audio cable for sound output.
•You can optimise the video output. (see ‘Adjust settings’ > ‘Video setup’ > [HDMI Setup]).
•This type of connection provides the best picture quality.
EN 11
Option 3: Connect to the Video (CVBS) jack
VIDEO
VIDEO OUT
VIDEO IN
1 Connect a composite video cable (not supplied) to the VIDEO jack on this Home Theatre System and the VIDEO input jack on the TV.
 Note
Note
•The video input jack on the TV might be labelled as A/V IN, VIDEO IN, COMPOSITE or BASEBAND.
•This type of connection provides standard picture quality.
Connect speaker cables to speakers
For the rear speakers of HTS3277, HTS3377, HTS3376 and HTS3377W, HTS3376W only
1 Connect the speaker cables to the matching colour jacks on the speakers (or speaker stands).
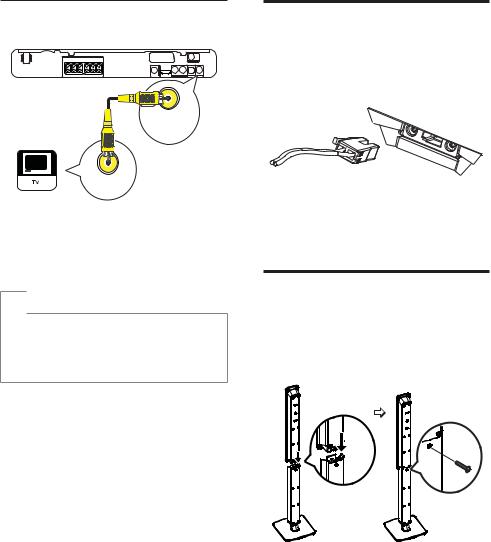
Connect speaker to speaker stand
For the rear speakers of HTS3277, HTS3377, HTS3376 and HTS3377W, HTS3376W only
1 Attach the speakers to the speaker stands and secure the position with screws.
12 EN

Connect speakers and subwoofer
For HTS3377W, HTS3376W only
For HTS3377, HTS3376 and HTS3277. Different set of speakers for HTS3270, HTS3269 (see ‘Specifications’ > ‘Speakers’).
1 Connect the speakers and subwoofer to the matching jacks on this Home Theatre System.
 Note
Note
•Ensure that the colours of the plugs and jacks are matched.
English
EN 13
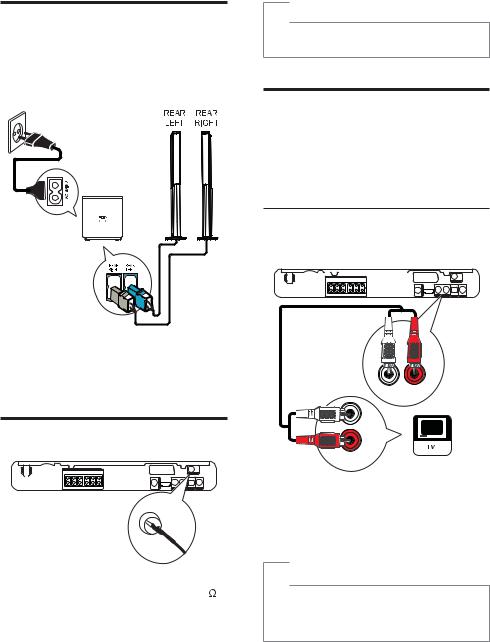
Connect rear speakers to wireless receiver
For the rear speakers of HTS3377W, HTS3376W only
1 Connect the rear left and right speakers to the matching jacks at the bottom of the wireless receiver.
Connect radio antenna
FM (75 Ω)
ANTENNA
1 Connect the FM antenna to the FM75 jack on this Home Theatre System (for some models, this cable is already connected).
2 Extend the FM antenna and fix its ends to the wall.
 Tip
Tip
•For better FM stereo reception, connect to an external FM antenna.
Connect audio cables/other devices
Route the audio from other devices to this Home Theatre System to enjoy audio play with multi-channel surround capabilities.
Connect audio to TV
(also used for EasyLink control)
AUX
AUDIO IN
AUDIO OUT
1 Connect the audio cables (not supplied) to the AUDIO IN-AUX jacks on the Home Theatre System and the AUDIO output jacks on the TV.
 Note
Note
•To listen to the audio output from this connection, press AUDIO SOURCE repeatedly until ‘AUX’ is displayed on the display panel.
14 EN
 Loading...