


DVD HOME THEATER SYSTEM |
HTS5000W |
User manual
Thank you for choosing Philips.
Need help fast?
Read your Quick-Use Guide and/or User Manual first for quick tips that make using your Philips product more enjoyable.
If you have read your instructions and still need assistance, you may access our online help at www.philips.com/support
1
001-051-hts5x-01-Eng50 |
1 |
17/05/05, 1:17 PM 3139 115 23842 |

Important notes for users in the U.K.
Mains plug
This apparatus is fitted with an approved 13 Amp plug. To change a fuse in this type of plug proceed as follows:
1Remove fuse cover and fuse.
2Fix new fuse which should be a BS1362 5 Amp, A.S.T.A. or BSI approved type.
3Refit the fuse cover.
If the fitted plug is not suitable for your socket outlets, it should be cut off and an appropriate plug fitted in its place.
If the mains plug contains a fuse, this should have a value of 5 Amp. If a plug without a fuse is used, the fuse at the distribution board should not be greater than 5 Amp.
Note: The severed plug must be disposed of to avoid a possible shock hazard should it be inserted into a 13 Amp socket elsewhere.
How to connect a plug
The wires in the mains lead are coloured with the following code: blue = neutral (N), brown = live (L).
¶As these colours may not correspond with the colour markings identifying the terminals in your plug, proceed as follows:
–Connect the blue wire to the terminal marked N or coloured black.
–Connect the brown wire to the terminal marked L or coloured red.
–Do not connect either wire to the earth terminal in the plug, marked E (or e) or coloured green (or green and yellow).
Before replacing the plug cover, make certain that the cord grip is clamped over the sheath of the lead - not simply over the two wires.
Copyright in the U.K.
Recording and playback of material may require consent. See Copyright Act 1956 and The Performer’s Protection Acts 1958 to 1972.
2
Italia
DICHIARAZIONE DI CONFORMITA’
Si dichiara che l’apparecchio HTS5000W, Philips risponde alle prescrizioni dell’art. 2 comma 1 del D.M. 28 Agosto 1995 n. 548.
Fatto a Eindhoven
Philips Consumer Electronics
Philips, Glaslaan 2
5616 JB Eindhoven,The Netherlands
Norge
Typeskilt finnes på apparatens underside.
Observer: Nettbryteren er sekundert innkoplet. Den innebygde netdelen er derfor ikke frakoplet nettet så lenge apparatet er tilsluttet nettkontakten.
For å redusere faren for brann eller elektrisk støt, skal apparatet ikke utsettes for regn eller fuktighet.
CAUTION
VISIBLE AND INVISIBLE LASER RADIATION WHEN OPEN AVOID EXPOSURE TO BEAM ADVARSEL
SYNLIG OG USYNLIG LASERSTRÅLING VED ÅBNING UNDGÅ UDSÆTTELSE FOR STRÅLING
VARNING
SYNLIG OCH OSYNLIG LASERSTRÅLNING NÄR DENNA DEL ÄR ÖPPNAD BETRAKTA EJ STRÅLEN
VARO!
AVATTAESSA OLET ALTTIINA NÄKYVÄLLE JA NÄKYMÄTTÖMÄLLE LASER SÄTEILYLLE. ÄLÄ KATSO SÄTEESEEN
VORSICHT
SICHTBARE UND UNSICHTBARE LASERSTRAHLUNG WENN ABDECKUNG GEÖFFNET NICHT DEM STRAHL AUSSETSEN
ATTENTION
RAYONNEMENT LASER VISIBLE ET INVISIBLE EN CAS D’OUVERTURE EXPOSITION DANGEREUSE AU FAISCEAU
001-051-hts5x-01-Eng50 |
2 |
17/05/05, 1:17 PM 3139 115 23842 |

Index
DK
Advarsel: Usynlig laserstråling ved åbning når sikkerhedsafbrydere er ude af funktion. Undgå utsættelse for stråling.
Bemærk: Netafbryderen er sekundært indkoblet og ofbryder ikke strømmen fra nettet. Den indbyggede netdel er derfor tilsluttet til lysnettet så længe netstikket sidder i stikkontakten.
S
Klass 1 laseraparat
Varning! Om apparaten används på annat sätt än i denna bruksanvisning specificerats, kan användaren utsättas för osynlig laserstrålning, som överskrider gränsen för laserklass 1.
Observera! Stömbrytaren är sekundärt kopplad och bryter inte strömmen från nätet. Den inbyggda nätdelen är därför ansluten till elnätet så länge stickproppen sitter i vägguttaget.
SF
Luokan 1 laserlaite
Varoitus! Laitteen käyttäminen muulla kuin tässä käyttöohjeessa mainitulla tavalla saattaa altistaa käyttäjän turvallisuusluokan 1 ylittävälle näkymättömälle lasersäteilylle.
Oikeus muutoksiin varataan. Laite ei saa olla alttiina tippu-ja roiskevedelle.
Huom.Toiminnanvalitsin on kytketty toisiopuolelle, eikä se kytke laitetta irti sähköverkosta. Sisäänrakennettu verkkoosa on kytkettynä sähköverkkoon aina silloin, kun pistoke on pistorasiassa.
‘CONSUMERS SHOULD NOTE THAT NOT ALL HIGH DEFINITION TELEVISION SETS ARE FULLY COMPATIBLE WITH THIS PRODUCT AND MAY CAUSE ARTIFACTS TO BE DISPLAYED IN THE PICTURE. IN CASE OF 525 OR 625 PROGRESSIVE SCAN PICTURE PROBLEMS, IT IS RECOMMENDED THAT THE USER SWITCH THE CONNECTION TO THE ‘STANDARD DEFINITION’ OUTPUT. IF THERE ARE QUESTIONS REGARDING OUR TV SET COMPATIBILITY WITH THIS MODEL 525p AND 625p DVD PLAYER, PLEASE CONTACT OUR CUSTOMER SERVICE CENTRE’.
English ----------------------------------------- |
6 |
Français -------------------------------------- |
52 |
Español -------------------------------------- |
98 |
Deutsch ------------------------------------- |
144 |
Nederlands -------------------------------- |
190 |
CAUTION
Use of controls or adjustments or performance of procedures other than herein may result in hazardous radiation exposure or other unsafe operation.
VAROITUS
Muiden kuin tässä esitettyjen toimintojen säädön tai asetusten muutto saattaa altistaa vaaralliselle säteilylle tai muille vaarallisille toiminnoille.
3
Nederlands Deutsch Español Français English
001-051-hts5x-01-Eng50 |
3 |
17/05/05, 1:17 PM 3139 115 23842 |

LASER
Type |
Semiconductor laser |
|
GaAlAs |
Wave length |
650~660 nm (DVD) |
|
784~796 nm (CD) |
Output Power |
7 mW (DVD) |
|
10 mW (VCD/CD) |
Beam divergence |
60 degree |
This product complies with the radio interference requirements of the European Community.
Manufactured under license from Dolby Laboratories.“Dolby”,“Pro Logic” and the double-D symbol are trademarks of Dolby Laboratories.
Manufactured under license from Digital Theater Systems, Inc. U.S. Pat. Noís. 5,451,942; 5,956,674; 5,974,380; 5,978,762; 6,226,616; 6,487,535 and other U.S. and world-wide patents issued and pending.“DTS” and “DTS Digital Surround” are registered trademarks of Digital Theater Systems, Inc. Copyright 1996, 2003 Digital Theater Systems, Inc. All Rights Reserved.
DivX®, DivX Certified, and associated logos are trademarks of DivXNetworks, Inc and are used under license.
Microsoft, Windows Media, and the Windows logo are trademarks, or registered trademarks of Microsoft Corporation in the United States and/or other countries
This DVD system is in conformity with the EMC directive and low-voltage directive.
4
English
Hereby, Philips Consumer Electronics, B. U. Peripherals & Accessories, declares that this product is in compliance with the essential requirements and other relevant provisions of Directive 1999/5/EC.
Français
Par la présente, Philips Consumer Electronics, B. U. Peripherals & Accessories, déclare que l’appareil est conforme aux exigences essentielles et aux autres dispositions pertinentes de la directive 1999/5/CE.
Español
Por medio de la presente, Philips Consumer Electronics, B. U. Peripherals & Accessories, declara que el cumple con los requisitos esenciales y cualesquiera otras disposiciones aplicables o exigibles de la Directiva 1999/5/CE.
Deutsch
Hiermit erklärt Philips Consumer Electronics, B. U. Peripherals & Accessories die Übereinstimmung des Gerätes mit den grundlegenden Anforderungen und den anderen relevanten Festlegungen der Richtlinie 1999/5/EG.
Nederlands
Hierbij verklaart, Philips Consumer Electronics, B. U. Peripherals & Accessories dat het toestel in overeenstemming is met de essentiële eisen en de andere relevante bepalingen van richtlijn 1999/5/EG.
Italiano
Con la presente Philips Consumer Electronics, B. U. Peripherals & Accessories dichiara che questo è conforme ai requisiti essenziali ed alle altre disposizioni pertinenti stabitilite dalla direttiva 1999/5/CE.
Svenska
Härmed intygar, Philips Consumer Electronics, B. U. Peripherals & Accessories, att denna står l överensstämmelse med de väsentliga egenskapskrav och övriga relevanta bestämmelser som framgår av direktiv 1999/5/EG.
Dansk
Undertegnede Philips Consumer Electronics, B. U. Peripherals & Accessories erklærer herved, at følgende udstyr overholder de væsentlige krav og øvrige relevante krav i direktiv 1999/5/EF.
Finnish
Philips Consumer Electronics, B. U. Peripherals & Accessories vakuuttaa täten että tyyppinen laite on direktiivin 1999/5/EY oleellisten vaatimusten ja sitä koskevien direktiivin muiden ehtojen mukainen.
Portuguese
Philips Consumer Electronics, B. U. Peripherals & Accessories declara que este está conforme com os requisitos essenciais e outras disposições da Directiva 1999/5/CE.
Ekkgmij
LE PAQOTRA Philips Consumer Electronics, B. U. Peripherals & Accessories DG XMEI OSI RTLLOQuXMESAI QOR SIR OTRIXDEIR A AISGREIR JAI SIR OI ER RVESIJER IASA EIR SGR ODGCIAR 1999/5/EJ .
As an ENERGY STAR® partner;
Philips has determined that this product meets the ENERGY STAR® guidelines for energy efficiency.
001-051-hts5x-01-Eng50 |
4 |
17/05/05, 1:17 PM 3139 115 23842 |

Language Code
Abkhazian |
6566 |
|
Inupiaq |
7375 |
|
Pushto |
8083 |
||
Afar |
6565 |
|
Irish |
7165 |
|
Russian |
8285 |
||
Afrikaans |
6570 |
|
Íslenska |
7383 |
|
Quechua |
8185 |
||
Amharic |
6577 |
|
Italiano |
7384 |
|
Raeto-Romance |
8277 |
||
Arabic |
6582 |
|
Ivrit |
7269 |
|
Romanian |
8279 |
||
Armenian |
7289 |
|
Japanese |
7465 |
|
Rundi |
8278 |
||
Assamese |
6583 |
|
Javanese |
7486 |
|
Samoan |
8377 |
||
Avestan |
6569 |
|
Kalaallisut |
7576 |
|
Sango |
8371 |
||
Aymara |
6589 |
|
Kannada |
7578 |
|
Sanskrit |
8365 |
||
Azerhaijani |
6590 |
|
Kashmiri |
7583 |
|
Sardinian |
8367 |
||
Bahasa Melayu |
7783 |
|
Kazakh |
7575 |
|
Serbian |
8382 |
||
Bashkir |
6665 |
|
Kernewek |
7587 |
|
Shona |
8378 |
||
Belarusian |
6669 |
|
Khmer |
7577 |
|
Shqip |
8381 |
||
Bengali |
6678 |
|
Kinyarwanda |
8287 |
|
Sindhi |
8368 |
||
Bihari |
6672 |
|
Kirghiz |
7589 |
|
Sinhalese |
8373 |
||
Bislama |
6673 |
|
Komi |
7586 |
|
Slovensky |
8373 |
||
Bokmål, Norwegian |
7866 |
|
Korean |
7579 |
|
Slovenian |
8376 |
||
Bosanski |
6683 |
|
Kuanyama; Kwanyama |
7574 |
|
Somali |
8379 |
||
Brezhoneg |
6682 |
|
Kurdish |
7585 |
|
Sotho; Southern |
8384 |
||
Bulgarian |
6671 |
|
Lao |
7679 |
|
South Ndebele |
7882 |
||
Burmese |
7789 |
|
Latina |
7665 |
|
Sundanese |
8385 |
||
Castellano, Español |
6983 |
|
Latvian |
7686 |
|
Suomi |
7073 |
||
Catalán |
6765 |
|
Letzeburgesch; |
7666 |
|
Swahili |
8387 |
||
Chamorro |
6772 |
|
Limburgan; Limburger |
7673 |
|
Swati |
8383 |
||
Chechen |
6769 |
|
Lingala |
7678 |
|
Svenska |
8386 |
||
Chewa; Chichewa; Nyanja |
7889 |
|
Lithuanian |
7684 |
|
Tagalog |
8476 |
||
|
|
|
9072 |
|
Luxembourgish; |
7666 |
|
Tahitian |
8489 |
Chuang; Zhuang |
9065 |
|
Macedonian |
7775 |
|
Tajik |
8471 |
||
Church Slavic; Slavonic |
6785 |
|
Malagasy |
7771 |
|
Tamil |
8465 |
||
Chuvash |
6786 |
|
Magyar |
7285 |
|
Tatar |
8484 |
||
Corsican |
6779 |
|
Malayalam |
7776 |
|
Telugu |
8469 |
||
Česky |
6783 |
|
Maltese |
7784 |
|
Thai |
8472 |
||
Dansk |
6865 |
|
Manx |
7186 |
|
Tibetan |
6679 |
||
Deutsch |
6869 |
|
Maori |
7773 |
|
Tigrinya |
8473 |
||
Dzongkha |
6890 |
|
Marathi |
7782 |
|
Tonga (Tonga Islands) |
8479 |
||
English |
6978 |
|
Marshallese |
7772 |
|
Tsonga |
8483 |
||
Esperanto |
6979 |
|
Moldavian |
7779 |
|
Tswana |
8478 |
||
Estonian |
6984 |
|
Mongolian |
7778 |
|
Türkçe |
8482 |
||
Euskara |
6985 |
|
Nauru |
7865 |
|
Turkmen |
8475 |
||
!"#$% |
|
6976 |
|
Navaho; Navajo |
7886 |
|
Twi |
8487 |
|
Faroese |
7079 |
|
Ndebele, North |
7868 |
|
Uighur |
8571 |
||
Français |
7082 |
|
Ndebele, South |
7882 |
|
Ukrainian |
8575 |
||
Frysk |
7089 |
|
Ndonga |
7871 |
|
Urdu |
8582 |
||
Fijian |
7074 |
|
Nederlands |
7876 |
|
Uzbek |
8590 |
||
Gaelic; Scottish Gaelic |
7168 |
|
Nepali |
7869 |
|
Vietnamese |
8673 |
||
Gallegan |
7176 |
|
Norsk |
7879 |
|
Volapuk |
8679 |
||
Georgian |
7565 |
|
Northern Sami |
8369 |
|
Walloon |
8765 |
||
Gikuyu; Kikuyu |
7573 |
|
North Ndebele |
7868 |
|
Welsh |
6789 |
||
Guarani |
7178 |
|
Norwegian Nynorsk; |
7878 |
|
Wolof |
8779 |
||
Gujarati |
7185 |
|
Occitan; Provencal |
7967 |
|
Xhosa |
8872 |
||
Hausa |
7265 |
|
Old Bulgarian; Old Slavonic |
6785 |
|
Yiddish |
8973 |
||
Herero |
7290 |
|
Oriya |
7982 |
|
Yoruba |
8979 |
||
Hindi |
7273 |
|
Oromo |
7977 |
|
Zulu |
9085 |
||
Hiri Motu |
7279 |
|
Ossetian; Ossetic |
7983 |
|
|
|
||
Hrwatski |
6779 |
|
Pali |
8073 |
|
|
|
||
Ido |
7379 |
|
Panjabi |
8065 |
|
|
|
||
Interlingua (International)7365 |
|
Persian |
7065 |
|
|
|
|||
Interlingue |
7365 |
|
Polski |
8076 |
|
|
|
||
Inuktitut |
7385 |
|
Português |
8084 |
|
|
|
||
|
|
|
|
|
|
|
|
|
|
5
001-051-hts5x-01-Eng50 |
5 |
17/05/05, 1:18 PM 3139 115 23842 |

hsilgnE
Contents
Language Code ...................................... |
|
5 |
General Information |
|
|
Supplied accessories ................................... |
|
8 |
Cleaning discs ............................................... |
|
8 |
Setup .............................................................. |
|
8 |
Basic Connections |
|
|
Step 1: Placing the speakers and |
|
|
subwoofer ..................................................... |
|
9 |
Step 2: Connecting the speakers and |
|
|
subwoofer ................................................... |
|
10 |
Step 3: Connecting wire-less rear |
|
|
speakers ....................................................... |
|
10 |
Step 4:Wireless Receiver system .......... |
|
11 |
Step 5: Connecting to TV ........................ |
|
12 |
Option 1: Using Scart socket ............. |
|
12 |
Option 2: Using S-Video socket ........ |
|
12 |
Option 3: Using Composite Video |
|
|
socket ..................................................... |
|
12 |
Step 6: Connecting to a Progressive |
|
|
ScanTV (optional) ..................................... |
|
13 |
Step 7: Connecting FM/MW antennas ... |
13 |
|
Step 8: Connecting the power cord |
..... |
14 |
Connections to External Devices |
||
Connecting a VCR or Cable/ |
|
|
Satellite Box ............................................... |
|
15 |
Viewing and listening to the |
|
|
playback .................................................. |
|
15 |
Connecting digital audio equipment |
..... |
15 |
Listening to the playback .................... |
|
15 |
Connecting a USB flash drive or USB |
|
|
memory card reader ................................ |
|
16 |
Using USB port ..................................... |
|
16 |
Remote Control ......................... |
17–18 |
|
Main Unit ............................................... |
|
19 |
Getting Started |
|
Step 1: Inserting batteries into the |
|
remote control .......................................... |
20 |
Using the remote control to |
|
operate the system .............................. |
20 |
Step 2: Switching on the DVD system .. |
20 |
Switching to Eco Power standby |
|
mode ....................................................... |
20 |
Step 3: Setting the TV ............................... |
20 |
Setting up Progressive Scan feature |
|
(for Progressive Scan TV only) .......... |
21 |
Selecting the matching colour |
|
system ..................................................... |
22 |
Setting the TV Display ......................... |
22 |
Step 4: Setting language preferences ..... |
23 |
On-Screen Display (OSD) language . 23 |
|
Audio, Subtitle and Disc menu |
|
languages ................................................ |
23 |
Disc Operations |
|
Playable discs .............................................. |
24 |
Playing discs ................................................ |
24 |
Auto Eco Power standby mode ........ |
25 |
Basic playback controls ............................ |
25 |
Selecting various repeat/shuffle |
|
functions ...................................................... |
25 |
Other operations for video playback |
|
(DVD/ VCD/ SVCD) ................................. |
26 |
Using the Disc Menu ........................... |
26 |
Viewing playback information ............ |
26 |
Advancing by frame ............................. |
27 |
Resuming playback from the last |
|
stopped point ........................................ |
27 |
Zooming in ............................................ |
27 |
Changing sound track language ......... |
27 |
Changing subtitle language |
|
(DVD only) ............................................ |
27 |
Preview Function (VCD only) ........... |
28 |
6
001-051-hts5x-01-Eng50 |
6 |
17/05/05, 1:18 PM 3139 115 23842 |

Contents
Playback |
|
|
Playing pictures or audio files from USB |
||
flash drive or USB memory card reader . |
||
....................................................................... |
|
29 |
Compatibility of |
USB device ............ |
29 |
Playing an MP3/Windows Media™ Audio/ |
||
JPEG/MPEG-4 media ................................. |
30 |
|
Playing MP3 music and JPEG |
|
|
picture simultaneously ........................ |
30 |
|
Playing a picture disc (slide show) ......... |
31 |
|
Preview Function |
.................................. |
31 |
Zoom picture ........................................ |
|
31 |
Rotating/Fliping the picture ................ |
31 |
|
Supported JPEG picture formats ...... |
31 |
|
Playing a Super Audio CD (SACD) ....... |
32 |
|
Playing a DivX disc .................................... |
|
32 |
DVD Setup Menu Options |
|
|
Accessing General Setup Page ............... |
33 |
|
Locking/Unlocking the disc |
|
|
for viewing ............................................. |
|
33 |
Dimming system’s display panel ........ |
33 |
|
Programming disc tracks (not |
|
|
for Picture CD/MP3/SACD) ............. |
34 |
|
OSD language ....................................... |
|
34 |
Screen Saver – turning on/ off ........... |
35 |
|
DivX(R) VOD registration code ....... |
35 |
|
Accessing Audio Setup Page ................... |
36 |
|
Speakers Volume/Speakers Delay ...... |
36 |
|
Night mode – turning on/ off ............ |
36 |
|
CD Upsampling .................................... |
|
36 |
Accessing Video Setup Page .................... |
37 |
|
TV Type ................................................... |
|
37 |
TV Display ............................................. |
|
37 |
Progressive function-turning on/off . 37 |
||
Picture Setting ....................................... |
|
38 |
Setting the Video Output ................... |
38 |
|
Accessing Preference Setup Page .......... |
39 |
|
Audio, Subtitle, Disc Menu ................. |
39 |
|
Restricting playback by Parental |
|
|
Control ............................................ |
39–40 |
|
PBC (Playback Control) ...................... |
40 |
|
MP3/ JPEG menu– turning on/ off ..... |
40 |
|
Changing the Password ....................... |
41 |
|
Setting the DivX Subtitle font ........... |
41 |
|
Restoring to original settings ............ |
41 |
|
Tuner Operations |
|
Tuning to radio stations ........................... |
42 |
Presetting radio stations .......................... |
42 |
Automatic tuning .................................. |
42 |
Automatic presetting .......................... |
43 |
Manual presetting ................................. |
43 |
Selecting a preset radio station ............. |
43 |
Deleting a preset radio station .............. |
43 |
Sound and Volume Controls |
|
Individual speakers volume adjustment 44 |
|
Selecting surround sound ........................ |
45 |
Selecting digital sound effects ................. |
45 |
Volume Control ......................................... |
45 |
Other Functions |
|
Setting the Sleep timer ............................ |
46 |
Specifications ...................................... |
47 |
Troubleshooting ......................... |
48–49 |
Glossary ............................................. |
50–51 |
7
English
001-051-hts5x-01-Eng50 |
7 |
17/05/05, 1:18 PM 3139 115 23842 |
hsilgnE
General Information
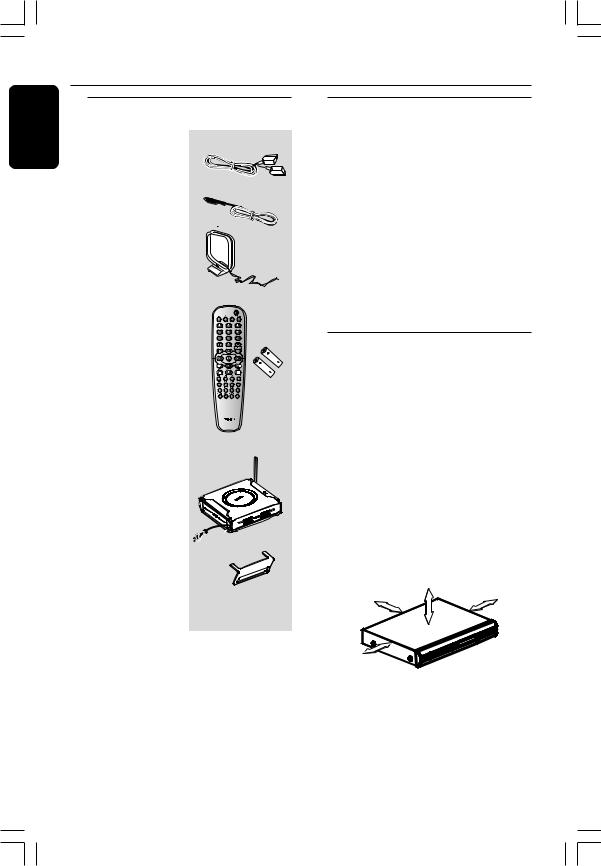
Supplied accessories
Scart cable (black)
FM wire antenna
MW loop antenna
Remote control and two batteries
(12nc: 3139 258 70142)
Wireless receiver
Table stand for wireless receiver
Cleaning discs
To clean a disc, use a micro fibre cleaning cloth and wipe the disc from the center to the edge in a straight line.
CAUTION!
Do not use solvents such as benzene, thinner, commercially available cleaners, or anti-static sprays intended for discs.
Since the optical unit (laser) of the DVD system operates at a higher power than regular DVD or CD players, cleaning CDs intended for DVD or CD players may damage the optical unit (laser).Therefore, refrain from using a cleaning CD.
Setup
Finding a suitable location
–Place the set on a flat, hard and stable surface. Do not place the set on a carpet.
–Do not position the set on top of other equipment that might heat it up (e.g., receiver or amplifier).
–Do not put anything under the set (e.g., CDs, magazines).
Space for ventilation
– Place the apparatus in a location with adequate ventilation to prevent internal heat build up. Allow at least 10 cm (4.5”) clearance from the rear and the top of the set and 5cm (2.3”) from the left and right to prevent overheating.
5cm (2.3")
10cm (4.5") |
10cm (4.5") |
5cm (2.3")
Avoid high temperatures, moisture, water and dust
– Apparatus shall not be exposed to dripping or splashing.
– Do not place any sources of danger on the apparatus (e.g., liquid filled objects, lighted candles).
8
001-051-hts5x-01-Eng50 |
8 |
17/05/05, 1:18 PM 3139 115 23842 |

Basic Connections
Step 1: Placing the speakers and subwoofer
2 |
SUBWOOFER |
|
4 |
||
|
||
1 CENTER |
1 |
|
FRONT L |
FRONT R |
3 |
3 |
REAR L |
REAR R |
Step 2: Connecting the speakers and subwoofer
Front Right |
Front Left |
Speaker |
Speaker |
FRONT R |
FRONT L |
Subwoofer
WIRELESS REAR |
L |
SPEAKER ANTENNA |
|
|
R |
DVD System
CENTRE
Centre Speaker
English
For best possible surround sound, all the speakers (except subwoofer) should be placed at the same distance from the listening position.
1Place the front left and right speakers at equal distances from the TV and at an angle of approximately 45 degrees from the listening position.
2Place the centre speaker above the TV or the DVD system so that the centre channel’s sound is localised.
3Place the rear speakers at normal listening ear level facing each other or hang on the wall.
4Place the subwoofer on the floor near the TV.
Helpful Hints:
–To avoid magnetic interference, do not position the front speakers too close to your TV.
–Allow adequate ventilation around the DVD system.
Connect the supplied speakers system using the fixed speaker cables by matching the colours of the sockets and speaker cables.
Helpful Hints:
–Ensure that the speaker cables are correctly connected. Improper connections may damage the system due to a shortcircuit.
–To prevent unwanted noise, do not place the subwoofer too close to the DVD system, AC power adaptor,TV or other radiation sources.
9
001-051-hts5x-01-Eng50 |
9 |
17/05/05, 1:18 PM 3139 115 23842 |

hsilgnE
Basic Connections (continued)
Step 3: Connecting wire-less rear speakers
Rear Left
Speaker
REAR L
Rear Right |
Wireless Receiver |
|
Speaker |
||
REAR R |
(see next page for |
|
complete setup) |
||
|
The rear speakers are equipped with the wire-less receiver that receives audio signals from the DVD system.The wireless rear speakers provide a surround sound entertainment experience without the scattered wires.
●Use the supplied Rear Left and Rear Right speaker cables to connect to the wireless receiver by matching the colours of the sockets and speaker cables.
Helpful Hint:
– To prevent unwanted noise, do not place the subwoofer too close to the DVD system, AC power adaptor,TV or other radiation sources.
10
001-051-hts5x-01-Eng50 |
10 |
17/05/05, 1:18 PM 3139 115 23842 |
Basic Connections (continued)
Step 4: Wireless Receiver
system
1
Built-in
Wireless transmitter
WIRELESS REAR
SPEAKER ANTENNA
Pr Y
WIRELESS REAR
SPEAKER ANTENNA
Pb
REAR L |
REAR R |
2 |
3 |
Wireless |
5 |
4 |
Receiver |
REAR L |
REAR R |
REAR L |
REAR R |
 table stand
English
●Turn on the DVD system and playback a disc.
●Select the same transmission frequency channel for both the wireless transmitter and receiver.
On the wireless transmitter:
●Press and hold SOUND button on the remote until the best frequency that obtains optimal reception.
Helpful Hints:
–In case of sound distortion, select another frequency for both the wireless transmitter and receiver. The distortion could be the result of interference caused by other equipment using same frequency channel in your house or neighborhood.
–Extend the antennas vertically to improve the reception. Check the antennas are safely positioned without obstructions.
To ensure quality sound production and transmission:
●Place both the wireless transmitter and receiver at least 3 metres apart and off the ground (recommended minimum height of 30cm). Do not place them too close to TV, AC power adaptor or any radiation sources.
●Also note that audio may be interrupted due to the reflected waves when a person crosses or approaches the space between the transmitter and wireless speaker.
●Wireless transmission may be interfere by other devices, e.g. microwave, cordless telephone, etc.
●Place the wireless receiver and antenna in standing position (as shown 5).
11
001-051-hts5x-01-Eng50 |
11 |
17/05/05, 1:18 PM 3139 115 23842 |

hsilgnE
Basic Connections (continued)
Step 5: Connecting to TV
OUT |
IN |
VIDEO |
TV |
AUDIO

WIRELESS REAR |
L |
|
SPEAKER ANTENNA |
||
|
||
|
R |
OR |
OR |
Pr |
Y |
|
Pb |
IMPORTANT!
–You only need to make one video connection from the following options, depending on the capabilities of your TV.
–Connect the DVD system directly to the TV.
–Proceed to page 20 for setting up the TV once you have completed the connections.
Helpful Hints:
–To hear the TV channels through this DVD system, use the audio cables (white/red - not supplied) to connect AUX IN sockets to the corresponding AUDIO OUT sockets on the TV (not required if you are using Scart connection).
–Scart (RGB) Video provides better picture quality than Composite Video.
Option 1: Using Scart socket
●Use the supplied scart video cable (black) to connect the DVD system’s SCART socket to the corresponding Scart input socket on the TV.
OR
Option 2: Using S-Video socket
●Use an S-video cable (not supplied) to connect the DVD system’s S-VIDEO socket to the S-Video input socket (or labelled as Y/C or S-VHS) on the TV.
OR
Option 3: Using Composite Video socket
●Use a composite video cable (yellow - not supplied) to connect the DVD system’s CVBS socket to the video input socket (or labelled as A/V In,Video In, Composite or Baseband) on the TV.
12
001-051-hts5x-01-Eng50 |
12 |
17/05/05, 1:18 PM 3139 115 23842 |

|
|
Basic Connections (continued) |
|||
|
|
|
|
|
|
|
Step 6: Connecting to a |
|
Step 7: Connecting FM/MW |
||
|
Progressive Scan TV |
|
|
antennas |
|
|
(optional) |
|
|
|
|
|
TV |
|
|
fix the claw |
|
|
|
|
into the slot |
||
|
|
|
|
||
|
|
|
FM |
|
antenna |
OUT |
IN |
VIDEO |
2 |
|
|
AUDIO |
|
MW 1  antenna

Pr |
Y |
Pr |
Y |
L |
|
|
|
|
Pb |
|
Pb |
R |
|
|
|
IMPORTANT!
–The progressive scan video quality is only possible when usingY Pb Pr and a progressive scanTV is required.
–DO NOT connect both SCART andY Pb Pr to a TV, it may affect the picture quality.
1 Use the component video cables (red/ blue/green - not supplied) to connect the DVD system’s Y Pb Pr sockets to the corresponding component video input sockets (or labelled as Y Pb/Cb Pr/Cr or YUV) on the TV.
2To hear the TV channels through this DVD system, use an audio cables (white/ red - not supplied) to connect AUX IN sockets to the corresponding AUDIO OUT sockets on the TV.
3Proceed to page 21 for detailed Progressive Scan set up.
1Connect the supplied MW loop antenna to the MW socket. Place the MW loop antenna on a shelf, or attach it to a stand or wall.
2Connect the supplied FM antenna to the FM socket. Extend the FM antenna and fix its ends to the wall.
For better FM stereo reception, connect an external FM antenna (not supplied).
Helpful Hints:
–Adjust the position of the antennas for optimal reception.
–Position the antennas as far as possible from your TV,VCR or other radiation source to prevent unwanted interference.
13
English
001-051-hts5x-01-Eng50 |
13 |
17/05/05, 1:18 PM 3139 115 23842 |

hsilgnE
Basic Connections (continued)
Step 8: Connecting the
power cord
TV
|
Pr |
Y |
WIRELESS REAR |
L |
|
SPEAKER ANTENNA
Pb
R
DVD system
After everything is connected properly, plug the AC power cord into the power outlet.
The red Eco Power LED on the DVD system will light up. Never make or change any connections with the power switched on.
Helpful Hint:
– Refer to the type plate on the rear of the subwoofer for identification and supply ratings.
14
001-051-hts5x-01-Eng50 |
14 |
17/05/05, 1:18 PM 3139 115 23842 |

Connections to External Devices
Connecting a VCR or |
Connecting digital audio |
|
Cable/Satellite Box |
equipment |
|
TV |
OUT IN |
|
VIDEO 

AUDIO
(for example)
CD Recorder
1
|
VCR or Cable/ |
|
|
|
|
Satellite Box |
|
|
|
|
|
|
|
Y |
|
Pr |
Y |
WIRELESS REAR |
L |
WIRELESS REAR |
L |
|
SPEAKER ANTENNA |
|
|
|
Pb |
||
SPEAKER ANTENNA |
|
|
|
|
|
|
Pb |
|
|
|
R |
|
|
|
DVD System
2
Viewing and listening to the playback
1Connect the VCR or Cable/Satellite Box to the TV as shown.
2Connect the DVD system’s AUX IN (R/L) sockets to the AUDIO OUT sockets on the VCR or cable/satellite box.
Press AUX/DI on the remote to select “AUX” in order to activate the input source.
Listening to the playback
●Connect the DVD system’s DIGITAL IN socket to the DIGITAL OUT socket on a digital audio device.
Press AUX/DI on the remote to select “DI” in order to activate the input source.
Helpful Hints:
–You cannot hear or record the SACD playback if you use the digital connection.
–For your playback through DIGITAL IN connection, set the digital output of that player to PCM format.
–Always refer to the user manual of the other equipment for complete connection and use details.
15
English
001-051-hts5x-01-Eng50 |
15 |
17/05/05, 1:18 PM 3139 115 23842 |

hsilgnE
Connections to External Devices (continued)
Connecting a USB flash drive or USB memory card reader
USB extension cable (optional accessory - not supplied)
Using USB port
You can only view the contents of the USB flash drive or USB memory card reader through this DVD system. Editing the data and recording to a DVD+R/+RW are not possible.
1Connect the USB flash drive or USB memory card reader directly to the USB port on the front panel (as shown on the above illustration).
2Press USB MODE on the remote in order to view the files stored in the USB flash drive or USB memory card reader.
3You have to stop playback before removing the USB flash drive or USB memory card reader from the USB port.
16
Helpful Hints:
–The USB port only supports the playback of the JPEG/MP3/Windows Media™ Audio.
–The USB port does not support the connection of other USB devices except the USB flash drive or USB memory card reader.
–If the USB device does not fit into the USB port, a USB extension cable is required.
001-051-hts5x-01-Eng50 |
16 |
17/05/05, 1:18 PM 3139 115 23842 |
 Loading...