


Recipes & Directions for use
Przepisy i instrukcja obsługi
Рецепты и Инструкции по эксплуатации
Retseptid ja kasutamisõpetus Ēdienu receptes un lietošanas norādījumi
HR7638 Receptai ir naudojimo instrukcijos
Pечепти и инструкчии за употреба
Recepti i uputstvo za upotrebu

2

3
M
K
L
J
I
H
G
F
E
D
C
B
A

N
O
P
Q
R
S
T
 U
U

4

5
ENGLISH 6
POLSKI 21
РУССКИЙ 36
EESTI 54
LATVISKI 68
LIETUVIŠKAI 82
БЪЛГАРСКИ 97
SRPSKI 113
HR7638

6 ENGLISH
Food processor: parts and accessories
A)Speed control
B)Motor unit
C)Built-in saftely lock
D)Bowl
E)Screw cap (for closing the blender fixing hole when the blender is not in use)
F)Tool holder
G)Blender jar
H)Peg of lid (activates and deactivates the safety switch)
I)Lif of bowl
J)Feed tube
K)Pusher
L)Lid of blender jar
M)Cover with closable insert storage space
N)Slicing insert medium
O)Slicing insert fime
P)Shredding insert medium
Q)Insert holder
R)Blade (with protective cover)
S)Kneading accessory
T)Emulsifying disc
U)Spatula
Introduction
This appliance has been equipped with an automatic thermal cut-off system. This system will automatically cut off the power supply to the appliance in case of overheating.
If your appliance suddenly stops running:
1Pull the mains plug out of the wall socket.
2Press the 'PULSE / 0' button to switch the appliance off.
3Let the appliance cool down for 60 minutes.
4Put the mains plug in the wall socket.
5Switch the appliance on again.
Please contact your Philips dealer or authorised Philips service centre if the automatic thermal cutout system is activated too often.
CAUTION: In order to avoid a hazardous situation, this appliance must never be connected to a timer switch.
Important
Read the instructions for use carefully and look at the illustrations before using the appliance.
Keep these instructions for use for future reference.
Check if the voltage indicated on the appliance corresponds to the local mains voltage (110-127V or 220-240V) before you connect the appliance.

Never use any accessories or parts from other manufacturers or that have not been specifically advised by Philips. Your guarantee will become invalid if such accessories or parts have been used.
Do not use the appliance if the mains cord, the plug or other parts are damaged.
If the mains cord is damaged, it must be replaced by Philips, a service centre authorised by Philips or similarly qualified persons in order to avoid a hazard.
Thoroughly clean the parts that will come into contact with food before you use the appliance for the first time.
Do not exceed the quantities and preparation times indicated in the tables and recipes.
Do not exceed the maximum content indicated on the bowl or the blender jar, i.e. do not fill beyond the top graduation.
Unplug the appliance immediately after use.
Never use your fingers or an object (e.g. a spatula) to push ingredients down the feed tube while the appliance is running. Only the pusher is to be used for this purpose.
Always unplug the appliance before reaching into the blender jar with your fingers or an object (e.g. a spatula).
Keep the appliance out of the reach of children.
Never let the appliance run unattended.
Never switch the appliance off by turning the lid. Always switch the appliance off by pressing the PULSE / 0 button.
ENGLISH 7
Switch the appliance off before detaching any accessory.
Never immerse the motor unit in water or any other fluid, nor rinse it under the tap. Use only a moist cloth to clean the motor unit.
When you mount the blender jar, the bowl and the screw cap in the proper way, you will hear a click.
The emulsifying disc, the blade and the kneading accessory have to be placed on the toolholder that stands in the bowl.
Remove the protective cover from the blade before use.
Avoid touching the SHARP cutting edges of the blades and inserts, especially when the appliance is plugged in.
If one of the blades get stuck, unplug the appliance before removing the ingredients that are blocking the blades.
Let hot ingredients cool down before processing them (max. temperature 80cC/175cF).
If you are processing a liquid that tends to foam, do not put more than 1 litre into the blender jar to avoid spillage.
Noise level: Lc= 83 dB [A]
Note that if both the blender and the bowl have
been correctly mounted, only the blender will function.

8 ENGLISH
Using the appliance
Bowl
1 
CLICK
2 C
1
2
CLICK C
If you want to use the bowl, remove the blender jar and close the fixing hole with the screw cap. All functions that require the use of the bowl will only work if the blender jar has been removed.
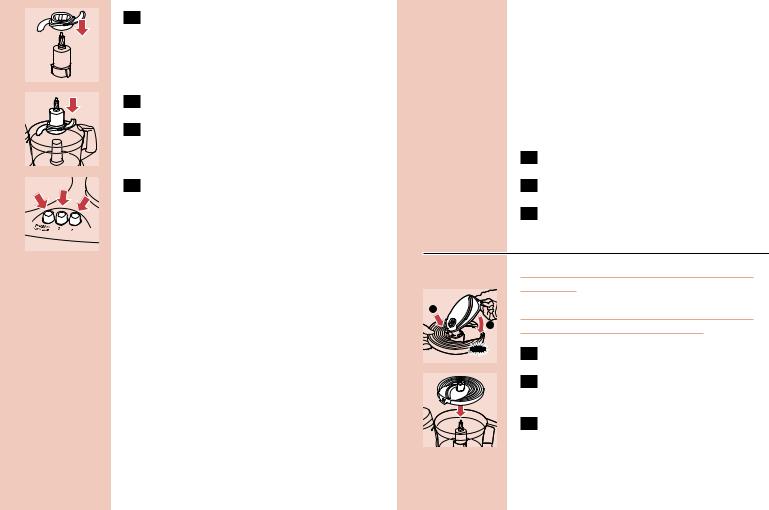
1Mount the bowl on the food processor by turning the handle in the direction of the arrow until you hear a click.
2Put the lid on the bowl. Turn the lid in the direction of the arrow until you hear a click (this requires some force).
Built-in safety lock
BThe motor unit as well as the lid have been provided with marks. The appliance will only function if the arrow on the motor unit is placed directly opposite the mark on the lid.
|
C 1 Make sure that the mark on the lid and |
|
the arrow on the bowl are directly |
|
opposite each other. The projection of the |
CLICK |
lid will now cover the opening of the |
|
|
|
handle. |
Feed tube and pusher
|
C |
|
Use the feed tube to add liquid and/or |
1 |
|||
|
|
|
solid ingredients. Use the pusher to push |
|
|
|
solid ingredients down the feed tube. |
|
|
|
|
C |
|
You can also use the pusher to close the |
|
2 |
|||
|
|
|
feed tube in order to prevent ingredients |
from escaping down the feed tube.
Blade
1 
CLICK
2
C
C
The blade can be used for chopping, mixing, blending, pureeing and preparing cake mixtures.
1Put the bowl on the motor unit.
2Remove the protective cover from the blade.
The cutting edges of the blade are very sharp
Avoid touching them!
C 3 Put the blade on the tool holder.

|
|
|
|
|
ENGLISH |
9 |
C 4 |
Put the tool holder in the bowl. |
|
|
1 |
Switch the appliance off. |
|
5 Put the ingredients in the bowl. Pre-cut |
|
|
2 |
Remove the lid from the bowl. |
|
|
|
large pieces of food into pieces of approx. |
|
|
3 |
Remove the ingredients with the spatula. |
|
|
3 x 3 cm. Put the lid on the bowl. |
|
|
|
||
C 6 |
The buttons allow you to adjust the speed |
|
|
Inserts |
|
|
|
of the appliance to obtain optimal results. |
|
|
|
|
|
B 'PULSE / 0' button: for pulse operation and for |
|
|
The cutting edges of the inserts are very sharp |
|
||
turning the appliance off. If the PULSE / 0 button |
|
|
Do not touch them! |
|
||
is pressed the appliance runs at the highest |
1 |
|
Do not process hard ingredients, such as ice |
|
||
speed. The appliance stops running when the |
|
|
||||
|
|
|
||||
button is released. |
|
2 |
cubes, with the inserts! |
|
||
|
|
|
|
|
|
|
B button 1: for normal speed. |
|
CLICK C 1 |
Put the selected insert in the insert holder. |
|||
B button 2: for high speed. |
|
|||||
See the table for the recommended speeds. |
|
|
C 2 |
Place the insert holder onto the tool |
|
|
Processing takes 10 - 60 seconds. |
|
|
|
holder that stands in the bowl. |
|
|
Tips |
|
|
|
3 |
Put the lid on the bowl. |
|
The appliance chops very quickly. Use the |
|
|
|
|
|
|
pulse function for short periods at a time to |
|
|
C 4 |
Put the ingredients in the feed tube. Pre- |
|
|
prevent the food from becoming too finely |
|
|
|
|||
chopped. |
|
|
|
cut large chunks to make them fit into the |
||
Do not let the appliance run too long when |
|
|
|
feed tube. |
|
|
you are chopping (hard) cheese. The cheese |
|
|
5 |
Fill the feed tube evenly for the best |
|
|
will become too hot, will start to melt and |
|
|
|
|||
will turn lumpy. |
|
|
|
results. |
|
|
Do not use the blade to chop very hard |
|
|
When you have to cut large amounts of food, |
|
||
ingredients like coffee beans, nutmeg and ice |
|
|
process only small batches at a time and empty |
|
||
cubes. The blade might get blunt. |
|
|
the bowl regularly between the batches. |
|
||
If food sticks to the blade or to the inside of the bowl:

10 ENGLISH
3Select the appropriate speed to obtain optimal results. See the table for the
recommended speed.
Processing takes 10-60 seconds.
C |
|
Press the ingredients slowly and steadily |
4 |
||
|
|
down the feed tube with the pusher. |
C |
|
To remove the insert from the insert |
5 |
||
|
holder, take the insert holder in your hands with its bottom pointing towards you. Push the edges of the insert with your thumbs to make the insert fall out of the holder.
Kneading accessory
C
1
2
CLICK |
C |

 C
C
The kneading accessory can be used for kneading dough for bread and dumplings and for mixing batters and cake mixtures.
6Fit the kneading accessory onto the tool holder.
7Put the ingredients in the bowl.
8Close the bowl with the lid.
9Close the feed tube by placing the pusher in it.
C 10 Select the appropriate speed to obtain optimal results. See the table for the recommended speed.
Emulsifying disc
You can use the emulsifying disc to prepare mayonnaise, to whip cream and to whisk egg whites.
C 11 Put the emulsifying disc onto the tool holder that stands in the bowl.
12Put the ingredients in the bowl and put the lid on the bowl.
13Select the appropriate speed to obtain optimal results. See the table for the recommended speed.
Tips
When you want to whisk egg whites, make sure the eggs are at room temperature.
Take the eggs out of the refrigerator at least half an hour before you are going to use them.
All the ingredients for making mayonnaise must be at room temperature.
Oil can be added through the small hole in the bottom of the pusher.
If you are going to whip cream, the cream must be taken straight from the refrigerator.
Please observe the preparation time in the table. Cream should not be whipped too long.
Use the pulse function to have more control over the process.
Blender
2
1
 C
C
 1 C
1 C
2
The blender is intended for:
-Blending fluids, e.g. dairy products, sauces, fruit juices, soups, mixed drinks, shakes.
-Mixing soft ingredients, e.g. pancake batter or mayonnaise.
-Pureeing cooked ingredients, e.g. for making baby food.
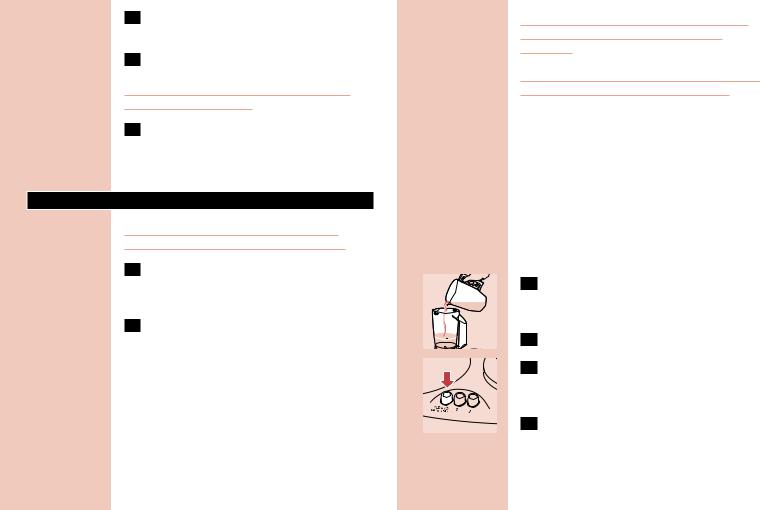
14Remove the screw cap.
15Mount the blender jar in the fixing hole by turning it in the direction of the arrow until it is firmly fixed.
CLICK |
Do not exert too much pressure on the handle |
|
|
||
|
of the blender jar. |
|
|
C 16 |
Put the ingredients in the blender jar. |
|
1 |
17 |
Screw the lid onto the blender jar. |
2 |
|
18 |
Switch the appliance on and blend the |
|
|
ingredients. The buttons allow you to adjust the speed of the appliance to obtain
ENGLISH 11
optimal results. See the table for the recommended speed.
Tips
C Pour liquid ingredients into the blender jar through the hole in the lid.
The longer you let the appliance run, the finer the blending result will be.
Pre-cut solid ingredients into smaller pieces before putting them into the blender. If you want to prepare a large quantity, process small batches of ingredients instead of trying to process a large quantity at once.
If you have doubts about the right speed, always choose the highest speed (button 2).
If ingredients stick to the wall of the blender jar:
1Switch the appliance off and unplug it.
2Remove the lid.
Never remove the lid while the appliance is still running.
3Use a spatula to remove the ingredients from the wall of the jar.
Keep the spatula at a safe distance from the cutting edges of the blade unit (approx. 2 cm).

12 ENGLISH
Cleaning
Always unplug the appliance before you start cleaning the motor unit.
1Clean the motor unit with a damp cloth. Do not immerse the motor unit in water and do not rinse it either.
2Always clean the parts that have come into contact with food in hot water with washing-up liquid immediately after use.
The bowl, the lid of the bowl, the pusher and the accessories can also be washed in a dishwasher.
These parts have been tested for dishwasher resistance according to DIN EN 12875.
The cover with insert storage space and the
blender jar are not dishwasher proof!
Clean the blade, the blade unit of the blender and
the inserts very carefully. Their cutting edges are
very sharp!
Make sure that the cutting edges of the blade, the blade unit of the blender and the inserts do not come into contact with hard objects. This could cause them to become blunt.
Certain ingredients may cause discolourations on the surface of the accessories. This does not have a negative effect on the accessories. The discolourations usually disappear after some time.
Blender quick-cleaning operation
C 1 |
Pour lukewarm water (not more than |
|
0.5 litres) and some washing-up liquid into |
|
the blender jar. |
2 |
Assemble the lid. |
C 3 |
Let the appliance run for a few moments |
by pressing the Pulse button. (The appliance stops running when you release the button.)
4Detach the blender jar and rinse it with clean water.
Storage
MicroStore
C Put the accessories (emulsifying disc, blade, kneading accessory, insert holder) on the tool holder and store them in the bowl. Always end up with the insert holder.
C Two inserts can be stored in the storage space in the cover that covers the lid of the bowl, as indicated on the inside of the cover. The inserts have to be slid into the cover, not pressed.

C Place the cover with insert storage space on the transparent lid of the bowl.
Wrap the mains cord around the reel on the back of the appliance.
Information & service
If you need information or if you have a problem, please visit the Philips Web site at www.philips.com or contact the Philips Customer Care Centre in your country (you will find its phone number in the worldwide guarantee leaflet).
If there is no Customer Care Centre in your country, turn to your local Philips dealer or contact the Service Department of Philips Domestic Appliances and Personal Care BV.
|
|
|
|
ENGLISH 13 |
|
|
|
||||
Quantities and preparation times |
|
||||
|
|
|
|
|
|
Ingredients & |
Max. |
Speed |
Procedure |
Applications |
|
results |
quanti |
/acces |
|
|
|
|
ty |
sory |
|
|
|
Batter |
250 |
2 |
/ P |
First pour the milk into the |
Pancakes, |
(pancake) - |
ml |
|
|
blender and then add the dry |
waffles |
whisking |
milk |
|
|
ingredients. Mix the ingredients |
|
|
|
|
|
approx. 1 minute. If necessary, |
|
|
|
|
|
repeat this procedure 2 times. |
|
|
|
|
|
|
|
Breadcrumbs - |
100g |
2 |
/ P |
Use dry, crispy bread. |
Breadcrumbed |
chopping |
|
|
|
|
dishes, au |
|
|
|
|
|
gratin dishes |
Butter cream |
300g |
2 |
/ P |
Use soft butter for a light |
Desserts, |
(creme au |
|
|
|
result. |
toppings |
beurre) - |
|
|
|
|
|
whisking |
|
|
|
|
|
|
|
|
|
|
|
Vegetables |
350g |
2 |
/ j |
Cut the vegetables into pieces |
Garnishing, |
(carrots, |
|
k |
|
that fit into the tube. Fill the |
raw |
turnips, white |
|
|
|
feed tube with the pieces and |
vegetables, |
radishes) - |
|
|
|
shred them while pressing the |
turnip dishes, |
shredding |
|
|
|
pusher down lightly. |
cakes, dips |
Vegetables |
350g |
2 |
/ P / Fill the feed tube with pieces of |
Salads |
|
(carrots, leaks, |
|
g |
|
vegetables and press them |
|
celery) - slicing |
|
|
|
carefully down with the pusher. |
|
|
|
|
|
|
|
Cheese |
200g |
2 |
/ P |
Use a piece of rindless |
Garnishing, |
(Parmesan) - |
|
|
|
Parmesan and cut it into pieces |
soup, sauces, |
chopping |
|
|
|
of approx. 3 x 3 cm. |
au gratin |
|
|
|
|
|
dishes |
Cheese |
200g |
2 |
/ j |
Cut the cheese into pieces that |
Sauces, pizzas, |
(Gouda) - |
|
k |
|
fit into the tube. Press the |
au gratin |
shredding |
|
|
|
pieces carefully down with the |
dishes, fondue |
|
|
|
|
pusher. |
|
14 ENGLISH
Ingredients & |
Max. |
Speed |
Procedure |
Applications |
results |
quanti |
/acces |
|
|
|
ty |
sory |
|
|
Chocolate - |
200g |
2 / P |
Use hard, plain chocolate. |
Garnishing, |
chopping |
|
|
Break it into pieces of 2 cm. |
sauces, pastry, |
|
|
|
|
puddings, |
|
|
|
|
mousses |
|
|
|
|
|
Cooked peas, |
250g |
2 / P |
Use cooked peas or beans. If |
Purees, soups |
beans - |
|
D |
necessary, add some liquid to |
|
pureeing |
|
|
improve the consistency of the |
|
|
|
|
mixture. |
|
Cooked |
300g |
2 / P |
For coarse puree, add only a |
Baby and |
vegetables and |
|
|
little liquid. For fine puree, keep |
infant food |
meats - |
|
|
adding liquid until the mixture |
|
pureeing |
|
|
is smooth enough. |
|
|
|
|
|
|
Cucumbers - |
1 |
1 / g |
Put the cucumber in the tube |
Salad, |
slicing |
cucum |
|
and press it carefully down |
garnishing |
|
ber |
|
with the pusher. |
|
Dough (for |
350g |
2 / { |
Mix warm water with yeast and |
Bread |
bread) - |
flour |
|
sugar. Add flour, oil and salt |
|
kneading |
|
|
and knead the dough for |
|
|
|
|
approx. 90 seconds. Leave to |
|
|
|
|
rise for 30 minutes. |
|
|
|
|
|
|
Dough (for |
400g |
2 / { |
Follow the same procedure as |
Pizza |
pizzas) - |
flour |
|
for bread dough. Knead the |
|
kneading |
|
|
dough for approx. 1 minute. |
|
|
|
|
First put in the flour and then |
|
|
|
|
the other ingredients. |
|
Dough (for |
200g |
2 / P |
Use cold margarine, cut into |
Apple pies, |
shortcrust |
flour |
|
pieces of 2 cm. Put all the |
sweet biscuits, |
pastry) - |
|
|
ingredients in the bowl and |
open fruit flans |
kneading |
|
|
knead until the dough has |
|
|
|
|
turned into a ball. Allow the |
|
|
|
|
dough to cool before further |
|
|
|
|
processing. |
|
Ingredients & |
Max. |
Speed |
Procedure |
Applications |
results |
quanti |
/acces |
|
|
|
ty |
sory |
|
|
Dough (for |
200g |
2 / P |
Use cold margarine and cold |
Fruit tarts, pies, |
tarts, pies) - |
flour |
|
water. Put flour in the bowl |
quiches |
kneading |
|
|
and add the margarine cut into |
|
|
|
|
pieces of 2cm. Mix at the |
|
|
|
|
highest speed until the dough |
|
|
|
|
has become crumbly, then add |
|
|
|
|
cold water while mixing. Stop |
|
|
|
|
as soon as the dough starts to |
|
|
|
|
turn into a ball. Allow the |
|
|
|
|
dough to cool before further |
|
|
|
|
processing. |
|
|
|
|
|
|
Dough (yeast) |
300g |
2 / { |
First mix yeast, warm milk and |
Luxury bread |
- kneading |
flour |
|
some sugar in a separate bowl. |
|
|
|
|
Put all the ingredients in the |
|
|
|
|
food processor bowl and |
|
|
|
|
knead the dough until it is |
|
|
|
|
smooth and no longer sticks to |
|
|
|
|
the wall of the bowl (takes |
|
|
|
|
approx. 1 minute). Leave it to |
|
|
|
|
rise for 30 minutes. |
|
Egg whites - |
4 egg |
2 / S |
Use egg whites at room |
Pudding, |
emulsifying |
whites |
|
temperature. Note: use at least |
soufflees, |
|
|
|
2 egg whites. |
meringues |
|
|
|
|
|
Fruit (e.g. |
500g |
P / P |
Tip: add a little lemon juice to |
Puddings, baby |
apples, |
|
|
prevent the fruit from |
food |
bananas) - |
|
|
discolouring. Add some liquid |
|
chopping/pure |
|
|
to obtain a smooth puree. |
|
eing |
|
|
|
|
Garlic - |
300g |
P / P |
Peel the garlic. Always press |
Garnishing, |
chopping |
|
|
the pulse button several times |
dips |
|
|
|
to prevent the garlic from |
|
|
|
|
being chopped too fine. Use at |
|
|
|
|
least 150g. |
|
Ingredients & |
Max. |
Speed |
Procedure |
Applications |
results |
quanti |
/acces |
|
|
|
ty |
sory |
|
|
Herbs (e.g. |
Min. |
2/P / P |
Wash and dry the herbs before |
Sauces, soups, |
parsley) - |
75g |
|
chopping |
garnishing, |
chopping |
|
|
|
herb butter |
|
|
|
|
|
Juices (e.g. |
500g |
2 / D |
Add water or another liquid |
Fruit juices |
papaya, water |
(total |
|
(optional) to obtain a smooth |
|
melon, pear) - |
amou |
|
juice. |
|
blending |
nt) |
|
|
|
Mayonnaise - |
3 eggs |
1-2 / |
All the ingredients must be at |
Salads, |
emulsifying |
|
S |
room temperature. Note: use |
garnishing and |
|
|
|
at least one large egg, two |
barbecue |
|
|
|
small eggs or two egg yolks. |
sauces |
|
|
|
Put the egg and a little vinegar |
|
|
|
|
in the bowl and add the oil |
|
|
|
|
drop by drop. |
|
|
|
|
|
|
Meat (lean) - |
300g |
2/ P / |
First remove any sinews or |
Steaks tartare, |
mincing |
|
P |
bones. Cut the meat into cubes |
hamburgers, |
|
|
|
of 3 cm. Use the pulse function |
meat balls |
|
|
|
for a coarser chopping result. |
|
Milkshakes - |
250ml |
2 / D |
Puree the fruit (e.g. bananas, |
Milkshakes |
blending |
milk |
|
strawberries) with sugar, milk |
|
|
|
|
and some ice cream and mix |
|
|
|
|
well. |
|
|
|
|
|
|
Cake mixture |
3 eggs |
2 / P |
The ingredients must be at |
Various cakes. |
- mixing |
|
|
room temperature. Mix the |
|
|
|
|
softened butter and the sugar |
|
|
|
|
until the mixture is smooth and |
|
|
|
|
creamy. Then add milk, eggs |
|
|
|
|
and flour. |
|
Nuts - |
250g |
2/ P / |
Use the pulse button for |
Salads, bread, |
chopping |
|
P |
coarse chopping or speed 2 for |
almond paste, |
|
|
|
fine chopping. |
puddings |
ENGLISH 15
Ingredients & |
Max. |
Speed |
Procedure |
Applications |
results |
quanti |
/acces |
|
|
|
ty |
sory |
|
|
Onions - |
400g |
P / P |
Peel the onions and cut them |
Stir-fries, |
chopping |
|
|
into 4 pieces. Note: use at least |
garnishing |
|
|
|
100g. Always press the pulse |
|
|
|
|
button several times to prevent |
|
|
|
|
the onions from being chopped |
|
|
|
|
too fine. |
|
|
|
|
|
|
Onions - |
300g |
1 / g |
Peel the onions and cut them |
Stir-fries, |
slicing |
|
|
into pieces that fit into the |
garnishing |
|
|
|
tube. Note: use at least 100g. |
|
Poultry - |
200g |
2/ P / |
First remove any sinews or |
Minced meat |
mincing |
|
P |
bones. Cut the meat into cubes |
|
|
|
|
of 3 cm. Use the pulse button |
|
|
|
|
for a coarser chopping result. |
|
|
|
|
|
|
Soups - |
500ml |
2 / D |
Use cooked vegetables |
Soups, sauces |
blending |
|
|
|
|
Whipping |
350ml |
P / S |
Use cream that comes straight |
Garnishing, |
cream - |
|
|
from the refrigerator. Note: |
cream, ice- |
whipping |
|
|
use at least 125ml cream. The |
cream |
|
|
|
whipped cream is ready after |
mixtures |
|
|
|
approx. 20 seconds. |
|

16 ENGLISH
Recipes
Broccoli soup (for 4 persons) h or D
-50g mature Gouda cheese
-300g cooked broccoli (stalks and florets)
-cooking liquid of the broccoli
-2 boiled potatoes in pieces
-2 stock cubes
-2 tbsp whipping cream
-curry
-salt
-pepper
-nutmeg
BShred the cheese. Puree the broccoli with the boiled potatoes and some of the cooking liquid of the broccoli. Put the broccoli puree and the remaining liquid and stock cubes into a measuring beaker and fill it up to 750ml. Transfer the soup to a pan and bring it to the boil while stirring. Stir in the cheese and season with curry, salt, pepper and nutmeg and add the cream.
Fruit cake
P
-450 g dry pitted dates, halved
-200 g dry plums, halved
-650 g pecan nuts
-160 g shredded coconut
-300 g glazed pineapple
-1 tin (400 g) sweetened condensed milk
-1 tsp vanilla essence
B Grease two 20cm-long baking tins and preheat the oven to 135c C.
BPut the halved dates and plums in the food processor bowl and chop at maximum speed for
30 seconds. Then empty the bowl.
BPut the pecan nuts in the food processor bowl and roughly chop the nuts, using the pulse
function. Then empty the bowl.
BPut the glazed pineapple in the food processor bowl and chop into pieces, using the pulse
function. Then empty the bowl.
BMix the dates, plums, pecan nuts, pineapple and shredded coconut in a large mixing bowl and mix
them.
B Add milk and vanilla to the ingredients and mix. B Put the fruit mixture in the baking tins and bake
the cakes at 135c C for 90 minutes.
BDo not process this recipe more than once without interruption. if you need to more quantities, let the appliance cool down first and then continue the process.
Mashed potatoes
P
-750g cooked potatoes
-approx. 250ml hot milk (90cC)
-1 tbsp of butter
-salt
BFirst mash the potatoes, then add milk, salt and butter. Use speed 1 and process for only approx. 30 seconds to prevent the puree from becoming sticky.

Mayonnaise
S
-2 egg yolks or 1 large egg
-1 tsp mustard
-1 tsp vinegar
-200ml oil
BThe ingredients must be at room temperature. Put the emulsifying disc in the bowl. Put the egg yolks or egg, mustard and vinegar in the bowl. Use speed 1 or 2. Pour the oil gradually through the feed tube onto the rotating disc. You can use the
hole in the pusher to add the oil.
B Tip for tartare sauce: add parsley, gherkins and hard-boiled eggs.
BTip for cocktail sauce: add 50ml creme fraiche, a dash of whisky, 3 tsp tomato puree and a dash of ginger syrup to 100ml mayonnaise.
Milkshake
D
-175ml milk
-10g sugar
-1/2 banana or approx.
-65g other fresh fruit
-50g vanilla ice cream
B Mix all the ingredients until the mixture is frothy.
Pizza
{
-400g flour
-40 ml oil
-1/2 tsp salt
ENGLISH 17
-20g fresh yeast or 1.5 sachets dried yeast
-approx. 240ml water (35cC)
For the topping:
-300ml sieved tomatoes (tinned)
-1 tsp mixed Italian herbs (dried or fresh)
-1 onion
-2 cloves garlic
-salt and pepper
-sugar
-Ingredients to be spread on the sauce: olives, salami, artichokes, mushrooms, anchovies.
Mozzarella cheese, peppers, grated mature cheese and olive oil according to taste.
BPlace the kneading accessory in the bowl. Put all the ingredients in the bowl and select speed
2. Knead the dough for approx. 1 minute until a smooth ball has formed. Hold the appliance down with one hand to prevent it from moving around on the worktop. Put the dough in a separate bowl, cover it with a damp cloth and leave it to rise for
about 30 minutes.
B Use the blade to chop the onion and the garlic. Fry the chopped onion and garlic until transparent.
BAdd the sieved tomatoes and the herbs and simmer the sauce for about 10 minutes.

18 ENGLISH
B Season to taste with salt, pepper and sugar. Allow the sauce to cool down.
B Heat the oven to 250cC.
BRoll the dough out on a floured worktop and make two round shapes. Place the dough shapes on a greased baking tray. Spread the topping on the pizza, leaving the edges free. Spread with the desired ingredients, scatter some grated cheese
over the pizza and drip some olive oil over it. B Bake the pizzas for 12 to 15 minutes.
Potato-courgette gratin
P g k
-375g potatoes
-pinch salt
-1 courgette (approx. 250g)
-1 clove of garlic, crushed
-approx. 40g butter + butter to grease the oven dish
-2 tsp Italian or Provencal herbs
-1 large egg
-75ml whipping cream
-75ml milk
-pepper
-70g semi-matured cheese
B Peel and wash the potatoes.
BPut the slicing insert in the insert holder and place the insert holder in the bowl. Slice the potatoes
and the courgette at speed 1.
B Cook the potato slices in boiling water with a pinch of salt until they are almost done.
B Put the slices in a colander and drain them properly.
BPut 20g butter and crushed garlic in a frying pan, fry half of the courgette slices for 3 minutes while turning them frequently. Sprinkle the slices with 1 tsp of Italian or Provencal herbs. Fry the other half of the courgette slices in the same way. Sprinkle
them with the rest of the herbs.
B Drain the fried courgette slices on kitchen paper.
BGrease a low-sided oven dish and put the courgette and potato slices in the dish, alternating them and arranging them in such way that they
partly overlap like roof tiles.
BWhisk the egg with the cream and the milk with the blade at speed 2. Add salt and pepper according to taste and pour the mixture over the
potato and courgette slices in the dish.
BReplace the slicing insert with the shredding insert, shred the cheese at speed 2 and sprinkle it over
the dish.
BPut the dish in the centre of a hot oven (200cC) and brown it in about 15 minutes.
Salmon mousse
P S
-1 tin of salmon (220g)
-2 sheets of gelatine
-a few stems of chives
-pinch salt
-pinch cayenne pepper
-half tbsp lemon juice
-125ml whipping cream
-1 small onion
-watercress for garnishing

B Soak the gelatine in plenty of water.
B Chop the chives and onions in the food processor using the pulse function.
B Remove the bones and the skin from the salmon.
BAdd salt, cayenne pepper, lemon juice, salmon and the liquid from the tin to the chopped chives
and onion and puree the ingredients at speed 2. B Put the puree in a bowl.
B Boil a small quantity of water and dissolve the gelatine in it.
B Stir the gelatine solution through the salmon puree.
BPut the emulsifying disc in the bowl and whip the cream by pressing the pulse button for about
15 seconds.
B Fold the whipped cream into the salmon puree with a wooden spoon.
B Turn the mousse out onto a dish, cover it and chill it in the refrigerator for a few hours.
B Garnish the mousse with some watercress.
Sandwich spread
P
-2 small carrots in pieces
-2-3 gherkins in pieces
-75g cauliflower in pieces
-75g celeriac in pieces
-green herbs (parsley, dill, tarragon, celery stalks in pieces)
-100g mayonnaise
-100g quark
-salt
-pepper
ENGLISH 19
BChop the carrots, gherkins, cauliflower, green herbs, celery stalks and celeriac fine. Mix in the mayonnaise and quark carefully and season to taste with pepper and salt.
Spanish cabbage salad
P
-1 small red cabbage
-2 red onions
-1 fennel
-1 apple
-juice of one orange and 2 tbsp red wine vinegar
-1 tbsp mustard
B Mix the juice, mustard and vinegar. Slice the cabbage, onions, fennel and apple at speed 1.
B Combine the ingredients in a salad bowl.
Sponge cake
P
-4 eggs
-30ml of water (35cC)
-1 pinch of salt
-150g sugar
-1 sachet vanilla sugar
-150g sieved flour
-3g baking powder
BBeat the eggs and the water for approx.
2 minutes. Gradually add the sugar, the vanilla sugar and the salt and mix for approx. 1 minute. The mixture should leave a trail when you lift

20 ENGLISH
some of it from the bowl with a spoon. Fold in the flour and baking powder with a spatula. Bake it in 30-35 minutes.
BTip: You can fill the sponge cake with different kinds of butter cream or simply with whipped cream and fresh fruit.
Tzatziki k
-1 cucumber
-200ml yoghurt
-1 tbsp olive oil
-2 cloves garlic
-pinch salt
-1 tsp finely chopped dill
-a few mint leaves
BPeel the cucumber and shred it at speed 1. Put the shredded cucumber in a colander and let it
drain properly.
BMix the other ingredients, except for the mint leaves, through the cucumber. Chill the salad by putting it in a covered bowl in the refrigerator for one hour. Sprinkle mint leaves on top before serving.
Malakser: części i akcesoria
A)Regulator prędkości obrotów
B)Część silnikowa
C)Wbudowany zamek bezpieczeństwa
D)Miska
E)Nakrętka (musi być zamontowana, by można było używać miski malaksera)
F)Uchwyt na akcesoria
G)Blender
H)Wypustka pokrywki (uruchamia i wyłącza zamek bezpieczeństwa)
I)Pokrywka miski malaksera
J)Lej wsypowy
K)Popychacz
L)Pokrywka blendera
M)Osłona pokrywki ze schowkiem
N)Nakładka krojąca na plastry średniej grubości
O)Nakładka drobno ścierająca
P)Nakładka średnio ścierająca
Q)Uchwyt nakładki
R)Ostrze (z ochronną osłonką)
S)Mieszak
T)Tarcza emulgująca
U)Łopatka
Wstęp
Urządzenie to zostało wyposażone w automatyczny termiczny system odcinający dopływ prądu. W przypadku przegrzania system ten automatycznie odcina dopływ prądu do urządzenia.
POLSKI 21
Jeśli urządzenie nagle się zatrzyma:
1 Wyjmij wtyczkę z gniazdka ściennego.
2Wciśnij przycisk "PULSE / 0".
3Odczekaj 60 minut, aż urządzenie ostygnie.
4 Włóż wtyczkę do gniazdka ściennego.
5Włącz ponownie urządzenie.
Skontaktuj się ze sklepem lub punktem serwisowym firmy Philips, jeśli automatyczny termiczny system odcinający dopływ prądu będzie włączać się zbyt często.
UWAGA: W celu uniknięcia niebezpiecznych
sytuacji spowodowanych przypadkowym włączeniem systemu odcinającego dopływ prądu
urządzenie to nie może być podłączone do
wyłącznika czasowego.
Ważne
Zanim po raz pierwszy skorzystasz z malaksera, przeczytaj instrukcję obsługi i zapoznaj się z poniższymi rysunkami.
Zachowaj tę instrukcję na przyszłość.
Zanim podłączysz urządzenie, sprawdź, czy napięcie wskazane na urządzeniu odpowiada lokalnemu napięciu sieciowemu (110-127V lub 220240V).

22 POLSKI
Nigdy nie używaj akcesoriów ani części zamiennych innych producentów lub takich, których nie zaleca firma Philips. Używanie takich akcesoriów lub części zamiennych spowoduje unieważnienie gwarancji.
Nie używaj urządzenia, jeśli przewód zasilający, wtyczka lub inne części są uszkodzone.
Jeśli przewód zasilający ulegnie uszkodzeniu, musi zostać wymieniony w autoryzowanym punkcie serwisowym firmy Philips, co pozwoli uniknąć ewentualnego niebezpieczeństwa.
Przed pierwszym użyciem umyj wszystkie części urządzenia stykające się z żywnością.
Nie przekraczaj maksymalnej ilości produktów ani czasu ich obróbki podanych w tabeli.
Nie przekraczaj maksymalnej ilości wskazanej na misce lub dzbanku blendera, tzn. nie napełniaj ich powyżej górnego oznaczenia.
Natychmiast po zakończeniu pracy wyłącz urządzenie z gniazdka ściennego.
Gdy urządzenie jest włączone, nigdy nie wkładaj palców ani przedmiotów (np. łopatki) do leja wsypowego w celu popchnięcia produktów. W tym celu używaj wyłącznie popychacza.
Zawsze wyłączaj urządzenie z sieci przed włożeniem palców albo jakiegoś przedmiotu (np. łopatki) do blendera.
Przechowuj urządzenie w miejscu niedostępnym dla dzieci.
Nie pozostawiaj włączonego urządzenia bez nadzoru.
Nigdy nie wyłączaj urządzenia przez przekręcenie pokrywy. Wyłączaj je, wciskając przycisk "PULSE / 0".
Wyłączaj urządzenie przez odłączeniem każdej nakładki.
Nigdy nie zanurzaj części silnikowej urządzenia w wodzie ani innym płynie. Nie spłukuj jej bieżącą wodą. Do czyszczenia części silnikowej używaj wyłącznie wilgotnej ściereczki.
Podczas właściwego montowania dzbanka blendera, miski, zatyczki usłyszysz charakterystyczne kliknięcie.
Tarczę emulgującą, ostrze i mieszaki należy umieszczać w uchwycie na akcesoria, który znajduje się w misce.
Przed każdym użyciem zdejmuj z ostrza osłonkę ochronną.
Nie dotykaj OSTRYCH krawędzi, zwłaszcza gdy urządzenie jest podłączone do sieci.
Jeśli ostrze zablokuje się, wyłącz urządzenie zanim usuniesz składniki, które zablokowały ostrze.
Odczekaj, aż gorące składniki ostygną, zanim poddasz je dalszej obróbce (maksymalna temperatura 80cC/175cF).
Jeśli poddajesz obróbce płynny składnik, który może się pienić, nie wlewaj do blendera więcej niż 1 litr płynu. W ten sposób unikniesz rozchlapywania.
Poziom hałasu: L= 83 dB(A)

Zwróć uwagę na fakt, że gdy zarówno blender,
jaki miska są prawidłowo zamontowane, tylko
blender będzie działać.
Użycie urządzenia
Miska
Jeśli chcesz korzystać z miski, zdejmij blender z otworu montażowego i zkryj otwór za
|
pomocą zatyczki. Wszystkie funkcje, które |
|
|
wymagają użycia miski będą działać, o ile z |
|
1 |
urządzenia zostanie zdjęty blender. |
|
CLICK |
C 1 |
Zamontuj miskę na malakserze, |
2 |
|
przekręcając uchwyt w kierunku |
|
|
wskazanym strzałką, aż usłyszysz |
|
|
charakterystyczne kliknięcie. |
1 |
C 2 |
Umieść pokrywkę na misce. Przekręć |
2 |
|
pokrywkę w kierunku wskazanym przez |
|
|
|
CLICK |
|
strzałkę, aż usłyszysz charakterystyczne |
|
|
kliknięcie (wymaga to użycia nieco siły). |
Wbudowany zamek bezpieczeństwa
BZarówno część silnikowa, jak i pokrywka zostały oznakowane. Urządzenie zadziała tylko wtedy, gdy strzałka na części silnikowej znajdzie się dokładnie naprzeciw oznaczenia na pokrywce.
|
C 1 Upewnij się, czy oznaczenie na pokrywce i |
|
strzałka na misce znajdują się dokładnie |
CLICK |
naprzeciwko siebie. Część wystająca |
|
|
|
pokrywki znajduje się teraz dokładnie nad |
|
otworem w uchwycie. |
|
|
|
POLSKI 23 |
|
|
Lej wsypowy i popychacz |
|
|
|
|
|
|
C |
|
Lej wsypowy służy do dodawania płynnych |
|
|
||
1 |
|||
|
|
|
i stałych składników. Do popychania |
|
|
|
stałych składników służy popychacz. |
|
|
|
|
C |
|
Można także używać popychacza jako |
|
2 |
|||
|
|
|
zatyczki w celu zapobieżenia wypadaniu |
produktów z leja.
Ostrze
1 C
CLICK
2
Ostrze służy do rozdrabniania, miksowania, mieszania, ucierania i wyrabiania ciasta.
1Ustaw miskę na części silnikowej.
C 2 Zdejmij ochronną osłonkę z ostrza.
Krawędzie ostrza są bardzo ostre. Nie dotykaj ich!
24 POLSKI
C 3 |
Umieść ostrze na uchwycie na akcesoria. |
|
|
Wówczas bowiem ser rozgrzewa się za |
|
|
|
|
|
bardzo i zaczyna topić się i kleić. |
|
|
|
|
|
Nie używaj ostrza do rozdrabniania bardzo |
|
|
|
|
|
twardych składników, takich jak ziarna kawy, |
|
|
|
|
|
gałka muszkatołowa czy kostki lodu. Ostrze |
|
C 4 |
Włóż do miski uchwyt na akcesoria. |
|
|
może się stępić. |
|
|
|
Jeśli produkty przykleją się do ostrza lub do |
|||
5 Włóż składniki do miski. Składniki pokrój |
|
|
|||
|
|
ścianek miski: |
|||
|
na kawałki o wymiarach ok. 3 cm x 3 cm. |
|
|
1 |
Wyłącz urządzenie. |
|
Załóż pokrywkę na miskę. |
|
|
||
C 6 |
Regulator obrotów umożliwia |
|
|
2 Zdejmij pokrywkę z miski. |
|
|
dostosowanie prędkości urządzenia do |
|
|
3 |
Odklej produkty łopatką. |
|
zamierzonych rezultatów. |
|
|
||
B ustawienie "PULSE / 0": działanie pulsacyjne oraz |
|
|
Nakładki |
||
wyłączenie urządzenia. Jeśli przycisk "PULSE / 0" |
|
|
|||
jest wciśnięty, urządzenie działa na najwyższych |
|
|
Krawędzie tnące nakładek są bardzo ostre. Nie |
||
obrotach. Po zwolnieniu przycisku, urządzenie |
|
|
|||
zatrzymuje się. |
|
|
dotykaj ich! |
||
B ustawienie 1: normalna prędkość obrotów |
|
|
Nigdy nie próbuj rozdrabniać wkładkami takich |
||
B ustawienie 2: wysoka prędkość obrotów |
1 |
|
|||
|
|
|
2 |
twardych produktów, jak kostki lodu. |
|
Zalecane ustawienia znajdziesz w tableli. Obróbka |
|
CLICK C 1 |
Włóż wybraną nakładkę na uchwyt. |
||
zajmuje od 1 do 60 sekund. |
|
||||
Porady |
|
|
C 2 |
Umieść uchwyt nakładki w uchwycie na |
|
Urządzenie rozdrabnia bardzo szybko. Używaj |
|
|
|
akcesoria, który znajduje się w misce. |
|
funkcji pulsacyjnej przez krótki czas, aby |
|
|
3 Załóż pokrywkę na miskę. |
||
zapobiec zbyt dużemu rozdrobnieniu |
|
|
|||
produktów. |
|
|
|
|
|
Uważaj, by urządzenie nie działało zbyt długo podczas rozdrabniania sera (żółtego).

C 4 Włóż składniki do leja wsypowego. Potnij produkty na kostki, które zmieszczą się w leju.
5Aby osiągnąć najlepsze rezultaty, napełniaj lej wsypowy równomiernie.
Jeśli masz do rozdrobnienia duże ilości składników, poddawaj jednorazowo obróbce małe porcje i opróżniaj miskę regularnie.
3Wybierz odpowiednie ustawienie, by uzykać najlepsze rezultaty. Zalecane ustawienia znajdziesz w tabeli.
Obróbka zajmuje ok. 10 - 60 sekund.
C |
|
Powoli i miarowo przyciskaj popychaczem |
4 |
||
|
|
składniki w leju wsypowym. |
C |
|
Aby zdjąć nakładkę z uchwytu, weź w ręce |
5 |
||
|
uchwyt; tylną częścią skierowaną do siebie. Przyciśnij brzegi nakładki kciukami, tak aby nakładka wypadła z uchwytu.
Mieszak
Mieszak może być używany do wyrabiania gęstego ciasta na chleb lub pączki bądź do miksowania rzadkiego ciasta i mas.
C 6 Umieść mieszak na uchwycie akcesoriów.
|
|
POLSKI 25 |
1 |
C 8 |
Zamknij miskę pokrywką. |
|
2 |
|
CLICK |
|
|
|
C 9 |
Zamknij lej wsypowy popychaczem. |
|
C 10 |
Wybierz odpowiednie ustawienie, by |
|
|
uzyskać planowane rezulaty. Zalecane |
ustawienia znajdziesz w tabeli.
Tarcza emulgująca
Dzięki tej tarczy możesz przygotować majonez, bitą śmietanę, pianę z białek.
C 11 Załóż tarczę emulgującą na uchwyt na akcesoria, który znajduje się w misce.
12Włóż składniki do miski i załóż pokrywkę.
13Wybierz odpowiednie ustawienie, by uzyskać planowane rezulaty. Zalecane ustawienia znajdziesz w tabeli.
7Włóż składniki do miski.

26 POLSKI
Porady
Jeśli chcesz ubić pianę z białek, upewnij się, że mają one temperaturę pokojową.
Wyjmij jajka z lodówki co najmniej pół godziny przed ich użyciem.
Wszystkie składniki potrzebne do przygotowania majonezu powinny mieć temperaturę pokojową.
Olej można wlewać przez mały otworek w popychaczu.
Jeśli masz zamiar ubić śmietanę, śmietana powinna być wyjęta prosto z lodówki. Należy przestrzegać wskazówek podanych w tabeli. Śmietany nie można ubijać za długo.
Jeśli chcesz mieć większą kontrolę nad obróbką składników, używaj funkcji pulsacyjnej.
Blender
Blender jest przeznaczony do:
-mieszania płynów, np. produktów mlecznych, sosów, soków owocowych, zup, koktajli.
-miksowania miękkich składników, np. ciasta na naleśniki lub majonezu.
-Ucierania gotowanych składników, np. potrawy dla niemowląt.
2 C 14 Zdejmij zatyczkę.
1
1 |
C 15 |
Zamocuj blender w otworze |
2 |
|
montażowym, przekręcając dzbanek |
|
blendera w kierunku wskazanym strzałką |
|
|
|
|
|
|
do momentu, gdy będzie dobrze |
CLICK |
|
przykręcony. |
|
|
|
|
Nie wywieraj zbyt dużego nacisku na uchwyt |
|
|
blendera. |
|
|
C 16 |
Włóż składniki do blendera. |
1 |
17 |
Zakręć pokrywkę blendera. |
2 |
18 |
Włącz urządzenie i zmiksuj składniki. |
|
||
|
|
Regulator prędkości obrotów umożliwia |
|
|
dostosowanie ustawień do planowanych |
|
|
rezultatów. Zalecane ustawienia znajdziesz |
|
|
w tabeli. |
Porady
C Wlewaj płynne składniki do dzbanka blendera przez otwór w pokrywce.
Im dłużej urządzenie działa, tym drobniej będą zmiksowane składniki.
Przed włożeniem do blendera, potnij produkty na mniejsze kawałki. Jeśli chcesz zmiskować duże ilości produktów, podziel je na małe porcje, zamiast miksować wszystko na raz.
Jeśli masz wątpliwości co do wyboru odpowiedniego ustawienia, zawsze wybieraj najwyższe ustawienie (pozycja 2).
Jeśli składniki przykleją się do ścianek blendera:
1Wyłącz urządzenie i wyjmij wtyczkę z gniazdka ściennego.
2Zdejmij pokrywkę.
Nigdy nie zdejmuj pokrywki, kiedy urządzenie
jeszcze się nie zatrzymało.
3Usuń składniki ze ścianek blendera za pomocą łopatki.
Trzymaj łopotkę w bezpiecznej odległości od ostrza noża (ok. 2 cm.)
Czyszczenie
Przed przystąpieniem do czyszczenia części silnikowej zawsze wyłączaj urządzenie z sieci.
1Wytrzyj część silnikową wilgotną ściereczką. Nie zanurzaj części silnikowej w wodzie ani jej nie spłukuj.
2Zawsze bezpośrednio po zakończeniu obróbki myj części, które kontaktują się z żywnością. Myj je w gorącej wodzie z płynem do mycia naczyń.
Miskę, pokrywkę, popychacz i inne akcesoria można także myć w zmywarce.
Części te zostały poddane testowi wytrzymałości na zmywanie w zmywarce, zgodnie z normą DIN EN 12875.
POLSKI 27
Pokrywa ze schowkiem na nakładki i dzbanek
blendera nie są odporne na zmywanie w
zmywarce!
Umyj ostrożnie i starannie nóż, ostrze blendera i
nakładki. Krawędzie tnące są bardzo ostre!
Upewnij się, czy ostrze noża, ostrze blendera i nakładki nie dotykają twardych przedmiotów. Mogłoby to bowiem spowodować ich stępienie.
Niektóre składniki mogą powodować przebarwienia na akcesoriach. Nie wpływa to negatywnie na działanie tych akcesoriów. Po pewnym czasie przebarwienia na ogół znikają samoistnie.
Szybkie mycie blendera
C 1 Wlej letnią wodę (nie więcej niż 0,5 litra) wraz z płynem do mycia naczyń do dzbanka blendera.
2Zamknij pokrywkę.
C 3 Włącz urządzenie na kilka minut, wciskając przycisk "PULSE / 0". (Urządzenie zatrzyma się, gdy zwolnisz przycisk.)
4Odłącz dzbanek blendera i wypłucz czystą wodą.

28 POLSKI
Przechowywanie
MicroStore
C Załóż akcesoria (tarczę emulgującą, nóż, mieszak, uchwyt nakładki) na uchwyt na akcesoria i schowaj je w misce. Zawsze na końcu chowaj uchwyt nakładek.
C Dwie nakładki można przechowywać w schowku w pokrywie miski, zgodnie z ilustracją na wewnętrznej stronie pokrywy. Nakładki trzeba wsunąć, nie wciskając, w pokrywę.
C Umieść pokrywę ze schowkiem na nakładki na przezroczystej pokrywie miski.
Owiń przewód zasilający na szpuli z tyłu urządzenia.
Gwarancja i serwis
Jeśli potrzebujesz informacji lub jeśli masz jakiś problem skontaktuj się z Działem Obsługi Klienta (numer telefonu znajdziesz w Karcie Gwarancyjnej) lub też najbliższym punktem serwisowym sprzętu AGD, autoryzowanym przez firmę Philips (patrz: wykaz w Karcie Gwarancyjnej).
Ilości produktów i czas obróbki
Składniki i |
Maksy |
Ustaw Postępowanie |
Zastosowanie |
rezultaty |
malna |
ienie |
|
obróbki |
ilość |
prędk |
|
|
|
ości / |
|
|
|
akces |
|
|
|
oria |
|
|
|
|
|
Rzadkie ciasto |
250ml 2 / P |
(na naleśniki) - |
mleka |
ubijanie |
|
Najpierw wlej mleko do blendera, następnie dodaj suche składniki. Miksuj składniki przez 1 minutę. W razie potrzeby powtórz czynność dwukrotnie.
Naleśniki, gofry
Potrawy
Bułka tarta - |
100g |
2 |
/ P |
Użyj suchego, chrupiącego |
obtaczane |
rozdrabnianie |
|
|
|
pieczywa. |
bułką tartą, |
|
|
|
|
|
zapiekanki |
|
|
|
|
|
|
Krem maślany |
300g |
2 |
/ P |
Aby uzyskać lekki krem, użyj |
Desery, |
(creme au |
|
|
|
miękkiego masła |
polewy |
beurre) - |
|
|
|
|
|
ubijanie |
|
|
|
|
|
|
|
|
|
|
|
Warzywa |
350g |
2 |
/ j |
Pokrój warzywa na kawałki, |
Przystrajanie |
(marchewka, |
|
2 |
/ k |
które zmieszczą się do leja |
dań, surowe |
rzepa, |
|
|
|
wsypowego. Wypełnij lej |
warzywa, dania |
rzodkiewki) - |
|
|
|
warzywami i rozdrabniaj je, |
z rzepy, ciasta, |
krojenie w |
|
|
|
przyciskając lekko |
dipy. |
plastry |
|
|
|
popychaczem. |
|
Warzywa |
350g |
2 |
/ P / |
Napełnij lej wsypowy |
Sałatki |
(marchewka, |
|
g |
|
warzywami i przyciskaj je lekko |
|
pory, selery) - |
|
|
|
popychaczem. |
|
krojenie w |
|
|
|
|
|
plastry |
|
|
|
|
|
|
|
|
|
|
|
Ser |
200g |
2 |
/ P |
Użyj sera bez skórki i potnij go |
Przystrajanie |
(parmezan) - |
|
|
|
na kawałki o wielkości ok. 3cm |
dań, zupy, |
ucieranie |
|
|
|
x 3cm. |
sosy, dania au |
|
|
|
|
|
gratin |
|
|
|
|
|
(zapiekanki) |
|
|
|
|
|
|
Składniki i |
Maksy |
Ustaw |
Postępowanie |
Zastosowanie |
rezultaty |
malna |
ienie |
|
|
obróbki |
ilość |
prędk |
|
|
|
|
ości / |
|
|
|
|
akces |
|
|
|
|
oria |
|
|
Rzadkie ciasto |
250ml |
2 / P |
Najpierw wlej mleko do |
Naleśniki, |
(na naleśniki) - |
mleka |
|
blendera, następnie dodaj |
gofry |
ubijanie |
|
|
suche składniki. Miksuj składniki |
|
|
|
|
przez 1 minutę. W razie |
|
|
|
|
potrzeby powtórz czynność |
|
|
|
|
dwukrotnie. |
|
|
|
|
|
|
Bułka tarta - |
100g |
2 / P |
Użyj suchego, chrupiącego |
Potrawy |
rozdrabnianie |
|
|
pieczywa. |
obtaczane |
|
|
|
|
bułką tartą, |
|
|
|
|
zapiekanki |
Krem maślany |
300g |
2 / P |
Aby uzyskać lekki krem, użyj |
Desery, |
(creme au |
|
|
miękkiego masła |
polewy |
beurre) - |
|
|
|
|
ubijanie |
|
|
|
|
|
|
|
|
|
Warzywa |
350g |
2 / j |
Pokrój warzywa na kawałki, |
Przystrajanie |
(marchewka, |
|
2 / k |
które zmieszczą się do leja |
dań, surowe |
rzepa, |
|
|
wsypowego. Wypełnij lej |
warzywa, dania |
rzodkiewki) - |
|
|
warzywami i rozdrabniaj je, |
z rzepy, ciasta, |
krojenie w |
|
|
przyciskając lekko |
dipy. |
plastry |
|
|
popychaczem. |
|
Warzywa |
350g |
2 / P / |
Napełnij lej wsypowy |
Sałatki |
(marchewka, |
|
g |
warzywami i przyciskaj je lekko |
|
pory, selery) - |
|
|
popychaczem. |
|
krojenie w |
|
|
|
|
plastry |
|
|
|
|
|
|
|
|
|
Ser |
200g |
2 / P |
Użyj sera bez skórki i potnij go |
Przystrajanie |
(parmezan) - |
|
|
na kawałki o wielkości ok. 3cm |
dań, zupy, |
ucieranie |
|
|
x 3cm. |
sosy, dania au |
|
|
|
|
gratin |
|
|
|
|
(zapiekanki) |
|
|
|
|
POLSKI 29 |
|
|
|
|
|
Składniki i |
Maksy |
Ustaw |
Postępowanie |
Zastosowanie |
rezultaty |
malna |
ienie |
|
|
obróbki |
ilość |
prędk |
|
|
|
|
ości / |
|
|
|
|
akces |
|
|
|
|
oria |
|
|
Rzadkie ciasto |
250ml |
2 / P |
Najpierw wlej mleko do |
Naleśniki, gofry |
(na naleśniki) - |
mleka |
|
blendera, następnie dodaj |
|
ubijanie |
|
|
suche składniki. Miksuj składniki |
|
|
|
|
przez 1 minutę. W razie |
|
|
|
|
potrzeby powtórz czynność |
|
|
|
|
dwukrotnie. |
|
|
|
|
|
|
Bułka tarta - |
100g |
2 / P |
Użyj suchego, chrupiącego |
Potrawy |
rozdrabnianie |
|
|
pieczywa. |
obtaczane |
|
|
|
|
bułką tartą, |
|
|
|
|
zapiekanki |
Krem maślany |
300g |
2 / P |
Aby uzyskać lekki krem, użyj |
Desery, |
(creme au |
|
|
miękkiego masła |
polewy |
beurre) - |
|
|
|
|
ubijanie |
|
|
|
|
|
|
|
|
|
Warzywa |
350g |
2 / j |
Pokrój warzywa na kawałki, |
Przystrajanie |
(marchewka, |
|
2 / k |
które zmieszczą się do leja |
dań, surowe |
rzepa, |
|
|
wsypowego. Wypełnij lej |
warzywa, dania |
rzodkiewki) - |
|
|
warzywami i rozdrabniaj je, |
z rzepy, ciasta, |
krojenie w |
|
|
przyciskając lekko |
dipy. |
plastry |
|
|
popychaczem. |
|
Warzywa |
350g |
2 / P / |
Napełnij lej wsypowy |
Sałatki |
(marchewka, |
|
g |
warzywami i przyciskaj je |
|
pory, selery) - |
|
|
lekko popychaczem. |
|
krojenie w |
|
|
|
|
plastry |
|
|
|
|
|
|
|
|
|
Ser |
200g |
2 / P |
Użyj sera bez skórki i potnij |
Przystrajanie |
(parmezan) - |
|
|
go na kawałki o wielkości ok. |
dań, zupy, sosy, |
ucieranie |
|
|
3cm x 3cm. |
dania au gratin |
|
|
|
|
(zapiekanki) |
|
|
|
|
|
30 POLSKI
Składniki i |
Maksy |
Ustaw |
Postępowanie |
Zastosowanie |
|
rezultaty |
malna |
ienie |
|
|
|
obróbki |
ilość |
prędk |
|
|
|
|
|
ości / |
|
|
|
|
|
akces |
|
|
|
|
|
oria |
|
|
|
Ciasto |
300g |
2 / { |
Najpierw wymieszaj drożdże, |
Placek |
|
(drożdżowe) - |
mąki |
|
|
ciepłe mleko i cukier w osobnej |
drożdżowy |
wyrabianie |
|
|
|
misce. Przełóż wszystkie |
|
|
|
|
|
składniki do miski malaksera i |
|
|
|
|
|
wyrabiaj ciasto, aż będzie |
|
|
|
|
|
gładkie i nie będzie przyklejało |
|
|
|
|
|
się do ścianek miski (około |
|
|
|
|
|
minuty). Zostaw ciasto na 30 |
|
|
|
|
|
minut, by wyrosło. |
|
|
|
|
|
|
|
Piana z białek - |
białka |
2 / S |
Użyj jajek o temperaturze |
Pudding, suflet, |
|
ubijanie |
z 4 |
|
|
pokojowej. Uwaga: weź co |
bezy |
|
jajek |
|
|
najmniej 2 jajka. |
|
Owoce (np. |
500g |
P / |
P |
Wskazówka: dodaj trochę soku |
Puddingi, |
jabłka, banany) |
|
|
|
z cytryny, aby zapobiec |
potrawy dla |
- rozdrabnianie |
|
|
|
ciemnieniu owoców. Dodaj |
niemowląt |
/ ucieranie |
|
|
|
trochę płynu, aby uzyskać |
|
|
|
|
|
gładką masę. |
|
|
|
|
|
|
|
Czosnek - |
300g |
P / |
P |
Obierz czosnek. Zawsze |
Przystrajanie |
siekanie |
|
|
|
używaj funkcji pulsacyjnej, aby |
dań, dipy |
|
|
|
|
uniknąć posiekania czosnku za |
|
|
|
|
|
drobno. Weź co najmniej 150g |
|
|
|
|
|
czosnku. |
|
Zioła (np. |
Min. |
2/ P/ P Przed posiekaniem umyj i osusz |
Sosy, zupy, |
||
pietruszka) - |
75g. |
|
|
zioła |
przystrajanie |
siekanie |
|
|
|
|
dań, masło |
|
|
|
|
|
ziołowe |
Soki (np. |
500g |
2 / D |
Dodaj trochę wody lub innego |
Soki owocowe |
|
papaja, arbuz, |
(łączn |
|
|
dowolnego płynu, by uzyskać |
|
gruszka) - |
a |
|
|
gładką konsystencję soku. |
|
miksowanie |
ilość) |
|
|
|
|
|
|
|
|
|
|
Składniki i |
Maksy |
Ustaw |
Postępowanie |
Zastosowanie |
rezultaty |
malna |
ienie |
|
|
obróbki |
ilość |
prędk |
|
|
|
|
ości / |
|
|
|
|
akces |
|
|
|
|
oria |
|
|
Majonez - |
3 jajka |
1-2 / |
Wszystkie składniki muszą mieć |
Sałatki, |
przygotowywa |
|
S |
temperaturę pokojową. Uwaga: |
przystrajanie |
nie |
|
|
weź co najmniej jedno duże |
dań, sosy |
|
|
|
jajko, dwa małe jajka lub dwa |
barbecue |
|
|
|
żółtka. Umieść jajko z odrobiną |
|
|
|
|
octu winnego w misce i |
|
|
|
|
stopniowo dodawaj olej po |
|
|
|
|
kropelce. |
|
|
|
|
|
|
Mięso (chude) |
300g |
2 / P / |
Najpierw wyjmij ścięgna i kości. |
Stek tatarski, |
- mielenie |
|
P |
Potnij mięso na kawałki o |
hamburgery, |
|
|
|
wielkości ok. 3 cm. Jeśli chcesz |
pulpety |
|
|
|
zemleć mięso grubiej, użyj |
|
|
|
|
funkcji pulsacyjnej. |
|
Koktajle |
250ml |
2 / D |
Utrzyj owoce (np. banany, |
Koktajle |
mleczne - |
mleka |
|
truskawki) z cukrem, mlekiem i |
mleczne |
miksowanie |
|
|
odrobiną lodów, zmiksuj |
|
|
|
|
dokładnie. |
|
|
|
|
|
|
Masy (do |
3 jajka |
2 / P |
Składniki muszą mieć |
Różne ciastka. |
ciast) - |
|
|
temperaturę pokojową. Mieszaj |
|
miksowanie |
|
|
miękkie masło z cukrem, aż |
|
|
|
|
powstanie gładka i lekka masa. |
|
|
|
|
Następnie dodaj mleko, jajka i |
|
|
|
|
mąkę. |
|
Orzechy - |
250g |
2 / P / |
Użyj przycisku funkcji |
Sałatki, chleb, |
rozdrabnianie |
|
P |
pulsacyjnej, jeśli chcesz |
ciasto |
|
|
|
posiekać orzechy grubiej, a |
migdałowe, |
|
|
|
ustawienia 2, jeśli chcesz |
puddingi |
|
|
|
posiekać drobniej. |
|
 Loading...