

HR1840

2
3
K
P
O
N
M
Q
R
S
T
J
H
F
D
E
G
C
B
A
I
L

4

ENGLISH 6
POLSKI 16
ROMÂNĂ 26
РУССКИЙ 35
ČESKY 46
MAGYAR 55
SLOVENSKY 65
УКРАЇНСЬКІЙ 75
HRVATSKI 85
EESTI 94
LATVISKI 103
LIETUVIŠKAI 112
SLOVENŠČINA 121
БЪЛГАРСКИ 130
SRPSKI 141
HR1840

Introduction
The appliance has been equipped with a built-in safety lock that
prevents it from functioning if the accessories have been assembled
incorrectly or have not been assembled at all.
Never use the accessories to turn the appliance on and off!
Important
◗ Please read these instructions carefully and look at the
illustrations before using the appliance.
◗ Keep these instructions for further reference.
◗ This appliance is intended for household use only.
◗ Check if the voltage indicated on the appliance corresponds to
the local mains voltage (110 - 127V or 220 - 240V) before you
connect the appliance to the wall socket.
◗ If the mains cord is damaged, it must be replaced by Philips, a
service centre authorised by Philips or similarly qualified persons
in order to avoid a hazard.
◗ Do not use the appliance when the mains cord, the plug or other
components are damaged.
◗ Assemble the appliance properly before plugging it into the wall
socket.
◗ When the jar unit or other accessories are properly fixed on the
motor unit, you can hear the 'click' sound.
◗ Do not remove accessories from the motorunit when the
appliance is working.
◗ Do not exceed the quantities and preparation times indicated in
the diverse sections.
◗ Let hot ingredients cool down before chopping them or pouring
them into the blender jar (max. temperature 80cC/175cF).
◗ Keep the appliance out of the reach of children.
◗ Never let the appliance operate unattended.
◗ Avoid touching the SHARP blades, especially when the appliance
is plugged in.
◗ If the blades get stuck, UNPLUG THE APPLIANCE before
removing the ingredients that are blocking the blades by using a
spatula.
◗ Never reach into the jar or bowl with your fingers or an object
while the appliance is running.
◗ Never immerse the motor unit in water or any other fluid, nor
rinse it under the tap. Use only a moist cloth.
◗ Unplug the appliance immediately after use, e.g. before unscrewing
the jar.
◗ Noise level: Lc= 83 dB [A]
ENGLISH6
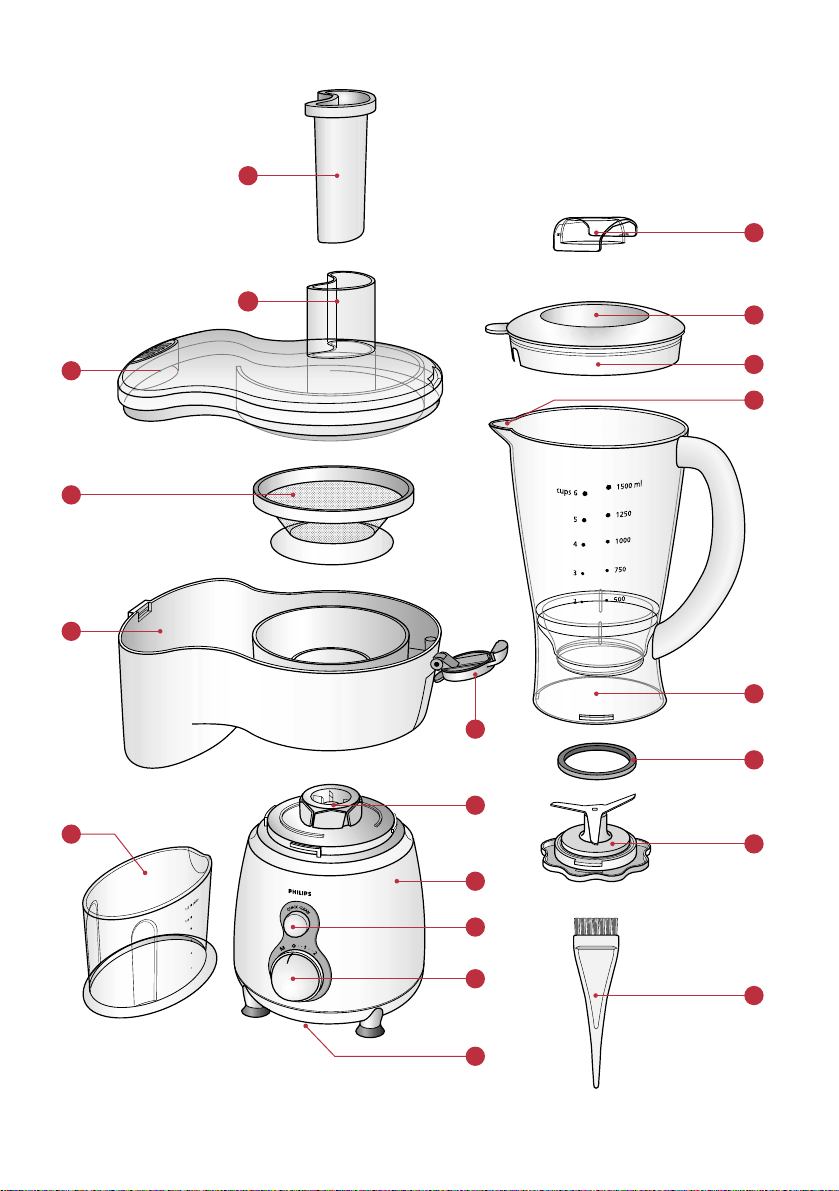
General description
A Cord storage
B Speed selector with 2 speeds and pulse setting (M)
C Quick Clean button
D Motor unit
E Driving Shaft
F Juice cup
G Clamp for (un) fastening the lid
H Pulp container
I Sieve
J Lid of juice extractor
K Feeding Tube
L Pusher
M Stopper
N Opening for adding ingredients
O Lid of jar
P Spout
Q Blender jar
R Rubber sealing ring
S Knife unit
T Cleaning brush
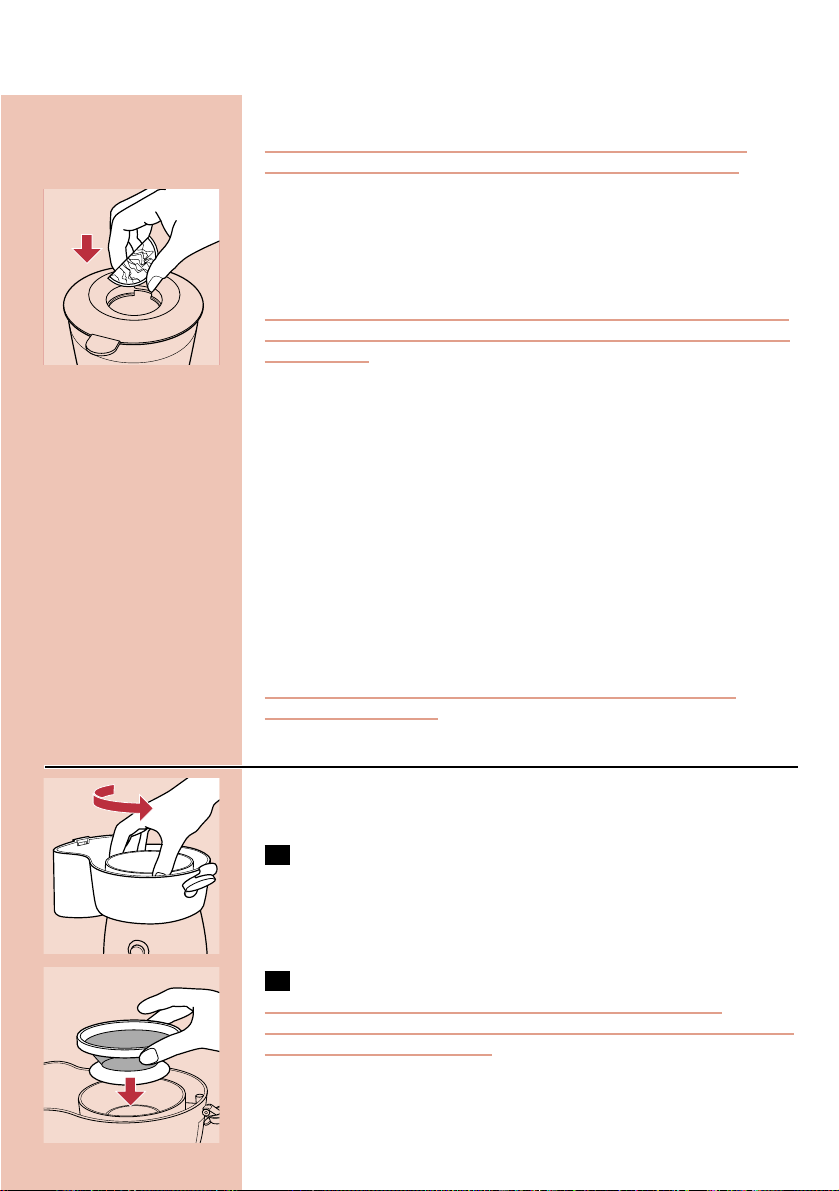
Preparing the appliance for use
Wash all accessories and detachable parts (see section 'Cleaning').
◗ Wind excess mains cord around the base of the appliance.
Using the appliance
Blender
◗ The blender is intended for:
- Blending fluids, e.g. dairy products, sauces, fruit juices, soups, mixed
drinks, shakes.
- Mixing soft ingredients, e.g. pancake batter or mayonnaise.
- Pureeing cooked ingredients, e.g. for making baby food.
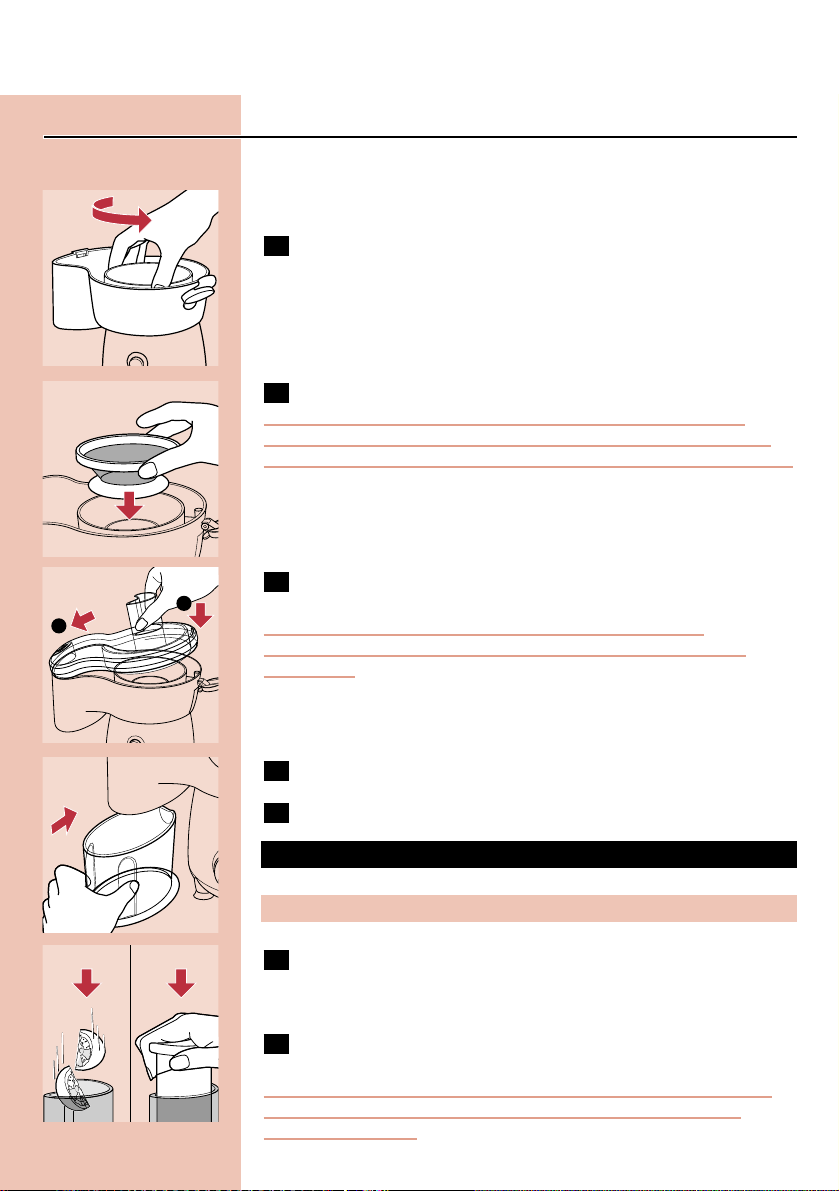
C
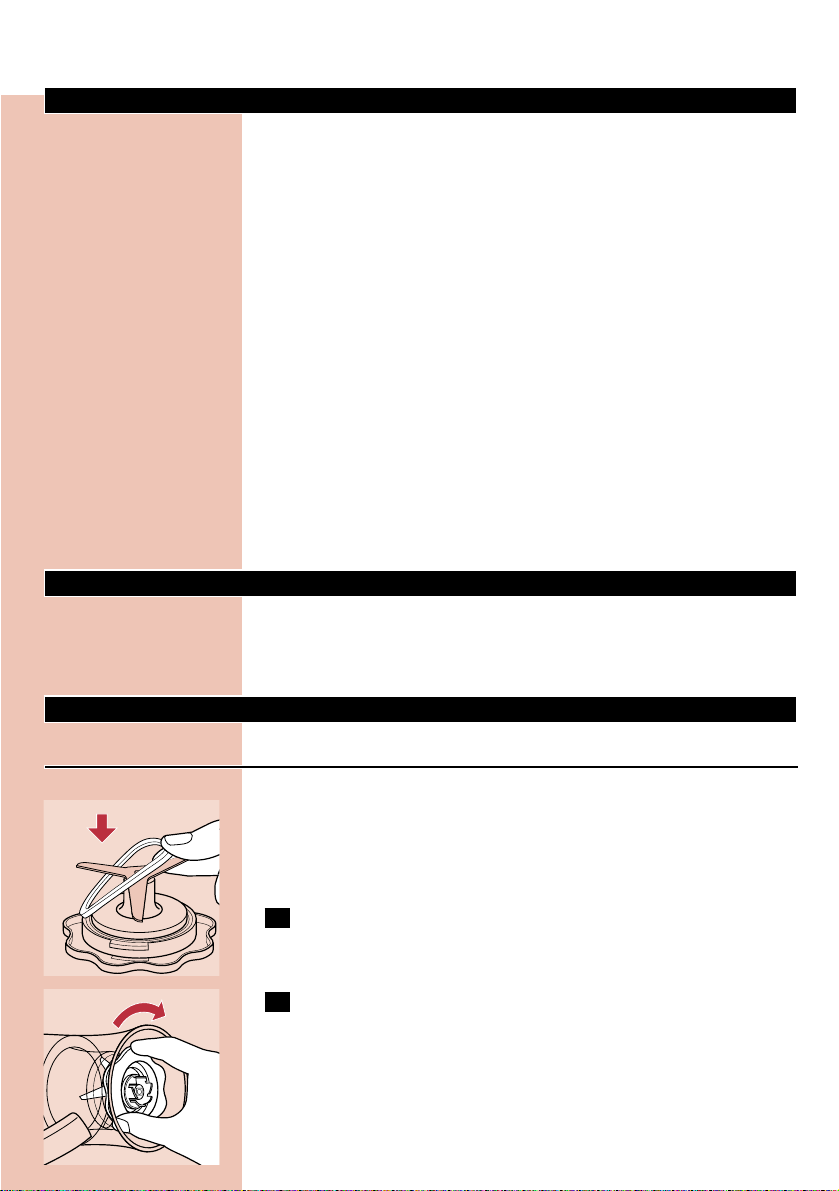
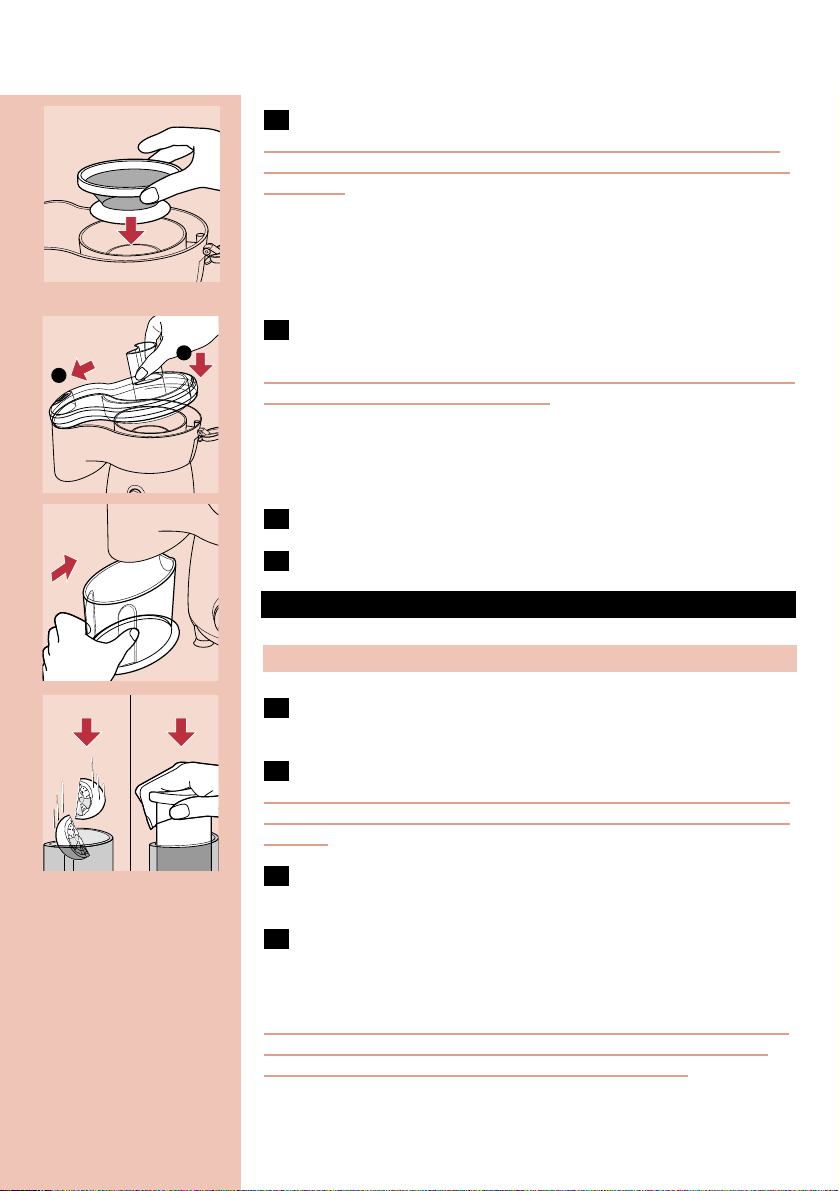
1 Put the rubber sealing ring around the edge of the knife unit.
C
2 Attach the knife unit to the blender jar by turning it in the
direction of the arrow.
ENGLISH 7
C
3 Mount the jar unit onto the motor unit. Fix it by turning it in
the direction of the arrow.
Be careful not to exert too much pressure on the handle of the jar.
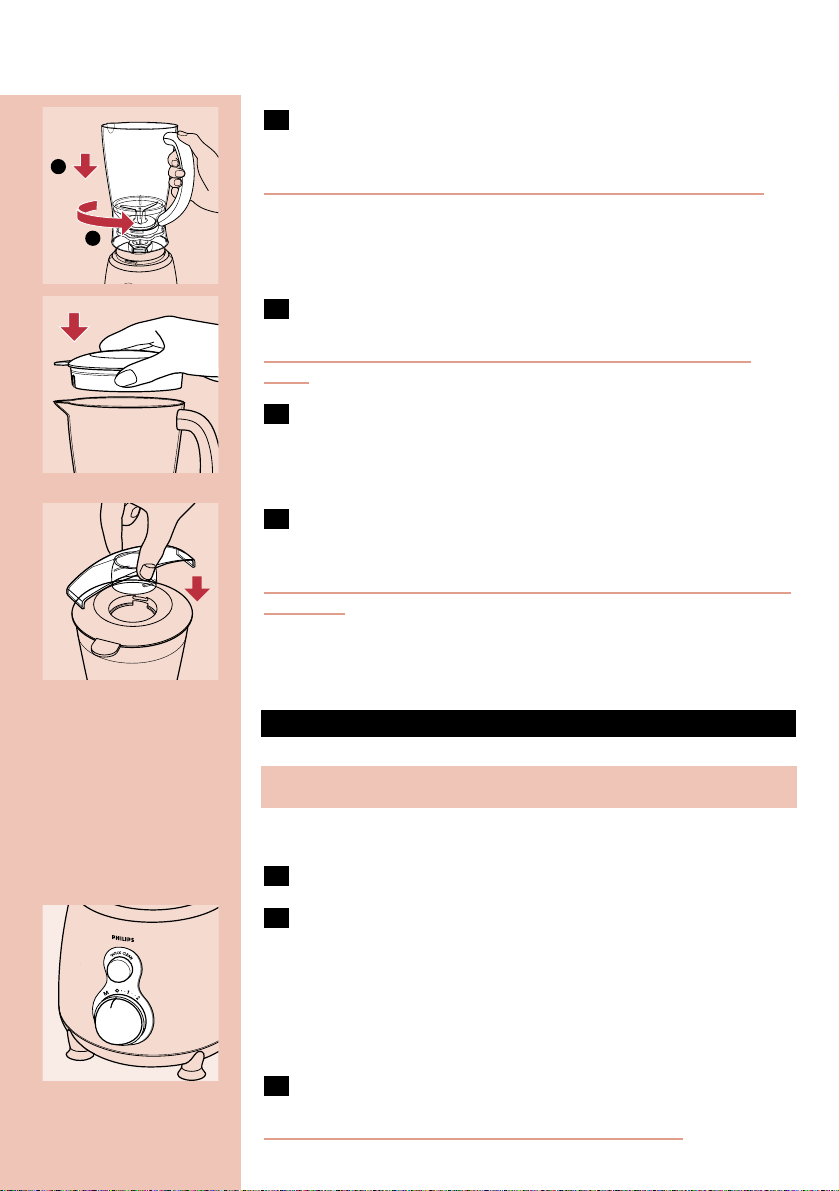
C
4 Put the ingredients in the jar.
Never fill the jar with ingredients that have a temperature of over
80cC.
5 Press the lid into place.
C
6 Place the stopper into the opening in the lid and turn it until it
is firmly fixed.
To avoid spillage, always insert the stopper into the lid before you start
processing.
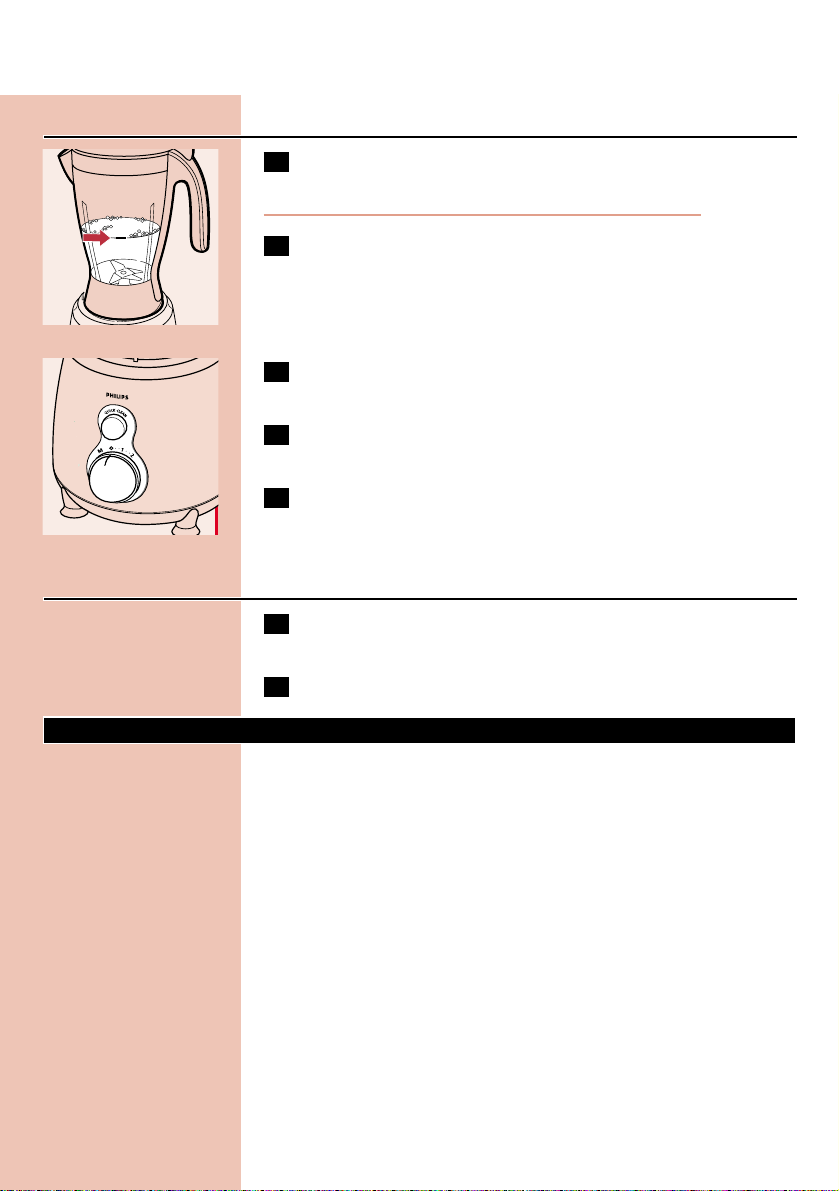
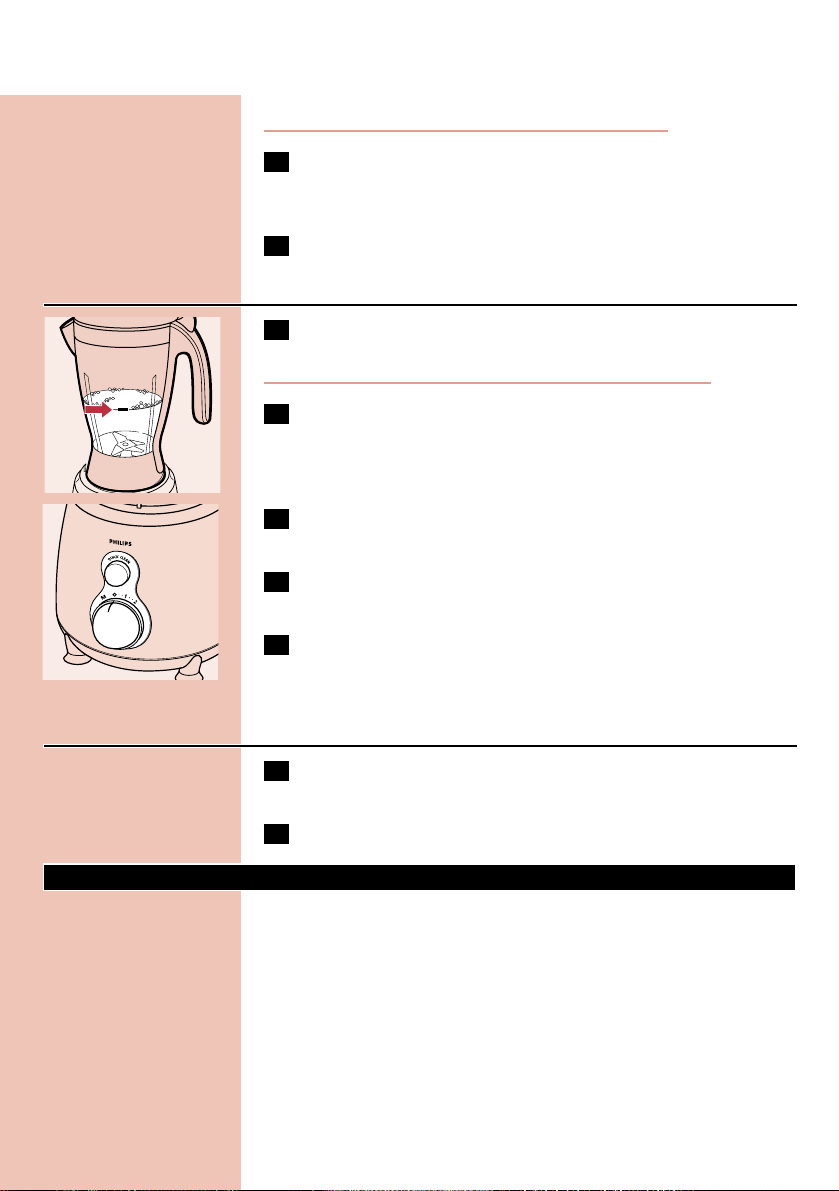
◗ The speed settings allow you to adjust the speed of the appliance
to obtain optimal results. See the table for the recommended
speed settings.
7 Put the mains plug in the wall socket.
C
8 Select the desired speed setting and the appliance will switch on.
If you are not sure which speed to select, you can always use the
highest speed (speed 2).
◗ To let the appliance run for only a few seconds at a time, set the
switch to position M (Momentum) and release it straight away.
Repeat this as often as necessary.
9 To switch the appliance off, switch to position 0.
Never switch the appliance on and off by turning the jar.
ENGLISH8
Speed
speed 1
speed 2
M
Ingredients to process
liquid ingredients (e.g. chocolate milk, milk with fruit, mayonnaise)
heavier ingredients e.g. a combination of liquid and solid ingredients
(e.g. tomato sauce or pate)
heavy, mainly solid ingredients (e.g. ice cubes, soups, beans, etc.)
1
2

For recipes see further on in this booklet.
Tips
To avoid spillage, never fill the jar above the maximum level indication
(1,5 litres), particularly not when you are blending hot liquids.
C
◗ Liquid ingredients (e.g. oil) can be poured into the blender jar
while the appliance is running through the opening in the stopper.
◗ While the motor is running, ingredients can be added into the
blender through the opening in the lid.
Do not run the blender for more than 3 minutes at a time. If you have
not finished blending after 3 minutes, switch the appliance off for one
minute before you continue blending.
◗ Dry ingredients must not be processed for more than 1 minute.
◗ Pre-cut solid ingredients into smaller pieces before putting them
into the blender. Do not feed a large quantity at once into the
blender jar. Feed a series of small amounts.
◗ If you are not satisfied with the result at blending solid materials,
switch the blender off and let it run briefly a number of times by
means of the M position. Or stir the ingredients with a spatula
(not while the blender is running), or reduce the contents of the
jar and process smaller amounts.
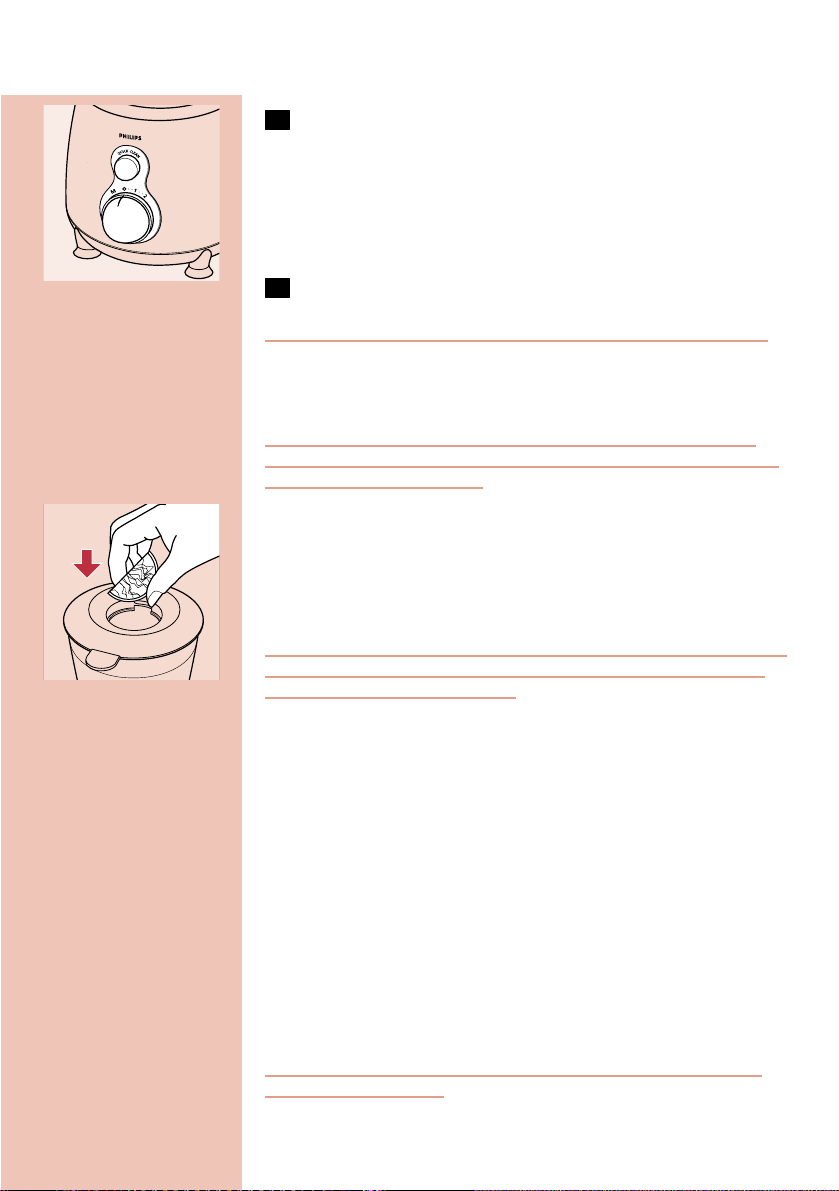
◗ To grind ice cubes, drop them into the rotating knives through the
opening in the lid.
◗ To make tomato juice, cut the tomatoes in four and drop the
pieces onto the rotating knives through the opening in the lid.
Never put your hand or any object in the jar while the blender is
running.
Juice extractor
◗ The juice extractor can be used for preparing fresh fruit juices.
Pulp, pips and skins will be separated.
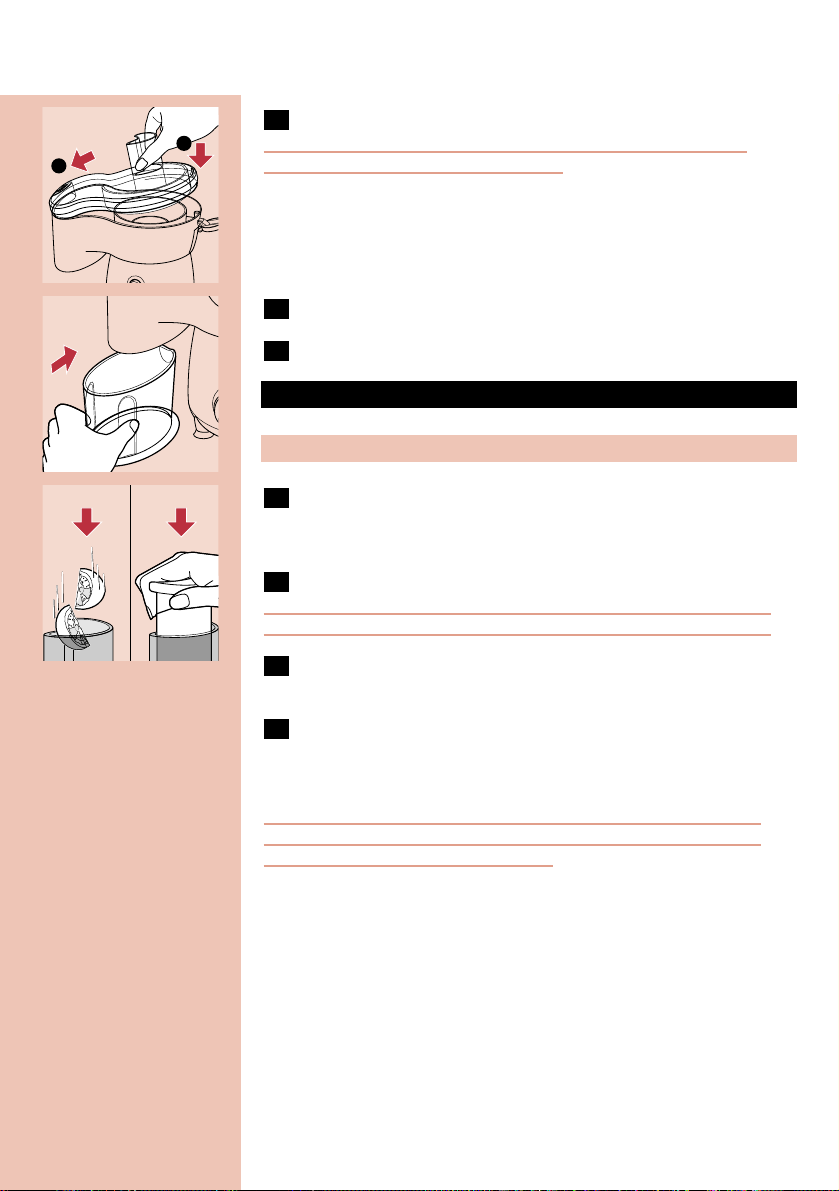
C
1 Put the pulp container on the motor unit and turn it in the
direction of the arrow until it is firmly fixed.
ENGLISH 9
C
2 Insert the sieve.
Always check the sieve before use. Do not use the sieve if you notice
any damage on it like cracks, fissures, opening on metal screen or loose
grater disc.
In case of a damaged sieve, contact the Philips Customer Care Centre
in your country (you will find its phone number in the worldwide
guarantee leaflet). If there is no Customer Care Centre in your country,
turn to your local Philips dealer or contact the Service Department of
Philips Domestic Appliances and Personal Care BV.
C
3 Put the lid in place and finally fasten the clamp by pushing it
down.
Make sure the clamp is on the right side of the motor unit. Check if the
lid is properly assembled and fastened.
C
4 Put the juice cup in place.
5 Select the right speed setting to switch the appliance on.
C
6 Put the ingredients in the feeding tube. Before processing, cut
large ingredients into pieces that fit into the feeding tube.
C
7 Push the ingredients gently down with the pusher.
Do not exert too much pressure on the pusher, since this would affect
the quality of the end result and it could even cause the sieve to come
to a halt.
8 If no more juice comes out, switch the appliance off and wait
until the sieve has stopped rotating before releasing the clamp.
9 Remove the juice cup.
B
For recipes see further on in this booklet.
Do not let the juice extractor run contnously for more than 2 minutes
If you have not finished extracting juice, switch the appliance off and
allow it to cool down for 2 minutes before you continue.
ENGLISH10
Speed
speed 1
speed 2
Ingredients to process
Fruits (soft)
Fresh coconut, beetroots (hard)
2
1

Tips
◗ If the pulp container is full during processing, switch the appliance
off and wait until the sieve has completely stopped rotating.
Unfasten the clamp and remove the lid. Remove the sieve. Detach
the pulp container from the motor unit by turning it to the right
and remove it. Empty the pulp container and clean the sieve.
Reassemble the juice extractor and switch it on again.
◗ If the juice cup is full during processing, switch the appliance off
and wait until the sieve has completely stopped rotating.Remove
the juice cup and empty it.The maximum content of the juice cup
is 700 ml.
◗ Before processing it is unnecessary to remove thin peels and
skins. Only thick peels (e.g. those of oranges, pineapples or
uncooked beetroots) need to be removed.
◗ Firm fruits that contain a lot of starch, such as bananas, papayas,
avocados, figs and mangoes are not suitable for processing in the
juice extractor. Use the blender to process these fruits.
◗ Always use fresh fruits and vegetables. They contain more juice.
◗ Leafs and leaf stalks of for instance lettuce can also be processed
in the juice extractor.
◗ Apple juice turns brown very quickly.You can slow down this
process by adding a few drops of lemon juice.
◗ The pulp of carrots, beetroots, cabbage or spinach can be used as
the basis for soups, sauces, jam, desserts, ice cream etc. Boil the
pulp and add some herbs. Puree the pulp in the blender.You can
use tomato pulp to make tomato paste.
Cleaning
Cleaning of the appliance, its parts and accessories is easiest
immediately after use.
Never clean the accessories or the appliance parts in the dishwasher.
Clean the motor unit with a moist cloth.
Do not use abrasives, scourers, alcohol, etc.
1 Unplug the appliance, detach the used accessories and parts
and clean them in lukewarm, soapy water.
2 Rinse all washed up accessories and parts under a tap.
ENGLISH 11
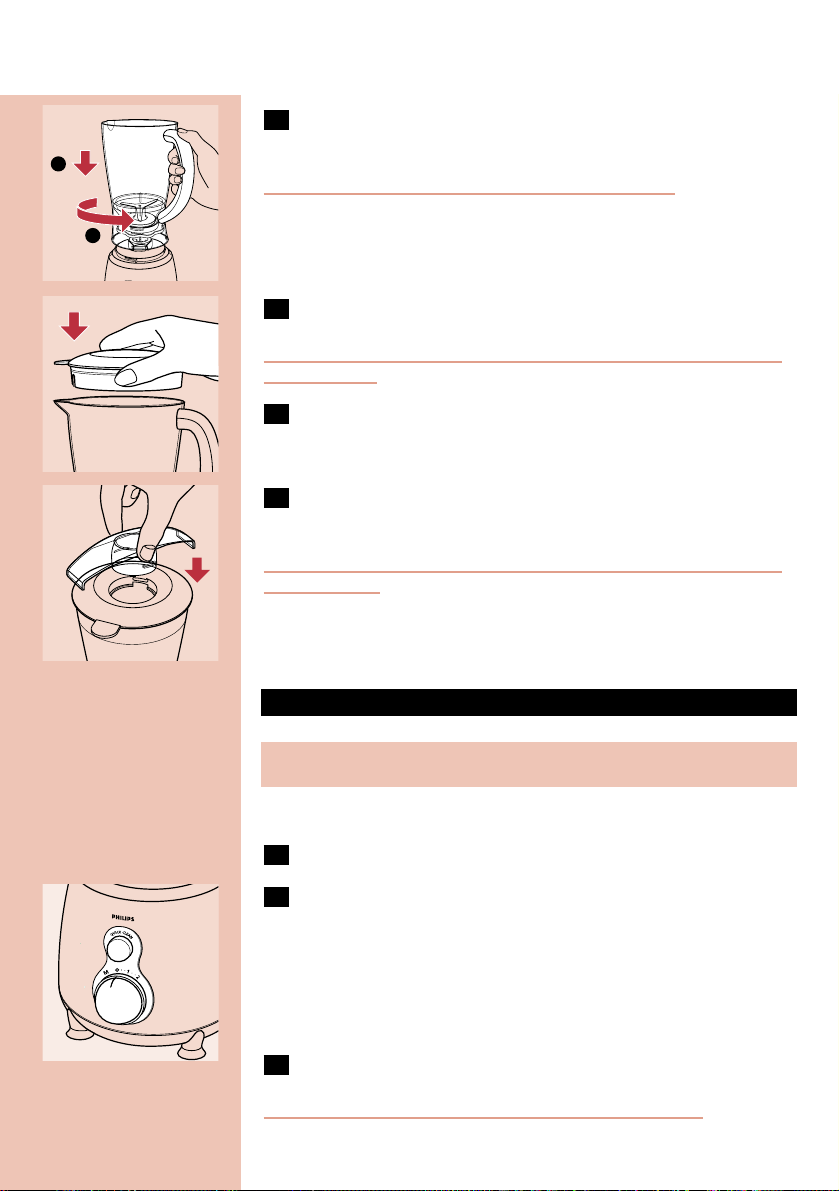
Blender, quick cleaning
C
1 Pour lukewarm water and some washing-up liquid into the
blender jar.
Do not exceed the maximum quantity of the jar (1.5 litre).
2 Assemble the lid and the stopper.
C
3 Let the appliance run for a few seconds by pressing the Quick
Clean button.
4 Detach the blender jar, remove the lid and stopper and rinse
them with clean water.
5 For better cleaning, remove the knife unit from the blender jar.
Juice extractor, better cleaning
1 Remove the lid, the pulp container and the sieve. Rinse them
immediately after use.
2 You can use the supplied brush to clean the sieve.
Guarantee & service
If you need information or if you have a problem, please visit the Philips
Web site at www.philips.com or contact the Philips Customer Care
Centre in your country (you will find its phone number in the
worldwide guarantee leaflet). If there is no Customer Care Centre in
your country, turn to your local Philips dealer or contact the Service
Department of Philips Domestic Appliances and Personal Care BV.
ENGLISH12

Recipes for the Juice Extractor and Blender combination
With the Juice & Co you can experiment endlessly and try out all kind
of recipes.You can make delicious juices, shakes, soups and sauces in no
time at all.To give you an idea of the possibilities, we have included a
number of recipes which will certainly prove a success.
Savoury cakes
- 250gr vegetable pulp (particularly suitable are cabbage, celery or
celeriac, tomatoes, carrots, onions, peppers, leeks, spinach and fennel)
- 100 gr breadcrumbs
- 2 eggs
- 2 tbsp tomato ketchup
- 1 tbsp chopped green herbs (e.g. parsley/chives)
- 2 tsp sambal
- 50 gr grated mature cheese
- salt
- pepper
- 50 gr butter
B
Stir the tomato ketchup, chopped herbs, sambal and cheese through the
pulp. Put the pulp in a bowl and mix the breadcrumbs, the eggs and
some salt and pepper. Make 4 - 5 flat cakes of the mixture.
B
Heat the butter in a frying pan and fry the cakes over moderate heat for
approx. 5 minutes on each side until they are brown and cooked. Serve hot.
Apple pancakes
- 150 gr apple pulp
- 150 gr self-raising flour
- 2 eggs
- approx. 100 ml milk
- 50 gr raisins
- 50 gr dried apricots, cut into pieces
- butter
- sugar and cinnamon according to taste
B
Stir the self-raising flour and the eggs through the apple pulp.Add
enough milk to make a fairly firm mixture. Spoon the raisins and apricots
through the mixture.
B
Heat some butter in a frying pan. Put scoops of mixture into the frying
pan at a small distance from each other. Flatten the mixture into the
pancakes and fry them over a moderate heat on both sides until they
are golden and cooked. Serve the pancakes hot or cold and sprinkle
them with sugar and cinnamon according to taste.
Vitamin drink (three glasses)
- 1 mango
- 1 banana
- juice of 1 apple (washed), 1 kiwi fruit and 1 orange
- 2 tsp honey (or more, according to taste)
- 300 ml buttermilk
B
Peel the kiwi fruit and the orange. Process them in the juice extractor
together with the apple. Peel the mango and the banana and mix them
ENGLISH 13

in the blender together with the fruit juice, the honey and the buttermilk
to create a delicious shake.
B
Tip: replace the buttermilk with quark or yoghurt to create a tasty and
healthy dessert.
Ice-cold shake for a tropical day (two glasses)
- 1/2 pineapple
- 2 apples
- 1 pink grapefruit
- ice cubes (approx. 2 full glasses)
B
Skin the pineapple and peel the grapefruit, rinse the apples and cut everything
into pieces. Process them in the juice extractor and collect the juice.
B
Assemble the blender and put the ice cubes in the blender jar. Crunch
the ice at the highest setting and add the fruit juice.You will have a
delicious, ice-cold fresh fruit shake that will quench your thirst!
Vegetable shake (one large serving)
- 200 ml carrot juice
- 1/2 stalk of celery, cut into pieces
- 1 medium-sized tomato, peeled and cut into pieces
- 1/2 small green or red pepper, cut into pieces
- small handful of fresh spinach or several sprigs of parsley
- 2 or 3 ice cubes
- 1 long, thin stalk of celery for garnishing
B
Process 6 to 8 carrots in the juice in the juice extractor.
B
Assemble the blender accessory. Put the carrot juice, the vegetables and
the spinach or the parsley in the blender and mix for 15-30 seconds at
maximum speed. Add the ice cubes and blend for a few more seconds.
Pour the shake into a tall glass and garnish with a long, stick of celery.
Gazpacho blanco (4 servings)
- 500 gr seedless white grapes
- 2 cucumbers (approx. 750 gr)
- 1 shallot, cut into pieces
- 1 clove garlic, shopped
- 1/4 tsp salt
- 1/4 tsp white pepper
- 500 ml low-fat yoghurt
- 6 - 8 drops of Tabasco
B
Wash the grapes and remove the stalks. Process them in the juice
extractor and collect the juice.
B
Assemble the blender accessory. Put the grape juice in the blender. Peel
the cucumber, halve it lengthwise and remove the seeds.
Cut the cucumber into thick slices and add these slices to the grape juice
in the blender.Add the shallot, the garlic, the salt and the pepper and run
the machine briefly. Pour the mixture into a bowl and stir the yoghurt
and Tabasco through it.
B
Chill the soup by putting it in a covered bowl in the refrigerator for 30
minutes. Serve in large soup bowls and garnish with cucumber slices and
halved grapes.
ENGLISH14

Troubleshooting guide
ENGLISH 15
Solution
The appliance is provided with a safety system. If accessories are not properly
connected with the motor unit, the appliance does not work. Check whether
the accessories have been connected in the right way (see the various
sections).Turn off the appliance first!
Turn off the appliance and process a smaller quantity.
This is normal for the first few applications. If the smelling continues, check the
quantity you are processing, the application time or used speed.
Turn off the appliance and unplug it. Contact Philips Customer Service Hotline,
Philips Offices or Philips Service Centre for assistance.
Turn off the appliance. Release the knife unit by turning it anti-clockwise. Check
whether the rubber ring is properly assembled on the knife unit (rest on flat
position).
Make sure the lid is attached properly.The stopper fits with a 'click'.
Turn off the appliance. Check if the sieve is properly connected.The ribs on
the bottom of the sieve should fit properly on the motor coupling opening.
Check if the sieve is damaged. Cracks, crazes, a loose grating disc or any other
irregularity may cause malfunction. If you detect any cracks or damage in the
sieve, do not use the appliance anymore and contact the nearest Philips
service centre.
Problem
The appliance does not work
The knife unit / motor unit is blocked.
The motor unit gives an unpleasant
smell during the first few times of use.
The appliance makes a lot of noise,
smells, feels hot to touch, smokes, etc.
The blender shows leakage
The lid and/or stopper of the blender
show leakage
The sieve of the juice extractor
makes contact with the feeding tube
or shows a high vibration during
processing.
* If problems persist or if other problems occur, please contact Philips Customer Service Hotline, Philips Offices or
Philips Service Centre for assistance.

Wstęp
Urządzenie zostało wyposa one we wbudowany zamek
bezpieczeństwa zapobiegający działaniu w przypadku niezało enia lub
nieprawidłowego zało enia akcesoriów.
Nigdy nie korzystaj z akcesoriów w celu włączenia lub wyłączenia
urządzenia!
Ważne
◗ Zanim zaczniesz korzystać z urządzenia, przeczytaj uważnie
niniejszą instrukcję oraz zapoznaj się z ilustracjami.
◗ Zachowaj tę instrukcję do ewentualnej późniejszej konsultacji.
◗ Urządzenie to jest przeznaczone wyłącznie do użytku domowego.
◗ Przed podłączeniem urządzenia do gniazdka ściennego sprawdź,
czy napięcie wskazane na tabliczce znamionowej odpowiada
lokalnemu napięciu sieciowemu (110 - 127 V lub 220 - 240V).
◗ Jeśli przewód zasilający ulegnie uszkodzeniu,musi zostać
wymieniony w autoryzowanym punkcie serwisowym firmy Philips
lub przez osobę o podobnych kwalifikacjach, co pozwoli uniknąć
ewentualnego niebezpieczeństwa.
◗ Nie korzystaj z urządzenia, gdy uszkodzone są przewód sieciowy,
wtyczka lub inne elementy składowe.
◗ Przed podłączeniem urządzenia do gniazdka ściennego należy je
poprawnie zmontować.
◗ Podczas prawidłowego montowania dzbanka lub innych
akcesoriów usłyszysz charakterystyczny odgłos zatrzaskiwania.
◗ Podczas pracy urządzenia nie wolno zdejmować akcesoriów z
części silnikowej.
◗ Nie przekraczaj maksymalnej ilości produktów ani czasu ich
obróbki, podanych w różnych rozdziałach.
◗ Odczekaj do chwili, aż ostygną gorące składniki, zanim rozdrobnisz
lub wlejesz je do dzbanka blendera (maksymalna temperatura
80cC).
◗ Przechowuj urządzenie w miejscu niedostępnym dla dzieci.
◗ Nigdy nie pozwalaj na pracę urządzenia bez dozoru.
◗ Uważaj, by nie dotykać OSTRYCH noży, zwłaszcza gdy urządzenie
jest podłączone do sieci.
◗ W przypadku zablokowania ostrzy WYJMIJ WTYCZKĘ
PRZEWODU SIECIOWEGO Z GNIAZDKA, po czym usuń za
pomocą łopatki składniki blokujące ostrza.
◗ Podczas pracy urządzenia nigdy nie wkładaj do dzbanka lub misy
dłoni ani jakichkolwiek przedmiotów.
◗ Nigdy nie zanurzaj części silnikowej urządzenia w wodzie ani
innym płynie. Nie spłukuj jej bieżącą wodą. Używaj wyłącznie
wilgotnej ściereczki.
◗ Natychmiast po użyciu wyciągaj przewód z gniazdka ściennego,np.
przed odkręceniem dzbanka blendera.
◗ Poziom hałasu: Lc= 83 dB [A]
POLSKI16

Opis ogólny
A Schowek na przewód sieciowy
B Przełącznik obrotów z 2 prędkościami oraz pozycją pracy
impulsowej (M)
C Przycisk Quick Clean (szybkiego mycia)
D Część silnikowa
E Wałek napędzający
F Kubek na sok
G Klamra do zamykania (i otwierania) pokrywy
H Pojemnik na miazgę
I Sitko
J Pokrywa wyciskarki soku
K Lej wsypowy
L Popychacz
M Zatyczka
N Otwór na składniki
O Pokrywa dzbanka
P Dziobek
Q Dzbanek blendera
R Gumowy pierścień uszczelniający
S Część tnąca
T Szczotka do czyszczenia
Przygotowanie urządzenia do użycia
Umyj wszystkie akcesoria i części ruchome (patrz fragment "Mycie").
◗ Zwiń zbędny fragment przewodu sieciowego wokół podstawy
urządzenia.
Użycie urządzenia
Blender
◗ Blender jest przeznaczony do:
- Miksowania płynów,np. produktów mlecznych,sosów, soków
owocowych, zup, napojów mieszanych lub koktajli.
- Mieszania miękkich składników, np. do przygotowywania ciasta na
naleśniki i majonezu.
- Ucierania gotowanych składników,np. do przygotowywania potraw
dla niemowląt.
C
1 Załóż gumowy pierścień uszczelniający wokół krawędzi części
tnącej.
17POLSKI
C
2 Połącz część tnącą z dzbankiem blendera obracając nim w
kierunku wskazanym strzałką.
C
3 Załóż dzbanek na część silnikową.Zamocuj go obracając nim w
kierunku wskazanym strzałką.
Nie wywieraj zbyt du ego nacisku na uchwyt blendera.
C
4 Włóż składniki do dzbanka.
Nie napełniaj dzbanka składnikami o temperaturze powy ej 80cC.
5 Wciśnij pokrywę na właściwe jej miejsce.
C
6 Umieść zatyczkę w otworze pokrywy i przekręć nią, aż
zostanie trwale zamocowana.
Aby nie dopuścić do rozlania, zawsze przed rozpoczęciem miksowania
wetknij zatyczkę do pokrywy.
◗ Przełącznik prędkości pozwala wybrać najlepszą prędkość
obrotową urządzenia. Zalecane prędkości pracy urządzenia
podane są w tabeli.
7 Włóż wtyczkę do gniazdka ściennego.
18 POLSKI
Prędkość
prędkość 1
prędkość 2
M
Składniki
Składniki płynne (np. mleko czekoladowe, mleko z owocami,
majonez)
składniki cię sze, np.mieszanka składników stałych i płynnych (np. sos
lub pasta pomidorowa)
składniki cię kie, przewa nie twarde (np. kostki lodu, zupy, ziarna, itd.)
1
2
19
C
8 Wybierz żądaną prędkość - urządzenie włączy się.
Jeśli nie jesteś pewien (pewna), jaką wybrać prędkość, mo esz zawsze
skorzystać z prędkości najwy szej (prędkość 2).
◗ Aby uruchomić urządzenie tylko na kilka sekund,ustaw
przełącznik w pozycji M (Moment) i natychmiast go zwolnij.
Powtarzaj tę czynność tak często,jak jest to niezbędne.
9 Aby wyłączyć urządzenie, ustaw przełącznik w pozycji 0.
Nie wolno włączać lub wyłączać urządzenia przez obrót dzbankiem.
W dalszej części niniejszej instrukcji zamieszczono przepisy.
Porady
Aby uniknąć rozlania, nie wolno wypełniać dzbanka powy ej kreski
wskazującej maksymalny poziom płynu (1,5 litra), szczególnie podczas
miksowania gorących płynów.
C
◗ Składniki płynne (np. olej) można wlewać do dzbanka blendera
podczas pracy urządzenia, przez otwór w pokrywie udostępniony
po wyjęciu zatyczki.
◗ Podczas pracy silnika można dodawać składniki przez otwór w
pokrywie.
Nie włączaj blendera na dłu ej ni trzy minuty. Jeśli po upływie 3 minut
nie skończyłeś/aś miksowania, wyłącz urządzenie i, zanim włączysz je
ponownie, odczekaj jedną minutę.
◗ Suchych składników nie można miksować dłużej niż 1 minutę.
◗ Przed wrzuceniem składników do blendera duże kawałki należy
pociąć na mniejsze. Dużej ilości składników nie wolno wkładać
jednorazowo do dzbanka blendera.Wkładaj składniki zawsze
małymi porcjami.
◗ Jeśli nie satysfakcjonuje cię wynik mieszania artykułów stałych,
wyłącz blender i włączaj go ponownie kilkakrotnie, ustawiając
przełącznik w pozycji M. Możesz również rozmieszać składniki
łopatką (ale tylko wtedy, gdy blender jest wyłączony), lub
zmniejszyć zawartość dzbanka i przetwarzać za każdym razem
mniejsze ilości.
◗ Aby zgnieść kostki lodu,wrzuć je przez otwór w pokrywie na
obracające się ostrza.
◗ Aby przyrządzić sok pomidorowy, pokrój pomidory na ćwiartki i
wrzuć je przez otwór w pokrywie na obracające się ostrza.
Nigdy nie wkładaj do dzbanka dłoni ani jakichkolwiek przedmiotów
podczas pracy blendera.
POLSKI
20 POLSKI
Wyciskarka soku
◗ Z wyciskarki soku należy korzystać w celu przygotowywania
świeżego soku owocowego. Miazga, pestki i skórki zostaną
usunięte.
C
1 Załóż pojemnik na miazgę na część silnikową i obróć nim w
kierunku wskazanym strzałką, aż zostanie trwale zamocowany.
C
2 Załóż sitko.
Zawsze przed u yciem sprawdzaj stan sitka. Nie u ywaj sitka, jeśli
zauwa ysz na metalowej osłonie jakiekolwiek uszkodzenie w rodzaju
pęknięcia, rysy, otworów, czy te luźno zamontowanej tarczy ścierającej.
W przypadku uszkodzenia sitka skontaktuj się z Biurem Obsługi Klienta
(numer telefonu znajdziesz w Karcie Gwarancyjnej) lub najbli szym
punktem serwisowym autoryzowanym przez dział AGD firmy Philips.
C
3 Umieść pokrywę na właściwym miejscu i zamknij klamrę
dociskając ją.
Upewnij się, e klamra znajduje się po prawej stronie części
silnikowej.Sprawdź, czy pokrywa zmontowana i zamocowana jest
prawidłowo.
C
4 Ustaw na miejscu kubek na sok.
5 Przed włączeniem urządzenia ustaw właściwą prędkość.
C
6 Włóż składniki do leja wsypowego.Przed rozpoczęciem
przetwarzania pokrój duże składniki na kawałki mieszczące się
w leju wsypowym.
C
7 Delikatnie dociskaj popychaczem pokrojone kawałki
produktów w leju wsypowym.
Nie wywieraj zbytniego nacisku na popychacz; mo e to mieć ujemny
wpływ na jakość końcowego rezultatu; mo e nawet spowodowa
zatrzymanie się sitka.
Prędkość
prędkość 1
prędkość 2
Składniki
Owoce (miękkie)
Świe e kokosy, buraki (twarde)
1
2

21
8 Gdy sok się już nie wylewa, wyłącz urządzenie i nie zwalniaj
klamry,dopóki nie ustaną obroty sitka.
9 Wyjmij kubek na sok.
B
W dalszej części niniejszej instrukcji zamieszczono przepisy.
Nie pozwól, aby wyciskarka soku pracowała nieprzerwanie przez ponad
dwie minuty. Jeśli w ciągu 2 minut nie skończyłaś/łeś wyciskania soku
wyłącz urządzenie i, zanim włączysz je ponownie, odczekaj dwie minuty
a ostygnie.
Porady
◗ Jeśli pojemnik na miazgę wypełni się podczas przetwarzania,
wyłącz urządzenie i poczekaj, aż ustaną zupełnie obroty
wirującego sitka. Otwórz klamrę i zdejmij pokrywę.Wyjmij sitko.
Odłącz pojemnik na miazgę od części silnikowej,obracając nim w
prawo, po czym zdejmij go. Opróżnij pojemnik na miazgę i umyj
sitko.Wyciskarkę soku złóż ponownie i znów ją włącz.
◗ Jeśli podczas przetwarzania kubek na sok wypełni się, wyłącz
urządzenie i poczekaj, aż ustaną zupełnie obroty wirującego sitka.
Wyjmij pojemnik na sok i przelej jego zawartość do innego
pojemnika. aksymalna pojemność kubka na sok wynosi 700 ml.
◗ Przed rozpoczęciem przetwarzania nie jest konieczne usunięcie
skórek.Tylko grube skórki, takie jak:pomarańczy,ananasów i nie
ugotowanych buraków, wymagają usunięcia.
◗ Twarde owoce zawierające dużo skrobi, takie jak: banany, papaja,
awokado, figi i mango, nie są odpowiednie do przetwarzania w
wyciskarce soku. Do przetwarzania tych owoców używaj
blendera.
◗ Zawsze wykorzystuj świeże owoce i warzywa. Zawierają one
więcej soku.
◗ W wyciskarce soku można wykorzystywać również liście oraz
łodygi liści, np. sałaty.
◗ Sok z jabłek bardzo szybko ciemnieje. Można spowolnić ten
proces, dodając kilka kropel soku z cytryny.
◗ Miazgę z marchewki,buraków, kapusty lub szpinaku można
wykorzystać do zup,deserów, lodów,itd. Ugotuj miazgę i dodaj
niewielką ilość ziół. Rozmieszaj miazgę w blenderze. Miazgę z
pomidorów można wykorzystać do zrobienia pasty pomidorowej.
Mycie
Urządzenie, jego części i akcesoria najłatwiej jest umyć tu po ich
u yciu.
Akcesoriów ani samego urządzenia nie wolno myć w zmywarce.
Wytrzyj część silnikową wilgotną szmatką.
POLSKI
22
Nie u ywaj środków szorujących, rących, alkoholu, itp.
1 Odłącz urządzenie od zasilania, zdemontuj wykorzystane
akcesoria i części, po czym umyj je w ciepłej wodzie z
dodatkiem środka do mycia naczyń.
2 Opłucz pod kranem wszystkie umyte akcesoria i części.
Blender, szybkie mycie
C
1 Wlej do dzbanka blendera ciepłą wodę z dodatkiem płynu do
mycia naczyń.
Nie przekraczaj maksymalnej pojemności dzbanka (1,5 litra).
2 Złóż pokrywę i zatyczkę.
C
3 Uruchom urządzenie na kilka sekund ustawiając przycisk
szybkiego mycia Quick Clean.
4 Odłącz dzbanek blendera, zdejmij pokrywę oraz zatyczkę i
opłucz je w czystej wodzie.
5 Aby lepiej umyć urządzenie, odłącz od dzbanka blendera część
tnącą.
Wyciskarka soku, dokładniejsze mycie
1 Zdejmij pokrywę, pojemnik na miazgę oraz sitko. Opłucz je
natychmiast po użyciu.
2 Do umycia sitka użyj załączonej w komplecie szczotki.
Gwarancja i serwis
Jeśli potrzebujesz informacji lub jeśli masz jakiś problem skontaktuj się z
Działem Obsługi Klienta (numer telefonu znajdziesz w Karcie
Gwarancyjnej) lub te najbli szym punktem serwisowym sprzętu AGD,
autoryzowanym przez firmę Philips (patrz: wykaz w Karcie
Gwarancyjnej).
POLSKI

23
Przepisy dotyczące wykorzystania urządzenia kombi:wyciskarki soku i blendera
Wykorzystując soki i warzywa mo esz bez końca eksperymentować
oraz wypróbowywać wszystkie rodzaje przepisów.Mo esz
błyskawicznie przygotowywać wspaniałe soki, koktajle, zupy i sosy.Aby
zapoznać cię z mo liwościami, załączyliśmy kilka przepisów,które z
pewnością odniosą sukces.
Pyszne ciasta
- 250 g miazgi warzywnej (szczególnie odpowiednia jest miazga z
kapusty, selera, pomidorów, marchewek,cebul, ziaren pieprzu, pora,
szpinaku i kopru włoskiego)
- 100 g miękiszu chleba
- 2 jajka
- 2 ły ki keczupu
- 1 ły ka zmielonej zieleniny (np. pietruszki/szczypiorku)
- 2 ły eczki sosu sambal
- 50 g startego dojrzałego sera
- sól
- pieprz
- 50 g masła
B
Wymieszaj z miazgą warzywną keczup, rozdrobnioną zieleninę, sos
sambal i ser.Umieść w misce miazgę i mieszaj z miękiszem chleba,
jajkami i odrobiną pieprzu oraz soli.Z utworzonej w ten sposób
mieszanki zrób 4- 5 płaskich placków.
B
Podgrzej na patelni masło i sma placki na średnim ogniu przez około
5 minut z ka dej strony,a usma ą się na brązowo. Podawaj na gorąco.
Naleśniki z jabłkami
- 150 g miazgi jabłecznej
- 150 g mąki na naleśniki
- 2 jajka
- około 100 ml mleka
- 50 g rodzynek
- 50 g pokrojonych na kawałki suszonych moreli
- masło
- cukier i cynamon do smaku
B
Wymieszaj mąkę i jajka z miazgą jabłeczną. Dodaj wystarczająco du o
mleka, aby utworzyła się dosyć gęsta masa. Dodaj do ciasta rodzynki i
morele, wymieszaj.
B
Podgrzej na patelni niewielką ilość masła. Kładź na patelni niedu e
porcje ciasta rozmieszczając je w małej odległości od siebie. Nadaj
porcjom ciasta grubość i kształt naleśników i sma je z obu stron na
umiarkowanym ogniu, a usma ą się na kolor złocisty. Podawaj naleśniki
na gorąco lub na zimno, posyp je cukrem i cynamonem do smaku.
Napój witaminowy (trzy szklanki)
- 1 owoc mango
- 1 banan
- sok z 1 (umytego) jabłka, 1 owoc kiwi i 1 pomarańcza
- 2 ły eczki miodu (lub więcej, odpowiednio do smaku)
POLSKI

24
- 300 ml maślanki
B
Obierz ze skórki owoc kiwi i pomarańczę.Włó je razem z jabłkiem do
wyciskarki. Obierz owoc mango i banan,a następnie wymieszaj w
blenderze wraz z sokiem z wyciskarki, miodem i maślanką - efektem
będzie otrzymasz smakowity koktajl.
B
Wskazówka: zastąp maślankę twarogiem lub jogurtem a otrzymasz
smaczny i zdrowy deser.
Lodowy koktajl na tropikalne upały (dwie szklanki)
- 1/2 ananasa
- 2 jabłka
- 1 ró owy grejpfrut
- kostki lodu (mniej więcej 2 pełne szklanki)
B
Obierz ananas i grejpfrut, opłucz jabłka i wszystko potnij na kawałki.
Umieść je w wyciskarce soku i wyciśnij sok.
B
Złó blender i umieść kostki lodu w dzbanku blendera. Przy najwy szej
prędkości rozbij lód i dodaj sok z owoców. Uzyskasz smaczny, świe y i
zimny koktajl owocowy,który doskonale ugasi twoje pragnienie!
Koktajl warzywny (jedno duże danie)
- 200 ml soku z marchwi
- 1/2 pokrojonej na kawałki łodygi selera
- 1 pomidor średniej wielkości, obrany ze skórki i pokrojony na kawałki
- 1/2 pokrojonej na kawałki małej zielonej lub czerwonej papryki
- mała wiązka świe ego szpinaku lub kilka gałązek pietruszki
- 2 lub 3 kostki lodu
- 1 długa, cienka łodyga selera do ozdoby
B
Wyciśnij w wyciskarce sok z 6 - 8 marchewek.
B
Załó akcesoria do blendera. Umieść w blenderze sok z marchwi,
warzywa, szpinak lub pietruszkę i miksuj z maksymalną prędkością
przez 15-30 sekund. Dodaj kostki lodu i mieszaj wszystko przez
dalszych kilka sekund.Wlej shake do wysokiej szklanki i udekoruj długą
łodygą selera.
Gazpacho blanco (dla 4 osób)
- 500 g bezpestkowych białych winogron
- 2 ogórki (około 750 g)
- 1 pokrojona na kawałki szalotka
- 1 zmia d ony ząbek czosnku
- 1/4 ły eczki soli
- 1/4 ły eczki białego pieprzu
- 500 ml chudego jogurtu
- 6 do 8 kropli sosu tabasco
B
Umyj winogrona i usuń łodygi. Przygotuj sok w wyciskarce.
B
Załó akcesoria do blendera.Wlej do blendera sok winogronowy. Obierz
ogórek, rozkrój wzdłu i usuń nasiona. Pokrój ogórek w grube plastry i
dodaj je do soku winogronowego w blenderze. Dodaj szalotkę, czosnek,
sól i pieprz, po czym na krótką chwilę uruchom urządzenie. Wlej
zmiksowane produkty do misy i zmieszaj z jogurtem i sosem tabasco.
POLSKI

25
B
Ostudź zupę przenosząc ją w przykrytej misie na pół godziny do
lodówki. Nale y podawać w du ych wazach stołowych, udekorować
plasterkami ogórka i połówkami winogron.
Rozwiązywanie problemów
POLSKI
Rozwiązanie
Urządzenie wyposa one jest w system zabezpieczający. Jeśli akcesoria nie
zostały prawidłowo połączone z częścią silnikową,urządzenie nie zostanie
uruchomione. Sprawdź, czy akcesoria zostały prawidłowo połączone z częścią
silnikową (sprawdź ró ne części). Przed dokonaniem sprawdzenia
prawidłowości monta u wyłącz urządzenie!
Wyłącz urządzenie i po ponownym włączeniu przetwarzaj mniejszą ilość
owoców.
W przypadku pierwszych kilku zastosowań jest to zjawisko normalne. Jeśli
swąd ten utrzymuje się, sprawdź przetwarzaną ilość, czas stosowania lub
wybraną prędkość.
Wyłącz urządzenie i wyjmij wtyczkę z gniazdka sieciowego. Zwróć się o pomoc
do gorącej linii Serwisu firmy Philips, do biura firmy Philips lub do centrum
serwisowego firmy Philips.
Wyłącz urządzenie. Odkręć jednostkę tnącą, obracając nią w kierunku
przeciwnym do ruchu wskazówek zegara. Sprawdź,czy pierścień gumowy jest
prawidłowo zało ony na część tnącą (spoczywa płasko).
Upewnij się, e pokrywa jest zało ona prawidłowo. Zamykaniu zatyczki
towarzyszy charakterystyczne kliknięcie.
Wyłącz urządzenie. Sprawdź, czy sitko jest zało one prawidłowo.O ebrowanie
w dnie sitka powinno dokładnie pasować do otworu w sprzęgle silnika.
Sprawdź, czy sitko nie jest uszkodzone. Pęknięcia,luźno zamontowana tarcza
ścierająca czy te siatka drobnych pęknięć na powierzchni mogą być powodem
nieprawidłowego działania wyciskarki. Jeśli zauwa ysz jakiekolwiek pęknięcia lub
uszkodzenia sitka, nie uruchamiaj urządzenia i zgłoś się do najbli szego punktu
serwisowego firmy Philips.
Problem
Urządzenie nie działa
Zablokowana jest część tnąca / część
silnikowa.
Na początku u ywania urządzenia
część silnikowa wydziela nieprzyjemny
zapach.
Urządzenie wytwarza du o hałasu,
wydziela swąd, jest zbyt gorące w
dotyku, wydziela dym,itd.
Blender przecieka.
Przeciekają pokrywa i zatyczka
blendera.
Sitko wyciskarki soku styka się z lejem
wsypowym lub mocno drga podczas
wyciskania.
* Jeśli problemy utrzymują się lub pojawiają się inne, zwróć się o pomoc do gorącej linii serwisu firmy Philips, do biura
firmy Philips lub do centrum serwisowego firmy Philips.

Introducere
Aparatul a fost echipat cu un sistem de siguranţă încorporat care
previne funcţionarea acestuia dacă accesoriile nu au fost montate
corect sau deloc.
Nu folosiţi niciodată accesoriile pentru a opri aparatul!
Important
◗ Vă rugăm să citiţi instrucţiunile de utilizare cu atenţie şi să
consultaţi imaginile înainte de a începe să folosiţi aparatul.
◗ Păstraţi-le pentru consultări ulterioare.
◗ Acest aparat poate fi folosit doar pentru uz menajer.
◗ Verificaţi dacă tensiunea indicată pe aparat corespunde tensiunii
locale (110 - 127V sau 220 - 240V) înainte de a conecta aparatul.
◗ Dacă se deteriorează cablul de alimentare al aparatului,acesta
trebuie înlocuit de Philips, la un centru service autorizat Philips
sau de persoane calificate, pentru a evita orice accident.
◗ Nu folosiţi aparatul dacă ştecherul, cablul sau alte componente
sunt deteriorate.
◗ Asamblaţi aparatul corect înainte de a-l conecta la priză.
◗ Când unitatea vasului sau alte accesorii sunt corect montate pe
blocul motor, veţi auzi un clic.
◗ Nu scoateţi accesoriile de pe blocul motor în timpul funcţionării
aparatului.
◗ Nu depăşiţi cantităţile şi duratele de preparare indicate în anumite
capitole.
◗ Lăsaţi ingredientele fierbinţi să se răcească înainte de a le toca sau
de a introduce în vasul blenderului (temperatura maximă
80cC/175cF).
◗ Nu lăsaţi aparatul la îndemâna copiilor.
◗ Nu lăsaţi aparatul în funcţiune fără a-l supraveghea.
◗ Evitaţi atingerea lamelor ASCUŢITE ale cuţitului , mai ales când
aparatul este în priză.
◗ Dacă se blochează cuţitul, SCOATEŢI APARATUL DIN PRIZĂ
înainte de a îndepărta ingredientele cu ajutorul unei spatule.
◗ Nu introduceţi niciodată degetele sau vreun obiect în vas sau în
bol în timpul funcţionării aparatului.
◗ Nu introduceţi niciodată blocul motor în apă sau în alt lichid, şi
nici nu-l clătiţi sub jet de apă. Folosiţi o cârpă umedă.
◗ Scoateţi aparatul din priză imediat după utilizare, înainte de a
deşuruba vasul.
◗ Nivel de zgomot: Lc = 83 dB [A]
Descriere generală
A Compartiment cablu
B Selector de viteză cu 2 viteze şi funcţie impuls (M)
C Buton curăţare rapidă
D Bloc motor
ROMÂNĂ26
E Arbore motor
F Cană suc
G Clemă pentru (des)prinderea capacului
H Colector pulpă
I Sită
J Capac storcător
K Tub de alimentare
L Împingător
M Opritor
N Orificiu adăugare ingrediente
O Capac vas
P Buză de golire
Q Vas blender
R Garnitură de cauciuc
S Cuţit
T Periuţă de curăţare
Pregătirea aparatului pentru utilizare
Spălaţi toate accesoriile şi părţile detaşabile (consultaţi capitolul
"Curăţare").
◗ Înfăşuraţi cablul de alimentare rămas în jurul bazei aparatului.
Utilizarea aparatului
Blender
◗ Blenderul poate fi folosit la:
- Mixarea lichidelor, de ex. lactate, sosuri, sucuri de fructe, supe,
cocteiluri, shake-uri.
- Mixarea ingredientelor moi, de ex. aluat de clătite sau maioneză.
- Pasarea ingredientelor gătite, de ex.pentru prepararea mâncării
pentru bebeluşi.
C
1 Poziţionaţi garnitura de cauciuc în jurul marginii unităţii
cuţitului.
C
2 Fixaţi portcuţitul pe vasul blenderului răsucindu-l în direcţia
săgeţii.
ROMÂNĂ 27
C
3 Montaţi unitatea vasului pe blocul motor. Fixaţi-l răsucindu-l în
direcţia săgeţii.
Nu exercitaţi o presiune prea mare pe mânerul vasului.
C
4 Puneţi ingredientele în pahar.
Nu umpleţi niciodată paharul cu ingrediente ce au o temperatură mai
mare de 80cC.
5 Poziţionaţi capacul.
C
6 Fixaţi opritorul în orificiul din capac şi răsuciţi-l până se fixează
corect.
Pentru a evita stropirea, introduceţi întotdeauna opritorul înainte de a
începe mixarea.
◗ Reglajele de viteză vă permit să reglaţi viteza aparatului pentru a
obţine rezultate optime. Consultaţi tabelul pentru reglajele de
viteză recomandate.
7 Introduceţi ştecherul în priză.
C
8 Selecţionaţi viteza dorită şi aparatul porneşte.
Dacă nu sunteţi sigur ce viteză trebuie să alegeţi, puteţi folosi viteza
maximă (viteza 2).
◗ Pentru a porni aparatul doar pentru câteva secunde, reglaţi
butonul pe poziţia M (Momentum) şi decuplaţi imediat. Repetaţi
de câte ori aveţi nevoie.
9 Pentru a opri aparatul, comutaţi pe poziţia 0.
Nu porniţi şi nici nu opriţi niciodată aparatul răsucind vasul.
A se vedea mai jos o serie de reţete.
ROMÂNĂ28
Viteză
viteza 1
viteza 2
M
Ingrediente de preparat
ingrediente lichide (de ex. lapte cu ciocolată,lapte cu fructe, maioneză)
ingrediente consistente, de ex. o combinaţie de ingrediente lichide şi
solide (suc de roşii)
în principal, ingrediente solide (de ex. cuburi de gheaţă, supe, fasole,
etc.)
1
2
Sugestii
Pentru a evita stropirea, nu umpleţi niciodată vasul peste gradaţia
maximă (1,5 l), în special dacă mixaţi ingrediente lichide fierbinţi.
C
◗ Ingredientele lichide (de ex. uleiul) pot fi turnate în vasul blenderului
în timpul funcţionării aparatului prin orificiul din opritor.
◗ În timpul funcţionării motorului, puteţi adăuga ingredientele prin
orificiul din capac.
Nu lăsaţi blenderul să funcţioneze mai mult de 3 minute continuu. Dac
nu aţi terminat mixarea după 3 minute, opriţi aparatul un minut înainte
de a continua.
◗ Ingredientele solide nu trebuie procesate mai mult de 1 minut.
◗ Înainte de a introduce ingredientele solide în vas,tăiaţi-le în
cuburi. Nu introduceţi o cantitate mare prea mare în vas.
Procesaţi pe rând mai multe tranşe.
◗ Dacă nu sunteţi mulţumit de rezultatul mixării ingredientelor
solide, opriţi blenderul şi porniţi-l scurt de câteva ori activând
funcţia M. Puteţi, de asemenea, amesteca ingredientele cu o
spatulă (nu în timpul funcţionării aparatului) sau puteţi reduce
conţinutul vasului pentru a prepara cantităţi mai mici.
◗ Pentru a rade cuburi de gheaţă, turnaţi-le în vas în timpul
funcţionării cuţitului prin orificiul din capac.
◗ Pentru a prepara suc de roşii,tăiaţi roşiile în patru şi introduceţi-le
în vas prin capac, în timpul funcţionării blenderului.
Nu introduceţi niciodată mâna sau vreun obiect în vas în timpul
funcţionării blenderului.
Storcător
◗ Storcătorul poate fi folosit pentru prepararea unor sucuri
proaspete de fructe. Pulpa, sâmburii şi cojile vor fi separate.
C
1 Fixaţi colectorul de pulpă pe blocul motor şi răsuciţi-l în
direcţia săgeţii până se montează corect.
C
2 Introduceţi sita.
Verificaţi întotdeauna sita înainte de utilizare. Nu o folosiţi dac
observaţi deteriorări cum ar fi crăpături, fisuri, spărturi sau dacă aţi uitat
vreun disc de radere în aparat.
Dacă se deteriorează sita, contactaţi Centrul Consumatori Philips din ţara
dumneavoastră (veţi găsi numărul de telefon în garanţia internaţională).
Dacă nu există un astfel de centru în ţara dumneavoastră, apelaţi la
furnizorul Philips sau contactaţi Departamentul Service pentru Produse
Electrocasnice şi de Îngrijire Personală Philips.
ROMÂNĂ 29
C
3 Poziţionaţi capacul şi fixaţi clema apăsând-o în jos.
Asiguraţi-vă că aţi fixat clema pe partea dreaptă a blocului motor
Verificaţi dacă aţi montat corect capacul.
C
4 Poziţionaţi cana de suc.
5 Selecţionaţi viteza corespunzătoare pentru a porni aparatul.
C
6 Introduceţi ingredientele în tubul de alimentare.Înainte de a
începe stoarcerea,tăiaţi ingredientele în cubuleţe care să încapă
în tub.
C
7 Apăsaţi ingredientele uşor cu dispozitivul de împingere.
Nu exercitaţi o presiune prea mare pe împingător, întrucât rezultatul
obţinut ar putea să nu mai fie cel scontat şi chiar s-ar putea opri sita.
8 Când nu se mai scurge sucul, opriţi aparatul şi aşteptaţi să se
oprească sita înainte de a desface clema de închidere.
9 Luaţi cana de suc.
B
A se vedea mai jos o serie de reţete.
Nu lăsaţi storcătorul să funcţioneze continuu mai mult de 2 minute
Dacă nu aţi terminat de stors, opriţi aparatul şi lăsaţi-l să se răceasc
alte două minute înainte de a continua.
Sugestii
◗ Dacă se umple colectorul de pulpă în timpul stoarcerii, opriţi
aparatul şi aşteptaţi să se oprească sita. Desfaceţi clema şi scoateţi
capacul. Scoateţi sita. Demontaţi colectorul de pulpă de pe blocul
motor răsucindu-l spre dreapta şi scoateţi-l.Goliţi-l şi spălaţi sita.
Montaţi componentele la loc şi porniţi din nou aparatul.
◗ Dacă se umple cana de suc în timpul stoarcerii, opriţi aparatul şi
aşteptaţi să se oprească sita. Luaţi cana de suc şi goliţi-o.
Capacitatea maximă a cănii de suc este de 700 ml.
◗ Înainte de stoarcere, nu trebuie să îndepărtaţi cojile subţiri şi
sâmburii. Desfaceţi doar cojile groase (de ex. cele ale portocalelor,
ananasului sau sfeclei necoapte).
◗ Nu este indicat să stoarceţi la storcător fructe ce conţin amidon,
ROMÂNĂ30
Viteză
viteza 1
viteza 2
Ingrediente de preparat
Fructe (moi)
Nucă de cocos proaspătă, sfeclă (necoaptă)
2
1

cum ar fi bananele, papaya, avocado, smochinele şi mango. Pentru a
prepara aceste fructe, folosiţi blenderul.
◗ Folosiţi întotdeauna fructe şi legume proaspete.Acestea conţin
mai mult suc.
◗ Frunzele şi pedunculii, cum este cazul salatei, se pot stoarce la
storcător.
◗ Sucul de mere se oxidează şi capătă culoarea maro foarte repede.
Pentru a încetini acest proces,adăugaţi câteva picături de zeamă
de lămâie.
◗ Pulpa de morcov, sfeclă,varză sau spanac poate fi folosită la supe,
sosuri, gemuri, deserturi, îngheţate,etc. Fierbeţi pulpa şi adăugaţi
puţină verdeaţă. Omogenizaţi pulpa în blender. Puteţi folosi pulpă
de roşii pentru a prepara pastă de tomate.
Curăţare
Curăţaţi aparatul, componentele şi accesoriile imediat după utilizare.
Nu spălaţi nici un accesoriu sau componentele aparatului în maşina de
spălat vase.
Curăţaţi blocul motor cu o cârpă umedă.
Nu folosiţi detergenţi abrazivi, bureţi abrazivi, alcool, etc.
1 Scoateţi aparatul din priză, demontaţi accesoriile şi
componentele folosite şi curăţaţi-le cu apă călduţă şi puţin
detergent de vase.
2 Clătiţi-le sub jet de apă.
Blender, curăţare rapidă
C
1 Turnaţi apă călduţă şi puţin detergent lichid în vasul blenderului.
Nu depăşiţi cantitatea maximă a vasului (1,5 l).
2 Montaţi capacul şi opritorul.
C
3 Porniţi aparatul câteva secunde apăsând butonul Curăţare
Rapidă.
4 Demontaţi vasul blenderului, scoateţi capacul şi opritorul, şi
clătiţi-le cu apă rece.
ROMÂNĂ 31

5 Pentru o curăţare temeinică,scoateţi portcuţitul din vasul
blenderului.
Storcător, curăţare temeinică
1 Scoateţi capacul, colectorul de pulpă şi sita. Clătiţi-le imediat
după utilizare.
2 Puteţi folosi periuţa furnizată pentru curăţarea sitei.
Garanţie şi service
Pentru informaţii suplimentare sau în cazul altor probleme, vă rugăm să
vizitaţi site-ul Philips www.philips.com sau să contactaţi Departamentul
Clienţi din ţara dumneavoastră (veţi găsi numărul de telefon în garanţia
internaţională). Dacă în ţara dumneavoastră nu există un astfel de
departament, contactaţi furnizorul dumneavoastră Philips sau
Departamentul Service pentru Aparate Electrocasnice şi Produse de
Îngrijire Personală Philips.
Reţete pentru combinaţia Storcător şi Blender
Cu ajutorul aparatului Juice & Co puteţi experimenta un număr
nelimitat de reţete. Puteţi prepara sucuri, shake-uri, supe sau sosuri
delicioase cât ai clipi. Pentru a vă sugera câteva posibilităţi, am inclus în
manual un număr de reţete care vă vor încânta cu siguranţă.
Chifteluţe apetisante
- 250 g pulpă de legume (cea mai potrivită ar fi varza, ţelina, roşiile,
morcovii, ceapa, ardeii graşi, prazul, spanacul sau mărarul)
- 100 g pesmet
- 2 ouă
- 2 linguri sus de roşii
- 1 lingură verdeaţă tocată (pătrunjel/arpagic)
- 2 linguriţe sambal
- 50 g caşcaval ras
- sare
- piper
- 50 g unt
B
Amestecaţi sucul de roşii, verdeaţa tocată, sambalul şi caşcavalul cu
pulpa de legume. Puneţi totul într-un bol şi amestecaţi pesmetul, ouăle,
sarea şi piperul. Faceţi 4 - 5 chifteluţe plate din compoziţia obţinută.
B
Încălziţi untul într-o tigaie şi prăjiţi chifteluţele la foc potrivit timp de
5 minute pe fiecare parte până se rumenesc bine. Se servesc fierbinţi.
Clătite cu mere
- 150 g pulpă de mere
- 150 g făină
- 2 ouă
- aprox. 100 ml lapte
ROMÂNĂ32

- 50 g struguri
- 50 g caise uscate, tăiate bucăţele
- unt
- zahăr şi scorţişoară după gust
B
Încorporaţi făina şi ouăle cu pulpa de mere.Adăugaţi lapte atât cât să
obţineţi o compoziţie destul de consistentă.Amestecaţi cu lingura
strugurii şi caisele în compoziţie.
B
Încălziţi puţin unt într-o tigaie. Luaţi din compoziţie cu o lingură pentru a
pune la prăjit în tigaie, lăsând o distanţă mică.Aplatizaţi în aşa fel încât
să obţineţi nişte mini clătite şi lăsaţi-le să se rumenească la foc potrivit
pe ambele părţi. Se pot servi reci sau calde, presărate cu zahăr şi
scorţişoară după gust.
Băutură fortifiantă (trei pahare)
- 1 mango
- 1 banană
- sucul de la 1 măr (spălat), de la 1 kiwi şi de la 1 portocală
- 2 linguriţe de miere (sau mai mult, după gust)
- 300 ml zer
B
Curăţaţi kiwi-ul şi portocala. Stoarceţi-le la storcător cu mărul. Curăţaţi
mango şi banana şi mixaţi-le la blender cu sucul de fructe, mierea şi
zerul pentru a obţine un shake delicios.
B
Sugestie: înlocuiţi zerul cu lapte bătut sau iaurt pentru a obţine un desert
gustos şi sănătos.
Shake cu gheaţă pentru zile toride (două pahare)
- 1/2 ananas
- 2 mere
- 1 grapefruit roşu
- cuburi de gheaţă (aprox. 2 pahare pline)
B
Curăţaţi ananasul şi grapefruitul, spălaţi merele şi tăiaţi totul cubuleţe.
Stoarceţi-le la storcător şi vărsaţi sucul într-un pahar.
B
Montaţi blenderul şi introduceţi cuburile de gheaţă în vasul acestuia.
Mărunţiţi gheaţa la viteza maximă şi adăugaţi sucul de fructe. Veţi
obţine un shake de fructe delicios şi rece ca gheaţa care vă va potoli
setea!
Shake de legume (o porţie mare)
- 200 ml suc de morcovi
- 1/2 tulpină de ţelină tocată
- 1 roşie potrivită, curăţată de coajă şi tocată
- 1/2 ardei mic roşu sau verde, tocat
- o mână de spanac proaspăt sau câteva frunze de pătrunjel
- 2 - 3 cuburi de gheaţă
- 1 tulpină subţire şi lungă de ţelină pentru garnisire
B
Stoarceţi 6 - 8 morcovi la storcător.
B
Montaţi blenderul. Puneţi sucul de morcovi,legumele şi spanacul sau
pătrunjelul în blender şi mixaţi 15-30 de secunde la viteza maximă.
Adăugaţi cuburile de gheaţă şi amestecaţi din nou câteva secunde.
Turnaţi shake-ul într-un pahar şi garnisiţi cu o tulpină lungă de ţelină.
ROMÂNĂ 33

Gazpacho blanco (patru porţii)
- 500 g struguri albi fără sâmburi
- 2 castraveţi (aprox. 750 g)
- 1 ceapă tocată
- 1 căţel de usturoi pisat
- 1/4 linguriţă sare
- 1/4 linguriţă piper alb
- 500 ml iaurt degresat
- 6 - 8 picături sos Tabasco
B
Spălaţi strugurii şi îndepărtaţi codiţele. Stoarceţi-i în storcător.
B
Montaţi blenderul. Puneţi sucul de struguri în blender. Curăţaţi
castravetele, tăiaţi-l în două pe lungime şi scoateţi sâmburii.Tăiaţi
castravetele în felii groase şi adăugaţi-le peste sucul de grapefruit din
blender.Adăugaţi ceapa, usturoiul, sarea şi piperul şi apăsaţi scurt pe
butonul impuls.Turnaţi compoziţia într-un bol şi încorporaţi iaurtul şi
Tabasco.
B
Lăsaţi supa obţinută să se răcească la frigider timp de 30 de minute
acoperind-o cu un capac. Se serveşte în boluri mari de supă şi se
garniseşte cu felii de castravete şi jumătăţi de boabe de struguri.
Depanare
ROMÂNĂ34
Soluţie
Acest aparat este dotat cu un sistem de siguranţă. Dacă accesoriile nu sunt
corect montate pe blocul motor, aparatul nu funcţionează.Verificaţi dacă
accesoriile au fost corect montate (a se vedea celelalte capitole). Opriţi mai
întâi aparatul.
Opriţi aparatul şi preparaţi cantităţi mai mici.
Acest lucru este normal pentru primele utilizări. Dacă aparatul continuă să
emane miros, verificaţi cantitatea preparată, durata aplicaţiei sau viteza utilizată.
Opriţi aparatul şi scoateţi ştecherul din priză. Duceţi aparatul la un centru
service Philips sau contactaţi un depar tament Philips pentru reparaţii.
Opriţi aparatul. Scoateţi portcuţitul răsucindu-l în sens invers acelor de
ceasornic.Verificaţi dacă aţi montat corect garnitura de cauciuc pe portcuţit (în
poziţie orizontală).
Asiguraţi-vă că aţi montat corect capacul. Opritorul se fixează cu un clic.
Opriţi aparatul.Verificaţi dacă aţi montat corect sita. Nervurile de pe fundul
sitei trebuie să se fixeze corect pe orificiul arborelui motor.
Verificaţi dacă sita este deteriorată. Eventualele crăpături, fisuri, un disc de
radere uitat pe ax sau orice altă neregularitate poate cauza proasta funcţionare
a aparatului. Dacă observaţi vreo crăpătură sau deteriorare a sitei, încetaţi
folosirea aparatului şi contactaţi cel mai apropriat centru ser vice Philips.
Problemă
Aparatul nu funcţionează
Cuţitul sau blocul motor sunt blocate.
Blocul motor emană un miros
neplăcut în timpul primelor utilizări.
Aparatul face zgomot, emană miros,
este foarte încins la atingere, fumegă,
etc.
Se prelinge zeamă prin blender.
Sunt scurgeri pe la capacul şi/sau pe la
opritorul blenderului
Sita storcătorului atinge tubul de
alimentare sau vibrează puternic în
timpul stoarcerii.
* Dacă nu rezolvaţi problema sau dacă apar alte nereguli, vă rugăm să ne sunaţi la telefonul special al Departamentului
Clienţi Philips, la Birourile Philips sau la Centrul Service Philips pentru asistenţă.

Введение
Этот прибор оснащен встроенной защитной блокировкой работы
прибора на случай, если принадлежности неправильно установлены
или не установлены совсем.
Нельзя использовать блокировку для включения и выключени
прибора.
Внимание
◗ Прежде чем пользоваться прибором, прочитайте настоящее
руководство и ознакомьтесь с иллюстрациями.
◗ Сохраните настоящее руководство по эксплуатации в
качестве справочного материала.
◗ Прибор предназначен для эксплуатации только в домашних
условиях.
◗ Прежде чем подключить прибор к электросети, убедитесь в
том, что напряжение,указанное на приборе, соответствует
напряжению электросети в вашем доме (110-127Вт или 220240Вт).
◗ В случае повреждения сетевого шнура его необходимо
заменить только в торговой организации или в
уполномоченном сервисном центре компании «Филипс», или в
сервисном центре с персоналом аналогичной квалификации,
чтобы обеспечить безопасную эксплуатацию прибора.
◗ Запрещается пользоваться прибором, если вилка шнура
питания, шнур питания или сам прибор имеют повреждения.
◗ Прежде чем подключить прибор к розетке электросети
убедитесь в том, что прибор собран правильно.
◗ При правильной установке кувшина и прочих
принадлежностей на блоке электродвигателя вы услышите
щелчок.
◗ Не снимайте принадлежности с блока электродвигателя во
время работы прибора.
◗ Не превышайте количество продуктов и время приготовления,
указанные в соответствующих разделах.
◗ Прежде чем измельчить горячие продукты или поместить их в
кувшин, дайте им остыть (максимальная температура
80cC/175cF).
◗ Храните прибор в недоступном для детей месте.
◗ Не оставляйте включенный прибор без присмотра.
◗ Не прикасайтесь к острому лезвию ножа, особенно если
прибор подключен к электросети.
◗ В случае остановки ножей,ОТКЛЮЧИТЕ ПРИБОР ОТ СЕТИ,
и при помощи лопаточки уберите ингредиенты, которые
заблокировали ножи.
◗ Во время работы прибора запрещается опускать пальцы или
какие-либо предметы в загрузочную горловину.
РУССКИЙ 35

◗ Запрещается опускать блок электродвигателя в воду или
любую другую жидкость.Не мойте его под краном.
Используйте влажную ткань.
◗ После эксплуатации сразу же отключите прибор, например,
перед тем как снять кувшин блендера.
◗ Уровень шума: Lc= 83 дБ [A]
Общее описание
A Отсек для хранения шнура питания
B Переключатель скоростей (2 скорости и пульсирующий режим
(М))
C Кнопка быстрой очистки
D Блок электродвигателя
E Приводной вал
F Чаша для сока
G Фиксатор крышки
H Бачок для выжимок
I Сетчатый фильтр
J Крышка соковыжималки
K Загрузочная горловина
L Толкатель
M Пробка
N Отверстие для загрузки ингредиентов
O Крышка кувшина
P Носик
Q Кувшин блендера
R Уплотнительное резиновое кольцо
S Ножевой блок
T Щетка для очистки
Подготовка электроприбора к работе
Вымойте все принадлежности и съемные детали (см. раздел
«Очистка»).
◗ Намотайте излишек шнура питания вокруг основания
электроприбора.
Как пользоваться прибором
Блендер
◗ Блендер предназначен для:
- Перемешивания жидкостей, таких как молочные продукты,
соусы, фруктовые соки, супы, напитки, коктейли.
- Перемешивания мягких ингредиентов для приготовления,
например, жидкого теста для оладьев или майонеза.
- Приготовления пюре из отварных продуктов, например, для
детского питания.
РУССКИЙ36

C
1 Наденьте уплотнительное резиновое кольцо на ободок
ножевого блока.
C
2 Присоедините ножевой блок к основанию кувшина
блендера, повернув его по направлению стрелки.
C
3 Установите кувшин блендера на блок электродвигателя.
Зафиксируйте его, повернув по направлению стрелки.
Не нажимайте слишком сильно на ручку кувшина.
C
4 Поместите в кувшин ингредиенты.
Не помещайте в кувшин ингредиенты с температурой выше 80cC.
5 Закройте кувшин крышкой
C
6 Закройте отверстие в крышке пробкой и поверните пробку
до отказа.
Чтобы не пролить жидкость всегда перед работой закрывайте
отверстие в крышке пробкой.
◗ Переключатель скоростей позволит выбрать оптимальный
режим работы. Смотри таблицу рекомендуемых скоростей.
РУССКИЙ 37
1
2

7 Вставьте вилку сетевого шнура в розетку электросети.
C
8 Выберите наиболее подходящую скорость,и прибор
включится.
Если вы не знаете, какую скорость выбрать, устанавливайте
блендер на максимальную скорость (скорость 2).
◗ Для того чтобы прибор работал в течение нескольких секунд,
установите переключатель в положение М (Momentum) и
сразу отпустите его. Повторяйте это столько раз, сколько
потребуется.
9 Чтобы выключить прибор, установите переключатель в
положение 0.
Запрещается включать/выключать прибор поворотом крышки.
Рецепты можете прочитать далее в руководстве.
Полезные советы
Чтобы не пролить жидкость, запрещается заполнять кувшин выше
отметки максимального уровня (1,5 литра) на крышке, особенно
при перемешивании горячих жидкостей.
C
◗ Жидкие ингредиенты (например, растительное масло) можно
вливать в блендер во время его работы через отверстие в
пробке.
◗ Ингредиенты можно добавлять в блендер при работающем
электродвигателе через отверстие в крышке.
Не давайте прибору работать в течение более чем 3 минут з
один раз. Если за 3 минуты вы не закончили смешивание
выключите прибор на 1 минуту и затем вы можете продолжит
работу.
◗ Время обработки сухих ингредиентов не должно превышать 1
минуты.
◗ Прежде чем поместить в блендер твердые ингредиенты,
разрежьте их на более мелкие кусочки. Если вам требуется
переработать большой объем продуктов, разделите его на
небольшие порции, а не старайтесь переработать все
продукты за один прием.
РУССКИЙ38
Скорость
Скорость 1
Скорость 2
M
Ингредиенты для измельчения
Жидкие ингредиенты (например, шоколадное молоко, молоко с
фруктами, майонез).
Более тяжелые ингредиенты, например, сочетание жидких и
твердых ингредиентов (например, томатный соус или паштет).
Тяжелые, главным образом, твердые ингредиенты (например,
кубики льда, супы, фасоль и т.д.)

◗ Если вы не удовлетворены результатом обработки
ингредиентов, установите прибор на короткое время в режим
"М" несколько раз.Или перемешайте ингредиенты лопаткой
(при выключенном электроприборе!) или выложите часть
содержимого кувшина и обработать меньшую порцию.
◗ Для измельчения кубиков льда загружайте их через отверстие
в крышке при вращающихся ножах.
◗ Для приготовления томатного сока разрежьте каждый
помидор на 4 части и загружайте их в блендер через
отверстие крышки.
Во время работы прибора запрещается опускать пальцы или какие
либо предметы в загрузочную горловину.
Соковыжималка.
◗ Соковыжималка используется для приготовления свежих
фруктовых соков.При этом мякоть, косточки и кожица будут
отделены.
C
1 Закрепите бачок для выжимок на блоке электродвигателя и
поверните его по стрелке до полной фиксации.
C
2 Вставьте сетчатый фильтр.
Всегда проверяйте сетчатый фильтр перед использованием
прибора. Не используйте прибор, если вы заметили такие
повреждения как трещины, повреждения металлической
поверхности и другие.
В случае повреждения сетчатого фильтра обратитесь в центр
компании "Филипс" по обслуживанию потребителей в вашей
стране (вы найдете его номер телефона на международном
гарантийном талоне). Если подобный центр в вашей стране
отсутствует, обратитесь в вашу местную торговую организацию
компании "Филипс" или сервисный центр компании.
C
3 Установите крышку и защелкните фиксатор крышки
нажатием вниз.
Убедитесь в том, что фиксатор находится с правой стороны блок
электродвигателя. Убедитесь в том, что крышка установлена и
закреплена надежным образом.
РУССКИЙ 39
2
1

C
4 Установите чашу для сока на место.
5 Выберите необходимую скорость, чтобы включить прибор.
C
6 Загрузите ингредиенты в загрузочную горловину. Перед
началом работы порежьте фрукты на ломтики, чтобы они
проходили в загрузочную горловину.
C
7 Слегка надавите на ингредиенты толкателем.
Не следует слишком сильно нажимать на толкатель, так это может
повлиять на конечный результат и даже привести к остановке
сетчатого фильтра.
8 Если из прибора больше не течет сок, выключите прибор и
подождите, пока сетчатый фильтр не остановится.
9 Снимите чашу для сока.
B
Рецепты можете прочитать далее в руководстве.
Не давайте работать соковыжималке более 2 минут подряд. Если
вы еще не получили сок, выключите прибор и дайте ему остыть в
течение 2 минут перед тем как продолжить работу.
Полезные советы
◗ Если во время работы бачок для выжимок переполнился,
выключите прибор и подождите, пока сетчатый фильтр не
остановится. Откройте фиксатор и саму крышку. Выньте
сетчатый фильтр. Отсоедините бачок для выжимок от блока
электродвигателя, повернув его вправо. Очистите бачок для
выжимок и сетчатый фильтр. Снова соберите соковыжималку
и продолжайте работу.
◗ Если во время работы чаша для сока переполнилась,
выключите прибор и подождите, пока сетчатый фильтр не
остановится. Снимите чашу для сока и вылейте готовый сок.
Максимальный объем чаши для сока - 700 мг.
◗ Перед приготовлением сока не обязательно очищать тонкую
кожицу или шкурку. Следует снимать только толстую кожуру,
например с апельсинов, ананасов и сырой свеклы.
◗ В соковыжималке не рекомендуется перерабатывать фрукты с
высоким содержанием крахмала, такие как бананы, папайя,
авокадо, инжир и манго. Для переработки этих фруктов
пользуйтесь блендером.
◗ Отбирайте только свежие фрукты и овощи - они содержат
больше сока.
РУССКИЙ40
Скорость
Скорость 1
Скорость 2
Ингредиенты для измельчения
Фрукты (мягкие)
Свежий кокос, свекла (сырая)

◗ Листья и стебли зелени, например, салат, также могут
обрабатываться в этой соковыжималке.
◗ Яблочный сок быстро приобретает коричневый цвет.
Несколько капель лимонного сока приостановит этот
процесс.
◗ Мякоть моркови, сырой свеклы, капусты или шпината может
послужить основой для супа, соуса, джема, десерта,
мороженого и т.д. Доведите мякоть до кипения и добавьте
пряностей. Вы можете приготовить пюре, поместив мякоть в
блендер. Вы можете использовать мякоть помидоров для
приготовления томатной пасты.
Очистка
Прибор легче очистить, если сделать это сразу после
использования.
Запрещается мыть детали прибора в посудомоечной машине.
Для очистки блока электродвигателя пользуйтесь влажной тканью.
Не используйте абразивные средства, металлические мочалки
моющие средства, содержащие спирты и т.д.
1 Выключите электроприбор, выньте вилку шнура питания из
розетки электросети. Снимите грязные детали с блока
электродвигателя, очистите их в теплой воде с мылом
мягкой щеткой.
2 Промойте все детали под струей воды.
Блендер, быстрая очистка
C
1 Налейте теплой воды и чистящего средства в кувшин
блендера.
Не превышайте максимальный объем кувшина (1.5 л).
2 Установите крышку и пробку.
C
3 Включите прибор на несколько секунд,нажав на кнопку
быстрой очистки.
4 Снимите кувшин блендера, крышку и пробку. Промойте их
чистой водой.
5 Для лучшей очистки снимите ножевой блок блендера.
РУССКИЙ 41

Соковыжималка, тщательная очистка
1 Снимите крышку, бачок для выжимок и сетчатый фильтр.
Вымойте их сразу же после использования.
2 Для очистки сетчатого фильтра пользуйтесь щеткой
Гарантия и обслуживание
По поводу дополнительной информации или в случае
возникновения каких-либо проблем обращайтесь на Web-сайт
компании «Филипс» по адресу: www.philips.com или в центр
компании «Филипс» по обслуживанию потребителей в вашей
стране (вы найдете его номер телефона на международном
гарантийном талоне). Если подобный центр в вашей стране
отсутствует, обратитесь в вашу местную торговую организацию
компании «Филипс» или в сервисное отделение компании Philips
Domestic Appliances and Personal Care BV.
Рецепты для соковыжималки и блендера
Вместе с прибором "Juice & Co" вы можете бесконечно
экспериментировать и пробовать всевозможные рецепты. Вы
можете приготовить вкусные соки, коктейли, супы, соусы, затратив
при этом минимум усилий. Мы приводим несколько рецептов,
которые несомненно вам понравятся.
Пикантные лепешки
- 250 г овощных выжимок (лучше всего подходят капуста,
сельдерей, томаты, морковь, лук, сладкий перец, лук-порей,
шпинат и фенхель)
- 100 г хлебных сухарей
- 2 яйца
- 2 столовые ложки томатного кетчупа
- 1 столовая ложка измельченной зелени (напр. петрушка/чеснок)
- 2 чайной ложки самбала
- 50 г тертого сыра
-соль
- перец
- 50 г масла
B
Перемешайте томатный кетчуп, измельченную зелень, самбал и
сыр с выжимками до получения однородной массы. Поместите
полученную массу в чашу и смешайте с хлебными сухарями, яйцами
и небольшим количеством соли и перца. Сделайте из смеси 3-4
плоских лепешек.
B
Подогрейте на сковороде масло и обжарьте лепешки на среднем
огне в течение 5 минут с каждой стороны, пока они не
подрумянятся и не станут готовыми. Подавать горячими.
РУССКИЙ42

Яблочные оладьи
- 150 г яблочных выжимок
- 150 г блинной муки
- 2 яйца
- около 100 г молока
- 50 г изюма
- 50 г кураги, нарезанной кусочками
- масло
- сахар и корица по вкусу
B
Перемешайте муку и яйца с яблочными выжимками. Добавьте
молока в достаточном количестве до получения однородной
массы. Добавьте к массе изюм и курагу и перемешайте ложкой.
B
Разогрейте на сковороде немного масла. Наливайте массу на
сковородку небольшими порциями, оставляя между ними
небольшие промежутки. Придайте порциям форму оладий и
обжарьте их с двух сторон на среднем огне, пока они не
подрумянятся и не будут готовы. Подавайте оладьи к столу
горячими или холодными, посыпав их по вкусу сахаром и корицей.
Витаминный напиток (3 стакана)
- 1 манго
- 1 банан
- сок 1 яблока, 1 киви, 1- апельсина
- 2 чайных ложки меда (или по вкусу)
- 300 мл пахты
B
Очистите от кожуры киви и апельсин. Пропустите их вместе с
яблоком через соковыжималку. Очистите от кожуры манго и
банан и смешайте их в блендере с фруктовым соком, медом и
пахтой для приготовления вкусного коктейля.
B
Полезный совет: Замените пахту обезжиренным творогом или
йогуртом, для приготовления вкусного и полезного десерта.
Ледяной коктейль для жаркого дня (2 стакана)
- ? ананаса
- 2 яблока
- 1 розовый грейпфрут
- кубики льда (примерно 2 полных стакана)
B
Очистите от кожуры ананас, грейпфрут и вымойте яблоки и
нарежьте их все кусочками. Пропустите все через
соковыжималку и соберите сок.
B
Соберите блендер и поместите кубики льда в кувшин блендера.
Измельчите лед на максимальной скорости, добавьте фруктовый
сок. Вы получите вкусный, холодный как лед, фруктовый коктейль,
который утолит жажду в любую жару.
Овощной коктейль
- 200 мл морковного сока
- 1/2 стебля сельдерея, нарезанного кусочками
- 1 помидор среднего размера, очищенный от кожицы и
нарезанный кусочками
РУССКИЙ 43

- 1/2 небольшого зеленого или красного перца, нарезанного
кусочками
- маленький пучок свежего шпината или несколько веточек
петрушки
- 2 или 3 кубика льда.
- 1 длинный стебель сельдерея для украшения
B
Переработайте от 6 до 8 морковин в соковыжималке.
B
Соберите блендер. Поместите морковный сок, овощи и шпинат
или петрушку в блендер и смешивайте в течение 15-30 секунд на
максимальной скорости. Добавьте кубики льда и смешивайте еще
несколько секунд. Перелейте коктейль в высокий бокал и
украсьте его длинным стеблем сельдерея.
Суп "Газпачо бланко" (Холодный овощной суп со
сметаной) (4 порции)
- 500 г белого винограда без косточек
- 2 огурца (примерно 750 г)
- 1 лук-шалот, нарезанный кусочками
- 1 измельченный зубчик чеснока
- 1/4 чайной ложки соли
- 1/4 чайной ложки белого перца
- 500 мл обезжиренного йогурта
- 6-8 капель соуса Табаско
B
Вымойте виноград и очистите его от веточек. Переработайте
его в соковыжималке и соберите сок.
B
Соберите блендер. Налейте виноградный сок в блендер.
Очистите огурцы, разрежьте в длину пополам и удалите семена.
Нарежьте огурцы толстыми ломтиками и добавьте эти
ломтики к виноградному соку в блендер. Добавьте лук-шалот,
чеснок и перец в блендер и на короткое время включите блендер.
Готовую смесь вылейте в чашу, добавьте йогурт и соус Тобаско и
перемешайте.
B
Охладите суп в закрытой чаше в холодильнике в течение 30
минут. Подайте к столу в больших суповых чашках, украсив
ломтиками огурца и виноградом.
РУССКИЙ44

Руководство по обнаружению и устранению неисправностей
РУССКИЙ 45
Устранение
Прибор оснащен встроенной защитной блокировкой работы прибора на
случай, если принадлежности неправильно установлены. Проверьте
правильность установки деталей (проверьте разные части).
Предварительно выключите прибор!
Выключите прибор и перемешайте меньшее количество ингредиентов.
Это нормально для первого раза работы. Если по-прежнему чувствуется
запах, проверьте качество перемешивающихся продуктов, время работы
или используемую скорость.
Выключите прибор и выньте вилку шнура питания из розетки
электросети. Обратитесь за помощью в центр компании "Филипс" по
обслуживанию потребителей или в вашу местную торговую организацию.
Выключите прибор. Выньте ножевой блок, повернув его против часовой
стрелки. Проверьте, правильно ли установлена резиновая шайба на
ножевом блоке.
Убедитесь, что крышка правильно установлена. Заглушка полностью
установлена, когда Вы услышите щелчок.
Выключите прибор. Проверьте правильность установки сита. Ребра на дне
сита должны точно сопрягаться с ответной частью электродвигателя.
Убедитесь, что сито не повреждено. Трещины, микротрещины,
ослабленное крепление измельчающего диска или любые другие
неисправности могут приводить к нарушению работоспособности
прибора. Если вы обнаружите трещины или какие-либо иные повреждения
сита, прекратите пользоваться прибором и обратитесь в ближайший
сервисный центр компании "Филипс".
Проблема
Электроприбор не работает.
Ножевой блок/ блок
электродвигателя заблокирован.
Чувствуется неприятный запах от
блока электродвигателя во время
первых минут работы.
Прибор слишком сильно шумит,
чувствуется запах, прибор сильно
нагрелся, дымит и т.д.
Блендер протекает
Крышка и/или заглушка блендера
протекает
Сито касается загрузочного окна
или сильно вибрирует в процессе
работы.
* Если вам не удалось устранить возникшую проблему, обратитесь за помощью в центр компании "Филипс" по
обслуживанию потребителей или в вашу местную торговую организацию.

Úvod
Přístroj je vybaven vestavěnou ochranou pro případ, že by bylo jeho
příslušenství připojeno nesprávně nebo nebylo připojeno vůbec.
Nikdy přístroj nezapojujte nebo nevypojujte připojením nebo
odpojením příslušenství.
Důležité
◗ Prosíme, abyste podrobně přečetli návod k obsluze a sledovali
přitom příslušná vyobrazení.
◗ Návod si ponechte pro případné pozdější nahlédnutí.
◗ Přístroj je určen výhradně pro použití v domácnosti.
◗ Dříve než přístroj připojíte do sítě přesvědčte se, že jeho napájecí
napětí souhlasí s napětím sítě (110 až 127 V nebo 220 až 240 V).
◗ Přívodní kabel musí být vždy vyměněn v autorizované opravně
firmy Philips nebo přímo v servisním středisku této firmy, abyste
zabránili vzniku nebezpečných situací.
◗ Nepoužívejte přístroj pokud byste zjistili,že je poškozen síťový
přívod nebo některý jiný díl.
◗ Dříve než zasunete zástrčku do síťové zásuvky, přístroj pečlivě
sestavte.
◗ Když je nádoba nebo jiné příslušenství nasazeno správně, ozve se
zřetelné zaklapnutí.
◗ Nikdy neodnímejte příslušenství dokud je přístroj v chodu.
◗ Nikdy nepřekračujte množství potravin ani dobu jejich zpracování,
které je udáno v návodu.
◗ Horké suroviny nechejte před vložením či nalitím do nádoby
mixéru vychladnout (maximální teplota 80cC).
◗ Přístroj uchovávejte vždy mimo dosah dětí.
◗ Nikdy nenechte přístroj pracovat bez dozoru.
◗ Nikdy se nedotýkejte OSTRÝCH nožů, obzvláště je-li přístroj
zapojen do sítě.
◗ Kdyby se nože zalepily, ODPOJTE PŘÍSTROJ dříve než blokující
přísady odstraníte stěrkou.
◗ Nikdy nesahejte prsty nebo jinými nástroji do nádoby pokud je
přístroj v chodu.
◗ Motorovou jednotku nikdy nesmíte ponořit do vody nebo do jiné
kapaliny, ani ji oplachovat pod tekoucí vodou.Vždy používejte
pouze navlhčený hadřík.
◗ Po ukončené práci přístroj odpojte od sítě dříve než odšroubujete
nádobu.
◗ Hladina hluku: Lc= 83 dB [A]
Všeobecný popis
A Prostor pro síťový přívod.
B Volič rychlosti se dvěma rychlostními a jedním mžikovým stupněm.
C Tlačítko rychlého čištění.
D Motorová jednotka.
ČESKY46

47
E Hnací hřídel.
F Nádobka na šťávu.
G Uzávěr pro zajištění/odjištění nádoby.
H Zásobník dužiny.
I Sítko.
J Víko odšťavňovače.
K Plnicí tubus.
L Pěchovač.
M Zátka.
N Otvor pro přidávání přísad.
O Víko nádoby.
P Výlevka.
Q Mixovací nádoba.
R Pryžový těsnicí kroužek.
S Nožová jednotka.
T Kartáček k čištění.
Příprava přístroje k použití
Umyjte příslušenství a oddělitelné části přístroje (viz odstavec "Čištění").
◗ Nadbytečný síťový přívod natočte kolem spodní části přístroje.
Použití přístroje
Mixér
◗ Mixér je vhodný pro:
- Mixování tekutin, například mléčných produktů,omáček, ovocných
šťáv nebo nápojů.
- Mixování měkkých ingrediencí, například lívancového těsta nebo
majonéz.
- Rozšlehání vařených ingrediencí, například výroba dětské výživy.
C
1 Položte pryžový kroužek kolem okraje nožové jednotky.
C
2 Nožovou jednotku upevněte k nádobě tak,že jí otočíte ve
směru šipky
ČESKY

C
3 Nádobu s nožovou jednotkou upevněte na motorovou
jednotku. Zajistěte ji otočením ve směru šipky.
Na držadlo nádoby netlačte nadměrnou silou.
C
4 Do nádoby vložte přísady.
Nikdy nádobu neplňte přísadami, které jsou teplejší než 80cC.
5 Víko přitiskněte na nádobu.
C
6 Zátku vložte do otvoru ve víku a otočením ji řádně upevněte.
Abyste zabránili vystřikování, vždy nezapomeňte do víka vložit zátku.
◗ Nastavte takovou rychlost otáčení, která bude pro optimální
zpracování vložených potravin nejvhodnější.Viz tabulku
doporučených rychlostí.
7 Síťovou zástrčku zasuňte do zásuvky.
C
8 Zapojte požadovanou rychlost a tím zapojíte i motor přístroje.
Pokud si nejste jisti jaká rychlost je vhodná, začněte volbou rychlosti 2.
◗ Jestliže chcete ponechat přístroj v chodu jen několik sekund,
zvolte rychlost M (mžikovou) a po několika sekundách ji opět
vypněte.To lze opakovat tak často,jak to bude třeba.
9 Přístroj vypnete, nastavíte-li polohu 0.
Nikdy přístroj nezapínejte ani nevypínejte otáčením nádoby.
Recepty naleznete na konci tohoto návodu.
48 ČESKY
Rychlost
rychlost 1
rychlost 2
M
Přísady ke zpracování
tekuté přísady (např. čokoládové mléko, mléko s ovocem, majonéza)
tužší přísady např. kombinace tekutin s tuhými přísadami
tuhé přísady (např. kostky ledu)
1
2

49
Praktické rady
Abyste zabránili vystřikování obsahu, nikdy nádobu neplňte nad
označené maximum (1,5 litru), obzvláště v případě, kdy mixujete horké
tekutiny.
C
◗ Tekuté přísady (například olej) můžete do nádoby přilévat za
chodu otvorem v zátce.
◗ Když je motor v chodu, lze přilévat tekuté přísady otvorem ve
víku.
Nenechávejte motor v chodu déle než asi 3 minuty. Pokud potřebujete
mixovat déle, přístroj nechte po uvedené době asi minutu vychladnout
a pak pokračujte v práci další 3 minuty.
◗ Suché přísady nemixujte déle než asi 1 minutu.
◗ Tuhé přísady předem rozkrájejte na malé kousky než je vložíte do
nádoby. Do nádoby též nevkládejte nadměrné množství potravin
najednou. Lepší je vždy vkládat více malých kousků.
◗ Pokud nejste při zpracování tuhých přísad s výsledkem spokojeni,
přístroj vypněte, část potravin vyjměte a zbytek mixujte
krátkodobě v poloze M. Můžete též zamíchat potraviny stěrkou
(motor nesmí být v chodu) nebo zmenšit obsah nádoby a mixovat
pouze malé kousky.
◗ Potřebujete-li drtit kostky ledu, vhazujte je otvorem ve víku za
chodu motoru.
◗ K výrobě šťávy z rajských jablek rozkrájejte rajská jablíčka na čtyři
díly a vkládejte je za chodu motoru otvorem ve víku.
Nikdy nestrkejte prsty ani jiné předměty do nádoby pokud je motor v
chodu.
Odšťavňovač
◗ Odšťavňovač lze použít pro přípravu čerstvých ovocných štáv.
Dužina, pecičky a kůra jsou přitom odděleny.
C
1 Nasaďte zásobník dužiny na motorovou jednotku a otočte jím
ve směru šipky až je řádně upevněn.
C
2 Vložte sítko.
Před použitím sítko vždy zkontrolujte. Nepoužívejte přístroj pokud by
bylo sítko jakkoli poškozené.
V případě poškození sítka se spojte se servisem firmy Philips, jehož
adresu a telefony najdete na konci záručních podmínek.
ČESKY

50
C
3 Na nádobu položte víko a zajistěte je stlačením uzávěru
směrem dolů.
Ujistěte se, že je uzávěr na pravé straně motorové jednotky
Zkontrolujte, zda je víko řádně nasazeno a zajištěno.
C
4 Vložte nádobku na šťávu.
5 Zvolte vhodnou rychlost a uveďte přístroj do chodu.
C
6 Vkládejte přísady do plnicího tubusu. Před tím však větší
potraviny rozkrájejte na menší kousky.
C
7 Přísady jemně přitlačujte pěchovačem.
Na pěchovač příliš netlačte, mohlo by to mít vliv na kvalitu výsledné
práce, připadně by se mohlo sítko zastavit.
8 Když již žádná šťava nevytéká,vypněte přístroj a vyčkejte až se
rotující sítko zcela zastaví.
9 Vyjměte nádobku se šťávou.
B
Recepty naleznete na konci tohoto návodu.
Nenechávejte přístroj v trvalém chodu déle než 2 minuty. Jestliže ještě
nejste s prací hotovi, přístroj vypněte a vyčkejte další 2 minuty než
budete v práci pokračovat.
Praktické rady
◗ Jestliže se během práce zásobník dužiny zcela naplní,vypněte
přístroj a vyčkejte až se sítko zcela zastaví.Uvolněte uzávěr a
odejměte víko.Vyjměte sítko. Oddělte zásobík dužiny z motorové
jednotky otočením doprava a sejměte ho.Vyprázdněte zásobník
dužiny a vyčistěte sítko.Všechny díly opět složte a pokračujte v
práci.
◗ Pokud je nádobka na šťávu během práce zcela naplněna, vypněte
přístroj a vyčkejte až se sítko zcela zastaví.Vyjměte nádobku na
šťávu a vyprázdněte ji. Maximální obsah nádobky je 700 ml.
◗ Během práce není třeba odstraňovat slupku nebo kůru. Jen tlusté
kůry (např. pomernačů, ananasů nebo syrové řepy) je vhodné
odstranit.
ČESKY
Rychlost
rychlost 1
rychlost 2
Přísady ke zpracování
Ovoce (měkké)
Čerstvé kokosy,řepy (tuhé)
1
2

51
◗ Ovoce, které obsahuje větší množství škrobu (banány, papaya,
avokádo, fíky nebo mango) není vhodné zpracovávat v
odšťavňovači.Pro zpracování tohoto ovoce je vhodnější mixér.
◗ Vždy používejte čerstvé ovoce a zeleninu.Získáte více šťávy.
◗ V tomto přístroji lze též zpracovávat listy nebo stonky salátů.
◗ Jablečné šťávy velmi rychle zhnědnou.Tento proces můžete
zpomalit přidáním několika kapek citrónové šťávy.
◗ Dužina mrkve, řepy, zelí nebo špenátu může být použita jako
základ pro polévky, omáčky džemy, dezerty,mražené krémy apod.
Uvařte dužinu a přidejte trochu bylinek.Pak vše rozmixujte v
mixéru. Dužinu z rajských jablíček můžete použít pro rajskou
omáčku.
Čištění přístroje
Přístroj i jeho příslušenství vyčistěte ihned po použití.
Příslušenství nikdy nemyjte v myčce nádobí.
Motorovou jednotku čistěte pouze navlhčeným hadříkem.
Nepoužívejte žádné abrasívní chemikálie (čisticí prášky).
1 Odpojte přístroj, oddělte použité příslušenství a díly a umyjte je
ve vlažné mýdlové vodě.
2 Umyté příslušenství opláchněte pod tekoucí vodou.
Rychlé čištění mixéru
C
1 Do nádoby mixéru nalijte vlažnou vodu s trochou vhodného
mycího prostředku.
Nepřekročte maximální náplň (1,5 litru).
2 Nasaďte víko a zátku.
C
3 Spusťte přístroj na několik sekund tlačítkem Quick Clean.
4 Sejměte mixérovou nádobu,odejměte víko a zátku a
opláchněte vše pod tekoucí vodou.
5 Pro lepší vyčištění doporučujeme vyjmout z nádoby nožovou
jednotku.
ČESKY

Lepší čištění odšťavňovače
1 Odejměte víko,zásobník dužiny a sítko.Vše opláchněte ihned
po použití.
2 Pro čištění sítka můžete použít přiložený kartáček.
Záruka & servis
Pokud byste potřebovali jakoukoli informaci nebo měli nějaký problém,
podívejte se na internetovou stránku www. philips.com, případně
kontaktujte Informační středisko firmy Philips, jehož telefonní číslo
naleznete na letáčku s celosvětovou zárukou.
Recepty pro kombinaci odšťavňovače a mixéru
S touto kombinací lze realizovat nekonečné množství experimentů a
vyzkoušet nejrůznější recepty.Můžete vyrábět chutné ovocné šťávy,
polévky nebo omáčky. Abychom vám tuto práci ulehčili, připravili jsme
některé recepty, které si můžete s úspěchem vyzkoušet.
Pikantní keksy
- 250 g zeleninové dužiny (obzvláště vhodné jsou zelí,celer, rajská
jablíčka, mrkev, cibule, paprika, cibule, pórek, špenát nebo fenykl).
- 100 g strouhanky
- 2 vejce
- 2 lžíce rajského kečupu
- 1 lžíce sekaných bylinek (petržel/pažitka)
- 2 lžičky sambalu
- 50 g nastrouhaného zralého sýra
- sůl
- pepř
- 50 g másla
B
Smíchejte rajský protlak, sekané bylinky a sýr s dužinou. Obsah vložte do
mixéru a přidejte strouhanku, vejce, trochu soli a pepře. Ze směsi
vytvořte 4 až 5 keksů.
B
Rozpalte máslo na pánvi a opečte keksy (asi 5 minut na každé straně)
až zhnědnou. Podávejte horké.
Jablečné lívance
- 150 g jablečné dužiny
- 150 g mouky
- 2 vejce
- asi 100 ml mléka
- 50 g hrozinek
- 50 g sušených meruněk, nakrájených na kousky
- máslo
- cukr a skořice (podle chuti)
B
Smíchejte mouku, vejce a jablečnou dužinu. Přidejte mléko a vytvořte
poměrně tuhou směs. Do směsi dejte hrozinky a meruňky.
52 ČESKY

B
Rozpalte máslo na pánvi. Ze směsi vytvořte na pánvi bochánky.Ty pak
zploštěte a osmažte je po obou stranách až zhnědnou. Podávejte je
horké a posypte je například skořicí s cukrem.
Vitamínový nápoj (tři sklenice)
- 1 mango
- 1 banán
- šťáva z 1 jablka (omytého), z 1 kivi a z 1 pomeranče
- 2 lžičky medu (nebo více, podle chuti)
- 300 ml podmáslí
B
Oloupejte kivi a pomeranč. Zpracujte je spolu s jablkem v odšťavňovači.
Oloupejte mango a banán a zpracujte vše v mixéru s ovocnou šťávou,
medem a podmáslím na chutný nápoj.
B
Doporučení: podmáslí můžete nahradit tvarohem nebo jogurtem.
Ledový nápoj pro tropické dny (dvě sklenice)
- 1/2 ananasu
- 2 jablka
- 1 růžový grejp
- ledové kostky (asi 2 plné sklenice)
B
Oloupejte ananas a grapefruit, omyjte jablka a rozkrájejte je na kousky.
Zpracujte vše v odšťavňovači a vytvořte ovocnou šťávu.
B
Sestavte mixér a vložte do něj kostky ledu. Rozmělněte led za použití
největší rychlosti a přidejte ovocnou šťávu. Získáte chutný ledový nápoj.
Zeleninový nápoj (jedna velká porce)
- 200 ml mrkvové šťávy
- 1/2 stonku celeru, rozřezaného na kousky
- 1 středně velké rajské jablíčko, oloupané a rozkrájené na kousky
- 1/2 malé zelené nebo červené papriky, rozkrájené na kousky
- malá hrstka čerstvého špenátu nebo několik výhonků petržele
- 2 až 3 kostky ledu
- 1 dlouhý stonek celeru na ozdobu
B
Zpracujte v odšťavňovači 6 až 8 mrkví.
B
Sestavte mixér. Do mixéru nalijte mrkvovou šťávu, zeleninu a špenát
nebo petržel a mixujte největší rychlostí 15 až 30 sekund. Přidejte kostky
ledu a mixujte ještě několik sekund. Nápoj nalijte do vysoké sklenice a
ozdobte dlouhým stonkem celeru.
Gazpacho blanco (4porce)
- 500 g bílých grepů bez semen
- 2 okurky (asi 750 g)
- 1 šalotka, nakrájená na kousky
- 1 stroužek česneku, rozsekaný
- 1/4 lžičky soli
- 1/4 lžičky bílého pepře
- 500 ml polotučného jogurtu
- 6 až 8 kapek tabaska
B
Omyjte grepy a odstraňte stonky. Zpracujte je v odšťavňovači.
53ČESKY

54
Řešení
Přístroj je vybaven bezpečnostním systémem.Pokud by jeho jednotlivé díly
nebyly správně sestaveny, nelze ho uvést do chodu.Zkontrolujte, zda jsou
všechny jeho části správně připojeny, ale před kontrolou ho nezapomeňte
vypnout.
Vypněte přístroj a zpracovávejte menší množství.
Tento jev není u nového přístroje neobvyklý. Pokud je však zápach cítit trvaleji,
zkontrolujte, zda jste nepřekročili množstvívložených ingrediencí nebo dobu
jejich zpracování.
Vypněte přístroj a oddělte ho od sítě.Vyhledejte nejbližší servisní středisko
firmy Philips.
Vypněte přístroj. Odejměte nožovou jednotku jejím otáčením proti směru
pohybu hodinových ruček. Zkontrolujte, zda by řádně nasazen pryžový těsnicí
kroužek (naplocho).
Zkontrolujte, zda bylo víko řádně nasazeno. Zátka je řádně nasazena až když
zaklapne.
Vypněte přístroj a oddělte ho od sítě. Zkontrolujte, zda bylo sítko správně
vloženo. Žebra na dně sítka musí řádně zapadnout do hnacího hřídele.
Zkontrolujte, není-li sítko poškozené. Praskliny, uvolněný strouhacíkotouč a jiné
nepravidelnosti mohou způsobovat chybou funkci. Pokud zjistíte jakékoliv
praskliny nebo jiné poškození sítka, přestaňte přístroj používat a kontaktujte
servisní středisko Philips.
Problém
Přístroj nepracuje
Nožová jednotka / motor jsou
zablokovány.
Motorová jednotka produkuje
nepříjemný zápach krátkou chvíli po
použití přístroje.
Přístroj je příliš hlučný, zapáchá, je
nadměrně horký atd.
Ze spodní části mixéru prosakuje
obsah
Z víka nebo z jeho zátky prosakuje
obsah
Sítko se dotýká plnicího tubusu nebo
přístroj během provozu silně vibruje.
B
Sestavte mixér. Do mixéru nalijte grepovou šťávu. Oloupejte okurku,
podélně ji rozřízněte a vyjměte zrnka. Okurku rozřežte na tlustší plátky a
přidejte je do mixéru. Přidejte ještě šalotku, česnek, sůl a pepř a krátce
zapněte mixér. Směs nalijte do nádobky a smíchejte s jogurtem a
tabaskem.
B
Vše ochlaďte tak, že uzavřenou nádobku vložíte do chladničky asi na 30
minut. Podávejte ozdobené plátky okurky a půlenými grepy.
Řešení případných problémů
ČESKY
* Pokud by problémy přetrvávaly nebo by se vyskytly jiné problémy, kontaktujte Informační středisko firmy Philips.

Bevezetés
A készüléknek beépített biztonsági zára van, ami megakadályozza a
muködést, ha a tartozékok nincsenek helyesen felszerelve vagy
egyáltalán nincsenek felszerelve.
Soha ne használja a tartozékokat arra, hogy a készüléket be- vagy
kikapcsolja!
Fontos
◗ Elso használat elott olvassa el gondosan a használati útmutatót és
nézze meg az ábrákat.
◗ A használati útmutatót tartsa meg késobbi betekintésre.
◗ A készüléket csak háztartási használatra tervezték.
◗ Mielott a készüléket a fali konnektorhoz csatlakoztatja,
ellenorizze, hogy a készüléken feltüntetett feszültség megegyezik-e
a helyi hálózat feszültségével (110- 127 V vagy 220 - 240 V).
◗ Ha a hálózati csatlakozó kábel sérült, azt veszély elkerülésére
Philips, Philips szakszerviz vagy hasonlóan képzett személynek kell
kicserélnie.
◗ Ne használja a készüléket, ha a hálózati csatlakozó kábel, a hálózati
csatlakozó dugó vagy más alkatrész sérült.
◗ A készüléket megfelelően szerelje össze,mielőtt a fali
konnektorhoz csatlakoztatja.
◗ Ha a kancsó vagy egyéb tartozék helyesen van a motoregységre
rögzítve, kattanást hall.
◗ Ne távolítson el tartozékokat a motoregységrol,ha a készülék
muködik.
◗ Ne lépje túl a használati útmutatóban megadott mennyiségeket és
elkészítési idoket.
◗ Hagyja a hozzávalókat lehűlni, mielőtt aprítanávagy pépesítené
azokat a turmixgépben (max. hőmérséklet 80cC/175cF)
◗ Tartsa távol a készüléket gyermekektől.
◗ Soha ne hagyja a készüléket felügyelet nélkül muködni.
◗ Ne érintse meg az ÉLES vágókéseket, különösen, ha a készülék a
fali konnektorhoz csatlakozik.
◗ Ha a kések beszorulnak, HÚZZA KI A HÁLÓZATI
CSATLAKOZÓ DUGÓT a fali konnektorból, mielott a késeket
lefékezo hozzávalókat spatulával eltávolítja.
◗ Soha ne dugja az ujját vagy más tárgyat a kancsóba vagy a tálba,
miközben a készülék muködik.
◗ Soha ne merítse a motoregységet vízbe vagy más folyadékba, ne
ölbítse le vízcsap alatt sem.A tisztításhoz csak nedves ruhát
használjon.
◗ Használat után, illetve mielott lecsavarná a kancsót,azonnal húzza
ki a hálózati csatlakozó dugót a fali konnektorból.
◗ Zajszint: Lc=83 dB [A]
MAGYAR 55

Általános leírás
A Csatlakozó kábel tároló
B Fordulatszám választó 2 fordulatszámmal és impulzus beállítással
(M)
C Gyors tisztítás gomb
D Motoregység
E Meghajtó tengely
F Gyümölcslé gyujto csésze
G Fedél (oldó) rögzíto kapocs
H Péptartály
I Szita
J A gyümölcs-centrifuga fedele
K Adagoló cso
L Nyomó rúd
M Adagoló
N Hozzávaló adagoló nyílás
O Kancsó fedél
P Kiönto
Q Turmix kancsó
R Gumi tömítogyuru
S Késegység
T Tisztító kefe
A készülék előkészítése a használathoz
El ször mosogasson el minden levehet alkatrészt (nézze meg a
"Tisztítás" c. részt).
◗ Csévélje vissza a felesleges hálózati csatlakozó kábelt a készülék
alja köré.
A készülék használata
Turmixgép
◗ A turmixgép a következőkre használható:
- Folyadékok, pl. tejtermékek, mártások, gyümölcslevek, levesek, mixelt
italok, shake-ek keverésére.
- Puha hozzávalók, pl. palacsinta tészta vagy majonéz keverésére.
- F tt hozzávalók, pl. bébiételek pépesítésére.
C
1 Helyezze a gumi tömítogyurut a késegység szélére.
MAGYAR56

C
2 Csatlakoztassa a késegységet a turmix kancsóhoz úgy, hogy a
nyíl irányába fordítja el.
C
3 Szerelje a kancsót a motoregységre. Rögzítse úgy,hogy a nyíl
irányába fordítja el.
Vigyázzon, ne nyomja meg túlságosan a kancsó fogantyúját.
C
4 Tegye a hozzávalókat a turmix kancsóba.
Soha ne töltsön a turmix kancsóba 80cC-nál magasabb h mérséklet
hozzávalókat.
5 Nyomja a fedot a helyére.
C
6 Helyezze az adagolót a fedo nyílásába és fordítsa el addig, míg
biztosan rögzül.
A kifröccsenés elkerülésére a feldolgozás indítása elott mindig dugja be
az adagolót a fedélbe.
◗ A fordulatszám választóval szabályozhatja a készülék
fordulatszámát, hogy a feldolgozás eredménye a legjobb legyen.
Az ajánlott fordulatszám beállítást lásd a táblázatban.
7 Dugja a hálózati csatlakozó dugót a fali konnektorba.
C
8 Válassza ki a kívánt fordulatszámot és a készülék bekapcsol.
Ha nem biztos abban, hogy melyik fordulatszámot válassza, mindig
használhatja a nagyobb fordulatszámot (2. fordulatszám).
MAGYAR 57
Fordulatszám
1. fordulatszám
2. fordulatszám
M
Feldolgozandó hozzávalók
folyékony hozzávalók (pl. csokoládés tej, gyümölcsös tej, majonéz)
s r bb hozzávalók, pl. folyadék és szilárd hozzávalók keveréke
(pl. paradicsomlé vagy pástétom)
kemény, f leg szilárd hozzávalók (pl. jégkocka, leves,bab, stb.)
1
2

◗ Ha a készüléket egyszerre csak néhány másodpercig akarja
muködtetni, állítsa a kapcsolót M pozícóra (impulzus) és engedje
el azonnal. Ezt ismételje meg, ahányszor szükséges.
9 Ha ki akarja kapcsolni a készüléket,kapcsolja 0 pozícióra.
Soha ne kapcsolja be vagy ki a készüléket úgy, hogy elfordítja a kancsót.
Recepteket lásd a használati útmutató végén.
Tanácsok
A kifröccsenés elkerülése céljából soha ne töltse meg a kancsót a
maximális szint jelzése fölé (1,5 liter), különösen akkor ne, ha forró
folyadékot turmixol.
C
◗ Miközben a készülék muködik, az adagolón lévo nyíláson keresztül
betölthet a turmix kancsóba folyékony hozzávalókat (pl.olajat).
◗ Miközben a motor muködik, a fedél nyílásán át betehet
hozzávalókat a turmix kancsóba.
Ne muködtesse a készüléket folyamatosan 3 percnél tovább. Ha 3 perc
múlva nem fejezte be a turmixolást, kapcsolja ki a készüléket egy
percre, mielott folytatja a munkát.
◗ Száraz hozzávalókat nem szabad 1 percnél hosszabb ideig
feldolgozni.
◗ A szilárd hozzávalókat vágja fel elore kis darabokra,mielott a
turmixba teszi. Ne tegyen a turmix kancsóba egyszerre nagy
mennyiséget.Adagoljon egymás után kisebb mennyiségeket.
◗ Ha szilárd anyagok turmixolásánál nincs megelégedve az
eredménnyel,kapcsolja ki a turmixot és muködtesse rövid ideig
néhányszor M (impulzus) pozícióban.Vagy keverje meg a
hozzávalókat egy spatulával (miután kikapcsolta a készüléket), vagy
csökkentse a kancsó tartalmát és dolgozzon fel kisebb
mennyiségeket.
◗ Jégkocka darálásához dobja a jégkockákat a forgó kések közé a
fedél nyílásán keresztül.
◗ Paradicsomlé készítéséhez vágja a paradicsomokat négybe és a
darabokat dobja a forgó késekre a fedél nyílásán át.
Soha ne tegye be a kezét vagy más tárgyat a kancsóba, mikor a turmix
muködik.
Gyümölcs-centrifuga
◗ A gyümölcs-centrifugát friss gyümölcslé készítésére használhatja.A
gyümölcs húsát a készülék elválasztja a száraktól és a héjtól.
MAGYAR58

C
1 Tegye a pép tartályt a motoregységre és fordítsa el a nyíl
irányába, míg jól rögzül.
C
2 Tegye be a szitát.
Használat elott mindig ellenorizze a szitát. Ne használja a szitát, ha
bármilyen hibát fedez fel rajta, pl. repedés, nyílás a fém ernyon vagy
hiányosság a reszelotárcsán.
Ha a szita sérült, lépjen érintkezésbe a helyi Philips Vevoszolgálattal (a
telefonszámot megtalálja a világ minden részére kiterjedo
garancialevélen). Ha lakóhelyén nincs Vevoszolgálat, forduljon a helyi
Philips szaküzlethez vagy lépjen érintkezésbe a Philips háztartási
kisgépek és szépségápolási termékek üzletág képviseloivel.
C
3 Tegye a fedelet a helyére és a zárókapcsot lefelé nyomva
rögzítse.
Ellenorizze, hogy a kapocs a motoregység jobb oldalán van-e
Ellenorizze, hogy a fedél jól van-e feltéve és rögzítve.
C
4 Tegye a gyümölcslé gyujto csészét a helyére.
5 Válassza ki a helyes fordulatszámot,hogy a készüléket
bekapcsolja.
C
6 Tegye a hozzávalókat az adagoló csobe. Feldolgozás elott a nagy
hozzávalókat vágja fel akkora darabokra,hogy beférjenek az
adagoló csobe.
C
7 Enyhén nyomja lefelé a hozzávalókat a nyomó rúddal.
Ne nyomja túlságosan a nyomó rúdat,mert ezzel elronthatja a
végtermék minoségét és még a szita forgását is megállíthatja.
8 Ha már nem jön ki gyümölcslé, kapcsolja ki a készüléket és
mielott a kapcsot kioldja várjon, míg a szita forgása megáll.
MAGYAR 59
Fordulatszám
1. fordulatszám
2. fordulatszám
Feldolgozandó hozzávalók
Gyümölcsök (lágy)
Friss kókusz, cékla (kemény)
2
1

9 Vegye el a gyümölcslé gyujto csészét.
B
Recepteket lásd a használati útmutató végén.
A gyümölcs-centrifugát ne muködtesse folyamatosan 2 percnél
hosszabb ideig. Ha nem fejezte be a centrifugálást, kapcsolja ki a
készüléket és 2 percig hagyja hulni, mielott folytatja a munkát.
Tanácsok
◗ Ha centrifugálás közben a pép tartály megtelik, kapcsolja ki a
készüléket és várjon, míg a szita forgása teljesen megáll. Oldja a
kapcsot és vegye le a fedot.Távolítsa el a szitát.Vegye le a pép
tartályt a motoregységrol úgy, hogy jobbra fordítja. Ürítse ki a pép
tartályt és tisztítsa le a szitát. Szerelje össze ismét a gyümölcscentrifugát és kapcsolja be megint.
◗ Ha centrifugálás közben a gyümölcslé gyujto csésze megtelik,
kapcsolja ki a készüléket és várja meg,míg a szita forgása teljesen
megáll.Távolítsa el a gyümölcslé gyujto csészét és ürítse ki.A
gyümölcslé gyujto csésze urtartalma 700 ml.
◗ Feldolgozás elott nem szükséges a héj és tokok eltávolítása. Csak a
vastag héjat kell eltávolítani (pl.narancs, grapefruit vagy nyers
cékla).
◗ A sok keményítot tartalmazó gyömlcsök (pl. banán, papaja,
avokádó,füge és mangó), nem alkalmasak lényerésre. Ezeknek a
gyümölcsöknek a feldolgozására használja a turmixot.
◗ Mindig friss gyümölcsöt és zöldséget használjon. Ezeknek több a
levük.
◗ Pl.: saláták levelét és levélszárát szintén fel lehet dolgozni
gyümölcs-centrifugában.
◗ Az almalé gyorsan megbarnul. Ezt a folyamatot lelassíthatja néhány
csepp citromlé hozzáadásával.
◗ Sárgarépa, cékla, káposzta vagy paraj húsát hozzávalóként lehet
felhasználni levesek,mártások, lekvárok, desszertek, fagylalt, stb.
készítésénél. Fozze fel a pépet és fuszerezze meg kissé. Pürésítse a
pépet a turmixban. Paradicsomos tészta készítéséhez használhat
paradicsom pürét.
Tisztítás
A készüléknek, részeinek és tartozékainak tisztítása a legkönnyebb
közvetlenül használat után.
Soha ne tisztítsa a tartozékokat vagy a készülék részeit
mosogatógépben.
A motoregységet nedves ruhával tisztítsa.
Ne használjon dörzsöl , súroló, alkoholtartalmú stb. szereket.
MAGYAR60

1 Húzza ki a készülék hálózati csatlakozó dugóját a fali
konnektorból, vegye le a használt tartozékokat és részeket és
tisztítsa meg langyos, tisztítószeres vízben.
2 Öblítse le az összes lemosott tartozékot és részt vízcsap alatt.
Turmix, gyors tisztítás
C
1 Töltsön a turmix kancsóba langyos vizet és kevés folyékony
mosogatószert.
Ne lépje túl a kancsó legnagyobb urtartalmát (1,5 liter).
2 Tegye fel a fedelet és az adagolót.
C
3 Nyomja meg a gyors tisztítás gombot és muködtesse a
készüléket néhány másodpercig.
4 Szerelje le a turmix kancsót, vegye le a fedelet és az adagolót és
öblítse le tiszta vízzel.
5 Jobb tisztítás érdekében vegye ki a turmix kancsóból a kés-
egységet.
Gyümölcs-centrifuga, jobb tisztítás
1 Vegye le a fedot, a pép tartályt és a szitát. Öblítse le ezeket
közvetlenül használat után.
2 A szita tisztítására használhatja a mellékelt kefét.
Garancia és szerviz
Ha információra van szüksége, esetleg probléma merül fel, keresse fel a
Philips www.philips.comWeb-lapját, vagy lépjen érintkezésre a
lakóhelyén lév Philips Vev szolgálattal (a telefonszámot megtalálja az
egész világra kiterjed garancialevélen). Ha nincs Vev szolgálat a
lakóhelyén, forduljon a Philips készülékeket árusító szaküzlethez, vagy
lépjen érintkezésbe a Philips Háztartási Készülékek és Szépségápolási
termékek Szerviz Osztályával.
MAGYAR 61

Receptek a gyümölcs-centrifugához és turmixhoz
A Juice &Co-val (gyümölcs-centrifuga és turmix együtt) a végtelenségig
kísérletezhet és kipróbálhat mindenféle receptet. Igen rövid ido alatt
ízletes gyümölcsleveket, koktélokat, leveseket és mártásokat készíthet.
Hogy ötletet adjunk a lehetoségekrol, bemutatunk néhány receptet,
amelyek biztosan sikert fognak aratni.
Ízletes sütemény
- 250 g zöldség pép (különösen alkalmas káposzta, celler vagy gumós
celler, paradicsom, sárgarépa, hagyma, bors, póréhagyma, paraj és
köménymag)
- 100 g zsemlemorzsa
- 2 tojás
- 2 evokanál paradicsom ketchup
- 1 evokanál aprított zöldség (pl. petrezselyem/metélohagyma)
- 2 evokanál szarvasgomba
- 50 g érett reszelt sajt
-só
- bors
- 50 g vaj
B
Keverje össze a paradicsom ketchupot, aprított zöldséget,
szarvasgombátés sajtot péppé.Tegye a pépet tálba és keverje bele a
zsemlemorzsát, a tojásokat, kevés sót és borsot. Készítsen a keverékbol
4-5 lapos süteményt.
B
Melegítse fel a vajat sütoben és süsse a tésztát közepes meleggel kb. 5
percig minden oldalán, míg megpirul és megsül.Tálalja melegen.
Almás palacsinta
- 150 g almapép
- 150 g sütoporral kevert liszt
- 2 tojás
- kb. 100 ml tej
- 50 g mazsola
- 50 g szárított sárgabarack, aprítva
- vaj
- cukor és fahéj ízlés szerint
B
Keverje össze a lisztet és a tojásokat az almapéppel.Adjon hozzá
elegendo tejet, hogy jó, suru keverék legyen. Szórja a mazsolát és a
barackot a keverékre.
B
Melegítsen fel kevés vajat tepsiben.Tegye a keveréket merokanalanként
a tepsibe, egymástól kis távolságra. Lapítsa szét a keveréket
palacsintákká és süsse közepes melegen mindkét oldalát, míg
aranybarnák lesznek és megsülnek.Tálalja a palacsintát melegen vagy
hidegen és szórjon rá cukrot és fahéjat, ízlés szerint.
Vitaminos ital (három pohár)
- 1 mangó
- 1 banán
- 1 (megmosott) alma-, 1 kiwi és 1 narancs leve
- 2 evokanál méz (vagy több, ízlés szerint)
MAGYAR62

- 300 ml író
B
Hámozza meg a kiwit és a narancsot. Dogozza fel a gyümölcscentrifugában az almával együtt. Hámozza meg a mangót és a banánt
és a turmixban keverje össze a gyümölcslével, mézzel és íróval, hogy
ízletes koktélt kapjon.
B
Javaslat: helyettesítse az írót kvarkkal vagy joghurttal, hogy ízletes és
egészséges desszertet kapjon.
Jéghideg koktél trópusi napra (két pohár)
- 1/2 ananász
- 2 alma
- 1 rózsaszín grapefruit
- jégkockák (kb. 2 tele pohárral)
B
Hámozza meg az ananászt és a grapefruitot, öblítse le az almát és
vágja darabokra. Dolgozza fel a gyümölcs-centrifugában és gyujtse össze
a gyümölcslevet.
B
Szerelje össze a turmixot és tegye a jégkockákat a turmix kancsóba.
Törje össze a jeget a legnagyobb fordulatszámon és adja a
gyümölcsléhez. Ízletes, jéghideg, friss gyümölcskoktélt kap, ami oltja a
szomját!
Zöldség koktél (egy nagy adag)
- 200 ml sárgarépa lé
- 1/2 cellerszár darabokra vágva
- 1 közepes méretu pardicsom, hámozva és darabokra vágva
- 1/2 kis, zöld vagy piros paprika, aprítva
- kis marék friss paraj vagy néhány ág petrezselyem
- 2 vagy 3 jégkocka
- 1 hosszú, vékony cellerszár díszítéshez
B
Dolgozzon fel 6 vagy 8 sárgarépát a gyümölcs-centrifugában.
B
Szerelje össze a turmix gépet.Tegye a sárgarépa levet, a zöldségeket és
a parajt vagy a petrezselymet a turmixba és turmixolja 15-30 percig a
legnagyobb fordulatszámon.Adja hozzá a jégkockákat és keverje további
néhány másodpercig.Töltse a koktélt magas pohárba és díszítse hosszú
cellerszárral.
Gazpacho blanco (4 adag)
- 500 g mag nélküli fehér szolo
- 1 uborka (kb. 750 g)
- 1 mogyoróhagyma aprítva
- 1 cikk fokhagyma, aprítva
- 1/4 evokanál só
- 1/4 evokanál fehér bors
- 500 ml sovány yoghurt
- 6 - 8 csepp Tabasco
B
Mossa meg a szolot és szemezze le. Dolgozza fel a gyümölcscentrifugában és gyujtse össze a levet.
B
Hutse le a hutoben, fedett tálban, 30 percig.Tálalja nagy leveses
csészékben és díszítse uborka szeletekkel és felezett szoloszemekkel.
MAGYAR 63

Megoldás
A készüléknek biztonsági rendszere van. Ha a tartozékok nincsenek jól
csatlakoztatva a motoregységhez, a készülék nem muködik. Ellenorizze, hogy a
tartozékok helyesen vannak-e csatlakoztatva (lásd a különbözo fejezeteket).
Elobb kapcsolja ki a készüléket!
Kapcsolja ki a készüléket és dolgozzon fel kisebb mennyiséget.
Ez a néhány elso használatkor normális. Ha továbbra is van szaga, ellenorizze a
feldolgozás mennyiségét, az alkalmazás idotar tamát vagy a használt
fordulatszámot.
Kapcsolja ki a készüléket és húzza ki a hálózati csatlakozó dugót a fali
konnektorból. Forduljon a Philips vevoszolgálathoz vagy a Philips szervizhez.
Kapcsolja ki a készüléket.Vegye ki a kés-egységet úgy, hogy barla elfordítja.
Ellenorizze, hogy a gumigyuru jól van-e felszerelve a kés-egységre (lapos
helyzetben marad-e).
Ellenorizze, hogy a fedél jól van-e feltéve. Az adagoló kattanással ugrik a
helyére.
Kapcsolja ki a készüléket. Ellenorizze, hogy a szita jól van-e csatlakoztatva.A
szita alján lévo bordáknak jól kell illeszkedniük a motor tengelykapcsolójának a
nyílásába.
Ellen rizze le, hogy a szita nem sérült-e. Repedések,laza reszel tárcsa vagy
egyéb rendhagyóság is okozhatja a rossz m ködést. Ha bármilyen repedést
vagy hibát észlel, ne használja tovább a készüléket és keresse fel a legközelebbi
Philips szervizt.
Probléma
A készülék nem m ködik
A kés-egység / a motoregység akad
A motoregység kellemetlen szagot
áraszt a használat elején.
A készülék zajos, szagot áraszt,
érintésre meleg, füstöl, stb.
A turmix szivárog
A turmixgép fedele és/vagy az
adagoló szivárog
A gyümölcs-centrifuga szitája hozzáér
az adagoló csohöz vagy centrifugálás
közben erosen rezeg.
B
Szerelje össze a turmix gépet.Tegye a szololevet a turmix gépbe.
Hámozza meg az uborkát, felezze el hosszában és vegye ki a magját.
Vágja az uborkát vastag szeletekre és a szeleteket adja a szololéhez a
turmixba. Adja hozzá a mogyoróhagymát, a fokhagymát, sót és borsot és
muködtesse a gépet rövid ideig.Töltse a keveréket tálba és keverje össe
a joghurttal és a Tabascoval.
Hibaelhárítási útmutató
MAGYAR64
* Ha a hibák megmaradnak vagy ha más probléma fordul elo, forduljon a Philips ügyfélszolgálathoz vagy a Philips
szervizhez.

Úvod
Zariadenie je vybavené bezpečnostným zámkom, ktorý znemožní
činnosť zariadenia, ak nie je riadne, alebo vôbec pripojené jeho
príslušenstvo.
Nevypínajte a nezapínajte zariadenie tak, že odmontujete, alebo
namontujete jeho príslušenstvo.
Dôležité upozornenie
◗ Pred použitím zariadenia si pozorne prečítajte návod a pozrite
zodpovedajúce obrázky.
◗ Návod na použitie si odložte pre prípad,že ho neskôr opäť
budete potrebovať.
◗ Tento prístroj je určený len na domáce použitie.
◗ Pred zapojením zariadenia do siete sa presvedčite,či napätie
uvedené na zariadení je rovnaké ako napätie v sieti (110 - 127V
alebo 220 - 240V).
◗ Aby ste predišli nebezpečným situáciám, poškodený kábel
zariadenia smie vymeniť jedine personál spoločnosti Philips,
servisného centra autorizovaného spoločnosťou Philips, alebo iná
kvalifikovaná osoba.
◗ Zariadenie nepoužívajte, ak sú sieťový kábel, zástrčka alebo iné
časti poškodené.
◗ Prístroj pred zapojením do el.siete riadne zložte.
◗ Keď nádobu,alebo iné príslušenstvo, riadne namontujete na
pohonnú jednotku, budete počuť kliknutie.
◗ Pokým zariadenie pracuje, neodpájajte príslušenstvo od pohonnej
jednotky.
◗ Neprekračujte množstvo spracovávaných surovín ani čas prípravy
uvedené v jednotlivých častiach návodu.
◗ Ak chcete v mixeri posekať, alebo do nádoby mixera naliať,
horúce suroviny, počkajte kým vychladnú (maximálna teplota
80cC/175cF).
◗ Mixer odkladajte mimo dosahu detí.
◗ Nikdy nenechávajte zariadenie pracovať bez dozoru.
◗ Vyvarujte sa dotyku OSTRÝCH nožov,najmä keď je prístroj
pripojený do el. siete.
◗ Ak sa čepele zaseknú, ODPOJTE ZARIADENIE ZO SIETE, až
potom pomocou varešky odstráňte prísady, ktoré zablokovali
pohyb čepelí.
◗ Pokým je zariadenie v činnosti, nikdy nesiahajte prstami ani
predmetmi do nádoby mixéra..
◗ Pohonnú jednotku nikdy neponárajte do vody ani do inej
kvapaliny, neoplachujte ju pod tečúcou vodou. Na jej čistenie
používajte jedine navlhčenú tkaninu.
◗ Hneď po použití zariadenie odpojte zo siete, ešte skôr,ako
demontujete nádobu.
SLOVENSKY 65

66
◗ Deklarovaná hodnota emisie hluku tohto spotrebiča je 83 dB(A),
čo predstavuje hladinu A akustického výkonu vzhľadom na
referenčný akustický výkon 1 pW.
Opis zariadenia
A Priestor na navinutie kábla
B Voľba rýchlosti a pulzov (M)
C Tlačidlo pre rýchle čistenie
D Pohonná jednotka
E Hriadeľ pohonu
F Pohár na šťavu
G Svorka na uchytenie veka
H Zásobník na oddelenú dužinu
I Sitko
J Veko odšťavovača
K Dávkovacia trubica
L Piest
M Zátka
N Otvor na pridávanie prísad
O Veko nádoby mixéra
P Výpust
Q Nádoba mixéra
R Gumený tesniaci krúžok
S Nástavec s čepeľami
T Čistiaca kefka
Príprava prístroja na použitie
Umyte všetko príslušenstvo a snímateľné časti (viď odstavec "Čistenie").
◗ Prebytočnú časť kábla naviňte okolo pohonnej jednotky
zariadenia.
Použitie zariadenia
Mixer
◗ Mixér je určený na:
- Miešanie tekutín, napr. mliečných výrobkov, omáčiek, ovocných štiav,
polievok, miešaných nápojov, koktailov.
- Mixovanie jemných surovín, napr. palacinkového cesta, majonézy.
- Pasírovanie varených surovín, napr. na prípravu detskej výživy.
C
1 Gumený tesniaci krúžok položte na okraj nástavca s čepeľami.
SLOVENSKY

C
2 Nástavec namontujte na pohonnú jednotku tak,že ním otáčate
v smere šípky.
C
3 Nádobu mixéra namontujte na pohonnú jednotku. Upevnite ju
tak, že ju otáčate v smere šípky.
Dajte pozor, aby ste pri otáčaní nepôsobili na rúčku nádoby priveľkou
silou.
C
4 Do nádoby vložte zodpovedajúce prísady.
Nádobu nesmiete nikdy naplniť prísadami, ktorých teplota presahuje
80°C.
5 Položte veko na jeho miesto.
C
6 Otvor vo veku uzatvorte zátkou a otočením veko upevnite.
Otvor vo veku vždy uzatvorte zátkou, predídete tak rozliatiu surovín v
priebehu ich spracovania.
◗ Môžete nastaviť takú rýchlosť spracovania,ktorá je najvhodnejšia
pre dané suroviny. Odporúčané nastavenie rýchlosti spracovania je
uvedené v tabuľke.
7 Pripojte zariadenie do siete.
C
8 Nastavte zvolenú rýchlosť spracovania a zariadenie sa zapne.
Ak neviete, aká je najvhodnejšia rýchlosť spracovania, vždy môžete
použiť najvyššiu rýchlosť (rýchlosť 2).
67SLOVENSKY
Rýchlosť
rýchlosť 1
rýchlosť 2
M
Spracovávané suroviny
kvapalné prísady (napr. čokoládové mlieko,ovocný koktail, majonéza)
tuhšie prísady, napr. kombinácia kvapalných a pevných prísad (napr.
rajčinový pretlak, alebo paštéta)
tuhé, najmä pevné prísady (napr. kocky ľadu, polievky, zrnká, atď.)
1
2

68
◗ Ak chcete, aby zariadenie pracovalo naraz len niekoľko sekúnd,
zvoľte nastavenie M (Moment) a potom vypínač uvoľnite. Postup
opakujte toľkokrát, koľko je potrebné.
9 Zariadenie vypnete nastavením vypínača do polohy 0.
Zariadenie nikdy nevypínajte tak, že uvoľníte nádobu.
V tomto návode sú uvedené aj niektoré recepty.
Rady
Aby ste predišli rozliatiu surovín, plňte nádobu mixéra maximálne po
značku (1.5 litra), dbajte na to predovšetkým pri mixovaní horúcich
kvapalín.
C
◗ Kvapalné prísady (napr. olej) môžete do nádoby mixéra naliať v
priebehu spracovania cez otvor v zátke.
◗ Keď je mixér zapnutý, môžete do jeho nádoby pridávať ďalšie
prísady cez otvor vo veku.
Bez prestávky nechajte mixér pracovať maximálne 3 minúty.Ak
mixovanie nestihnete za 3 minúty ukončiť, na minútu zariadenie vypnite
a až potom pokračujte v činnosti.
◗ Suché prísady nesmiete miešať dlhšie ako 1 minútu.
◗ Tuhé prísady pred vložením do nádoby mixéra nakrájajte na
menšie kúsky. Nepridávajte súčasne veľké množstvo prísad.
Postupne pridávajte menšie množstvá prísad.
◗ Ak Vám nevyhovuje kvalita pripravenej zmesi, vypnite mixér a na
mixovanie použite pulzy. Na premiešanie (mixér je vypnutý)
môžete použiť varešku, alebo odobrať zo zmesi a spracovať naraz
menšie množstvo prísad.
◗ Ak chete posekať kocky ľadu, vhadzujte ich do nádoby cez otvor
vo veku zapnutého mixéra.
◗ Paradajkový džús pripravíte tak, že na štvrťky pokrájané paradajky
vhodíte cez otvor vo veku na rotujúce čepele.
Pokým je mixér zapnutý,nesiahajte do jeho nádoby rukou, ani žiadnym
predmetom.
Odšťavovač
◗ Odšťavovač môžete použiť na prípravu čerstvej ovocnej šťavy. Pri
spracovaní sa oddelí dužina, jadierka a šupa.
C
1 Nasaďte zásobník na oddelenú dužinu na pohonnú jednotku a
otočte ním v smere šípky, aby ste ho riadne upevnili.
SLOVENSKY

69
C
2 Vložte sitko.
Pred použitím vždy prekontrolujte sitko.Ak zistíte akékoľvek známky
poškodenia, napr.praskliny, otvory prípadne je uvoľnený disk na
strúhanie, sitko nepoužívajte.
Ak je sitko poškodené, kontaktujte Centrum starostlivosti o zákazníka
firmy Philips (telefónne čísla nájdete na celosvetov platnom záručnom
liste).Ak sa vo Vašej krajine nenachádza Centrum starostlivosti o
zákazníka firmy Philips, obráťte sa na Vášho miestneho predajcu
výrobkov Philips, alebo kontaktujte oddelenie služieb divízie Philips
Domáce spotrebiče a osobná starostlivosť.
C
3 Položte veko na miesto a zaistite ho svorkou.
Uistite sa, že svorka je na správnej strane pohonnej jednotky
Skontrolujte, či je veko riadne namontované a upevnené.
C
4 Položte nádobu na ovocnú šťavu na určené miesto.
5 Zvoľte vhodnú rýchlosť a zapnite tým zariadenie.
C
6 Prísady vložte do dávkovacej trubice. Pred spracovaním
pokrájajte prísady na menšie kúsky tak, aby sa zmestili do
dávkovacej trubice.
C
7 Suroviny jemne pretlačte cez dávkovaciu trubicu pomocou
piesta.
Na piest priveľmi netlačte, pretože tým môžete ovplyvniť kvalitu
pripravenej šťavy, dokonca až zastaviť pohyb sitka.
8 Keď už nevyteká žiadna šťava, vypnite zariadenie. Skôr, ako
uvoľníte svorku počkajte, kým sitko prestane rotovať.
9 Odložte pohár so šťavou.
B
V tomto návode sú uvedené aj niektoré recepty.
Odšťavovač nenechajte pracovať bez prestávky dlhšie ako 2 minúty.Ak
ste odšťavovanie neukončili,na 2 minúty zariadenie vypnite a až potom
pokračujte v činnosti.
SLOVENSKY
Rýchlosť
rýchlosť 1
rýchlosť 2
Spracovávané suroviny
Ovocie (mäkké)
Čerstvý kokos, repa (tvrdé)
2
1

70
Rady
◗ Ak sa počas odšťavovania naplní zásobník na dužinu, vypnite
zariadenie a počkajte, kým sitko neprestane rotovať.Uvoľnite
svorku a otvorte veko.Vyberte sitko. Otočení doprava
odmontujte zásobník na dužinu z pohonnej jednotky.Vyprázdnite
ho a očistite sitko.Poskladajte odšťavovač a znovu ho zapnite.
◗ Ak sa počas odšťavovania naplní pohár na šťavu,vypnite zariadenie
a počkajte, kým sitko neprestane rotovať.Vezmite pohár na šťavu a
vyprázdnite ho.Objem pohára je maximálne 700 ml.
◗ Pred spracovaním nie je potrebné odstraňovať jemné šupky.
Ošúpať musíte len ovocie, ktoré má tvrdú šupu (napr. pomaranče
alebo ananás).
◗ Ovocie, ktoré obsahuje veľa škrobu, ako napr. banány, papája,
avokádo, figy alebo mango, nie je vhodné na odšťavovanie.Na ich
spracovanie použite mixér.
◗ Vždy používajte čerstvé ovocie a zeleninu.Je šťavnatejšie.
◗ Odšťavovač môžete použiť aj na spracovanie listov a bylí, napr.
hlávkového šalátu.
◗ Jablková šťava rýchlo zhnedne.Tento proces môžete spomaliť
pridaním niekoľkých kvapiek citrónovej šťavy.
◗ Dužina z mrkvy, kapusty alebo špenátu môže poslúžiť ako základ
na prípravu polievok,omáčok, džemov, detskej výživy, zmrzliny, atď.
Uvarte ju a pridajte bylinky.V mixéri z dužiny urobte pyré.Dužinu
z paradajok možete použiť na prípravu paradajkového pretlaku.
Čistenie
Čistenie zariadenia a jeho príslušenstva je jednoduchšie, ak s ním
začnete hneď po jeho použití.
Žiadne zo súčiastok neumývajte v umývačke riadu.
Pohonnú jednotku očistite navlhčenou tkaninou.
Nepoužívajte abrazívne prostriedky, drôtenky, alkohol, atď.
1 Zariadenie odpojte zo siete, odmontujte príslušenstvo a
súčiastky a umyte ich vo vlažnej vode so saponátom.
2 Umyté príslušenstvo a súčiastky opláchnite pod tečúcou vodou.
Mixér, rýchle čistenie
C
1 Do nádoby mixéra nalejte vlažnú vodu a saponát.
Na čistenie nepoužívajte viac vody, ako je maximum vyznačené na
nádobe (1.5 litra).
2 Nasaďte veko a zátku.
SLOVENSKY

71
C
3 Stlačte tlačidlo rýchleho čistenia a nechajte zariadenie chvíľu
pracovať.
4 Odmontujte nádobu mixéra, otvorte veko a zátku a opláchnite
ich vodou.
5 Pri dôkladnejšom čistení odmontujte z nádoby mixéra nástavec
na čepele.
Odšťavovač, dôkladnejšie čistenie
1 Otvorte veko a vyberte sitko a zásobník na dužinu. Hneď po
použití ich opláchnite.
2 Na čistenie sitka môžete použiť dodanú kefku.
Záruka a servis
Ak potrebujete informácie, alebo máte problém,prosíme Vás, aby ste
navštívili www stránku spoločnosti Philips - www.philips.com, alebo sa
obrátili na Centrum služieb zákazníkom spoločnosti Philips vo Vašej
krajine (telefónne číslo Centra nájdete v priloženom celosvetovo
platnom záručnom liste). Ak sa vo Vašej krajine toto Centrum
nenachádza, obráťte sa na miestneho predajcu výrobkov Philips, alebo
kontaktujte Oddelenie služieb Philips - divízia domáce spotrebiče a
osobná starostlivosť.
Recepty pre kombináciu odšťavovač a mixér
Kombinácia odšťavovača a mixéra Vám poskytuje neobmedzené
možnosti pri experimentovaní s rôznymi receptami.V mihu oka môžete
pripraviť chutné nápoje, miešané nápoje, polievky a omáčky.Aby sme
Vám ukazali možnosti tohoto zariadenia, vybrali sme niekoľko receptov,
pri ktorých určite budete úspešní.
Pikantné placky
- 250 g dužiny zo zeleniny (najvhodnejšie sú kapusta,zeler, rajčiny,
mrkva, cibuľa, paprika, pór, špenát a fenikel)
- 100 g strúhanky
- 2 vajcia
- 2 polievkové lyžice kečupu
- 1 polievková lyžica posekaných zelených byliniek (napr. petržlenová
vňať/pažítka)
- 2 čajové lyžičky sambala
- 50 g strúhaného syra
- soľ
- čierne korenie
- 50 g masla
SLOVENSKY

72
B
Do dužiny vmiešajte kečup, posekané bylinky, sambal a syr. Dužinu vložte
do nádoby mixéra a pridajte strúhanku, vajcia a trochu soli a čierneho
korenia. Zo zmesi pripravte 4 až 5 placiek.
B
Na panvici zohrejte maslo a na miernom plameni smažte placky asi 5
minút z každej strany kým nezhnednú. Podávajte horúce.
Jablkové palacinky
- 150 g dužiny z jabĺk
- 150 g múky
- 2 vajcia
- približne 100 ml mlieka
- 50 g hrozienok
- 50 g sušených marhúľ pokrájaných na kúsky
- maslo
- cukor a škoricu podľa chuti
B
Múku a vajcia vmiešajte do dužiny z jabĺk. Pridajte toľko mlieka, aby
vznikla pomerne tuhá zmes. Po lyžičkách pridajte hrozienka a marhule.
B
Na panvici zohrejte trochu masla. Pomocou naberačky ukladajte do
masla v pravidelných vzdialenostiach malé dávky pripravenej zmesi.
Jednotlivé dávky roztlačte na malé palacinky a smažte na miernom
plameni z oboch strán, kým nie sú usmažené do zlatova. Palacinky
podávajte horúce alebo studené a podľa chuti ich posypte cukrom a
škoricou.
Vitamínový nápoj (tri poháre)
- 1 mango
- 1 banán
- šťava z 1 jablka (umytého), 1 kiwi a 1 pomaranča
- 2 čajové lyžičky medu (prípadne viac, podľa chuti)
- 300 ml plnotučného mlieka
B
Ošúpte kiwi a pomaranč. Spolu s jablkom ich odšťavte. Ošúpte mango a
banán a v mixéri ich zmiešajte so šťavou z ovocia, medom a plnotučným
mliekom. Pripravíte chutný koktail.
B
Tip: ak miesto mlieka použijete jogurt, pripravíte chutný a zdravý dezert.
Ľadový koktail na tropické dni (dva poháre)
- 1/2 ananásu
- 2 jablká
- 1 ružový grapefruit
- kocky ľadu (približne 2 plné poháre)
B
Ošúpte ananás a grapefruit, opláchnite jablká a pokrájajte ich na kúsky.
Odšťavte ich.
B
Zostavte mixér a do jeho nádoby vložte kocky ľadu. Pri najvyššej rýchlosti
podrvte ľad a pridajte ovocnú šťavu. Pripravíte vynikajúci ľadový nápoj,
ktorý uhasíVáš smäd!
Zeleninový koktail (jedna veľká dávka)
- 200 ml mrkvovej šťavy
- 1/2 zelerovej vňate, pokrájaná na kúsky
SLOVENSKY

73
- 1 stredne veľká paradajka, ošúpaná a pokrájaná na kúsky
- 1/2 malej zelenej alebo červenej papriky, pokrájanej na kúsky
- malá hrsť čerstvého špenátu alebo niekoľko výhonkov petržlena
- 2 až 3 kocky ľadu
- 1 dlhý tenký výhonok zelerovej vňati na ozdobu
B
Na prípravu mrkvovej šťavy v odšťavovači použite 6 až 8 mrkiev.
B
Zostavte mixér. Do nádoby nalejte šťavu, pridajte zeleninu, špenát alebo
petržlen a pri najvyššej rýchlosti nechajte 15 -30 sekúnd zmixovať.
Pridajte kocky ľadu a mixujte ešte pár sekúnd. Koktail nalejte do
vysokého pohára a ozdobte dlhým tenkým výhonkom zeleru.
Gazpacho blanco (4 taniere)
- 500 g bieleho hrozna bez zrniek
- 2 uhorky (približne 750 g)
- 1 šarlotka, pokrájaná na kúsky
- 1 strúčik cesnaku, posekaný
- 1/4 čajovej lyžičky soli
- 1/4 čajovej lyžičky bieleho korenia
- 500 ml nízkotučného jogurtu
- 6 - 8 kvapiek tabasca
B
Umyte a očistite hrozno. Spracujte ho v odšťavovači.
B
Zostavte mixér. Do nádoby nalejte hroznovú šťavu. Ošúpte uhorky,
rozkrojte ich po dĺžke a odstráňte ich jadierka. Uhorky pokrájajte na
hrubšie plátky a pridajte ku hroznovej šťave v nádobe mixéra. Pridajte
šarlotku, cesnak, soľ a korenie a krátko zmixujte. Zmes nalejte do
polievkovej misy a primiešajte do nej jogurt a tabasco.
B
Misu zakryte a nechajte v chladničke 30 minúť vychladnúť. Podávajte v
polievkových miskách a ozdobte plátkami uhorky a rozpolenými
bobuľkami hrozna.
SLOVENSKY

74
Riešenie
Zariadenie je vybavené bezpečnostným systémom.Ak nie je príslušenstvo
riadne namontované na pohonnú jednotku, zariadenie nebude pracovať.
Skontrolujte, či je príslušenstvo správne namontované (podľa informácií v
jednotlivých častiach návodu). Pred tým však zariadenie vypnite!
Vypnite zariadenie a pri spracovaní pokračujte s menším množstvom surovín.
V prípade nového zariadenia je to normálne. Ak ale zápach pretrváva,
skontrolujte spracovávané množstvo surovín, dĺžku spracovania a nastavenú
rýchlosť spracovania.
Zariadenie vypnite a odpojte zo siete. Požiadajte o pomoc na linke strediska
starostlivosti o zákazníka firmy Philips, kanceláriu Philips, alebo servisné centrum
Philips.
Vypnite zariadenie. Otočením proti smeru pohybu hodinových ručičiek
uvoľnite nástavec na čepele. Skontrolujte, či je riadne (naplocho) uložený
gumený tesniaci krúžok.
Uistite sa, či je veko riadne nasadené. Keď správne nasadíte zátku,budete
počuť kliknutie.
Vypnite zariadenie. Skontrolujte, či je sitko správne namontované. Rebrá v
spodnej časti sitka by mali riadne zapadnúť do otvoru na pripojenie ku
pohonnej jednotke.
Skontrolujte, či sito nie je poškodené.Trhliny, poškodenia, alebo akákoľvek iná
nepravidelnosť môže spôsobiť nefunkčnosť zariadenia.Ak objavíte chyby,
trhliny alebo poškodenie sita, zariadenie už nesmiete použiť, ale kontaktujte
najbližšie servisné centrum spoločnosti Philips.
Problém
Zariadenie nepracuje
Nástavec s čepeľami / pohonná
jednotka je blokovaný.
Pohonná jednotka počas niekoľkých
prvých použití zapácha.
Zariadenie je hlučné, zapácha, je na
dotyk horúce, dymí sa z neho, atď.
Z nádoby mixéra unikajú prísady.
Cez veko a/alebo zátku unikajú
prísady.
Sitko odšťavovača sa dotýka
dávkovacej trubice, alebo počas
odšťavovania silno vibruje.
Sprievodca pri riešení problémov
SLOVENSKY
* Ak problémy pretrvávajú, alebo sa vyskytnú nové problémy, prosím, kontaktujte servisnú linku Philips, kanceláriu
Philips, alebo servisné centrum Philips a požiadajte o pomoc.

Вступ
Пристрій оснащено вбудованим замком безпеки, що запобігає
роботі пристрою, якщо приладдя встановлено неправильно або
взагалі не встановлено.
Ніколи не застосовуйте приладдя для ввімкнення чи вимкненн
пристрою.
Важливо
◗ Будь-ласка, перед тим, як використовувати пристрій,
прочитайте цю інструкцію та продивіться ілюстрації.
◗ Зберігайте цю інструкцію для подальшого використання.
◗ Цей прилад призначений виключно для побутового
використання.
◗ Перед тим, як вмикати пристрій, перевірте, чи співпадає
напруга, вказана на пристрої, напрузі у мережі Вашого будинку
(110-127 В чи 220-240В).
◗ Якщо шнур пошкоджено, для запобігання небезпеці його
треба замінити у фірмі "Philips", у сервісному центрі,
уповноваженому фірмою "Philips", або його має замінити
кваліфікований спеціаліст.
◗ Не використовуйте пристрій,якщо шнур, штекер або інші
елементи пошкоджено.
◗ Перед тим, як ввімкнути прилад у розетку, зберіть його
належним чином.
◗ Коли чаша або інше приладдя належним чином
встановлюється на вузол двигуна, Ви можете почути клацання.
◗ Не знімайте приладдя з двигуна, коли пристрій працює.
◗ Не перевищуйте рекомендовану кількість продуктів та час
приготування.
◗ Перед тим, як нарізати або заливати продукти у блендер, дайте
їм охолонути (макс. температура 80cC/175cF).
◗ Тримайте пристрій подалі від дітей.
◗ Ніколи не залишайте пристрій працювати без нагляду.
◗ Не торкайтеся ГОСТРИХ лез, особливо якщо прилад
ввімкнутий у розетку.
◗ Якщо леза заїдають, перед тим, як усунути лопаткою продукти,
що блокують лезалопаті, ВИТЯГНІТЬ ШТЕПСЕЛЬ З РОЗЕТКИ.
◗ Ніколи не встромляйте пальці чи предмети у глек чи чашу,
коли пристрій працює.
◗ Ніколи не занурюйте двигун у воду чи будь-яку іншу рідину та
не мийте його під краном. Застосовуйте лише вологу ганчірку.
◗ Негайно після використання, наприклад, перед тим як знімати
глек, витягніть штепсель з розетки.
◗ Рівень шуму:Lc= 83 dB [A]
УКРАЇНСЬКІЙ 75

Загальний опис
A Місце для шнура
B Перемикач швидкості на дві неперервні швидкості та режим
поштовхів (M)
C Кнопка швидкого чищення ("Quick Clean")
D Вузол двигуна
E Привідний вал
F Чашка для соку
G Затискувач для кришки
H Контейнер для м'якоті
I Сито
J Кришка соковижималки
K Приймальна трубка
K Штовхач
M Пробка
N Отвір для додавання продуктів
O Кришка чаши
P Трубка стоку
Q Чаша міксера
R Гумове кільце
S Вузол ножів
T Щітка для чищення
Підготовка пристрою до роботи
Мийте все приладдя та частини, що від'єднуються (див. розділ
"Чищення").
◗ Надлишок шнура намотайте навколо основи пристрою.
Використання пристрою
Блендер
◗ Міксер призначено для:
- Змішування рідин, наприклад молокопродуктів, соусів, фруктових
соків, супів, змішаних напоїв, молочних коктейлів.
- Змішування м'яких інгредієнтів, наприклад, рідкого тіста для
пирогів або майонезу.
- Доведення приготовлених інгредієнтів до однорідного стану,
наприклад, для приготування дитячого харчування.
C
1 Встановіть гумове кільце на краї вузла ножів.
УКРАЇНСЬКІЙ76

C
2 Приєднайте вузол ножів до чаши міксера, повертаючи його
за напрямком стрілки.
C
3 Встановіть чашу на вузол двигуна. Закріпіть його,
повернувши за стрілкою.
Не прикладайте забагато сили до ручки чаши.
C
4 Наповніть посудину продуктами.
Ніколи не заповнюйте посудину продуктами при температу
більше за 80cC.
5 Натисніть на кришку, щоб вона стала на місце.
C
6 Встановіть пробку в отвір кришки та повертайте, поки вона
не закріпиться щільно.
Щоб запобігти витіканню, завжди вставляйте пробку в кришку до
початку роботи.
◗ Установки швидкості дозволяють Вам регулювати швидкість
пристрою для оптимального результату. Див.таблицю
рекомендованих швидкостей.
7 Під'єднайте пристрій до стінної розетки.
УКРАЇНСЬКІЙ 77
Швидкість
швидкість 1
швидкість 2
M
Продукти для обробки
Рідкі продукти (наприклад, шоколадне молоко, фруктове
молоко, майонез)
Більш важкі продукти, наприклад, комбінація рідких та твердих
(такі як томатний соус та паста).
Важкі, в основному тверді продукти (кубики льоду, супи, бобові
та т.п.).
1
2

C
8 Виберіть потрібну швидкість, і пристрій увімкнеться.
Якщо Ви не впевнені в тому, яку швидкість обрати, завжди
застосовуйте найвищу (швидкість 2).
◗ Щоб дати пристрою попрацювати лише декілька секунд,
переставте перемикач у положення М (моментальний режим)
та зразу відпустіть. Повторіть цю процедуру стільки разів,
скільки потрібно.
9 Щоб вимкнути пристрій, переставте перемикач на "0".
Ніколи не вмикайте та не вимикайте пристрій поворотом глека.
Рецепти дивіться далі у брошурі.
Поради
Щоб запобігти витіканню, ніколи не наповнюйте чашу вище
максимальної позначки (1,5 л), зокрема коли обробляєте
рідини.
C
◗ Рідкі продукти (наприклад, олія) можна заливати у чашу, коли
пристрій працює, через отвір у пробці.
◗ Коли двигун працює,продукти можна додавати у міксер через
отвір у кришці.
Не давайте міксеру працювати більше 3 хвилин за один раз. Якщо
Ви не закінчили змішування за 3 хвилини, вимкніть пристрій т
почекайте хвилину перед тим, як увімкнути знову.
◗ Сухі продукти не слід змішувати більше хвилини.
◗ Тверді продукти попередньо розрізайте на менші шматки. Не
додавайте велику кількість продуктів за один раз. Додавайте
продукти малими порціями.
◗ Якщо результат перемішування твердих продуктів Вас не
задовольняє, вимкніть пристрій, та запускайте його декілька
разів, пересуваючи перемикач у положення "М". Ви також
можете перемішувати продукти лопаткою (коли пристрій не
працює) або зменшувати вміст чаши та обробляти малими
порціями.
◗ Для здрібнення кубиків льоду кидайте їх на ножі,що
обертаються, через отвір у кришці.
◗ Для того, щоб зробити томатний сік, наріжте томати на
чотири частини та кидайте шматки на ножі, що обертаються,
через отвір у кришці.
Ніколи не встромляйте руку чи будь-які предмети у чашу, коли
міксер працює.
УКРАЇНСЬКІЙ78

Соковижималка
◗ Соковижималку можна застосовувати для приготування
свіжого фруктового соку. М'якоть, кісточки та шкуринку треба
видаляти.
C
1 Встановіть контейнер для м'якоті на вузол двигуна та
поверніть за стрілкою, поки він не зафіксується.
C
2 Вставте сито.
Завжди перевіряйте сито перед використанням. Не
використовуйте сито, якщо помічаєте дефекти - тріщини чи дірки у
металевій гратці, чи коли тертка від'єдналася.
У випадку пошкодження сита, зв'яжіться з Центром обслуговування
клієнтів "Philips" у Вашій країні (Ви знайдете телефонні номери на
міжнародному гарантійному талоні). Якщо у Вашій країні немає
Центру обслуговування клієнтів, зверніться до місцевого ділера або
зв'яжіться з Сервісним відділом "Philips Domestic Appliаnces аnd
Personаl Cаre BV".
C
3 Встановіть кришку на місце та закріпіть затискувачем,
натиснувши його донизу.
Переконайтеся, що затискувач знаходиться на правій стороні вузл
двигуна. Перевірте, чи кришку правильно встановлено т
зафіксовано кришку.
C
4 Поставте чашку для соку.
5 Виберіть потрібну швидкість для ввімкнення пристрою.
C
6 Покладіть продукти через приймальну трубку. Перед
початком обробки наріжте великі шматки продуктів на
маленькі.
C
7 Обережно просувайте продукти донизу штовхачем.
Не прикладайте забагато сили до штовхача, оскільки це впливає н
якість кінцевого результату та може зупинити сито.
УКРАЇНСЬКІЙ 79
Швидкість
швидкість 1
швидкість 2
Продукти для обробки
Фрукти (м'які)
Свіжі кокоси, буряки (тверді)
2
1

8 Якщо сік вже не виходить, вимкніть пристрій та почекайте,
поки сито зупиниться, перед відпусканням затискувача.
9 Зніміть чашку для соку.
B
Рецепти дивіться далі у брошурі.
Не давайте соковижималці працювати безперервно більше 2
хвилин. Якщо Ви не закінчили обробку, вимкніть пристрій, дайте
йому охолонути 2 хвилини перед тим, як починати знову.
Поради
◗ Якщо підчас обробки контейнер для м'якоті заповнюється,
вимкніть пристрій та почекайте, поки сито повністю
зупиниться. Зніміть затискувач та кришку. Витягніть сито.
Від'єднайте контейнер для м'якоті від вузла двигуна,
повернувши його вправо, та зніміть його. Спорожніть
контейнер та почистіть сито. Зберіть соковижималку знову та
ввімкніть.
◗ Якщо чашка для соку наповнюється підчас обробки, вимкніть
пристрій та почекайте, поки сито зупиниться повністю. Зніміть
чашку для соку та спорожніть її. Максимальний вміст чашки
для соку - 700 мл.
◗ Перед обробкою тонку шкурку з фруктів можна не знімати.
Треба зняти лише товсту шкурку (наприклад, з апельсинів,
ананасів чи сирого буряка).
◗ У соковижималці не можна обробляти тверді фрукти, що
містять багато крохмалю, такі як банани, папайя, авокадо, фіги
та манго. Для обробки таких фруктів застосовуйте міксер.
◗ Завжди використовуйте свіжі фрукти та овочі. Вони містять
більше соку.
◗ Листя та стеблі, наприклад, латуку також можна обробляти у
соковижималці.
◗ Яблучний сік темніє дуже швидко.Ви можете уповільнити цей
процес, додавши декілька крапель лимонного соку.
◗ М'якоть моркви, буряка, капусти чи шпинату можна
використовувати для супів, соусів, джему, десертів, морозива та
іншого. Закип'ятіть м'якоть та додайте трохи приправ.Зробіть
із м'якоті пюре у міксері. З томатної м'якоті Ви можете зробити
томатну пасту.
Чистка приладу
Чищення пристрою, його частин та приладдя легше за все
проводити одразу після використання.
Ніколи не чистіть приладдя та частини у посудомийній машині.
УКРАЇНСЬКІЙ80

Чистіть блок двигуну вологою ганчіркою.
Не застосовуйте абразиви, металеві щітки, спирт тощо.
1 Витягніть штепсель із розетки, від'єднайте приладдя та
частини та помийте їх у теплій воді з милом.
2 Промивайте все приладдя та частини під краном.
Міксер, швидке чищення
C
1 Залийте теплу води та трохи миючої рідини у чашу.
Не перевищуйте максимальну ємність чаши (1,5 л).
2 Встановіть кришку та пробку.
C
3 Дайте пристрою попрацювати декілька секунд, натиснувши
кнопку швидкого чищення ("Quick Clean").
4 Від'єднайте чашу, зніміть кришку та пробку та промийте їх
чистою водою.
5 Для кращого чищення витягніть вузол ножів із чаши.
Соковижималка, краще чищення
1 Зніміть кришку, контейнер для м'якоті та сито.Промийте їх
негайно після використання.
2 Для чищення сита Ви можете застосувати щітку, що
додається.
Гарантія та обслуговування
Якщо Вам необхідна інформація або у Вас виникли проблеми,
зверніться до веб-сторінки компанії "Philips" - www.philips.com, або
зверніться до Центру обслуговування клієнтів компанії "Philips" у
Вашій країні (телефон Ви можете знайти на гарантійному
талоні).Якщо у Вашій країні немає Центру обслуговування клієнтів,
зверніться до місцевого ділера або зв'яжіться з Сервісним відділом
"Philips Domestic Appliаnces аnd Personаl Cаre BV".
УКРАЇНСЬКІЙ 81

Рецепти для соковижималки та міксера
За допомогою "Juice & Co" Ви можете експериментувати скільки
завгодно та пробувати всі види рецептів. Ви можете робити смачні
соки, коктейлі, супи та соуси, не витрачаючи часу. Щоб дати Вам
уявлення про можливості, ми додаємо декілька рецептів, які
безперечно мають успіх.
Апетитні тістечка
- 250 г овочевої м'якоті (зокрема підходить капуста, селера,
томати, морква, цибуля, перець, порей, шпинат та фенхель)
- 100 г хлібних крихт
- 2 яйця
- 2 столові ложки томатного кетчупу
- 1 столова ложка покришених свіжих трав (петрушка, різанець)
- 2 чайні ложки самбалу
- 50 г тертого зрілого твердого сиру
- сіль
- перець
- 50 г масла
B
Змішайте кетчуп, покришені трави, самбал та сир зі м'якоттю.
Покладіть м'якоть у чашу та змішайте з хлібними крихтами,
яйцями, сіллю та перцем. Зробіть із суміші 4-5 плоских тістечка.
B
Розтопіть масло на сковороді та підсмажуйте тістечка на
середньому вогні близько 5 хвилин із кожної сторони, поки вони не
підрум'яняться. Подавати гарячими.
Млинці з яблуками
- 150 г яблучної м'якоті
- 150 г самопіднімаючогося борошна
- 2 яйця
- прибл. 100 мл молока
- 50 г родзинок
- 50 г сухих нарізаних абрикосів
- масло
- цукор, кориця за смаком
B
Змішайте тісто та яйця з яблучною м'якоттю. Додайте молока
для утворення густої суміші. Обсипте суміш родзинками та
абрикосами.
B
Розтопіть на сковороді трохи масла. Наливайте суміш черпачком
на сковороду кругами на деякій відстані один від одного. Зробіть із
суміші млинці та підсмажуйте на середньому вогні з обох сторін
до того, коли вони підрум'яняться. Подавайте млинці гарячими чи
холодними, посипавши цукром та корицею за смаком.
Вітамінний напій (три склянки)
- 1 манго
- 1 банан
- сік з 1 яблука (помитого), 1 ківі та 1 апельсина
- 2 чайні ложки меду (або більше за смаком)
- 300 мл пахти
УКРАЇНСЬКІЙ82

B
Почистіть ківі та апельсин. Обробляйте у соковижималці разом із
яблуком. Почистіть манго та банан, змішайте у міксері разом із
фруктовим соком, медом та пахтою до утворення смачного
шейку.
B
Порада: можна замінити пахту сиром чи йогуртом для створення
смачного та здорового десерту.
Холодний коктейл для спекотного дня (дві склянки)
- 1/2 ананасу
- 2 яблука
- 1 рожевий грейпфрут
- кубики льоду (прибл. 2 повні склянки)
B
Зніміть шкурку з ананасу та почистіть грейпфрут, помийте
яблука та поріжте всі фрукти на шматки. Обробляйте у
соковижималці та зберіть сік.
B
Зберіть міксер та покладіть у чашу кубики льоду. Здрібнюйте
кубики на максимальній швидкості та додайте сік. Ви отримаєте
смачних холодний свіжий фруктовий коктейль, що втамує Вашу
спрагу.
Овочевий коктейль (одна велика порція)
- 200 мл морквяного соку
- 1/2 стеблі селери, порізаного на шматки
- 1 томат середнього розміру, почищений та нарізаний
- 1/2 маленького зеленого або червоного перцю, нарізаного
- маленька жменька свіжого шпинату та декілька ростків петрушки
- 2-3 кубики льоду
- 1 довге тонке стебло селери для прикрашення
B
Зробіть у соковижималці сік з 6-8 морквин.
B
Встановіть міксер. Налийте сік, покладіть овочі та шпинат чи
петрушку у міксер та змішуйте 15-30 секунд на максимальній
швидкості. Додайте льоду та змішуйте ще декілька секунд.
Налийте коктейль шейку велику склянку та прикрасьте довгим
стеблом селери.
Газпако-бланко (4 порції)
- 500 г білого винограду без кісточок
- 2 огірка (прибл. 750 г)
- 1 шалот, нарізаний
- 1 зубчик часнику, нарізаний
- 1/4 чайної ложки солі
- 1/4 чайна ложка білого перцю
- 500 мл нежирного йогурту
- 6-8 крапель табаско
B
Помийте виноград та видаліть стеблі. Обробляйте у
соковижималці та зберіть сік.
B
Встановіть міксер. Налийте виноградний сік у міксер. Почистіть
огірки, наріжте кожен на дві частини вздовж, видаліть насіння.
Наріжте огірок на товсті скибки та додайте ці скибки у
УКРАЇНСЬКІЙ 83

Рішення
Пристрій оснащено системою безпеки. Якщо приладдя неправильно
приєднано до вузла двигуна, пристрій не працюватиме. Перевірте, чи
правильно приєднане приладдя (див. відповідні розділи). Спершу вимкніть
пристрій!
Вимкніть пристрій та обробляйте меншу кількість.
Це є нормальним для першого використання. Якщо запах не припиняється
через декілька разів використання, перевірте кількість продуктів та час
приготування або швидкість.
Вимкніть пристрій та витягніть штепсель. Зверніться по гарячій лінії
обслуговування клієнтів "Philips" або до Сервісного центру "Philips" чи офісу
фірми "Philips".
Вимкніть пристрій. Від'єднайте вузол ножів, повернувши проти
годинникової стрілки. Перевірте, чи правильно встановлено гумове кільце
на вузлі ножів (зафіксовано у плоскому положенні).
Переконайтеся, що кришку правильно встановлено. Пробка
встановлюється з "клацанням".
Вимкніть пристрій. Перевірте, чи правильно приєднано сито. Виступи на
дні сита повинні входити в отвори на двигуні.
Перевірте, чи не пошкоджено сито.Тріщини, відставання диску чи інший
дефект може спричинити збої в роботі.Якщо ви знайшли на ситі тріщини
чи пошкодження, не використовуйте більше пристрій або зв'яжіться з
найближчим сервісним Philips.
Проблема
Пристрій не працює
Вузол ножів / вузол двигуна
заблоковано.
З двигуна виходить неприємний
запах при першому використанні.
Пристрій шумить, з нього виходить
запах, дим, він гарячий на дотик і
таке інше.
Продукти витікають із міксера.
Витікання з кришки або пробки
міксера
Сито соковижималки торкається
приймальної трубки та вібрує підчас
обробки.
виноградний сік, що знаходиться у міксері. Додайте шалот, часник,
сіль та перець і запустіть пристрій на короткий час. Залийте
суміш у чашу та перемішайте з йогуртом і табаско.
B
Дайте супу охолонути, помістивши його у холодильник на 30
хвилин у закритій посудині. Подавайте суп у великій посудині,
прикрасивши скибками огірків та розрізаними навпіл
виноградинами.
Можливі проблеми
УКРАЇНСЬКІЙ84
* Якщо проблеми не зникають, будь ласка, зверніться по гарячій лінії обслуговування клієнтів "Philips" або до
Сервісного центру "Philips" чи офісу фірми "Philips".

Uvod
Aparat je opremljen sigurnosnim mehanizmom koji zaustavlja rad ako
su nastavci neispravno stavljeni ili ih nema.
Nikad ne koristite nastavke za uključenje i isključenje aparat!
Važno
◗ Prije uporabe aparata pažljivo pročitajte upute i pogledajte slike.
◗ Zadržite ove upute za buduću uporabu.
◗ Ovaj aparat je namijenjen isključivo uporabi u kućanstvu.
◗ Prije spajanja na napajanje provjerite da li napon označen na
aparatu odgovara naponu Vaše mreže (110-127V ili 220-240V).
◗ Ako se mrežni kabel ošteti,mora se zamijeniti jedino u
ovlaštenom PHILIPS servisu tj. od strane ovlaštene osobe kako bi
se izbjegle potencijalno opasne situacije.
◗ Nemojte koristiti aparat ako su mrežni kabel, utikač ili druge
komponente oštećeni.
◗ Prije priključenja u zidnu utičnicu sastavite aparat ispravno.
◗ Kad su posuda ili drugi nastavci ispravno učvršćeni,čuje se "klik".
◗ Nemojte skidati nastavke s motorne jedinice kad aparat radi.
◗ Nemojte prekoračivati količine i vrijeme pripreme naznačene u
tablicama.
◗ Ostavite vruće sastojke da se ohlade prije nego ih procesirate u
blender posudi (maksimalna temperatura 80cC/175cF)
◗ Držite aparat dalje od dohvata djece.
◗ Nikad ne ostavljajte aparat raditi bez nadzora.
◗ Ne dodirujte OŠTRE noževe, posebno kad je aparat priključen na
napajanje.
◗ Ako noževi zapnu,ODSPOJITE APARAT IZ NAPAJANJA prije
vađenja sastojaka koji blokiraju noževe.
◗ Nikad ne stavljajte prste ili druge predmete u posudu ili bokal dok
aparat radi.
◗ Nikad ne uranjajte motornu jedinicu u vodu ili drugu tekućinu i ne
ispirite je pod vodom. Koristite samo vlažnu krpu.
◗ Odspojite aparat iz napajanja odmah nakon uporabe, odnosno,
nakon odvajanja posude.
◗ Razina buke: Lc = 83 dB[A]
Opći opis
A Spremnik za mrežni kabel
B Preklopka za odabir dvije brzine i pulsni rad (M)
C Quick Clean tipka
D Motorna jedinica
E Pogonska osovina
F Posuda za sok
G Hvataljka za učvršćenje/skidanje pokrova
H Spremnik za kašu
I Sito
HRVATSKI 85

86
J Pokrov sokovnika
K Cijev za stavljanje sastojaka
L Potiskivač
M Stoper
N Otvor za dodavanje sastojaka
O Pokrov posude
P Žlijeb
Q Posuda mješača
R Gumeni brtveni prsten
S Rezna jedinica
T Četka za čišćenje
Priprema aparata za uporabu
Operite sav pribor i odvojive dijelove (pogledajte poglavlje "Čišćenje").
◗ Višak mrežnog kabela omotajte oko podnožja aparata.
Uporaba
Mješač (blender)
◗ Mješač je namijenjen:
- Miješanju tekućina, primjerice mliječnih proizvoda, umaka, voćnih
sokova, juha, miješanih pića, frapea.
- Miješanje mekih sastojaka, primjerice, tijesta za palačinke ili majoneze.
- Miješanje kuhanih sastojaka, primjerice za dječju hranu.
C
1 Stavite gumeni prsten oko ruba rezne jedinice.
C
2 Stavite reznu jedinicu na posudu mješača zakretanjem u smjeru
strelice.
C
3 Učvrstite posudu na motornu jedinicu zakretanjem u smjeru
strelice.
Nemojte jako pritiskati ručku posude.
HRVATSKI
1
2

87
C
4 Stavite sastojke u posudu.
Nikada ne punite posudu sastojcima čija temperatura prelazi 80cC.
5 Potisnite pokrov na mjesto.
C
6 Postavite stoper u otvor pokrova i zakrenite ga dok se dobro
ne učvrsti.
Kako bi izbjegli prolijevanje, prije uporabe umetnite stoper u pokrov.
◗ Preklopka za podešavanje brzine omogućuje podešavanje brzine
za optimalne rezultate. Pogledajte tablicu s preporučenim
brzinama.
7 Utaknite mrežni kabel u zidnu utičnicu.
C
8 Odaberite željenu brzinu i aparat se uključuje.
Ako ne znate koju brzinu odabrati, uvijek možete koristiti najvišu
(brzina 2).
◗ Želite li da aparat radi u intervalima od nekoliko sekundi,postavite
preklopku na položaj M (Momentum) i odmah je otpustite.
Ponovite postupak koliko god je potrebno.
9 Za isključenje aparata, postavite preklopku na položaj 0.
Nikad ne uključujte aparat zakretanjem posude.
Recepte potražite na kraju ovog priručnika.
Savjeti
Kako bi izbjegli prolijevanje, nikad ne punite posudu iznad oznake
maksimalne razine (1,5 l), posebno prilikom obrade vrućih sastojaka.
C
◗ Tekući sastojci (primjerice, ulje) mogu se uliti kroz otvor u
stoperu dok aparat radi.
◗ Kad motor radi, sastojci se mogu dodati u mješač kroz otvor na
pokrovu.
HRVATSKI
Brzina
brzina 1
brzina 2
M
Sastojci
tekući sastojci (primjerice, čokoladno mlijeko, mlijeko s voćem,
majoneza)
tvr i sastojci, primjerice, kombinacija tekućih i krutih sastojaka
(primjerice, sok od rajčice ili namaz)
tvrdi, uglavnom kruti sastojci (primjerice, kocke leda, juhe, itd.)

88
Mješač ne smije raditi dulje od tri minute odjednom. Ako niste završili
miješanje nakon tri minute, prije nastavka isključite aparat na jednu
minutu.
◗ Suhi sastojci ne smiju se obrađivati dulje od 1 minute.
◗ Prije stavljanja krutih sastojaka u mješač, narežite ih na manje
komade. Nemojte stavljati velike količine odjednom. Stavljajte
manje količine u serijama.
◗ Ako niste zadovoljni rezultatima miješanja krutih sastojaka,
isključite aparat i pustite ga kratko raditi nekoliko puta dok je
preklopka u položaju M. Ili promiješajte sastojke lopaticom (ne
dok mješač radi), smanjite količinu sastojaka i obrađujte manje
količine.
◗ Za drobljenje kocaka leda,stavite ih izravno na rotirajuće noževe
kroz otvor u pokrovu.
◗ Za pripremu soka od rajčice, izrežite rajčice na četvrtine i stavite
ih izravno na rotirajuće noževe kroz otvor u pokrovu.
Nikad ne stavljajte ruke ili strane predmete u posudu dok mješač radi.
Sokovnik
◗ Sokovnik služi pripremi svježih voćnih sokova.Kaša i žilice se
odvajaju.
C
1 Stavite spremnik za kašu a motornu jedinicu i zakrenite ga u
smjeru strelice dok se ne učvrsti.
C
2 Umetnite sito.
Uvijek provjerite sito prije uporabe. Nemojte koristiti sito ako je
oštećeno.
Ako je sito oštećeno, obratite se Philips predstavništvu (broj telefona
nalazi se na priloženom jamstvenom listu). Ako takvo predstavništvo ne
postoji, obratite se lokalnom prodavatelju ili servisu.
C
3 Stavite pokrov i učvrstite hvataljku potiskom prema dolje.
Hvataljka mora biti postavljena na desnu stranu motorne jedinice
Provjerite je li pokrov ispravno stavljen i učvršćen.
HRVATSKI
2
1

89
C
4 Stavite posudu za sok na mjesto.
5 Odaberite odgovarajuću brzinu za uključenje aparata.
C
6 Stavite sastojke u cijev.Prije obrade narežite veće sastojke na
manje komade koji stanu u cijev.
C
7 Lagano potisnite sastojke potiskivačem.
Nemojte primjenjivati silu pri rukovanju potiskivačem, jer to može
utjecati na kvalitetu konačnog rezultata i čak može blokirati cijev.
8 Ako nema više soka, isključite aparat i pričekajte da se cijev
zaustavi prije otpuštanja hvataljke.
9 Odvojite posudu za sok.
B
Recepte potražite na kraju ovog priručnika.
Sokovnik ne smije neprekidno raditi dulje od dvije minute. Ako ste
završili s pripremom soka, isključite aparat i pustite ga da se ohladi dvije
minute prije nastavka.
Savjeti
◗ Ako se spremnik za kašu napuni tijekom rada, isključite aparat i
pričekajte da se sito u potpunosti zaustavi. Otpustite hvataljku i
skinite pokrov. Skinite sito.Odvojite spremnik za kašu od
motorne jedinice tako da ga zakrenete udesno. Ispraznite
spremnik za kašu i očistite sito.Ponovo sastavite sokovnik i
uključite ga.
◗ Ako se posuda za sok napuni tijekom obrade,isključite aparat i
pričekajte da se sito u potpunosti zaustavi. Skinite posudu za sok i
ispraznite je. Maksimalna količina soka iznosi 700 ml.
◗ Prije obrade nije potrebno ogluliti tanku kožu s voća.Ogulite
samo sastojke poput naranči, ananasa ili sirove cikle.
◗ Voće s mnogo škroba, poput banana, papaje, avokada ili manga nije
pogodno za obradu u sokovniku.Takvo voće obrađujte mješačem.
◗ Uvijek koristite samo svježe voće i povrće jer sadrži više soka.
◗ Povrće s lišćem ili stabljikama (primjerice, zelena salata) također
se može obraditi u sokovniku.
◗ Sok od jabuke vrlo brzo poprima smeđu boju.Taj se proces može
usporiti dodavanjem nekoliko kapi limunovog soka.
◗ Kaša od mrkve, cikle, kupusa ili špinata može se koristiti kao
temeljac za juhe, umake, džem, deserte, ledenu kremu,itd. Skuhajte
kašu i dodajte začine. Obradite u mješaču. Kašu od rajčice možete
koristiti za izradu kečapa.
HRVATSKI
Brzina
brzina 1
brzina 2
Sastojci
Voće (meko)
Svježi kokos, cikla (tvrda)

90
Čišćenje
Čišćenje aparata, pribora i nastavaka najlakše je odmah nakon uporabe.
Nikad ne perite nastavke ili dijelove aparata u perilici posu a.
Očistite motornu jedinicu vlažnom krpom.
Nemojte koristiti abrazivna sredstva, žičane spužve, alkohol, itd.
1 Odspojite aparat iz napajanja, odvojite nastavke i dijelove i
operite ih u mlakoj vodi s malo sredstva za pranje.
2 Isperite nastavke i dijelove pod slavinom.
Brzo čišćenje mješača
C
1 U posudu mješača ulijte mlaku vodu i malo sredstva za pranje.
Nemojte prekoračiti maksimalnu količinu (1,5 l).
2 Sastavite pokrov i stoper.
C
3 Ostavite aparat raditi nekoliko sekundi pritiskom na tipku
Quick Clean.
4 Odvojite posudu mješača, skinite pokrov i stoper i isperite ih u
čistoj vodi.
5 Za bolje čišćenje, odvojite reznu jedinicu od posude mješača.
Sokovnik,bolje čišćenje
1 Skinite pokrov, spremnik za kašu i sito. Isperite ih odmah nakon
uporabe.
2 Sito možete očistiti isporučenom četkicom.
Jamstvo i servis
Zatrebate li informaciju ili imate problem, molimo, posjetite Philips web
stranicu www.philips.com ili se obratite Philips predstavništvu u Vašoj
zemlji (brojevi telefona se nalaze u priloženom jamstvenom listu).Ako
takvog predstavništva nema u Vašoj zemlji, obratite se prodavatelju ili
ovlaštenom servisu.
HRVATSKI

91
Recepti za sastojke obrađene sokovnikom i mješačem
U ovoj kombinaciji možete neograničeno eksperimentirati i iskušavati
sve vrste recepata. Možete pripremiti ukusne sokove, frapee, juhe i
umake za vrlo kratko vrijeme. Kako bismo Vam dali ideju o
mogućnostima, ovdje smo naveli nekoliko dokazano uspješnih recepata.
Ukusni kolači
- 250 g kaše od povrća (posebno je pogodan kupus, celer, rajčica,
mrkva, luk, paprika, poriluk, špinat i komorač)
- 100 g krušnih mrvica
- 2 jaja
- 2 žličice kečapa
- 1 žličica nasjeckanog aromatičnog bilja (primjerice, peršun/vlasac)
- 2 žličice indijskih začina
- 50 g ribanog sira
- sol
- papar
- 50 g maslaca
B
U kašu umiješajte kečap, indijski zašin, nasjeckano aromatično bilje i sir.
Stavite kašu u posudu i dodajte krušne mrvice, jaja i malo soli i papra.
Načinite 4-5 kolača.
B
Zagrijte maslac u tavi i pirjajte kolače na umjerenoj vatri oko pet minuta
sa svake strane dok ne budu pečeni. Poslužite vruće.
Palačinke s jabukama
- 150 g kaše od jabuka
- 150 g brašna
- 2 jaja
- približno 100 ml mijeka
- 50 g grož ica
- 50 g sušenih marelica, narezanih na komadiće
- maslac
- šećer i cimet, po ukusu
B
U kašu od jabuka umiješajte brašno i jaja. Dodajte dovoljno mlijeka kako
bi smjesa bila čvrsta. Smjesi dodajte grož ice i marelice.
B
Zagrijte malo maslaca u tavi. Od smjese načinite pogačice i stavite ih u
tavu na malu me usobnu udaljenost. Izravnajte smjesu u palačinke i pecite
ih na laganoj vatri s obje strane dok ne dobiju zlatnu boju. Poslužite
palačinke tople ili hladne i pospite ih šećerom ili cimetom po ukusu.
Vitaminski napitak (tri čaše)
- 1 mango
- 1 banana
- sok jedne jabuke (oprane), 1 kivi i 1 naranča
- 2 žličice meda (ili više, po ukusu)
- 300 ml sirutke
B
Ogulite kivi i naranču. Obradite ih u sokovniku zajedno s jabukom. Ogulite
mango i bananu i obradite ih u mješaču zajedno s voćnim sokom,
medom i sirutkom za ukusni frape.
B
Savjet: za ukusan i zdrav desert, zamijenite sirutku jogurtom.
HRVATSKI

92
Ledeni frape za tropski dan (dvije čaše)
- 1/2 ananasa
- 2 jabuke
- 1 ružičasti grejp
- kocke leda (približno dvije pune čaše)
B
Ogulite ananas i grejp, operite jabuke i sve naežite na komadiće.
Obradite ih u sokovniku i načinite sok.
B
Sastavite mješač i stavite kocke leda u mješač. Sameljite led na
podešenju najviše brzine i dodajte voćni sok. Rezultat je ukusan, ledeni
voćni sok koji će ugasiti Vašu že !
Frape od povrća (jedan veliki obrok)
- 200 ml soka od mrkve
- 1/2 stabljike celera narezane na komadiće
- 1 rajčica srednje veličine, oguljena i narezana na komadiće
- 1/2 male zelene ili crvene paprike, narezane na komadiće
- prstohvat svježeg špinata ili peršuna
- 2 ili 3 kocke leda
- 1 duga i tanka stabljika celera za ukras
B
Obradite 6 do 8 mrkvi u sokovniku.
B
Sastavite mješač. U mješač stavite sok od mrkve, povrće i špinat ili
peršun i miješajte 15-30 sekundi pri maksimalnoj brzini. Dodajte kocke
leda i miješajte još nekoliko sekundi. Izlijte frape u visoku čašu i ukrasite
dugom stabljikom celera.
Bijeli Gazpacho (za 4 osobe)
- 500 g bijeloga grož a bez koštica
- 2 krastavca (približno 750 g)
- 1 ljutika, narezana na komade
- 1 režanj češnjaka, nasjeckani
- 1/4 žličice soli
- 1/4 žličice bijelog papra
- 500 ml nemasnog jogurta
- 6-8 kapi Tabasca
B
Operite grož e i izvadite koštice. Obradite ih u sokovniku i načinite sok.
B
Sastavite mješač. Stavite sok od grož a u mješač. Ogulite krastavac,
prepolovite ga po duljini i izvadite koštice. Narežite krastavac na tanke
ploške i dodajte ih soku od grož a u mješaču. Dodajte ljutiku, češnjak,sol
i papar i nakratko uključite aparat. Izlijte smjesu u posudu i umiješajte
jogurt i Tabasco.
B
Ohladite juhu u pokrivenoj posudi u hladnjaku oko 30 minuta. Poslužite u
hladnim tanjurima i ukrasite ploškama krastavca i polovicama grož a.
HRVATSKI

93
U slučaju problema
HRVATSKI
Rješenje
Aparat je opremljen sigurnosnim sustavom. Ako nastavci nisu ispravno stavljeni
na motornu jedinicu, aparat ne radi. Provjerite jesu li nastavci ispravno stavljeni
(pogledajte razne odjeljke). Prvo isključite aparat!
Isključite aparat i obradite manju količinu sastojaka.
To je uobičajena pojava kod prvih nekoliko uporaba.Ako se nastavi, provjerite
količinu, vrijeme obrade ili brzinu.
Isključite aparat i odspojite ga iz napajanja. Obratite se Philips predstavništvu ili
ovlaštenom servisu.
Isključite aparat. Otpustite nož tako da ga zakrenete ulijevo. Provjerite je li
gumeni prsten pravilno učvršćen na reznu jedinicu (postavljen u vodoravni
položaj).
Provjerite je li pokrov dobro učvršćen. Čuje se "klik".
Isključite aparat. Provjerite je li sito ispravno stavljeno. Rebra s donje strane sita
moraju pristajati na otvor spojnice motora.
Provjerite da li je sito oštećeno. Oštećenja, napuknuća ili bilo kakva druga
neispravnost može prouzročiti prestanak rada. Primjetite li oštećenja, zaustavite
rad i obratite se u najbliži ovlašteni servis.
Problem
Aparat ne radi
Rezna/motorna jedinica je blokirana
Iz motorne jedinice osjeća se
neugodan miris prilikom prvih
nekoliko uporaba.
Aparat je bučan, osjeća se miris, vruć
je na dodir, pojavljuje se dim, itd.
Iz mješača ispadaju sastojci
Iz pokrova i/ili stopera ispadaju
sastojci
Sito sokovnika dodiruje cijev za
dodavanje sastojaka ili vibrira tijekom
obrade.
* Ako ne uspijete ukloniti problem, obratite se Philips predstavništvu ili ovlaštenom servisu.

Kasutamisjuhend
Seade on varustatud turvalukustiga ning kui lisaosad ei ole ühendatud
korralikult või ei ole ühendatud üldse, ei hakka seade tööle.
Ärge lülitage lisaosade abil seadet sisse ja välja!
Pange tähele!
◗ Enne seadme kasutuselevõttu tutvuge juhendi ja joonistega.
◗ Hoidke juhend alles edaspidiseks kasutamiseks.
◗ Seade on mõeldud kasutamiseks ainult koduses majapidamises.
◗ Kontrollige, et kohalik voolutugevus (110 - 127 V või 220 - 240 V)
vastaks seadme voolutugevusele enne seadme sisselülitamist
seinapistikupessa.
◗ Kui toitejuhe on vigastatud,vahetage see Philipsi, Philipsi volitatud
hooldekeskuse või lihtsalt kvalifitseeritud isiku poolt, et vältida
ohtlikke olukordi.
◗ Ärge kasutage seadet, kui toitejuhe, pistik või mõni muu osa on
vigastatud.
◗ Enne pistiku pistikupesasse panemist monteerige seade kokku.
◗ Kui fikseerite kannu või teised lisaosad mootorile korralikult, on
kuulda klõpsatust.
◗ Ärge eemaldage lisaosi seadmelt selle töötamise ajal.
◗ Ärge ületage erinevates lõikudes nimetatud koguseid ega
töötlemiskestusi.
◗ Laske tulistel toiduainetel enne mikserkannus töötlemist jahtuda
(maks temperatuur 80cC/175cF).
◗ Ärge lubage lastel seadet kasutada.
◗ Ärge kunagi jätke töötavat seadet järelvalveta.
◗ Ärge puudutage teravaid lõiketeri ja eriti siis,kui seade on sisse
lülitatud.
◗ Kui koostisosad jäävad tiiviknoa külge kinni, LÜLITAGE SEADE
VÄLJA, enne kui asute kinnijäänud koostisosi kaabitsaga tiiviknoa
küljest eemaldama.
◗ Ärge kunagi pange mikserkannu ega nõusse sõrmi ega kaabitsat
enne, kui seade pole välja lülitatud.
◗ Ärge kunagi pange mootoriosa vette ega mingisse muusse
vedelikku ega loputage seda veega.Mootori puhastamiseks
kasutage ainult niisket lappi.
◗ Lülitage seade välja otsekohe peale kasutamist, näit enne kannu
lahtikeeramist.
◗ Müratase: Lc = 83 dB [A]
Osade kirjeldus
A Juhtmehoidja
B Kiirusevalija 2 kiiruse ja pulseerimisfunktsiooni seadega (M)
C Kiirpuhastusnupp
D Mootor
E Veovõll
EESTI94

F Mahlanõu
G Klamber kaane kinnitamiseks ja vabastamiseks
H Jäätmenõu
I Riivsõel
J Mahlapressi kaas
K Etteandetoru
L Lükkur
M Kork
N Koostisosade lisamisava
O Kannu kaas
P Tila
Q Mikserkann
R Kummist tihendrõngas
S Tiiviknuga
T Puhastushari
Seadme ettevalmistamine kasutamiseks
Peske kõik tarvikud ja eemaldatavad lisaosad (vt lõiku 'Puhastamine').
◗ Kerige toitejuhe ümber seadme aluse.
Seadme kasutamine
Mikser
◗ Kannmikser on ette nähtud:
- Vedelate toitude segamiseks, näit piimatooted, kastmed,
puuviljamahlad, supid, segatud joogid, kokteilid.
- Pehmete koostisosade segamine, näiteks, tainas või majonees.
- Keedetud koostisosade püreestamine, näiteks,lastetoit.
C
1 Pange kummist tihend ümber tiiviknoa lõiketera.
C
2 Ühendage tiiviknuga mikserkannuga seda noole suunas
keerates.
EESTI 95

C
3 Paigutage kann seadmele. Kinnitage kann kohale, keerake seda
noole suunas.
Olge ettevaatlik ning ärge vajutage liialt tugevasti kannu käepidemele.
C
4 Pange koostisosad kannu.
Ärge kunagi pange kannu koostisosi, mille temperatuur ületab 80cC.
5 Vajutage kaas oma kohale.
C
6 Paigutage kork kaanes olevasse avasse ja keerake,kuni see on
täpselt kohal.
Pritsimise vältimiseks sisestage kork enne töötlemise alustamist.
◗ Kiiruseseaded võimaldavad Teil kiirust reguleerida optimaalseima
tulemuse saavutamiseks.Vt. tabelist soovitatud kiiruse seadeid.
7 Pange toitejuhe seinapistikusse.
C
8 Valige sobiv kiirus ja seade lülitub sisse.
Kui te ei tea täpselt, millist kiirust valida, kasutage alati suurimat kiirust
(kiirus 2).
◗ Selleks, et seade töötaks ainult mõne sekundi, seadke kiirusevalija
asendisse M (Momentum) ja laske kohe lahti.Korrake seda nii
tihti, kui selleks on vajadust.
9 Seadme välja lülitamiseks seadke asendisse 0.
Ärge kunagi lülitage seadet sisse ega välja keerates kannu.
Vt. retsepte sellest broshüürist.
EESTI96
Kiirus
1. kiirus
2. kiirus
M
Töötlemise koostisosad
vedelad koostisosad (näiteks: šokolaadipiim, piim puuviljadega,
majonees)
vedelate ja kõvade koostisosade kombinatsioon (näiteks, tomatimahl
või pasteet)
rasked, peamiselt tahked koostisosad(näiteks, jäätükid,supid, oad, jne.)
1
2

Nõuanded
Pritsmete vältimiseks ärge kunagi ületage kannule märgitud
maksimumkoguse joont (1,5 liitrit), eriti kui töödeldakse tuliseid
koostisosi.
C
◗ Vedelaid koostisosi (näit. õli) võib valada töötavasse mikserkannu
korgiava kaudu.
◗ Kui seade töötab,võib koostisosi lisada läbi kaanes oleva ava.
Ärge laske seadmel korraga töötada üle 3 minuti. Kui koostisosade
töötlemine ei ole veel lõpetatud, lülitage seade minutiks välja ja seejärel
jätkake toimingut.
◗ Kuivade koostisosade töötlemisel ärge kasutage mikserit üle 1
minuti.
◗ Tahked koostisosad tuleb enne mikserisse panemist väikesteks
tükkideks lõigata. Ärge pange korraga suurt kogust mikserisse.
Töödelge väikeste koguste kaupa.
◗ Kui Teid ei rahulda tahkete ainete segamistulemus,lülitage mikser
välja ja laske seadmel töötada lühikest aega M rezhiimis.Või segage
koostisosi kaabitsaga (mitte siis, kui mikser töötab), või vähendage
kannus olevat kogust ning töödelge väikeste koguste kaupa.
◗ Jääkuubikute peenestamisel pange neid mikserisse läbi kaanes
oleva ava.
◗ Tomatimahla valmistamiseks lõigake tomatid neljaks ja seejärel
laske need pöörlevale tiiviknoale läbi kaanes oleva ava.
Ärge kunagi pange kätt või mingeid objekte töötavasse mikserisse.
Mahlapress
◗ Mahlapresssi võib kasutada värske puuviljamahla valmistamiseks.
Jäätmed, südamikud ja seemned eraldatakse.
C
1 Paigutage jäätmenõu mootorile ja keerake seda noole suunas,
kuni see korralikult paigal on.
C
2 Sisestage riivsõel.
Enne kasutamist kontrollige alati riivsõela. Ärge kasutage sõela, mis on
defektne, näit praksub töötades, on mõranenenud, tuleb lahti metallist
vahesein või riivimistera.
Juhul, kui riivsõel on katki, võtke ühendus Philipsi teeninduskeskusega
oma riigis (telefoninumbri leiate garantiilehelt). Kui teie riigis ei ole
teeninduskeskust, pöörduge abi saamiseks Philipsi toodete müüja poole
või võtke ühendus Philipsi Kodumasinate Teeninduskeskuse ja
hoolduskeskusega.
EESTI 97

C
3 Pange kaas oma kohale ja vajutage klambrid alla.
Kontrollige, kas klambrid on mootorist õigel pool. Kontrollige, et kaas
oleks korralikult kohale paigutatud.
C
4 Pange mahlanõu kohale.
5 Valige õige töötlemiskiirus ja lülitage seade sisse.
C
6 Pange koostisosad etteandetorusse. Enne töötlema asumist
lõigake suured koostisosad etteandetorusse mahtuvateks
tükkideks.
C
7 Tõugake koostisosi õrnalt lükkuriga allapoole.
Ärge vajutage liiga tugevasti lükkuriga, see võib mõjutada töötlemise
lõpptulemuse kavliteeti ja põhjustada riivsõela seiskumist.
8 Kui mahla enam ei tule, lülitage seade välja ja ärge enne
klambreid lahti tehke, kui riivsõel ei ole peatunud.
9 Eemaldage mahlanõu.
B
Vt. retsepte sellest broshüürist.
Ärge laske mahlapressil korraga üle 2 minuti töötada. Kui
mahlapressimine ei ole veel lõpetatud, lülitage seade välja ja laske
seadmel 2 minutit jahtuda, seejärel jätkake töötlemis.
Nõuanded
◗ Kui jäätmenõu on täis,lülitage seade välja ja oodake, kuni riivsõel
on pöörlemise lõpetanud.Vabastage klambrid ja eemaldage kaas.
Võtke jäätmenõu mootorilt ära seda paremale pöörates.
Tühjendage jäätmenõu ja puhastage riivsõel. Paigaldage mahlapress
ja lülitage seade uuesti sisse.
◗ Kui mahlanõu on mahla täis,lülitage seade välja ja oodake, kuni
riivsõel on pöörlemise lõpetanud. Eemaldage mahlanõu ja
tühjendage see. Mahlanõu mahutab maksimaalselt 700 ml mahla.
◗ Enne töötlemist ei pea eemaldama õhukesi koori ega nahku.
Paksud koored (näit apelsinilt,ananassilt või toorelt peedilt) tuleb
eemaldada.
EESTI98
Kiirus
1. kiirus
2. kiirus
Töötlemise koostisosad
Puuviljad (pehmed)
Värske kookos, peet (toores)
2
1

◗ Rohke tärklisesisaldusega puuvilju, nagu banaane, papaiasid,
avokaadot,viigimarju ja mangosid ei pea kindlasti mahlapressis
töötlema.Tarvita nende viljade töötlemiseks mikserit.
◗ Tarvita ainult värskeid puu- ja aedvilju. Need on suurema
mahlasisaldusega.
◗ Mahlapressis saab töödelda ka lehti ja lehevarsi.
◗ Õunamahl värvub väga kiiresti pruuniks. Selle protsessi
aeglustamiseks võib mahlale lisada tilgakese sidrunimahla.
◗ Porgandist, peedist, kapsast või spinatist võib valmistada erinevaid
suppe, kastmeid, keediseid, magustoite, jäätist jms. Keetke viljaliha
ja lisage sellele maitseaineid. Püreestage viljaliha mikseris.Tomati
viljaliha saab tarvitada tomatipasta tegemiseks.
Puhastamine
Seadet, lisaosi ja tarvikuid on lihtsam puhastada kohe peale kasutamist.
Ärge peske seadme osi nõudepesumasinas.
Mootoriosa puhastage niiske lapiga.
Ärge kasutage abrasiivseid, söövitavaid puhastusvahendeid, alkoholi jm.
1 Võtke seade vooluvõrgust välja,võtke seadmelt kasutatud
lisaosad lahti ja peske neid leiges vees,millele on lisatud pisut
pesemisvahendit.
2 Loputage kõik pestud osad voolava vee all puhtaks.
Mikser, kiirpuhastus
C
1 Valage leiget vett ja pisut pesemisvahendit mikserkannu.
Ärge ületage kannule märgitud maksimumkoguse joont (1,5 l).
2 Pange kohale kaas ja kork.
C
3 Vajutage nuppu Kiirpuhastus ja laske seadmel mõni sekund
töötada.
4 Eemaldage mikserkann, eemaldage kaas ja kork ning loputage
puhta veega.
5 Eemaldage tiiviknuga mikserkannust, et seadet paremini
puhastada.
EESTI 99

Mahlapressi tõhusam puhastamine
1 Eemaldage kaas, jäätmenõu ja riivsõel. Loputage neid kohe
pärast kasutamist.
2 Kasutage ka kaasasolevat harja riivsõela puhastamisel.
Garantii ja teenindus
Kui Te vajate informatsiooni või on teil probleemid tekkinud, külastage
Philips Web lehekülge www.philips.com või võtke ühendus oma maa
Philipsi hoolduskeskusega (lisainfo ja telefoninumbrid leiate
garantiitalongilt). Kui Teie riigis ei ole Philipsi hoolduskeskust, pöörduge
Philipsi toodete müüja poole või võtke ühendus Philipsi
koduhooldusseadmete ja isikliku hoolduse BV teenindusosakonnaga.
Retseptid kombineerides töötlust mahlapressi ja mikseriga
Juice & Co seadmega on võimalik lõputult katsetada ja proovida
kõikvõimalikke retsepte. Seadme abil saate valmistada igal ajal
hõrgutavaid mahlu, kokteile, suppe ja kastmeid.Võimalike heade ideede
õhutamiseks oleme lisanud mõned retseptid, mis tagavad Teie
katsetustele edu.
Hõrgutavad koogid
- 250 g aedvilja viljaliha (eriti sobivad on kapsas, seller, tomat,porgand,
sibul, pipar,porru, spinat ja fenkol)
- 100 g riivsaia
- 2 muna
- 1 pl tomatiketshupit
- 1 pl peenestatud maitserohelist (näit peterselli/murulauku)
- 2 spl sambalit
- 50 g riivitud juustu
- soola
- pipar
- 50 g võid
B
Segada ketshup, hakitud maitseroheline, sambal ja juust köögiviljalihaga.
Pange segu kaussi ja segage riivsaia, munade, soola ja pipraga.Vormige
saadud tainast 4-5 lamedat pätsi.
B
Pange või küpsetuspannile ja kuumutage, praadige kooke keskmises
kuumuses umbes 5 minutit, mõlemalt poolt pruuniks. Serveerida
kuumalt.
Õunapannkoogid
- 150 g õuna viljaliha
- 150 g kergitusainega jahu
- 2 muna
- umbes 100 ml piima
- 50 g rosinaid
- 50 g kuivatatud aprikoose, tükeldatud
EESTI100
 Loading...