


Operating Instructions
Air-to-Water Heatpump
Model No. |
|
Indoor Unit |
Outdoor Unit |
LIAC7IM3 |
LIAV7IM |
LIAC9IM3 |
LIAV9IM |
ENGLISH |
2 |
~ 9 |
Before operating the unit, read these operating instructions thoroughly and keep them for future reference. |
|
|
Before operating the unit, make sure the installation has been carried out correctly by authorized dealer correctly and |
|
|
precisely following the installation instructions given. |
|
|
FRANÇAIS |
10 |
~ 17 |
Avant d’utiliser l’appareil, lisez ce mode d’emploi dans son intégralité et conservez-le pour toute référence ultérieure. |
|
|
Avant de faire fonctionner l’unité, assurez-vous que l’installation a été correctement réalisée par un revendeur agréé |
|
|
et dans le strict respect des consignes d’installation fournies. |
|
|
ESPAÑOL |
18 |
~ 25 |
Antes de utilizar la unidad, sírvase leer atentamente estas instrucciones de funcionamiento y conservarlas como |
|
|
futuro elemento de consulta. |
|
|
Antes de operar la unidad asegúrese de que la instalación haya sido realizada correctamente por un distribuidor |
|
|
autorizado, siguiendo de forma correcta y precisa las instrucciones de instalación dadas. |
|
|
DEUTSCH |
26 |
~ 33 |
Bevor Sie das Gerät in Betrieb nehmen, lesen Sie bitte diese Bedienungsanleitung aufmerksam durch und bewahren Sie |
|
|
sie für die künftige Verwendung auf. |
|
|
Vor der Inbetriebnahme dieses Geräts ist sicherzustellen, dass die Montage durch einen autorisierten Händler |
|
|
fachgerecht entsprechend der Installationsanleitung durchgeführt wurde. |
|
|
F567343
01_F567343_OYTH0912-00_EN.indd 1 |
1/28/2010 9:50:54 AM |
TABLE OF CONTENTS
SAFETY PRECAUTIONS
2~3
CONTROL PANEL
4~7
INDOOR UNIT
8
TROUBLESHOOTING
9
INFORMATION
34~35
NOTE
The illustrations in this manual are for explanation purposes only and may differ from the actual unit. It is subjected to change without notice for future improvement.
OPERATION CONDITION
Water outlet |
Indoor |
||
Temperature (°C) |
|||
|
|||
HEATING |
Max. |
55 |
|
Min. |
25 |
||
|
|||
|
|
||
Ambient |
Outdoor |
||
Temperature (°C) |
|||
|
|||
HEATING |
Max. |
35 |
|
Min. |
-20 |
||
|
|||
NOTICE : When the outdoor temperature is out of the above temperature range, the heating capacity will drop significantly and outdoor unit might stop for protection control.
2
SAFETY PRECAUTIONS
•This manual describes how to operate the Heatpump system between indoor and outdoor units only.
•Other operation such as water tank, radiator, external thermo controller and underfloor system, please refer to respective manufacturer operation manuals.
To prevent personal injury, injury to others, or property damage, please comply with the following.
Incorrect operation due to failure to follow instructions below may cause harm or damage, the seriousness of which is classified as below:
 WARNING This sign warns of death or serious injury.
This sign warns of injury or damage to
CAUTION property.
The instructions to be followed are classified by the following symbols:
This symbol denotes an action that is
PROHIBITED.
These symbols denote an actions that is COMPULSORY.
 WARNING
INDOOR UNIT AND OUTDOOR UNIT
This appliance is not intended for use by persons (including children) with reduced physical, sensory or mental capabilities, or lack of experience and knowledge, unless they have been given supervision or instruction concerning use of the appliance by a person responsible for their safety. Children should be supervised to ensure that they do not play with the appliance.
Please consult authorized dealer or specialist to repair, install, remove and reinstall the unit. Improper installation and handling will cause leakage, electric shock or fire.
Do not install the unit in a potentially explosive or flammable atmosphere. Failure to do so could result in fire.
Do not insert your fingers or other objects into the air conditioner indoor or outdoor unit, rotating parts may cause injury.
Do not touch the outdoor unit during lightning, it may cause electric shock.
Do not attempt to repair the unit by yourself. Otherwise, it may cause injury if it is mishandling.
Do not install the indoor unit at outdoor. This is designed for indoor installation only.
01_F567343_OYTH0912-00_EN.indd 2 |
1/28/2010 9:50:56 AM |
WARNING
POWER SUPPLY
Do not use modified cord, joint cord, extension cord or unspecified cord to prevent overheating and fire.
Do not share the same power outlet with other equipment to prevent overheating and fire.
Do not operate with wet hands to prevent electric shock.
If the supply cord is damage, it must be replaced by the manufacturer, its service agent or similarly qualified persons in order to avoid a hazard.
This unit is equipped with Residue Current Circuit Breaker (RCCB). It is strongly recommended to check the operation of the RCCB after installation and periodically after servicing or maintenance by authorized dealer to ensure it is in good working order. Otherwise, it may cause electrical shock or fire in case of malfunction.
It is recommended to wear gloves during servicing or maintenance in order to avoid hazard.
This equipment must be earthed to prevent electrical shock or fire.
In case of emergency or abnormal conditions (burnt smell, etc), turn off the power supply, and please consult authorized dealer.
Prevent electric shock by switching off the power supply when:
-Before cleaning or servicing.
-Extended non-use.
-Abnormally strong lightning activity.
This appliance is for multiple uses. All power supply circuits must be turn off before access to any of the terminals in the indoor unit, to avoid electrical shock, burn or fatal injury.
 CAUTION
INDOOR UNIT AND OUTDOOR UNIT
Do not wash the indoor unit with water, benzene, thinner or scouring powder.
Do not install the unit close to any combustible equipment or at bathroom. Otherwise, it may cause electric shock or fire.
Do not touch the water discharge pipe at the indoor unit during operation.
Do not place anything on top or beneath of the unit.
Do not sit or step on the unit, you may fall down accidentally.
Do not touch the sharp aluminium fin, sharp parts may cause injury.
Ensure drainage pipe is connected properly. Otherwise, leakage may occur.
Check the installation rack periodically to make sure that it is not damaged. After long periods of use, the strength of the installation rack may have deteriorated.
CONTROL PANEL
Do not let the control panel get wet. Otherwise, it may cause electric shock or fire.
Do not press the buttons on the control panel with hard, pointed objects. Otherwise, it may damage the unit.
Do not wash the control panel with water, benzene, thinner or scouring powder.
Do not inspect or service the control panel by yourself. Please consult authorized dealer. Otherwise, it may cause injury if mishandling.
Panel
ENGLISH
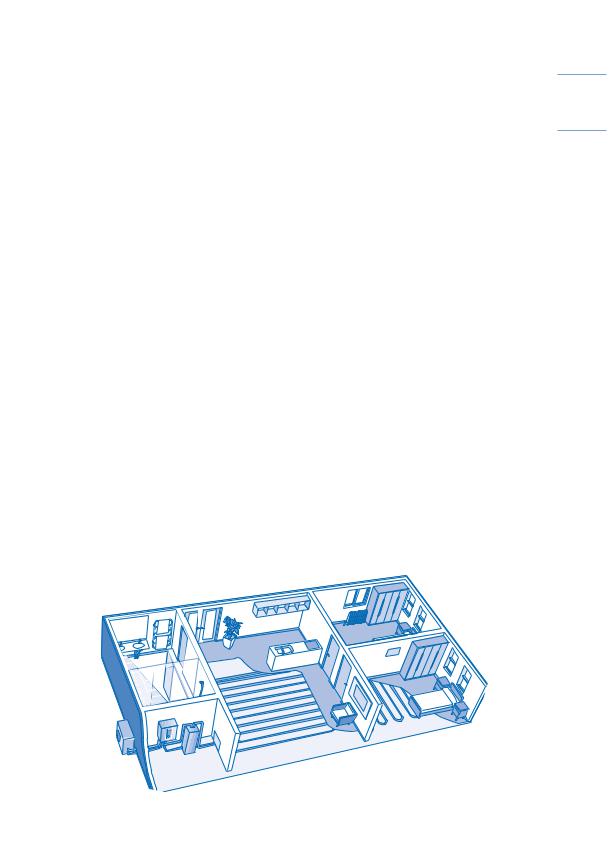
Indoor Unit
Power Supply
Outdoor Unit
Floor Heating
Water Tank Unit
Control Panel
3
01_F567343_OYTH0912-00_EN.indd 3 |
1/28/2010 9:50:56 AM |
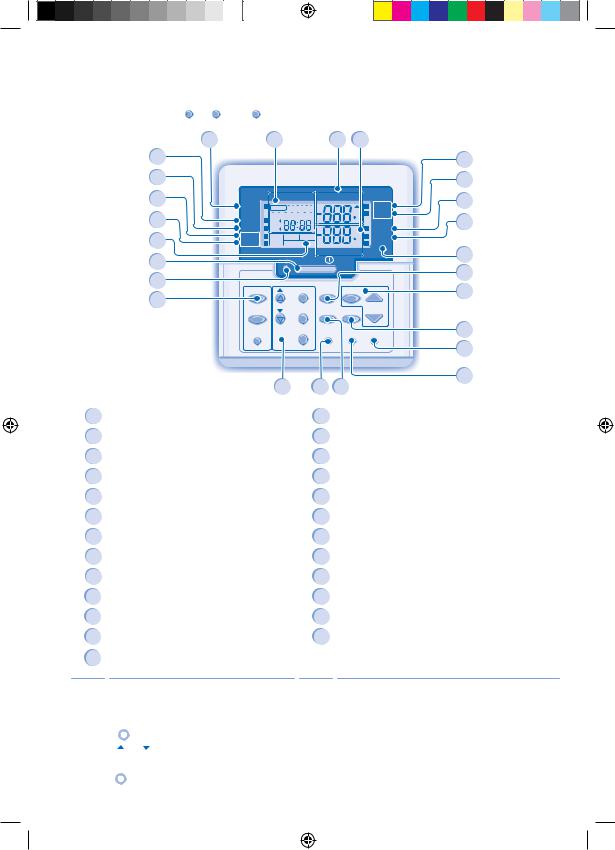
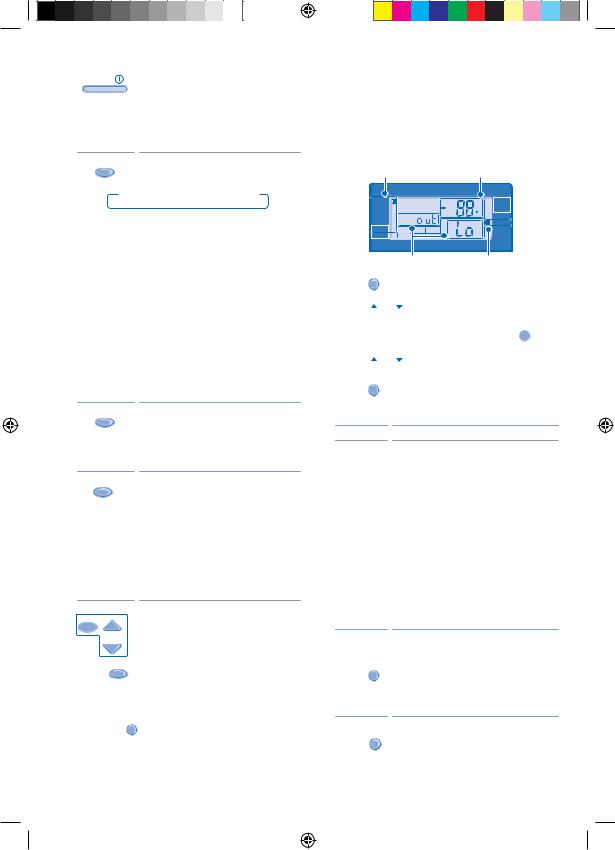
CONTROL PANEL
•Some functions described in this manual may not be applicable to your unit.
•Consult your nearest authorized dealer for further information.
ERROR
• For normal operation, the RESET , FORCE and PUMPDW buttons are not in use.
13 |
12 |
22 |
24 |
25 |
|
|
|
|
|
|
|
|
|
17 |
|
14 |
|
|
|
|
|
|
18 |
15 |
|
TIMER |
OUTDOOR |
ACTUAL |
19 |
||
HEAT |
TIMER 1 2 3 4 5 6 |
|
|
|
HEATER |
||
16 |
TANK |
MONTUEWEDTHUFRI SAT SUN |
|
|
C |
BOOSTER |
20 |
ON |
|
|
|
||||
QUIET |
OFF |
|
|
|
SETTING |
||
23 |
HEATER |
REMOTE |
|
|
C |
STATUS |
|
FORCE |
|
|
|
PUMPDW |
21 |
||
1 |
OPERATION |
|
WATER OUTLET |
|
|||
|
OFF/ON |
|
|
|
|||
|
|
|
|
|
|
3 |
|
2 |
|
SETTING |
|
|
STATUS |
||
|
|
|
10 |
||||
7 |
TIMER |
SET |
MODE |
CHECK |
|
||
|
|
|
|
|
|
||
OFF/ON |
SELECT |
QUIET |
HEATER SEARCH |
|
|||
|
|
||||||
|
|
CANCEL |
ERROR |
|
|
|
5 |
|
CLOCK |
RESET |
FORCE PUMPDW |
||||
|
|
|
|
|
|
|
9 |
|
|
6 |
11 |
4 |
|
|
8 |
|
|
|
|
|
|||
1 |
OFF/ON Button |
14 |
Quiet Operation OFF/ON Indicator |
2 |
Operation LED |
15 |
Backup Heater Request OFF/ON Indicator |
3 |
Operation Mode Button |
16 |
Force Heater Request OFF/ON Indicator |
4 |
Quiet Operation Button |
17 |
Backup Heater Actual Operation (OFF/ON) Indicator |
5 |
Indoor Unit Backup Heater Operation Button |
18 |
Booster Heater Actual Operation (OFF/ON) Indicator |
6 |
System Setting Mode Buttons |
19 |
System Setting Mode OFF/ON Indicator |
7 |
Timer Setting Group Buttons |
20 |
System Status Check Mode OFF/ON Indicator |
8 |
Force Heater Mode Button |
21 |
System Pumpdown Mode OFF/ON Indicator |
9 |
System Pumpdown Mode Button |
22 |
Timer/Clock Setting Display |
10 |
System Status Check Mode Buttons |
23 |
Remote Display |
11 |
Error Reset Button |
24 |
Outdoor Ambient Temperature Display |
12 |
Heat Mode OFF/ON Indicator |
25 |
Water Outlet Temperature Display |
13 |
Tank Mode OFF/ON Indicator |
|
|
CONTROL PANEL PREPARATION
Setting Current Day and Time
CLOCK
1.Press  .
.
2.Press  or
or  to set current day.
SET
3. Press  to confirm.
4 4. Repeat steps 2 and 3 to set the current time.
Notes:
•The current day and time need to be set when:
-The power is turned on for the first time.
-After a long time has elapsed since the power was last turned on.
•The current time that has been set will be the standard time for all the Timer operations.
01_F567343_OYTH0912-00_EN.indd 4 |
1/28/2010 9:50:57 AM |
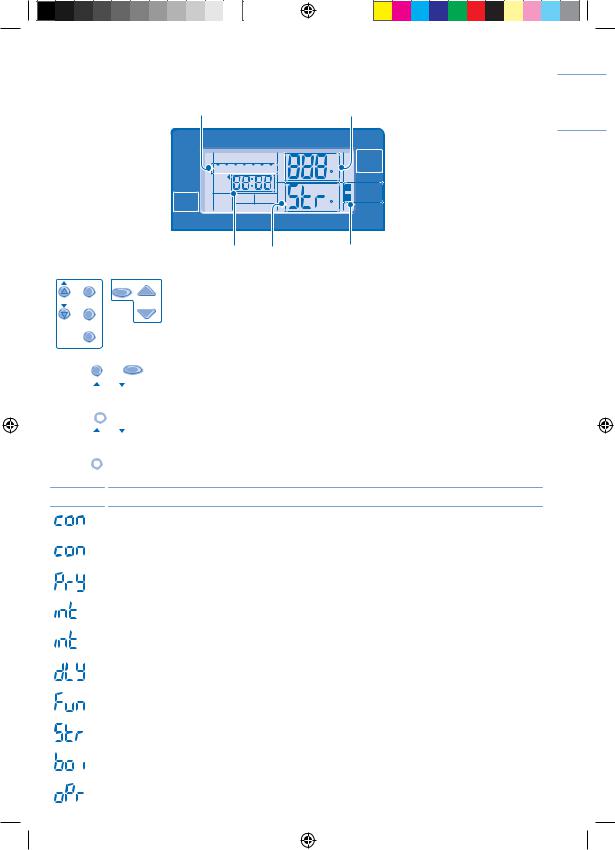
SETTING UP THE SPECIAL FUNCTIONS
•After initial installation, you can manually adjust the settings. The initial setting remains active until the user changes it.
•The control panel can be used for multiple installations. Some functions may not be applicable to your unit.
Day display |
YES / NO / Temperature display |
|
TIMER |
OUTDOOR |
ACTUAL |
HEAT |
|
|
HEATER |
TANK |
MONTUEWEDTHUFRI SAT SUN |
C |
BOOSTER |
ON |
|
||
QUIET |
|
|
SETTING |
HEATER |
REMOTE |
C |
STATUS |
FORCE |
|
PUMPDW |
|
OPERATION |
|
WATER OUTLET |
|
ENGLISH
Timer display Functions* SETTING / STATUS indicator
SETTING |
STATUS |
|
SET |
CHECK |
|
SELECT |
SEARCH |
|
SELECT FUNCTIONS AND SET YOUR DESIRED TIMER |
||
|
||
CANCEL |
|
1.Press SET and CHECK simultaneously for 5 seconds to enter special setting mode. “SETTING” and “STATUS” indicator is ON.
2.Press  or
or  to browse functions.
SELECT
3.Press  to enter the function.
4.Press  or
or  to enable YES or disable NO function, or set your desired day and time.
SET
5. Press  to confirm.
Display |
Function * |
|
|
External Thermo Controller (YES / NO) |
|
|
To set external thermo controller connection. |
|
|
Tank Connection (YES / NO) |
|
|
To set tank connection. |
|
|
Heating Priority (YES / NO) |
|
|
To choose the heat pump only use for Heating side during HEAT + TANK mode. |
|
|
Heating Heat-up Interval Set |
|
|
To set timer for Heating during HEAT + TANK mode (0.5hour ~ 10hours). |
|
|
Tank Heat-up Interval Set |
|
|
To set timer for Tank during HEAT + TANK mode (5minutes ~ 1hour 35minutes). |
|
|
Booster Heater Delay Time Set |
|
|
To set delay timer for booster heater to ON if tank temperature is not reached (20minutes ~ 1hour 35minutes). |
|
|
Sterilization (YES / NO) |
|
|
To set sterilization, if required. |
|
|
Sterilization Day & Time Set |
|
|
To set timer for sterilization (only once a week). |
|
|
Sterilization Temperature Set |
|
|
To set temperature for sterilization function (40°C ~ 75°C). |
|
|
Sterilization Continue Time |
|
|
To set timer to maintain heating temperature in order to complete the sterilization function (5minutes ~ 1hour). |
5 |
01_F567343_OYTH0912-00_EN.indd 5 |
1/28/2010 9:51:01 AM |
BASIC OPERATION
OFF / ON
TO TURN ON OR OFF THE UNIT
•When unit is ON, operation LED is lit and the actual temperature for water outlet and outdoor ambient are shown on the control panel display.
MODE
TO SELECT OPERATION MODE
 HEAT
HEAT  HEAT+TANK
  TANK
TANK
•HEAT MODE
-To turn ON or OFF the panel/floor heating operation.
-In this mode, the outdoor unit will provide heating capacity to the indoor unit.
•HEAT + TANK MODE
-In this mode, the outdoor unit will provide heating capacity to the sanitary tank and indoor unit.
-This operation is not used when the sanitary water tank is not installed.
•TANK MODE
-To turn ON or OFF the sanitary tank operation.
-In this mode, the outdoor unit will provide heating capacity to the sanitary tank.
QUIET
TO ENJOY QUIET ENVIRONMENT
•This operation reduces outdoor unit noise. In this condition, it may cause decrease in heating capacity.
HEATER
BACKUP HEATER OPERATION
•The backup heater provides extra heating capacity during cold outdoor temperature and only can operated at heat mode operation for indoor unit.
•The backup heater will automatically turn ON when the setting conditions is fulfilled.
•To cancel the Heater operation manually, press the respective button again.
STATUS
CHECK
 SEARCH SYSTEM STATUS CHECK MODE
1.Press CHECK for 5 seconds to enter STATUS mode.
2.Press  or
or  to check the Compressor Running Frequency or Error History.
•Press CANCEL to exit STATUS mode.
•Once STATUS mode is entered, “STATUS” indicator is ON.
•STATUS mode cannot be activated when the “SETTING” indicator is ON.
6
01_F567343_OYTH0912-00_EN.indd 6
ADVANCE OPERATION
•It is strongly recommended to contact the nearest authorized dealer to change the water temperature range.
•Using the control panel could set the temperature range for water outlet temperature and outdoor ambient temperature.
SYSTEM SETTING MODE
Operation Mode |
Temperature display |
|
TIMER |
OUTDOOR |
ACTUAL |
HEAT |
|
|
HEATER |
TANK |
|
C |
BOOSTER |
ON |
|
||
QUIET |
|
|
SETTING |
HEATER |
|
|
STATUS |
FORCE |
|
|
PUMPDW |
OPERATION |
|
WATER OUTLET |
|
Parameter * SETTING indicator
1.Press SET for 5 seconds to enter “SETTING” mode. “SETTING” indicator is ON.
2.Press  or
or  to choose a parameter.
SELECT
3.After selecting the desired parameter, press  to enter the parameter.
4.Press  or
or  to set the desired temperature.
5.Press SET again to confirm the setting.
• Repeat steps 2 to 5 to set other parameters.
Mode |
Parameter * |
HEAT |
Outdoor ambient set temperature at low |
|
water outlet temperature (-15°C ~ 15°C). |
HEAT |
Outdoor ambient set temperature at high |
|
water outlet temperature (-15°C ~ 15°C). |
HEAT |
Water outlet set temperature at low outdoor |
|
ambient temperature (25°C ~ 55°C). |
HEAT |
Water outlet set temperature at high outdoor |
|
ambient temperature (25°C ~ 55°C). |
HEAT |
Set temperature for turning OFF heating |
|
operation (5°C ~ 35°C). |
HEATER |
Outdoor ambient set temperature for turning |
|
ON heater operation (-15°C ~ 20°C). |
TANK |
Sanitary tank set temperature |
|
(40°C ~ 75°C). |
WATER TEMPERATURE THERMO SHIFT SETTING
Ensure the operation LED is in OFF condition before setting. 1. Press SET within 5 seconds.
•Repeat steps 3 to 5 to set the desired shift temperature (-5°C ~ 5°C).
Notes:
•Press CANCEL or wait 30 seconds to exit “SETTING” mode.
•The setting temperature will be stored in the system once confirm.
•“SETTING” mode cannot be activated when the “PUMPDW” and “STATUS” indicator is ON.
1/28/2010 9:51:01 AM

WEEKLY TIMER SETTING
Timer Display |
|
|
Lights up if Timer |
|
6 different programs can be set in a day (1 ~ 6) |
operation is selected |
|
|
TIMER 1 2 3 4 5 6 |
Indicates the selected day |
|
MONTUEWEDTHUFRI SAT SUN |
||
Indicates the next timer operation day |
||
ON |
Time to be selected (10 minutes step) |
|
OFF |
||
|
||
ON Timer |
OFF Timer |
|
To automatically switch “OFF” the unit |
||
To automatically switch “ON” the unit |
||
Day to be selected |
|
SETTING
TIMER SET
OFF/ON SELECT
CLOCK CANCEL
Function
Enter timer mode
Set day & time
Add/Modify timer
Disable timer
Enable timer
Check timer
Cancel timer
Notes:
Step
|
TIMER |
|
|
|
|
Press |
. |
|
|
|
|
1. |
Press |
or |
to select your desired day. |
|
|
2. |
Press |
SELECT |
|
|
|
to confirm |
SELECT |
|
|||
3. |
“1” will be blinking, press |
|
|||
to set program 1. |
|
||||
4. |
Press |
OFF/ON |
to select ON or OFF timer. |
|
|
|
|
||||
5. |
Press |
or |
to select your desired time. |
QUIET |
|
|
|
|
|
MODE |
|
If you want to set the timer together with other operations, press  and
and  .
.
6.Press SET to confirm program 1. The selected day will be highlighted with ▼.
•After 2 seconds, the display will move to the next program.
7.Repeat steps 4 to 7 to set programs 2 to 6.
•During timer setup, if no button is pressed within 30 seconds, or if the SET button is pressed the setting at that moment is confirmed and timer setup is ended.
Repeat the steps above.
Press |
TIMER |
CANCEL |
, then press |
. |
Press TIMER , then press SET .
TIMER
1. Press  .
.
SELECT
2.Press  or
or  until your desired day is shown, press
  to confirm your selection.
3.Press  or
or  to check the set programs.
TIMER
1.Press  .
.
2.Press  or
or  until your desired day is shown.
SELECT
3.Press  to enter program setting.
4.Press  or
or  until your desired program is shown.
5. Press |
CANCEL |
to cancel the program. |
•You can set the Timer for each day of the week (Monday to Sunday) with 6 programs per day.
•ON Timer can be set together with your desired temperature and this temperature will be used continuously.
•Same timer program cannot be set in the same day.
•You may also select collective days with same timer setting.
• Promotes energy saving by allowing you to set up to 6 programs in any given day.
ENGLISH
7
01_F567343_OYTH0912-00_EN.indd 7 |
1/28/2010 9:51:02 AM |
INDOOR UNIT
 • Switch off the power supply before cleaning. CAUTION
CLEANING INSTRUCTIONS
• Do not use benzene, thinner or scouring powder.
• Use only soap ( pH7) or neutral household detergent.
• Do not use water hotter than 40°C.
HINT
•To ensure optimal performance of the unit, cleaning maintenance has to be carried out at regular intervals. Please consult authorized dealer.
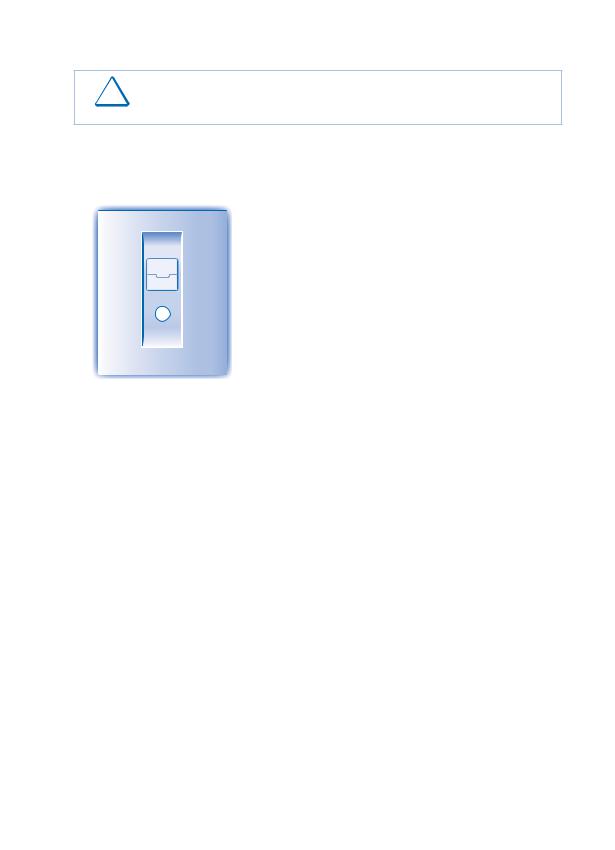
WATER PRESSURE GAUGE
0.2
0.10.3
00.4
MPa
•Do not press or hit the glass cover with hard, pointed objects. This may damage the unit.
•Ensure that the water pressure is between 0.05 to 0.2MPa.
•In case the water pressure is out of the above range, please consult authorized dealer.
INDOOR UNIT & CONTROL PANEL
•Do not splash water directly.
•Wipe the unit gently with a soft, dry cloth.
OUTDOOR UNIT
•Do not obstruct the air inlet and air outlet vents, it may cause low performance or breakdown. Please remove obstacles to assure the ventilation.
•During winter, please clean and remove the snow near outdoor unit so that the snow does no cover the air inlet and air outlet vents.
INSPECTION
•In order to ensure optimal performance of the unit, seasonal inspections on the unit and field wiring have to be carried out at regular intervals. This maintenance should be carried out by authorized dealer.
•Clear any obstruction at the air inlet and air outlet vents of outdoor unit.
FOR EXTENDED NON-USE
• Turn off the power supply.
NON SERVICEABLE CRITERIAS
TURN OFF POWER SUPPLY then please consult authorized dealer under the following conditions:
•Abnormal noise during operation.
•Water/foreign particles have entered the control panel.
•Water leaks from Indoor unit.
•Circuit breaker switches off frequently.
•Power cord becomes unnaturally warm.
8
01_F567343_OYTH0912-00_EN.indd 8 |
1/28/2010 9:51:03 AM |

TROUBLESHOOTING
The following symptoms do not indicate malfunction. |
|
SYMPTOM |
CAUSE |
Flowing sound during operation.
Operation is delayed a few minutes after restart.
Outdoor unit emits water/steam.
Outdoor unit emits steam during heating mode.
Outdoor unit does not operate.
System difficult to heat-up.
System cannot get warm instantly.
Operation starts after power resumes.
►
►
►
►
►
►
►
►
•Refrigerant flow inside the unit.
•The delay is a protection to the unit’s compressor.
•Condensation or evaporation occurs on pipes.
•This is due to defrost operation happens at the heat exchanger.
•When the outdoor temperature is out of the operation condition range, the heatpump system enter protection control.
•When heating is operated by indoor unit together with floor heating or panel heater simultaneously, there may be case where warm water temperature is getting
lower and cause floor heating or panel heater heat-up is weaken.
•When outdoor air temperature is low, it may be difficult to get warm.
•Is the snow pile blocking the discharge outlet or intake inlet of outdoor unit.
•When water outlet set temperature is low, it may be difficult to get warm.
•Due to the nature of the heatpump system, it may take some time to heat-up the water if the unit is operated from cold-start.
•Unit is operates under auto restart function.
Check the following before calling for servicing. |
|
SYMPTOM |
CHECK |
Heating operation is not working efficiently.
Noisy during operation.
The unit does not work.
Operation LED is no lit or control panel display is blank.
►
►
►
►
•Set the temperature correctly.
•Is the panel heater valve closed.
•Clear any obstruction at the air inlet and air outlet vents of outdoor unit.
•Check if the unit has been installed at an incline or the cover is not closed properly.
•Check if the circuit breaker is tripped.
•Is the power supply off or power failure.
ENGLISH
The operation LED blinks and error code appear on control panel display.
TIMER |
TIMER 1 2 3 4 5 6 |
MONTUEWEDTHUFRI SAT SUN |
ON |
OFF |
•Turn the unit off and reveal the error code to authorized dealer.
•Timer operation cancel when error code occur.
Force Heater Mode Button
• In case of a failure of the Air-to-Water Heatpump system, the backup heater can be used to heat
FORCE |
up the heating water. Press FORCE to switch on the backup heater. |
|
• |
Press OFF / ON |
to stop the force heater operation. |
• During Force Heater mode, all other operations are not allowed.
9
01_F567343_OYTH0912-00_EN.indd 9 |
1/28/2010 9:51:03 AM |

TABLE DES MATIÈRES
CONSIGNES DE SÉCURITÉ
10~11
PANNEAU DE COMMANDE
12~15
UNITÉ INTÉRIEURE
16
DÉPANNAGE
17
INFORMATIONS
34~35
REMARQUE
Les illustrations de ce mode d’emploi sont fournies à titre d’exemple uniquement et peuvent présenter des différences par rapport à l’appareil proprement dit. Celui-ci peut être modifié sans préavis à des fins d’amélioration.
CONDITION D’UTILISATION
Température de |
Unité |
||
sortie d’eau (°C) |
intérieure |
||
CHAUFFAGE |
Max. |
55 |
|
Min. |
25 |
||
|
|||
Température |
Unité |
||
ambiante (°C) |
extérieure |
||
CHAUFFAGE |
Max. |
35 |
|
Min. |
-20 |
||
|
|||
ATTENTION: Si la température extérieure sort de la plage de températures ci-dessus, la capacité thermique chutera de façon importante et il se peut que l’unité extérieure s’arrête pour le contrôle de protection.
10
CONSIGNES DE SÉCURITÉ
•Ce manuel décrit comment utiliser le système de pompe à chaleur entre les unités intérieure et extérieure seulement.
•Pour le fonctionnement d’autres systèmes tels que le réservoir d’eau, le radiateur, le contrôleur thermique externe et le chauffage au sol, référez-vous aux modes d’emploi de leurs fabricants respectifs.
Pour éviter des blessures corporelles sur vous-même et sur les autres ou des dégâts matériels, respectez les instructions ci-dessous.
Tout dysfonctionnement dû au non-respect des instructions peut occasionner des nuisances ou des dégâts dont la gravité est classée comme décrit ci-après:
Ce symbole signale la présence d’un
AVERTISSEMENT danger pouvant provoquer des blessures graves ou mortelles.
Ce symbole signale la présence d’un
ATTENTION danger pouvant provoquer des blessures corporelles ou des dégâts matériels.
Les instructions à respecter sont classées d’après les symboles suivants:
Ce symbole désigne une action
INTERDITE.
Ces symboles désignent des actions OBLIGATOIRES.
 AVERTISSEMENT
UNITÉ INTÉRIEURE ET UNITÉ EXTÉRIEURE
Cet appareil n’est pas conçu pour être utilisé par des personnes (y compris les enfants) aux capacités physiques, sensorielles ou mentales diminuées, ou manquant d’expérience ou de connaissances, sauf si une personne responsable de leur sécurité leur a expliqué le fonctionnement de l’appareil et les garde sous surveillance. Les enfants doivent être supervisés afin qu’ils ne jouent pas avec l’appareil.
Veuillez consulter un revendeur agréé ou un spécialiste pour la réparation, l’installation, le retrait ou le déménagement de l’unité. Une installation et une manipulation incorrectes pourraient occasionner des fuites, un choc électrique ou un incendie.
N’installez pas l’appareil dans une atmosphère potentiellement explosive ou inflammable. Sinon, il y a un risque d’incendie.
N’insérez jamais vos doigts ou des objets dans l’unité intérieure ou extérieure du climatiseur, les parties tournantes peuvent causer des blessures.
Ne touchez pas l’unité extérieure au cours d’un orage, cela pourrait provoquer un choc électrique.
N’essayez pas de réparer l’appareil vous-même. Vous pourriez vous blesser en cas de mauvaise manipulation.
N’installez pas l’unité intérieure à l’extérieur. Elle est uniquement conçue pour une installation en intérieur.
02_F567343_OYTH0910-00_FR.indd 10 |
1/28/2010 9:51:52 AM |

AVERTISSEMENT
ALIMENTATION
N’utilisez pas de cordon modifié, de raccords, de rallonge ou de cordon non spécifié afin d’éviter une surchauffe et un incendie.
Ne partagez pas la même prise d’alimentation qu’un autre équipement afin d’éviter une surchauffe et un incendie.
N’utilisez pas l’appareil pas avec les mains mouillées afin d’éviter un choc électrique.
Si le cordon d’alimentation est endommagé, il doit être remplacé par le fabriquant, par un de ses techniciens ou par une personne qui possède des qualifications équivalentes afin d’éviter tout risque.
Cette unité est équipée d’un disjoncteur de courant résiduel (RCCB). Il est fortement conseillé de faire contrôler le fonctionnement du RCCB après l’installation et périodiquement après l’entretien ou la maintenance par un revendeur agréé afin de garantir son bon fonctionnement. Sinon, il y a risque de choc électrique ou d’incendie en cas de dysfonctionnement.
Il est conseillé de porter des gants pendant la maintenance ou l’entretien afin d’éviter tout risque.
Cet équipement doit être raccordé à la terre afin d’éviter un choc électrique ou un incendie.
En cas d’urgence ou dans des conditions anormales (odeur de brulé, etc.), débranchez l’alimentation électrique et contactez le revendeur autorisé.
Prévenez les chocs électriques coupant l’alimentation:
-Avant le nettoyage ou l’entretien.
-En cas de non-utilisation prolongée.
-En cas d’activité orageuse anormalement forte.
Cet appareil convient à de multiples usages. Tous les circuits d’alimentation électrique doivent être coupés avant toute intervention sur les bornes de l’unité intérieure, afin d’éviter tout choc électrique, brûlure ou blessure mortelle.
 ATTENTION
UNITÉ INTÉRIEURE ET UNITÉ EXTÉRIEURE
Ne nettoyez pas l’unité intérieure avec de l’eau, du benzène, du solvant ou de la poudre à récurer.
N’installez pas l’unité à proximité d’un équipement combustible ou dans une salle de bains. Sinon, il y a risque de choc électrique ou d’incendie.
Ne touchez pas le tuyau d’évacuation d’eau de l’unité intérieure pendant le fonctionnement.
Ne posez rien sur ou sous l’unité.
Ne vous asseyez pas et ne montez pas sur l’unité, vous risquez de tomber accidentellement.
Ne touchez pas l’ailette pointue d’aluminium, les parties pointues peuvent causer des dommages.
Assurez-vous que le tuyau de vidange est correctement raccordé. Sinon, une fuite peut se produire.
Vérifiez régulièrement le rack d’installation pour vous assurer qu’il n’est pas endommagé. Après de longues périodes d’utilisation, la solidité du rack d’installation peut être amoindrie.
PANNEAU DE COMMANDE
Ne laissez pas le panneau de commande prendre l’humidité. Sinon, il y a risque de choc électrique ou d’incendie.
N’appuyez pas sur les touches du panneau de commande à l’aide d’objets durs et pointus. Vous pourriez endommager l’unité.
Ne nettoyez pas le panneau de commande avec de l’eau, du benzène, du diluant ou de la poudre à récurer.
N’inspectez pas et n’entretenez pas le panneau de commande vous-même. Consultez un revendeur agréé. Sinon, vous pourriez vous blesser en cas de mauvaise manipulation.
Panneau
FRANÇAIS
Unité Intérieure
Alimentation
Unité Extérieure
|
Chauffage au sol |
|
Panneau de commande |
Réservoir d’eau |
|
11 |
||
|
02_F567343_OYTH0910-00_FR.indd 11 |
1/28/2010 9:51:54 AM |
 Loading...