


Operating Instructions
Manuel d’utilisation
Rechargeable Shaver
Rasoir rechargeable
Model No. ES7101/ES7103
N° de modèles ES7101/ES7103
English |
2 |
Français |
8 |
Español |
14 |
Before operating this unit, please read these instructions completely.
Il est recommandé de lire attentivement ce manuel avant d’utiliser l’appareil.

English
IMPORTANT SAFETY INSTRUCTIONS
When using an electrical appliance, basic precautions should always be followed, including the following:
Read all instructions before using this appliance.
DANGER Toshock:reduce the risk of electric
1.Do not reach for an appliance that has fallen into water. Unplug immediately.
2.Charger unit is not for immersion or for use in shower.
3.Do not place or store appliance where it can fall or be pulled into a tub or sink. Do not place in or drop into water or other liquid.
4.Except when charging, always unplug this appliance from the electrical outlet immediately after using.
5.Unplug this appliance before cleaning.
6.Do not use an extension cord with this appliance.
WARNING To reduce the risk of burns, fire, electric shock, or injury to persons:
1.Close supervision is necessary when this appliance is used by, on, or near children or invalids.
2.Use this appliance only for its intended use as described in this manual. Do not use attachments not recommended by the manufacturer.
3.Never operate this appliance if it has a damaged cord or plug, if it is not working properly, if it has been dropped or damaged, or dropped into water. Return the appliance to a service center for examination and repair.
4.Keep the cord away from heated surfaces.
5.Never drop or insert any object into any opening.
6.Do not use outdoors or operate where aerosol (spray) products are being used or where oxygen is being administered.
7.Do not use this appliance with damaged shaving blades and/or foil, as facial injury may occur.
8.Always attach plug to appliance first, then to outlet. To disconnect, turn all controls to “off” then remove plug from outlet.
SAVE THESE INSTRUCTIONS
SPECIFICATIONS
Power source: 100-240 V AC, 50-60 Hz (Automatic voltage conversion)
Motor voltage: 2.4 V DC Charging time: 1 hour
This product is intended for household use only.

Important
Before use
This Wet/Dry shaver can be used for wet shaving with shaving lather or for dry shaving. You can use this watertight shaver in the shower and clean it in water. The following is the symbol of Wet shaver. The symbol means that the hand-held part may be used in a bath or shower.
Treat yourself to wet lather shaves for at least three weeks and notice the difference. Your Panasonic Wet/Dry shaver requires a little time to get used to because your skin and beard need about a month to adjust to any new shaving method.
Using the shaver
Caution - The outer foil is very thin and can be damaged if not used correctly. Check that the foil is not damaged before using the shaver. Do not use the shaver if the foil etc. is damaged as you will cut your skin.
Charging the shaver
Do not use any power cord or AC adaptor other than one specifically designed for this model. Plug in the adaptor into a household outlet where there is no moisture and handle it with dry hands. The shaver may become warm during use and charging. However, this is not a malfunction. Do not charge the shaver where it will be exposed to direct sunlight or other heat sources. Hold the adaptor when disconnecting it from the household outlet. If you tug on the power cord, you may damage it. Contact an authorized service center if the power cord gets damaged.
Adequate ambient temperature for charging is 0-40 °C (32104 °F).
For model #ES7101, if the plug symbol  does not glow initially when the shaver is plugged in, wait for a short while until it does.
For model #ES7103, if the plug symbol  does not glow initially when the shaver is plugged in, wait for a short while until it does.
The adaptor is intended to be correctly oriented in a vertical or floor mount position.
Cleaning the shaver
Warning - Disconnect the power cord from the shaver before cleaning it to prevent electric shock.
Keep both the inner blades inserted. If only one of the inner blades is inserted, the shaver may be damaged. If you clean the shaver with water, do not use salt water or hot water. Do not soak the shaver in water for a long period of time. Wipe it with a cloth dampened with soapy water. Do not use thinner, benzine or alcohol.
Storing the shaver
Disconnect the power cord when storing the shaver. Do not bend the power cord or wrap it around the shaver. Do not leave this shaver within the reach of small children. Keep these operating instructions in a safe place.
English
English
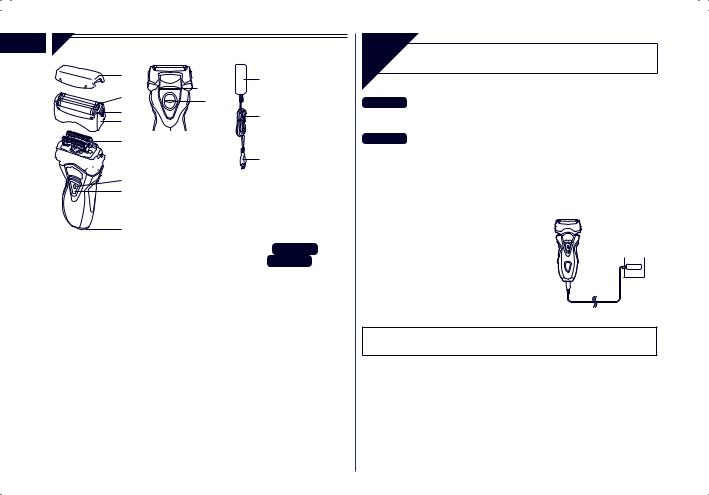
Parts identification |
|
|
|
|
|
|
||
|
|
|
|
||
|
||
|
|
|
|
||
|
||
|
|


Protective capSystem outer foil
3System outer foil release buttons
4 Foil frame
5 Inner blades
6 Foil frame release buttons
7 Switch lock button
8 OFF/ON switch
9 LED display ES7101 LCD panel ES7103
Appliance socketTrimmer
Trimmer handleAdaptor (RE7 40)Power cord
Appliance plug
Charge |
Charging |
|
ES7101 The battery capacity is low when  blinks. You can shave 1 to 2 times after
  blinks. (This will differ depending on usage.)
ES7103 The battery capacity is low when “0%” appears and  blinks.
You can shave 1 to 2 times after “0%” appears. (This will differ depending on usage.)
•A full charge will supply enough power for approx. 14 shaves of 3 minutes each.
1Insert the appliance plug
into the shaver. 
2 Plug in the adaptor into a household outlet.
•If the shape of the plug does not fit the power outlet, use an attachment plug adaptor of the proper configuration.

Reading the LED display or the LCD panel
While charging |
After charging is completed |
||
ES7101 |
ES7103 |
ES7101 |
ES7103 |
|
|
|
|
The |
|
|
|
blinks |
indicators |
glows. |
glows. |
|
once every |
blink once |
|
|
|
second. |
every |
|
|
|
|
second. |
|
||||
10 minutes after charging is completed |
||||
ES7101 |
|
|
ES7103 |
|
blinks once every 2 |
The indicators blink once |
seconds. |
every 2 seconds. |
|
|
When the battery capacity is low |
|
ES7101 |
ES7103 |
blinks. |
“0%” appears and |
blinks. |
Shave |
Using the shaver |
English |
|
||
|
|
|
|
|
90˚ |
1 Depress the |
2 Hold the shaver as |
switch lock button |
illustrated above and |
and slide the OFF/ |
shave. |
ON switch |
|
upwards. |
|
•Start out shaving by applying gentle pressure to your face. Stretch your skin with your free hand and move the shaver back and forth in the direction of your beard. You may gently increase the amount of pressure as your skin becomes accustomed to this shaver. Applying excessive pressure does not provide a closer shave.
Using the trimmer
Slide the trimmer handle up. Place at a right angle to your skin and move downwards to trim your sideburns.
English
Clean
Cleaning
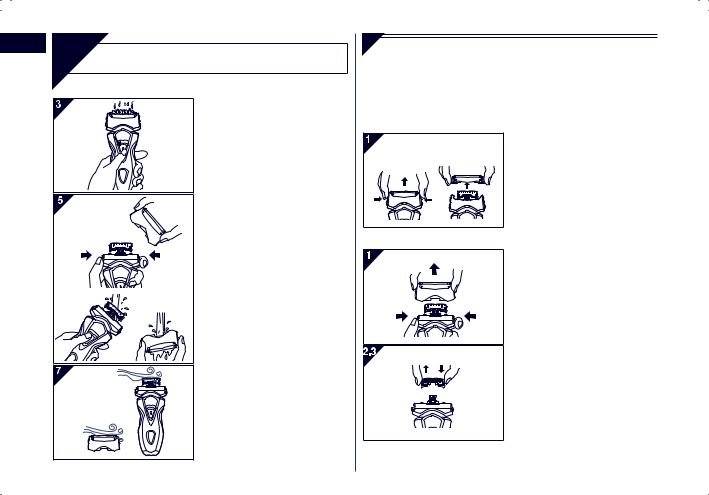
1. Disconnect the power cord from the shaver.
2. Apply some hand soap to the outer foil.
3. Turn the shaver on and then pour some water over the outer foil.
4. Turn the shaver off after 10-20 seconds.
5. Remove the foil frame and clean it with running water.
6. Wipe off any drops of water with a dry cloth.
7. Remove the system outer foil and the foil frame to allow them to dry completely.
Replacing the system outer foil and the inner blades
system outer foil |
once every year |
|
|
inner blade |
once every two years |
|
|
Replacing the system outer foil
1. Press the system outer foil release buttons and lift the system outer foil upwards as
illustrated.
2. Insert the system outer foil by pushing it downwards until it clicks.
Replacing the inner blades
|
|
1. |
Press the foil frame release |
|
|
|
|
buttons and lift the foil frame |
|
|
|
|
upwards as illustrated. |
|
|
|
2. |
Remove the inner blades one |
|
|
|
|
at a time as illustrated. |
|
|
|
|
• Do not touch the edges |
|
|
|
|
(metal parts) of the inner |
|
|
|
|
blades to prevent injury to |
|
2 |
3 |
|
your hand. |
|
3. |
Insert the inner blades one at |
|||
|
|
|||
|
|
|
a time until they click as |
|
|
|
|
illustrated. |
 Loading...