


Operating Instructions
(Household) Nose & Facial Hair Trimmer
Model No. ER-GN70
English............................ |
3 |
Français........................ |
17 |
Español......................... |
33 |

2

English
Operating Instructions
(Household) Nose & Facial Hair Trimmer
Model No. ER-GN70
Contents |
|
Safety precautions.................................... |
4 |
Parts identification................................................. |
9 |
Installing or replacing the alkaline batteries..... |
10 |
Before use............................................................. |
10 |
Using...................................................................... |
11 |
Cleaning................................................................ |
12 |
Opening and closing the water inlet.................. |
14 |
Installing or removing the blade......................... |
14 |
Installing or removing the trimmings box......... |
16 |
Troubleshooting................................................... |
17 |
Specifications....................................................... |
17 |
Thank you for purchasing this Panasonic product.
Before operating this unit, please read these instructions
completely and save them for future use.
3

English
Safety precautions
To reduce the risk of injury, loss of life, electric shock, fire, and damage to property, always observe the following safety precautions.
Explanation of symbols
The following symbols are used to classify and describe the level of hazard, injury, and property damage caused when the denotation is disregarded and improper use is performed.
Denotes a potential hazard WARNING that could result in serious
injury or death.
Denotes a hazard that could CAUTION result in minor injury or
property damage.
The following symbols are used to classify and describe the type of instructions to be observed.
This symbol is used to alert users to a specific operating procedure that must not be performed.
This symbol is used to alert users to a specific operating procedure that must be followed in order to operate the unit safely.
4

 WARNING
 This product
Do not store within reach of children or infants. Do not let them use it.
- Putting parts or accessories in the mouth may cause an accident or injury.
→ Store with the protection cap attached after use.
Immediately stop using if there is an abnormality or malfunction.
- Using it in such conditions may cause fire, or injury.
 Preventing accidents
This appliance is not intended for use by persons (including children) with reduced physical, sensory or mental capabilities, or lack of experience and knowledge, unless they have been given supervision or instruction concerning use of the appliance by a person responsible for their safety.
Children should be supervised to ensure that they do not play with the appliance.
- Failure to do so may cause an accident or injury.
 CAUTION
 To protect your skin
Do not press the blade with excessive force or insert too deeply into your nostril/ear canal.
Do not press the blade with excessive force against your skin.
- Doing so may result in injury to your skin.
Do not touch the blade of the inner blade (metallic part) with your finger.
- Doing so may result in injury to your finger.
Check the blade for deformation or damage before use. Use the trimmer to cut nose hair and ear hair and outline eyebrows, moustache, or beard.
- Failure to do so may result in injury to your skin.
English
5

English
 CAUTION
 This product
Do not share with your family or others.
- Doing so may result in infection or inflammation.
Do not drop or subject to shock.
- Doing so may cause injury.
Never modify, disassemble, or repair.
- Doing so may cause an accident or injury. → Contact an authorized service center for repair.
 The batteries
Do not throw into fire or disassembly.
The supply terminals are not to be short-circuited.
- Doing so may cause a burn or injury.
Always follow the precautions printed on the alkaline batteries.
Check the polarity of the alkaline batteries ( and
and  ) and install them correctly.
Do not mix new and old alkaline batteries or different types of alkaline batteries.
Remove the alkaline batteries immediately and dispose of them safely when they are discharged.
Remove the alkaline batteries when not using the appliance for an extended period of time.
Please use the alkaline batteries by the recommended use-by date.
Non-rechargeable batteries are not to be recharged.
-Failure to do so may cause injury or surrounding contamination due to heat generation, bursting, or leakage of the alkaline batteries.
The mark on the left means suitable for cleaning under an open water tap.
6

Parts identification
A
B


A Protective cap
B Main body
1 Outer blade
2 Inner blade
3 Trimmings box
4 Water outlet
5 Exhaust hole
6 Battery cover
7 Power switch [O/I]
C


8 Filter
9 Wash switch ring
Water inlet
Accessory
C Cleaning brush (Brush)
Alkaline batteries are not enclosed.
7
English

English
Installing or replacing the alkaline batteries
• Make sure that the power is off. |
|
|
||
1. |
Pull the battery cover straight to |
|
2 |
|
|
remove it. |
|
||
|
|
|
||
2. |
Check |
the polarity of the alkaline |
|
3 |
|
batteries ( and ) and install |
1 |
||
|
them. |
|
|
|
|
|
|
|
|
3. Insert the battery cover straight.
You can use the appliance for approximately 6 months with two Panasonic LR03 (AAA Alkaline Batteries). (When using dry in an environment at a 20 °C (68 °F) room temperature, once a week, and
90 seconds at a time.)
Notes
•When insert the alkaline batteries, wipe off the main body carefully to prevent water droplets from getting inside.
•Confirm nothing adheres to the terminals ( and
and  ) of the alkaline batteries.
•Be sure to use LR03 (AAA Alkaline Batteries). If any batteries other than the specified ones are used, the power and the number of times of use will be different.
•Panasonic alkaline batteries are recommended.
•When replacing alkaline batteries, replace both of them with new ones.
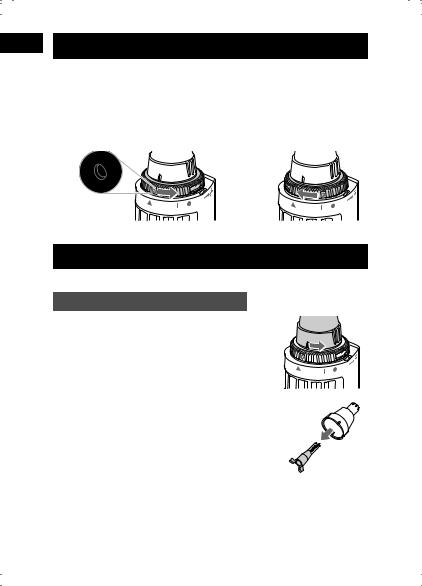
Before use
Be sure to close the water inlet of the wash switch ring during use. Otherwise, the main body cannot provide sufficient suction power.
→ Check that the marks of “ ”, “  ” and “
 ” align (as shown in right figure).
8
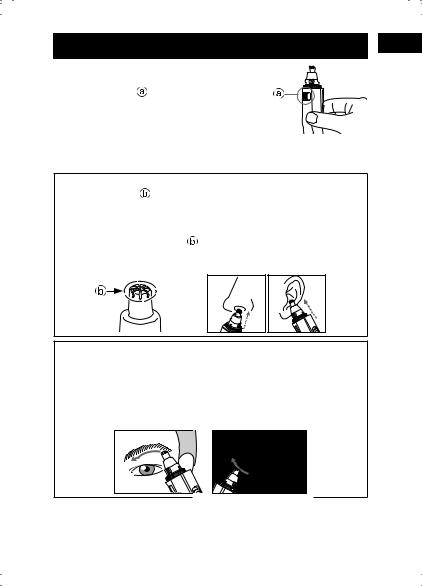
Using
1. Remove the protective cap and hold the main body so as not to block the exhaust hole ( ).
2.Slide the power switch on the main body to the “O” position to turn on the power.
•The outer blade surface may get a little warm during use, but performance will not be affected.
3.Trim
Trimming your nose hair and ear hair
1. Insert the tip ( ) of the outer blade into your nostril or ear canal.
• Insert it slowly so as not to injure your nostril or ear canal.
2.Cut the nose hair and ear hair by moving the main body.
• Cut hairs using the tip ( ) of the outer blade (metallic part).
•Some trimmings may remain inside your nostril or ear canal after cutting, so remove them using a tissue or similar.
Outlining your eyebrows, moustache, or beard
1.Apply the tip of the outer blade to the hair (eyebrow, moustache or beard) you would like to cut.
2.Cut the hair by moving the appliance slowly against the direction of hair growth.
•You cannot trim the hair to length with this appliance.
•It is not suitable for the hair below 0.5 mm (1/64˝).
4.After use, slide the power switch on the main body to the
“I” position to turn off the power and clean it. (See page 10).
9
English

English
Cleaning
Wet cleaning
1. Wet the outer blade with water, and apply some hand soap and some water to the outer foil.
2. Slide the power switch to the “O” position, and let it foam for approximately 10 seconds.
3. Turn off the power.
▼▼
To clean lightly dirty parts |
To clean heavily dirty parts |
•Quick cleaning |
•Complete cleaning |
4. Open the water inlet (see |
4. Slide the power switch to |
page 12) and turn on the |
the “I” position. |
power again. |
5. Remove the blades and |
•If the trimmings box is |
the trimmings box (see |
removed, open the water |
pages 12 and 14) and rinse |
inlet after attaching the |
under running water. |
trimmings box (see page 14). |
•Cover the drainage outlet of |
|
washbasin to prevent the |
|
inner blade from flowing |
|
away. |
5. Pour water through the water inlet at the “ ”
”
above the “ ” mark, rinse
well and slide the power switch to the “I” position.
▼▼
6.Wipe off water with a towel or
similar item, and let it dry naturally.
•It will dry faster with the blades and the trimmings box removed (see pages 12 and 14).
10
Cleaning with the brush
Remove the blades and the trimmings box (see pages 12 and 14) and lightly brush off the trimmings with the brush.
•Be careful not deform the inner blade.
•Be careful not to damage the filter.
 Notes
Notes
•The battery cover should not be removed from the main body as this can affect the watertight construction of the appliance.
•Do not use hot water or any detergents other than hand soap.
Doing so may result in malfunction.
•In order to prevent malfunction, be careful not to hit the appliance against a washbasin.
•Do not use thinner, benzine, alcohol or other chemicals to clean the appliance. Doing so may result in malfunction, cracking or discoloring of the parts. Please use a cloth soaked with soapy water to wipe the dirt.
•After cleaning, be sure to attach the blades, the trimmings box and the protective cap. (See pages 13~14)
11
English
English
Opening and closing the water inlet
1 How to open
Rotate the wash switch ring until its “  ” mark aligns with “
  ” mark of the main body to open the water inlet.
2 How to close
Rotate the wash switch ring until its “  ” mark aligns with “
 ” mark of the main body.
1 |
2 |
Installing or removing the blade
•Make sure that the power is off.
How to remove the blade
1. Rotate the outer blade and remove it.
•Rotate the outer blade until its “  ” mark aligns with the “
  ” mark of the main body.
2. Pull to remove the inner blade.
12

How to attach the blade
1. Insert the inner blade straight along the inner surface of the outer blade.
2. Insert the main body’s shaft ( ) into the hole of the inner blade.
•Align the “  ” mark of the outer blade with the
“  ” mark of the trimmer.
3. Rotate to attach the outer blade.
•Rotate the outer blade to align its “  ” mark with the “
 ” mark of the main body.
English
13

English
Installing or removing the trimmings box
•Make sure that the power is off.
How to remove
Rotate to remove the wash switch ring.
•Rotate the wash switch ring until its “  ” mark aligns with “
 ” mark of the main body.
How to attach
1. Insert the trimmings box.
•Align the “  ” mark of the wash switch ring with the “
 ” mark of the main body.
•Be careful not to damage the filter with the shaft ( ).
).
2. Rotate to attach the wash switch ring.
•Rotate the wash switch ring to align its
“  ” mark and the “
 ” mark of the main body.
14

Troubleshooting
Problem |
Action |
|
|
Replace the blade. |
|
The cutting performance |
(See pages 12~13) |
|
Replace the alkaline batteries. |
||
has reduced. |
||
(See page 8) |
||
|
||
There is an odd odour. |
Clean the inner blade. |
|
Blade does not move/ |
||
(See pages 10~11) |
||
rotate smoothly. |
||
|
||
The suction power is low. |
Clean the trimmings box. |
|
(See pages 10~11). |
||
|
Close the water inlet. |
|
|
(See pages 8 and 12). |
|
|
Place the alkaline batteries correctly. |
|
The appliance is not |
(See page 8). |
|
turned on. |
Replace the alkaline batteries. |
|
|
(See page 8). |
If the problems still cannot be solved, contact the store where you purchased the appliance or a service center authorized by
Panasonic for repair.
English
Specifications
Power supply |
Dry-cell battery |
|
Battery type |
Two LR03 (AAA Alkaline |
|
Batteries) (Sold separately) |
||
|
This product is intended for household use only.
15

English
Personal Care & Beauty Care Products
FOR USA ONLY
30-Day Quality
Satisfaction Guarantee
If you are dissatisfied with any Panasonic Personal Care &
Beauty Care Products for any reason, simply return it to the place of purchase with a dated proof of purchase, in the original packaging, with all accessories, parts and instructions, within 30 days of the date of purchase, for a full refund, or call Panasonic at 1-800-338-0552.
Abuse or misapplication of this product voids the guarantee.
FOR YOUR CONVENIENCE, WE HAVE ESTABLISHED A TOLL FREE (IN USA ONLY) NATIONAL ACCESSORY PURCHASE HOT LINE AT 1-800-332-5368.
16
 Loading...