


Operating Instructions
(Household) AC/Rechargeable Beard Trimmer
Model No. ER-GB96/ER-GB86
ER-GB96_86.indb 1 |
17/12/13 2:31 |
English |
3 |
Dansk |
103 |
Česky |
199 |
||
|
|
|
|
|
|
|
|
Deutsch |
19 |
Português |
119 |
Slovensky |
215 |
||
|
|
|
|
|
|
|
|
Français |
37 |
Norsk |
135 |
Magyar |
231 |
||
|
|
|
|
|
|
|
|
Italiano |
55 |
Svenska |
151 |
Română |
249 |
||
|
|
|
|
|
|
|
|
Nederlands |
71 |
Suomi |
167 |
Türkçe |
265 |
||
|
|
|
|
|
|
|
|
Español |
87 |
Polski |
183 |
|
|
|
|
|
|
|
|
|
|
|
|
2
ER-GB96_86.indb 2 |
17/12/13 2:31 |
English
(Household) AC/Rechargeable Beard T
Model No. ER-GB96/ER-GB86
Contents
Safety precautions |
..................................6 |
Intended use..................................................... |
9 |
Parts identification........................................... |
10 |
Charging.......................................................... |
10 |
How to use...................................................... |
11 |
Cleaning.......................................................... |
14 |
Troubleshooting.............................................. |
16 |
Blade life......................................................... |
17 |
Battery life....................................................... |
17 |
Removing the built-in rechargeable battery.... |
17 |
Specifications.................................................. |
18 |
Thank you for purchasing this Panasonic product.
Before operating this unit, please read these instructions completely and save them for future use.
3
ER-GB96_86.indb 3 |
17/12/13 2:31 |

 Warning
English • This appliance can be used by children aged from
8 years and above and persons with reduced physical, sensory or mental capabilities or lack of experience and knowledge if they have been given supervision or
instruction concerning use of the appliance in a safe way and understand the hazards involved. Children shall not play with the appliance. Cleaning and user maintenance shall not be made by children without supervision.
• The supply cord cannot be replaced. If the cord is damaged, the AC adaptor should be scrapped.
4
ER-GB96_86.indb 4 |
17/12/13 2:31 |
• The following symbol means suitable for cleaning under
an open water tap. |
English |
|
|
• Do not clean with water when the AC adaptor is attached. |
|
• Do not use anything other than the supplied AC adaptor |
|
for this product. |
|
Also, do not use any other product with the supplied AC |
|
adaptor. (See page 10.) |
|
• The following symbol indicates that a specific detachable |
|
power supply unit is required for connecting the electrical |
|
appliance to the supply mains. The type reference of |
|
power supply unit is marked near the symbol. |
|
5
ER-GB96_86.indb 5 |
17/12/13 2:31 |
 Safety precautions
English To reduce the risk of injury, loss of life, electric shock, fire, and damage to property, always observe the following safety
precautions.
Explanation of symbols
The following symbols are used to classify and describe the level of hazard, injury, and property damage caused when the denotation is disregarded and improper use is performed.
Denotes a potential hazard DANGER that will result in serious injury
or death.
Denotes a potential hazard WARNING that could result in serious
injury or death.
Denotes a hazard that could CAUTION result in minor injury or
property damage.
The following symbols are used to classify and describe types of instructions to be observed.
This symbol is used to alert users to a specific operating procedure that must not be performed.
This symbol is used to alert users to a specific operating procedure that must be followed in order to operate the unit safely.
6
 WARNING
 This product
This product has a built-in rechargeable battery. Do not throw into flame or heat.
- Doing so may cause fluid leak, overheating, or explosion.
Do not modify or repair.
- Doing so may cause fire, electric shock, or injury.
→Contact an authorized service centre for repair (battery change, etc.).
Never disassemble except when disposing of the product.
- Doing so may cause fire, electric shock, or injury.
 In case of an abnormality or malfunction
Immediately stop using and remove the adaptor if there is an abnormality or malfunction.
- Failure to do so may cause fire, electric shock, or injury.
<Abnormality or malfunction cases>
 The main unit or AC adaptor is deformed or abnormally hot.
 The main unit or AC adaptor smells of burning.
  There is abnormal sound during use or charging of the main unit or AC adaptor.
→Immediately request inspection or repair at an authorized service centre.
 Power supply
Do not connect or disconnect the adaptor to a household outlet with a wet hand.
- Doing so may cause electric shock or injury.
ER-GB96_86.indb 6 |
17/12/13 2:31 |
 WARNING
Do not immerse the AC adaptor in water or wash it with water.
Do not place the AC adaptor over or near a waterfilled sink or bathtub.
Never use the appliance if the AC adaptor is damaged or if the power plug fits loosely in a household outlet.
Do not damage or modify, or forcefully bend, pull, or twist the cord.
Also, do not place anything heavy on or pinch the cord.
-Doing so may cause electric shock or fire due to a short circuit.
Do not use in a way exceeding the rating of the household outlet or the wiring.
-Exceeding the rating by connecting too many plugs to one household outlet may cause fire due to overheating.
Always ensure the appliance is operated on an electric power source matched to the rated voltage indicated on the AC adaptor.
Fully insert the adaptor.
- Failure to do so may cause fire or electric shock.
Always unplug the adaptor from the household outlet when cleaning.
- Failure to do so may cause electric shock or injury.
Regularly clean the power plug and the appliance |
|
|
|
plug to prevent dust from accumulating. |
English |
||
- Failure to do so may cause fire due to insulation |
|||
|
|
||
failure caused by humidity. |
|
|
|
Disconnect the adaptor and wipe with a dry cloth. |
|
|
|
 Preventing accidents
Do not store within the reach of children or infants. Do not let them use it.
-Putting the blade, the cleaning brush and/or oil container in the mouth may cause accidents or injury.
If the oil is consumed accidentally, do not induce vomiting. Please drink a large amount of water, and contact a physician.
If the oil comes into contact with eyes, immediately wash thoroughly with running water, and contact a physician.
- Failure to do so may result in physical problems.
 CAUTION
 Protecting the skin
Do not press the blade strongly against your skin or lips.
Do not use this product for any purpose other than trimming beard.
Do not directly apply the blades on ears or rough skin (such as swellings, injuries and blemishes).
- Doing so may cause injury to ears or uneven skin.
7
ER-GB96_86.indb 7 |
17/12/13 2:31 |
English
 CAUTION
Check that the blades are not damaged or deformed before use.
- Failure to do so may cause skin injury.
 Note the following precautions
Do not allow metal objects or trash to adhere to the power plug or the appliance plug.
-Doing so may cause electric shock or fire due to a short circuit.
Do not drop it or expose it to shock.
- Doing so may cause injury.
Do not wrap the cord around the adaptor when storing.
-Doing so may cause the wire in the cord to break with the load, and may cause fire due to short circuit.
Disconnect the adaptor from the household outlet when not using.
-Failure to do so may cause electric shock or fire due to electrical leakage resulting from insulation deterioration.
Disconnect the adaptor or the appliance plug by holding onto the adaptor or the appliance plug instead of the cord.
- Failure to do so may cause electric shock or injury.
8
► Handling of the removed battery when disposing
 DANGER
 The rechargeable battery is exclusively for use with this appliance. Do not use the battery with other products.
 Do not charge the battery after it has been removed from the product.
 Do not throw into fire or apply heat.
 Do not solder, disassemble, or modify the battery.
 Do not let the positive and negative terminals of the battery get in contact with each other through metallic objects.
 Do not carry or store the battery together with metallic jewellery such as necklaces and hairpins.
 Never peel off the tube.
-Doing so may cause fluid leak, overheating, or explosion.
The battery contains alkaline fluid. If it comes in contact with the eyes, do not rub the eyes, and thoroughly rinse with clean water, such as tap water.
-Failure to do so may cause loss of vision.
Consult a physician immediately.
ER-GB96_86.indb 8 |
17/12/13 2:31 |
 WARNING
After removing the rechargeable battery, do not keep it within reach of children and infants.
-The battery will harm the body if accidentally swallowed.
If this happens, consult a physician immediately.
The battery contains alkaline fluid. If it comes in contact with the skin or clothes, rinse off with clean water, such as tap water.
- Failure to do so may cause skin injury.
Intended use
 Be sure to mount the attachment after each use. Otherwise, infants may remove the blade and accidentally swallow it, or the blade may be deformed.
 Apply the oil to the blade before and after each use. (See page 15.)
Failure to apply the oil may cause the following problems.
-The appliance has become blunt.
-Shorter operating time.
-Louder sound.
 The appliance may become warm during operation and/or charging. This is normal.
 Clean the housing only with a soft cloth slightly dampened with tap water or soapy tap water. Do not use thinner, benzine, alcohol or other chemicals.
 Before using an attachment, check that it has been installed correctly. Failure to do so may cause hair to be cut too short.
 Store the appliance in a place with low humidity after use.
 The appliance should not be used on animals.
9
English
ER-GB96_86.indb 9 |
17/12/13 2:31 |
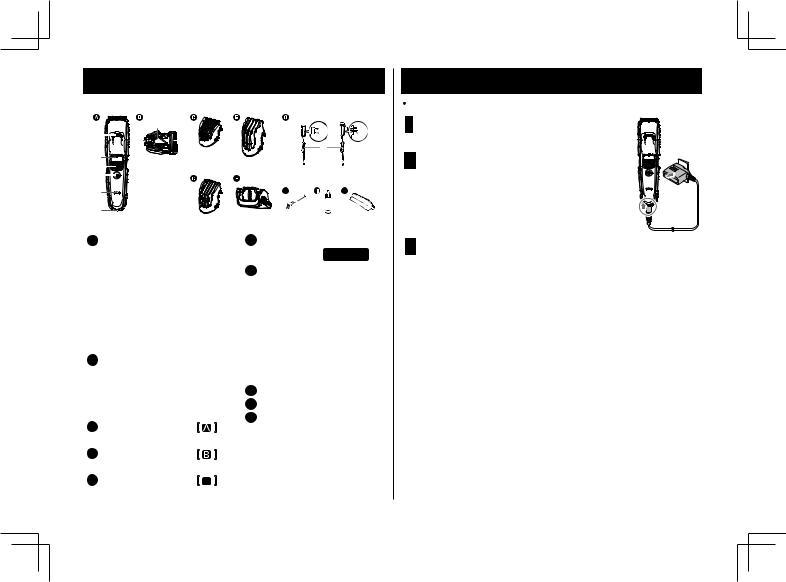
 Parts identification
English |
G |
|
|
|
K |
K |
|
|
|
||
A |
|
L |
L |
J |
|
H |
|
|
|
M |
|
B |
|
I |
|
|
N |
|
|
|
|
|
|
C |
|
|
|
D |
|
|
|
E |
|
H |
J |
F |
|
|
|
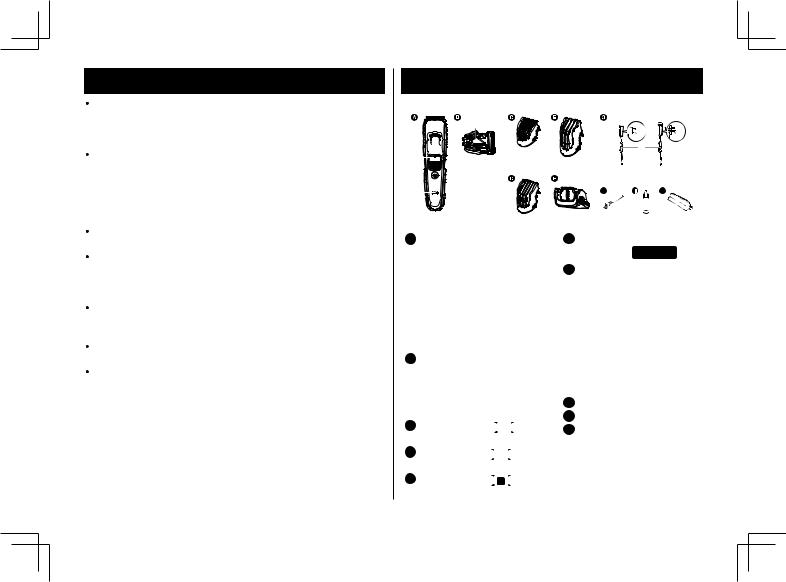
A Main body
A Water inlet
B Trimming height indication mark
C Dial (Height adjustment control)
D Power switch
E Charge status lamp F Appliance socket
B Blade
G Cleaning lever |
|
|
H Moving blade |
|
|
I Stationary blade |
|
|
J Mounting hook |
|
|
C Comb attachment |
[ |
] |
(1mm to 10 mm) |
|
|
D Comb attachment |
[ |
] |
(11mm to 20 mm) |
|
|
E Comb attachment |
[ |
C ] |
(21mm to 30 mm) |
|
|
10
F Detail trimming attachment ER-GB96
G AC adaptor (RE9-86)
(The shape of the power plug differs depending on the area.)
KAdaptor
LPower plug
MCord
NAppliance plug
Accessories
H Cleaning brush
I Oil
J Travel pouch
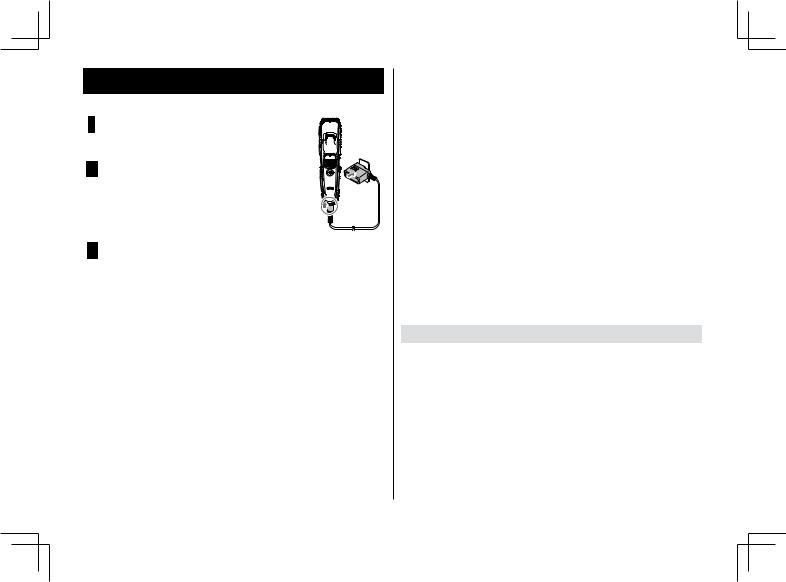
Charging
Turn the appliance off. |
|
|
1 |
Connect the appliance plug to |
|
the appliance socket. |
|
|
2 |
Plug in the adaptor into a |
|
household outlet. |
2 |
|
|
• Check that the charge status lamp |
|
|
glows. |
1 |
|
• Charging is completed after approx. |
|
|
1 hour. |
|
3 |
Disconnect the adaptor when the charge status |
|
lamp stops glowing. |
|
|
(for safety and to reduce energy usage) <To check if charging is completed>
•If you remove and reinsert the appliance plug while charging, the charge status lamp glows and turns off
after approximately 5 seconds.
Notes
•To keep charging the battery will not affect battery performance.
•If there is noise from the radio or other sources while using or charging the product, move to a different location to use the product.
•When the appliance is not used for 6 months or more, the battery will weaken (leak battery fluid, etc.). Fully charge the battery once every 6 months.
•You can charge the battery before it is completely discharged. However, it is recommended to charge when the battery is completely discharged. The battery life depends strongly on factors such as how it is used and stored.
ER-GB96_86.indb 10 |
17/12/13 2:31 |
•Recommended ambient temperature for charging is 0 –
35 °C. Battery performance may decrease or charging time changes under extremely low or high temperatures.
•A full charge supplies enough power for approximately 50 minutes of use. (Based on dry using at 20 - 30 °C.) The operating time may differ depending on the frequency of use.
•When charging the appliance for the first time or when it has not been in use for more than 6 months, the charging time may change or the charge status lamp may not glow for a few minutes or the operating time may shorten. Please charge it for more than 8 hours in such cases.
AC operation
If you connect the AC adaptor to the appliance in the same way as for charging, and turn on the power, you can use it.
•If the remaining battery is too low, the blades may move slowly or stop, even with the AC operation. In this case, charge the battery for 1 minute or more.
•The battery will be discharged, even with the AC operation.
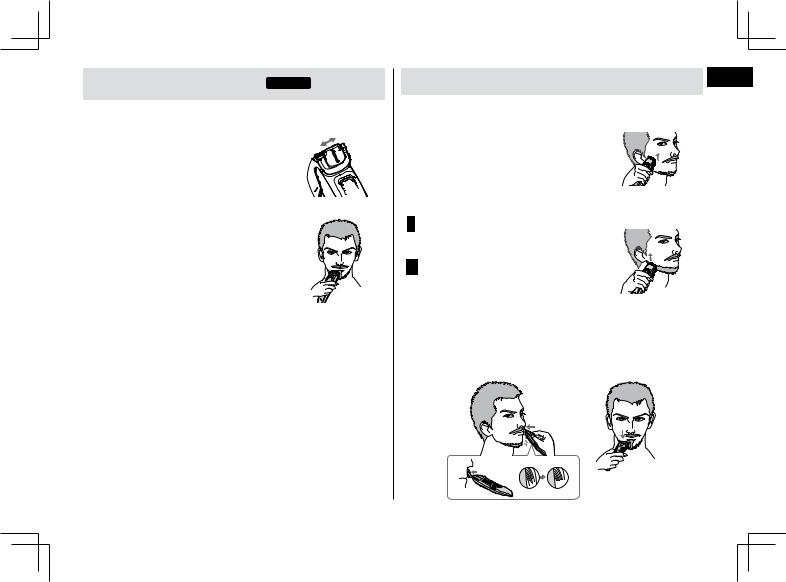
How to use
 Turn the appliance off.
 Apply the oil to the blade before and after each use. (See page 15.)
 Do not use with shaving foam applied or when the beard is wet.
A wet beard may stick to the skin or bunch up, making it difficult to trim.
 Before trimming, comb your moustache with a comb.
 The appliance may not operate in an ambient temperature lower than approximately 0 °C.
1 Mount the desired attachment and adjust the trimming height as needed. (See page 12.)
•It can also be used without the attachment.
(Trimming height: approx. 0.5 mm)
2Press the power switch to turn on the power.
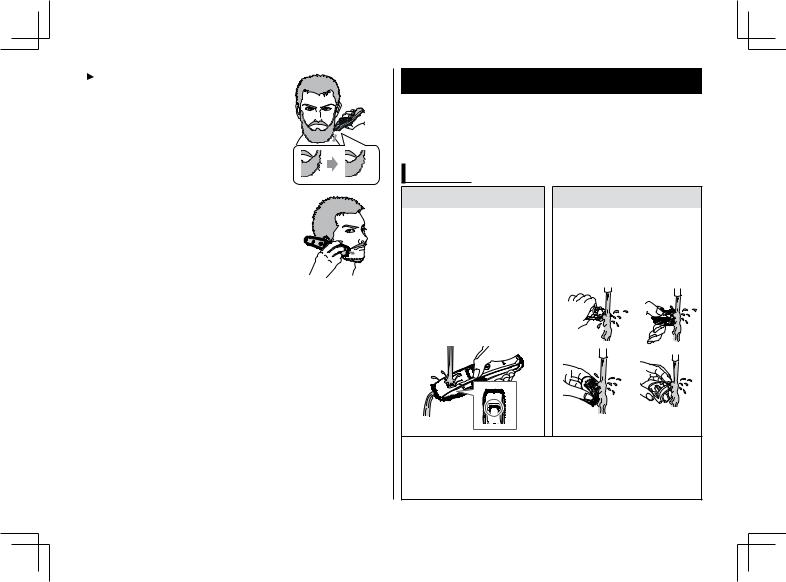
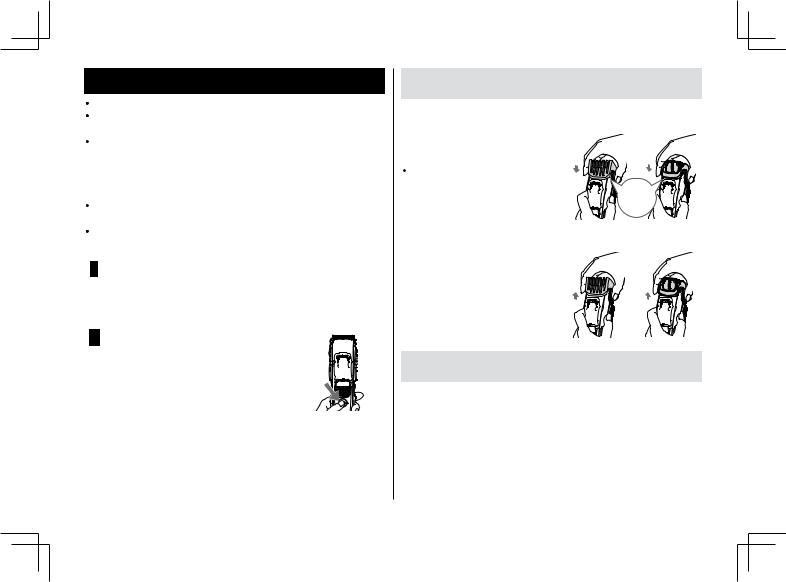
Removing and mounting the attachments
 Take care not to injure hands, etc., with the blade when removing or mounting the attachment.
►Mounting the attachment |
|
Mount the attachment to the |
|
main body until it clicks. |
|
If the attachment is not |
|
attached correctly, it may shift |
click |
and end up cutting too much |
|
during use. |
|
►Removing the attachment |
|
Hold the main body securely and |
|
remove the attachment from the |
|
main body. |
|
English
11
ER-GB96_86.indb 11 |
17/12/13 2:31 |

English
Comb attachment
•Actual hair length will be a little longer than the height you set.
•Setting of 10.5 mm or 20.5 mm is unavailable.
•Hair trimmings may collect inside the attachment when a large volume of beard is cut, so discard hair trimmings after each use.
►How to use the comb attachment
Mount the desired attachment and turn the dial and adjust the trimming height indication mark to the desired height.
C 


Comb attachment [ |
] |
|
|
|
|
|
|
||||
Indicator |
1 |
• |
2 |
• |
3 |
• |
4 |
• |
5 |
• |
|
Trimming height |
1 |
1.5 |
2 |
2.5 |
3 |
3.5 |
4 |
4.5 |
5 |
5.5 |
C |
(mm) (estimate) |
|||||||||||
Indicator |
6 |
• |
7 |
• |
8 |
• |
9 |
• |
10 |
|
|
Trimming height |
6 |
6.5 |
7 |
7.5 |
8 |
8.5 |
9 |
9.5 |
10 |
|
|
(mm) (estimate) |
|
|
|||||||||
12
Comb attachment [ |
|
] |
|
|
|
|
|
|||
Indicator |
11 |
• |
12 |
• |
13 |
• |
14 |
• |
15 |
• |
Trimming height |
11 11.5 |
12 12.5 13 |
13.5 |
14 14.5 |
15 15.5 |
|||||
(mm) (estimate) |
||||||||||
Indicator |
16 |
• |
17 |
• |
18 |
• |
19 |
• |
20 |
|
Trimming height |
16 16.5 |
17 17.5 18 |
18.5 |
19 19.5 |
20 |
|
||||
(mm) (estimate) |
|
|||||||||
Comb attachment [ C ] |
|
|
|
|
|
|||||
Indicator |
21 |
• |
22 |
• |
23 |
• |
24 |
• |
25 |
• |
Trimming height |
21 21.5 |
22 22.5 23 |
23.5 |
24 24.5 |
25 25.5 |
|||||
(mm) (estimate) |
|
|
|
|
|
|
|
|
|
|
Indicator |
26 |
• |
27 |
• |
28 |
• |
29 |
• |
30 |
|
Trimming height |
26 26.5 |
27 27.5 28 |
28.5 |
29 29.5 |
30 |
|
||||
(mm) (estimate) |
|
|||||||||
 Trimming to an even length
Holding the appliance with the power switch facing outwards, trim by bringing the blade in contact with the skin and moving the appliance against the flow of the beard.
ER-GB96_86.indb 12 |
17/12/13 2:31 |
Detail trimming attachment ER-GB96
• The trimming height cannot be adjusted.
►How to use the detail trimming attachment
Slide the detail trimming attachment to switch the position of the blade to be exposed
depending on the location to cut.
►Trim the beard in tight sections or to detailed form
Move the blade along the skin to trim.
Without the attachment
(Trimming height: approx. 0.5 mm)
• The appliance cannot trim hair to lengths less than 0.5 mm.
►Trimming the downy hair
Holding the appliance with the power switch facing outwards, trim by bringing the blade in contact with the skin.
►Design precise lines
1 Place the blade at a right angle
on the edge of where you want to make a precise line. 2 Move the blade away and
down from the area you want to leave, and cut the remaining beard.
► Above and below lips
Holding the appliance with the power switch at the bottom, cut across a line with the blade at a 90° angle to the skin.
English
13
ER-GB96_86.indb 13 |
17/12/13 2:31 |
|
|
Full beard |
English |
Holding the appliance with the |
|
keeping the blade at a 90° angle to |
||
|
|
power switch at the bottom, and |
|
|
the direction of the hairs, trim and |
|
|
shape your beard as desired. |
 Ends of moustache
Holding the appliance with the power switch facing outside, trim gradually from the ends by bringing the blade in contact with the skin.
14
Cleaning
 Clean the main body, blade and the attachment after each use. (If not cleaned, the motion will become poor and the sharpness will worsen.)
 Turn the appliance off.
 Remove the main body from the AC adaptor.
With water
To remove light dirt |
To remove heavy dirt |
1. Remove the attachment |
1. Remove the attachment |
and turn the appliance |
and blade. |
on. |
2. Clean the appliance, the |
2. Run water down the |
blade and the attachments |
water inlet at the front |
with running water. |
of the main body, |
|
rinse thoroughly for |
|
approximately 20 |
|
seconds, and then turn |
|
the appliance off. |
|
 Be careful not to hit the main body on the sink or any other object while draining the water. Failure to do so may cause malfunction.
 Rinse with water and shake up and down several times to remove the water.
ER-GB96_86.indb 14 |
17/12/13 2:31 |

3.Wipe off the water with a towel and let it dry naturally.
 It will dry faster with the blade removed.
4. Apply the oil to the blade after drying. (See this page.)
5. Attach the attachment and blade to the appliance.
With the brush
1.Remove the attachment and blade.
2.Brush off any hair trimmings from
the main body and from around the blade.
3. Brush any hair trimmings out from between the stationary blade and the moving blade while pressing down the cleaning lever to raise the moving blade.
4.Apply the oil to the blade. (See this page.)
5.Attach the attachment and blade to the appliance.
Lubrication
• Apply the oil to the blade before and after each use. |
English |
|||
|
||||
|
|
|
Remove the blade. |
|
|
1 |
|
|
|
|
|
(See page 16.) |
|
|
|
|
|||
2 Apply a drop of the oil to each indicated point.
3 Attach the blade to the main body, turn on the power and allow to run for approximately
5seconds.
►Replacement parts
Replacement part is available at your dealer or Service Centre.
Replacement part for |
Blade |
WER9620 |
ER-GB96/ER-GB86 |
Lubrication oil |
WES003P |
•Do not use any blade other than the one dedicated as it may cause defect in performance.
•We recommend Panasonic lubrication oil WES003P.
15
ER-GB96_86.indb 15 |
17/12/13 2:31 |
English
Removing the blade
Hold the main body with the switch facing upward and push the blade with your thumb while catching the blade in your other hand.
Remounting the blade
Fit the mounting hook (B) into the blade mounting (A) on the appliance and then push in until you hear a click.
16
Troubleshooting
Problem |
|
Action |
|
|
Until problems are solved, please |
|
|
follow each procedure as follows: |
|
|
1. Charge the appliance. |
|
|
(See page 10.) |
|
|
2. Clean the blade and apply oil. |
|
|
(See pages 14 and 15.) |
The appliance has |
|
3. Replace the blade. |
become blunt. |
|
(See this page.) |
|
|
4. Have the battery replaced by an |
The operating time is |
|
authorized service centre. |
short. |
|
Charge the battery for |
The appliance stopped |
|
approximately 8 hours |
|
continuously to rejuvenate it. |
|
working. |
|
If few uses remain even after |
|
|
charging, the battery has reached |
|
|
the end of its life. (Fluid may be |
|
|
leaking due to degradation at the |
|
|
end of battery life.) |
|
|
Contact an authorized service |
|
|
centre for repair. |
|
|
Insert the appliance plug into the |
|
|
main body firmly and make sure |
The appliance cannot |
|
the charge status lamp glows. |
|
|
|
be charged. |
|
Charge within the recommended |
|
|
charging temperature of 0 °C to |
|
|
35 °C. |
ER-GB96_86.indb 16 |
17/12/13 2:31 |
Problem Action
Makes a loud sound.
Apply oil. (See page 15.)
Confirm that the blade is properly attached.
If the problems still cannot be solved, contact the store where you purchased the unit or a service centre authorized by Panasonic for repair.
Blade life
Blade life varies according to the frequency and period of use of the appliance.
For example, the blade life is approximately 3 years when using the appliance for 5 minutes 10 times a month. Replace the blades if cutting efficiency reduces substantially despite proper maintenance.
Battery life
Battery life will vary according to the frequency and length of use. If the battery is charged once a month, the service life will be approximately 3 years.
If the operating time is significantly shorter even after a full charge, the battery has reached the end of its life.
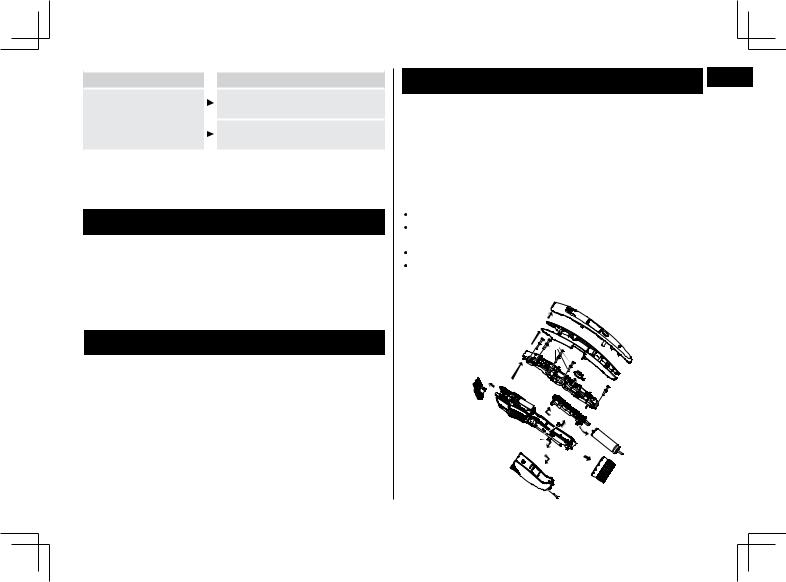
Removing the built-in rechargeable battery
Remove the built-in rechargeable battery before disposing of |
English |
|
|
||
the appliance. |
|
|
The battery must be disposed of safely. |
|
|
Please make sure that the battery is disposed of at an officially |
|
|
designated location if there is one. |
|
|
This figure must only be used when disposing of the appliance, |
|
|
and must not be used to repair it. If you dismantle the appliance |
|
|
yourself, it will no longer be waterproof, which may cause it to |
|
|
malfunction. |
|
|
Remove the appliance from the AC adaptor. |
|
|
Press the power switch to turn on the power and then keep |
|
|
the power on until the battery is completely discharged. |
|
|
Perform Steps A to K , and then lift the battery to remove it. |
|
|
Take care not to short-circuit the positive and negative |
|
|
terminals of the removed battery, and insulate the terminals |
|
|
by applying tape to them. |
|
|
D |
|
|
E |
|
|
H |
|
|
J |
F |
|
|
|
|
A |
|
|
|
H |
|
K |
|
|
I |
|
|
C |
G |
|
|
B |
|
17
ER-GB96_86.indb 17 |
17/12/13 2:31 |

|
|
For environmental protection and recycling of materials |
|
English |
|||
This appliance contains a Nickel-Metal Hydride battery. |
|||
officially designated location if there is one. |
|||
|
|
Please make sure that the battery is disposed of at an |
|
|
|
|
|
Specifications
Power source |
See the name plate on the AC adaptor. |
|||
(Automatic voltage conversion) |
||||
|
||||
|
|
|
|
|
Motor voltage |
1.2 V |
|
|
|
|
||||
|
|
|
|
|
Charging time |
Approx. 1 hour |
|||
|
|
|
|
|
Airborne |
65 (dB(A) re 1 pW) |
|||
Acoustical Noise |
||||
|
|
|
||
This product is intended for household use only.
18
Disposal of Old Equipment and Batteries
Only for European Union and countries with recycling systems
These symbols on the products, packaging, and/
or accompanying documents mean that used electrical and electronic products and batteries
must not be mixed with general household waste.
For proper treatment, recovery and recycling of
old products and batteries, please take them to applicable collection points in accordance with your national legislation.
By disposing of them correctly, you will help to save valuable resources and prevent any
potential negative effects on human health and the environment.
For more information about collection and recycling, please contact your local municipality.
Penalties may be applicable for incorrect disposal of this waste, in accordance with national legislation.
Note for the battery symbol (bottom symbol)
This symbol might be used in combination with a chemical symbol. In this case it complies with the requirement set by the Directive for the chemical involved.
ER-GB96_86.indb 18 |
17/12/13 2:31 |
Bedienungsanleitung
(Haushalt) Netz-/Akku Bartschneider
Modell Nr. ER-GB96/ER-GB86
Inhalt
Sicherheitsmaßnahmen........................ |
22 |
Verwendungszweck........................................ |
26 |
Bezeichnung der Bauteile............................... |
26 |
Aufladen.......................................................... |
27 |
Verwendung des Geräts.................................. |
28 |
Reinigung........................................................ |
31 |
Fehlersuche.................................................... |
33 |
Lebensdauer der Klinge.................................. |
33 |
Lebensdauer des Akkus.................................. |
34 |
Entfernen des eingebauten Akkus.................. |
34 |
Technische Daten............................................ |
35 |
Deutsch
Vielen Dank, dass Sie sich für den Kauf dieses Panasonic-Produkts entschieden haben.
Bevor Sie dieses Gerät in Betrieb nehmen, lesen Sie sich bitte diese Anleitung vollständig durch und bewahren Sie sie für ein späteres Nachschlagen auf.
19
ER-GB96_86.indb 19 |
17/12/13 2:31 |
Deutsch
Warnung
•Dieses Gerät kann von Kindern ab 8 Jahren und von Personen mit eingeschränkten physischen, sensorischen oder mentalen Fähigkeiten verwendet werden, oder
von Personen, denen entsprechende Kenntnisse und Erfahrungen fehlen. Voraussetzung ist, dass sie dabei beaufsichtigt werden oder ihnen eine Einweisung gegeben wurde, wie sie das Gerät sicher verwenden können, und sie die damit verbundenen Risiken verstanden haben. Kinder dürfen nicht mit dem Gerät spielen. Die Reinigung und Wartung sollte nicht von Kindern ohne Aufsicht durchgeführt werden.
•Das Netzkabel kann nicht ausgetauscht werden. Wenn das Kabel beschädigt ist, muss der Netzadapter entsorgt werden.
20
ER-GB96_86.indb 20 |
17/12/13 2:31 |
• Das folgende Symbol bedeutet, dass das Gerät für die Reinigung unter einem offenen Wasserhahn geeignet ist.
|
|
|
• Nicht mit Wasser reinigen, wenn der Netzadapter |
Deutsch |
|
|
|
|
angeschlossen ist. |
|
|
• Verwenden Sie keinen anderen als den mitgelieferten |
|
|
Netzadapter. |
|
|
Laden Sie außerdem keine anderen Produkte mit dem |
|
|
mitgelieferten Netzadapter. (Siehe Seite 26.) |
|
|
• Das folgende Symbol zeigt an, dass eine bestimmte |
|
|
absteckbare Stromversorgungseinheit benötigt wird, um |
|
|
das elektrische Gerät mit dem Strom zu verbinden. Die |
|
|
Typenreferenz der Stromversorgungseinheit ist neben |
|
|
dem Symbol markiert. |
|
|
21
ER-GB96_86.indb 21 |
17/12/13 2:31 |
Deutsch
Sicherheitsmaßnahmen
Um das Risiko von Verletzungen, Tod, elektrischem Schlag, Brand und Sachschäden zu reduzieren, beachten Sie immer die folgenden Sicherheitsmaßnahmen.
Erklärung der Symbole
Die folgenden Symbole werden verwendet, um die Größe der Gefahr, Verletzung und Schäden am Eigentum zu beschreiben, die verursacht werden, wenn die Beschreibung nicht beachtet wird und ein unsachgemäßer Gebrauch erfolgt.
Bezeichnet eine mögliche Gefahr, GEFAHR die zu ernsthaften Verletzungen
oder zum Tod führt.
Bezeichnet eine mögliche Gefahr, WARNUNG die zu ernsthaften Verletzungen
oder zum Tod führen könnte.
Bezeichnet eine Gefahr, die zu VORSICHT kleineren Verletzungen oder
Sachschäden führen kann.
Die folgenden Symbole werden verwendet, um die Art der
Anleitungen, die beachtet werden müssen, zu klassifizieren und zu beschreiben.
Dieses Symbol wird verwendet, um die Benutzer auf einen speziellen Betriebsablauf aufmerksam zu machen, der nicht ausgeführt werden darf.
Dieses Symbol wird verwendet, um die Benutzer auf einen bestimmten Betriebsablauf aufmerksam zu machen, der befolgt werden muss, um das Gerät sicher zu betreiben.
22
 WARNUNG
 Dieses Produkt
Dieses Produkt hat einen eingebauten, wiederaufladbaren Akku. Akku nicht ins Feuer oder in eine Wärmequelle werfen.
-Nichtbeachtung führt zu Überhitzung, Zündung oder Explosion.
Nicht verändern oder reparieren.
-Andernfalls kann es zu einem Brand, elektrischen
Schlag oder zu Verletzungen kommen.
→Bei Fragen zur Reparatur setzen Sie sich bitte mit einem autorisierten Kundenzentrum in Verbindung (Akkutausch, usw.).
Zerlegen Sie niemals das Produkt, außer wenn Sie es entsorgen.
-Andernfalls kann es zu einem Brand, elektrischen
Schlag oder zu Verletzungen kommen.
ER-GB96_86.indb 22 |
17/12/13 2:31 |

 WARNUNG
 Bei einer Unregelmäßigkeit oder Fehlfunktion
Stoppen Sie sofort den Gebrauch und entfernen Sie den Adapter, wenn sich das Gerät ungewöhnlich verhält oder eine Fehlfunktion auftritt.
- Andernfalls kann es zu einem Brand, elektrischen
Schlag oder zu Verletzungen kommen.
<Unregelmäßigkeit oder Fehlfunktionen>
 Das Gerät oder der Netzadapter ist deformiert oder ungewöhnlich heiß.
 Das Gerät oder der Netzadapter riecht verbrannt.
 Während des Gebrauchs oder Aufladens des
Geräts oder Netzadapters ist ein ungewöhnlicher Ton zu hören.
→Fordern Sie augenblicklich eine Überprüfung oder Reparatur bei einem autorisierten Kundenzentrum an.
 Stromversorgung
Nicht den Adapter mit nassen Händen in die Steckdose stecken oder von ihr abziehen.
-Andernfalls kann zu einem elektrischen Schlag oder zu Verletzungen kommen.
Nicht den Netzadapter unter Wasser tauchen und |
|
|
|
nicht mit Wasser abwaschen. |
|
|
|
Stellen Sie den Netzadapter nicht über oder in |
|
|
|
die Nähe mit Wasser gefüllter Waschbecken oder |
|
|
|
Badewannen. |
|
|
|
Benutzen Sie den Apparat auf keinen Fall, wenn |
Deutsch |
||
der Netzadapter beschädigt ist oder falls der |
|||
|
|
||
Netzstecker lose in einer Steckdose sitzt. |
|
|
|
Das Netzkabel nicht beschädigen oder verändern |
|
|
|
oder gewaltsam biegen, ziehen oder verdrehen. |
|
|
|
Stellen Sie auch nichts Schweres auf das |
|
|
|
Netzkabel und klemmen Sie es nicht ein. |
|
|
|
-Andernfalls kann es durch einen Kurzschluss zu einem elektrischen Schlag oder Brand kommen.
Nicht auf eine Art verwenden, welche die Nennleistung der Steckdose oder der Kabel übersteigt.
-Wird die Nennleistung überschritten, weil zu viele
Stecker in einer Steckdose stecken, kann dies zu Brand durch Überhitzung führen.
Stellen Sie immer sicher, dass das Gerät mit einer elektrischen Stromquelle betrieben wird, die zu der Nennspannung passt, die auf dem Netzadapter angegeben ist.
Den Adapter vollständig hineinstecken.
-Andernfalls kann es zu einem Brand oder zu einem elektrischen Schlag kommen.
Trennen Sie immer den Adapter von der Steckdose, wenn Sie ihn reinigen.
-Andernfalls kann es zu einem elektrischen Schlag oder Verletzungen kommen.
23
ER-GB96_86.indb 23 |
17/12/13 2:31 |

Deutsch
 WARNUNG
Reinigen Sie regelmäßig den Netzstecker und den Gerätestecker, um zu verhindern, dass sich Staub ansammelt.
-Andernfalls kann es aufgrund eines Isolierungsfehlers durch Feuchtigkeit zu einem Brand kommen.
Ziehen Sie den Adapter ab, und reinigen Sie ihn mit einem trockenen Tuch.
 Verhindern von Unfällen
Nicht in Reichweite von Kindern oder Kleinkindern lagern. Lassen Sie es von ihnen nicht benutzen.
-Wird die Klinge, die Reinigungsbürste und/oder der Ölbehälter in den Mund gesteckt, kann dies zu
Unfällen und Verletzungen führen.
Wenn versehentlich Öl verschluckt wird, führen Sie kein Erbrechen herbei, sondern trinken Sie viel Wasser und suchen Sie einen Arzt auf.
Wenn die Augen in Kontakt mit dem Öl kommen, waschen Sie sie sofort unter fließendem Wasser aus und suchen Sie einen Arzt auf.
-Andernfalls kann es zu körperlichen Problemen kommen.
24
 VORSICHT
 Schützen der Haut
Drücken Sie die Klinge nur vorsichtig gegen die Haut oder Lippen.
Verwenden Sie dieses Produkt nicht für andere Zwecke als das Schneiden des Barts. Verwenden Sie die Klingen nicht direkt auf den Ohren oder auf rauer Haut (wie zum Beispiel auf Schwellungen, Verletzungen oder Hautunreinheiten).
-Andernfalls können Verletzungen an Ohren oder an
Stellen mit unebener Haut verursacht werden.
Überprüfen Sie vor dem Gebrauch, dass die Klingen unbeschädigt und nicht verformt sind.
- Andernfalls kann es zu Hautverletzungen kommen.
 Beachten Sie folgende Vorsichtsmaßnahmen
Stellen Sie sicher, dass sich an Netzstecker oder Gerätestecker keine Metallobjekte oder Schmutz ansammeln.
-Andernfalls kann es durch einen Kurzschluss zu einem elektrischen Schlag oder Brand kommen.
Gerät und Adapter nicht fallen lassen und keinen Stößen aussetzen.
- Andernfalls kann es zu Verletzungen kommen.
Nicht das Netzkabel um den Adapter wickeln, wenn Sie ihn aufbewahren.
-Andernfalls kann es passieren, dass das Netzkabel unter der Last bricht und es so zu einem Brand durch Kurzschluss kommt.
ER-GB96_86.indb 24 |
17/12/13 2:31 |
 VORSICHT
Ziehen Sie den Adapter aus der Steckdose, wenn Sie das Gerät nicht verwenden.
-Eine Zuwiderhandlung kann einen elektrischen Schlag oder Brand aufgrund eines elektrischen Leckstroms durch die Verschlechterung der Isolierung verursachen.
Halten Sie nicht das Netzkabel, sondern den Adapter oder den Gerätestecker fest, wenn Sie diesen von der Steckdose bzw. vom Gerät trennen.
-Andernfalls kann es zu einem elektrischen Schlag oder zu Verletzungen kommen.
►Handhabung des ausgebauten Akkus beim
Entsorgen
 GEFAHR
 Der Akku ist ausschließlich für die Benutzung mit diesem Gerät bestimmt. Verwenden Sie den Akku nicht für andere Geräte.
 Laden Sie den Akku nicht mehr auf, nachdem dieser entfernt wurde.
 Werfen Sie den Akku nicht ins Feuer und setzen Sie ihn keiner Hitze aus.
 Den Akku nicht löten, zerlegen oder modifizieren.
 Lassen Sie die positiv und negativ geladenen Pole nicht mittels metallener Objekte miteinander in Berührung kommen.
 Bewahren Sie keinen metallenen Schmuck oder Haarnadeln in der Nähe des Akkus auf.
 Ziehen Sie niemals die Hülsen ab.
- Nichtbeachtung führt zu Überhitzung, Zündung oder Explosion.
Der Akku enthält alkalische Flüssigkeit. Wenn diese mit den Augen in Berührung kommt, die Augen nicht reiben sondern gründlich mit klarem Wasser wie Leitungswasser abspülen.
- Andernfalls kann es zu Erblindung kommen.
|
|
Verständigen Sie bitte sofort einen Arzt. |
Deutsch |
|
|
|
|
|
|
WARNUNG |
|
|
|
||
|
|
|
|
|
|
|
|
Nach der Entfernung des Akkus bewahren Sie diesen außer Reichweite von Kindern auf.
-Wird der Akku versehentlich verschluckt, kann er körperlichen Schaden verursachen.
Bei versehentlichem Verschlucken verständigen Sie bitte sofort einen Arzt.
Der Akku enthält alkalische Flüssigkeit. Wenn diese mit Haut oder Kleidung in Berührung kommt, mit klarem Wasser wie Leitungswasser abspülen.
- Andernfalls kann es zu Hautverletzungen kommen.
25
ER-GB96_86.indb 25 |
17/12/13 2:31 |
Verwendungszweck
|
|
Stellen Sie sicher, die Abdeckung nach jeder Verwendung |
|
|
|
aufzustecken. Andernfalls könnten Kinder die Klinge |
|
|
|
unbeabsichtigt verschlucken oder die Klinge könnte sich |
|
Deutsch |
verformen. |
||
Vor und nach jedem Gebrauch Öl auf der Klinge auftragen. |
|||
|
|
||
|
|
(Siehe Seite 32.) |
|
|
|
Andernfalls kann es zu folgenden Problemen kommen. |
|
|
|
- Das Gerät ist stumpf geworden. |
|
|
|
- Die Betriebszeit ist kürzer. |
|
|
|
- Lauteres Geräusch. |
|
|
|
Das Gerät kann während des Gebrauchs und/oder des |
|
|
|
Ladens warm werden. Das ist normal. |
|
|
|
Reinigen Sie das Gehäuse nur mit einem weichen Tuch, das |
|
|
|
leicht mit Leitungswasser oder Seifenwasser angefeuchtet |
|
|
|
wurde. Verwenden Sie niemals Verdünner, Benzin, Alkohol |
|
|
|
oder andere Chemikalien. |
|
|
|
Bevor Sie Zubehör verwenden, prüfen Sie, dass es richtig |
|
|
|
montiert wurde. Andernfalls kann es passieren, dass die |
|
|
|
Haare zu kurz geschnitten werden. |
|
|
|
Lagern Sie das Gerät nach dem Gebrauch an einem Ort mit |
|
|
|
niedriger Luftfeuchtigkeit. |
|
|
|
Das Gerät sollte nicht an Tieren angewendet werden. |
|
26
Bezeichnung der Bauteile
G
A
J
 H
H
 I
I
B
C
D
E
F
A Haartrimmer
AWassereingang
BSchnitthöheAnzeigemarkierung
CWahlschalter (Schnittlänge)
DNetzschalter
ELadestatusleuchte
FSteckeranschluss
B Klingen
GReinigungshebel
HBewegliche Klinge
IFeststehende Klinge
JBefestigungshaken
C Kammaufsatz [

 ]
]

(1 mm bis 10 mm)
D Kammaufsatz[

 ]
]

(11 mm bis 20 mm)
E Kammaufsatz[
 C ]
C ]

(21 mm bis 30 mm)
K |
K |
L |
L |
M |
|
N |
|
H |
J |
F Aufsatz für FeinTrimmen ER-GB96
G Netzadapter (RE9-86)
(Die Form des
Netzsteckers unterscheidet sich je nach Bereich.)
KAdapter
LNetzstecker
MNetzkabel
NGerätestecker
Zubehör
H Reinigungsbürste
I Öl
J Transporttasche
ER-GB96_86.indb 26 |
17/12/13 2:31 |
Aufladen
 Schalten Sie das Gerät aus.
1 Verbinden Sie den Gerätestecker mit dem Steckeranschluss.
2 |
Stecken Sie den Adapter in eine |
2 |
|
Steckdose. |
|
|
• Stellen Sie sicher, dass die |
1 |
|
Ladestatusleuchte leuchtet. |
|
|
• Der Ladevorgang ist nach etwa 1 |
|
3 |
Stunde abgeschlossen. |
|
Ziehen Sie den Adapter heraus, wenn die |
||
Ladestatusleuchte nicht mehr leuchtet. |
||
(aus Sicherheitsgründen und um den Energieverbrauch zu senken)
<Überprüfen, ob das Laden abgeschlossen ist>
•Wenn Sie den Gerätestecker während des
Ladevorgangs abziehen und erneut anschließen,
leuchtet die Ladestatusleuchte und schaltet sich nach etwa 5 Sekunden aus.
Hinweise
•Weiteres Aufladen des Akkus hat keinen Einfluss auf seine Leistung.
•Wenn Geräusche vom Radio oder anderen Quellen während des Gebrauchs oder des Ladevorgangs zu hören sind, verwenden Sie das Produkt an einem anderen Ort.
•Wenn das Gerät 6 Monate oder länger nicht verwendet wird, wird der Akku schwächer (Akkuflüssigkeit läuft aus usw.). Laden Sie den Akku alle 6 Monate vollständig auf.
• Sie können den Akku aufladen, bevor er vollständig |
|
|
|
entladen ist. Es wird jedoch empfohlen, ihn aufzuladen, |
|
|
|
wenn er vollständig entladen ist. Die Lebensdauer des |
|
|
|
Akkus variiert stark je nach Verwendung und Lagerung. |
|
|
|
• Die empfohlene Umgebungstemperatur zum Laden |
|
|
|
beträgt 0 bis 35 °C. Bei extrem niedrigen oder |
|
|
|
Deutsch |
|||
• Ein vollständig aufgeladenes Gerät hat genug Strom |
|||
hohen Temperaturen kann es vorkommen, dass die |
|
|
|
Akkuleistung abnimmt oder sich die Ladezeit verändert. |
|
|
|
für eine Anwendung von etwa 50 Minuten. (Beim |
|
|
|
Trockenschneiden bei 20-30 °C.) |
|
|
|
Die Betriebszeit kann unterschiedlich sein und hängt |
|
|
|
von der Häufigkeit des Gebrauchs ab. |
|
|
|
• Beim erstmaligen Laden des Geräts, oder wenn es seit |
|
|
|
mehr als 6 Monaten nicht verwendet wurde, kann sich |
|
|
|
die Ladezeit ändern, die Ladestatusleuchte leuchtet |
|
|
|
möglicherweise ein paar Minuten lang nicht, oder die |
|
|
|
Betriebszeit verkürzt sich. In solchen Fällen laden Sie es |
|
|
|
bitte länger als 8 Stunden. |
|
|
|
Netzbetrieb
Wenn Sie den Netzadapter an das Gerät anschließen, so wie Sie dies auch im Falle der Aufladung tun, und das Gerät einschalten, können Sie es verwenden.
•Wenn die verbleibende Akkuleistung niedrig ist, kann es sein, dass sich die Klingen langsam bewegen oder stoppen, selbst im Netzbetrieb. In diesem Fall laden Sie den Akku 1
Minute oder länger auf.
•Der Akku wird auch im Netzbetrieb entladen.
27
ER-GB96_86.indb 27 |
17/12/13 2:31 |
Verwendung des Geräts
|
|
Schalten Sie das Gerät aus. |
|
|
|
Tragen Sie das Öl vor und nach jedem Gebrauch auf die |
|
|
|
Klingen auf. (Siehe Seite 32.) |
|
Deutsch |
Verwenden Sie das Gerät nicht mit Rasierschaum oder wenn |
||
der Bart nass ist. |
|||
|
|
||
|
|
Ein nasser Bart kann auf der Haut kleben bleiben oder |
|
|
|
Ansammlungen bilden, so dass es schwierig wird, ihn zu |
|
|
|
schneiden. |
|
|
|
Kämmen Sie Ihren Schnurrbart vor dem Schneiden mit |
|
|
|
einem Kamm. |
|
|
|
Es ist möglich, dass das Gerät bei Temperaturen unter 0 °C |
|
|
|
nicht funktioniert. |
|
1 Montieren Sie den gewünschten Aufsatz und stellen Sie die Schnitthöhe je nach Bedarf ein. (Siehe diese Seite.)
•Er kann auch ohne Aufsatz verwendet werden.
(Schnitthöhe: etwa 0,5 mm)
2 Betätigen Sie den Netzschalter, um den Strom einzuschalten.
28
Entfernen und Montieren der Aufsätze
 Achten Sie beim Entfernen oder Montieren des Aufsatzes darauf, sich nicht an den Klingen zu schneiden.
►Montieren des Aufsatzes |
|
Montieren Sie den Aufsatz auf |
|
das Gehäuse, bis es klickt. |
|
Wenn der Aufsatz nicht richtig |
|
angebracht wird, kann er sich |
|
verschieben und dazu führen, |
click |
dass zuviel Haar abgeschnitten |
|
wird. |
|
►Entfernen des Aufsatzes |
|
Halten Sie den Haartrimmer fest |
|
und entfernen Sie den Aufsatz |
|
vom Gehäuse. |
|
Kammaufsatz
•Die tatsächliche Haarlänge wird etwas länger sein als die von
Ihnen eingestellte Höhe.
•Die Einstellung von 10,5 mm oder 20,5 mm ist nicht verfügbar.
•Es kann sein, dass sich Haarabschnitte innerhalb des
Aufsatzes ansammeln, wenn eine große Menge Bart geschnitten wird. Sie sollten also die Haarabschnitte nach jedem Gebrauch entfernen.
ER-GB96_86.indb 28 |
17/12/13 2:31 |

►Verwendung des Kammaufsatzes
Montieren Sie den gewünschten Aufsatz, drehen Sie den Wahlschalter und stellen Sie die SchnitthöheAnzeigemarkierung auf die gewünschte Höhe ein.
C 


Kammaufsatz [ |
|
] |
|
|
|
|
|
|
|
|||
Anzeige |
1 |
• |
2 |
• |
3 |
• |
4 |
• |
5 |
• |
|
|
Schnitthöhe |
|
|
|
|
|
|
|
|
|
|
C |
|
(mm) |
1 |
1,5 |
2 |
2,5 |
3 |
3,5 |
4 |
4,5 |
5 |
5,5 |
||
|
||||||||||||
(geschätzt) |
|
|
|
|
|
|
|
|
|
|
|
|
Anzeige |
6 |
• |
7 |
• |
8 |
• |
9 |
• |
10 |
|
|
|
Schnitthöhe |
|
|
|
|
|
|
|
|
|
|
|
|
(mm) |
6 |
6,5 |
7 |
7,5 |
8 |
8,5 |
9 |
9,5 |
10 |
|
|
|
(geschätzt) |
|
|
|
|
|
|
|
|
|
|
|
|
Kammaufsatz [ |
|
] |
|
|
|
|
|
|
|
|||
Anzeige |
11 |
• |
12 |
• |
13 |
• |
14 |
• |
15 |
• |
|
|
Schnitthöhe |
|
|
|
|
|
|
|
|
|
|
|
|
(mm) |
11 11,5 12 |
12,5 |
13 13,5 14 |
14,5 15 |
15,5 |
|
||||||
(geschätzt) |
|
|
|
|
|
|
|
|
|
|
|
|
Anzeige |
16 |
• |
17 |
• |
18 |
• |
19 |
• |
20 |
|
|
|
Schnitthöhe |
|
|
|
|
|
|
|
|
|
|
|
|
(mm) |
16 16,5 17 |
17,5 |
18 18,5 19 |
19,5 20 |
|
|
||||||
(geschätzt) |
|
|
|
|
|
|
|
|
|
|
|
|
 Kammaufsatz [
 C ]
C ]

|
|
|
|
|
|
|
|
|
|
|
|
Anzeige |
21 |
• |
22 |
• |
23 |
• |
24 |
• |
25 |
• |
|
Schnitthöhe |
|
|
|
|
|
|
|
|
|
|
|
(mm) |
21 |
21,5 |
22 |
22,5 |
23 |
23,5 |
24 |
24,5 |
25 |
25,5 |
|
(geschätzt) |
|
|
|
|
|
|
|
|
|
|
|
|
|
|
|
|
|
|
|
|
|
|
|
Anzeige |
26 |
• |
27 |
• |
28 |
• |
29 |
• |
30 |
|
|
Schnitthöhe |
|
|
|
|
|
|
|
|
|
|
|
(mm) |
26 |
26,5 |
27 |
27,5 |
28 |
28,5 |
29 |
29,5 |
30 |
|
|
(geschätzt) |
|
|
|
|
|
|
|
|
|
|
|
 Schneiden auf gleichmäßige Länge
Halten Sie das Gerät so, dass der Netzschalter nach außen zeigt. Beginnen Sie zu schneiden, indem Sie die Klinge in Kontakt mit
der Haut bringen und das Gerät gegen die Bartwuchsrichtung bewegen.
Aufsatz für Fein-Trimmen ER-GB96
• Die Schnitthöhe kann nicht eingestellt werden.
►Verwendung des Aufsatzes für Fein-Trimmen
Verschieben Sie den Aufsatz für Fein-Trimmen, um die Position der freistehenden Klinge je nach der zu schneidenden Stelle zu verändern.
Deutsch
29
ER-GB96_86.indb 29 |
17/12/13 2:31 |

►Schneiden Sie Ihren Bart in schmalen Bereichen oder bringen Sie ihn richtig in Form
Bewegen Sie die Klinge entlang der Haut, um den Bart zu schneiden.
Deutsch
Ohne Aufsatz
(Schnitthöhe: etwa 0,5 mm)
•Das Gerät kann kein Haar auf kürzere Längen als 0,5 mm schneiden.
►Trimmen des Flaums
Halten Sie das Gerät so, dass der Netzschalter nach außen zeigt. Beginnen Sie zu schneiden, indem Sie die Klinge in Kontakt mit der Haut bringen.
►Erzeugen von präzisen Linien
1 Setzen Sie die Klinge im rechten Winkel zum Rand des Bartes an, an dem Sie eine präzise Linie schneiden möchten.
2 Bewegen Sie die Klinge mit etwas Abstand von der freizulassenden Stelle nach
unten, um den restlichen Bart zu trimmen.
30
► Oberhalb und unterhalb der Lippen
Halten Sie das Gerät so, dass der Netzschalter nach unten zeigt, schneiden Sie über eine Linie mit der Klinge im 90°-Winkel zur Haut.
 Vollbart
Halten Sie das Gerät so, dass der Netzschalter nach unten zeigt, und führen Sie die Klinge im 90°-Winkel zur Richtung des Barts. Schneiden Sie Ihren Bart in die gewünschte Form.
 Enden des Schnurrbarts
Halten Sie das Gerät so, dass der Netzschalter nach außen zeigt, schneiden Sie schrittweise von den Enden ab, indem Sie die Klinge in Kontakt mit der Haut bringen.
ER-GB96_86.indb 30 |
17/12/13 2:31 |
 Loading...