


Operating Instructions
Инструкция по эксплуатации Інструкція з експлуатації Пайдалану нұсқаулары
(Household) Rechargeable Shaver
Электробритва с возможностью работы от аккумулятора (Побутового призначення) Бритва з можливістю роботи від акумулятора (Тұрмыстық) Аккумулятормен жұмыс істеу мүмкіндігі бар электр ұстара
Model No.
Модель № Модель № ES SL41
Үлгі №
English |
2 |
Русский |
8 |
Українська |
15 |
Қазақша |
23 |
Before operating this unit, please read these instructions completely and save them for future use.
Прежде чем использовать этот прибор, внимательно прочитайте данную инструкцию и сохраните её для дальнейшего использования.
Перш ніж починати користуватись цим приладом, уважно прочитайте дані інструкції та збережіть їх для подальшого використання.
Осы құралды пайдаланар алдында осы нұсқауларды мұқият оқып шығыңыз және оларды болашақта қолдануға сақтап қойыңыз.
English
Thank you for choosing a Panasonic shaver ES SL41. With our WET/DRY technology, you can enjoy using your Panasonic shaver dry or in the shower or bath for gentle and easy shaving. Please read all instructions before use.
Important
This shaver has a built-in rechargeable battery. Do not throw into fire, apply heat, or charge, use, or leave in a high temperature environment.
►►Before use
This WET/DRY shaver can be used for wet shaving using shaving lather or for dry shaving. You can use this watertight shaver in the shower and clean with water. The following symbol means suitable for use in a bath or shower.
Treat yourself to wet lather shaves for at least three weeks and notice the difference. Your Panasonic WET/DRY shaver requires a little time to get used to because your skin and beard need about a month to adjust to any new shaving method.
►►Using the shaver
Caution
The outer foil is very thin and can be damaged if not used correctly. Check that the foil is not damaged before using the shaver. Do not use the shaver if the foil is damaged as you will cut your skin.
••Terminate usage when there is an abnormality or failure.
••Do not use excessive pressure to apply the outer foil to your lip or other part of your face. Do not apply the outer foil directly to blemishes or injured skin.
••Do not share your shaver with your family or other people. Doing so may result in infection or inflammation.
••This appliance is not intended for use by persons (including children) with reduced physical, sensory or mental capabilities, or lack of experience and knowledge, unless they have been given supervision or instruction concerning use of the appliance by a person responsible for their safety. Children should be supervised to ensure that they do not play with the appliance.
►►Charging the shaver
••Never use the AC adaptor in the bathroom or shower room.
••Use the dedicated AC adaptor (RE7 73) only. Do not use the dedicated AC adaptor to charge other appliances.
••Put the plug into a household outlet where there is no moisture and handle it with dry hands.
••Hold the plug when disconnecting it from the household outlet. If you tug on the power cord, you may damage it.
••The supply cord cannot be replaced. If the cord is damaged, the AC adaptor should be scrapped.
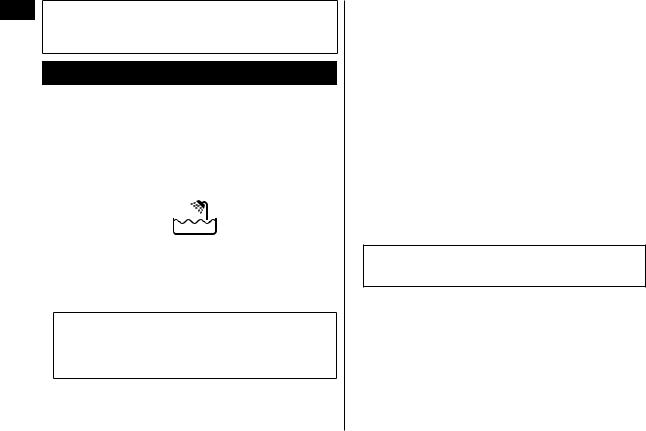
►►Cleaning the shaver
Warning
Disconnect the plug from the household outlet before cleaning to prevent electric shock.
••Keep both the inner blades inserted. If only one of the inner blades is inserted, the shaver may be damaged.
••If you clean the shaver with water, do not use salt water or hot water. Do not soak the shaver in water for a long period of time.
••Clean the housing only with a soft cloth slightly dampened with tap water or soapy tap water. Do not use thinner, benzine, alcohol or other chemicals.
••Do not wash the AC adaptor with water.
2

►►Storing the shaver
••When storing the shaver, always put it in the carrying holder to avoid scratching the outer foil.
••Store the shaver in a place with low humidity after use.
••Do not store the shaver where it will be exposed to direct sunlight or other heat sources.
••Remove the shaver from the AC adaptor when storing it.
••Do not bend the power cord or wrap it around the AC adaptor.
Parts identification
|
|
|
|
|
|
|
|
|
|
|
|
|
|
|
|
|
|
|
|
|
|
|
|
|
|
|
|
|
|
|
|
|
||
|
|
|
|
|
|
|
|
|
|
|
|
|
|
|
|
|
|
||
|
|
|
|
|
|
|
|
|
|
A Main body |
|
: Outer foil section |
|
|
1 System outer foil |
|
; Trimmer |
|
|
2 Cleaning shutter |
|
< Trimmer handle |
|
|
3 Side terminals |
|
B AC adaptor (RE7 73) |
|
|
4 Power switch |
|
= Charging terminal |
|
|
5 Foil frame release button |
> Charge indicator lamp |
|
||
6 Water inlet |
|
Power cord |
|
|
7 Foil frame |
|
C Carrying holder |
|
|
8 System outer foil release |
D Cleaning brush |
|
|
|
buttons |
|
|
|
|
9 Inner blades |
|
|
|
|
English
3

English
Using the carrying holder
The shaver can be kept vertically or horizontally. When transporting the shaver, you can use the carrying holder to protect the outer foil and prevent erroneous operation of the switch.
••When transporting the shaver, be sure to clean off any shavings before attaching the carrying holder.
Attaching the carrying holder
Attach the carrying holder as illustrated.
••Check that all four protrusions on the shaver are inserted securely.
Removing the carrying holder
Remove the carrying holder while pressing down on both sides.
Charge
Charging the shaver
Perform the following steps to charge the shaver if it seems to lose the speed.
You can charge the shaver with the carrying holder attached.
1 Turn off the shaver and insert |
|
|
it in the AC adaptor until it |
2 |
|
clicks as illustrated. |
||
|
||
••Wipe off any water droplets on the side |
1 |
|
terminals. |
||
••If you charge the shaver with power switch |
turned on, it will start working when you remove from the AC adaptor.
2 Put the plug into a household outlet.
The charge indicator lamp glows red.
••Charging is completed after approx. 8 hours.
••When charging the shaver for the first time or when it has not been in use for more than 6 months, the charge indicator lamp may not glow for a few minutes, or the operating time may shorten. Please charge it for more than 20 hours in such cases.
3 Disconnectcompleted. the plug after charging is
••Charging the battery for more than 8 hours will not affect battery performance.
••Recommended ambient temperature for charging is 0 35 °C. The battery may not charge properly or at all under extreme low or high temperatures.
••The charge indicator lamp glows and stays on until the plug is disconnected from a household outlet.
4

••A full charge will supply enough power for approx. 7 shaves of 3 minutes each. (This will differ depending on usage.)
You cannot operate the shaver while charging.
Shave
Using the shaver
1 Press the power |
2 Hold the shaver as |
switch. |
illustrated above and |
|
shave. |
Start shaving by applying gentle pressure to your face. Stretch your skin with your free hand and move the shaver back and forth in the direction of your beard. You may gently increase the amount of pressure as your skin becomes accustomed to this shaver. Applying excessive pressure does not provide a closer shave.
You can also use a pen grip to hold the shaver.
Caution
••Before shaving, check that the cleaning shutter is closed.
••Do not place your fingers on the power switch while using the shaver. This may cause the shaver to turn off.
••Do not use shaving creams or face cleansers containing scrubbing compounds as these may cause the outer foil to clog.
Using the trimmer
Slide the trimmer handle up. Place at a right angle to your skin and move downwards to trim your sideburns.
••We recommend using the shaver in an ambient temperature range of 0 - 35 °C. If used outside this range, the appliance may stop operating.
Clean
Cleaning the shaver
1. |
Remove the shaver from the AC adaptor. |
3 |
|
2. |
Apply some hand soap and some water |
||
|
|||
|
to the outer foil. |
|
|
|
••Close the cleaning shutter. |
|
|
3. |
Turn the shaver on. |
|
|
|
|
|
English
5

English
▼
To remove light dirt
4.Slide the cleaning shutter until it clicks.
5.Clean the outer foil section with running water.
6.Turn the shaver off.
••Rinse with water and shake up and down several times to remove the water.
▼
▼
For heavy dirt
4.Turn the shaver off after 10 - 20 seconds.
5.Remove the outer foil section and turn the shaver on.
6.Clean the shaver and the outer foil section with running water.
••Rinse with water and shake up and down several times to remove the water.
▼
7. |
Wipe off any drops of water with a dry |
8 |
|
cloth. |
|
|
|
|
8. |
Dry the outer foil section and the shaver |
|
|
completely in a shaded area. |
|
9.Attach the outer foil section to the shaver.
••Open the cleaning shutter.
••The outer foil section will dry faster if removed from the main body.
Cleaning with the brush
Clean the system outer foil, the shaver body and the trimmer using the long brush.
Clean the inner blades using the |
(A) |
(B) |
short brush by moving it in direction |
|
|
(A). |
|
|
••Do not move the short brush in |
|
|
direction (B) as it will damage the |
|
|
inner blades and affect their |
|
|
sharpness. |
|
|
••Do not use the short brush to |
|
|
clean the outer foils. |
|
|
Replacing the system outer foil and the inner blades
system outer foil |
once every year |
|
|
inner blades |
once every two years |
Removing the outer foil section
Press the foil frame release button and lift the outer foil section upwards.
Attaching the outer foil section |
|
|
After turning the water inlet surface to the front, |
2 |
|
securely attach the outer foil section to the |
||
1 |
||
shaver until it clicks. |
||
|
6

►►Replacing the system outer foil
1. Press the system outer foil release buttons and pull down the system outer foil.
2. Align the water inlet surface and the system outer foil mark ( ) and securely attach together.
••The system outer foil cannot be reversely attached.
••Always insert the system outer foil to the foil frame when attaching to the shaver.
►►Replacing the inner blades
1. Remove the inner blades one at a time.
••Do not touch the edges (metal parts) of the inner blades to prevent injury to your hand.
2. Insert the inner blades one at a time until they click.
►►Replacement parts
Replacement parts are available at your dealer or Service Center.
|
System outer foil and inner |
WES9013 |
Replacement parts for |
blades |
|
ES SL41 |
System outer foil |
WES9087 |
|
|
|
|
Inner blades |
WES9068 |
Removing the built-in rechargeable battery
Remove the built-in rechargeable battery before disposing of the shaver. Please make sure that the battery is disposed of at an officially designated location if there is one. Do not dismantle or replace the battery so that you can use the shaver again. This could cause fire or an electric shock.
Please contact an authorised service center.
••Remove the shaver from the AC adaptor when removing the battery.
••Perform steps 1 to ; and lift the battery, and then remove it.


For environmental protection and recycling of materials
This shaver contains a Nickel Metal Hydride battery.
Please make sure that the battery is disposed of at an officially assigned location, if there is one in your country.
Specifications
Power source |
See the name plate on the AC adaptor. |
||
Motor voltage |
1.2 V |
|
|
|
|||
|
|
|
|
Charging time |
Approx. 8 hours |
||
This product is intended for household use only.
English
7

Благодарим вас за выбор электробритвы Panasonic ES SL41. Наша технология ВЛАЖНОГО/СУХОГО БРИТЬЯ позволяет использовать электробритву Panasonic не только в сухом режиме, но также в душе или ванне для мягкого и простого бритья. Перед использованием прочитайте все инструкции.
Важная информация
Данная электробритва оснащена встроенным аккумулятором. Не бросайте в огонь, не нагревайте, а также не заряжайте, не используйте и не оставляйте прибор в местах с высокой температурой.
Русский |
►►Перед началом эксплуатации |
|
Данная электробритва может использоваться как для влажного |
||
|
||
|
бритья с пеной, так и для сухого бритья. Этой водонепроницаемой |
|
|
бритвой можно пользоваться в душе, а после бритья промывать |
|
|
водой. Данный знак означает, что бритвой можно пользоваться в |
|
|
ванной или в душе. |
Попробуйте влажное бритье с применением пены на протяжении трех недель, и вы заметите разницу. Потребуется некоторое время для того, чтобы привыкнуть к бритве Панасоник для влажного/ сухого бритья, поскольку Вашей коже и волосяному покрову всегда требуется около месяца, чтобы привыкнуть к любому новому методу бритья.
►►Как пользоваться бритвой
Внимание
Внешняя сетка - очень тонка и может быть повреждена при неправильном использовании электробритвы. Перед использованием электробритвы убедитесь, что сетка не повреждена. Если она повреждена, электробритвой пользоваться нельзя, так как при этом можно повредить кожу.
••Немедленно прекратите использование прибора в случае нарушения работы или неисправности.
••Не оказывайте чрезмерного давления, прикладывая внешнюю сетку бритвенной головки к губам или другим частям лица. Не прикладывайте бритвенную головку непосредственно к дефектам или повреждениям кожи.
••Не давайте пользоваться электробритвой членам вашей семьи или другим людям. Это может привести к инфекции или воспалению.
••Этот прибор не предназначен для использования людьми (включая детей) с ограниченными физическими, сенсорными или умственными способностями или лицами без соответствующих знаний и опыта. Использование прибора такими людьми допускается только под наблюдением лица, отвечающего за их безопасность, и при условии соблюдения четких инструкций по работе с прибором. Необходимо следить, чтобы дети не играли с прибором.
►►Зарядка бритвы
••Ни в коем случае не используйте адаптер сети переменного тока
вванной комнате или в душевой.
••Используйте только специальный адаптер сети переменного тока (RE7 73). Не используйте специальный адаптер сети переменного тока для зарядки других устройств.
••Подключайте штепсельную вилку к электрической розетке только
впомещениях с низкой влажностью и сухими руками.
••Выключая штепсельную вилку из розетки, держитесь за вилку. Не тяните за шнур электропитания, так как это может повредить его.
8

••Шнур питания не подлежит замене. В случае повреждения шнура адаптер сети переменного тока необходимо утилизировать.
►►Очистка бритвы
Предупреждение
Перед очисткой отсоединяйте штепсельную вилку от электрической розетки, чтобы избежать поражения током.
••Следите, чтобы оба внутренних лезвия были вставлены. Если вставлено только одно внутреннее лезвие, электробритва может быть повредиться.
••При очистке электробритвы в воде не используйте соленую или горячую воду. Не оставляйте электробритву погруженной в воду на длительное время.
••Чистите корпус только мягкой тканью, слегка смоченной водопроводной водой или слабым мыльным раствором. Не используйте для очистки прибора растворители (бензин, спирт и другие химические вещества).
••Не мойте адаптер сети переменного тока водой.
►►Хранение бритвы
••При хранении бритвы всегда кладите ее в держатель, чтобы избежать царапания внешней сетки.
••После использования храните электробритву в сухом месте.
••Не храните электробритву в местах, где она будет подвергаться воздействию прямых солнечных лучей или других источников тепла.
••Снимайте бритву с адаптера сети переменного тока при хранении.
••Не перегибайте шнур и не наматывайте его на адаптер сети переменного тока.
Детали электробритвы
|
|
|
|
|
|
|
|
|
|
|
|
|
|
|
|
|
|
|
|
|
|
|
|
|
|
|
|
|
|
|
|
|
|
||
|
|
|
|
||
|
|
|
|
|
|
|
|
|
|
|
|
|
|
|
|
|
|
|
|
|
|
||
|
|
|
|
|
Русский |
|
|
|
|
|
|
|
|
|
|
|
|
A Корпус бритвы |
|
: Бритвенная головка |
|
|
|
1 |
Сеточная система |
|
; Триммер |
|
|
2 |
Задвижка для очистки |
< Переключатель триммера |
|||
3 |
Боковые контакты |
|
B Адаптер сети переменного |
|
|
4 |
Выключатель питания |
тока (RE7 73) |
|
|
|
5 |
Кнопка для снятия |
|
= Разъем для зарядки |
|
|
|
бритвенной головки |
|
> Индикатор режима зарядки |
||
6 |
Отверстие для входа воды |
Шнур электропитания |
|
||
7 |
Рамка для крепления сеток |
C Держатель |
|
|
|
8 |
Кнопки для снятия сеток |
D Чистящая щеточка |
|
|
|
9 |
Внутренние лезвия |
|
|
|
|
9

Русский
Использование держателя
Бритва может храниться вертикально или горизонтально. При транспортировке бритвы можно использовать держатель, чтобы защитить внешнюю сетку и избежать неправильную работу выключателя.
••При транспортировке бритвы прежде чем устанавливать держатель обязательно вычистите все остатки от бритья.
Установка держателя
Установите держатель, как показано на рисунке. ••Убедитесь, что все четыре выступа на бритве вставлены надежно.
Снятие держателя
Снимите держатель, прижимая с обеих сторон.
Зарядка Зарядка бритвы
Если бритва стала медленнее работать, выполните следующие шаги для ее зарядки.
Можно заряжать бритву с присоединенным держателем.
1 |
Выключите бритву и |
|
установите ее на адаптер сети |
2 |
|
|
переменного тока до щелчка, |
|
|
|
|
|
как показано на рисунке. |
1 |
••Тщательно вытрите капельки воды с |
||
боковых контактов.
••Если заряжать бритву с включенным выключателем питания, то при снятии ее с адаптера сети переменного тока она начнет работать.
2 Включите штепсельную вилку в электрическую розетку.
Индикатор режима зарядки загорается красным.
••Зарядка занимает приблизительно 8 часов.
••При первой зарядке электробритвы, или если она не использовалась дольше 6 месяцев, индикатор режима зарядки может не светиться несколько минут, либо может уменьшится время автономной работы. Если это происходит, оставьте электробритву заряжаться в течение более 20 часов.
3 Отсоедините штепсельную вилку по окончании зарядки.
••Зарядка батареи в течение более 8 часов не скажется на работоспособности батареи.
10
 Loading...