


Operating Instructions Manuel d’utilisation Manual De Operación
(Household) Rechargeable Shaver
(Utilisation domestique) Rasoir rechargeable
(Uso doméstico) Afeitadora Recargable
Model No. ES LF51 No de modèle ES LF51 Modelo No. ES LF51
English |
2 |
Français |
9 |
Español |
16 |
Before operating this unit, please read these instructions completely and save them for future use.
Avant d’utiliser ce produit, veuillez lire attentivement les instructions et conserver ce manuel pour un usage futur. Antes de utilizar este producto, lea las instrucciones detenidamente y guarde este manual para uso futuro.

English
IMPORTANT SAFETY INSTRUCTIONS
When using an electrical appliance, basic precautions should always be followed, including the following:
Read all instructions before using this appliance.
DANGER Toshock:reduce the risk of electric
1.Do not reach for an appliance that has fallen into water. Unplug immediately.
. Charger unit is not for immersion or for use in shower.
3.Do not place or store appliance where it can fall or be pulled into a tub or sink. Do not place in or drop into water or other liquid.
4.Except when charging, always unplug this appliance from the electrical outlet immediately after using.
5.Unplug this appliance before cleaning.
6.Do not use an extension cord with this appliance.
WARNING To reduce the risk of burns, ire,
electric shock, or injury to persons:
1.Close supervision is necessary when this appliance is used by, on, or near children or invalids.
. Use this appliance only for its intended use as described in this manual. Do not use attachments not recommended by the manufacturer.
3.Never operate this appliance if it has a damaged cord or plug, if it is not working properly, if it has been dropped or damaged, or dropped into water. Return the appliance to a service center for examination and repair.
4.Keep the cord away from heated surfaces.
5.Never drop or insert any object into any opening.
6.Do not use outdoors or operate where aerosol (spray) products are being used or where oxygen is being administered.
7.Do not use this appliance with damaged shaving blades and/or foil, as it has the potential to result in facial injury.
8.Always attach plug to appliance irst, then to outlet. To disconnect, turn all controls to “off” then remove plug from outlet.
SAVE THESE INSTRUCTIONS
Thank you for choosing a Panasonic shaver ES LF51. With our WET/DRY technology, you can enjoy using your Panasonic shaver dry or in the shower or bath for gentle and easy shaving. Please read all instructions before use.
Important
This shaver has a built in rechargeable battery. Do not throw into ire, apply heat, or charge, use, or leave in a high temperature environment.
Before use
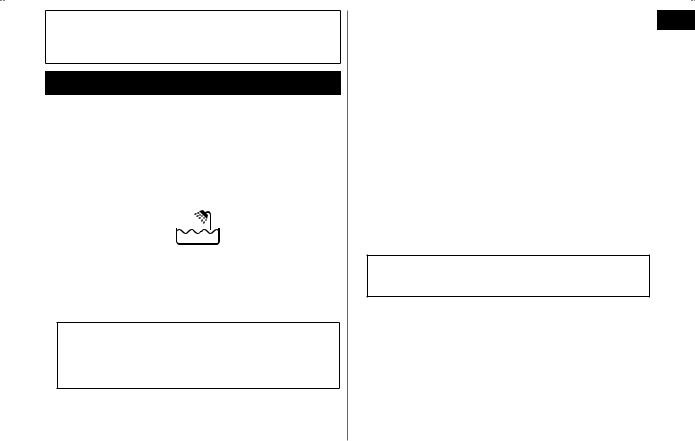
This WET/DRY shaver can be used for wet shaving using shaving lather or for dry shaving. You can use this watertight shaver in the shower and clean with water. The following symbol means suitable for use in a bath or shower.
Treat yourself to wet lather shaves for at least three weeks and notice the difference. Your Panasonic WET/DRY shaver requires a little time to get used to because your skin and beard need about a month to adjust to any new shaving method.
Using the shaver
Caution
The outer foil is very thin and can be damaged if not used correctly. Check that the foil is not damaged before using the shaver. Do not use the shaver if the foil is damaged as you will cut your skin.
•Terminate the usage when there is an abnormality or failure.
•Do not share your shaver with your family or other people. Doing so may result in infection or inlammation.
•This appliance is not intended for use by persons (including children) with reduced physical, sensory or mental capabilities, or lack of experience and knowledge, unless they have been given supervision or instruction concerning use of the appliance by a person responsible for their safety. Children should be supervised to ensure that they do not play with the appliance.
Charging the shaver
•Never use the AC adaptor in the bathroom or shower room.
•Do not use any power cord or AC adaptor other than the AC adaptor (RE7 59).
•Plug in the AC adaptor into a household outlet where there is no moisture and handle it with dry hands.
•Hold the AC adaptor when disconnecting it from the household outlet. If you tug on the power cord, you may damage it.
•The supply cord cannot be replaced. If the cord is damaged, the AC adaptor should be scrapped.
•The AC adaptor is intended to be correctly oriented in a vertical or loor mount position.
Cleaning the shaver
Warning
Disconnect the power cord from the shaver before cleaning it in water to prevent electric shock.
•Keep both the inner blades inserted. If only one of the inner blades is inserted, the shaver may be damaged.
•If you clean the shaver with water, do not use salt water or hot water. Do not soak the shaver in water for a long period of time.
•Clean the housing only with a soft cloth slightly dampened with tap water or soapy tap water. Do not use thinner, benzine, alcohol or other chemicals.
English
3
|
|
Storing the shaver |
|
|
|
• Store the shaver in a place with low humidity after use. |
|
English |
|||
• Disconnect the power cord when storing the shaver. |
|||
|
|
• Do not store the shaver where it will be exposed to direct |
|
|
|
sunlight or other heat sources. |
|
|
|
• Do not bend the power cord or wrap it around the shaver. |
|
|
|
|
|
|
|
Parts identiication |
|
|
|
|
|
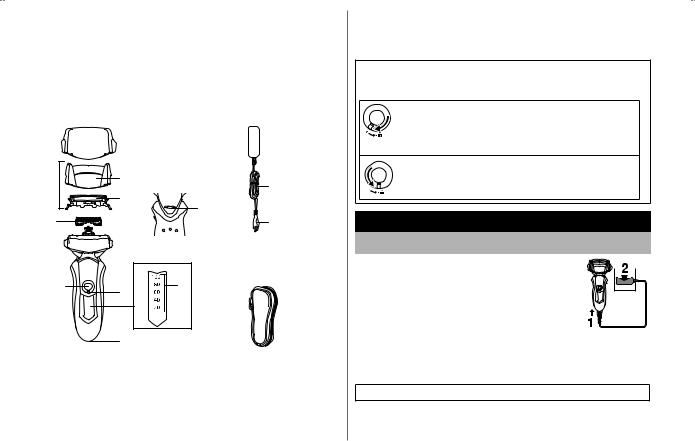
A
B


C
D


;

:
E
>
 <
<
=
|
F |


A Protective cap B Outer foil section
Foil frame
System outer foil
System outer foil release buttons
C Inner blades
D Main body
Foil frame release buttonsPivot action selector
Lock ring
Battery capacity lampCharge status lamp ( )Appliance socket
: Power switch [0/1] |
E AC adaptor (RE7 59) |
; Thumb rest |
> Power cord |
< Trimmer |
Appliance plug |
= Trimmer handle |
F Travel case |
Using the lock ring
Use the lock ring to lock or unlock the power switch. Rotate the lock ring until it clicks.
Rotate the lock ring to “ ” to unlock the power switch:
For when shaving, washing the shaver, lubricating the shaver.
Rotate the lock ring to “ ” to lock the power switch:
For when carrying the shaver.
Charge
Charging the shaver
1 Insert the appliance plug into the
shaver.
2 Plug in the AC adaptor into a
household outlet.
•Turn the shaver off before attaching.
•Charging is completed after approx. 1 hour.
•If the shape of the plug does not it the power outlet, use an attachment plug adaptor of the proper coniguration.
You cannot operate the shaver while charging.
4

Reading lamps when charging
While charging
The charge status lamp ( ) glows. The number of the battery capacity lamp will increase as charging progresses.
After charging is completed
All the lamps will light up and then turn off after 5 seconds.
•After charging is completed, turning the power switch ON with the shaver plugged in will cause all the lamps to light up and then turn off after 5 seconds. This shows that the shaver is fully charged.
•Recommended ambient temperature for charging is 5 35 °C (41 95 °F). The battery may not charge properly or not at all under extreme low or high temperatures.
The charge status lamp ( ) will blink when there is a problem with charging.
•When charging the shaver for the irst time or when it has not been in use for more than 6 months, the charge status lamp ( ) may not glow. It will eventually glow if kept connected.
Shave |
|
Using the shaver |
English |
|
|
|
|
1 Rotate the lock ring to 2 unlock the power switch and press the power switch.
Page 4
Hold the shaver as illustrated above and shave.
•We recommend using the shaver in an ambient temperature range of 5 35 °C (41 95 °F). If used outside this range, the appliance may stop operating.
Start out shaving by applying gentle pressure to your face. Stretch your skin with your free hand and move the shaver back and forth in the direction of your beard. You may gently increase the amount of pressure as your skin becomes accustomed to this shaver. Applying excessive pressure does not provide a closer shave.
Caution
•If you press the power switch for more than seconds, the sonic vibration cleaning mode is activated. Page 6
You cannot shave in this mode.
•Do not place your ingers on the power switch while using the shaver. This may cause the shaver to turn off or enter the sonic vibration cleaning mode. Place your thumb on the thumb rest while using the shaver.
5

English
Pivot action selector
Use to select “SOFT” (soft) or “LOCK” (lock).
You can change the pivot action whether the shaver is turned on or off.
Using the trimmer
Slide the trimmer handle up. Place at a right angle to your skin and move downwards to trim your sideburns.
Reading lamps when using
While using
• Approximate amount of battery charge is displayed as 0 100.
• It will turn off approximately 5 seconds after operating the switch.
When the battery capacity is low
“ 0” blinks when operating the shaver.
•You can shave to 3 times after “ 0” appears. (This will differ depending on usage.)
•A full charge will supply enough power for approx. 14 shaves of 3 minutes each. (This will differ depending on usage.)
Clean |
|
||
Cleaning the shaver |
|
||
1. |
Disconnect the power cord from the shaver. |
4 |
|
. Apply some hand soap and some water to |
|||
|
|||
|
the outer foil. |
|
|
3. |
Rotate the lock ring to unlock the power |
|
|
|
switch. |
|
|
4. |
Press the power switch for more than |
|
|
|
seconds to activate the sonic vibration |
|
|
|
cleaning mode. |
5 |
|
|
• The battery capacity lamps blink in order. |
||
|
• After about 0 seconds, it will be |
|
|
|
automatically turned off, or you can turn it |
|
|
|
off by pressing the power switch. |
|
|
5. |
Remove the outer foil section and press the |
|
|
|
power switch for more than seconds to |
|
|
|
activate the sonic vibration cleaning mode |
|
|
|
and clean it with running water. |
|
|
6. |
Wipe off any drops of water with a dry cloth. |
|
|
7. |
Dry the outer foil section and the shaver |
|
|
|
completely. |
|
|
8. |
Attach the outer foil section to the shaver. |
|
|
6

Replacing the system outer foil and the inner blades
system outer foil |
once every year |
|
|
inner blades |
once every two years |
|
|
Replacing the system outer foil
1. Press the foil frame release buttons and lift
the outer foil section upwards.. Press the system outer foil release buttons and pull down the system outer foil.
3. Align the foil frame mark ( ) and the system outer foil mark (
 ) and securely attach together.
• The system outer foil cannot be reversely attached.
• Always insert the system outer foil to the foil frame when attaching to the shaver.
4. After turning the foil frame mark ( ) to the
  front, securely attach the outer foil section to
  the shaver until it clicks.
Replacing the inner blades
1. Press the foil frame release buttons and lift
the outer foil section upwards.. Remove the inner blades one at a time.
• Do not touch the edges (metal parts) of
the inner blades to prevent injury to your hand.
3. Insert the inner blades one at a time until they click.
Replacement parts
Replacement parts are available at your dealer or Service Center.
|
|
|
English |
|
System outer foil and inner |
WES90 7 |
|
|
|
||
Replacement parts for |
blades |
|
|
|
|
||
ES LF51 |
System outer foil |
WES9167 |
|
|
Inner blades |
WES9068 |
|
|
|
|
|
Removing the built in rechargeable battery
ATTENTION:
A lithium ion battery that is recyclable powers the product you have purchased. Please call 1 800 8 BATTERY for information on how to recycle this battery.
Remove the built in rechargeable battery before disposing of the shaver. Do not dismantle or replace the battery so that you can use the shaver again. This could cause ire or an electric shock. Please contact an authorised service center.
The battery replacing service is available only in the United States of America.
•Disconnect the power cord from the shaver when removing the battery.
7

• Perform steps to and lift the battery, and then remove it.
English |
|
|
|
|
|
|
|
|
|
|
|
|
|
|
|
|
|


Speciications
Power source |
See the name plate on the AC adaptor. |
|||
(Automatic voltage conversion) |
||||
|
||||
Motor voltage |
3.6 V |
|
|
|
|
||||
|
|
|
|
|
Charging time |
Approx. 1 hour |
|||
This product is intended for household use only.
Federal Communication Commission Interference Statement
This equipment has been tested and found to comply with the limits for a Class B digital device, pursuant to Part 15 of the FCC Rules. These limits are designed to provide reasonable protection against harmful interference in a residential installation. This equipment generates, uses and can radiate radio frequency energy and, if not installed and used in accordance with the instructions, may cause harmful interference to radio communications. However, there is no guarantee that interference will not occur in a particular installation. If this equipment does cause harmful interference to radio or television reception, which can be determined by turning the equipment off and on, the user is encouraged to try to correct the interference by one of the following measures:
•Reorient or relocate the receiving antenna.
•Increase the separation between the equipment and receiver.
•Connect the equipment into an outlet on a circuit different from that to which the receiver is connected.
•Consult the dealer or an experienced radio/TV technician for help.
FCC Caution: To assure continued compliance, install and use in accordance with provided instructions. Any changes or modiications not expressly approved by the party responsible for compliance could void the user’s authority to operate this equipment.
This device complies with part 15 of the FCC Rules. Operation is subject to the following two conditions: (1) This device may not cause harmful interference, and ( ) this device must accept any interference received, including interference that may cause undesired operation.
FOR YOUR CONVENIENCE, WE HAVE ESTABLISHED A TOLL FREE (IN USA ONLY) NATIONAL ACCESSORY PURCHASE HOT LINE AT 1 800 332 5368. IN CANADA, CONTACT PANASONIC CANADA INC. AT THE ADDRESS OR TELEPHONE NUMBER ON THE BACK PAGE.
8
 Loading...